

Enjoying your Plex Media Server over HDMI with QNAP NAS
Buying a NAS Drive for use as a Plex Media server is pretty common these days and something that alot of people have done in the past to huge success. With access to your own privately owned multimedia, the ability to share that media with friends and family, access Plex TV channels and enjoy all the metadata background images, reviews and information that are included to dress up your movies and boxsets beautifully – the appeal is pretty obvious. However many users also like the option to access their Plex Media Server locally over HDMI, i.e. connecting a TV to the HDMI port of their NAS and then accessing the Plex Media Server (with all it’s graphical flair and design) but with near-zero latency, which is hugely beneficial for MASSIVE 4K H.264 high bitrate media that is just so big to stream over the network, but HDMI can handle immediately. Till recently, the very best way of having HDMI access to your Plex Media Server was using the QNAP HD Station application and many of the QNAP HDMI enabled NAS.
This was especially tempting to do, as many of the newest generations of QNAP NAS in 2020 (such as the TS-251D and TS-253D) have HDMI 2.0, HDMI 2.0a and HDMI 2.0b support – so 60FPS 4K and higher. Unfortunately, the most recent release of QTS and QNAP HD Station appears to have lost/removed the Plex Media client application for HDMI access. Whether this is because of the older Plex client app not being compatible with HD Station 4, or QNAP choosing to remove it (as they did older versions of Kodi) because of some users playing fast & lose with copyright law, we do not know. However, never fear! There are still several ways to access your Plex Media Server NAS over HDMI with HD Station and below I have detailed the very best way to do it in my Plex HDMI NAS Guide. Take a look and let’s get back to watching some movies.
Plex, QNAP NAS and HDMI – What You Will Need?

In order to take advantage of the Plex Media Server HDMI output on a QNAP NAS, you are going to need a few things before we start. This whole installation should take you no more than about 15 minutes (as long as you already have the Plex Media Server NAS application installed from the QNAP App centre, otherwise, make it 45-60mins). Additionally, this guide is based on the idea that you have already set your NAS drive set up for use and you already have media uploaded onto the NAS drive to watch. Not all QNAP NAS devices are suitable for this installation, as you will need to have a NAS drive that supports an HDMI output and graphically enabled CPU. Below is your checklist to make sure you have before beginning the installation of the PLEX HD Station application for HDMI.
- QNAP NAS with an Intel/AMD CPU
- HDMI Port (1.4 or 2.0a)
- QTS Upgraded to QTS 4.4.1 or later
- Latest Version of HD Station
- Control Device for HDMI, ie IR Remote, Keyboard+Mouse,
- Access to the Internet (can be disabled after if you prefer) and access the NAS via the Web Browser GUI (Graphical User Interface, ie The Desktop of QNAP NAS)
And that is about it. You will also need a client device like a desktop PC or mobile device to access the QNAP QTS graphical user interface (GUI), but this is something you should already own and used when setting your device up from scratch for time. So, let’s get started with this Plex QNAP NAS HDMI setup guide.
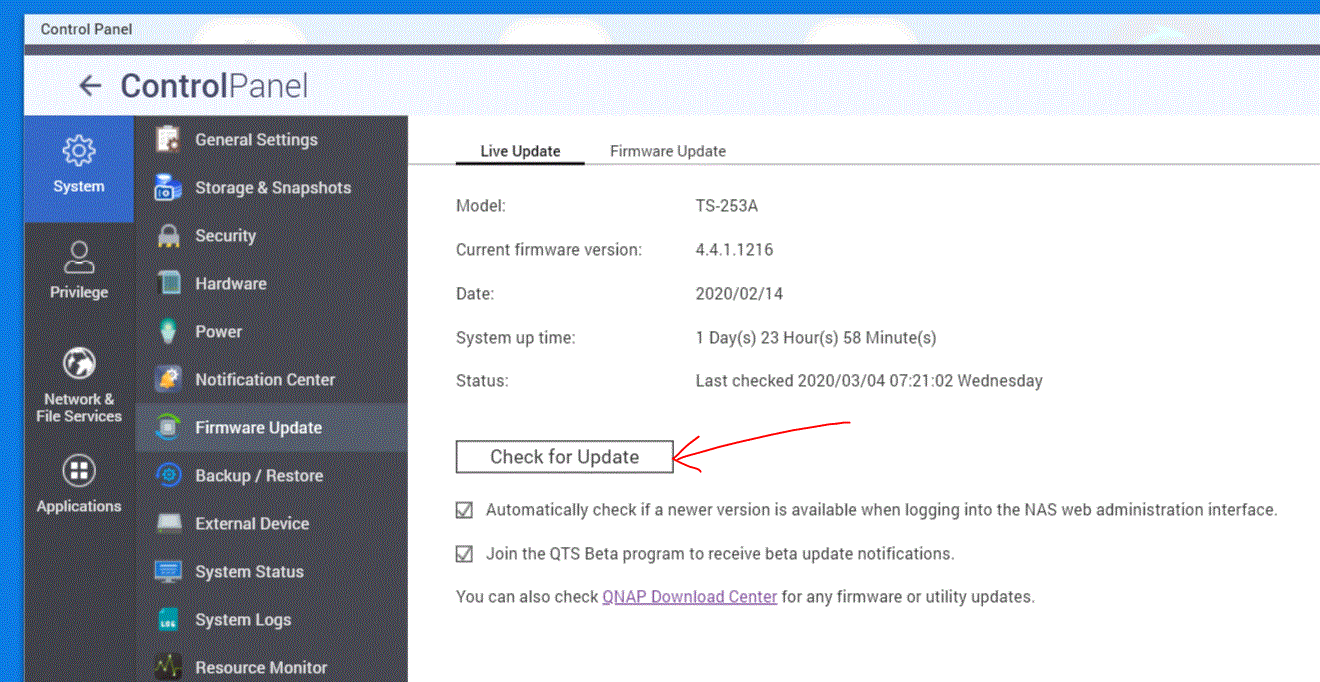
Step 1 – Upgrade your QNAP NAS to the latest version of QTS
Make sure that the QNAP NAS you are using is updated to the latest version of their QTS software platform. This will ensure that you have the most recent release from them, as well as have access to the latest applications in the app center.
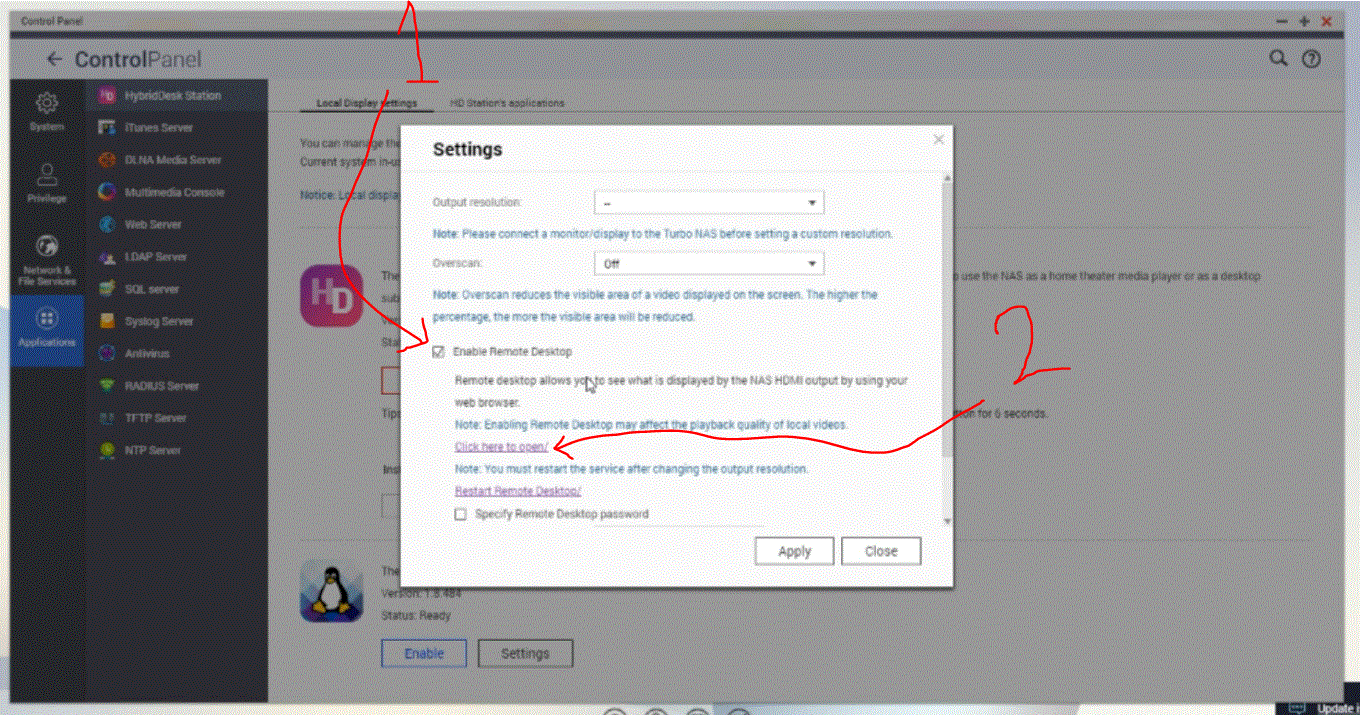
Step 2 – Enable HD Station and Upgrade to the latest version
If you QNAP NAS has an HDMI port (which is essential for this installation and setup of HDMI Plex NAS), then on the desktop of your QNAP NAS you will see an option for HD Station. Clicking on it will install the HDMI GUI portal that is HD Station from QNAP. It will also ask if you want to install a few companion applications for the HDMI output to enjoy Photos, Video, Music, Surveillance and more.
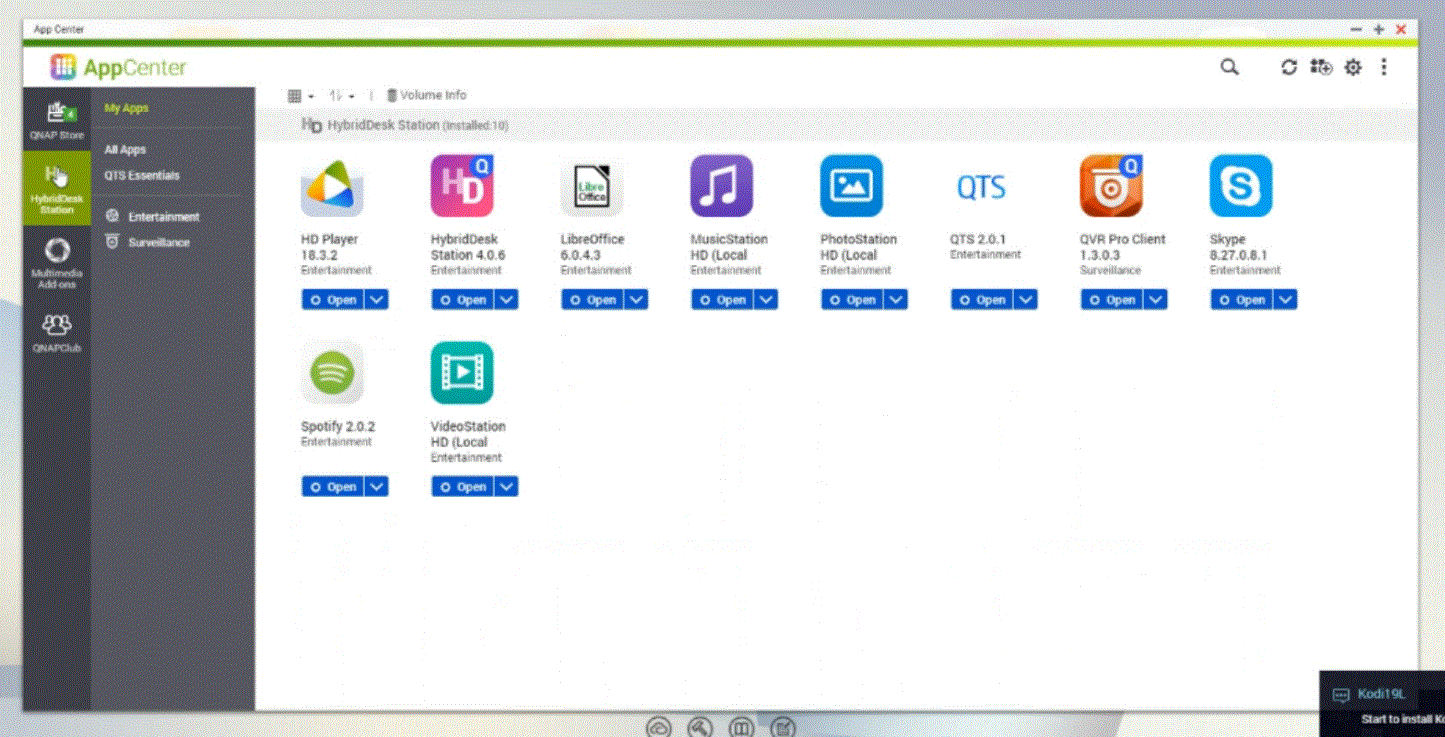
Alternatively, you can head to the control panel and click the HD Station menu option and install HD Station there.
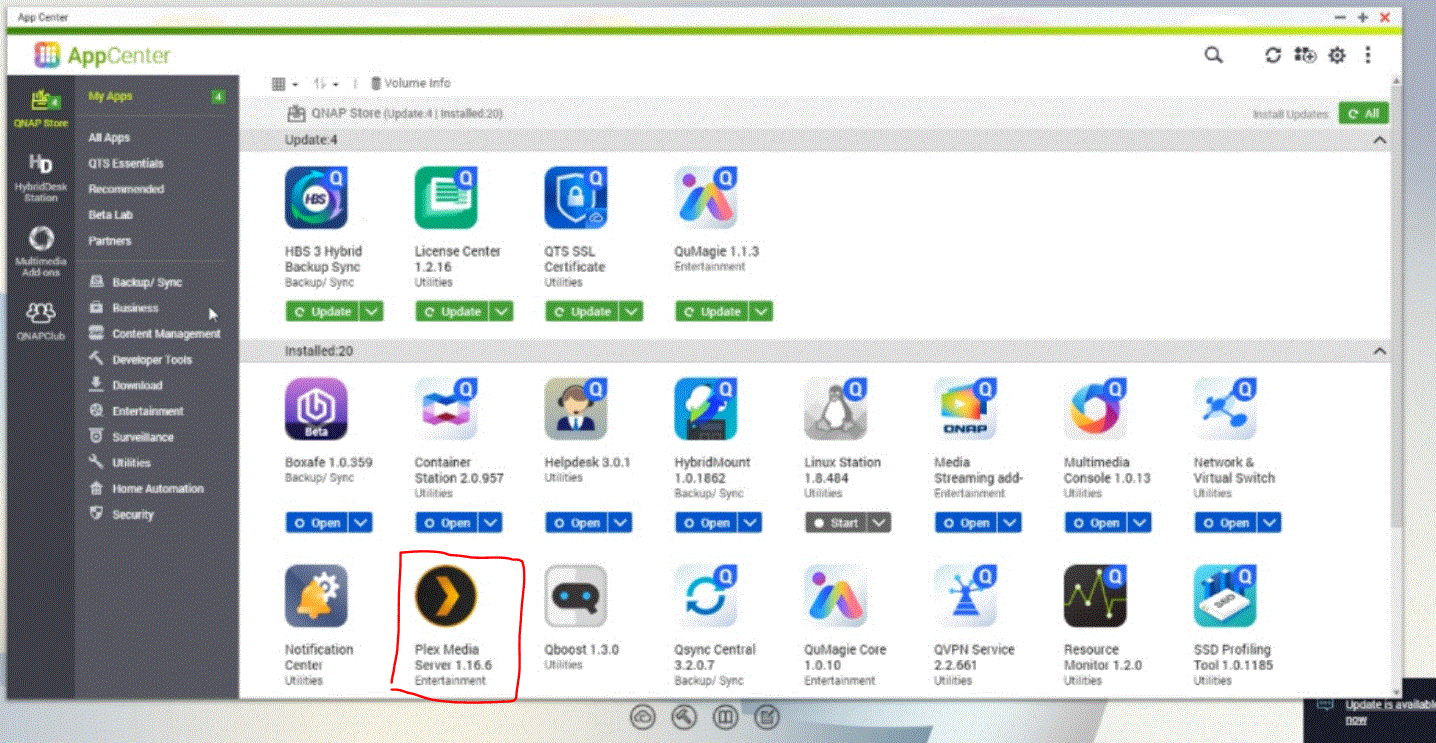
Step 3 – Install the Offical Plex Media Server App in the App Center
If you have already installed Plex Media Server and it’s libraries on the QNAP NAS, then you can skip steps 3 & 4. Otherwise, to install Plex Media Server on QTS (not HD Station) you need to open the app center and then click the option on the list for all apps, as this will include the 3rd party applications (so, ones that are not made/produced by QNAP). Scroll down to the P’s and you will find Plex Media Server. From here you jsut need to click the downward arrow/Install button and it will install the application locally to your QNAP NAS drive.
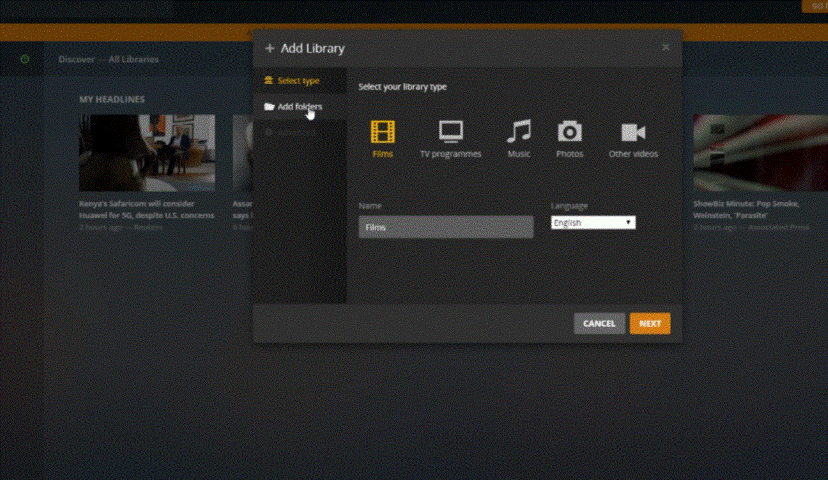
Step 4 – Open the Plex Media Server Application via the Web Brower and set up your account, library and directories
Once Plex Media Server is installed, you will need to open the application (by clicking the item on the start menu or on the icon that has now appeared on your QNAP NAS QTS GUI desktop, and that will open a new tab that will guide you through the steps of registering/pairing your Plex Media Server account, linking the NAS, creating directories and indexing your media for metadata etc to take place. This will set up a Plex Media Server account on your QNAP NAS that the next few steps will link to over HDMI and HD Station.
Step 5 – Return to the QNAP QTS Menu, then over to the App Center and add the Unofficial App Store – QNAP Club
The next step is to head back to the QTS QNAP NAS GUI desktop that you use on your web browser and head back to the app center. However, we are now going to give your NAS access to the unofficial app center, QNAP Club.
QNAP Club is a community and homebrew application center that lets you access older versions of applications or customized software that has been modified from working on other software platforms, so they can run on your QNAP NAS.
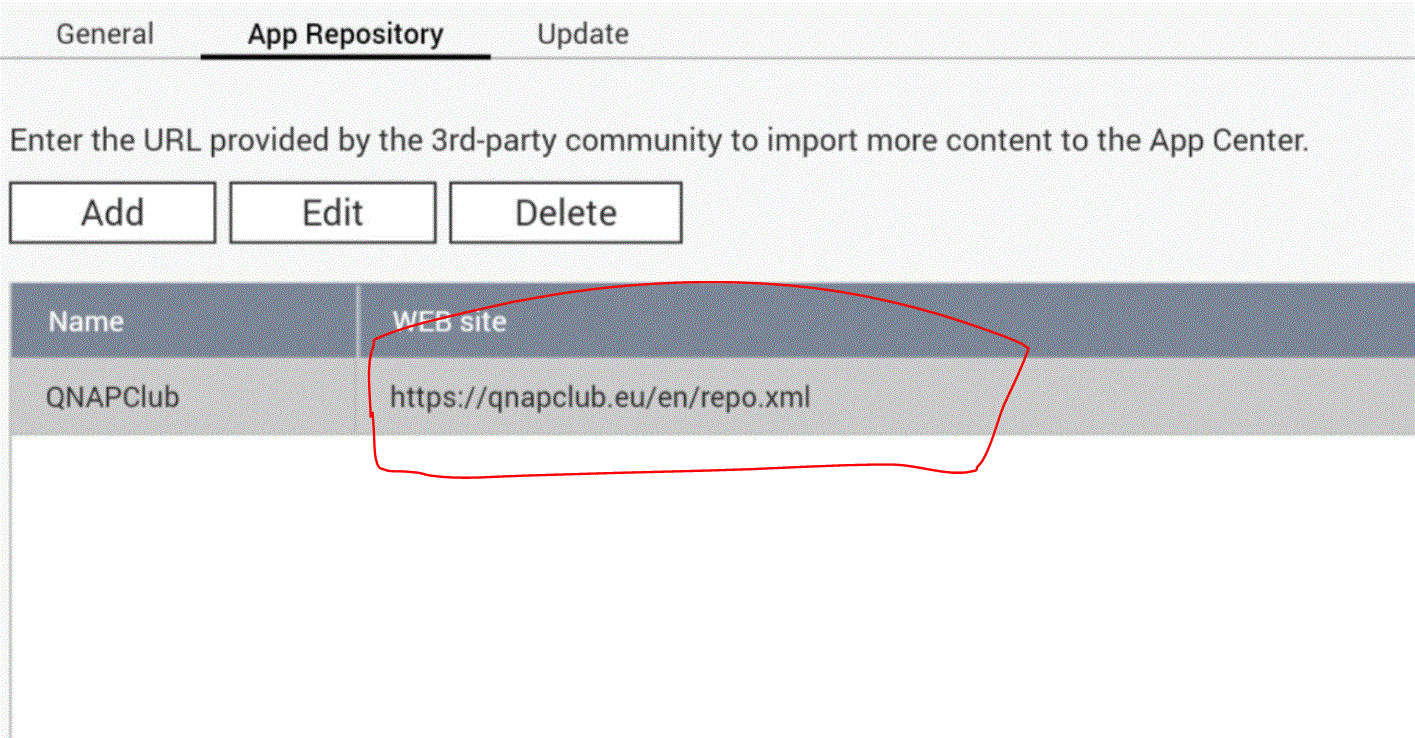
This unofficial app center contains hundreds of very unique NAS applications, but it is worth remembering that these apps are unofficial and that means they do not get the official brand’s quality control or compatibility checks – so you are installing this at your own risk and can potentially invalidate your support from the manufacturer.
Here is how to gain access to the QNAP Club app centre.
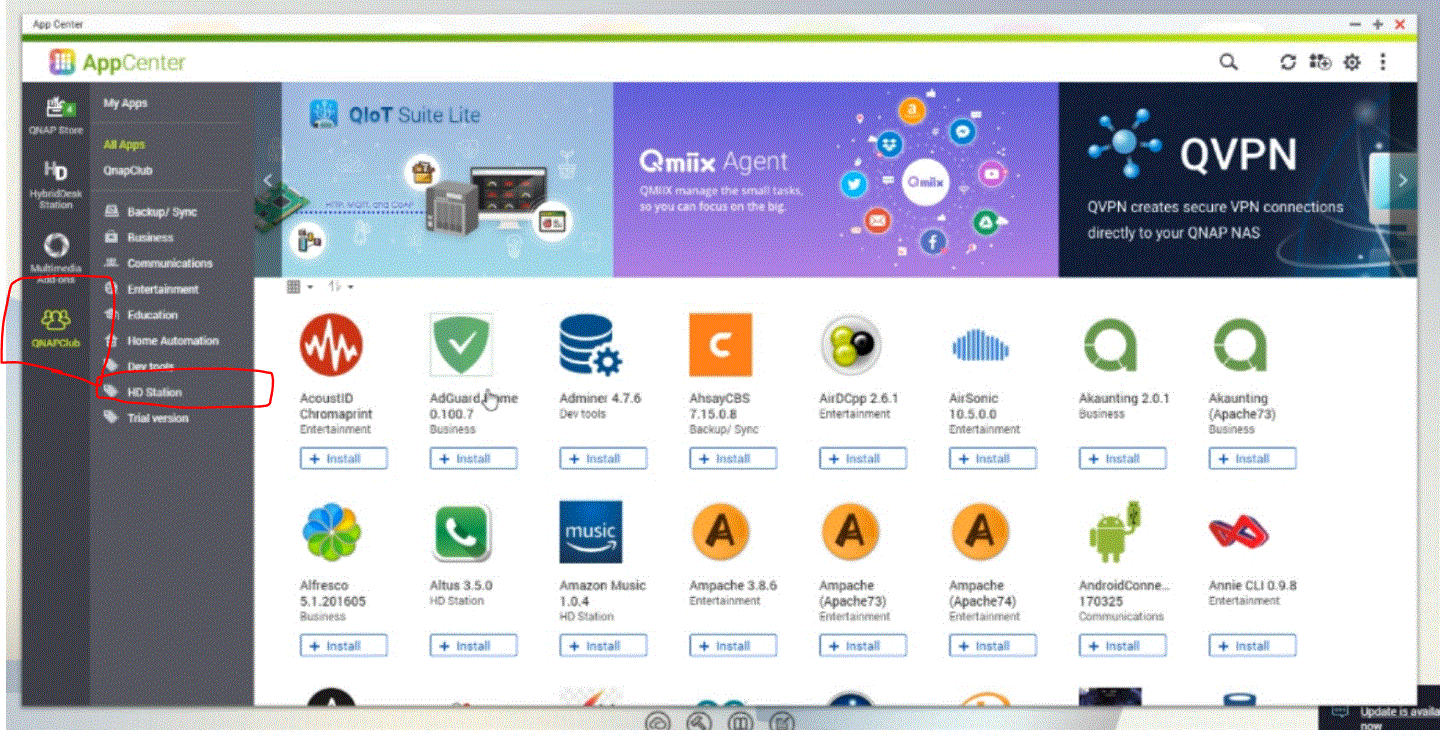
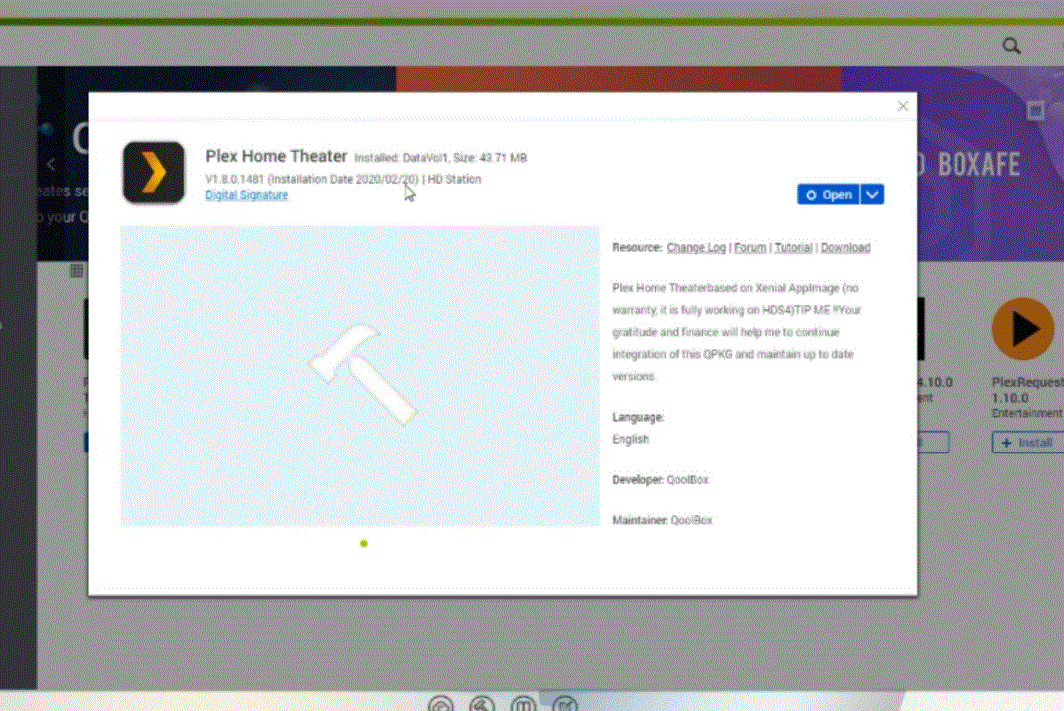
Step 4 – Head to the HD Station Catagory and search for PLEX, then Install Plex Media Player and/or Plex Media Theatre
Once you have added access to the QNAP Club app centre (and given it a minute or two to sync with their server over the internet), you will have a category list on the left-hand side that breaks down all of the applications into their subjects. Head down to the ‘HD Station’ category to see the full list of unofficial applications that utilize the QNAP HDMI Port and HDMI Portal software GUI. In that list, you will find several Plex related appliances (you can also just search for the word ‘Plex’ in the search bar of the QNAP App centre).
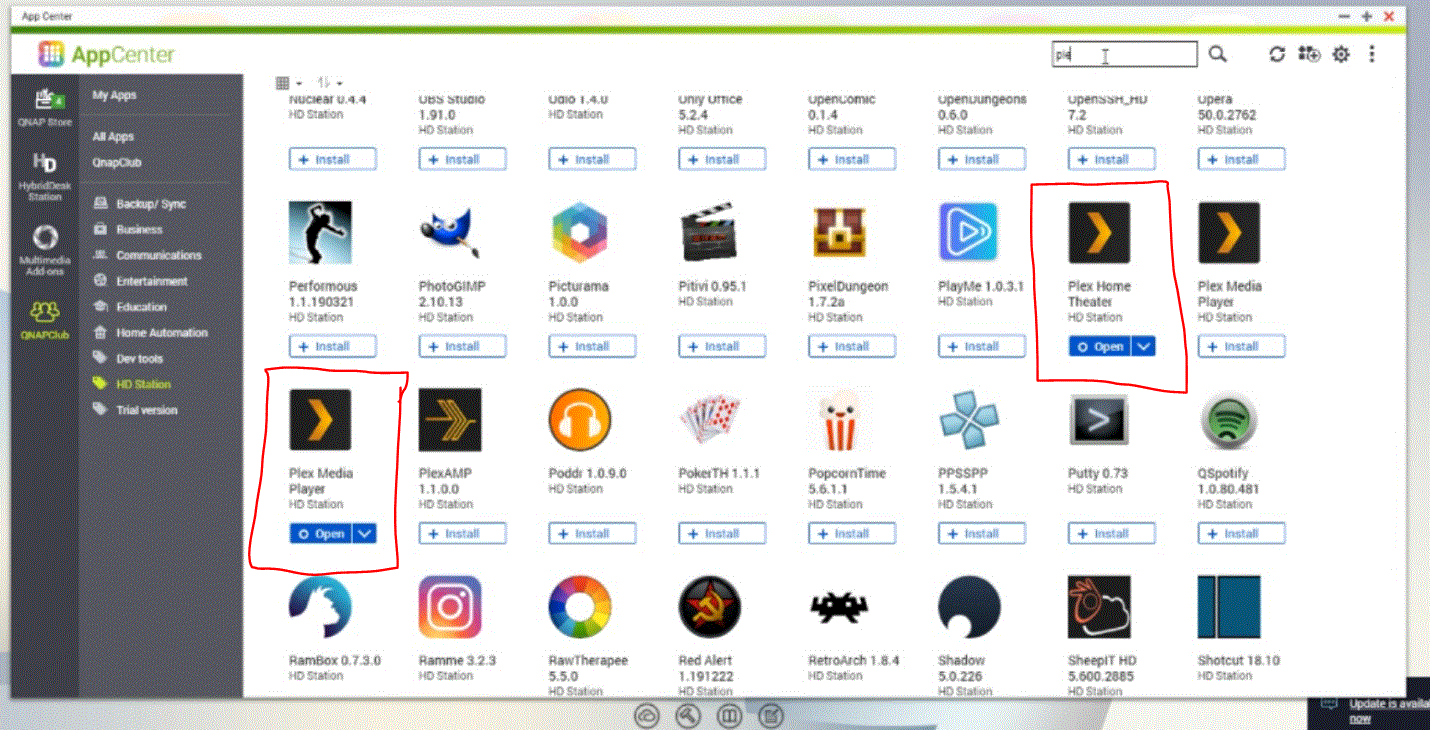
Of these two applications, the two best ones that will serve your needs are the Plex Media Theatre application (which is the much more streamlined user interface of the two) that presents you with a simple browsing list option of your Plex library (that you should have set up earlier in the Plex Media Server QNAP NAS app installation in Step 3&4). Alternatively, this is Plex Media Player, which gives you alot more of the features and design that existing Plex Media Server users will be familiar with, as well as an option to switch between a ‘simple’ view and a more ‘detailed’ view.
I would recommend installing both to test them individually and see which one best suits your needs. Each is a pretty big installation file (just under 1GB) so it will take differing times to install based on your internet connection.
Step 5 – Connect an HDMI Monitor and Control Device so you can browse the QNAP HD Station GUI over HDMI
If you have not done it already, now you need to connect the HDMI monitor/TV, as well as establish the means of which you plan on controlling the options menus and navigating. With regard to control, your options are:
IR Remote – QNAP has several different remote controls that are either bundled with NAS releases (such as the TS-251+, TS-253B, TS-682, etc) that communicate like any home remote control, over infrared. These can also be purchased for around £10-20. I STRONGLY recommend the latest one, as it has NAS task tailored buttons that can be connected with different applications or tasks on the NAS (eg a button that IMMEDIATELY switches to your Surveillance setup or a button that automatically opens Plex).
|
New Generation QNAP Remote |
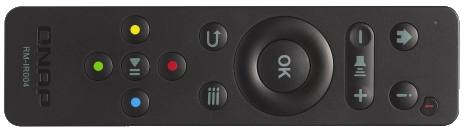
Buy the QNAP RM-IR004 HERE |
|
Old Generation QNAP Remote |
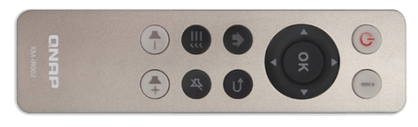
Buy the QNAP RM-IR002 HERE |
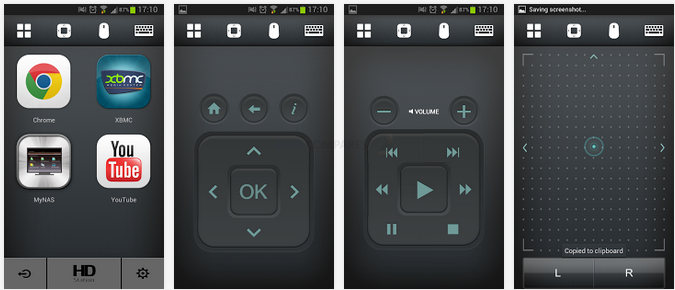
QRemote – A free application for Android and iOS, this is the official QNAP mobile remote. A small download and supported by pretty much ANY mobile phone, it has all the features and functionality of the physical remote control mentioned above but is connected to the NAS over the network. It also arrives with much more integrated connectivity with the QNAP NAS applications and can even give you a touch-screen mouse pad control. Quite cool, but then requires you to use your mobile phone in conjunction with the TV/NAS and adds an extra few seconds to access the menu (unlocking your phone from standby, etc) and pausing/controlling your Plex Media.
Keyboard and Mouse – This is the most rudimentary option, allowing you to connect ANY USB mouse and keyboard, as well as those that use a wireless radio/Bluetooth dongle. Depending on the keyboard, some of the hotkeys functions (volume, media keys, etc) that are featured on yoru keyboard might well be supported on Plex HD Station, but having a keyboard/mouse setup on the sofa is hardly ideal.
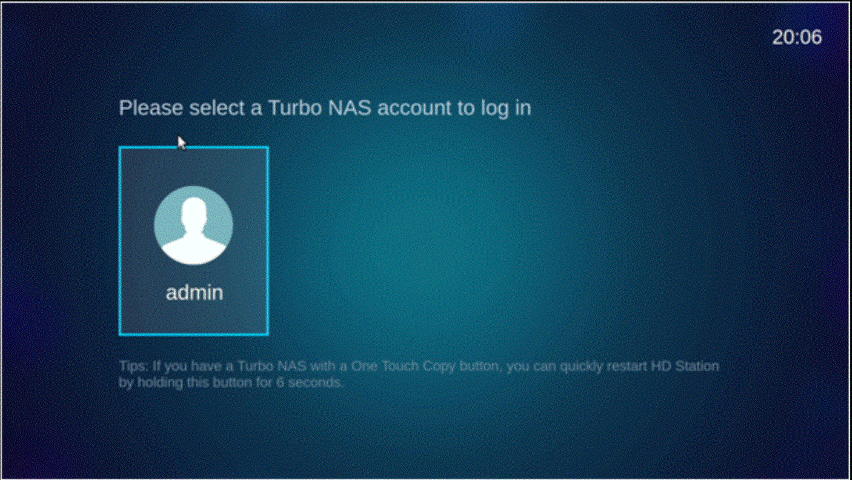
Any of these options are workable and each has its own advantages/disadvantages. Personally, I use the IR Remote. Once you connect the QNAP NAS to an HDMI monitor (and the QNAP is fully booted), the screen with show the QNAP Login screen. Use the input device you have selected from my options above and then enter your username and password. If you are concerned with security and entering your login details on a big TV in front of friends and family, I HIGHLY recommend you create a 2nd account that ONLY has access to the HD Station applications, or use the HD Station setup options to create a login account that ONLY works in the HD Station HDMI GUI portal.
Step 6 – Open the Plex Media Player / Theatre Application and initialize with Plex.tv Servers
Once you are logged in, you will see the HD STATION GUI window over HDMI, as well as the applications you have selected to install (which should include Plex apps now).

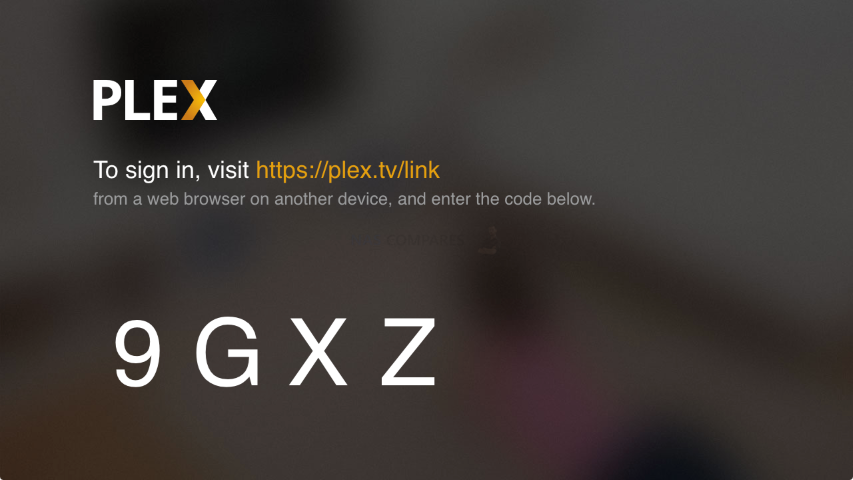
From here you can select which Plex Application you want to try first. As mentioned, each has its own strengths and weaknesses and you may well prefer one over the other. As it is your first time setup, you will almost certainly need to verify the connection to the Plex Media Server account and credentials for the first time accessing the HDMI App. This may be a simple ‘username and password’ entry, verifying a screen code with the Plex servers (plex.tv) or both.
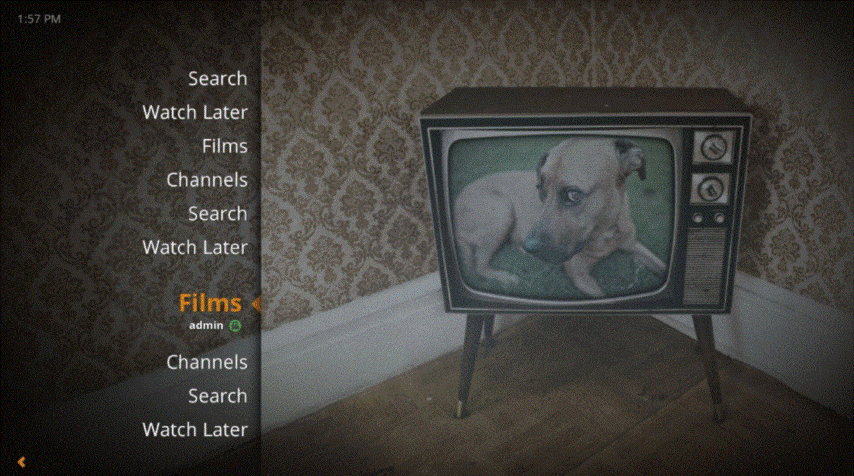
Once you have verified your account credentials and linked the Plex Account with this NAS HDMI app, you should have access to all the libraries and setup from yoru Plex Media Server adn can access your full multimedia library, stream shows from the Plex Channels and more.
Step 7 – Head back to the HD STATION GUI and Set Plex as the Default Boot App
This last step is purely optional. If you plan on ONLY using Plex Media Player/Theatre for your HDMI output on the QNAP NAS and want to skip all the steps to open it every single time, you can head into the HD Station settings options (in the HD Station HDMI GUI on your TV) and then assign PLEX to be the default opening app. This means that it will automatically open Plex everytime you boot the QNAP NAS and save you time going into it every time. This does not stop you accessing the HD Station menu though and jsut clicking the home/back/exit key of your control device (remote, keyboard, etc) will take you back to the HD Station GUI menu and all the apps. Just like QNAP QTS, the HD Station application allows you to run multiple applications at once, flicking between them as needed. You have now installed the Plex Client application on your QNAP, over HD Station and have access to the Plex Media Server library on your NAS Drive. I hope you found this guide helpful.

Use the FREE ADVICE Button to contact me directly for a recommendation on the Best Plex NAS for your Setup/Budget. Please bear in mind that this is a one-man operation, so my reply might take a little bit of time, but it will be impartial, honest and have your best interests at heart.
📧 SUBSCRIBE TO OUR NEWSLETTER 🔔🔒 Join Inner Circle
Get an alert every time something gets added to this specific article!
This description contains links to Amazon. These links will take you to some of the products mentioned in today's content. As an Amazon Associate, I earn from qualifying purchases. Visit the NASCompares Deal Finder to find the best place to buy this device in your region, based on Service, Support and Reputation - Just Search for your NAS Drive in the Box Below
Need Advice on Data Storage from an Expert?
Finally, for free advice about your setup, just leave a message in the comments below here at NASCompares.com and we will get back to you. Need Help?
Where possible (and where appropriate) please provide as much information about your requirements, as then I can arrange the best answer and solution to your needs. Do not worry about your e-mail address being required, it will NOT be used in a mailing list and will NOT be used in any way other than to respond to your enquiry.
Need Help?
Where possible (and where appropriate) please provide as much information about your requirements, as then I can arrange the best answer and solution to your needs. Do not worry about your e-mail address being required, it will NOT be used in a mailing list and will NOT be used in any way other than to respond to your enquiry.


|
 |


Is Qnap club still running? I can’t access it.
REPLY ON YOUTUBE
Is this still working? I see nothing, even after refreshing….
REPLY ON YOUTUBE
Don’t Work, It find no apps
REPLY ON YOUTUBE
This option does not work.. When clicking on all apps fields are empty. Nothing populates the window
REPLY ON YOUTUBE
wow so great
REPLY ON YOUTUBE
Plex Media Player from QnapClub does not work anymore.
REPLY ON YOUTUBE
Not working
REPLY ON YOUTUBE
Your audio is lower volume than other Youtube videos.
REPLY ON YOUTUBE
Thank you man, i was about to buy a new pc just to download from torrent and move the files to the nas, but with this i can download directly
REPLY ON YOUTUBE
Any idea how to install QPKG on TS-332?
REPLY ON YOUTUBE
Can I use this with hero?
REPLY ON YOUTUBE