

DS218+ RAM upgrade – official
D3NS1866L-4G 4GB –
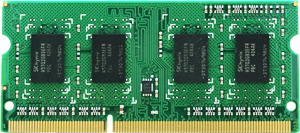
DDR3L-1866 unbuffered SO-DIMM 204pin 1.35V
Applied Models
- Synology DiskStation: DS918+, DS718+, DS218+, DS418play
DS218+ RAM upgrade – NOT official
Crucial 8GB RAM CT102464BF160B 8 GB DDR3 1600 MHz CL11 Memory UK USA
8GB DDR3L 1600MHz Laptop Memory (PC3-12800) CL11 204Pin 1.35V Non-ECC Unbuffered DDR3 SODIMM RAM UK USA
Crucial RAM CT51264BF160B 4GB DDR3 1600 MHz CL11 Memory UK USA
Upgrades for NAS DS918+, DS718+, DS218+, DS418play DiskStation Series
DS218+
This NAS model is sold with 2GB RAM preinstalled. So official upgrade option is 2+4 = 6GB. Unofficially it can be also 4+4=8GB or 4+8=12GB or 8+8=16GB.
iDomiX channel has actually physically tested 16GB upgrade and proven that it works perfectly.
How to do it?
If you are happy to keep 2GB RAM alongside with your new 4GBor 8GB RAM stick then simply remove HDD bays and install the RAM.
If you want to go up to 16GB, you will need to dissemble entire unit to get to the other side of the motherboard where 2GB stick is located.
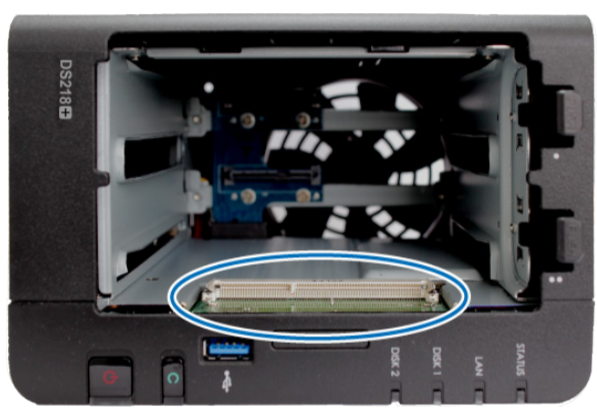
Add a Memory Module on DiskStation
The optional Synology memory module is designed for DiskStation memory expansion. Follow the steps below to
install, check, or remove a memory module on your DiskStation.
To install a memory module:
1 Shut down your DiskStation. Disconnect all cables connected to your DiskStation to prevent any possible
damages.
2 Remove the two hard drive trays from the two drive bays. An empty memory slot is located on the inner right
side of your DiskStation
3 Insert the new memory module into the empty slot:
a Align the notch on the gold contacts of the memory module with the notch on the empty slot. Insert the
memory module into the slot. Make sure the module is properly inserted.
b Push down on the memory module with moderate pressure until you hear a click.
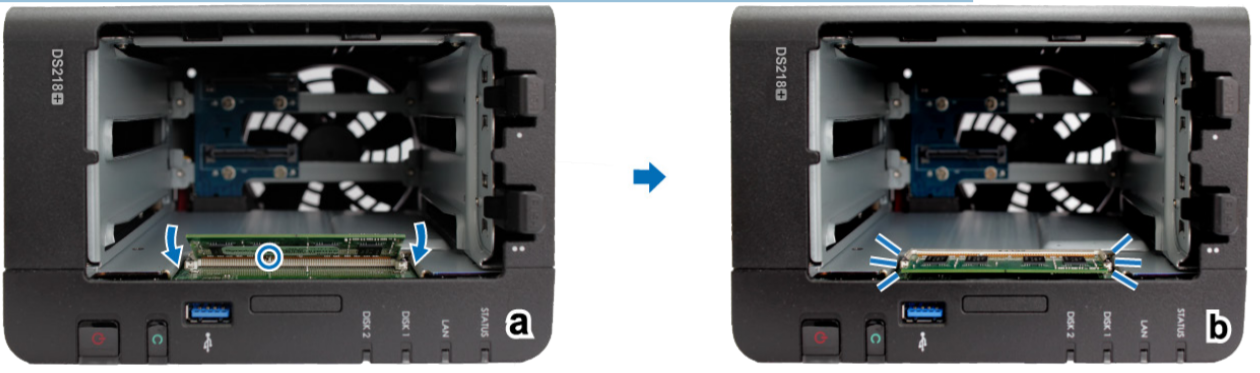
Important: Hold the memory module by its edge, and do not touch the gold contacts.
4 Insert the two hard drive trays back into the hard drive bays.
5 Reconnect the cables you removed in step 1, and then press and hold the power button to turn on your
DiskStation.
To make sure DiskStation recognizes the new memory capacity:
1 Install DiskStation Manager (DSM). Please see the next chapter for more information.
2 Log into DSM as admin or a user belonging to the administrators group.
3 Check Total Physical Memory in Control Panel > Info Center.
If your DiskStation does not recognize the memory or does not start up successfully, please make sure that the
memory module is installed correctly.
To remove the memory module:
1 Follow step 1 and 2 of the “To install a memory module” section to shut down your DiskStation, disconnect the
cables, and then remove the two hard drive trays.
2 Push the levers on both sides of the memory module outward. The memory module will be released from the
slot

3 Hold the memory module by its notches and remove it from the slot.
4 Insert the hard drive trays back into the hard drive bays.
5 Reconnect the cables removed in step 1. Now you may turn on your DiskStation.


Which type of RAM could be used to upgrade the NAS?
DDR3 1600 non ECC is the listed compatible one. Are different types as well compatible? ECC? 1333, 1833? -L -U?
No ECC RAM.
Different frequency could work, but buy from shops with easy returns.
User asking: “I have upgraded my DS218+ using 2x HMT41GS6AFR8A-PB – SK Hynix 8GB DDR3-1600 SODIMM PC3L-12800S Dual Rank x8 Module and everything works perfect. It seems that DSM can use the extra RAM for caching the files. RAM cache is much faster than SSD cache. I wonder if there is a way to configure how DSM is using the RAM cache. It would be great if I can store in cache a local hosted website from my DS218+. Another approach could be if I can define a RAM-disk for my website and keep it there. Is this doable?”