

WD My Cloud Pro Series PR2100
Do you have a link to a video describing how to correctly install the WD My Cloud Pro Series PR2100 device?
I am a graphic designer and a webmaster but I am not good at computer hardware and software.
I have posted here some most important steps of setting WD NAS up.
manual – WD My Cloud Pro Series PR2100 device
You will need to do three things:
- Put the drive in if this is empty NAS and connect the cables and power it on
- Go through setup wizard and choose what data protection mode you want. One or two disk (RAID1,5,6)
- And mount the drive to your computer. So it will appear similar to your C: drive.
Here it goes:
Preparing your My Cloud Device for Use
There are a few steps you need to take in order to get your My Cloud device up and running.
Follow the steps outlined below to prepare your device for use.
Adding a Hard Disk Drive to your Device (Diskless Drives)
Use the following steps to install the hard disk drive(s) in your My Cloud device.
Note: If your My Cloud device came with the drive(s) pre-installed, continue to
“Physically Connecting your Device” on page 10.
1. Pull the handle on the front of the hard disk drive toward you.
2. Slide the approved hard disk drive into the drive bay, making sure that it is properly seated
and is facing the correct direction.
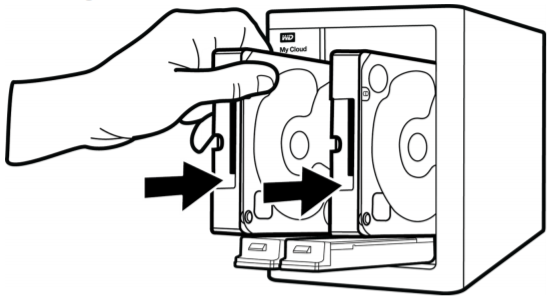
3. Using some force, snap the hard disk drive handle shut.
4. Follow steps 1 through 3 for all hard disk drives on your device.
Note: After the My Cloud device is physically connected, the drive LEDs on the front of
the device will be solid red until new volumes are created. For more information,
see “Physically Connecting your Device” on page 10 and “RAID Storage” on
page 53.
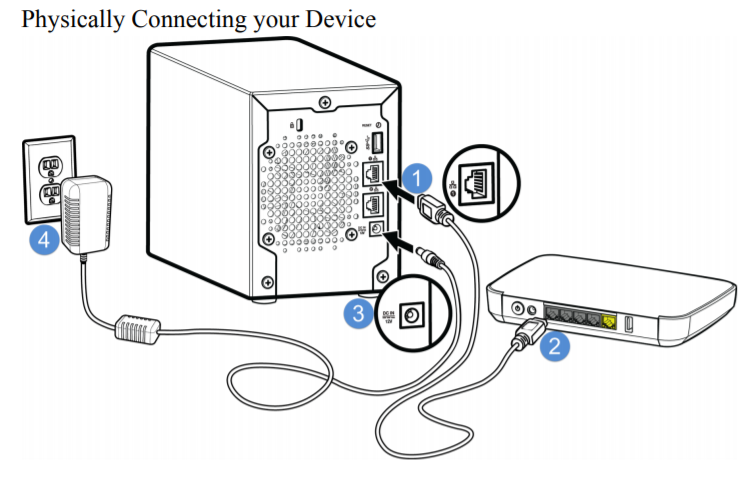
Follow the steps below to connect the My Cloud device to a home or small office network.
1. Using the Ethernet cable, connect one end of the Ethernet cable to the Ethernet port located
on the back of the device.
2. Connect the other end of the Ethernet cable directly into a router or network switch port.
3. Connect one end of the power adapter into the power supply socket on the back of the device.
4. Plug the other end of the power adapter into a power outlet. The unit powers up
automatically.
5. When the power LED on your device turns a solid blue, continue to Getting Started with My
Cloud Online Setup.
Getting Started with My Cloud Online Setup
The online setup process walks you through the steps necessary to easily connect your My Cloud
device to your home or small office network. Use the following steps to run the online setup
process, discover the device, and get started using your device.
My Cloud Device Online Setup
After connecting your device:
1. Open a web browser and type http://mycloud.com/setup to display the welcome page.
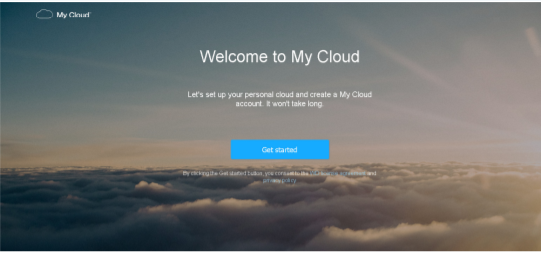
2. On the Welcome page, click Get Started.
The setup function begins searching for your My Cloud device.
3. Follow the on-screen instructions to complete the setup process.
Note: To keep all of your My Cloud content synchronized to your network-attached
devices, download the WD Sync app at http://www.mycloud.com/learn/
#mc_download.
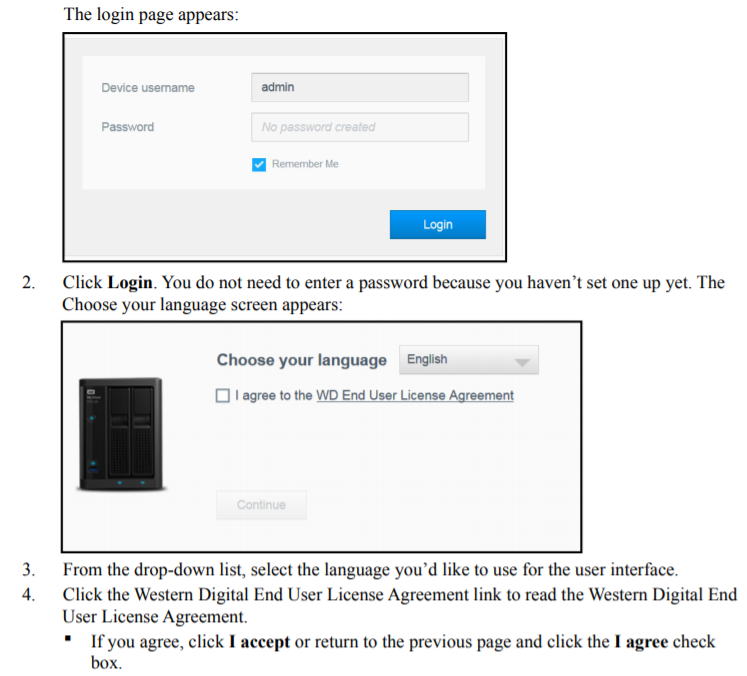
Getting Started without My Cloud Online Setup
Use the following steps to set up your device using your web browser (for browser requirements,
see “Web Browsers” on page 3).
If you choose not to set up the network attached storage (NAS) for your device, you can still:
Configure the device using the My Cloud dashboard. (See “The Dashboard at a Glance”
on page 16.)
Use your My Cloud device as an external hard drive, dragging and dropping files to and
from it. (See “Accessing Content” on page 14.)
Back up files using USB, Remote, Internal, Cloud, and Camera backup. (See “Backing
Up and Retrieving Files” on page 43.)
1. Open a browser and enter your device URL as listed below, then click Enter.
Note: If you changes your device name at any time, the URL also change to the new
name.


Accessing Content
The My Cloud device’s Public folder contains Shared Music, Shared Pictures, and Shared Videos
subfolders. The existing content of the subfolders are files that you dragged and dropped or files
that have been backed up from your computer or an attached USB drive.
Once you’ve physically connected your My Cloud device (see “Preparing your My Cloud Device
for Use” on page 9), use the following steps to access the contents of your device
Windows 8 / Windows 8.1 / Windows
10./W
1. On the Start page, type Computer.
2. Click Computer.
3. In the left pane, click Network.
4. Double-click the My Cloud device (see “Appendix D: My Cloud
Device URLs and Names” on page 104 for a list of device
names) and locate the device’s Public folder.
5. Double-click the Public folder to display the Shared Music,
Shared Pictures, and Shared Videos subfolders. You can now
drag and drop files into (and from) the shared media folders
using Windows Explorer.
Mac OS X
(El Capitan, Yosemite, Mavericks,
Mountain Lion)
1. In a Finder window, click the My Cloud device (see “Appendix
D: My Cloud Device URLs and Names” on page 104 for a list of
device names) under the shared items in the side bar.
2. If presented with an authorization page, enter your Username
and password or select Guest and click Connect to display the
Public share.
3. Double-click the Public folder to display the subfolders: Shared
Music, Shared Pictures, and Shared Videos. You can now drag
and drop files into the shared folders using Finder.
4. If you want to create a shared drive icon permanently on your
desktop, create an alias. There are two ways to do this:
Note: Before creating an alias, click Finder > Preferences >
General and make sure Connected Servers is checked.
– Click the item you wish to alias (e.g., Shared Music), hold
down the mouse button, hold down the Cmd and Option
keys simultaneously, then drag the item to where you’d like
to make an alias. Instead of moving the original item, this
action creates an alias at the new location.
– OR –
– Right-click the item you want to alias (e.g., Shared Music)
and click File > Make Alias.
Mapping the Public Folder (Windows)
To map the My Cloud Public folder for quick access in the future:
1. In Windows Explorer, under Network, click the My Cloud device (see “Appendix D: My Cloud
Device URLs and Names” on page 104 for a list of device names).
2. Right-click the Public folder and select Map Network Drive from the menu.
3. Select an available letter from the Drive drop-down list.
4. Select the Reconnect at login check box.
5. Click Finish. Your Public drive is now mapped
manual – WD My Cloud Pro Series PR2100 device
| Where to Buy a Product | |||
 |
    
|

|
VISIT RETAILER ➤ |
 |
|
|
VISIT RETAILER ➤ |
 |
|
|
VISIT RETAILER ➤ |
 |
|
|
VISIT RETAILER ➤ |
We use affiliate links on the blog allowing NAScompares information and advice service to be free of charge to you. Anything you purchase on the day you click on our links will generate a small commission which is used to run the website. Here is a link for Amazon and B&H. You can also get me a ☕ Ko-fi or old school Paypal. Thanks! To find out more about how to support this advice service check HERE If you need to fix or configure a NAS, check Fiver Have you thought about helping others with your knowledge? Find Instructions Here


DISCUSS with others your opinion about this subject.
ASK questions to NAS community
SHARE more details what you have found on this subject
CONTRIBUTE with your own article or review. Click HERE
IMPROVE this niche ecosystem, let us know what to change/fix on this site
EARN KO-FI Share your knowledge with others and get paid for it! Click HERE