

Actions to take If you NAS must be directly connected to the Internet
If, at the discretion of individual users, QNAP NAS is directly connected to the Internet, we recommend the following steps to strengthen your device and to decrease the chance of being penetrated:
- Put QNAP NAS behind your router and firewall. Do not let QNAP NAS obtain a public IP address. Do not use UPnP and DMZ. It’s advised to turn off UPnP on QNAP NAS as well. Manually set up port forwarding in your router configuration only for the network ports required by specific QNAP NAS services.
- Stop or disable services, such as Telnet, SSH, web server, SQL server, phpMyAdmin and PostgreSQL, when not in use.
- Change default external (Internet side) port numbers, such as 21, 22, 80, 443, 8080 and 8081, to customized (randomized) ones. For example, change 8080 to 9527.
- Use only encrypted HTTPS connections, or other types of secure connections (SSH, etc.).
- Install QuFirewall on your QNAP NAS and limit the allowed IP addresses to a specific region or subnet.
- Set up a new administrator account, and disable the default admin account.
- Use strong passwords for all NAS users, including the new administrator account you’ve just created.
- Configure MFA (2-Step Verification) on QNAP NAS.
- Enable auto OS and app updates. Pick a time that works best for you without interrupting your auto backup/sync schedule or other tasks.
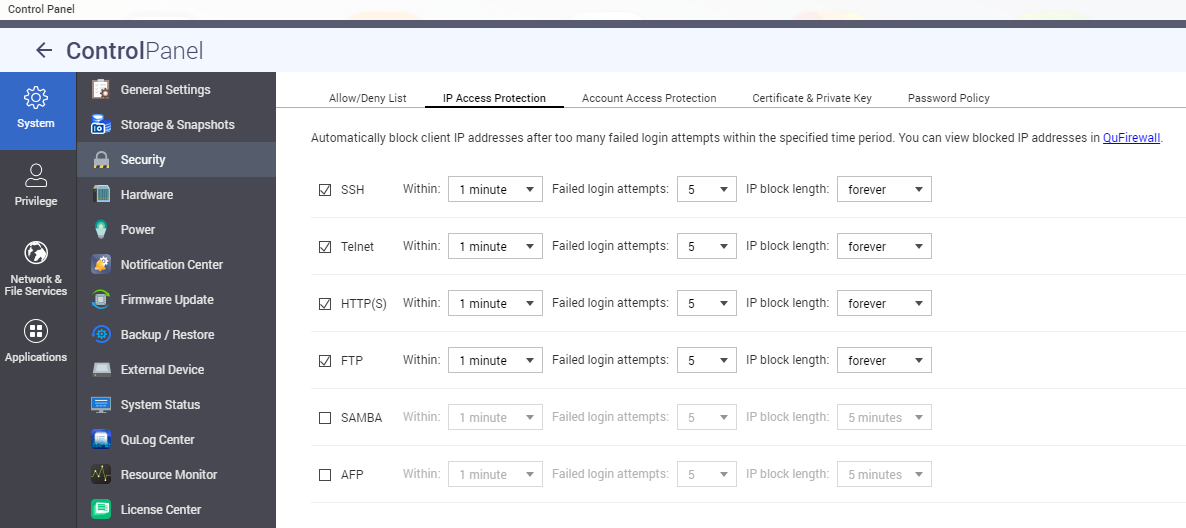
- Enable IP access protection to block IP addresses with too many failed login attempts.
Attackers have been constantly looking for any exploitable weaknesses to take advantage for their own agendas. As a result, QNAP monitors the latest information security intelligence to deliver up-to-date details and software updates, ensuring data security for users. Please work with us and follow the advice and recommendations given in this article, to enhance the resilience of your data/privacy protection strategy.
To prevent malware infection or other attacks, you can check the NAS and configure system settings following these recommendations to better secure your device and protect your data.
- Remove unknown or suspicious accounts.
- Remove unknown or suspicious applications.
- Disable auto router configuration and set up device access controls in myQNAPcloud.
- Avoid opening default port numbers to the Internet.
- Install and run the latest version of Malware Remover.
- Change passwords for all accounts.
- Update installed QTS applications to the latest versions.
- Update QTS to the latest available version.
Removing Unknown or Suspicious Users
- Log on to QTS as administrator.
- Go to Control Panel > Privilege > Users.
- Verify all users on the list.
- Select unknown or suspicious users.
- Click Delete.
A confirmation message appears. - Click OK.
Removing Unknown or Suspicious Applications
- Log on to QTS as administrator.
- Open the App Center.
- Verify all installed applications.
- Locate an unknown or suspicious application.
- Click Remove.
A confirmation message appears. - Click OK.
Changing myQNAPcloud Settings
- Log on to QTS as administrator.
- Open myQNAPcloud.
- Go to Auto Router Configuration.
- Deselect Enable UPnP port forwarding.
- Go to Publish Services.
- Deselect all unnecessary services.
- Click Apply.
- Go to Access Control.
- Set Device access controls to Private.
- Click Apply.
Changing the System Port Number
If the NAS is directly connected to the Internet (for example, via PPPoE, static external IP address, or a router in DMZ mode), change the system port number in QTS.
- Log on to QTS as administrator.
- Go to Control Panel > System > General Settings > System Administration.
- Specify a new system port number.
Warning: Do not use 22, 443, 80, 8080 or 8081. - Click Apply.
If the NAS is behind a router but is connected to the Internet through port forwarding, specify a new port number on the router. Do not use 22, 443, 80, 8080 or 8081.
Installing and Running the Latest Version of Malware Remover
- Log on to QTS as administrator.
- Open the App Center, and click the Search icon.
A search box appears. - Type “Malware Remover”, and then press ENTER.
The Malware Remover application appears in the search result list. - Click Install.
QTS installs the latest version of Malware Remover. - Open Malware Remover.
- Click Start Scan.
Malware Remover scans the NAS for malware.
Changing the Admin Password
- Log on to QTS as administrator.
- Click the profile picture on the QTS Task Bar.
The Options window opens. - Click Change Password.
- Specify the old password.
- Specify the new password.
QNAP recommends the following criteria to improve password strength:- Should be at least 8 characters in length
- Should include both uppercase and lowercase characters
- Should include at least one number and one special character
- Must not be the same as the username or the username reversed
- Must not include characters that are consecutively repeated three or more times
- Verify the new password.
- Click Apply.
Changing User Passwords
- Log on to QTS as administrator.
- Go to Control Panel > Privilege > Users.
- Select a user.
- Click Change Password.
The Change Password window appears. - Specify the old password.
- Specify the new password.
QNAP recommends the following criteria to improve password strength:- Should be at least 8 characters in length
- Should include both uppercase and lowercase characters
- Should include at least one number and one special character
- Must not be the same as the username or the username reversed
- Must not include characters that are consecutively repeated three or more times
- Verify the new password.
- Click Apply.
- Repeat the above steps to change passwords for other users.
Updating Installed QTS applications
- Log on to QTS as administrator.
- Open the App Center.
- Go to My Apps.
- Beside Install Updates, click All.
A confirmation message appears. - Click OK.
QTS updates installed applications to the latest versions.
Updating QTS
- Log on to QTS as administrator.
- Go to Control Panel > System > Firmware Update.
- Under Live Update, click Check for Update.
- QTS downloads and installs the latest available update.
| Where to Buy a Product | |||
 |
    
|

|
VISIT RETAILER ➤ |
 |
|
|
VISIT RETAILER ➤ |
 |
|
|
VISIT RETAILER ➤ |
 |
|
|
VISIT RETAILER ➤ |
We use affiliate links on the blog allowing NAScompares information and advice service to be free of charge to you. Anything you purchase on the day you click on our links will generate a small commission which is used to run the website. Here is a link for Amazon and B&H. You can also get me a ☕ Ko-fi or old school Paypal. Thanks! To find out more about how to support this advice service check HERE If you need to fix or configure a NAS, check Fiver Have you thought about helping others with your knowledge? Find Instructions Here


DISCUSS with others your opinion about this subject.
ASK questions to NAS community
SHARE more details what you have found on this subject
CONTRIBUTE with your own article or review. Click HERE
IMPROVE this niche ecosystem, let us know what to change/fix on this site
EARN KO-FI Share your knowledge with others and get paid for it! Click HERE