

A Guide to Using Apple Time Machine and your NAS
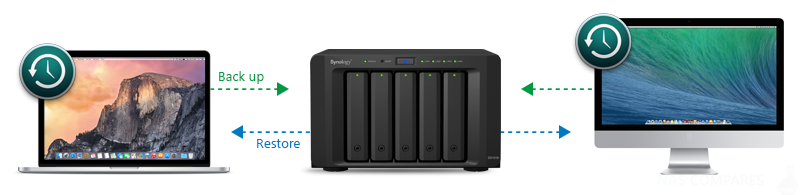
Apple Time Machine is a backup software application included with macOS operating system from Apple. The software is designed to work with their range of AirPort Time Capsule devices, the Wi-Fi router with built-in hard disk (which apple are pulling out of), as well as other internal and external disk drives connected via USB and Thunderbolt. It was introduced in Mac OS X Leopard quite a few years ago and has become a backup essential for Mac users worldwide. With the growth of popularity in NAS devices from Synology and 3rd party clouds like Google Drive, Amazon Drive and CrashPlan it has become a common requirement to store backup images of a Mac system off-site.
How Does Apple Time Machine Backup My Files
Time Machine creates incremental backups of files that can be restored at a later date. It allows the user to restore the whole system or specific files from the Recovery HD or the macOS Install DVD. It works within Mail, iWork, iLife, and several other compatible programs, making it possible to restore individual objects (e.g. emails, photos, contacts, calendar events) without leaving the application. Likewise, storing data on a Synology NAS uses the same system of file transfer, but changes to transfer protocol (the way files are sent) from internally to externally. According to an Apple support statement:
“Time Machine is a backup utility, not an archival utility, it is not intended as offline storage. Time Machine captures the most recent state of your data on your disk. As snapshots age, they are prioritized progressively lower compared to your more recent ones.”
For backups to a Synology NAS drive, Time Machine allows the user to back up Mac computers over the network and supports backing up to certain network attached storage devices or servers, depending on the version of Time Machine. Earlier versions worked with a wide variety of NAS servers, but later versions require the server to support a recent version of Apple’s Apple Filing Protocol (AFP), and Time Machine no longer works with servers using the Server Message Block (SMB) protocol typical for Windows servers. I am pleased to say that Apple time machine is still supported on Synology NAS servers. Below I have detailed how to create time machine backups to a Synology network attached storage device in your environment.
Apple Time Machine and Synology NAS Guide
This article will guide you through the process of backing up data from your Mac OS X computer to a Synology DiskStation using Apple’s Time Machine, a backup utility included in Mac OS X 10.5 and later.
Set up a Synology DiskStation to Support Time Machine
Before setting your DiskStation as the destination for Time Machine, you’ll need to login to DSM and change a few settings.
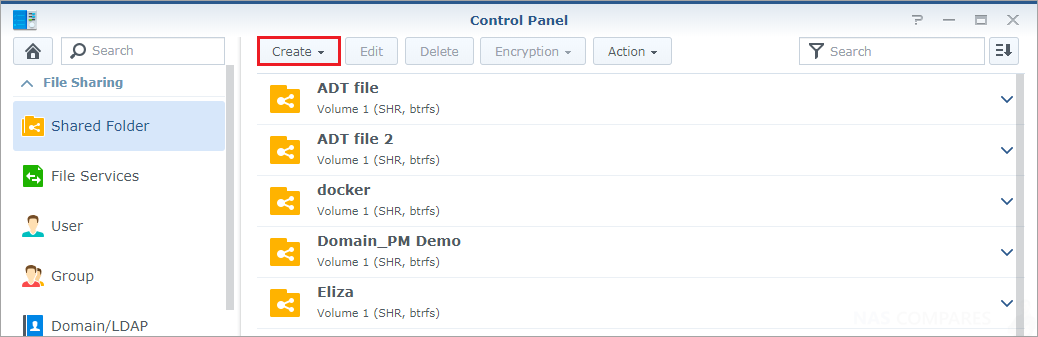
1. Create a shared folder for Time Machine backup
- Login to DSM with an account belonging to the administrator’s group.
- Go to Control Panel > Shared Folder and click Create to create a shared folder.
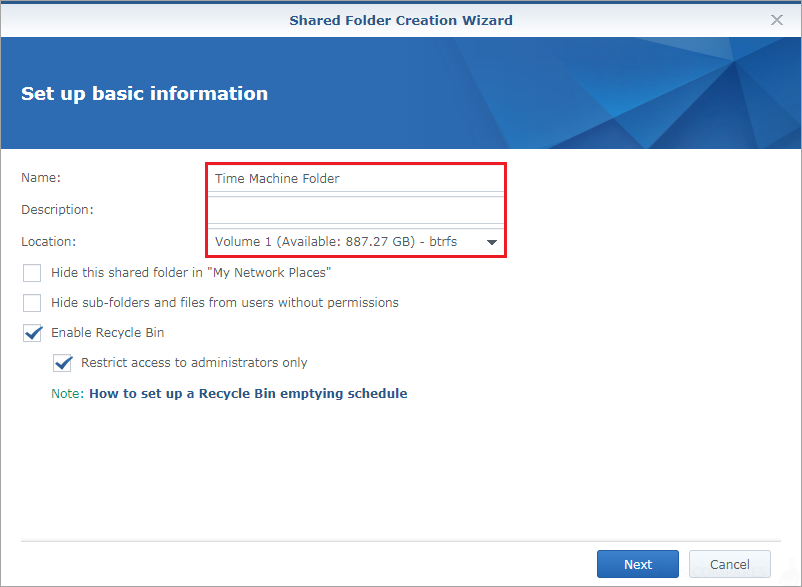
Enter a name for the shared folder (such as “Time Machine Folder”) and select a location (if multiple volumes exist). In this example, we’ll choose Volume 1.
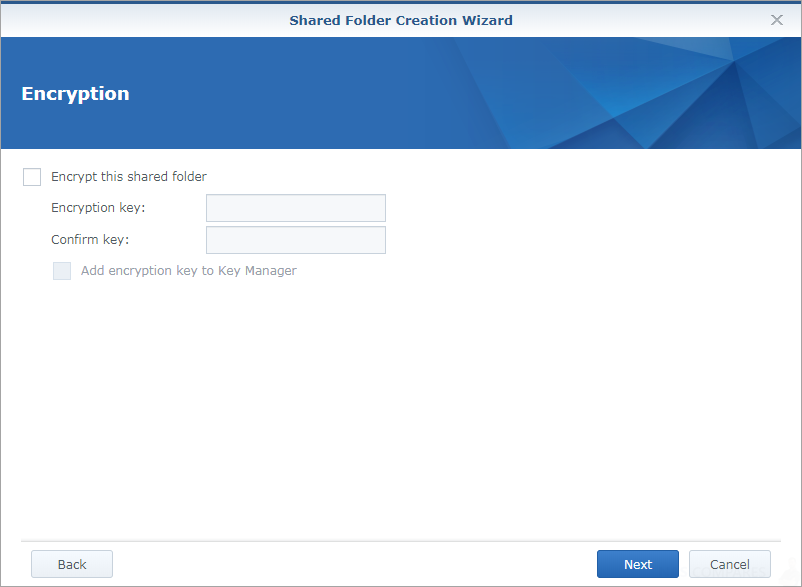
Check the Encrypt this shared folder box and enter an encryption key if you would like to encrypt the shared folder Time Machine Folder, and then click Next.
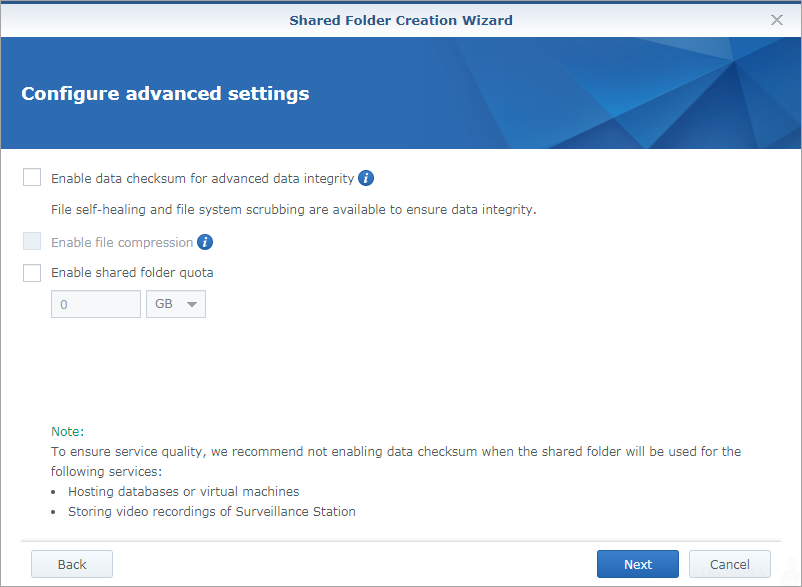
Configure advanced settings for the shared folder as you prefer, and then click Next
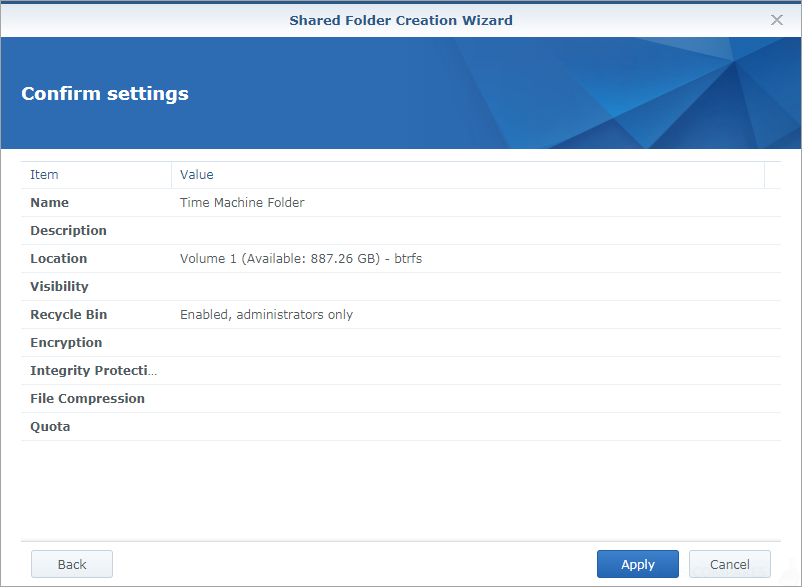
Click Apply
Click OK.
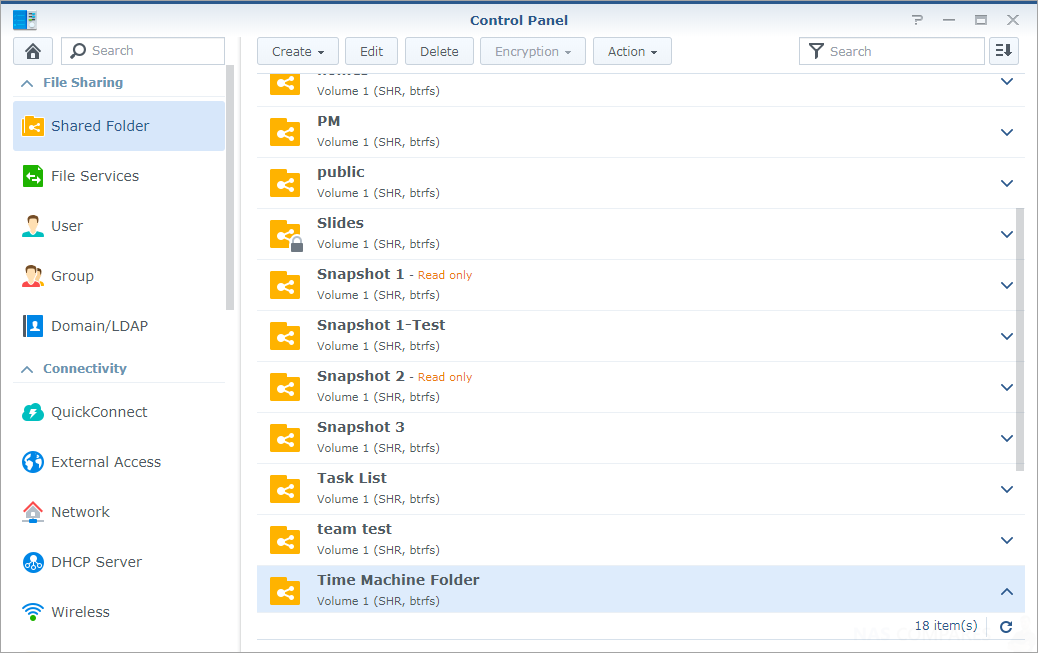
Now you should see the newly-created shared folder.
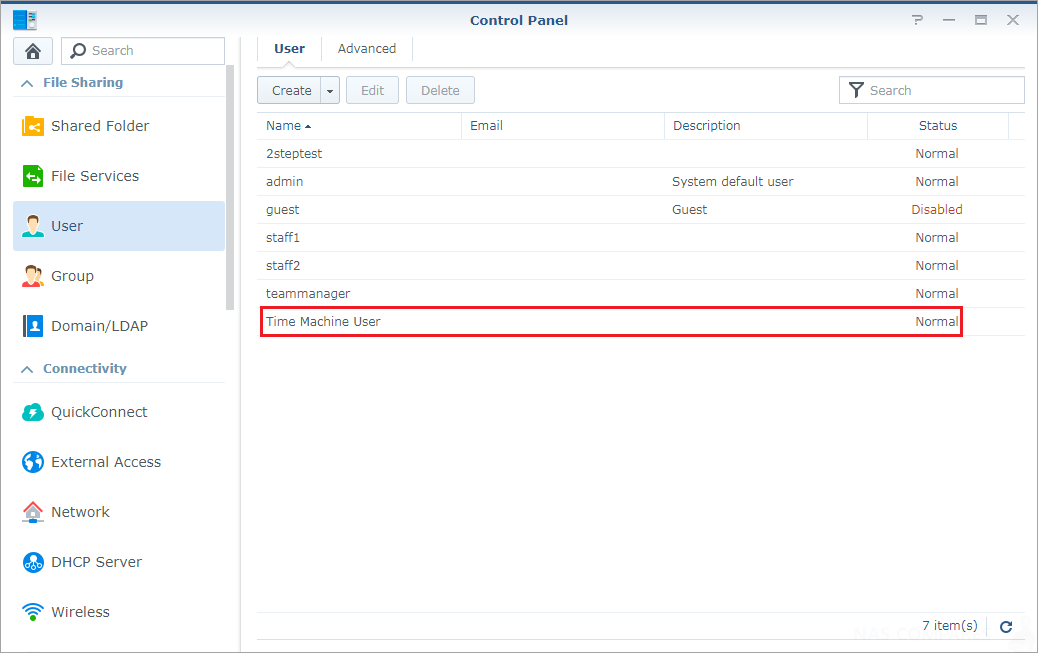
1.2 Create a user for Time Machine and set a Quota limit
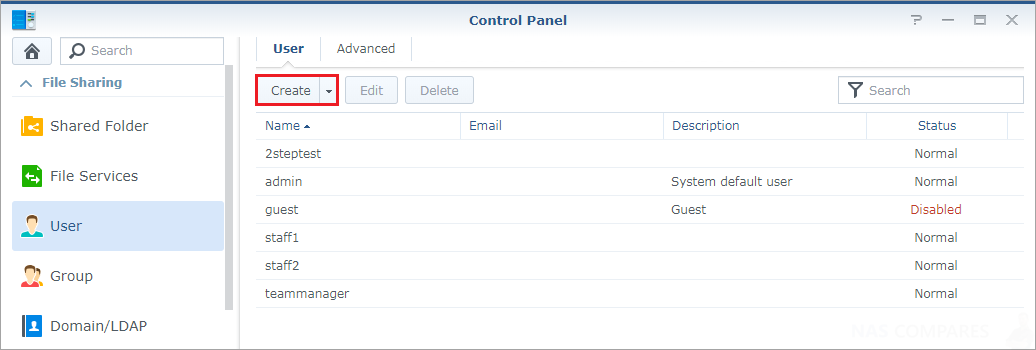
- Go to Control Panel > User and click Create.
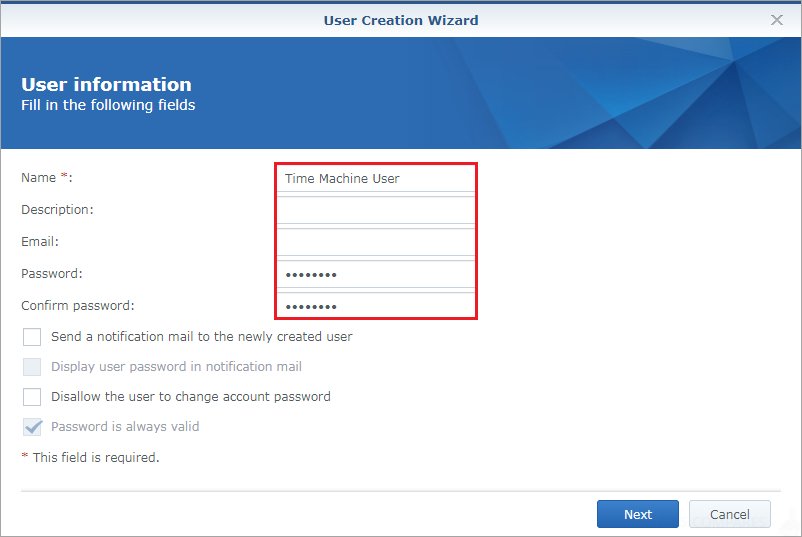
Enter a username (such as “Time Machine User”) and specify a password. Then click Next.
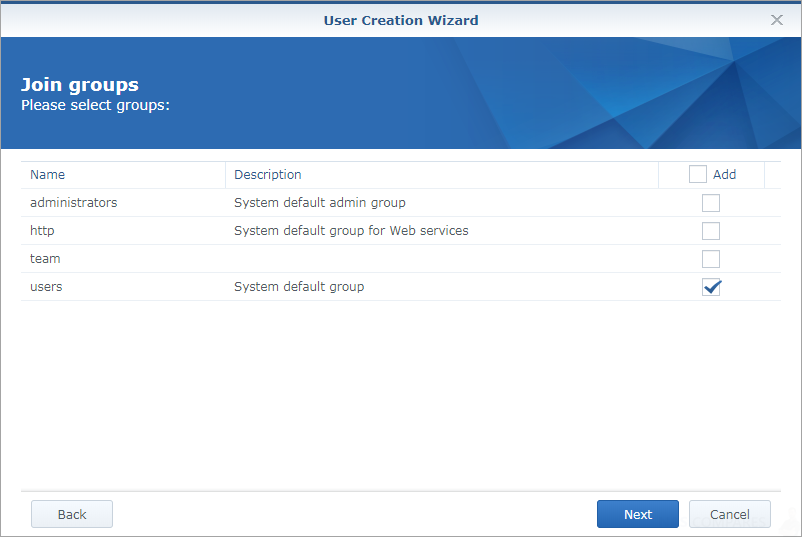
Click Next.
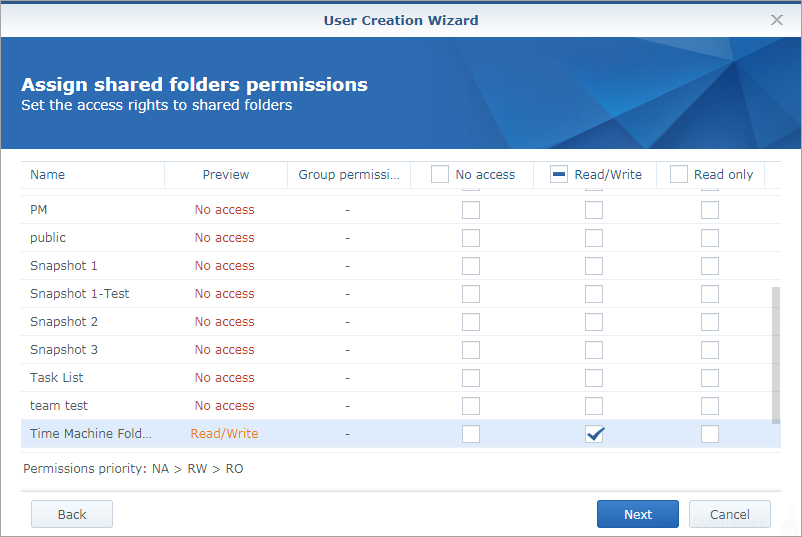
Make sure this user is assigned read/write permission to Time Machine Folder, and click OK.
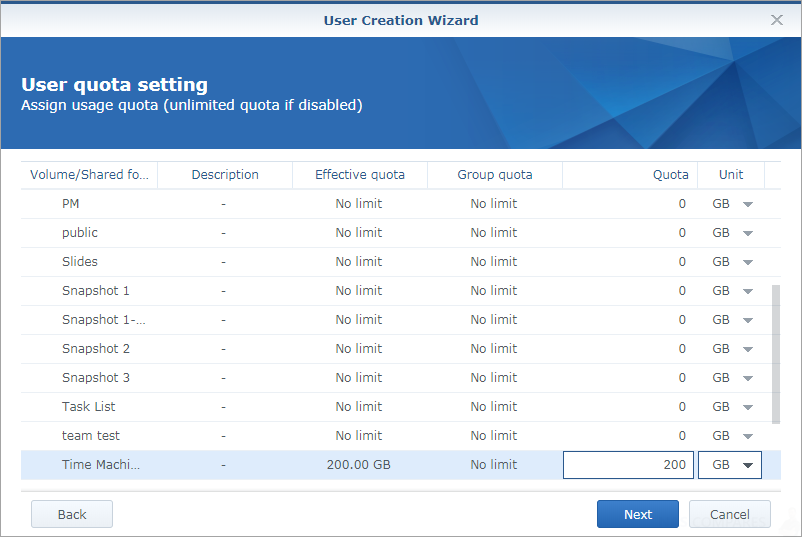
In this example, we’ll back up data to Time Machine Folder. However, we don’t want the backup to use up your space, so we’ll specify a usage quota. On the User quota setting page, enter a value you prefer in the Quota field and select a Unit from the drop-down menu. For example, we’ll set a quota of 200 GB for Time Machine Folder. After specifying a quota, click Next.
Click Next.
Click Next.
Click Apply.
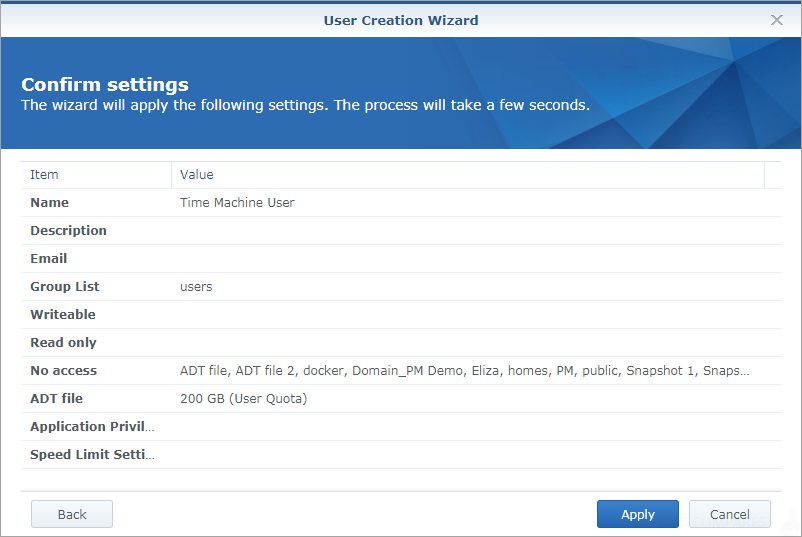
Now we should have a user called Time Machine User.
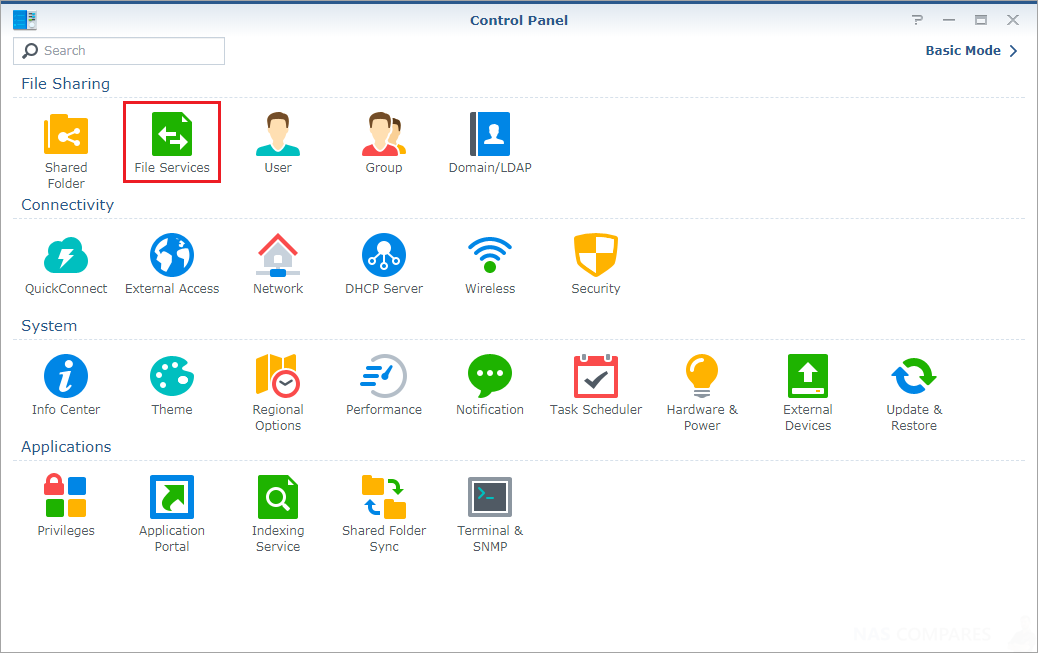
1.3 Set the shared folder as Time Machine’s backup target
- Go to Control Panel > File Services.
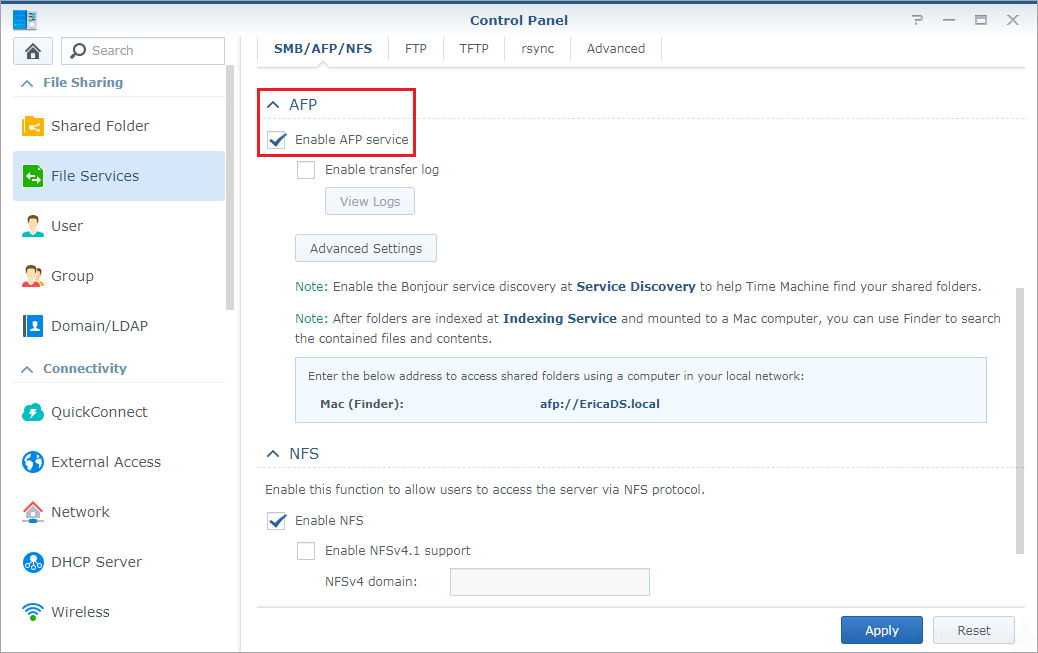
Find the AFP section on the SMB/AFP/NFS tab, and check the Enable AFP service box.
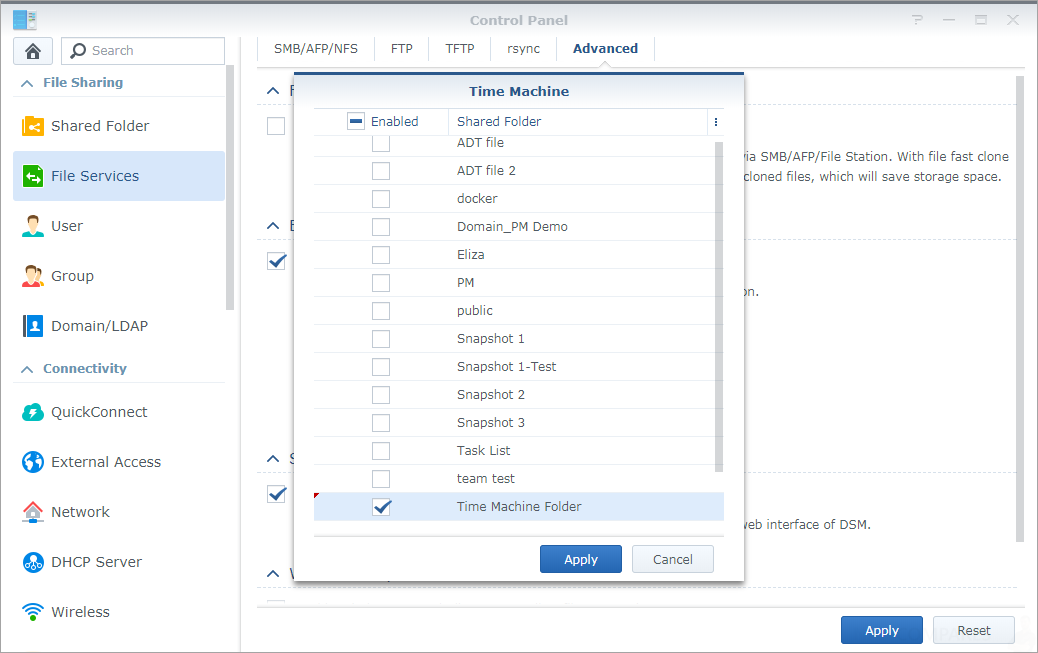
Go to the Advanced tab, check the Enable Bonjour Time Machine broadcast via AFP box, and click on the Set Time Machine Folders button.
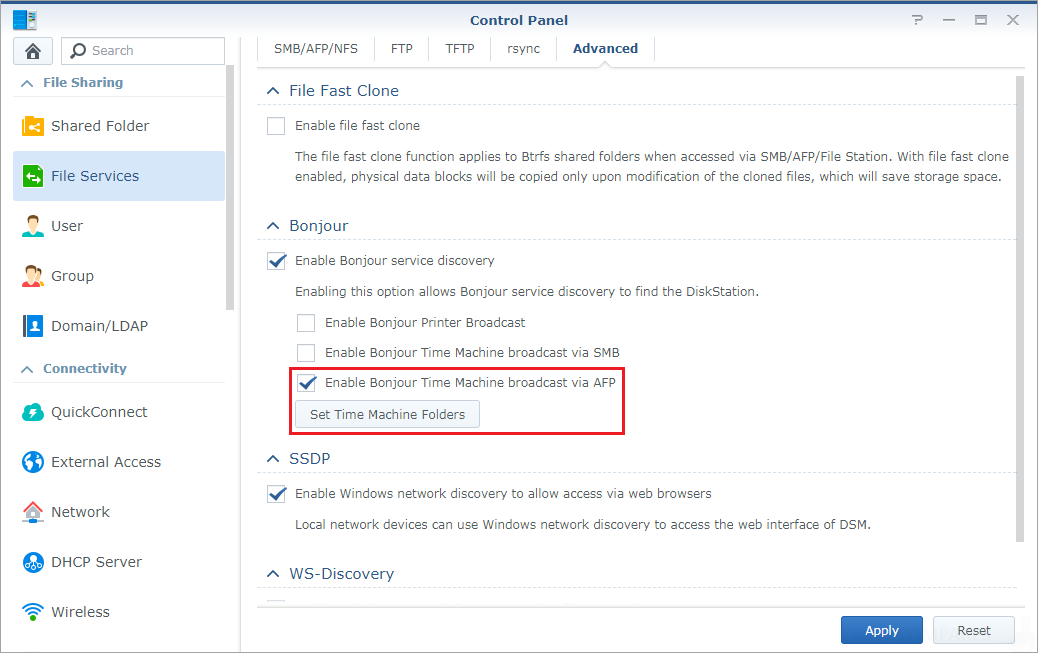
Choose the shared folder you just created from the Time Machine menu, and click Apply to save settings.
Action a Time Machine Backup to your Synology NAS
This section will show you how to configure Time Machine to set DiskStation’s shared folder as the backup destination. This process allows Time Machine to easily locate your DiskStation on the local area network and regard it as the backup disk. When the setup is complete, Time Machine will be able to start backing up data to the DiskStation.
2.1 Connect to your NAS server
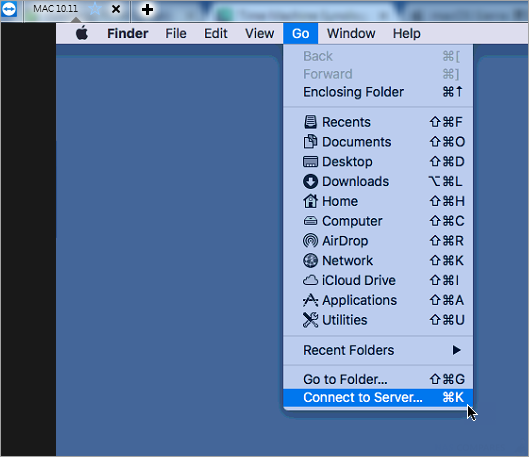
- On your Mac, click Go in the top menu bar, and select Connect to Server.
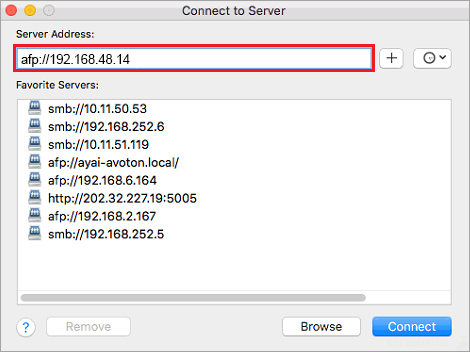
Enter the address of your NAS server. Use AFP or SMB according to your setting in the step 1.3.2. After specifying the address, click Connect.
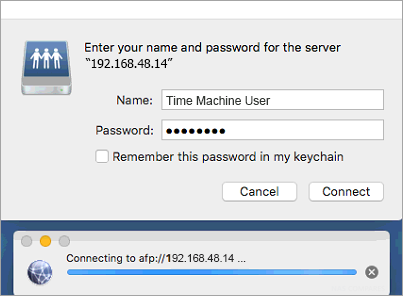
Enter your account credentials, and click Connect.
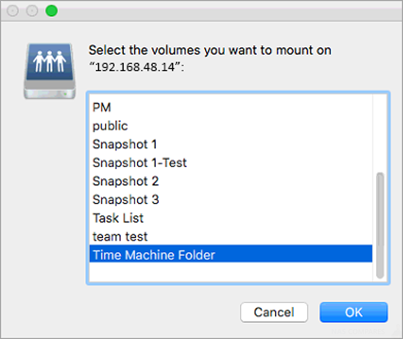
Select Time Machine Folder from the list, and then click OK.
2.2 Configure Time Machine to set DiskStation as its backup disk
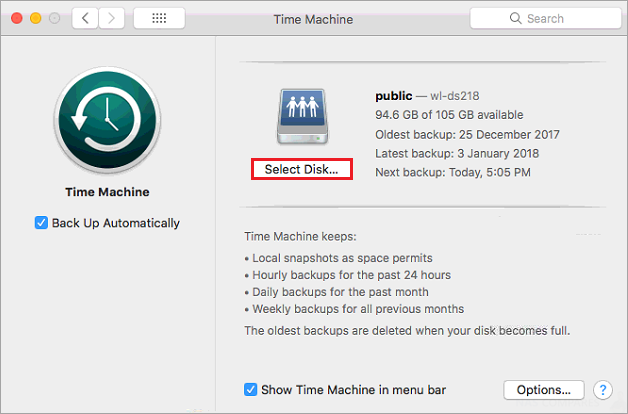
- On your Mac, open System Preferences from the Dock, and click Time Machine.
- Check the Back Up Automatically box, and click Select Disk.
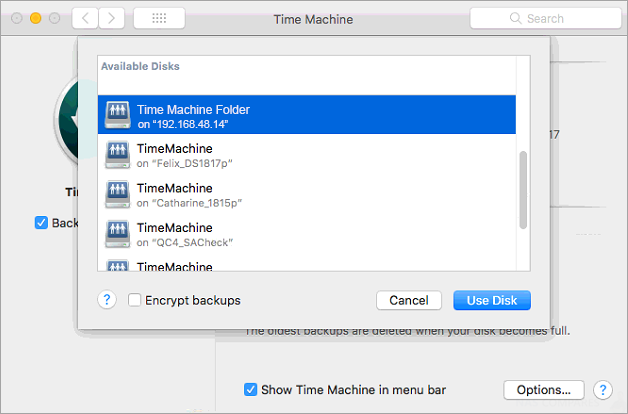
Choose the shared folder you created, which is Time Machine Folder in this case, and then click Use Disk.
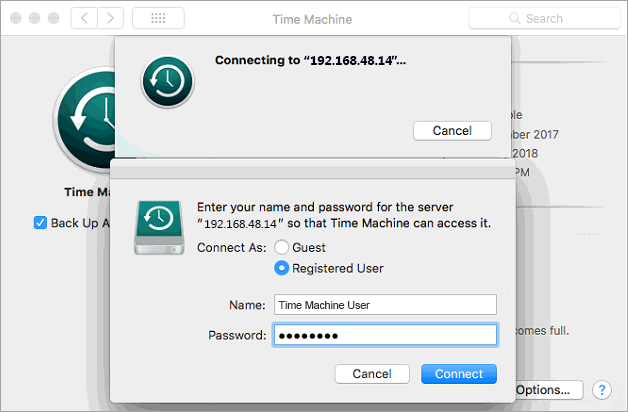
The system will prompt you to provide your account credentials. Enter the username and password of the user you just created, and click Connect.
- Time Machine will start backing up data soon after.
3. More Information on Apple Time Machine
If you would like to learn more about Time Machine, you can consult Apple’s Time Machine support page.
IMPORTANT Things to Remember
- I recommended you set a quota to prevent Time Machine from occupying your entire NAS storage space. In general, the quota should be at least two or three times the size of your Mac’s hard drive or the amount of data to be backed up. Then you can maintain versions or different devices adequately.
- Only on models that support the Btrfs file system can users set usage quotas for individual folders. If your NAS server only supports the EXT4 system, you can only set a usage quota for the entire volume.
- (For more techie users) Time Machine supports both SMB and AFP. For macOS Sierra and later, Time Machine uses SMB, instead of AFP, as the default protocol.
- (For more techie users) If you want to back up your files via SMB, please go to the SMB section on the same tab, and check the Enable SMB service box.
- (For more techie users) If you chose to use SMB in the step 1.3.2, please check the Enable Bonjour Time Machine broadcast via SMB box instead. Choose the shared folder you just created and click Apply. Then click Yes in the popup window to confirm and save your settings.
🔒 Join Inner Circle
Get an alert every time something gets added to this specific article!
This description contains links to Amazon. These links will take you to some of the products mentioned in today's content. As an Amazon Associate, I earn from qualifying purchases. Visit the NASCompares Deal Finder to find the best place to buy this device in your region, based on Service, Support and Reputation - Just Search for your NAS Drive in the Box Below
Need Advice on Data Storage from an Expert?
Finally, for free advice about your setup, just leave a message in the comments below here at NASCompares.com and we will get back to you. Need Help?
Where possible (and where appropriate) please provide as much information about your requirements, as then I can arrange the best answer and solution to your needs. Do not worry about your e-mail address being required, it will NOT be used in a mailing list and will NOT be used in any way other than to respond to your enquiry.
Need Help?
Where possible (and where appropriate) please provide as much information about your requirements, as then I can arrange the best answer and solution to your needs. Do not worry about your e-mail address being required, it will NOT be used in a mailing list and will NOT be used in any way other than to respond to your enquiry.


|
 |
