

How to migrate between Synology NAS (DSM 6.0 and later)
When you purchase a new Synology NAS, your existing data can be moved from the old Synology NAS to the newly acquired one. This simple process is called “migration” but needs to be performed with care, so please read the instructions below to avoid any accidental data loss due to human error.
Depending on your Synology product or individual setup, there are several methods to perform migration. This article explains the basics and important information regarding migration and will guide you through the procedure of smoothly migrating data from one Synology NAS to another.
Contents
- Before you start
- Choosing the right migration method for you
- HDD Migration
- Migration via Migration Assistant
- Migration via Hyper Backup
1. Before you start
1.1 Source and destination Synology NAS
Performing migration moves data or drives from one Synology NAS to another. In this article, the original Synology NAS from which data or drives are moved shall be called the source Synology NAS or source device, while the new one shall be called the destination Synology NAS or destination device.
Note:
- Migrating between Synology NAS and IP SAN is not supported.
1.2 Always back up your data
The migration procedures mentioned in this article allow you to keep most of your data. However, to prevent any accidental data loss, we strongly recommend backing up the following items:
| Item | Backup Method |
|---|---|
| Shared folders and selected packages | Go to Hyper Backup and click the Create icon > Data backup task. Follow the wizard instructions to perform backup. |
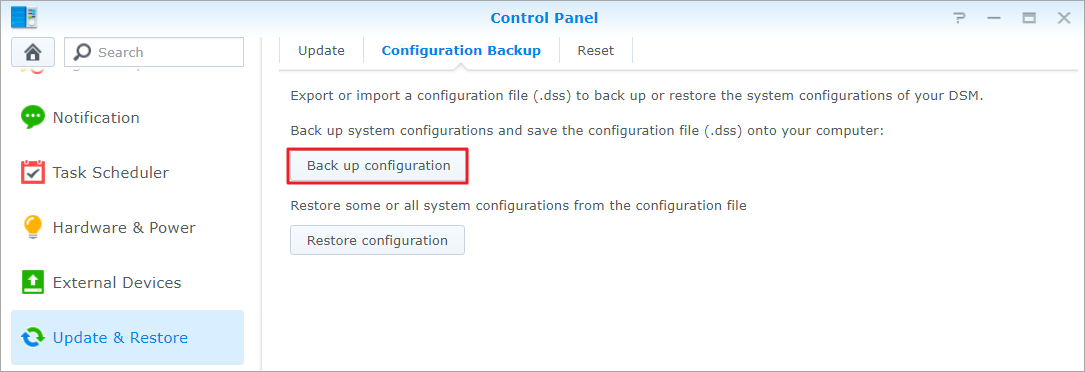
| System configuration | Go to Control Panel > Update & Restore > Configuration Backup and click Back up configuration to back up the following configurations:
|
| License keys | Licensed packages may have different migration policies. Please visit our license page for more details. |
| Photo Station Blog posts | Go to the Settings page of Photo Station. In the Backup section under the Blog tab, click Start. |
Important:
- Performing migration requires Synology Assistant 6.0 and DSM 6.0 or above. If you are using an older version of DSM, please see How to migrate between Synology NAS (DSM 5.x) for instructions on performing migration.
- Hyper Backup can be downloaded from Package Center. You need to install Hyper Backup Vault on your destination NAS to perform backup related tasks.
1.3 Check the hardware and DSM specifications of the destination Synology NAS
Some advanced system services are not supported on all Synology NAS models. You will not be able to use the following services if they’re not supported by the destination Synology NAS, including:
- iSCSI LUN/virtualization support
- SSD cache/TRIM support
- HFS+ read/write support on external drives
- Packages which are designed for specific Synology NAS
Therefore, we recommend migrating to a Synology NAS with better hardware specifications to ensure all packages and services will work properly after migration. You can also refer to the destination Synology NAS product datasheet to learn more details about DSM specifications.
2. Choosing the right migration method for you
Synology provides three migration methods: HDD Migration, migration via Migration Assistant, and migration via Hyper Backup. Deciding on the right migration method is crucial. This section explains the differences between these three methods and the limitations of each method. Please pay special attention to the limitations of each method when choosing the suitable migration method.
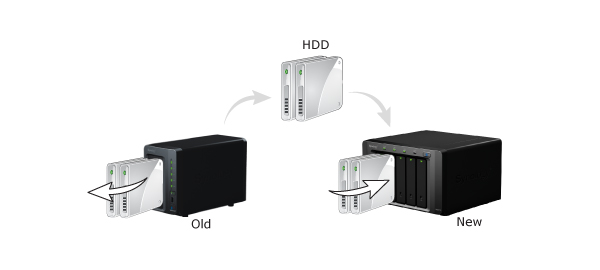
2.1 HDD migration
HDD migration allows you to migrate data through migrating HDDs on the source Synology NAS to the destination one directly. Therefore, if you wish to keep using the same hard drives on the new Synology NAS, refer to HDD migration. However, this migration method have restriction on the model of the source and destination Synology NAS as well as system requirements. Please see the following rules:
-
- HDD migration to a different Synology NAS model is not available if your source Synology NAS is listed below:
- 19-series: RS819
- 18-series: DS418, DS418j, DS218, DS218play, DS118
- 17-series: DS1817, DS1517
- 16-series: DS416, DS416play
- 15-series: DS2015xs, DS1515, DS715, DS415play, DS215+
- 14-series: DS214, DS214play
- 13-series: DS413, DS213+
- 12-series: DS212+, DS112+
- 11-series: DS211+
- 10-series: DS410, DS210+, DS110+
- If your source Synology NAS is not listed above, refer to the table below to see whether your source and destination Synology NAS are able to migrate through HDD migration. An “O” means that HDD migration works, and a “X” means that HDD migration between the two Synology NAS is not allowed.
Source/Destination J Series Value Series Plus Series XS/XS+ Series SA Series FS Series J Series O O X X X X Value Series O O X X X X Plus Series X X O O O X XS/XS+ Series X X O O O X SA Series X X X O O O FS Series X X X X X O
- HDD migration to a different Synology NAS model is not available if your source Synology NAS is listed below:
Note:
- All models ending with j, se, or slim (e.g., DS120j, DS216se, DS419slim) belong to the J Series, except for DS620slim, which belongs to the Plus Series.
- All models without a suffix or ending with play (e.g., DS118, DS218play) belong to the Value Series.
- All models ending with + (e.g., DS918+) belong to the Plus Series.
- All models ending with xs or xs+ (e.g., DS3018xs, RS3617xs+) belong to the XS/XS+ Series.
- All models starting with SA (e.g., SA3200D) belong to the SA Series.
- All models starting with FS (e.g., FS6400) belong to the FS Series.
- If any of the following is applicable, please migrate via Migration Assistant or Hyper Backup.
- DSM version: If the destination Synology NAS is not in the brand-new out-of-the-box status, the DSM version running on the destination Synology NAS must be the same or newer than the version on the source Synology NAS. For example, you cannot perform migration from a DS411 running DSM 5.1 to a DS411 running DSM 5.0.
- File system: Please make sure the destination Synology NAS supports the required file system. If the destination Synology NAS does not support the file system you are using, the volumes cannot be mounted and data stored on the volumes cannot be accessed.
- Number of drive slots: The destination Synology NAS must have enough drive slots to accommodate all of the drives belonging to the RAID volume on the source Synology NAS. For example, if you have a DS214 with a RAID 1 volume consisting of two hard drives, then your destination Synology NAS must have at least two hard drive slots.
- Single-bay and multiple-bay models: Due to differences in the disk partition system, single-bay models cannot migrate hard drives to multiple-bay models and vice versa. For example, hard drives from a DS114 cannot be migrated to a DS214 or DS414. Likewise, you cannot migrate hard drives from a DS214 or DS414 to a DS114.
- Drive type: Please make sure the drive type and size (i.e., SAS/SATA and 2.5″/3.5″) is supported on the destination Synology NAS. For example, you cannot insert SAS drives into a model that only supports SATA drives.
- Single volume size beyond 16TB: Most Synology NAS models in the J Series and Value Series support a single volume size up to 16TB. If the single volume size in the source Synology NAS is larger than 16TB, please select a destination Synology NAS that supports a single volume size of 108TB before migration.
- SSD cache: If your SSD cache fits any of the following conditions, you will need to remove it on the source Synology NAS before migrating its data to the destination Synology NAS to proceed. Otherwise, the SSD cache can be migrated directly.
- The destination Synology NAS does not support SSD cache
- The SSD read/write cache was built before DSM 5.2 and the destination Synology NAS runs on an Alpine CPU
Yes, you can almost always migrate drives from an older NAS to a newer NAS. Especially if it is the same kind of NAS – same category like plus series or value series.
Group 1: Armada370, Armada375, Armada38x, ArmadaXP, Comcerto2k
Group 2: Armada37xx, rtd1296
Group 3: Apollolake, Avoton, Braswell, Broadwell, Broadwellnk, Broadwellntbap, Bromolow, Cedarview, Denverton, Geminilake, Grantley, Purley, R1000, V1000, X86
Group 1 => Group 1 / 2 /3 = OK
Group 2 => Group 2/ 3 = OK
Group 3 => Group 3 / 2 = OK
You can also use this table
1. Package architecture group definitions
- Group 1: Armada370, Armada375, Armada38x, ArmadaXP, Comcerto2k
- Group 2: Armada37xx, rtd1296
- Group 3: Apollolake, Avoton, Braswell, Broadwell, Broadwellnk, Broadwellntbap, Bromolow, Cedarview, Denverton, Geminilake, Grantley, Purley, R1000, V1000, X86
- https://kb.synology.com/en-uk/DSM/tutorial/What_kind_of_CPU_does_my_NAS_have
2. Migration table
|
From \ To
|
Group 1
|
Group 2
|
Group 3
|
|---|---|---|---|
|
Group 1
|
O
|
O*
|
▲
|
|
Group 2
|
X
|
O
|
Migrating from DSM 7.x to DSM 7.x: O*
Migrating from DSM 6.2 to DSM 7.x: ▲ Migrating from DSM 6.2 to DSM 6.2: ▲ |
|
Group 3
|
X
|
Migrating from DSM 7.x to DSM 7.x: O*
Migrating from DSM 6.2 to DSM 7.x: ▲ Migrating from DSM 6.2 to DSM 6.2: ▲ |
O – Using HDD migration to migrate between these package architectures is safe.
▲ – Re-configuring package settings is required after migration. Original package data and tasks are lost.
X – Using HDD migration to migrate between these package architectures is not recommended. Doing so might result in all DSM configurations and package settings being lost after migration. Only user data in the volumes will remain intact.
* – Repairing packages is required after migration. Original package data and tasks will remain intact.
2.2 Migration via Migration Assistant
If you wish to replace all hard drives along with replacing your old Synology NAS, Migration Assistant simplifies the migration process by allowing you to migrate data (volumes and block-level LUNs), packages, and system configurations, without the hassle of manually moving hard drives to your new Synology NAS. However, there are some restrictions for this migration method:
- Please refer to this article for the list of models that are supported by Migration Assistant. If the models of your source and destination Synology NAS are not supported, we recommend migrating via Hyper Backup.
- The DSM version on the destination device will remain unchanged.
- Migration Assistant does not support High Availability cluster, SSD cache, MailPlus cluster, and Time Backup. Please remove those services on the source Synology NAS before migration.
2.3 Migration via Hyper Backup
This migration method allows you to migrate data, packages, and system configurations with several backup tools and has less restrictions. Therefore, this method is recommended if you are unable to use the above two migration methods.
3. HDD migration
This section explains steps to migrate data via HDD migration. You may choose to either migrate between different Synology models or identical models. Before you attempt this procedure, please make sure you have read through the requirements and limitations in Section 1.2 Always back up your data and Section 2 Choosing the right migration method for you to avoid any accidental data loss. If you have any questions, please contact us before proceeding. Additionally, please note that this method requires reinstalling DSM and all packages on the destination Synology NAS, which will result in losing the following data:
- The database of LDAP Server (formerly Directory Server)
- Photo Station/blog content
- Auto-block settings
- Video info content in Video Station
- Mail Server and Mail Station settings
- Surveillance Station settings
- Download Station tasks and temporary storage
- All media files will be re-indexed after migration
Before you start:
- Make sure both Synology NAS models are plugged into a power outlet and connected to the same network as your computer.
- Please remove Time Backup on the source Synology NAS first to prevent any error occurring on the destination Synology NAS after migration.
3.1 Migrating between different Synology NAS models
This section explains how to perform migration between different Synology NAS models.
-
- Sign in to the source Synology NAS.
- Go to Control Panel > Update & Restore.
- Make sure the source Synology NAS is running the newest version of DSM. If a newer version is available, please download and install before continuing.

- Go to the Configuration Backup tab and click Back up configuration. A configuration file named [DiskStation Name]_[Created Date].dss will be downloaded to your computer. Keep this file in a safe place.
- If you need to back up any data mentioned above, please go to Hyper Backup and click the Create icon > Data backup task. Follow the wizard instructions and continue to the next step once the data is successfully backed up.
Important:
- If you are migrating HDD between two different Synology NAS models, you need to use Hyper Backup to backup your data first.

- Shut down both Synology devices. Wait for both Synology devices to shut down completely.

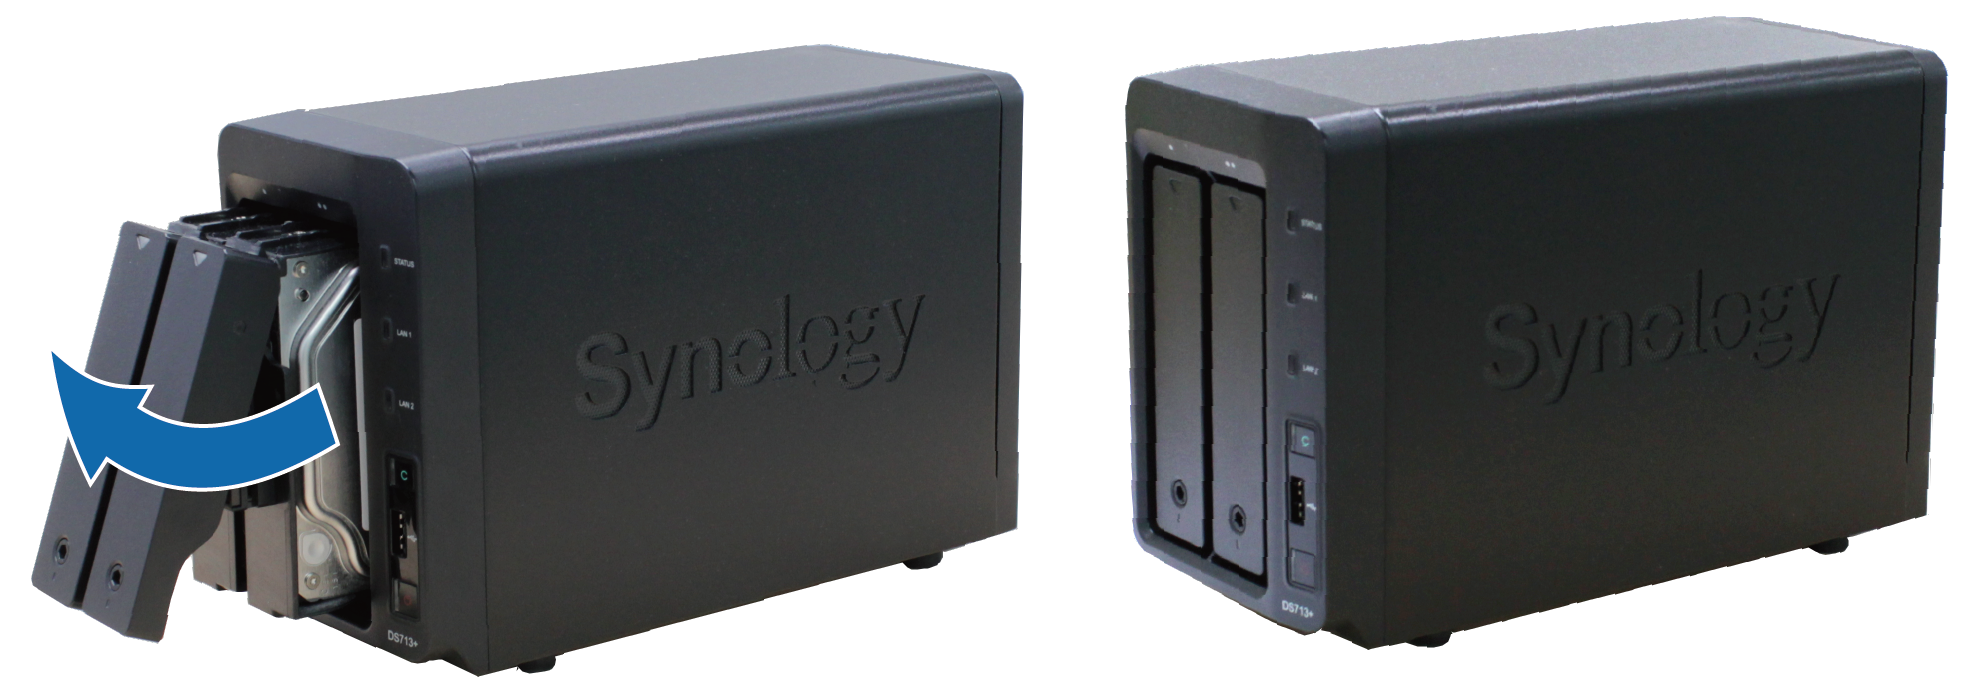
- Remove the hard drives from the source Synology NAS. Please take note of the order each hard drive was installed in.

- Install the hard drives in the destination Synology NAS. Hard drives must be installed in the same order as they were installed in the source Synology NAS. For details regarding drive slot numbering, please refer to the Quick Installation Guide available in Synology’s Download Center, or try checking on the drive slots of your Synology NAS.

- Turn on the destination Synology NAS and wait for it to boot up.

- Open a web browser on your computer and go to find.synology.com.
- Find the destination Synology NAS and double-click it.

- The status of the destination Synology NAS should be Migratable. Click Install to continue.
Important:
- If you see a warning message, similar to Note: All data on the hard drive(s) will be deleted, this means data on the installed hard drives will be deleted. In this case, please stop, close the browser, and make sure you have installed hard drives in the same order as they were installed in the source Synology NAS.
- Choose the option to migrate files and settings.
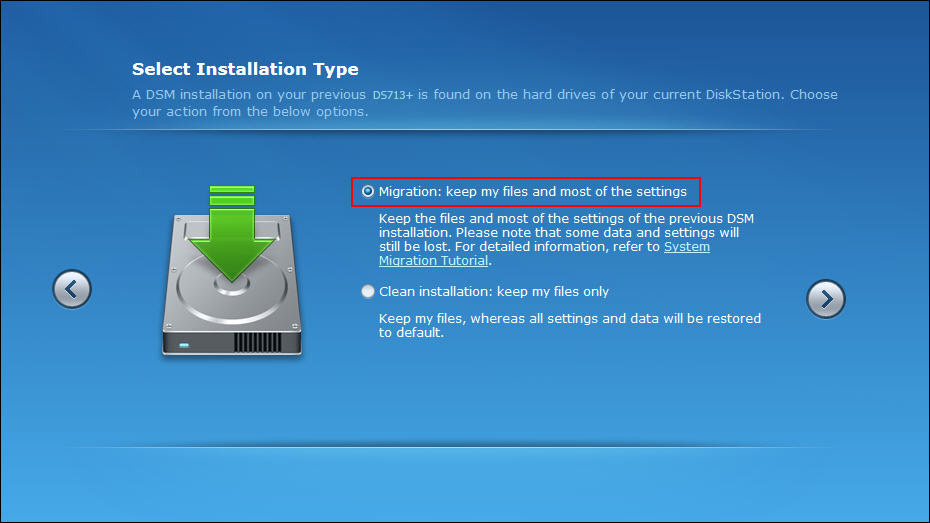
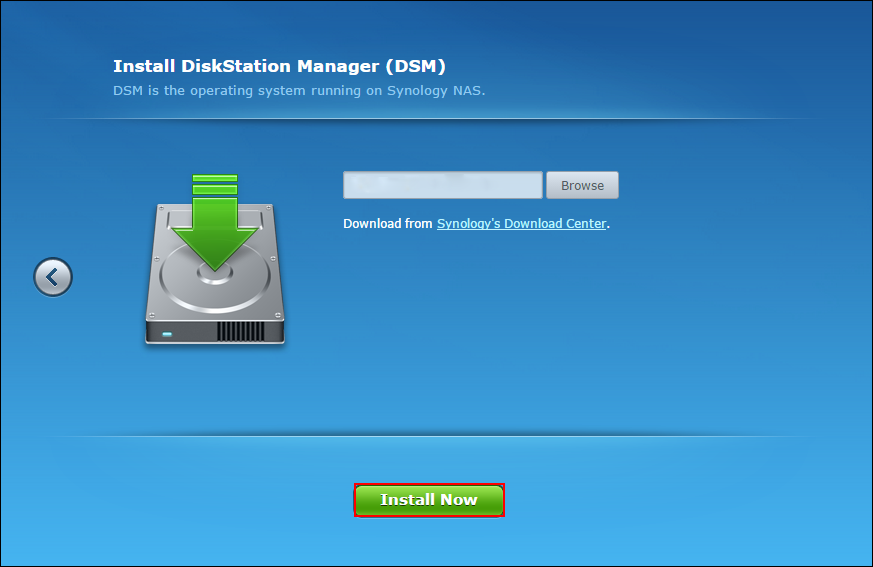
- Choose the option to download and install the newest version of DSM.
- Enter a new password for the admin account and click Install Now.
- Once installation is complete, sign in to the destination Synology NAS.
- Go to Control Panel > Update & Restore.
- Go to the Configuration Backup tab and click Restore configuration.

- Click Browse and choose the backup file that you saved on your computer earlier. Click OK.

- Choose the All System Configurations option. Click OK.
- A warning message will appear. Click YES to confirm.
- Wait for system configurations to be restored. When finished, your data will be successfully migrated to the destination Synology NAS.
Note:
- During the migration procedure described above, you might encounter a warning message when using Synology Assistant to install DSM on the destination Synology NAS. There are two messages that are likely to show up, depending on the situation:
- Note! All data in the hard drive(s) will be deleted
- Note! All data on the hard drive(s) [number] will be deleted
If you see any of the above-mentioned warning messages, please abort the migration procedure immediately, and try performing migration via Hyper Backup.
3.2 Migrating between two identical Synology NAS models
This section explains how to perform migration between two identical Synology NAS models, for example, migrate from an old DS713+ to a new DS713+.
Before you start:
- Prepare a temporary SATA hard drive. This temporary hard drive will be used to update DSM on the destination Synology NAS.
- Make sure both Synology NAS are plugged into a power outlet and connected to the same network as your computer.
- Make sure the source Synology NAS is running and the destination Synology NAS is turned off.
- Sign in to the source Synology NAS.
- Go to Control Panel > Update & Restore.
- Make sure the source Synology NAS is running the newest version of DSM. If a newer version is available, please download and install before continuing.
- Install the temporary hard drive in the destination Synology NAS.

- Turn on the destination Synology NAS and wait for it to boot up.

- Open a web browser on your computer and go to find.synology.com.
- Find the destination Synology NAS and double-click it.

- The welcome screen is displayed. Click Next to continue.
- Use Synology’s Download Center to download and install the newest version of DSM. Click Install Now to continue.
- Continue installation by creating an administrator account. Click Next to continue.
- When installation is complete, shut down both Synology devices. Wait for both Synology devices to shut down completely.

- Remove the temporary hard drive from the destination Synology NAS.

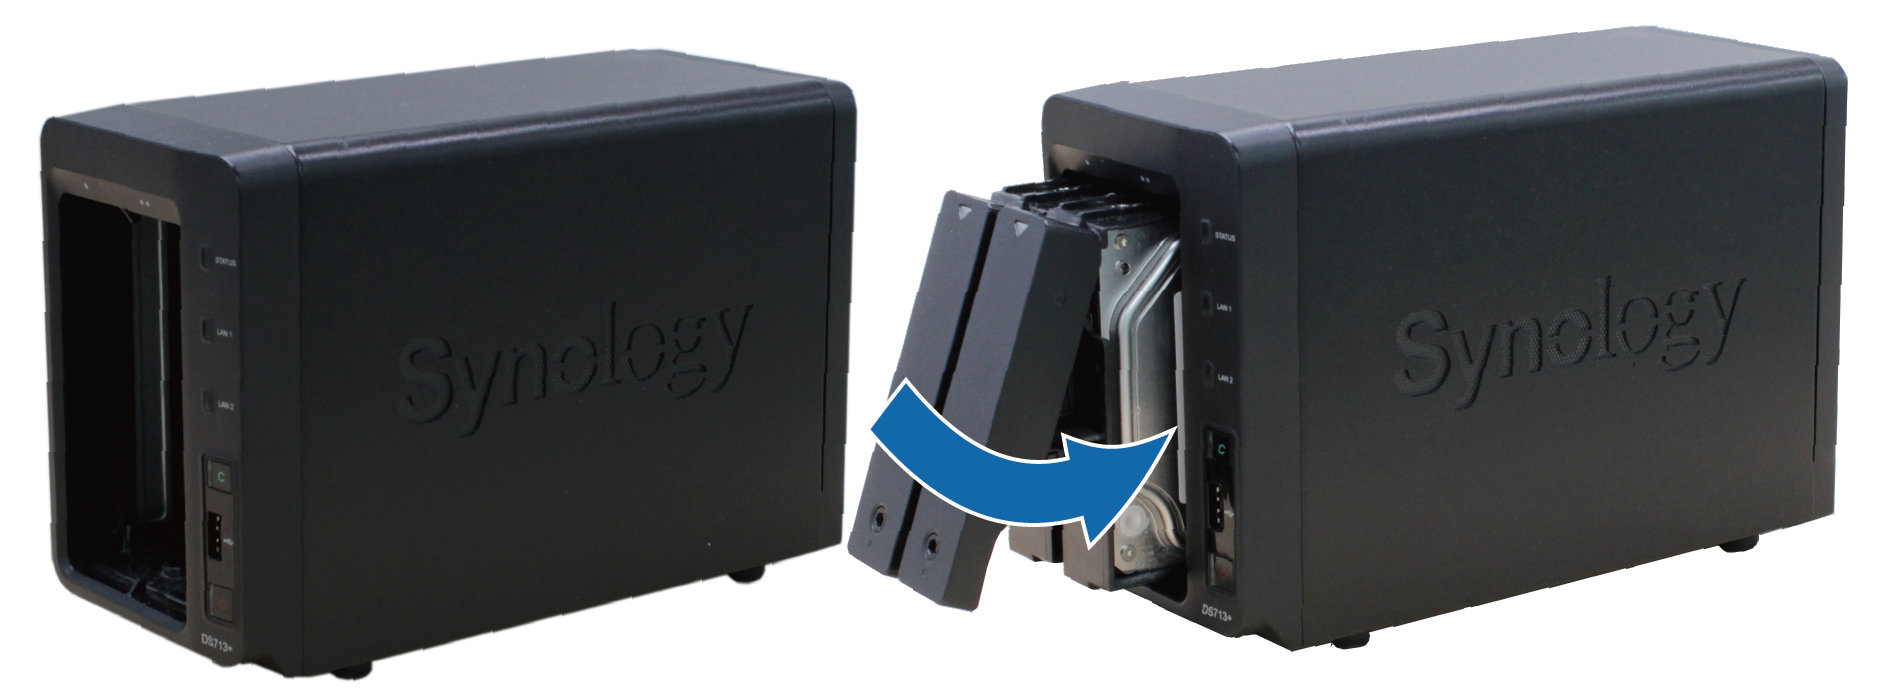
- Remove the hard drives from the source Synology NAS. Please take note of the order each hard drive was installed in.
- Install the hard drives in the destination Synology NAS. Hard drives must be installed in the same order as they were installed in the source Synology NAS.
- Turn on the destination Synology NAS and wait for it to boot up. Sign in to DSM and your data will be successfully migrated to the destination Synology NAS now.
4. Migration via Migration Assistant
This section explains how to migrate your Synology NAS via Migration Assistant. The simple setup wizard in Migration Assistant will guide you through the processes of copying volume/LUNs, data and settings of packages, and system configurations from one Synology NAS to another without migrating hard drives. Before you attempt to migrate via Migration Assistant, we recommend checking the conditions for this method again and paying special attention to Before you start and Important sections below to prevent accidental data loss.
Before you start:
- On the source device:
- The DSM version on the source device must be DSM 6.0 or above. However, we recommended upgrading to DSM 6.0.3, 6.1.7, or 6.2.2.
- If the source device has set up High Availability cluster, SSD cache, MailPlus cluster, or Time Backup, please remove them first.
- On the destination device:
- Set up and install DiskStation Manager on the destination Synology NAS. The DSM version must be DSM 6.2.2 or above.
- Set up storage pool(s) in Storage Manager first, as data will be migrated on a volume/block-level basis. The total capacity of storage pool(s) must be larger than the total capacity of all volumes on the source device. For more information on how to create storage pool, please refer to this page.
- Please make sure that the data on the destination device does not need to be retained, and then go to Control Panel > Shared Folder and iSCSI Manager on the destination device to manually remove shared folders and LUNs first.
- We recommend setting up the destination device in the same local network as the source device.
- To ensure a stable and fast migration, we recommend connecting the two devices directly via 10G interface and cable.
- To learn more about the requirements and limitations of Migration Assistant, please refer to online help.
Important:
- The following items will be migrated by Migration Assistant:
-
- Data (migrated on a volume/block-level LUN basis)
- Packages, package settings, and package data
- System configurations
Note:
- Firewall and DHCP server settings will be migrated. However, these services will be set to disable on the destination device by default.
-
- The following items will NOT be migrated:
- The DSM version on the destination device will remain unchanged
- Synology Account settings
- Licenses
- Network settings in Control Panel
- Server name, Default gateway, IPv6 default gateway in General tab
- Network Interface (except for VPN profile, IPv6 Tunneling, MTU value in IPv4 settings, and 802.1X)
- Static Route
- External Access settings in Control Panel
- Push Service settings in Control Panel > Notification
- Desktop widget and taskbar settings
- Virtual Machine Manager’s settings
- To ensure all services (especially the following ones) on the destination Synology NAS can take over the services on the source Synology NAS, and will work properly on the destination Synology NAS, manual configuration will be required after migration. Please refer to this article to manually configure them after migration is complete:
- Services such as QuickConnect, DDNS, DHCP Server, SSO Client, domain clients
- Server-related packages such as Central Management System (CMS), Synology Directory Server (formerly Active Directory Server), VPN Server, MailPlus
- Sync-related and backup-related packages such as Synology Drive Server, Cloud Station Server, Active Backup for Business, Hyper Backup, Shared Folder Sync, Snapshot Replication, Cloud Sync, Glacier Backup
- Other packages such as Surveillance Station, Docker, Virtual Machine Manager
To copy data across the Synology NAS:
- Sign in to the destination Synology NAS.
- Open Package Center. Find and install the package Migration Assistant.
- The Migration Wizard will be automatically launched the first time you open Migration Assistant, and it will guide you through the migration task setup process.
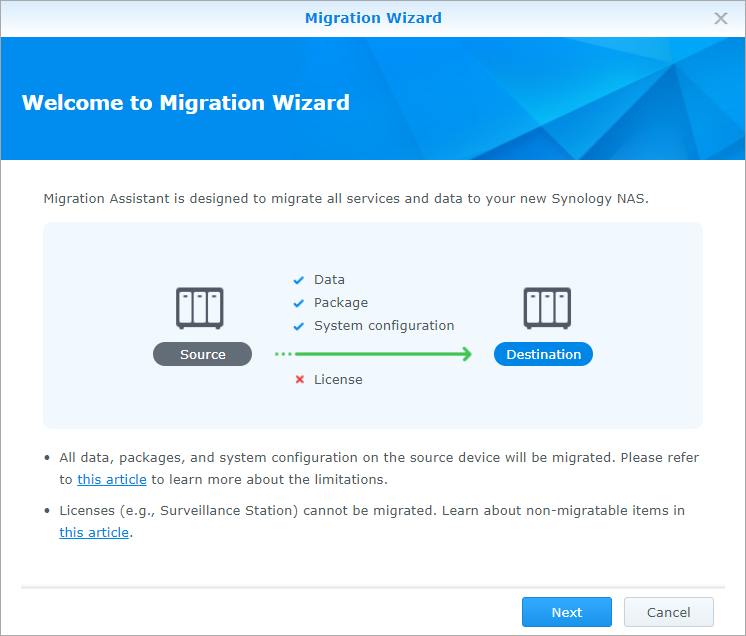
- Please read through the information on the welcome page, and then click Next.
- Enter your source device’s IP or server name, admin account, and password. Click Next.

- The system will conduct an initial check. If Migration Assistant detects issues with either the source or the destination devices, you are required to resolve the issue first before continuing. Below is an example of the message you may receive.

- You may also see messages similar to the below image. This is to inform you that some changes on either the source or the destination devices may require your attention (e.g., certain packages will need an update after migration or schedule settings in Snapshot Replication on the source device will be deleted), or network settings on either devices should be changed. However, with these issues, you can still continue without resolving them first. Click Next.

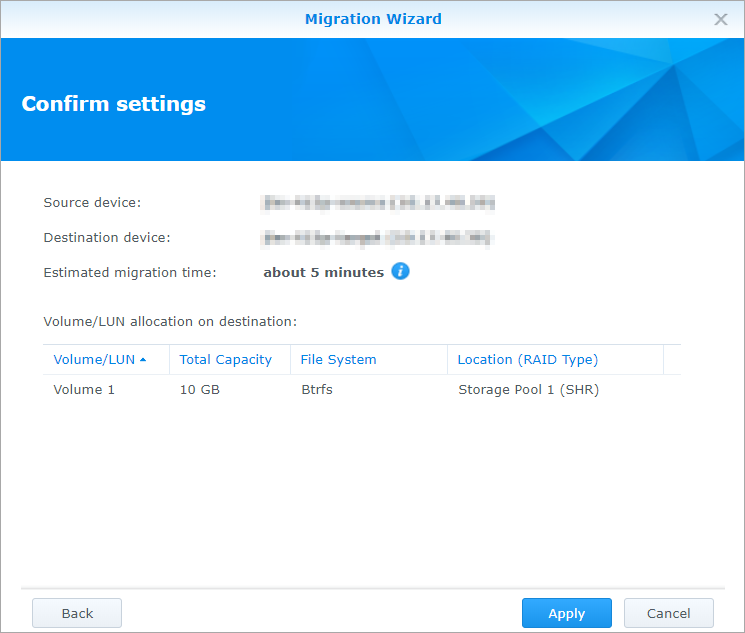
- Confirm the settings. Click Apply to begin the migration task.
- A dialogue will appear to confirm the actions that will be taken. Click Continue.

- To double confirm the actions, you will be asked to enter the password of the account you’re currently signed in to. Click Submit after entering the password and begin the migration process.

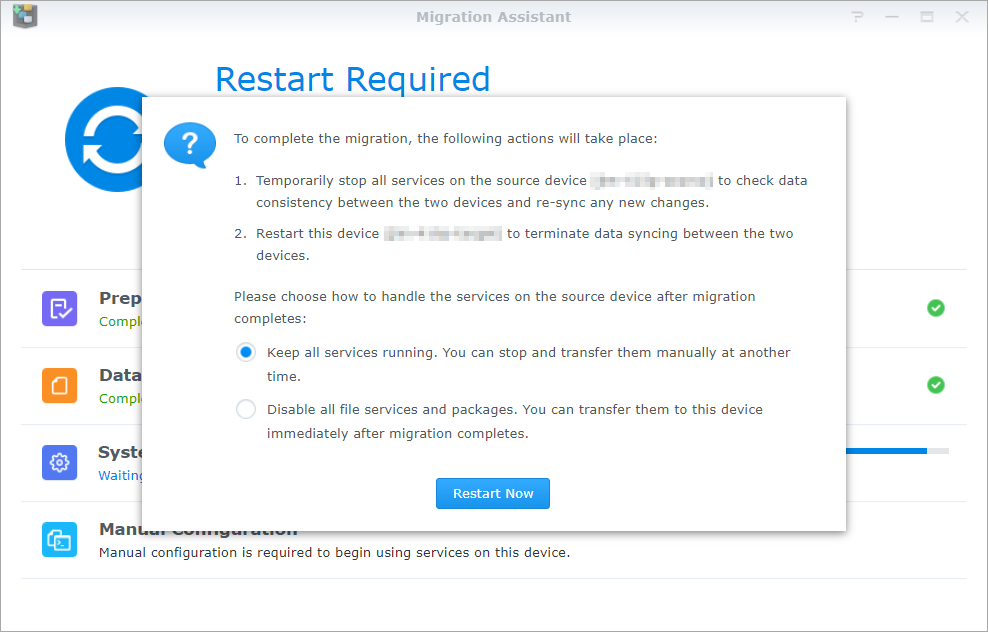
- At the end of the System phase, a dialogue will appear when it is time to restart the destination device. Before restarting the destination device, choose how to handle the services on the source device:
-
- Keep all services running. You can stop and transfer them manually at another time. All packages and services on the source device will be available after the migration completes. Choose this option if you would like to configure additional settings (e.g., set up firewall rules), or continue using the source device for a while before switching to the destination device at a later date. Please note that any modifications made to the source device will not be transferred after restarting the destination device.
- Disable all file services and packages. You can transfer them to this device immediately after migration completes. This option will stop all file services and packages on the source device after clicking Restart Now. This helps to prevent any modifications to be made on the source device from this point forward. Choose this option if you would like to replace the source device with the destination device right away.
- After the migration has succeeded, the destination device will require manual configuration to take over all services from the source device. A dialogue will appear with details of which services will require manual configuration. Click Learn more on the right for detailed information. You can also refer to this article for a complete guide to ensuring all services will work properly on the destination device.

-
The following actions CANNOT be performed during the migration process:
- Disabling the SSH service on the source device.
- Editing or removing the user account named Migration Assistant on the source device. This account was automatically created by Migration Assistant for the migration task and will be removed after the migration task is completed.
- Changing the storage location of packages on the source device.
- Changing any settings on the destination device.
- Adding or removing volumes or Block-Level LUNs on either source or destination device.
- Editing the administrator account (such as disabling the account or changing the password) which is being used to connect to the source device.
- Creating or deleting Bond on either source or destination device.
- Enabling or disabling Open vSwitch on either source or destination device.
5. Migration via Hyper Backup
This section explains how to migrate your Synology NAS with Hyper Backup, with or without network connection. You can copy data from one Synology NAS to another without going through the hassle of migrating hard drives.
To copy data across the network:
Before you start:
- Set up and install DiskStation Manager on both Synology NAS. Connect them to the same network as your computer.
- Sign in to the destination Synology NAS, go to Storage Manager > Volume, and make sure there is a volume with twice the amount of storage capacity as the amount of data on your source Synology NAS. For example, if you want to migrate 100GB of data from your source Synology NAS, then your destination Synology NAS must have a volume with at least 200GB of storage capacity.
- You must install Hyper Backup on your source Synology NAS while the destination Synology NAS must have both Hyper Backup and Hyper Backup Vault installed.
- Hyper Backup supports backup and restoration of many packages, including Surveillance Station, DNS Server, Synology Directory Server (formerly Active Directory Server), and more. Yet some packages are not supported. For these packages, please re-install them on the destination device after migration is complete.
- To learn more about the requirements and limitation of Hyper Backup, read online help.
-
- Sign in to the destination Synology NAS.
- Open Control Panel.
- Go to File Services > rsync and tick the Enable rsync service box. Then click Apply.

- Now sign in to the source Synology NAS.
- Go to Hyper Backup.
- Click the Create icon > Data backup task.
- Choose the Remote Synology NAS option. Then click Next.

- Enter the server name or IP address, admin account, and password of the destination Synology NAS. You can also quickly find the destination Synology NAS by clicking the arrow in the Server name or IP address text field. Specify which shared folder to back up data to and a directory that will be created (e.g. DiskStation_1). Then click Next.

- Tick the box of each folder you want to back up. Then click Next.
- Tick the box of each application you want to back up. Then click Next.
- Click Next and follow the wizard instructions.
- Wait for the backup task to finish backing up data to the destination Synology NAS.

- Now sign in to the destination Synology NAS.
- Open Hyper Backup.
- Click the Restore icon and choose Data.

- Select Restore from existing repositories.

- Select Local folder & USB as the restoration source.

- Choose a shared folder as the backup destination for files from the source device.
- In this example, we will choose to Restore system configuration and tick All System Configurations because we want to restore all settings from the source Synology NAS. Click Next.

- In this example, we will tick Shared Folder because we want to restore all shared folders from the source Synology NAS. Click Next.

- In this example, we will restore data of Photo Station. Click Next.

- A confirmation message may appear depending on which packages you selected to restore. Click Yes to continue.
- A summary of the restoration task appears. Click Apply to continue.
- Wait for the data to be restored to your destination Synology NAS. Click OK to finish. Once you have confirmed all data and settings have been successfully copied and restored to the destination Synology NAS, you can delete the shared folder used to restore the data.
Making an offline backup to another storage device:
Aside from the method above, if your Synology NAS is not connected to the internet, you can also copy data from the source Synology NAS to a storage device, and then copy the data from the storage device to the destination Synology NAS.
Before you start:
- Make sure you are using the latest DSM and Synology Assistant. Both are available at Synology’s Download Center.
To back up configurations:
- Sign in to the source Synology NAS.
- Go to Control Panel > Update & Restore.
- Go to the Configuration Backup tab and click Back up configuration. A configuration file named [DiskStation Name]_[Created Date].dss will be downloaded to your computer. Keep this file in a safe place.
To back up data:
- Sign in to the source Synology NAS.
- Go to Hyper Backup.
- Click the Create icon > Data backup task to back up data on the source Synology NAS.
- Remove the external storage device.
- Now sign in to the destination Synology NAS. Make sure you have connected the external storage device to the destination Synology NAS.
- Open Hyper Backup.
- Click the Restore icon and choose Data to copy the data from your storage device to the destination Synology NAS.
- Follow steps 13 to 24 in To copy data across the network.
Important:
- Make sure you complete the steps above before continuing.
To erase data on your drives:
- Remove the drives from the source Synology NAS.
- Delete all partitions and data on the drives by doing any of the following:
- Install the drives into your computer, and then use the computer’s disk utility to delete all partitions on the drives. Deleting data on drives with your computer should lower the chances of errors occurring. After that, install the drives into the destination Synology NAS.
- Install the drives directly into the destination Synology NAS and let Synology Assistant delete partitions and data on the drives during DSM installation.
To install DSM and restore configurations:
- Open a web browser on your computer and go to find.synology.com.
- Find the destination Synology NAS and double-click it.
- The welcome screen is displayed. Click Next to continue.
- Use Synology’s Download Center to download and install the newest version of DSM. Click Install Now to continue.
- Continue installation by creating an administrator account. Click Next to continue.
- Once installation has finished, sign in to the destination Synology NAS.
- Go to Control Panel > Update & Restore.
- Go to the Configuration Backup tab.
- Click Restore configuration to upload and restore configurations using the backup file you exported earlier.
- Open Hyper Backup.
- On the bottom left corner, click Restore and choose Data to copy the data from your storage device to the destination Synology NAS.


