NAS Windows Server – How to Create a New User Account and a New Share
How to create a user on the Local machine and join a domain
Once the user has been created and configured on Windows server, next step is to connect local machnes to the domain.
To do so, first go to your system setting by simply searching system on the taskbar and clicking System /Control Panel.
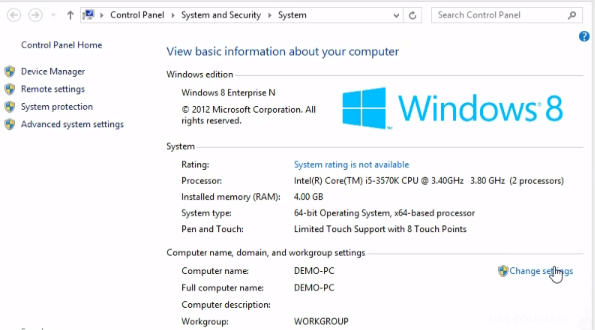
Then click Change Settings button which will take you to System Properties.
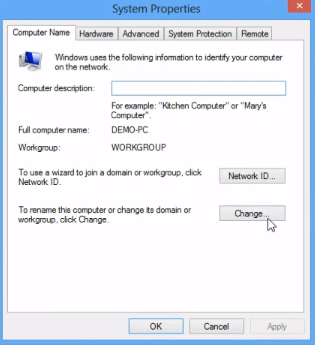
Click Change on the System Properties window which will take you to domain settings.
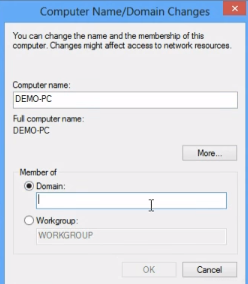
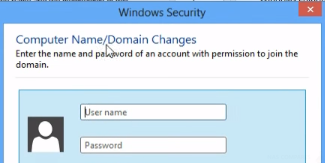
Click on Domain field and type in your domain name you want to connect to. Then Log into Domain using credentials created earlier while creating users on the server.
Buffalo WSS 2012 range
| WS5200 | WS5400 | WS5400RRS2 | WS5600 | WS5610 | |
| Bays | 2 | 4 | 4 | 6 | 6 |
| CPU | Intel® Atom™ D2550 dual core | Intel® AtomTM D2700 | Celeron™ J1900, quad, 2 GHz | ||
| RAM | 4GB DDR3 | ||||
| LAN | 2X RJ-45 1Gb/s | ||||
| Internal OS | 2012 R2 Workgroup (up to 50 users) | 2012 R2 Standard (unlimited users) | |||
| RAID | RAID 0/1, Spanning, JBOD | RAID 0/1/5, Spanning, JBOD | Hardware RAID 0/10/5/6 | ||
| Serial | 1x D-SUB 9 Pin for UPS | ||||
| eSATA | No | No | No | No | Yes |
Buffalo WSS 2016 range
| WS5420RN | WS5220DN | WS5420DN | WSH5610 | |
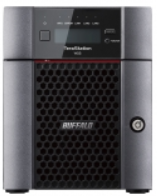 |
||||
| Bays | 4 | 2 | 4 | 6 |
| CPU | Intel Atom C3338 | Celeron™ J1900, quad, 2 GHz | ||
| RAM | 8GB DDR4 ECC | 8GB DDR3 | ||
| LAN | 2x 1Gbe + 1x 10GbE | 2x 1GbE | ||
| Internal OS | WSS 2016 Standard Edition | WSS 2016 Workgroup Edition | WSS 2016 Standard Edition | |
| RAID | Hardware RAID 0/10/5/6 | |||
| Serial | 1x D-SUB 9 Pin for UPS | |||
| eSATA | No | No | No | Yes |
| HDMI | No | No | No | Yes |

