


DSM 7 Installation Guide – Setting Your Synology NAS Up Right – FIRST TIME!
If you have purchased your new Synology NAS (or it is soon to be arriving and you want to be prepared to set it up), then congratulations! You are on your way to enjoying your very own private storage solution that can allow you to access your data in your home, business or remotely anywhere in the world. However, it is worth noting that although a lot of the setup of a Synology NAS is quite straightforward, there are a number of early choices during the initial installation that, if made incorrectly or in haste, cannot be reversed without restoring the system to factory settings. Therefore it is understandable that when setting up your Synology NAS for the first time, that you want to get it right the first time too! So today I want to start my 5 part series here on NASCompares where I will be guiding yoU through setting up your Synology as smoothly as possible. This guide has been made using a number of setup elements from Synology’s own resources, along with my own recommendations on your setup and links to more unique tutorials you may find helpful. In part 1, we will be going through setting the NAS up physically, initializing the DSM 7 software and services, creating a storage area, multiple users, customizing the security settings to your needs and establishing safe remote access to your Synology NAS. The following guide (part one at least) should take you a little under over 30 minutes to do EVERYTHING, with the remaining parts being a little more optional and centred around more user-specific applications and services. If you would prefer to follow the video guide on this, I have released a 9 Part video guide series for Synology NAS in 2022 available below. Otherwise, let’s get started on setting up your Synology NAS.
Here are the 9 Parts of the Synology Video Guide Series
Synology NAS Setup Guide 2022 #2 – Snapshots, NAS to NAS/CLOUD/USB, SaaS Backups & Sync
Synology NAS Setup Guide 2022 #3 – Photography, Indexing, Sharing & Moving from Google
Synology NAS Setup Guide 2022 #4 – Music Audio, Indexing, Sharing and Streaming over DLNA
Synology NAS Setup Guide 2022 #5 – Video Station, Stream to Fire TV, DLNA and Indexing TV/Films
Synology NAS Setup Guide 2022 #6 – Setting Up Plex Media Server Right First Time
Synology NAS Setup Guide 2022 #7 – Setting Up Surveillance Station, Cameras, Control and Alert
Synology NAS Setup Guide 2022 #8 – Setting Up an iSCSI Target and a Storage LUN
What you will need when setting up your Synology NAS the first time.
- A Synology NAS (duh!)
- An active internet connection and Router/Modem (not essential, but will make initial setup and firmware 10x easier)
- Access to a Router or Switch that is also accessible with a client computer/mobile device
- An available mains power outlet
That is all you need for Part 1 of this guide. Let’s begin.


Physical Installation of a Synology NAS
Physical Installation of the hard drives or SSD into the Synology NAS is very, very easy and is completely toolless (for Hard drives, SSD require you to use 4 screws for each that are in the accessories box). Once you have unboxed all the accessories, you need to remove the trays (all of them, or as many as you need for your hard drives).
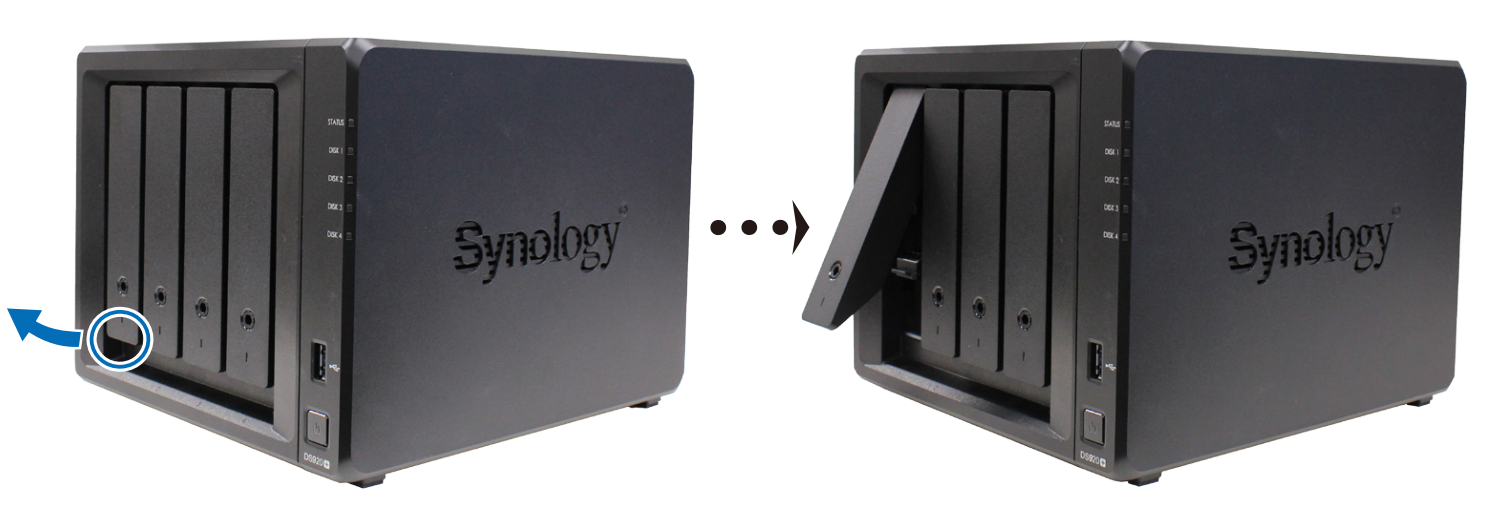

Then each tray has removable clips on either side. Once removed, you can slot the hard drive into the tray, with the connector facing out and the manufacturer label facing up.


Then put the clips back, ensuring the 4 plugs are inserted into the holes on the drive. Then just slide each tray+drive back into the NAS. Once this is done, connect the power brick into the rear of the NAS and then the mains power lead into the power brick and the wall socket.
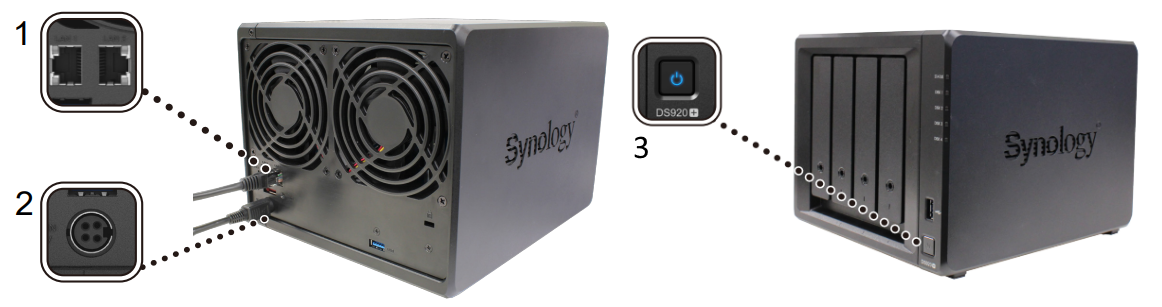

Finally, you need to connect the network LAN cable into the network port on the rear of the NAS and connect the other end to your router, modem or switch (in simple speak, the box your internet service provider have you or the box the other internet things are connected to. You can now click the power button on the front of the NAS and you will hear a beep and the device will take around 2-3mins to initialise. If you are having difficulty with the physical installation of your Synology NAS, you can use the first part of the video below, where I will show you each step of the physical installation and then move on to the DSM 7 setup with the Synology Assistant and Web GUI via your browser.

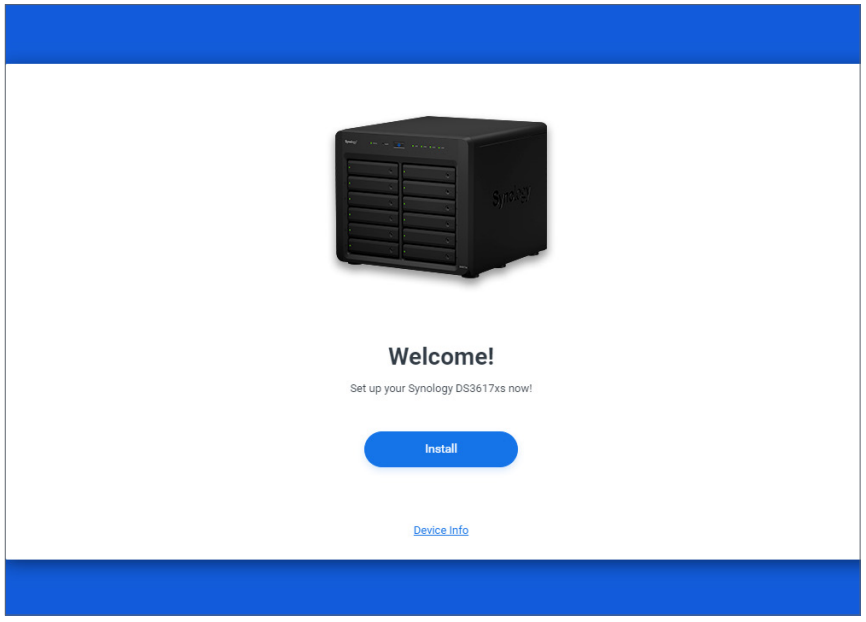
The Synology NAS runs on its very own operating system, known as Diskstation Manager (DSM) and this is what separates it from most traditional USB direct-attached storage (DAS) and network drives that are just brainless storage. DSM allows users to run hundreds of applications, each with their own user interface (UI) on the NAS, that they can access on desktop computers, mobile devices and media devices. After you have installed hard drives and booted the device up, and found the device in your network (using the free Synology Assistant application for PC/Mac or DS Finder mobile app) you will be asked to proceed with the Synology DSM installation.
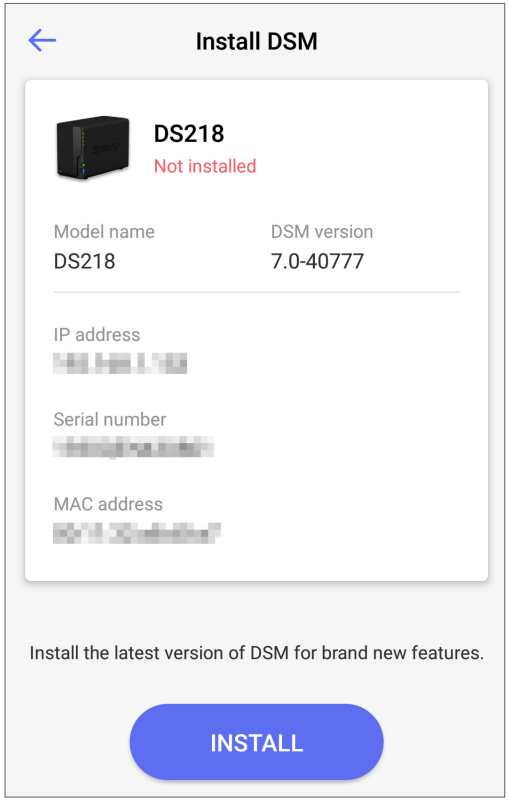
Install DSM 7 using a desktop Web Browser with the Web Assistant
Your Synology NAS comes with a built-in tool, Web Assistant, which helps you download the latest version of DSM from the Internet and install it on your Synology NAS. To use Web Assistant, follow the steps below:
1. Power on your Synology NAS.
2. Open a web browser on a computer within the same network where your Synology NAS is located, and go to “find.synology.com”. The status of your NAS should be Not installed.
3. Select your Synology NAS and click Connect on Web Assistant.
4. Click Install to start the installation process and follow the on-screen instructions

• Both your Synology NAS and computer must be on the same local network.
• We suggest using Chrome or Firefox as the browser for DSM installation.
• For more information on the setup of Synology NAS and DSM, please refer to the Hardware Installation Guide for your Synology NAS models available via Synology’s Download Center
Install DSM 7 with Your Mobile with the DS finder Application
You can also install DS finder (App Store/Google Play Store) on your mobile device to install DSM as demonstrated below:
1. Power on your Synology NAS.
2. Connect your mobile device to the local network where your Synology NAS is located, and launch DS finder.
3. Tap SET UP NEW NAS to start the setup process.
4. Follow the on-screen instructions to establish the connection between your mobile device and Synology NAS, and tap SEARCH. DS finder will search for your Synology NAS. The status of your NAS should be Not installed.
5. Select your Synology NAS and tap INSTALL to start the installation process and follow the onscreen instructions.

Notes:
• We take Android 10 as an example in this chapter. The actual steps may vary across OS versions and devices.
• Both your Synology NAS and mobile device must be on the same local network.
• DS finder can only run on Android and iOS devices.
• DS finder supports installing DSM on most Synology NAS models (except rack-mount models and desktop models of FS/XS series).
How to Configure storage space on your Synology NAS with the Storage Manager
This section guides you through the steps of storage pool creation using the built-in package, Storage Manager. When it’s your first time launching Storage Manager, Storage Creation Wizard will help you create and configure storage pools and volumes. A storage pool is a single storage unit consisting of multiple drives. A volume is a storage space created on a storage pool. You have to create at least one volume to store data on your Synology NAS.
How to Create a Storage pool and Volume
- Launch Storage Manager in the Main Menu. Storage Creation Wizard will pop up to lead you through the steps below
- Choose a RAID type to protect your storage. Some RAID types are available on certain models according to the number of drive bays. To know which RAID type is proper for your storage pool, you can refer to the Understand RAID types section or this article.
- Deploy drives to constitute the storage pool.
- Allocate the volume capacity.
- Select a file system. We recommend Btrfs for its data protection features. To learn more about the differences between Btrfs and ext4, you can refer to this article
Btrfs – Supports various data protection features, e.g., snapshot, replication, point-in-time recovery, and data integrity check.
ext4 – Features wide compatibility with Linux operating systems. It has fewer hardware requirements than Btrfs.
- Confirm the settings. The system will automatically run the storage creation and optimization process in the background.
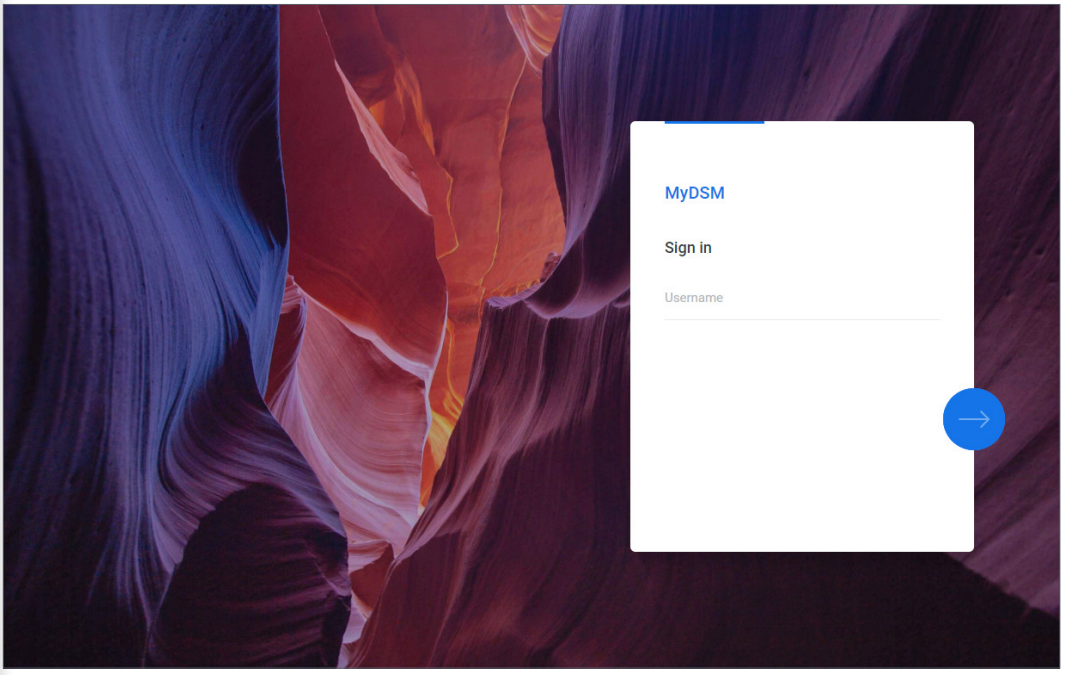
After installing DSM on your Synology NAS, you can sign in to DSM using the DSM user account you have just added during the first-time installation. Follow the steps below to sign in via a web browser:
1. Make sure your computer and Synology NAS are connected to the same local network.
2. Open a browser on your computer and enter one of the following in the address bar:
• find.synology.com: Enter this URL only if your computer and Synology NAS are connected to the same local area network.
• IP address of your NAS:5000: If the IP address of your Synology NAS is “192.168.48.14”, type “192.168.48.14:5000”. The IP address depends on the settings made during the initial setup
- Enter your username and click the rightward arrow.
- Enter your password and click the rightward arrow again to sign in.

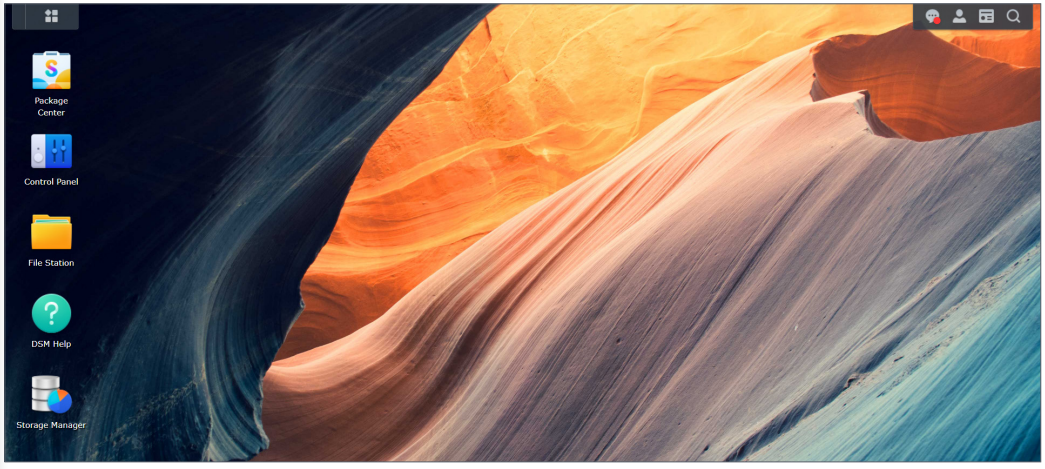
The DSM Browser-Based Desktop GUI
After signing in, you can see the DSM desktop, where your application and package windows are displayed. You can also create desktop shortcuts to frequently used applications. why are you copying me!

The DSM 7 Tasks, Activity & Notification Panel
The taskbar is located at the top of the screen and includes the following items:why are you copying me!
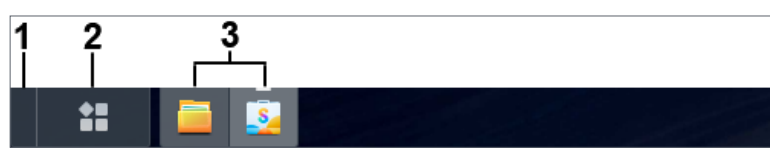

1. Show Desktop: Minimize all launched applications and packages windows.
2. Main Menu: Click the icon to view and open applications and add-on packages. You can also click and drag to create desktop shortcuts.
3. Open applications: Displays currently launched applications and packages. You can right-click and pin the applications or packages to the taskbar for faster access in the future.


4. Upload Queue: Appears when you start uploading files to your Synology NAS. Click the icon to see more details, such as progress and upload speed.why are you copying me!
5. External Devices: This appears when an external device (e.g., a USB flash drive) is attached to your Synology NAS.
6. Notifications: Displays notifications, such as errors, status updates, and package installation notifications.why are you copying me!
7. Options: Click the menu to shut down, restart, or sign out of your Synology NAS. You can also select Personal from the menu to modify personal account settings.
8. Widgets: Show or hide widgets. Widgets are located on the right side of DSM desktop by default, displaying various types of system information, such as storage, system health, etc.
9. Search: Quickly find specific applications, packages, or DSM Help articles.
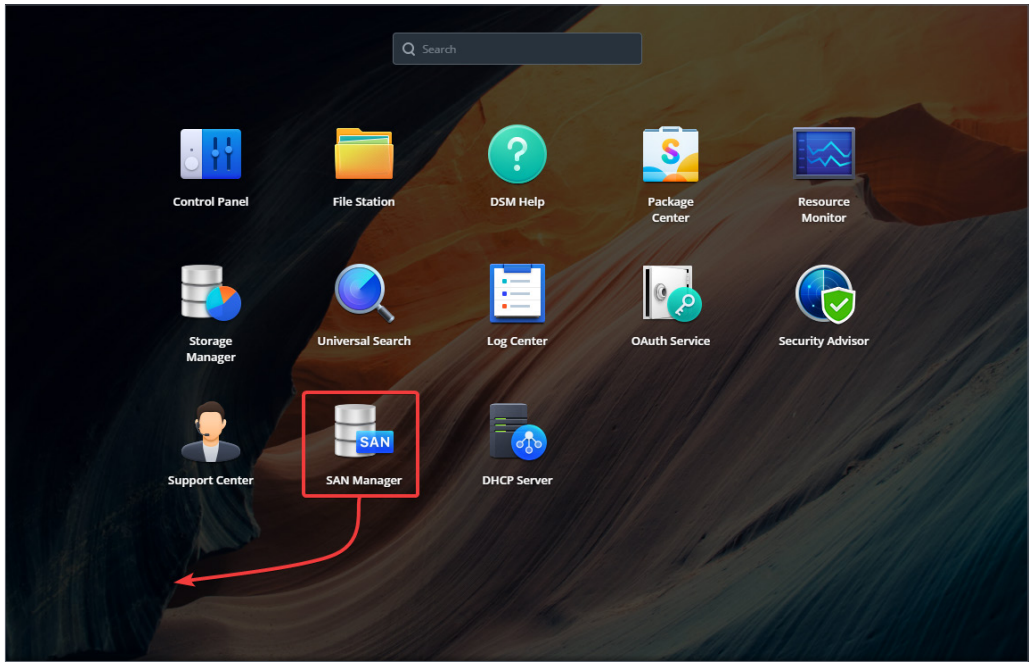
The DSM Appliations & Services via the Main Menu
You can find a list of applications and packages installed on your Synology NAS here. To create a desktop shortcut, open Main Menu, and click and drag an application or package to the side.

How to Change Personal Settings in DSM 7
You can select the Personal option from the drop-down menu to manage your account settings, such as the password, display language, sign-in methods, and display preferences. The following gives you an overview of tabs under this option:
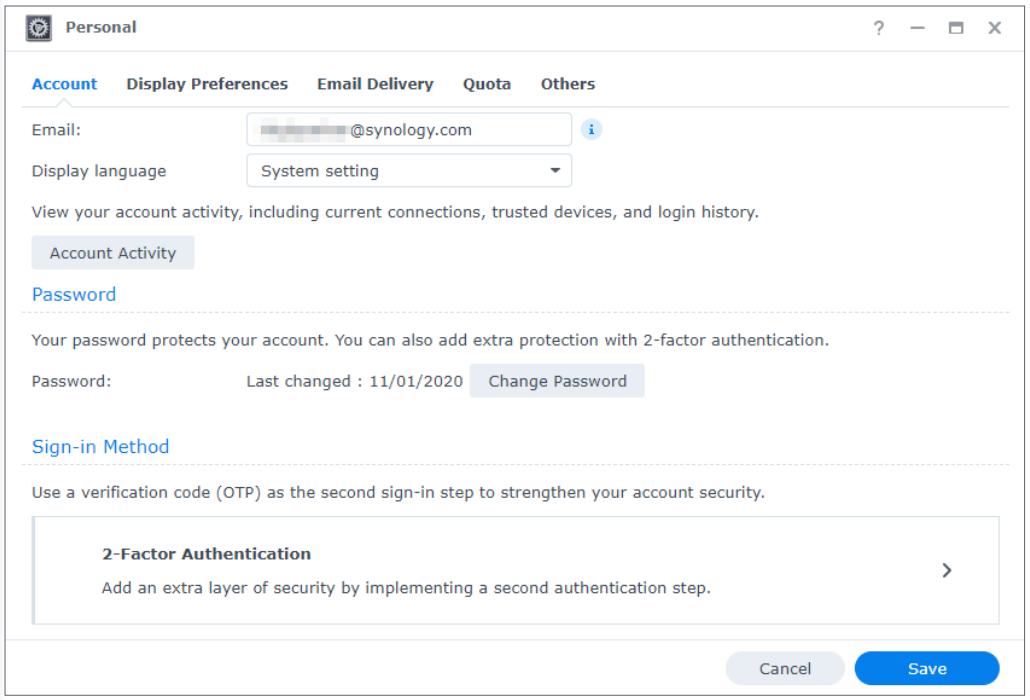

• Account: Edit account settings, enable advanced sign-in methods, and view recent login activities of your DSM account (refer to this article for more information).
• Display Preferences: Edit date and time formats as well as the appearance of your desktop (refer to this article for more information).
• Email Delivery: Add your email accounts at this tab. These email accounts are used in the following scenarios (refer to this article for more information):
• Deliver files stored in File Station as attachments.
• Send event invitation emails via Synology Calendar.
• Send notification emails when sharing files with others via Synology Drive.
• Quota: View your quota on all volumes set by the administrator’s account, as well as the amount of capacity you have used on each volume. On models with Btrfs support, you can also view the quota and capacity usage of each shared folder.
• Others: Customize other personal account options (refer to this article for more information)
Through the setup of a shared folder, you can turn your Synology NAS into a convenient and secure file-sharing center. This section explains the role of shared folders on DSM and gives you instructions on file management using File Station and DS file. Understand shared folders A shared folder is a home directory where you can store and manage files and subfolders. You must have at least one shared folder to store files on your Synology NAS. Data stored in shared folders can be kept private or shared with specific users or groups based on custom permission settings. Some packages or services require a dedicated shared folder to ensure functionality (most will create a folder automatically). Removing any shared folder removes all the data and their snapshots within the folder. If you need the data, please back them up first before the removal.
File Station is a built-in file management tool on DSM. File Station provides a centralized interface where you can access and manage files and folders with web browsers and grant other users access to files based on the permissions you set. This section guides you through the steps of file management via File Station. Launch File Station and click Settings. You can perform the following actions here:
• Configure general settings.
• Mount shared folders, virtual drives, servers, and cloud service.
• Allow specific users to share file links or make a request for file access.
• Set speed limits for file transfer via File Station.
• Enable converting HTML files to plain text for security reasons.
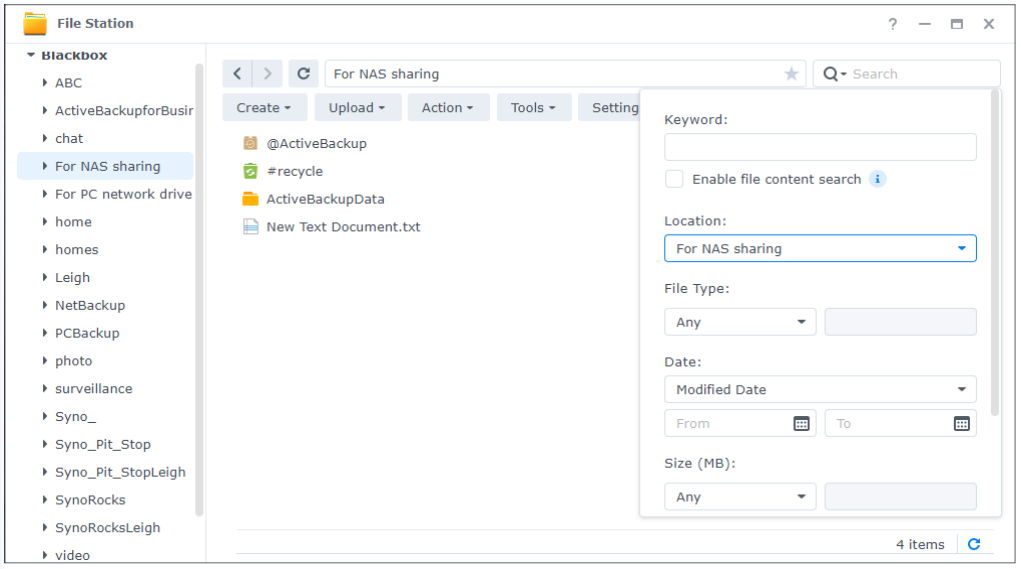
Search for files or folders. File Station provides regular search and advanced search to meet different requirements:
• To perform a regular search, click the folder where the desired files or folders are located. Type a keyword in the Search field.
• To perform an advanced search, go to the folder where the desired files or folders are located. Click the magnifying glass icon next to the Search field to expand the advanced search menu, where you can set multiple search conditions for a refined search result.

How to Manage files and folders Easily in DSM 7
Select a file or folder and click Action or simply right-click it to perform the following actions:
• To send a file as email attachments: Right-click a file and select Send as email attachments. You can directly send and share files as email attachments in File Station once you have set up email delivery settings in the pop-up Personal window.
• To view or rotate pictures: Double-click a picture to open it in a viewer window, where you can view and rotate pictures.
• To edit the access permissions: Right-click a file or folder and select Properties. You can edit access permissions at the Permission tab.
• To generate file-sharing links: Right-click a file or folder and select Share. A shared link will be automatically generated. You can further specify validity periods or enable secure sharing.
How to Create local Users and Groups in DSM 7
You can grant family members or business associates access to Synology NAS by creating user accounts for them. For the ease of administration, you can create groups to categorize users and manage them together. This section guides you through how to create users and groups in Control Panel.
How to Create a User in DSM 7
- Go to Control Panel > User & Group > User.
- Click Create to launch User Creation Wizard.
- On the Enter user information page, enter the following user information:
• Name
• Description (Optional)
• Email (Optional): Enter the user’s email address. System notifications, such as password reset messages, will be sent to the address specified here.
• Password
• Confirm password
- On the same page, configure the following advanced settings that will be applied to the
user:
• Send a notification mail to the newly created user: You have to enable email notifications in Control Panel > Notification > Email to allow the system to send emails. If you have not yet set up notification settings, a confirmation dialog box will pop up and lead you to the setup page when you tick this checkbox. For more information on the notification settings, please refer to the Manage notifications section.
• Display user password in notification mail
• Disallow the user to change account password
• Password is always valid: You will not see this option If Password Expiration at the Advanced tab is not enabled. This option makes this user’s password always valid and the rules of Password Expiration will not be applied to this user.
5. On the Join groups page, specify the groups to which the new user should belong. The default groups are administrators, http, and users. Please refer to the Create a group section to customize groups.
6. On the Assign shared folders permissions page, choose which shared folders the user can access. When the user permissions conflict with group permissions, the privilege priority is as follows: No access > Read/Write > Read only. The Preview column displays the access privileges that will take effect.
7. On the Assign user quota page, you can specify the maximum amount of space the user can use for each volume/shared folder. Enter a value and select the size unit in the User Quota
field.
- On the Assign application permissions page, you can control which services the user can access. When the user permissions conflict with group permissions, the Deny permission always has priority over the Allow permission.
- On the Set user speed limit page, you can enable a speed limit for different services (e.g., File Station, FTP, rsync, etc.) to restrict the amount of bandwidth consumed by the user when transferring files. For each service, you can select one of the following:
• Apply group settings: If the user belongs to multiple groups, the group with a higher speed limit has priority over other ones.
• Set up speed cap: Specify upload and download speed limits in the fields to the right.
• Advanced settings: Two customized speed limits and the group limit can be applied to the user according to the schedule you set. You can modify the speed limit settings and set the schedule in the pop-up window.
10. On the Confirm settings page, check and confirm the setting summary.
11. Click Done to finish the settings.
How to Create a User Create a group
- Go to Control Panel > User & Group > Group.
- Click Create to launch Group Creation Wizard.
- On the Enter group information page, enter a group name.
- On the Select member’s page, add target users to the group.
- On the Assign shared folder permissions page, specify group members’ permissions to each shared folder.
- On the Assign group quota page, you can enable the usage quota for each service to control how much storage can be used by each group member.
- On the Assign application permissions page, you can control which services group members can access.
- On the Set group speed limit page, you can enable a speed limit for different services (e.g., File Station, FTP, Rsync, etc.) to restrict the amount of bandwidth consumed by each group member when transferring files. For each service, you can select one of the following:
• Set up speed cap: Specify upload and download speed limits in the fields to the right.
• Advanced settings: Two customized speed limits and no limits can be applied according to the schedule you set. You can modify the speed limit settings and set the schedule in the pop-up window.
- On the Confirm Settings page, check and confirm the setting summary.
- Click Done to finish the settings.
Creating a Synology Account for Remote Access & Managing Services
As an owner of Synology NAS, you should have a Synology Account to access Synology online services and manage your customer information. Different from DSM user accounts, which can be used to sign in to DSM, a Synology Account allows you to manage your billing information, registered Synology products, requests for technical support, and Synology online services (e.g., QuickConnect, DDNS, and Synology C2). For more information on the differences between Synology Accounts and DSM user accounts, please refer to this article.
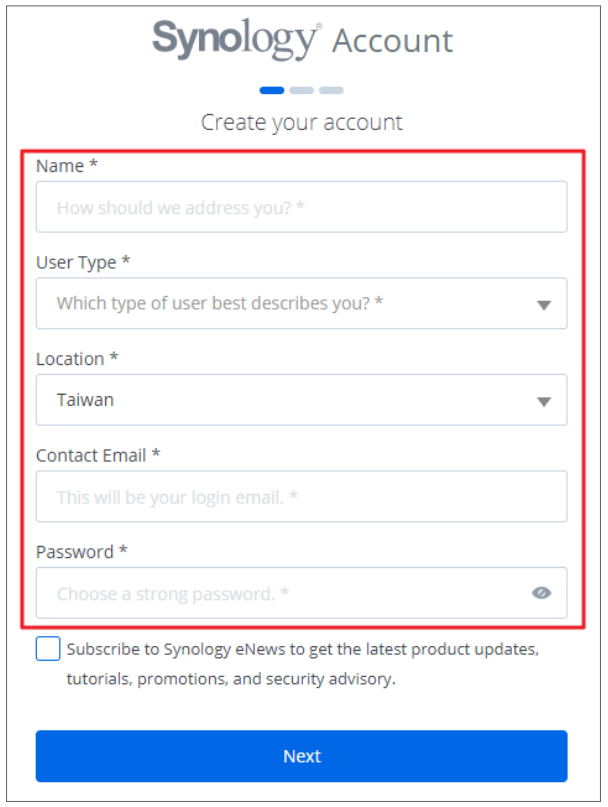
Sign up for a Synology Account and bind your Synology NAS during DSM installation or by following the steps below:
1. Go to this website.
2. Complete the form and click Next. Then, follow the on-screen instructions to create a Synology Account

- Go to the email box you have entered, and click the email titled Synology Account – sign up (sent from “noreply@synologynotification.com”) to get your verification code.
- Enter the verification code and click Next.
- Check the terms and privacy policy. Click Submit.
-
Go to Control Panel > Synology Account, and click Sign in or sign up for a Synology Account.
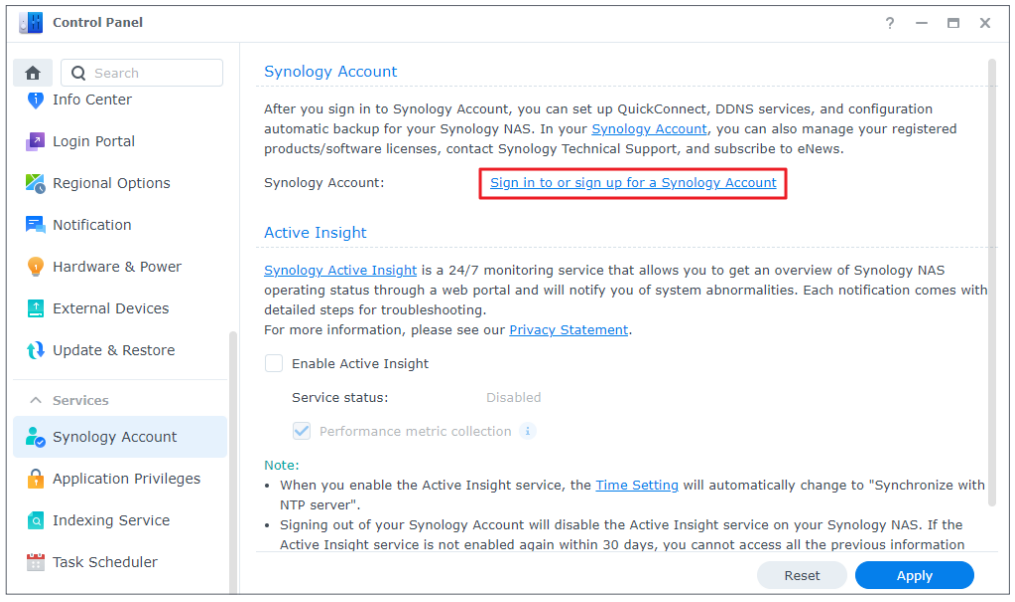

- In the pop-up window, enter the credentials of your Synology Account and click Sign In.
- Now you have successfully registered for a Synology Account and bound your NAS to it
Creating and Editing Your QuickConnect ID
QuickConnect allows client applications to connect to your Synology NAS via the Internet without setting up port forwarding rules. It can work with Synology-developed packages, such as Audio Station, Video Station, Download Station, Surveillance Station, Synology Photos, File Station, Note Station, CMS, Synology Drive, and mobile applications. You can either specify your QuickConnect ID during DSM installation, or activate the service by following the steps below:
1. Go to Control Panel > External Access > QuickConnect.
2. Tick the Enable QuickConnect checkbox
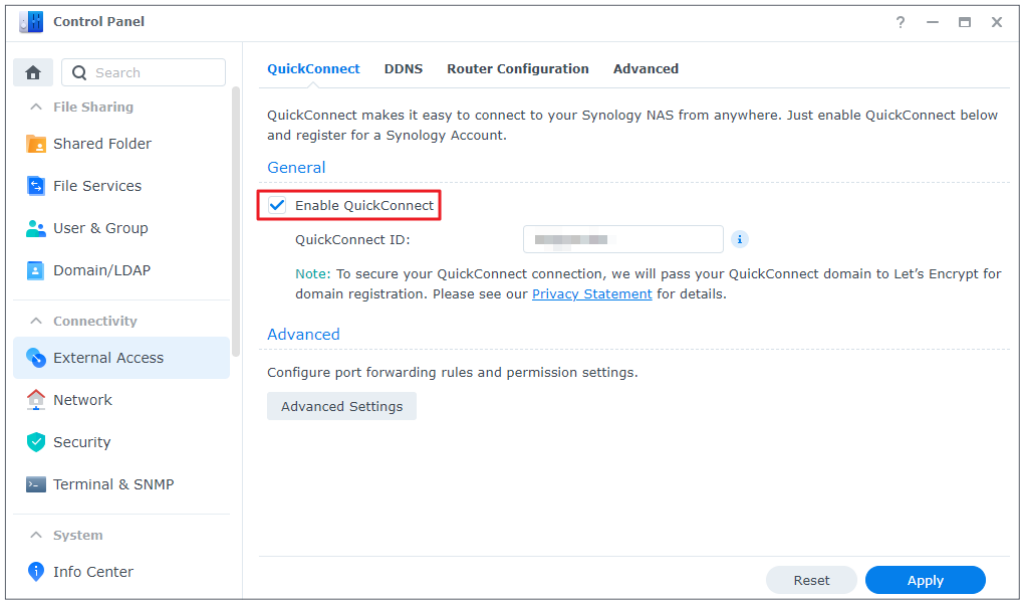

- If you have not signed in to your Synology Account, a login window will pop up. Enter your existing Synology Account information or create a new account in the window.
- Specify a new QuickConnect ID.
- Click Apply.
Notes:
• A customized QuickConnect ID can only include English letters, numbers, and dashes (-). It must start with a letter, and cannot end with a dash.
How to Configure & Increase Network Access Security
Once your Synology NAS is connected to the Internet, it is crucial to ensure system security. This section provides you four methods to strengthen the security of your DSM. Configuring a Firewall, utilizing the Security Advisor, Activating 2-Step Authentication and Enabling auto block, Account Protection, and DoS protection.
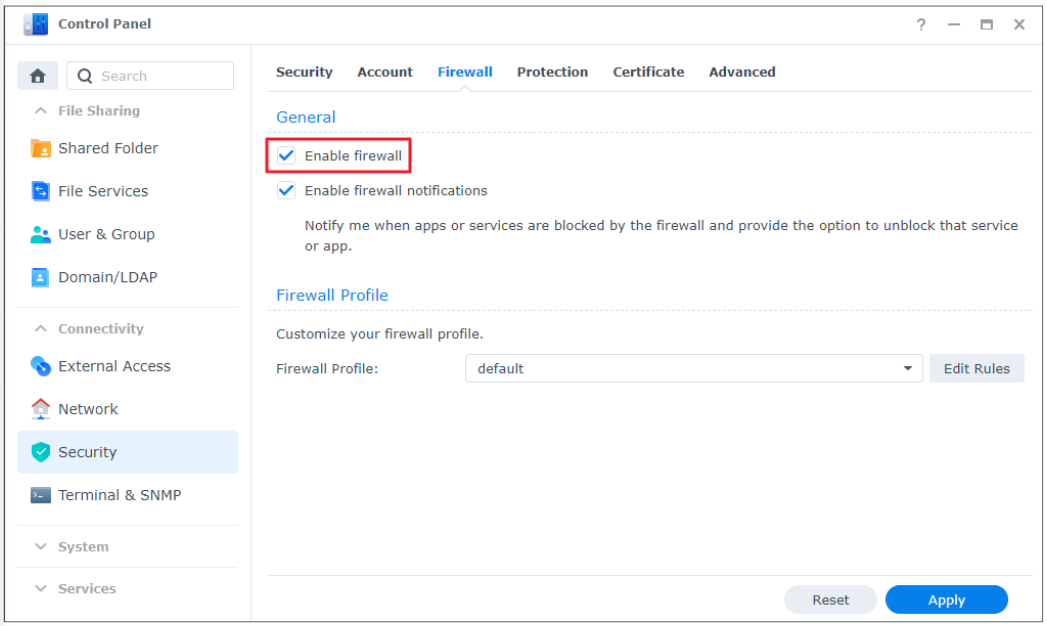
How to Activate the Firewall
- Go to Control Panel > Security > Firewall.
- Tick Enable firewall and click Apply. The default firewall profile will be applied to your DSM.

Utilizing the Security Advisor
Security Advisor is a built-in application that scans your Synology NAS, checks your DSM settings, and provides advice on how to address security weaknesses. Keep your Synology NAS secure by following the steps below:
Scan your Synology NAS immediately
1. Go to Security Advisor > Overview.
2. Click Scan.
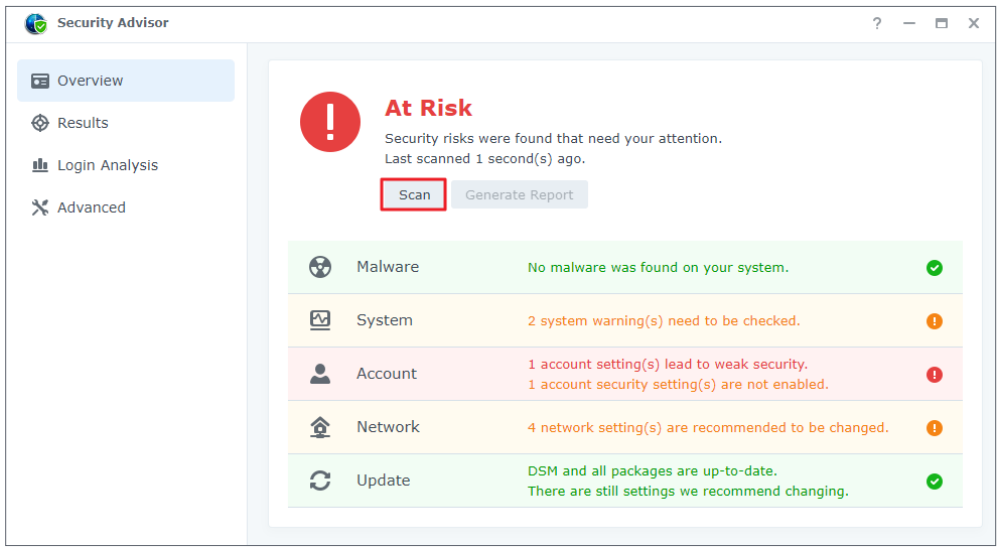

- Fix the security weaknesses according to the scanning results.
Set up an automatic scan schedule
1. Go to Security Advisor > Advanced.
2. Tick Enable regular scan schedule under the Scan Schedule section. Select the time to run scanning from the drop-down menus.
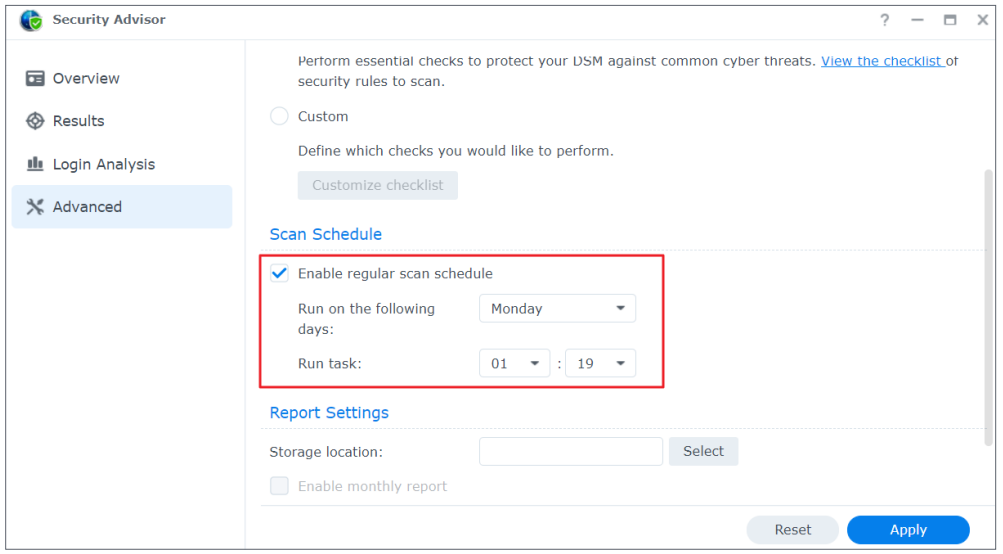

- Click Apply to save the settings.
How to Activate 2-factor authentication
2-factor authentication provides additional security for your DSM account. Once this option is enabled, you will need to enter a one-time authentication code besides your password when signing in to DSM. The code can be obtained through authenticator apps (e.g., Synology Secure SignIn and Google Authenticator) installed on your mobile device.
To enable 2-factor authentication for your account, please follow the steps below:
• Go to Personal > Account and click 2-Factor Authentication to launch the setup wizard. Enter your password to continue.
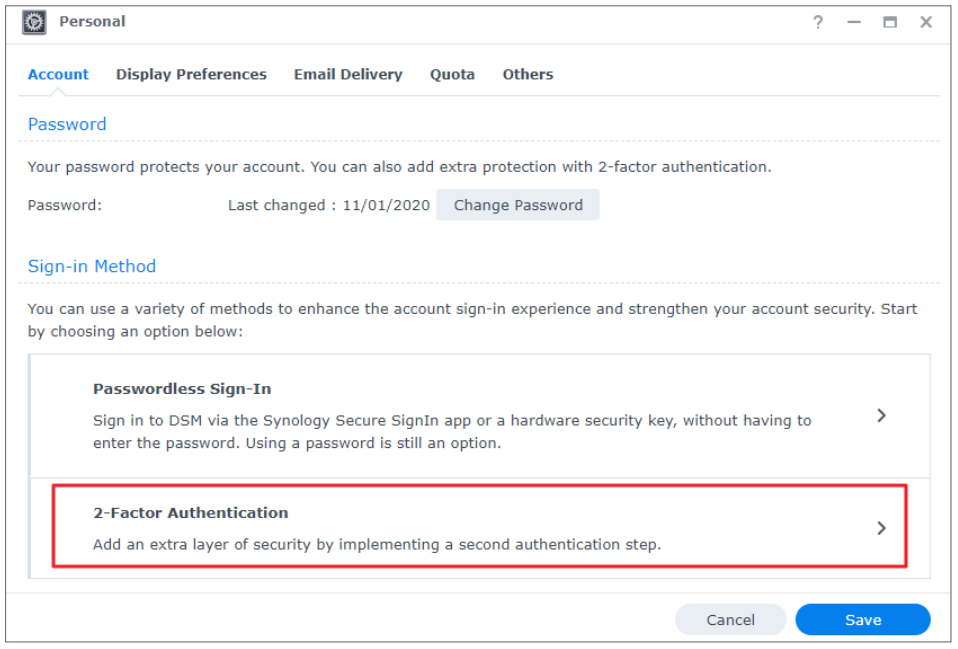

• If Secure SignIn Service is already enabled in Control Panel > Security > Account, select from either Approve sign-in, hardware security key, or OTP for the second sign-in step.
• If Secure SignIn Service has not been enabled, OTP is the only available option for the second sign-in step.
How to Enable auto block, Account Protection, and DoS protection
You can safeguard DSM through these three mechanisms: autoblock, Account Protection, and DoS protection.
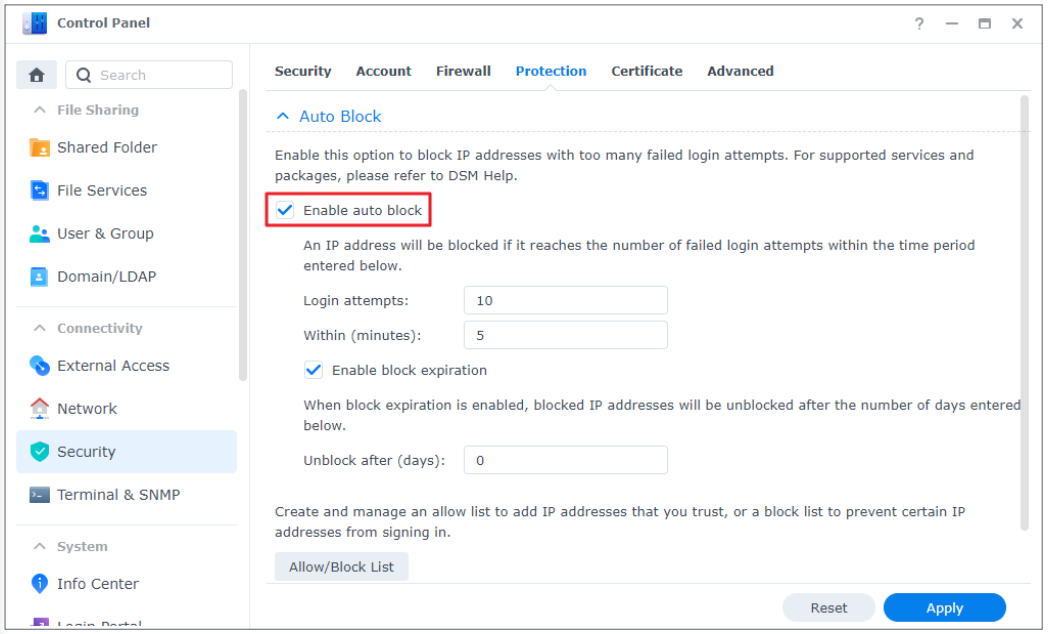
Autoblock unauthorized access
- Go to Control Panel > Security > Protection > Auto Block.
- Tick Enable autoblock.
- Enter a value in the Login attempts field and a value in the Within (minutes) field. An IP address shall be blocked when it exceeds the number of failed login attempts within the specified duration.
- Tick Enable block expiration and enter a value in the Unblock after (days) field to unlock a blocked IP address after the specified number of days.
-
Click Apply to save the settings.

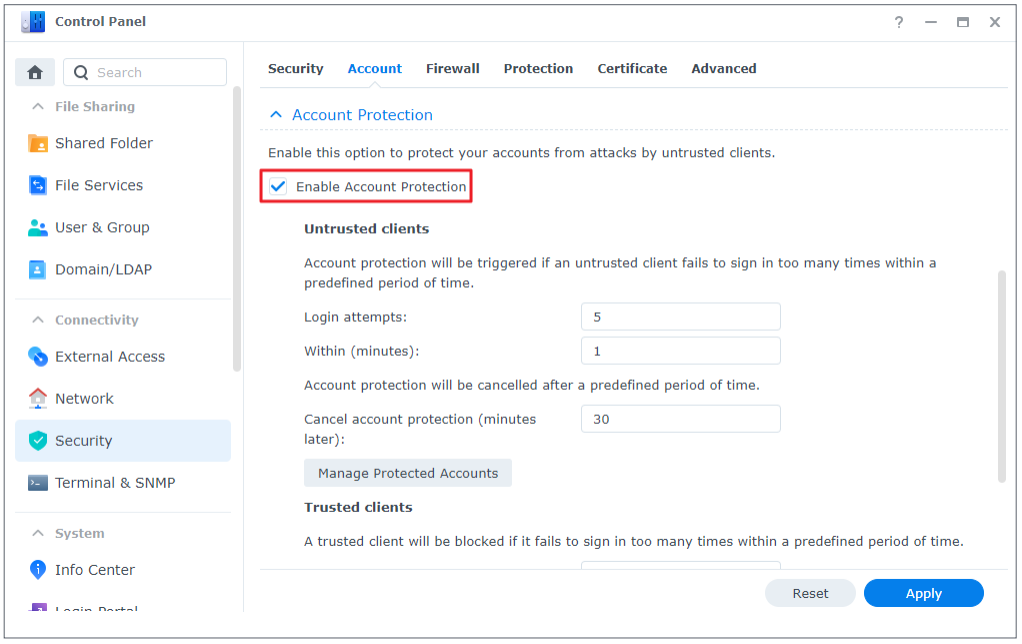
Enable Account Protection to prevent login attacks
- Go to Control Panel > Security > Account > Account Protection.
- Tick Enable Account Protection.
- Enter a value in the Login attempts field and a value in the Within (minutes) field. An untrusted client will be blocked if it exceeds the number of failed login attempts within the specified duration.
- For Untrusted clients, enter a value in the Cancel account protection (minutes later) field. The account protection will be cancelled after the specified duration.
- For Trusted clients, enter a value in the Unblock (minutes later) field. The account protection will be cancelled after the specified duration.
- Click Apply to save the settings

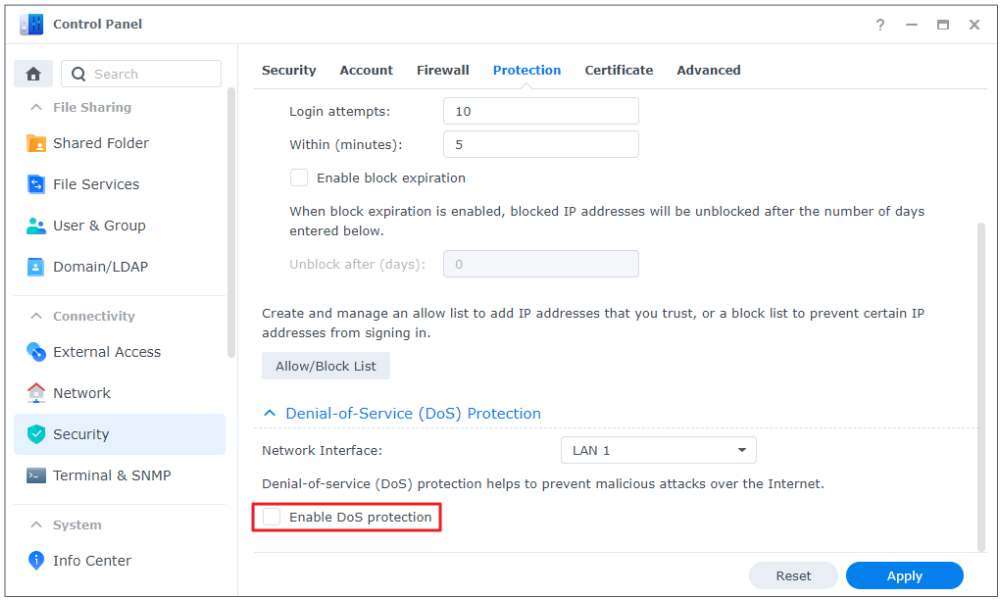
Setting up Defence against DoS attacks
A Denial-of-Service (DoS) attack is a malicious attempt to render network services unavailable by disrupting service functionality. To avoid this type of cyberattack, follow the steps below:
1. Go to Control Panel > Security > Protection > Denial of Service (DoS) Protection.
2. Tick Enable Dos Protection and click Apply

How to Ensure your Synology NAS & DSM 7 is Constantly updated
Synology releases DSM updates from time to time. Updates may include new features function improvements and performance enhancements. This section guides you through the configuration of DSM updates. Perform manual DSM update
1. Go to Synology’s Download Center.
2. Select your model from the two drop-down menus.
3. Go to the Operating System tab of search results and download an update file.
4. Go to DSM > Control Panel > Update & Restore > DSM Update.
5. Click Manual DSM Update.
- In the pop-up window, click Browse to upload the file
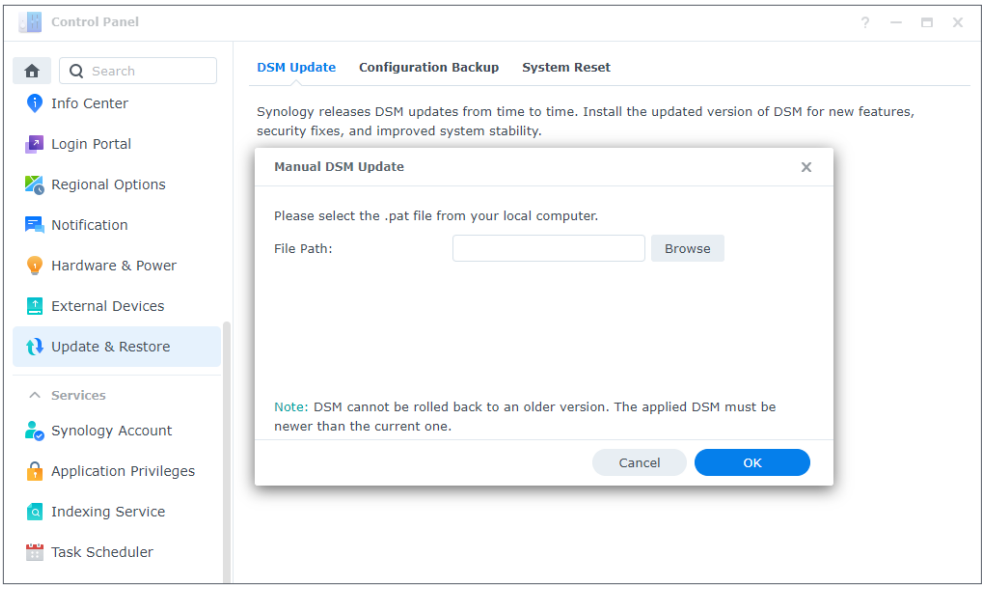

- Click OK and wait for the file to be uploaded.
- After reading through the update information and ticking the confirmation checkbox, click Update.
- Click Yes in the confirmation box. The installation can take 20 to 40 minutes. Please do not shut down the system during the update.
- The system will restart all services and packages when the update is complete.
How to Setup the NAS to Automatically Install DSM 7 Updates
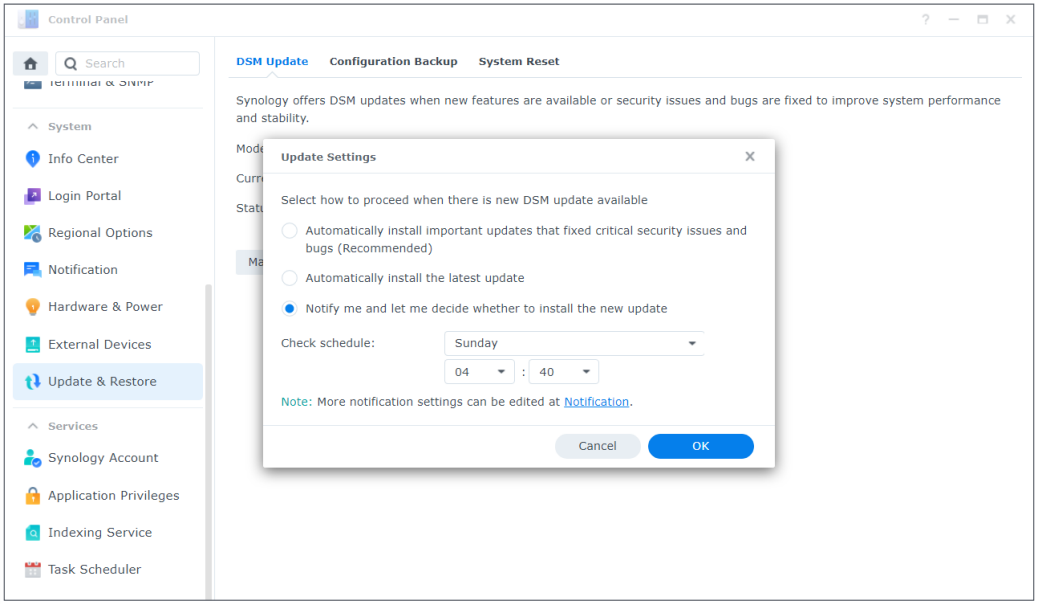
- Go to DSM > Control Panel > Update & Restore > DSM Update.
- Click Update Settings.
- In the pop-up window, you can configure the following settings to check for DSM releases via Synology’s Download Center.
• Automatically install important updates that fixed critical security issues and bugs (Recommended): Allow the system to automatically install important DSM updates. To ensure that your system is always protected, we recommend enabling this option.
• Automatically install the latest update: Allow the system to automatically install new DSM updates when the system check finds new updates available.
• Notify me and let me decide whether to install the new update: Have the system notify you via desktop notifications when there is a new DSM update available. You can choose whether to download the update after receiving the notification.
• Check schedule: Decide when the system should check for available updates. Specify the check time from the drop-down menus.

• An automatic update only applies to minor updates and not to major updates. Generally, minor updates consist of bug fixes and security patches, major updates include brand-new features and performance enhancement in addition to bug fixes and security patches, and important updates contain fixes for critical security issues or bugs. For more information about important updates, please refer to this article.
📧 SUBSCRIBE TO OUR NEWSLETTER 🔔
🔒 Join Inner Circle
Get an alert every time something gets added to this specific article!
This description contains links to Amazon. These links will take you to some of the products mentioned in today's content. As an Amazon Associate, I earn from qualifying purchases. Visit the NASCompares Deal Finder to find the best place to buy this device in your region, based on Service, Support and Reputation - Just Search for your NAS Drive in the Box Below
Need Advice on Data Storage from an Expert?
Finally, for free advice about your setup, just leave a message in the comments below here at NASCompares.com and we will get back to you.


 |
 |


