RAM upgrade for Asustor Nimbustor 2&4 AS5304T / AS5202T
After watching your video about 16GB upgrade, wondering if the J4105 Celeron can handle frequencies above 2400Mhz.
Looking at Crucial Ballistix 3200Mhz or Kingston HyperX 2666Mhz
The specs say 2400 MT/s. But you can always experiment. If it doesn’t work you can always return.
Here is Asustor compatibility list:
| ASUSTOR | DDR4 SDRAM | AS-2GD4 | 2G | For AS 52/53 series | DDR4-2400, 1.2V, 260Pin SO-DIMM |
| ASUSTOR | DDR4 SDRAM | AS-4GD4 | 4G | For AS 52/53 series | DDR4-2400, 1.2V, 260Pin SO-DIMM |
| Crucial | DDR4 SDRAM | CT2K102464BF186D | 8G | For AS 52/53 series |
DDR3-1866, 1.35V, 260Pin SO-DIMM
|
| Crucial | DDR4 SDRAM | CT8G4SFS824A | 8G | For AS 52/53 series |
DDR4-2400, 1.2V, 260Pin SO-DIMM
|
| Hynix | DDR4 SDRAM | HMA81GS6AFR8N-UH | 8G | For AS 53 series | DDR4-2400, 1.2V, 260Pin SO-DIMM |
And Crucial RAM upgrade options:
Crucial 4GB DDR4-2400 SODIMM
CT4G4SFS824A
Configuration ID: CT15395563
DDR4 PC4-19200 • CL=17 • Single Ranked • x8 based • Unbuffered • NON-ECC • DDR4-2400 • 1.2V • 512Meg x 64 •
Crucial 8GB Kit (2 x 4GB) DDR4-2400 SODIMM
CT2K4G4SFS824A
Configuration ID: CT15395537
DDR4 PC4-19200 • CL=17 • Single Ranked • x8 based • Unbuffered • NON-ECC • DDR4-2400 • 1.2V • 512Meg x 64 •
Crucial 4GB DDR4-2666 SODIMM
CT4G4SFS8266
Configuration ID: CT15395548
DDR4 PC4-21300 • CL=19 • Single Ranked • x8 based • Unbuffered • NON-ECC • DDR4-2666 • 1.2V • 512Meg x 64 •
Crucial 4GB DDR4-2666 SODIMM
CT4G4SFS6266
Configuration ID: CT15395559
DDR4 PC4-21300 • CL=19 • Single Ranked • x16 based • Unbuffered • NON-ECC • DDR4-2666 • 1.2V • 512Meg x 64 •
Crucial 8GB Kit (2 x 4GB) DDR4-2666 SODIMM
CT2K4G4SFS8266
Configuration ID: CT15395535
DDR4 PC4-21300 • CL=19 • Single Ranked • x8 based • Unbuffered • NON-ECC • DDR4-2666 • 1.2V • 512Meg x 64
Crucial 8GB Kit (2 x 4GB) DDR4-2666 SODIMM
CT2K4G4SFS6266
Configuration ID: CT15395545
DDR4 PC4-21300 • CL=19 • Single Ranked • x16 based • Unbuffered • NON-ECC • DDR4-2666 • 1.2V • 512Meg x 64 •
Crucial 4GB DDR4-3200 SODIMM
CT4G4SFS632A
Configuration ID: CT15395564
DDR4 PC4-25600 • CL=22 • Single Ranked • x16 based • Unbuffered • NON-ECC • DDR4-3200 • 1.2V • 512Meg x 64 •
Crucial 8GB Kit (2 x 4GB) DDR4-3200 SODIMM
CT2K4G4SFS632A
Configuration ID: CT15395529
DDR4 PC4-25600 • CL=22 • Single Ranked • x16 based • Unbuffered • NON-ECC • DDR4-3200 • 1.2V • 512Meg x 64 •
Here is how to do it:
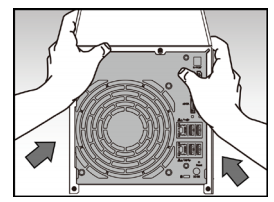
Use a screwdriver to loosen the three screws found on the rear of the NAS as shown
in the illustration.
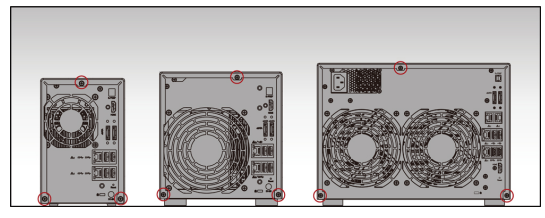
Grip the cover from both sides with two hands and then gently push it back to
remove it from the chassis.
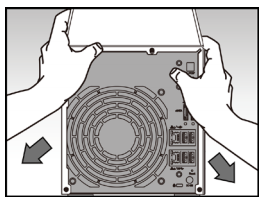
Installing Memory
Note: When installing a single memory module, please ensure that it is the same size as the built-in
memory module (1GB/2GB). When installing two memory modules, please ensure that they are the
same size and ideally use the same type of RAM for both memory slots. The maximum supported
memory is 8GB combined.
To install the first memory module, follow the steps outlined below.
• When inserting the memory module into the empty slot, please make sure to align the notches on
the module with the notches in the slot.
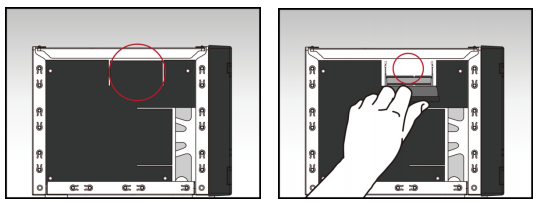
Diagonally slide in the memory module (as shown in the illustration) making sure that the memory
module’s connectors are fully inserted into the slot.
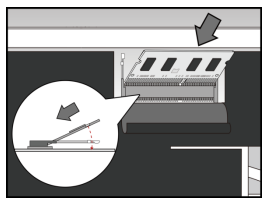
Using two fingers, carefully push down and then back on the memory module until it clicks into
place. You should be able to hear an audible “click”.
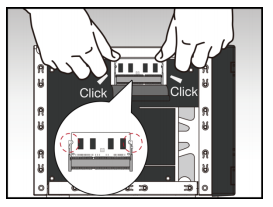
To install the second memory module, continue with the steps outlined below.
• Locate the slot for the built-in memory as shown in the graphic below.
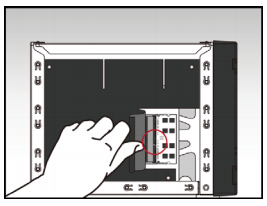
Release the ejector clips by gently pulling them out to the sides and then remove the built-in
memory module.
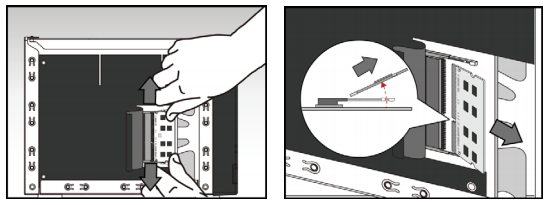
When inserting the memory module into the empty slot, please make sure to align the notches on
the module with the notches in the slot. Diagonally slide in the memory module (as shown in the
illustration) making sure that the memory module’s connectors are fully inserted into the slot.
Using two fingers, carefully push down and then back on the memory module until it clicks into
place. You should be able to hear an audible “click”.
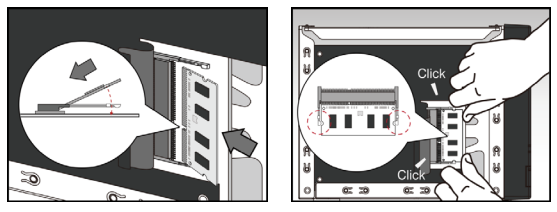
Replace the cover and tighten the three screws that were removed previously
How Much RAM Do You Need in Your NAS?
A Buyer's Guide to Travel Routers - GET IT RIGHT, FIRST TIME
Jonsbo N6 DIY NAS Case Review
The Best Bits (and Worst Bits) of NAS of 2025!
Minisforum MS-02 Ultra Review
Minisforum N5 NAS, 6 Months Later - Better, Worse, the Same?
Access content via Patreon or KO-FI
Discover more from NAS Compares
Subscribe to get the latest posts sent to your email.


I can confirm that:
Crucial 8GB Kit (2 x 4GB) DDR4-2666 SODIMM
CT2K4G4SFS8266
DOES NOT WORK.