

MAX Synology RAM for RS812+
Hi, I was hoping you can help me with the maximum amount of ram I can use with my Synology RS812+
The NAS is obviously older, but still runs great, however RAM availability is getting low due to running a number of Docker containers and is causing DSM to crash occasionaly.
I currently have 2GB ram. (2x1GB)
I have read that the processor can handle 4GB but Synology says max of 3GB
If the first RAM module is not soldered on the motherboard, you can remove it and replace with something faster (therefore limit 1GB+2GB=3GB). By default, you get 1333MHz model. Often CPU limits mean – per lane. So it would be 2x4GB. But this is something you can experiment with thanks to Amazon free returns.
| CPU Frequency | Dual Core 2.13 GHz |
| Memory | DDR3 1 GB (expandable, up to 3 GB) 204pin SO-DIMM DDR3 – 1333MHz , Unbuffered, 1,5V |
This RAM also fits RS814+, RS814RP+, RS812+, RS812RP+.
On eBay they sell 2GB memory sticks
A-Tech 2GB DDR3 PC3-12800 1600 MHz SO-DIMM for Synology RS812+ NAS Memory RAM
https://www.ebay.co.uk/itm/A-Tech-2GB-DDR3-PC3-12800-1600-MHz-SO-DIMM-for-Synology-RS812-NAS-Memory-RAM-/323912579761
Amazon UK
Amazon US
Add a RAM Module on RackStation
Synology RAM module 2GB is designed for RackStation memory expansion and is optional for your choice.
Follow the steps below to install, check, or remove your RAM module.
Install the RAM Module
1 Shut down your RackStation. Disconnect all cables connected to your RackStation to prevent any possible
damages.
2 Unscrew the two knobs that secure the back panel. Pull out the panel to reveal the circuit board.
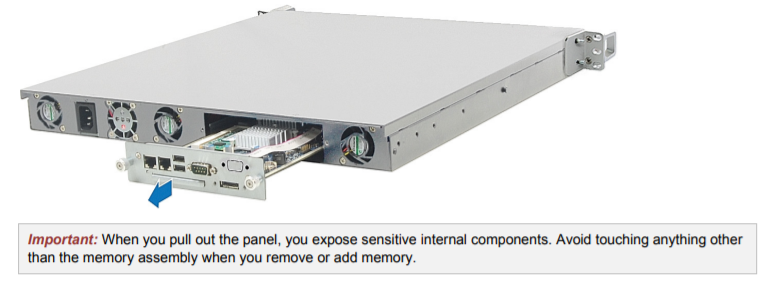
Chapter 2: Hardware Setup
3 Turn the circuit board over.
4 Insert the new memory module in the slot:
a Align the notch on the gold edge of the module with the notch in the lower memory slot.
b Tilt the card and push the memory into the slot. Make sure the module is pushed in all the way.
c Use two fingers with firm, even pressure to push down on the memory module. You should hear a click
when the memory is inserted correctly.
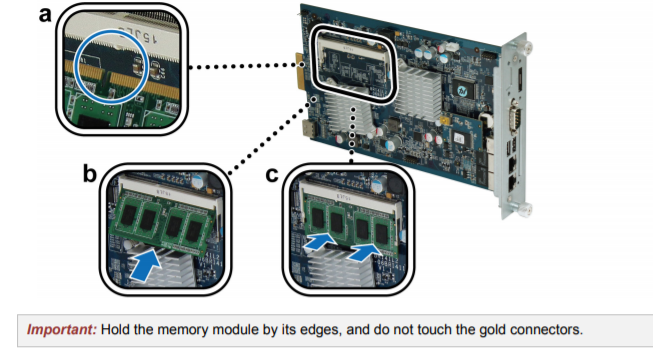
5 Turn the circuit board back to its original position.
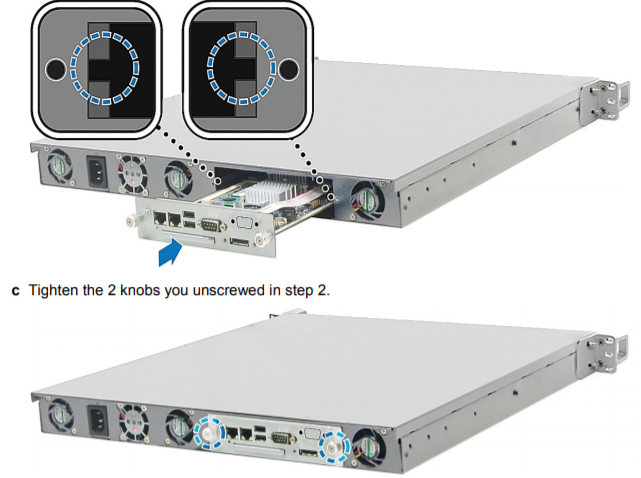
6 Return the board into the RackStation:
a Identify the rail within the RackStation.
b Place the circuit board within the rail and push the board all the way in.


Do You NEED 5GbE NAS? (Or Should You Skip Ahead to 10GbE)
UGREEN DXP4800 PRO NAS Review
Minisforum G7 Pro Review
CAN YOU TRUST UNIFI REVIEWS? Let's Discuss Reviewing UniFi...
WHERE IS SYNOLOGY DSM 8? and DO YOU CARE? (RAID Room)
UniFi Routers vs OpenWRT DIY Routers - Which Should You Choose?
Access content via Patreon or KO-FI
Discover more from NAS Compares
Subscribe to get the latest posts sent to your email.
DISCUSS with others your opinion about this subject.
ASK questions to NAS community
SHARE more details what you have found on this subject
IMPROVE this niche ecosystem, let us know what to change/fix on this site