All the ways to Access the files on your Synology NAS
When you have set up users or groups with proper access privileges to the shared folders, they can share their files with your Synology NAS from anywhere. This chapter explains the ways to access the Synology NAS shared folders within the local network or over the Internet.
Access Files on your Synology NAS within the Local Network
This section explains how to allow users to use Windows, Mac, or Linux computer to access shared folders on Synology NAS within the local network. Note: Before accessing, make sure the relative file sharing protocols have been enabled for your Synology NAS.
Access Shared Folders on your Synology NAS from Windows
To access shared folders from Windows, you can use any of the following methods:
Method 1: Use Synology Assistant to map shared folders as network drives
Run Synology Assistant (available at Synology’s Download Center) and select the server from the server list. Click Map Drive and follow the onscreen steps to finish the setup. Upon completion, you can access the mapped shared folder directly in Windows Explorer.
Method 2: Use Windows Explorer.
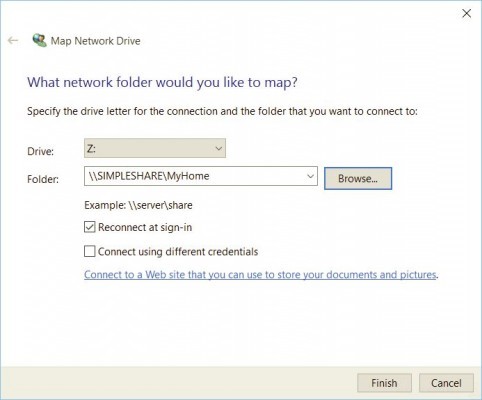
Open a Windows Explorer window and go to This PC. Click Map network drive to show the Map Network Drive window. Choose a drive letter from the Drive drop-down menu. Locate the shared folder by doing either of the following:
- Enter \\Synology_Server_Name\Shared_Folder_Name in the Folder field.
- Click Browse to locate the shared folder, and then click OK.
- Enter your username and password for Synology DiskStation Manager and click OK. Upon completion, you can access the mapped shared folder directly in Windows Explorer.
Access Shared Folders on your Synology NAS from a Mac
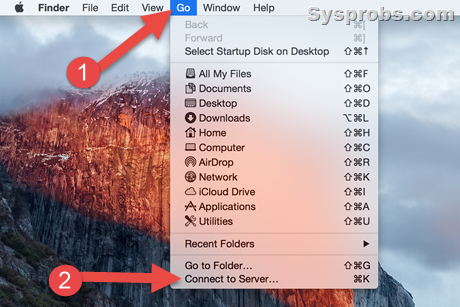
Choose Go > Connect to Server from the menu bar. Type the IP address or name (appended with .local) of the Synology NAS preceded by smb:// or afp:// in the Server Address field and click Connect. (e.g. smb://EricaWang.local or afp://192.168.0.2)
Note: For better performance, it is recommended that you connect to the shared folders via SMB, Select the shared folder you want to access. Upon completion, you can access the shared folder in the Finder
Access Shared Folders on your Synology NAS from Linux
In Synology DiskStation Manager, Go to Main Menu > Control Panel > Shared Folder. Select the shared folder you want to access, click Edit > NFS Permissions, and find the mount path at the bottom of the window that appears. On a Linux computer, enter the mount path to mount the shared folder.
Access Files on your Synology NAS via FTP
If your Synology NAS is accessible over the Internet, you can use an FTP application to access the shared folders.
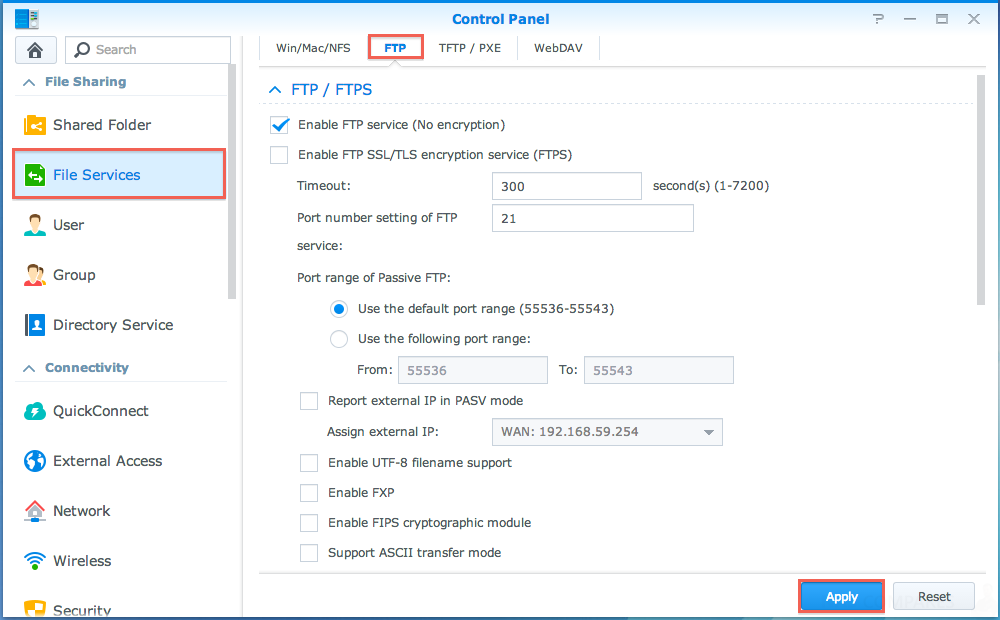
Go to Control Panel > File Services > FTP to enable FTP service, allowing users to upload or download Synology NAS data via FTP.
Connect to your Synology NAS Using an FTP Application
Open any FTP application on your computer and enter the following information to connect to Synology NAS:
- IP address or domain name of the Synology NAS
- Your user account and password
- The port number (The default number is 21)
Access Files on your Synology NAS via WebDAV
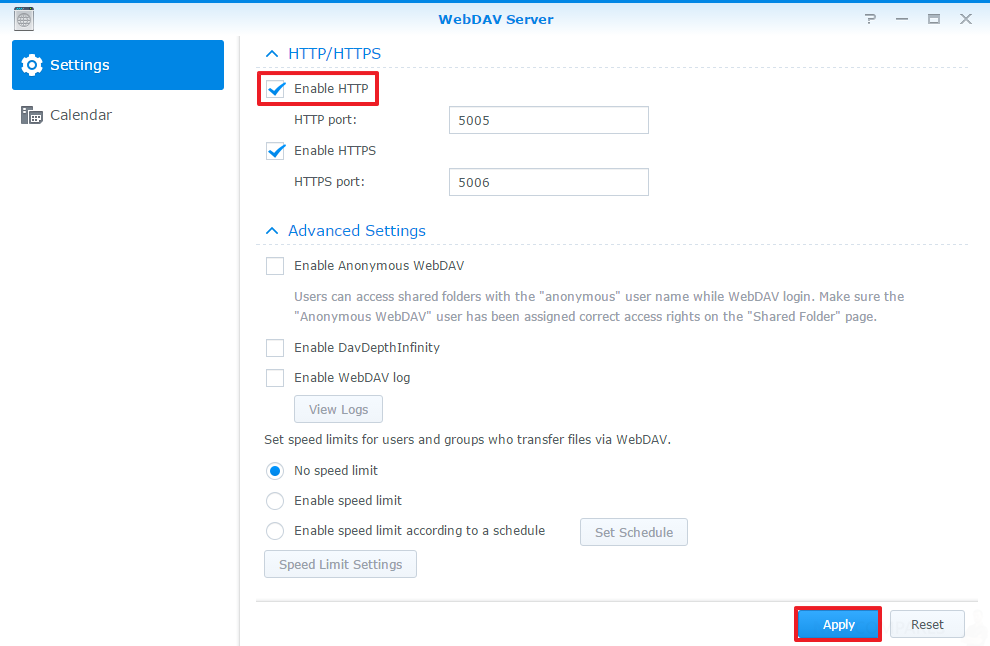
By enabling WebDAV or CalDAV, you can remotely manage and edit files or calendars stored on the Synology NAS. Go to Package Center to install the WebDAV package and to enable its services.
Access and Synchronize Files on your NAS via Synology Drive
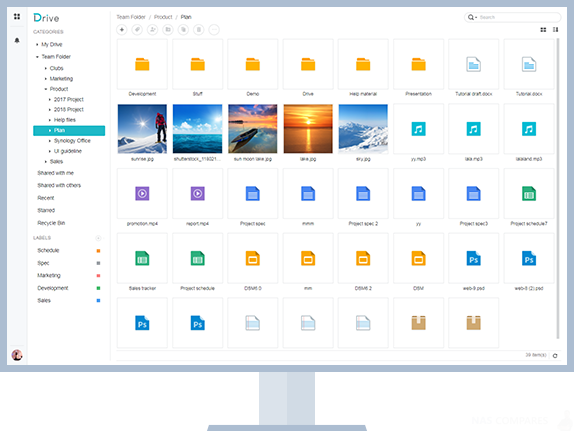
Synology Drive provides a unified portal for all the files stored on your Synology NAS. You can access and synchronize these files via native client applications on a computer, mobile device, or another Synology NAS. Go to Package Center to install and run the Synology Drive package.
Access Files on your NAS via Synology File Station
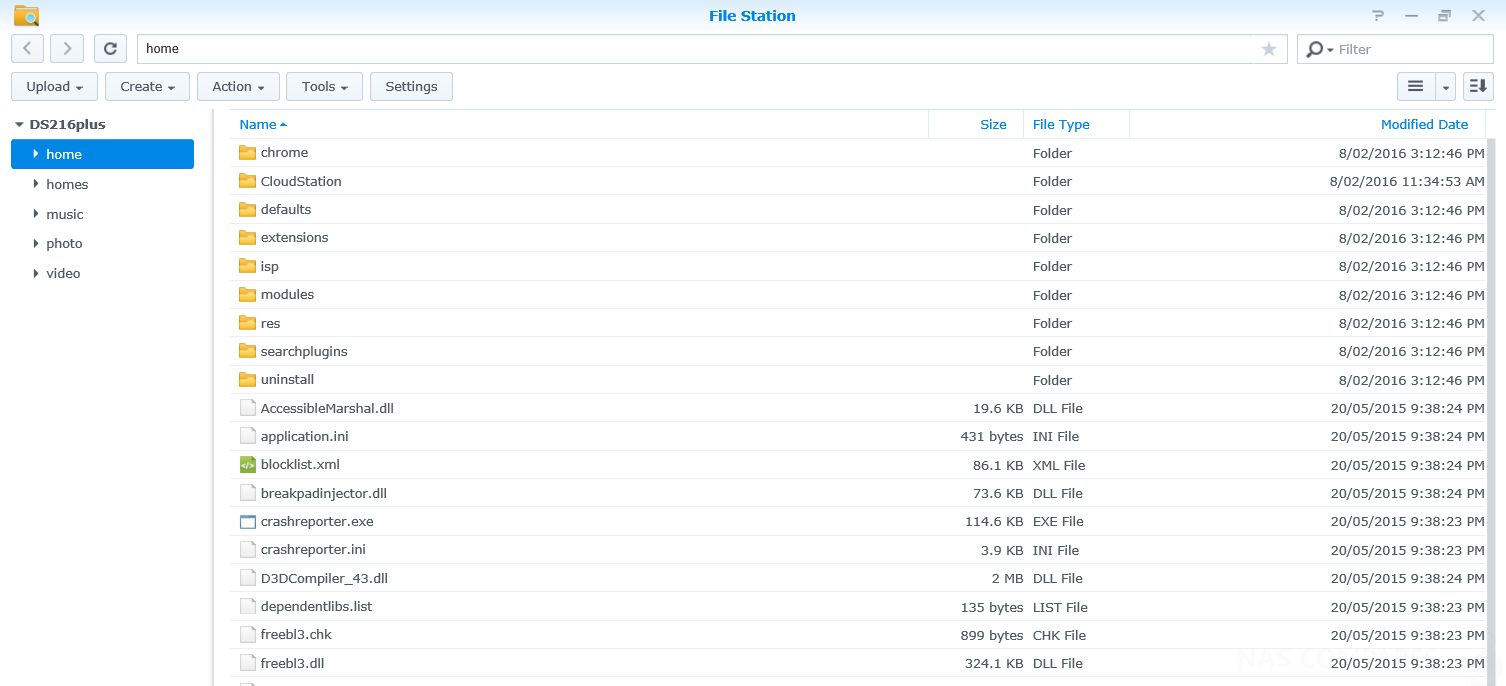
File Station is DSM’s file management tool, allowing DSM users over the Internet to access the Synology NAS folders with their web browsers, or transfer files to another WebDAV/FTP server. By launching two or more File Stations, you can manage all your Synology NAS data by dragging and dropping them between different File Stations.
Synology File Station Appearance and User Interface
- Left panel: Displays shared folders and their subfolders in the upper part, and the folders on your local computer in the lower part.
- Main section: Displays contents of the currently selected folder.
- Help button (top-right corner): Click the Help button (with a question mark) to reveal the DSM Help, where you can get useful help about how to use File Station.
- Search field: Enter a keyword to filter through files or folders in the current folder.
- Advanced Search (magnifying glass button): Search for refined search results.
- Manage File Station Options – Click Settings to configure general settings, enable File Station log, mount remote folders or virtual drives, determine who can share file links, and set speed limit to control the bandwidth usage for DSM file transfer services.
Search for Files or Folders on your Synology NAS
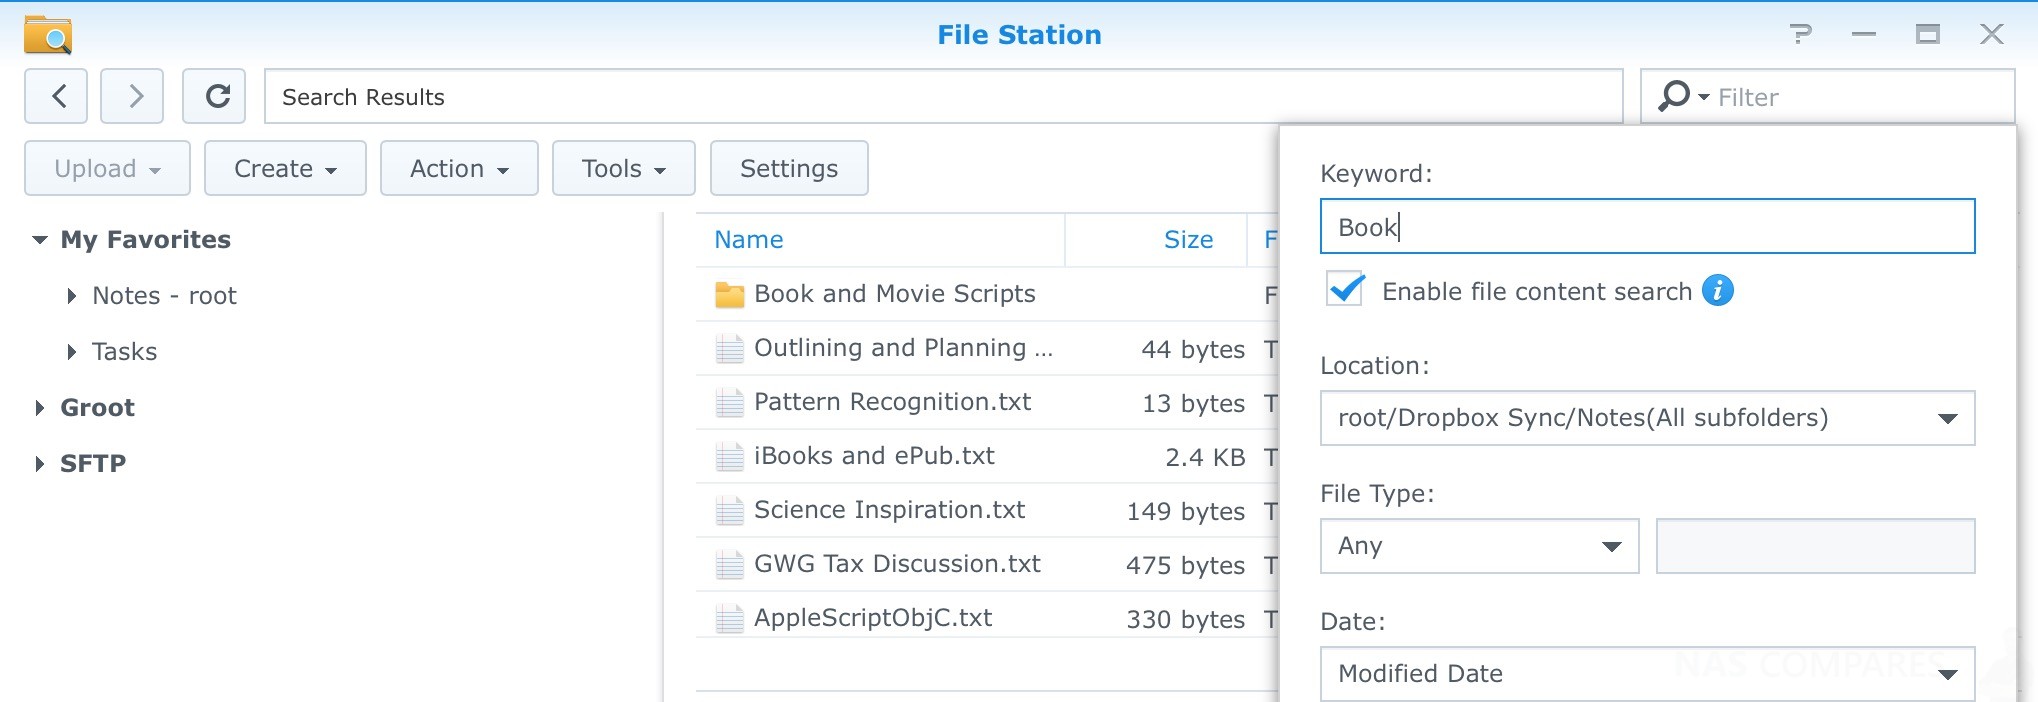
You can type keywords in the Search field at the top-right corner of File Station to filter through files or folders in the current folder. Additionally, you can also perform an advanced search in the Advanced Search panel for more refined search results.
Set File Station in Actions to Perform on your Synology NAS
With the Action menu, right-clicking, and dragging-and-dropping, you can easily download, upload, copy, move, rename, delete, extract, and compress files or folders, and more.
Edit the Properties of Files and Subfolders in File Station
You can edit the access privileges to files and subfolders (meaning folders and their subfolders in a shared folder), copy download links, and open a file in a new browser window in the Properties window. Select the files and folders for which you want to set access privileges. Right-click one of the files or folders, or choose the Action menu, and then choose Properties.
- To set access privileges to shared folders, please see “Allow Users or Groups to Access Shared Folders” for more information.
- You are not allowed to edit the access privileges to files and subfolders in the photo shared folder here. To set access privileges to photo albums for Photo Station users, open Photo Station, go to the Settings page, and click the Help tab for more information.
- With File Station, you can only perform the upload action for files and folders on your computer. All the other action and property settings in File Station are available for files and folders on Synology NAS only.
- Share File Links, files or folders stored on your Synology NAS can be shared quickly and easily. Simply right-click a file or folder and select Share. This generates a link and QR code, which can be sent to friends or other users. DSM users will also receive notifications. Whether or not they possess a DSM account, they can follow the link to download the selected file or folder.
Send Files on your Synology NAS as Email Attachments
You can directly send and share files as email attachments. Simply right-click selected files and then select Send as email attachments
 .
.
Mount Remote Folders or Virtual Drives on your Synology NAS
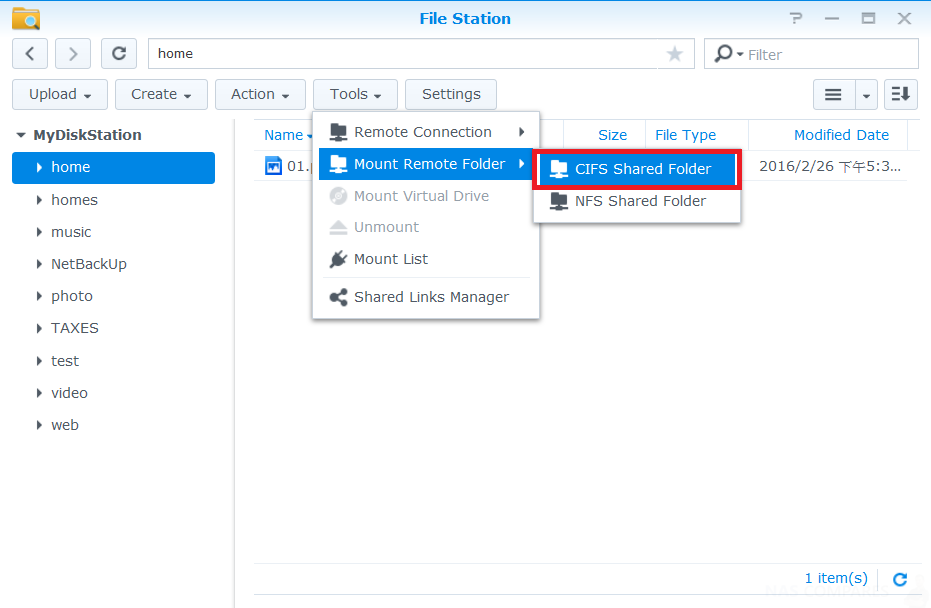
File Station allows you to mount remote folders to access contents shared by network computers or other Synology NAS, or virtual drives to access contents within disc images. That way, you can easily navigate all available network resources or disc images with File Station. For more information about remote folders or virtual drives, click the Help button (with a question mark) at the top-right corner.
Edit Music Information
📧 SUBSCRIBE TO OUR NEWSLETTER 🔔Synology NAS Software Guide – Part 5 – Time Machine, Rsync, Shared Folder Sync and Cloud Backup
🔒 Join Inner Circle
Get an alert every time something gets added to this specific article!
This description contains links to Amazon. These links will take you to some of the products mentioned in today's content. As an Amazon Associate, I earn from qualifying purchases. Visit the NASCompares Deal Finder to find the best place to buy this device in your region, based on Service, Support and Reputation - Just Search for your NAS Drive in the Box Below
Need Advice on Data Storage from an Expert?
Finally, for free advice about your setup, just leave a message in the comments below here at NASCompares.com and we will get back to you. Need Help?
Where possible (and where appropriate) please provide as much information about your requirements, as then I can arrange the best answer and solution to your needs. Do not worry about your e-mail address being required, it will NOT be used in a mailing list and will NOT be used in any way other than to respond to your enquiry.

|
 |


