


The Best Methods of Backup, Redundancy and Data Recovery on Synology NAS for Dummies
Backup, backup, BACKUP! It’s something I am prone to say at the beginning and end of my videos whenever I talk about NAS Drives and integrating them into your home and business environment. Most people THINK they have a robust and secure data storage solution, yet only a fraction of them actually do. Most people will be happy/convinced their data is perfectly safe when they buy a Synology NAS drive, that they have a rugged, intelligent and reliable backup solution in place! They then start to back up their phones to the NAS, their PC’s and Macbooks to the NAS, their home media, their photo albums, their precious and irreplaceable memories! All of that data is sent to the Synology NAS to be kept safe as a ‘backup’. HOWEVER, they then start to delete the photos from their phone, delete those files from their laptop, Free up room on that USB drive by moving the data over to the NAS – Congratulations, your NAS is NO-LONGER A BACKUP! The minute the data is deleted from any other device, the NAS becomes the ONLY place that data exists and is now JUST as unsafe and prone to loss/damage as it was when it stayed on your phone, computer or USB drive. It is incredibly important that people practice comprehensive and intelligent backup strategies that feature multiple tiers, multiple locations and/or failsafe/safety nets along the way that can give you at least a little warning before the worst can happy. Today I want to go through all the different ways in which you can backup, protect, failover and ultimately SAVE the DATA on your Synology NAS server. Let’s go through all of them and find out which ones best suit your Synology NAS storage setup.
Important – Below I detail 10x methods to provide redundancy (eg a failover), backups, data recovery and/or time managed versioning (so you can recover a file to a specific point) that can ALL be done on a Synology NAS with DSM 6.2 or DSM 7 in 2021 onwards. However, some are free and included in your Synology NAS by default, whereas others can arrive with a small, medium or very large price tag. It is important to remember when setting a price tag on your Data Storage Solution that you think of how much it would cost to LOSE your data. NOT the cost of storing it, but the cost to you/your business if the data in your Synology NAS was gone. So, whether it is photos of your child when they were mere months old, your entire business portfolio or the customer accounts for 2021/2022 – you need to FOCUS on the cost of LOSING your data when deciding how much you will spend!
Creating or Increasing Your RAID Level and Redundancy
The Hard drives or SSD inside your Synology NAS are typically bunched together in a RAID group, each of which provides a different level of safety net and overall storage. This RAID will typically form a storage pool and this is the basis on which your data (in one of more volumes) lives inside your Synology NAS. Storage pools can be changed from one RAID type to another without losing existing data. For example, you can create a RAID 1 storage pool on your Synology NAS and later change it to RAID 5 if you install more drives. This article provides instructions on changing the RAID type of existing storage pools on your Synology NAS. Before you start changing the RAID type of a storage pool, please refer to the Drive Requirements and RAID Type Requirements and Limitations sections below for details on the relevant requirements and limitations.
Before you start:
Before changing the RAID type, please note the following:
- Make sure the status of your storage pool is Healthy.
- When adding new drives to a storage pool, the new drives must be larger than or equal to the smallest drive in the storage pool and all drives must be of the same drive type.
- The RAID type of RAID Arrays in a RAID Group cannot be changed. The RAID Group feature is available on specific models only.
To change the RAID type of a storage pool:
- Launch Storage Manager.
- Go to Storage Pool.
- Select the storage pool that you want to change its RAID type, and click Change RAID Type from the Action drop-down menu.
- Select the RAID type that you want to change to. Click Next.
- Select the drives to add to the existing storage pool. Click Next.
Note: All data on the newly added drives will be erased. Please make sure to back up your data in advance. - Follow the wizard to finish.
Below is a video guide on how to set your Synology NAS RAID Storage Pool for the first time, as well as Create a Volume:

To add a drive to a storage pool:
Before you start, make sure the status of the storage pool you intend to expand is Healthy. If the storage pool status is not healthy, please follow the recommended actions shown beneath the status to fix drive issues. Afterward, follow the steps below to add a drive to a storage pool:
- Power off your Synology NAS. Note: Skip this step if your Synology NAS supports hot-swapping.
- Insert a new drive into an empty drive slot.
- Power on your Synology NAS and launch Storage Manager.
- Go to the Storage Pool page and select the storage pool you want to expand. Click Add Drive from the Action drop-down menu.
- Select the drive you want to add from the list. Only drives that meet the type and capacity requirements will be listed.
- Follow the wizard to finish the process.
To expand the volume size:
Once a storage pool contains sufficient capacity, the size of its corresponding volume can be expanded either automatically or manually, depending on the storage pool type.
- Single-volume storage pool: For a storage pool that supports a single volume, the volume size will be expanded automatically once the storage pool capacity has been expanded.
- Multiple-volume storage pool: For a storage pool that supports multiple volumes, the volume size can be expanded manually once the storage pool contains sufficient capacity.
Make Sure You Check Your Synology NAS RAID and Storage Health Periodically
You can learn more about each drive’s information and health condition by going to Storage Manager > HDD/SSD. Each drive is color-coded to indicate its overall status:
- Green: The drive is in good condition, or its warning status has been suppressed or disabled.
- Orange: The drive is in abnormal status. Please pay attention to the drive’s health status and allocation status.
- Red: Critical issues have been detected on the drive. Please replace the drive immediately.
- Blue: The drive is processing one or multiple tasks.
- Gray: The drive is disabled.
A drive’s overall status shows the relatively more serious status between the drive’s Allocation status (i.e., the condition of the storage pool that the drive is assigned to) and its Health status (i.e., the condition of the drive itself). For example, if a drive’s allocation status is Not Initialized and its health status is Warning, its overall status will be Warning as this is the more serious status.
To learn about health statuses:
The health status indicates the drive condition.
| Health Status | Definition |
|---|---|
| Healthy | The drive is in good condition, or its warning has been suppressed or disabled. |
| Warning | The system has detected issues or an increase in bad sectors on the drive. We recommend monitoring the drive even though it may still be working properly. |
| Critical | The system has detected one or more critical issues on the drive. Please replace the drive immediately. |
| Failing | The system has detected severe issues on the drive. Drive integrity may not be guaranteed. Please replace the drive immediately. |
| Access Error | The system has detected severe issues on the drive. Drive communication errors may have caused the drive to disconnect from the system, or these errors have resulted in severe read-write failure. Please replace the drive immediately. |
To learn about allocation statuses:
The allocation status indicates the status of the storage pool where the drive is assigned to.
| Allocation Status | Definition |
|---|---|
| Not Initialized | The drive can be assigned to a storage pool. DSM is not installed on the drive. |
| Initialized | The drive can be assigned to a storage pool. DSM is installed on the drive. |
| Normal | The drive is assigned to a storage pool. DSM is installed on the drive. |
| Hot Spare | The drive is assigned as a hot spare drive. |
| System Partition Failed | The system cannot access the partitions of this drive. |
| Crashed | The system has removed the drive from the storage pool. To continue using the drive, please do the following:
|
| Deactivated | The drive is deactivated. |
To view a drive’s general information:
- Go to the HDD/SSD page.
- Select a drive and click its upper-right icon to expand the drive information.
- Here you can learn information regarding drive location, storage pool, allocation status, health status, temperature, serial number, firmware version, and more.
To view a drive’s health information:
- Go to the HDD/SSD page.
- Select a drive and click Health Info.
- Go to the Overview tab to find out how many hours the drive has been powered on, and to view its current temperature, reconnection/re-identification count, and bad sector count.
- Go to the S.M.A.R.T. tab to perform diagnostic tests on the supported drive and view the S.M.A.R.T. attributes. In the S.M.A.R.T. Test section, you can run an S.M.A.R.T. test immediately and view the test results and schedules; in the S.M.A.R.T. Attribute section, you can view the details of the S.M.A.R.T. attribute values.
- Go to the IronWolf Health tab to perform diagnostic tests on the supported drive.
- Go to the History tab to view and export the health diagnosis results and to view the history of the major S.M.A.R.T. attributes.
The S.M.A.R.T. test and the IronWolf Health test can be scheduled to run automatically on drives. Please note that these tests are supported only on certain models. Below is a video guide on how to check your RAID and Drive Health:
Setup Snapshots on Your Synology NAS as Soon as Possible
Snapshot Replication is an expert of data backup and recovery. Businesses need data protection to prevent data loss from accidental deletion, application crashes, data corruption, and viruses.
Note:
- The “snapshot” feature is a point-in-time copy stored in the same volume used to record the whole data status at the time upon being taken. Snapshots use only a small amount of additional storage space, and do not have a performance impact.
With the snapshots, if a user accidentally modifies or deletes data on a volume with snapshots, you are able to quickly restore the data back to the previous time at which the snapshot was taken. In addition, it allows users to recover their own deleted or modified files in shared folders without assistance from the administrator. - The “replication” feature is a mechanism to sync the taken snapshots of shared folders or iSCSI LUNs between the sources and destinations. If the replication source fails to run normal service, you can perform a failover and protect your data with the replicated snapshots.
Snapshot Replication helps you manage and monitor the snapshots and replication tasks on your Synology NAS.
Depending on the functions supported by your Synology NAS, Snapshot Replication helps you accomplish the following tasks:
- Take and manage snapshots of shared folders and iSCSI LUNs.
- Configure scheduled snapshots and retention settings. These settings will determine when and how the snapshots should be taken, retained, and/or removed.
- Create and manage replication tasks for shared folders and iSCSI LUNs.
- Configure scheduled replication to periodically run the syncing for your replication tasks.
- Restore data from snapshots, and perform failover/switchover of replication tasks between the source and destination.
- View the logs of the events related to snapshots and replications.
Note:
- The snapshot and replication features are available for the following targets only:
- Shared folders located in volumes using the Btrfs file system
- iSCSI LUNs created as Standard LUNs with storage acceleration or Advanced LUNs
- Snapshot Replication has defined the limits of the following maximum numbers of retainable snapshots:
- 1024 snapshots for each shared folder (or 256 on certain Synology NAS models)
- 256 snapshots for each iSCSI LUN
- 65536 snapshots in total in the system (or 4096 on certain Synology NAS models)
For more information on the maximum snapshot number, please refer to the specifications of your purchased Synology NAS models.
- To improve replication performance, you can go to Storage Manager > Volume to select a Btrfs volume containing replicated targets, and set Record File Access Time Frequency to Monthly or Never in the Edit window.
- Features related to iSCSI LUNs have been moved to iSCSI Manager since DSM 6.2. Corresponding features in previous DSM versions can be found at Storage Manager > iSCSI LUN.
Below is another video guide, which covers a large number of backup options, but will also show you how to set snapshots on your Synology NAS, as well as adjust retention and versions long term:
Create a Routine of Local USB Backups on your Synology NAS
USB Copy helps you copy files between your Synology NAS and external USB/SD storage devices. This package comes with multiple copy and file organization strategies to ensure efficient storage usage and easy location of files.
Note:
- Only USB/SD devices with file systems recognized by your Synology NAS (e.g., FAT32, NTFS, ext3, ext4, and exFAT) are allowed for data copy.
- Not all Synology NAS models support the HFS+ file system. USB Copy will not be able to export data to a USB/SD device using this format if the external device is inserted into a Synology NAS which does not support HFS+: the external device may enter read-only mode in such a situation.
- Only the admin and the users belonging to the administrators group can access this package.
Create USB/SD Copy Tasks
You can customize each copy task for an external USB/SD storage device, and import/export files between your Synology NAS and the USB/SD device. When the USB/SD device is inserted again for copy, your Synology NAS will recognize the matched device and apply the same copy settings.
- Insert an external USB/SD storage device to your Synology NAS.
- Click Create (the plus icon) on the upper left corner.
- Select the desired task type: Photo/Video Import, Data Import, or Data Export.
- Specify basic task information and select a copy mode:
- Multi-versioned: Each time the task runs, a folder will be created and named with the run time. All source files will be fully copied to the destination.
- Mirroring: Each time the task runs, all changes made in the source folder will be copied to the destination, making the destination folder a complete mirror copy of the source.
- Incremental: Each time the task runs, newly added and modified source files will be copied to the destination.
- When you choose the Multi-versioned copy mode, you can set up rotation policies to delete older versions:
- Enable backup rotation: Select to rotate versions by the following conditions:
- Rotate from the earliest version: Delete the earliest versions when stored versions exceed the maximum limit.
- Smart Recycle: Select to start rotation when the maximum limit is exceeded. The system will rotate versions that do not meet any of the conditions below; when remaining versions still exceed the limit, the system will rotate the earliest versions:
- Hourly versions from the past 24 hours: Keep the earliest version created each hour.
- Daily versions from the past 1 day to 1 month: Keep the earliest version created each day.
- Weekly versions older than 1 month: Keep the earliest version created each week.
- Number of versions: Specify the maximum number (between 1 and 65535) of versions to keep.
- Enable backup rotation: Select to rotate versions by the following conditions:
- When you choose the Incremental copy mode, three more settings will be available:
- Remove original file structure (i.e. flatten all files) in the destination folder: Select to copy files without copying the source file structure, and to further sort out the files according to the selected file organization or renaming policy.
- File conflict policy: Choose Rename or Overwrite to deal with the situation when files with the same names are copied to the destination.
- Delete source files after copy completes: Select to have files in the source folders deleted after they are copied to the destination.
- Configure execution settings:
- Copy data whenever the USB/SD storage device is plugged in: Select to auto-perform this copy task when the matched USB/SD device is inserted to your Synology NAS.
- Eject the USB/SD storage device when copy completes: Select to auto-eject the USB/SD drive when this copy task completes.
- Enable schedule: Select to run the copy task based on specified conditions.
- Deselect unwanted file types and extensions to copy only needed files. You can also create filters through the text field:
- Specify the full filename (Template:
NAME.FILE_EXTENSION). - Specify the file extension (Template:
*.FILE_EXTENSION).
- Specify the full filename (Template:
- Click Apply to finish the setup.
- To run the task, do one of the following:
- Click Run on the management interface.
- Press the Copy button (for models with the hardware Copy button).
- Plug in the USB/SD device to your Synology NAS (with Copy data whenever the USB/SD storage device is plugged in enabled).
Note:
- Photo/Video Import tasks only run in the incremental copy mode. The imported photos and videos will be renamed with modification time and sorted into folders by modification date.
- You can manage scheduled copy tasks at Control Panel > Task Scheduler.
- When a copy task is scheduled for multiple runs, keep the storage device mounted to your Synology NAS and do not select Eject the USB/SD storage device when the copy completes. The device will be ejected when there are no more pertaining tasks in progress.
- Files and folders should follow the naming rules below for successful copying:
- Filenames should not start with “._” or “.SYNOPPSDB”.
- Filenames and folder names should not be or contain any of the following: “@eaDir”, “#recycle”, “desktop.ini”, “.ds_store”, “Icon\r”, “thumbs.db”, “$Recycle.Bin”, “@sharebin”, and “#snapshot”.
- A partition on a USB device can only support multiple copy tasks with, however, certain limitations on the destination path:
- Tasks cannot share the same destination path.
- A task cannot use a destination path if a part of that destination path is already set as the destination path of another task.
- A task cannot have its destination path be included in the destination paths of other tasks.
- If the file system of your backup destination is exFAT/FAT32, a file with filename containing the following characters might overwrite other files with the same filename during automatic renaming: \ / | : < > ” * ? \r \n. This is because the characters are considered to be invalid characters and the system will automatically replace them with a random character that’s recognizable by the system. For example, a file named A|A might overwrite files named A>A or A?A after they all are renamed to A-A.
- When you run a copy task, the hardware Copy button of your Synology NAS (for models without this button, see the Power LED indicator instead) will continue to blink until the task ends. You will also hear a short beep and a normal beep at the beginning and end of the task.
Set up Tasks for Hardware Copy Button
If your Synology NAS comes with a hardware Copy button, through Copy Button (associated with the frontal USB port) and SD Copy Button (associated with the SD slot) you can copy data between your Synology NAS and any external USB/SD storage devices inserted into the frontal ports.
To enable a task for hardware Copy button:
- Sign in to your Synology NAS and open USB Copy.
- Select Copy Button or SD Copy Button on the left panel, depending on the device type.
- Go to Overview to enable the Copy-button task, and then go to Task Settings and File Filter to specify relevant settings.
Note: The Copy Button tab only works with USB devices inserted into the frontal USB port.
If you still need help, use the Video Guide below to walk you through the steps on how to setup a USB backup routine on your Synology NAS:
Backup and/or Sync Your Synology NAS to Google Drive, DropBox and OneDrive
With Cloud Synchronization, you can seamlessly sync and share files among your Synology NAS and multiple public cloud services.
Create New Connections
To sync files among your Synology NAS and public cloud services, you need to create connections on Cloud Sync to link to the service provider by using your user credentials.
To create a new connection:
- On the Cloud Sync user interface, click on the Create icon at the bottom-left corner to start the wizard.
- Choose one of the following public cloud services to sync files with and click Next.
- Dropbox, Baidu Cloud, Google Drive, Box, OneDrive, Amazon Drive, MegaFon MegaDisk, and HiDrive: Sign in with your user credentials.
- WebDAV: Input the server address, your account and password. Server address should follow the formats specified below:
-
- Input http or https URLs of the intended WebDAV server, with custom port number after the colon (optional), e.g. http://mywebdavserver.synology.me:5005 or https://mywebdavserver.synology.me:5006
Note: Please note that the entered address cannot contain “.” or “..“.
- Cloud Sync will connect to the server via http if the URL does not imply http or https.
- If port number is not specified in the URL, Cloud Sync will access port 80 in http connections, and port 443 in https connections.
- Path can be appended to the URL, e.g. https://mywebdavserver.synology.me:5006/webdav/folder
-
- Yandex: Input your account and password.
- Google Cloud Storage: Sign in with your user credentials, then Project ID and Bucket name.
- IBM SoftLayer: Input username and API Key, and choose location and Container in the next page.
- RackSpace: Input username and API Key, and choose location and Container in the next page.
- OpenStack Swift compatible cloud services: Input the identity server address and choose the KeyStone protocol version which the server supports:
- Version 1.0: Input username and API Key
- Version 2.0: Input username, password, Tenant ID or Tenant name (optional).
- Version 3.0: Input username, password, Tenant ID or Tenant name (optional), and Domain ID or Domain name (optional).
- You can choose the location and Container on the next page after passing the identity service
- S3 storage: Select a server (Amazon S3, Amazon S3 China, or input a server address directly), then input the Access key, Secret key and Bucket name. If users want to enter user-specified S3 service hosts, they should enter something like “s3.amazonaws.com”, or “api.suite-stockage-cloud.sfrbusinessteam.fr” in the S3 Server Address field.
- hicloud S3: Input Access key, Secret key, and Bucket name.
- SFR NAS Backup: Input Access key, Secret key, and Bucket name.
- Microsoft Azure: Select a server, input the Blob Storage Access key, and select a Blob container.
- Backblaze B2: Input keyID and application key, and select a Bucket.
- Alibaba Cloud OSS: Input Access key and Secret key, and select a Bucket.
- Tencent Cloud COS: Input Secret ID and Secret key, and select a Bucket.
- JD Cloud OSS: Select region, input Access key and Secret key, and select a Bucket.
- Once authentication has been successful, fill in the following fields and then click Next.
- Task name: This name will show on the connection list.
- Local path: Select a local folder. All directories and files within this folder will be synced to the remote folder.
- Remote path: Select a remote folder. All directories and files within this folder will be synced to the local folder.
- Sync direction: Select whether you want the sync to be Bidirectional,Download remote changes only, or Upload local changes only.
- Check the box next to Data encryption to enable client-side data encryption.
- Check the box next to Don’t remove files in the destination folder when they are removed in the source folder. if needed.
- Schedule settings: Go to this section to enable your schedule for file syncing.
- To further adjust your sync settings, click Advanced settings.
- You can prevent certain files from being synced by unchecking any folders you don’t want synced, by setting a max file size limit, or filtering out certain file names or file extensions:
- By folder: Uncheck any sub-folders you don’t want synced.
- By maximum file size: If a file is bigger than your specified size, it will not be synced.
- By file name: Any file with the designated file name will not be synced.
- File extension: Any designated file extension will not be synced. Add *.[extension] to the table, e.g. *.iso.
- You can prevent certain files from being synced by unchecking any folders you don’t want synced, by setting a max file size limit, or filtering out certain file names or file extensions:
- Click Apply to save your settings.
Here is another brief Video Guide that will walk you through how to backup/sync your Synology NAS with a cloud storage provider:
Stay 1st Party and Connect Your Synology NAS to Synology C2 with Cloud Synchronization
You may already be aware, but Synology has its own premium cloud platform/service in the form of Synology C2, which can be synchronized with your NAS using the same steps as those detailed above with Cloud Sync and/or Hyper Backup. Synology C2 Storage plans are tailored to different users with features, storage and prices to match their size and needs. Whether you are a home user looking for an easy-to-use cloud backup plan, or a system administrator in search of secure cloud storage with optimized space utilization, Synology’s pricing plans can meet your needs. In order to start using the Synology C2 Cloud service for backups and Syncing, sign in to DSM with administrator privileges and install Synology Hyper Backup. Create a backup task and select Synology C2 Storage as the cloud destination. You will be asked to sign in with the Synology Account you wish to use to manage C2 Storage for Hyper Backup. After login, you may start the 30-day free trial if eligible or purchase a C2 Storage plan.
Back up data on your Synology NAS to Synology C2 Storage
- In Hyper Backup, click on the + icon in the bottom left corner and select Data backup task.
- Choose Synology C2 Storage as your backup destination.
- Enter your Synology Account and password. Then, follow the instructions to finish creating your backup task.
- If you have not used Synology C2 Storage before, you will receive a 30-day free trial so you can try it out.
- Select a region and plan.
- A credit card is required for creating a backup plan. You will not be charged during the free trial period.
- Confirm your subscription to start using C2 Storage.
Monitor backup tasks and browse data on the C2 Storage portal
- After you have created a backup task, you can sign in to the C2 Storage portal to monitor your task and browse the data stored there. You can see the storage usage, the top five tasks that take up the most space, and all of the tasks backed up to Synology C2 Storage.

- To browse your data and retrieve them directly to your computer, click on the “browse” icon to launch the C2 Storage web explorer.

- In the web explorer, click on the “download” icon to download a file.


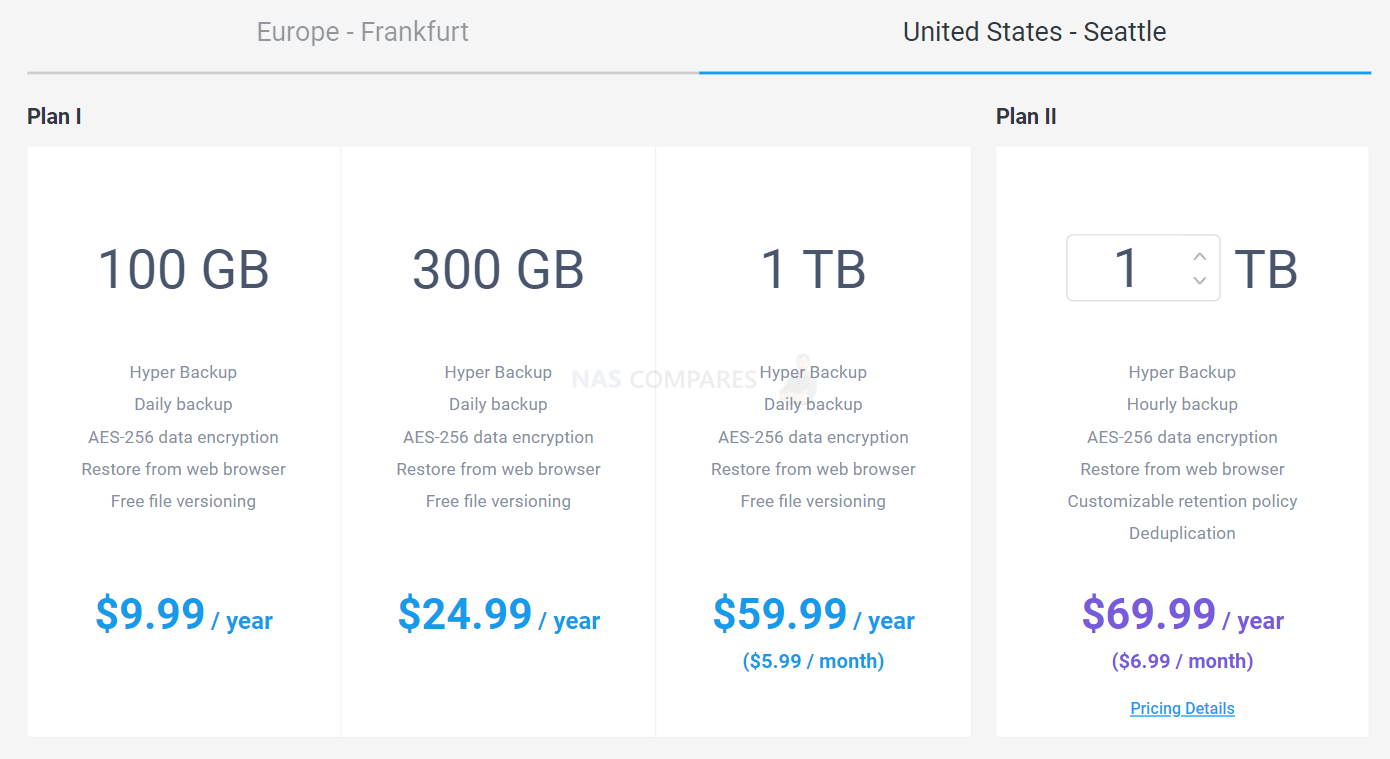
- Plan I
Plan I protects your data through daily backups with a default retention policy. C2 Storage for Hyper Backup will retain 11 backup versions (one latest, 7 daily, 3 weekly) going back 30 days. Regardless of the cumulative size of your backup versions, only the source data size on your Synology NAS is counted toward your C2 Storage usage. - Plan II
Plan II lets you customize your backup schedules and retention policies. All your backup versions count toward your total C2 Storage usage. However, Plan II-exclusive deduplication helps you cut back storage use by reducing duplicate data across different versions.

Each Synology Account can activate a one-time 30-day free trial. Try all the great features that C2 Storage offers before deciding whether it is the solution for you. Backup storage on C2 Storage can be purchased using one Synology Account and shared with multiple Synology NAS, increasing the flexibility of storage use. You can upgrade your backup plan at any time if more space is needed. Use the Video guide below for a view of the Synology C2 User Interface and see how to create a sync/backup with a Synology NAS, as well as see how versioning is handled:
Setup a 2nd NAS and Connect Both Devices for NAS to NAS Backups
Here is a Synology guide, or you can read it also from their web site.
Also, you don’t need RAID on a old NAS any more because it will not be your main point of access any more.
1. Install Hyper Backup
If Hyper Backup has not been installed on your Synology NAS yet, please follow the below steps:
- Log in to DSM and go to Package center. Search for Hyper Backup and download the package.
- Make sure your Synology NAS is running DSM 6.0 or above. For users of older DSM versions, Hyper Backup is not supported.
2. Create a backup task
This section shows you how to create a backup task to a remote Synology NAS or file server.
-
- Open Hyper Backup.
- Click the + icon on the bottom left corner, and select Data backup task.
- On the Backup Destination page, select Remote NAS device if you would like to back up to another Synology NAS. To back up to file servers, please select one of the options in the File Server section. (Please note that rsync copy only supports single-version backup.) Click Next after choosing your destination.


-
- On the Backup Destination Settings page, select Create backup task and enter the information required to connect with the other NAS device or file server. As the procedures of backing up to both the aforementioned destinations are similar, only the step-by-step screenshots of remote Synology NAS backup are provided here for your reference. Enter the IP address and account information of the remote NAS to connect with it, and select a shared folder as the backup destination. You can also change the name of the Directory under which you can find your backed up data.


If the backup destination you selected is an encrypted shared folder, please make sure it has been mounted already. Otherwise, it won’t be displayed in the shared folder list.


-
- Select any source folder(s) to back up the contained data. Encrypted shared folders, if selected, must stay mounted during the backup process. In cases where the source and destination are in the same volume, the system will mark such source folders with orange exclamation marks.


-
- Select the application(s) you would like to back up.


-
- Specify the backup settings below to fit your needs:
- Task: Name the backup task.
- Enable task notification: Select to have you informed of the task status via email, SMS, or push service.
- Enable configuration backup: Back up the system configurations (e.g. user credentials). This setting is enforced on all backup tasks by default.
- Compress backup data: Compress backup data to reduce the usage of destination storage. More backup time is needed if this option is selected.
- Enable backup schedule: Select to schedule when the system should automatically perform the backup task.
- Enable integrity check: Select to schedule an automatic integrity check, which examines stored data and detects corruption, to run at a specific time to ensure data reliability. Index check is enabled by default, while you may set a limit on the time spent on data check.
- Enable client-side encryption: Select to protect the backup data with password from unwanted access on the destination side. Please note that the password used for encryption here will be required for restoring the data backed up in this task. Therefore, losing this password will cause permanent data loss.
- Specify the backup settings below to fit your needs:


-
- Select Enable backup rotation to set up the rotation scheme:
- From the earliest versions: Delete the earliest existing backup versions once the specified Number of versions is exceeded.
- Smart Recycle: The system will retain every backup version until the specified number of versions is exceeded. When rotation is triggered, the system will first rotate the versions that do not meet any of the conditions; if all the existing versions meet the conditions below, the system will rotate the earliest version:
- Hourly versions from the past 24 hours: The system keeps the earliest version that is created each hour.
- Daily versions from the past 1 day to 1 month: The system keeps the earliest version that is created each day.
- Weekly versions older than 1 month: The system keeps the earliest version that is created each week.
- Number of versions: Set the upper limit of possible retained backup versions.
- Timeline: Display the possible result of backup retention according to your backup schedule and rotation scheme.
- Select Enable backup rotation to set up the rotation scheme:


- Click Apply to complete the setup.
- To perform the backup task immediately, follow the Backup Wizard’s instructions and click Yes.
If you want to create a synchronized backup between your Synology NAS and a NAS from another brand, you can use the video guide below to walk you through the steps easily:
Connect 2 Identical NAS Setup for Failover Using a Dual Controller/SHA on your Synology NAS
The term “high-availability” refers to a server layout solution designed to reduce service interruptions caused by server malfunctions. Synology High Availability (SHA) employs two hosts to form a “high-availability cluster” in which one host assumes the role of “active server” and the other host acts as a standby “passive server.”
In a high-availability cluster, data on the active server is continuously replicated to the passive server, so mirrored copies of all files will exist on both hosts. Therefore, in the event the active server crashes or malfunctions, the passive server can take over all services, minimizing system downtime.
Before you start
Please read the following sections carefully before trying to create a high-availability cluster.
Hardware Requirements:
- SHA requires two identical Synology NAS to act as active and passive servers.
- Two different Synology NAS can act as active and passive servers, but with limitations.
System Requirements:
- The active and passive servers must be identical models and both support Synology High Availability.
- The same version of DSM and package must be installed on both hosts.


The illustration above is for reference only. Your model and DSM version may differ.
Volume and Disk:
- The drive capacity of both hosts must be identical to avoid data inconsistencies.
- The active and passive servers must have the same number of drives. In addition, drive position must be identical.
- The hosts cannot contain any SHR format volumes. Go to Storage Manager > Volume to make sure no SHR volumes exist.


The illustration above is for reference only. The number and size of disks in your environment may differ.
Network Environment:
- Both hosts must be assigned static IP addresses as the cluster connection. Make sure that the IP addresses of both hosts are accessible and belong to the same subnet; otherwise, errors might occur when performing a switchover to the passive server. To change network settings, log in to each host and go to Control Panel > Network > Network Interface, select the network interface and click Edit.
- Both hosts must have the same number of LAN ports. If the hosts are equipped with additional network interface cards, these network cards will also count as additional LAN ports.
- Synology High Availability does not support the following: DHCP, DHCP server, IPv6, PPPoE, and Wi-Fi. Please ensure that the above are all switched off before creating a high-availability cluster.
Cable the hosts
In this section, we’ll explain how to connect both hosts so that a high-availability cluster can be created. Please see the following steps:
- Use a network cable to connect the two hosts to each other. This connection shall serve as the Heartbeat connection between the two hosts, facilitating communication and allowing data to be replicated from the active server to the passive server. This connection must meet the following criteria:
- Use the same network interface on both hosts. For example, if one end is connected to LAN 1 on one host, then the other end must be connected to LAN 1 on the other host.
- Use the fastest network interface on both hosts. If the hosts are equipped with 10GbE add-on network interface cards, this connection must use them.
- Connect the two hosts directly, without passing through any switches or routers.

- Use network cables to connect the two hosts to the network using the remaining network interfaces. Make sure these connections are active and belong to the same network. In order to prevent service interruptions caused by network failure, we recommend deploying multiple switches in your network environment so that each host in the high-availability cluster can be connected to a separate switch.

- The hosts are now ready to create a high-availability cluster. Please continue with the steps below.


Create a high-availability cluster with the hosts
Once the two hosts are connected properly, you can follow the steps below to create a high-availability cluster.
- Log into the host that you want to assume the role of the active server with an account belonging to the administrators group.
- Open Synology High Availability.

- Click Create high-availability cluster to start the cluster creation wizard.
- Click Next.


- Select which network interfaces to use for the high-availability cluster’s cluster connection and Heartbeat connection. Then click Next.
- Enter the credentials of an account belonging to the administrators group on the passive server. Then click Next.
- Specify a name for the high-availability cluster and the IP address with which you’ll be able to access the cluster resources. The wizard will display the available IP range; please select an IP address that has not been used by other services in the network. Then click Next.
- The wizard will check if the system meets all the requirements. Click Next when the verification is done.
- If there are existing data, volume or LUN detected on the active server, you can choose to keep the data or erase it all. Click Next to continue.
- Confirm the settings you previously made. Then click Apply.
- Tick the checkbox after reading the instructions and then click Yes.
- The wizard will start to create the high-availability cluster. Creation time varies depending on your environment.
- Once finished, you’ll see the cluster status on the Cluster page.


Below I set up an SHA Environment on two Synology DS920+ NAS Systems. Take a look to see how using a high availability environment can allow your storage to withstand a whole system failure:
Use Seagate Ironwolf NAS Hard Drives with FREE Data Recovery Services Included
Most Seagate drives now include Rescue Data Recovery Services matching the duration of your warranty — helping you defend against power outages, natural disasters, user error, viruses and more. With an industry-leading 95% success rate against unexpected data loss and access to world-class data recovery experts, you can focus on what’s important and rest easy knowing your files are safer. Not available in all countries.
Below is an EXTREME demonstration of me causing exceedingly large amounts of damage to a Seagate Ironwolf NAS Hard Drive and how the Rescue Recovery service was able to assist:
📧 SUBSCRIBE TO OUR NEWSLETTER 🔔
🔒 Join Inner Circle
Get an alert every time something gets added to this specific article!
This description contains links to Amazon. These links will take you to some of the products mentioned in today's content. As an Amazon Associate, I earn from qualifying purchases. Visit the NASCompares Deal Finder to find the best place to buy this device in your region, based on Service, Support and Reputation - Just Search for your NAS Drive in the Box Below
Need Advice on Data Storage from an Expert?
Finally, for free advice about your setup, just leave a message in the comments below here at NASCompares.com and we will get back to you.


 |
 |


