


The ZimaCube NAS – Teardown of the Prototype
This article marks the beginning of a three-part series focusing on the ZimaCube NAS Prototype by Ice Whale. In this first installment, we conduct a hardware-only teardown of the prototype, providing a factual and detailed analysis of its construction and design elements. Our aim is to present an objective view of the ZimaCube’s physical attributes, examining how it is assembled and the quality of its components. As part of our comprehensive coverage, we will closely inspect the ZimaCube’s storage configurations, cooling systems, and overall build quality. This teardown is intended to offer a clear understanding of the device’s hardware capabilities, setting the stage for subsequent evaluations of its software and performance in the later parts of this series. The ZimaCube NAS Prototype has been designed to offer a balance of storage capacity and compactness, and our teardown will assess how well these design goals have been achieved. We will explore the intricacies and technical aspects of the prototype, providing insights into the potential strengths and limitations of this new NAS solution in a straightforward and precise manner.
The Zimacube NAS Kickstarter Project is now LIVE and you can find out about it HERE
IMPORTANT – Please note that while the ZimaCube prototype we’re examining is representative of the solution being promised by Ice Whale, it’s important to remember that this product is still in active development and currently undergoing crowdfunding. As with any project in this stage, there are inherent uncertainties and potential changes that could occur as development progresses. Consequently, while we aim to provide an accurate overview of the prototype’s current state, the final product may differ from what is presented. Additionally, as with all crowdfunding initiatives, there is an element of risk involved for backers and potential buyers.

Disclaimer – Where are the Power and Noise Tests?
This article is about taking the ZimaCube NAS apart and finding out more about its hardware architecture. There will be users arriving at this guide who are going to want to know why I have not included temperature tests of the system when in operation and power consumption tests. These are definitely, definitely going to be tests I’m going to perform; however, a large part of the effectiveness of these and the measurable benchmarks is going to be heavily focused on the efficiency of the Casa OS running on this hardware. The Casa OS NAS software has already been around for a few years in the Zimaboard and Zimablade systems, and the ZimaCube prototype I received included this software. However, Ice Whale have told me that a more featured and system-developed version of this software is being rolled out with the ZimaCube, which arrives with significantly more horsepower across both its standard and pro versions than the previous two Ice Whale single board server NAS devices. Therefore, measuring the performance and efficiency of this system with the software it currently arrives with would not be a fair test, and therefore I am holding back on these more operational focus tests for when the intended software update is rolled out.

ZimaCube NAS N100 Teardown Start
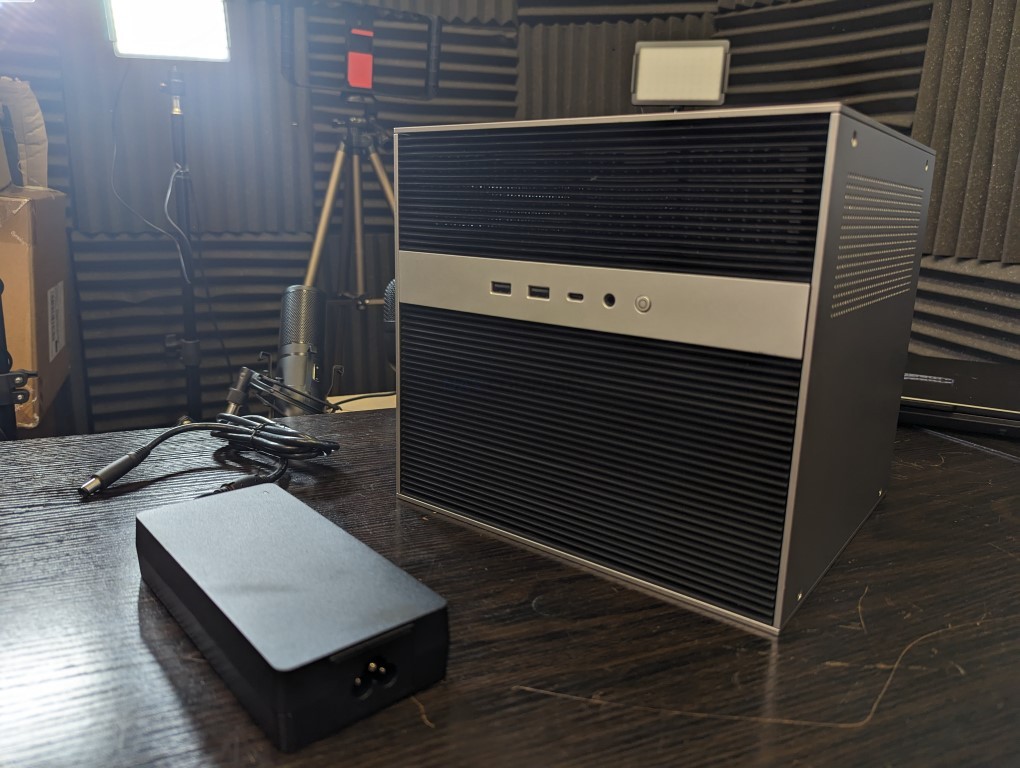
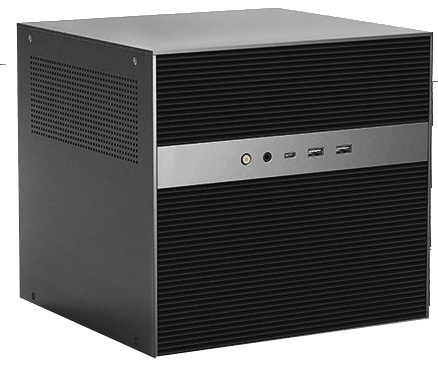
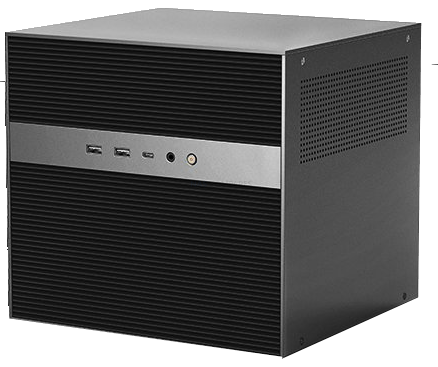
The ZimaCube system was not shipped to me in the retail packaging, but rather in a plain brown box with protective foam surroundings. Nevertheless, the system did arrive with the enclosure completed, as well as its external PSU included as well. There was no accessories kit, but I am sure this is something that will be addressed much further down the line during intended fulfillment and retail. The chassis was pretty much identical to all images currently shown by the brand on their Kickstarter pages. The chassis is metal on all sides, with each of the ventilation panels in plastic material. The front-mounted panel utilizes a magnetic attachment system in four corners, whereas all other ventilated panels are held in place with hinges hooked into the edges of the enclosure.


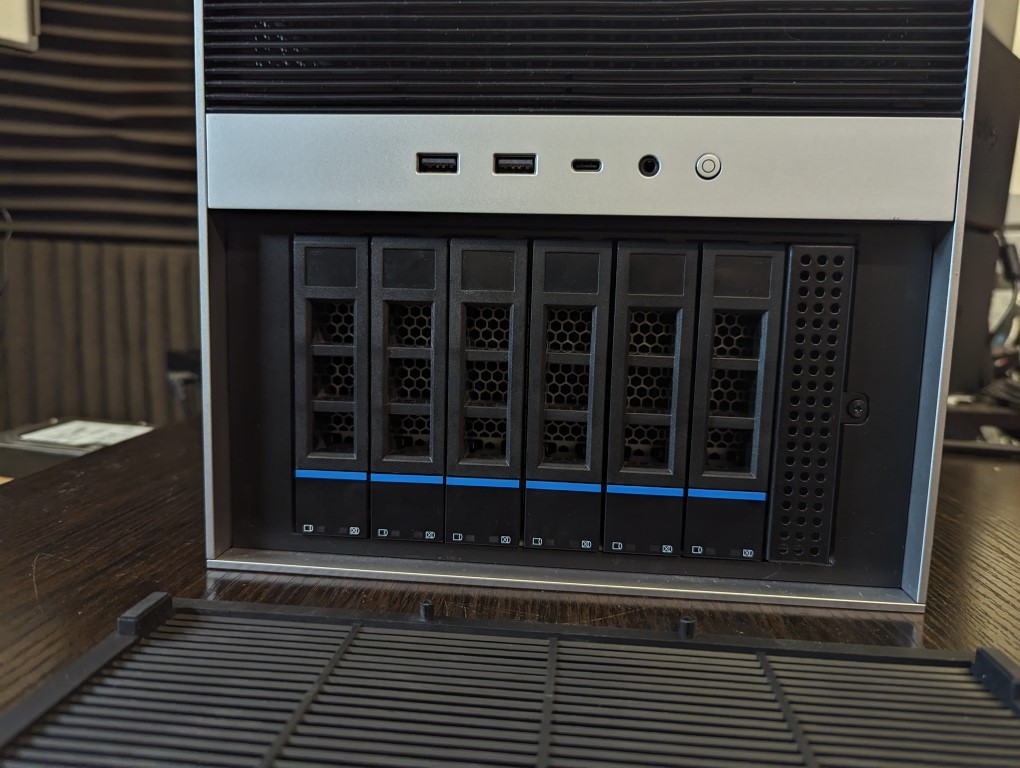
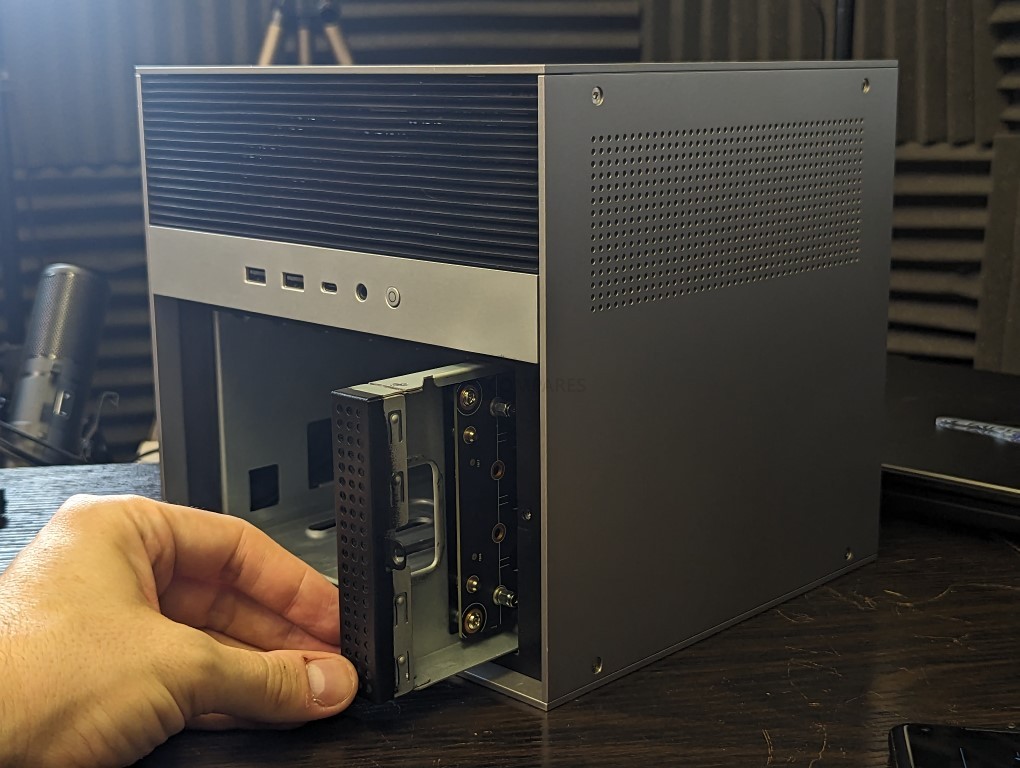
As previously discussed, the ZimaCube arrives with six SATA storage bays and an additional PCB tray-loaded module that houses two or four M.2 NVMe SSDs. To access this storage area, the front panel needs to be removed. As much as I like the streamlined and understated aesthetic of the ZimaCube, removing the front panel is not as easy as I would like, and I think a small handle, small separate pull tether or something along those lines would really help in removing this panel in the long term. It is a small complaint, but when you look at similar chassis designs in the Jonsbo N2 and N3, which both use the same understated vented front panel, they include a small fabric protruding element that allows you to remove the case easily. The ZimaCube doesn’t really have any aperture with which you can leverage that front case off easily.
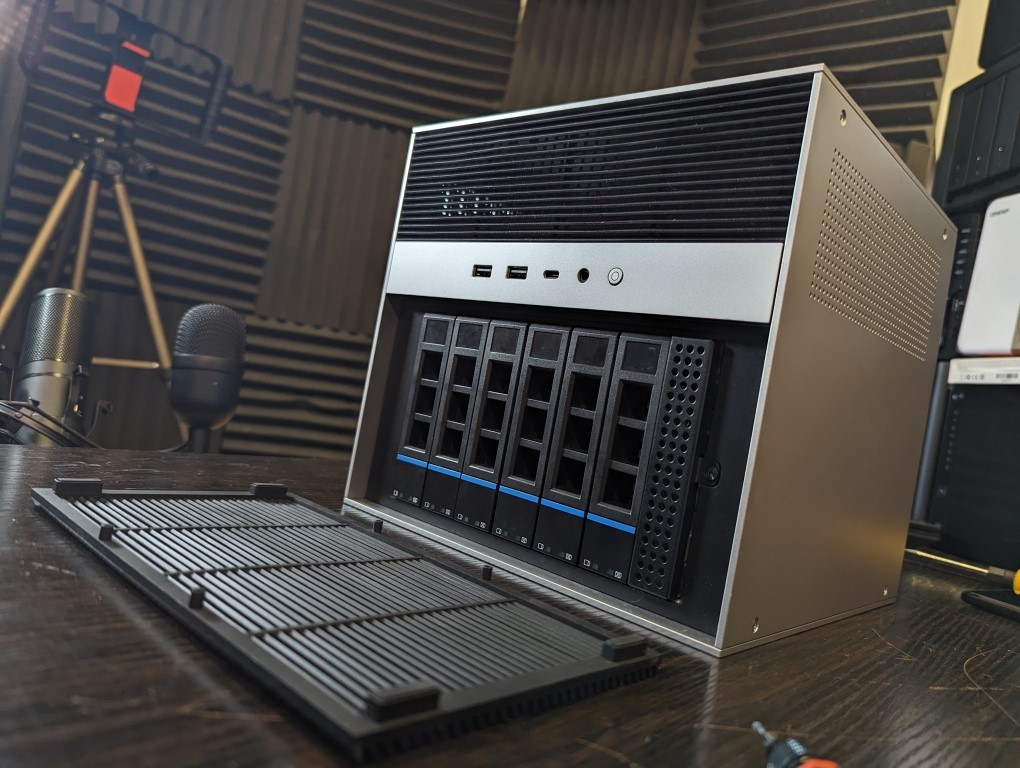

The SATA trays are all pretty high quality, spring-loaded on the handle, and although they cannot be locked, they do feature LEDs running at the base of the tray panel. They are quite a snug fit inside the chassis, and they have definitely used every available millimeter in order to populate this enclosure with six SATA bays and that M.2 module, but nevertheless, these are pretty good quality trays and also include pretty clear instructions for the installation of different types of media.

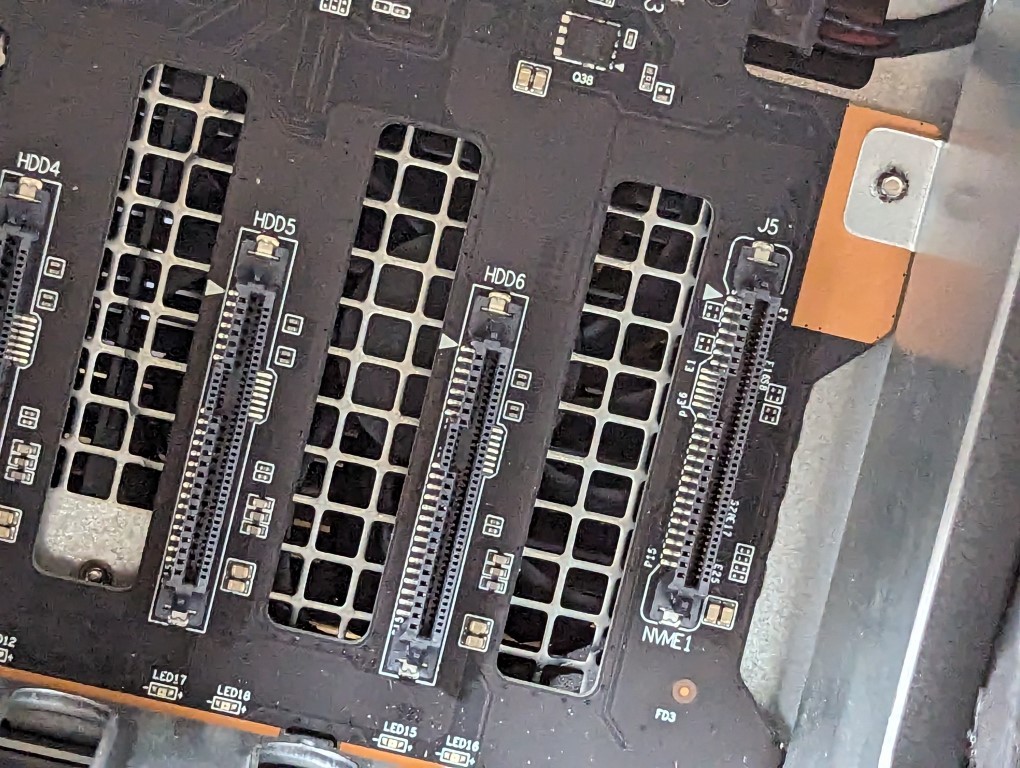
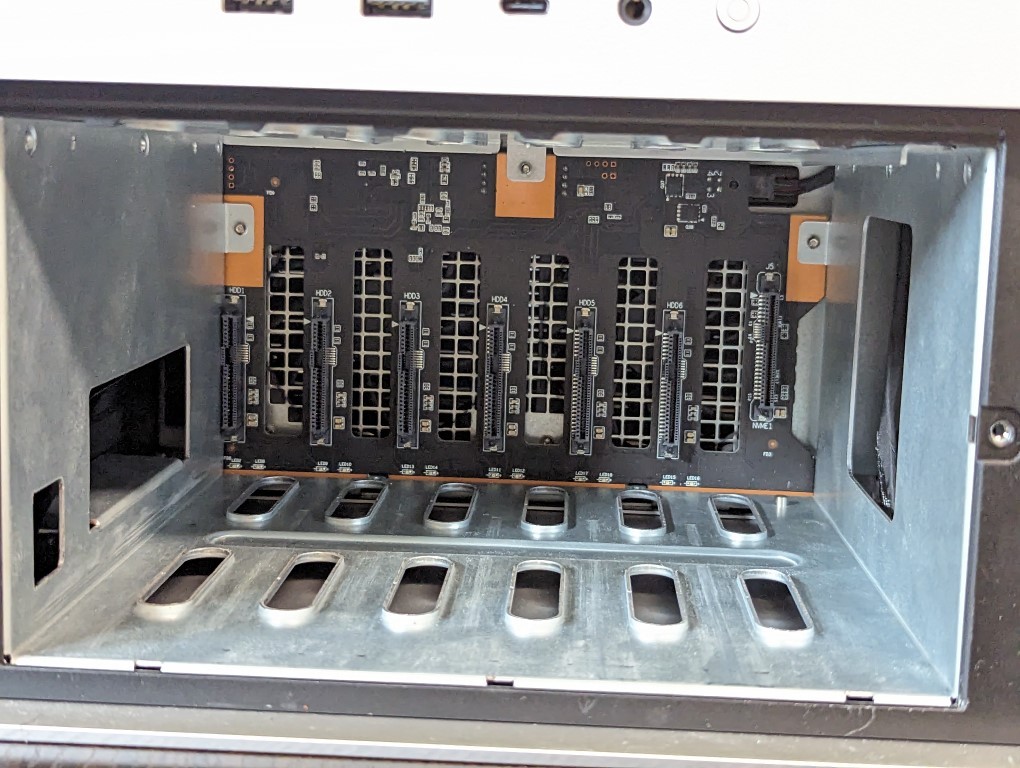
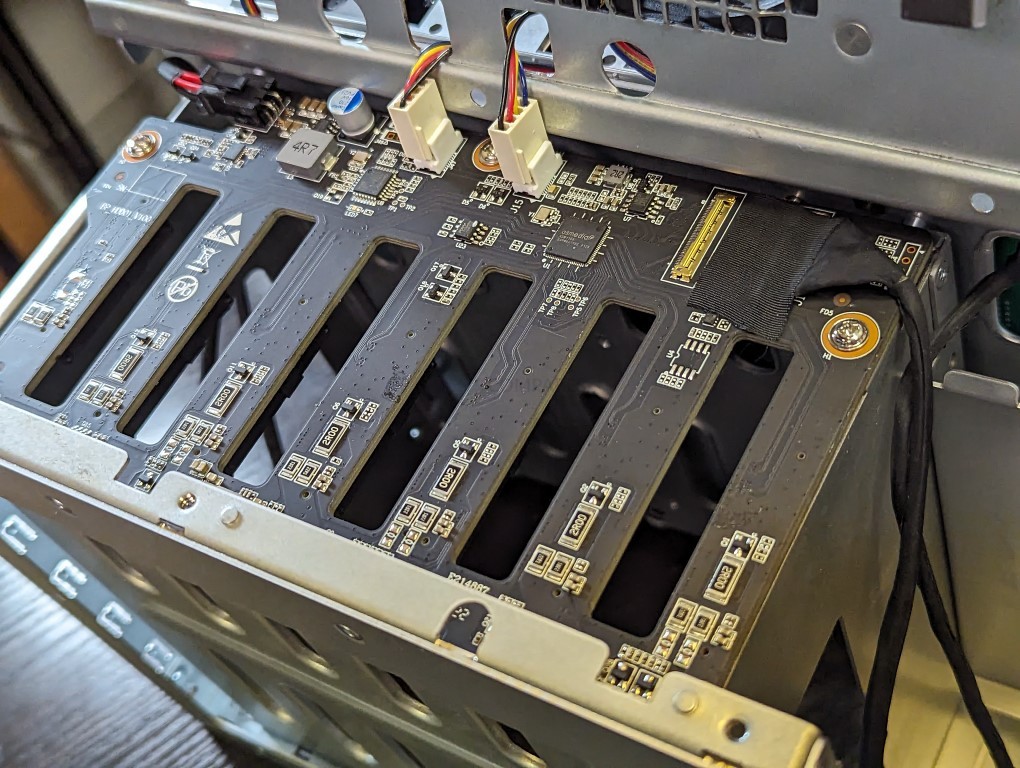
Removing all of the trays shows us a pretty clean internal backplane. Each of the individual connectors is combined SATA and data, and there seems to be a good surround of ventilation around this internal storage cage. You can make out the two active rear cooling fans which, although beneficial, I will be interested to see how air flows throughout this system and over the motherboard and CPU cooler located above the hard drive cage, as (and I will go into more detail on this later on) these are the only two active cooling fans in this system, which is always good news. Noise-wise is something of a question for the more aggressive i5 pro system.
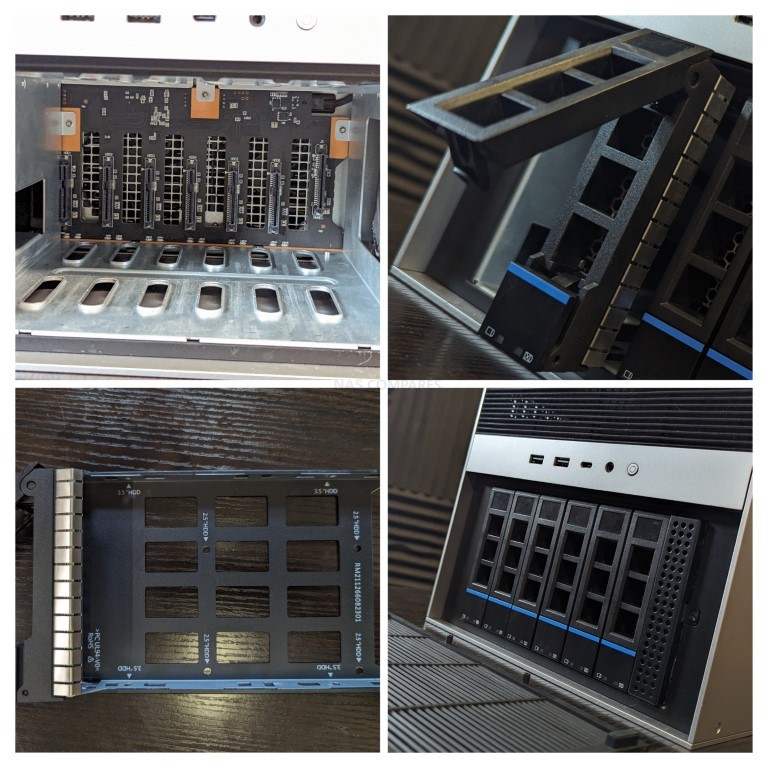

The M.2 module connects to exactly the same backplane as the rest of the main SATA storage bays but interfaces into a U.2 connector on this board that is slightly out of alignment with the rest of the data bays – nothing wrong with that, and if anything, I’m pleased to see that they have separated it with its own interface and lanes. No doubt. Removing the module is nice and straightforward and is done so with the removal of a single hexagonal screw located on the front. This totally makes sense, as unlike the more hot-swap supported SATA drives, the M.2 caddy is one that is going to be less stable upon hot-swapping attempts.

The U.2 connector that this M.2 caddy interfaces with is largely identical to the SATA connectors, but clearly, this is where space has been at a premium and this module is a little bit more stylized as a 9.5 mm width drive. Nevertheless, injection and removal are very clean and there is little chance of missing the interface during use.

The M.2 PCB contains either two or four drive interfaces, depending on which version of the ZimaCube you choose to use, and I will go into a lot more detail in a later article about lane distribution on these and on the rest of the system. Once again, space is at something of a premium and if you do choose to use M.2 heatsinks in this drive area, you are going to have to utilize moderately low-height ones in order to not interfere with the already full hard drive cage.
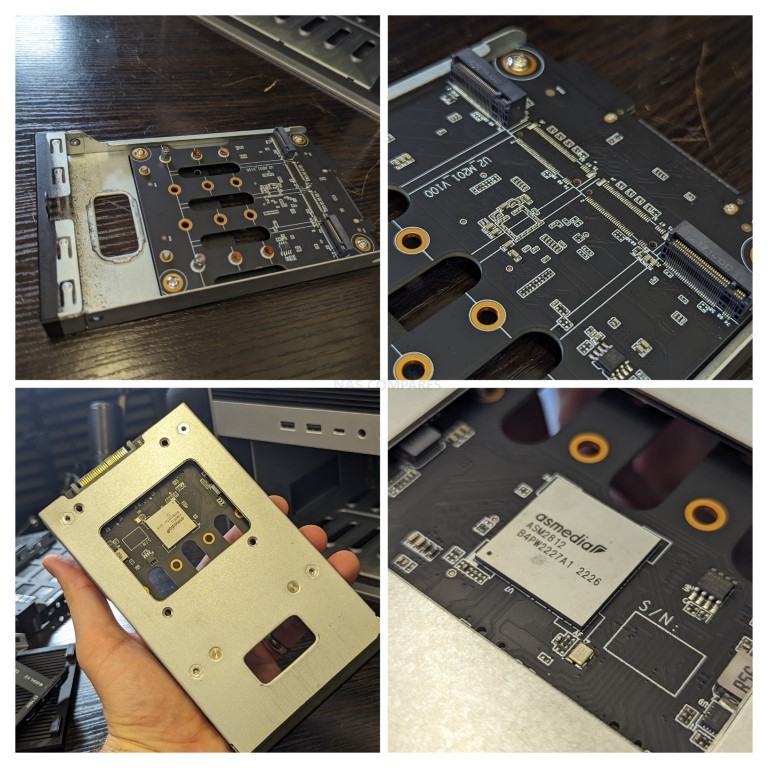
On the base of the M.2 module, we find an ASMedia PCIe chip that no doubt is bolstering these individual drives in order to leverage a little bit more lanes and speed. This is not unusual and something we have already observed in the case of the Flashstor from Asustor, but nevertheless, it also confirms that this system is really stretching the availability of those lanes and the speeds afforded to them.

ASMedia PCIe product ASM2812, a low latency, low-cost, and low-power 12-lane, maximum 6 downstream ports packet switch. With upstream PCIe Gen3x4 bandwidth, ASM2812 can enable users to build up various high-speed I/O systems, including server, system storage, or communication platforms. As this is the non-pro version of the ZimaCube system, I cannot confirm yet if this additional PCIe controller is present on that higher-spec device or even if the interface utilizes the same U.2 connectivity. Though I can imagine that they will either be largely similar or pretty much identical. Next, I wanted to remove some of the plates and panels around this system to get a better look at the internal cage of this NAS.
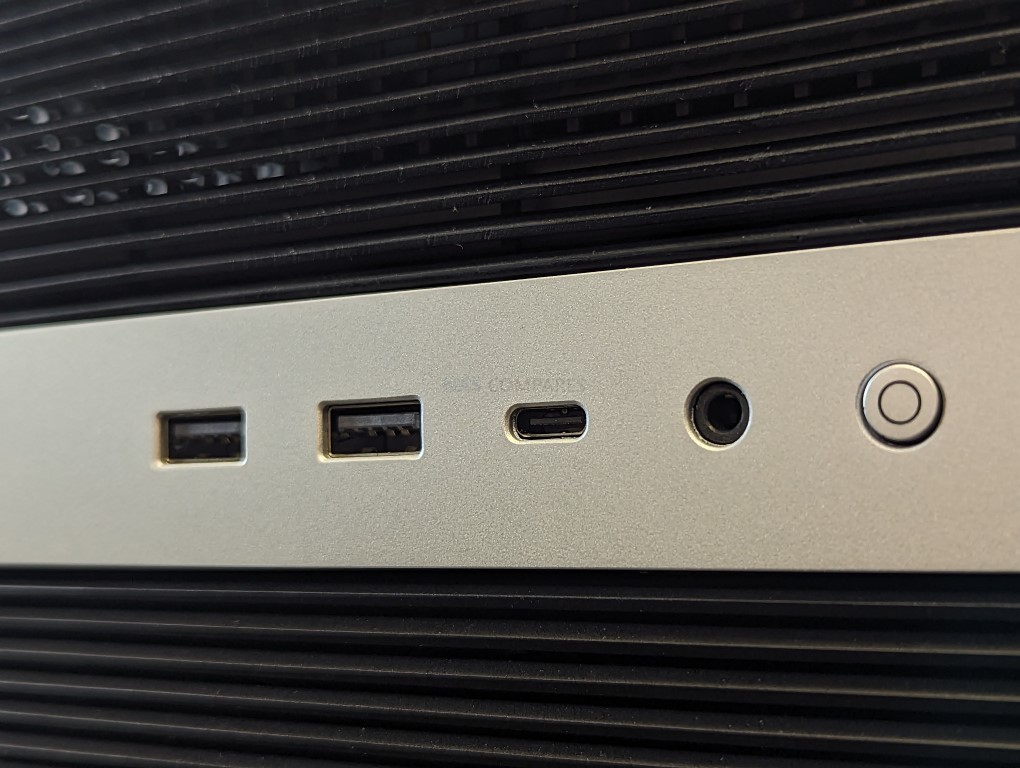

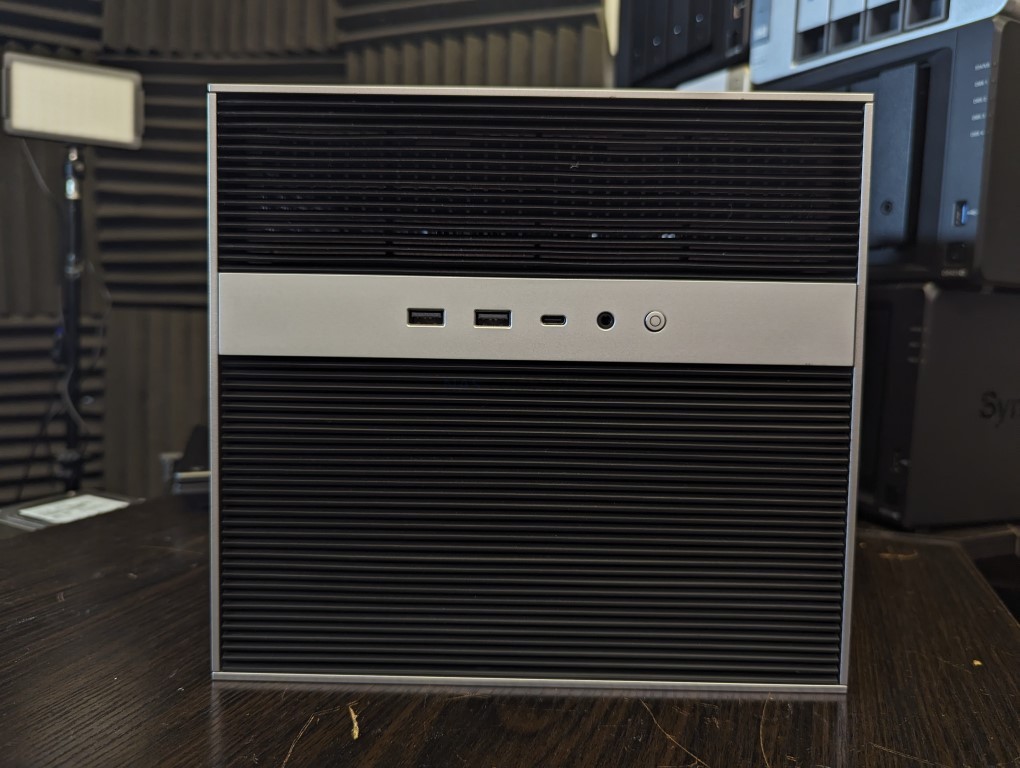
The front panel ports are exactly as Icewhale detailed in their initial Kickstarter details, with the N100 version of the ZimaCube featuring a combination of USB Type A and Type C as needed (as well as audio in/out). The panel just above this is another fully ventilated panel and behind it is the metal chassis that is also completely ventilated throughout. On the ZimaCube Pro, the system benefits from the front-mounted USB-C port being Thunderbolt 4! I will be curious to see how the motherboard factors this in, as well as the potential heat generation associated with heavy TB4 use. Let’s look at the rear panel.


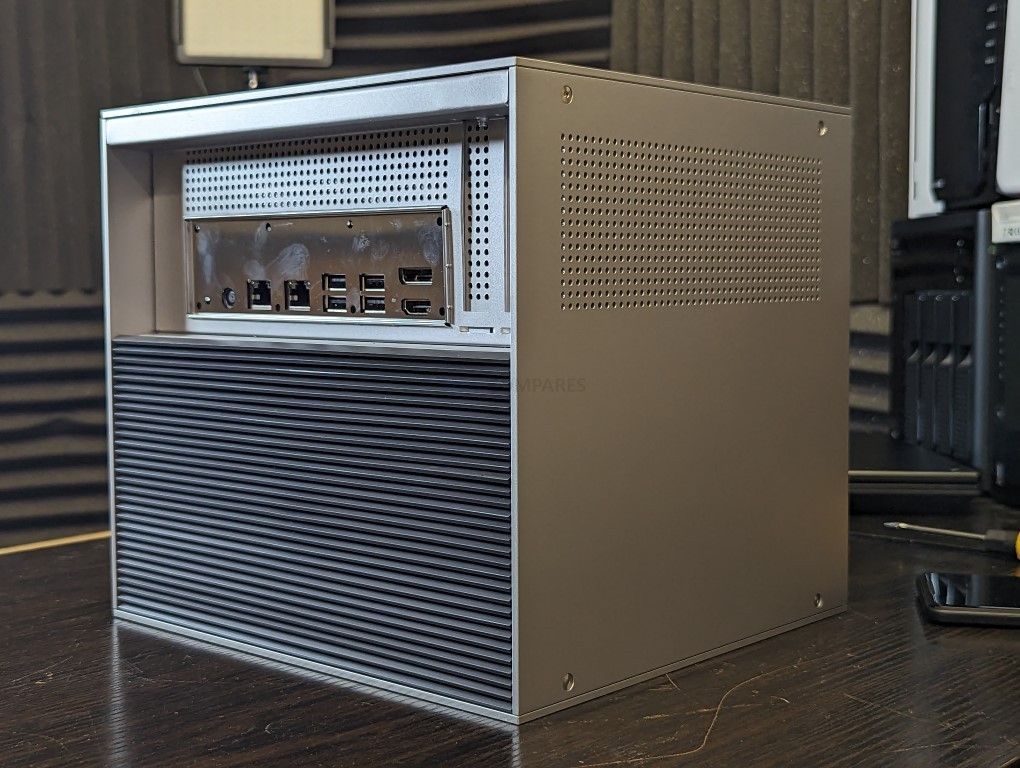
The rear ports of the N100 Zimacube model are all pretty familiar stuff, more USB ports, 2x 2.5GbE network connections and twin visual outputs in the form of a displayport and HDMI (both 4K 60FPS) – though I have yet to confirm if these mirror one another or the software and architecture allows for multiple displays. There is also the PCIe upgrade slot that allows for greater network connectivity. I completely understand why the N100 lacks 10GbE (to a point…), as integrated 10GbE onto this motherboard would be complicated and likely jack the price up – when there are other ways to achieve this for interested users looking at the N100 later. However, I am still a little surprised that the i5 Pro version lacks 10GbE and instead arrives with 4x 2.5GbE. TECHNICALLY this is 10GbE (with the right port trunking/aggregation/SMB Multi/load balancing/etc support), but with this amount of storage bandwidth across HDD and SSD available (even if you limit the M.2 NVMes to 3×1 or 4×1), its a shame that 10GbE isn’t standard in the Pro. Passive ventilation holes are present on pretty much every side and I am particularly pleased to see an especially large ventilation panel on the system’s right side, where you would find the PCIe slot (backers of the more advanced Kickstarter tiers have been looking at the GPU equipped models, with active cooling on board). But, let’s be honest – it’s whats inside that counts! Let’s get those side panels off and have a butchers inside.
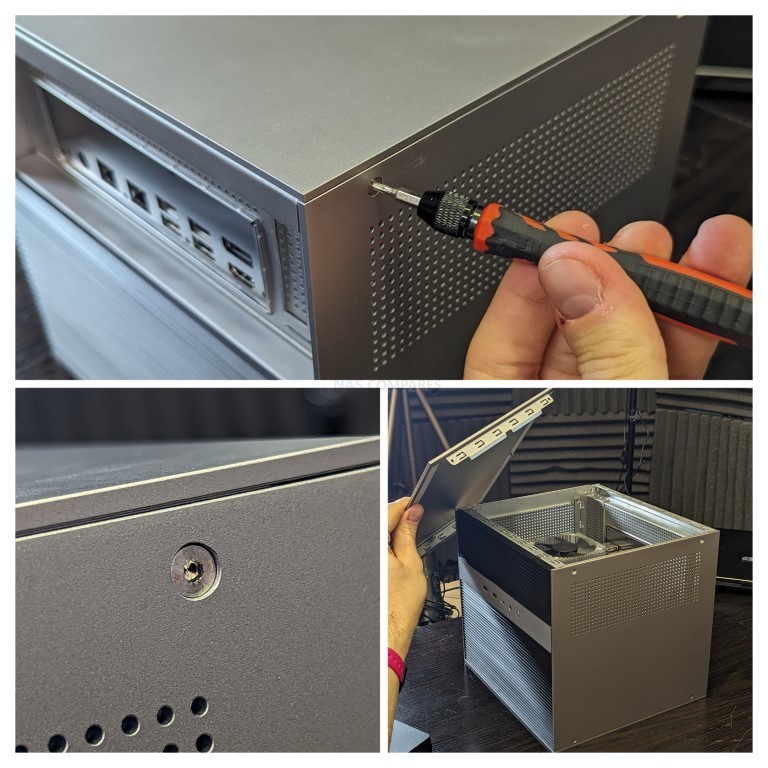

Full credit to Ice Whale on the ZimaCube NAS, unlike a lot of more affordable NAS systems that leverage the use of plastic external chassis with metal internal frameworks, the ZimaCube is pretty much all metal, which is going to be great for heat dissipation (though that does mean questions about noise in operation, of course, from vibration). Each side, as well as the top and base panel, are removed via 4 hexagonal screws in either corner. They are hooked in multiple corners and come off easily but also at the same time do feel very securely attached.
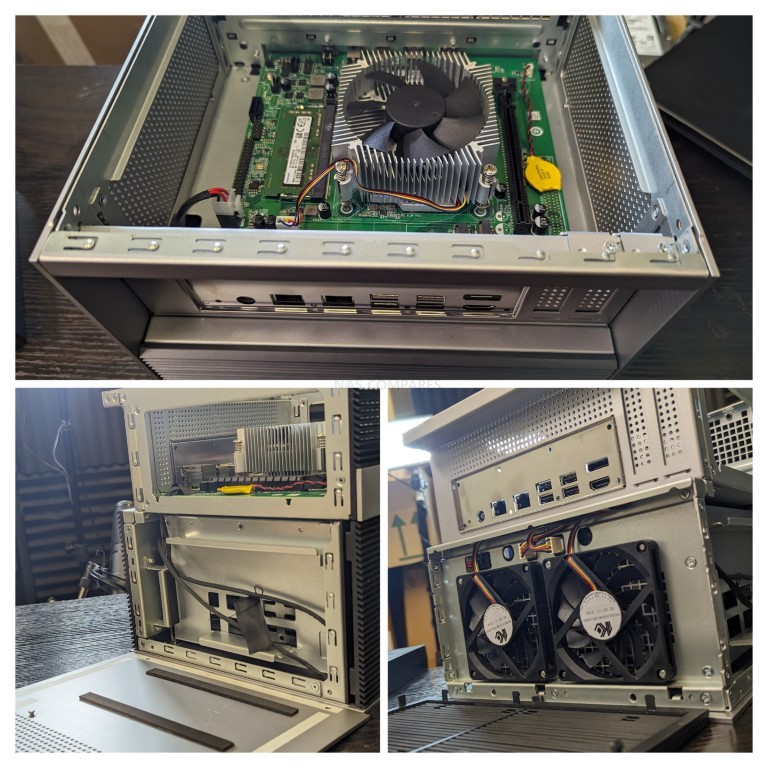

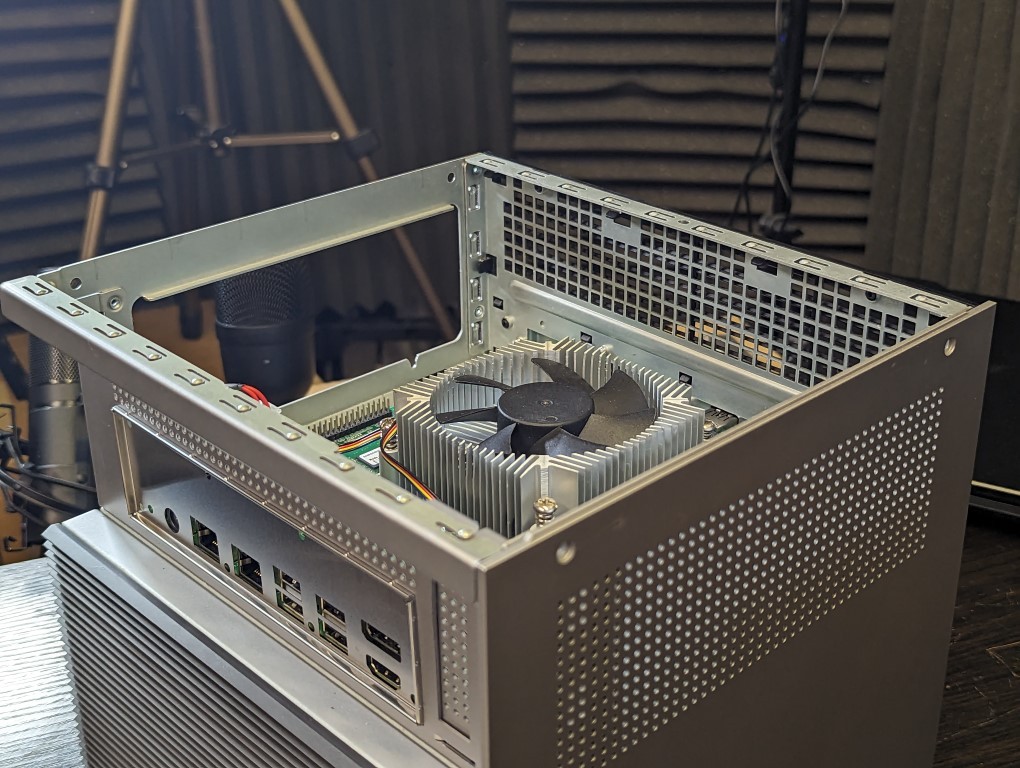
Removing both of the side panels allows you to remove the top panel, as these three pieces overlap at the top joints. This reveals a rather snugly fit motherboard. As discussed numerous times here on the blog, as well as in the crowdfunding campaign, I’m sure, this is a pretty compact system for this amount of storage, and although I’m not surprised that the mITX board inside is pretty tightly fitted, I’m still amazed at just how much they’ve packed in here. It’s already pretty apparent why they abandoned the inclusion of an internal PSU here, as notwithstanding the utter lack of space that would have ended up infringing on storage potential, it’s a great deal more elegant for this kind of design to have an external PSU that feeds into a single modest power cable running through the system connected to the mobo and the storage backplane respectively.
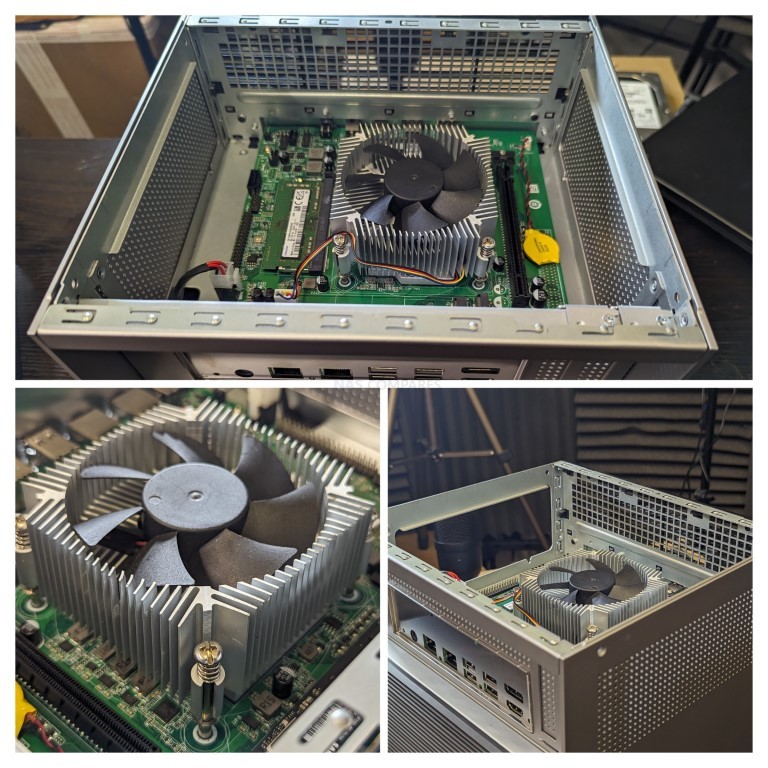

As this is the slightly more modest Intel N100 version of the ZimaCube, the CPU fan does not need to be too crazy in comparison to that of the i5. Nevertheless, after running multiple reviews on Topton motherboard built systems, I’m actually quite impressed by the CPU cooler that this system arrives with. Whereas most Topton boards that run on modest Celeron or Pentium processors arrive with an exceptionally low-profile CPU cooler, the N100 here is placed under a much more substantial CPU heatsink and fan. It’s not exactly enterprise-level, of course, but given the economies that this system is designed with in mind, the CPU fan is better than I was expecting. Note, I resisted the urge to remove the CPU fan and take a closer look at the CPU largely because I did not want to compromise future testing of this device. Nevertheless, I will update this article and future articles later with details on this when I run the more evolved Casa OS software and system benchmarks first.

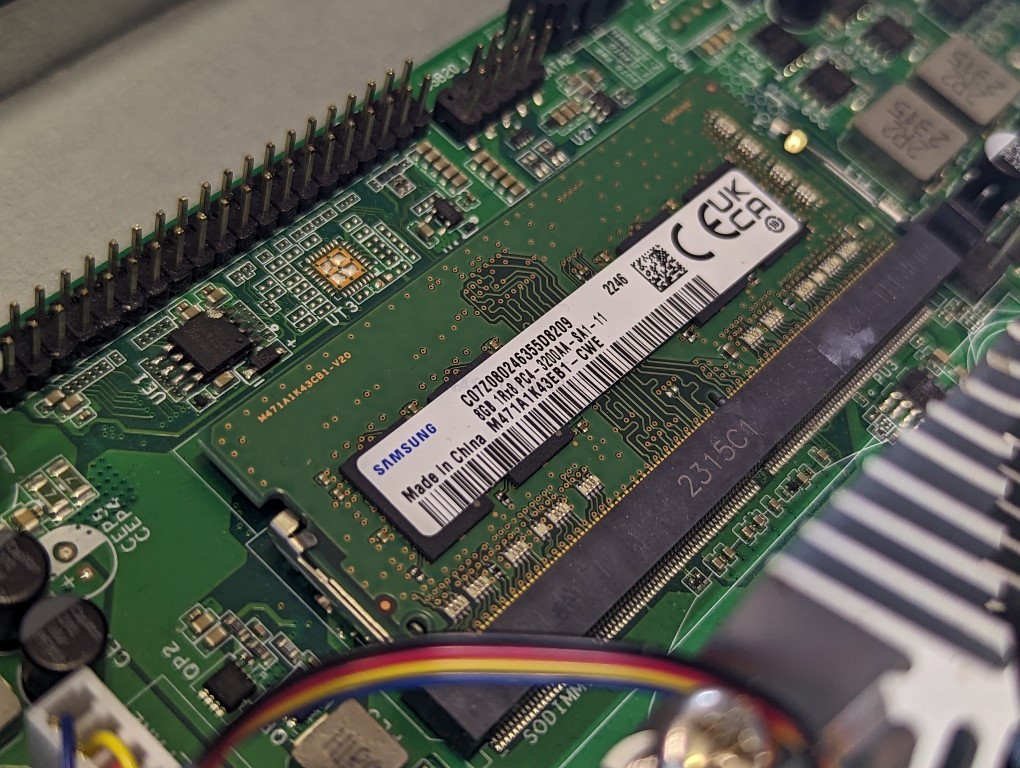
The onboard memory that this prototype arrived with was 8GB of DDR4 non-ECC SODIMM memory. The system features a single SODIMM memory slot and, given this CPU supports a maximum of 32GB, that means one SODIMM slot should be enough. Once again, a lot of more economical systems have a tendency to cut corners and increase efficiency in those systems by opting for pre-soldered individual memory modules attached to the motherboard. This often results in the inclusive memory being more affordable, but also limits any kind of upgrade or flexibility in the amount of memory you need. Therefore, much like the CPU heatsink, I am impressed that they opted for a traditional removable SODIMM slot here.

The Casa OS runs on an included NVMe SSD, in this case, a Samsung 980 Gen 3 SSD. It isn’t a huge SSD in capacity, but then again it does not need to be and once again just goes another step towards keeping this system affordable. It is still too early to say whether, if this system completes its crowdfunding and fulfillment is reached, whether all systems will be utilizing a similar known branded SSD for the operating system – this is once again another area in which some brands will cut corners and go for unbranded SSDs for OS drives. We’ll have to wait and see on that one. As the system is using an mITX motherboard, there are the inevitable question marks around SATA ports. This system has a lot of SATA storage to handle and it is always interesting to see how different NAS developers get around the low number of ports afforded to mITX motherboards. Originally, I assumed that these six storage bays would be connected to an M.2 SATA adapter, or perhaps, an auxiliary board connected at an angle to the base of the motherboard by PCIe. However, on closer inspection of the motherboard inside the ZimaCube, it turns out that this system isn’t even using the available SATA port that it arrives with and instead has a very different method in mind to connect that additional backplane for the SATA drives.
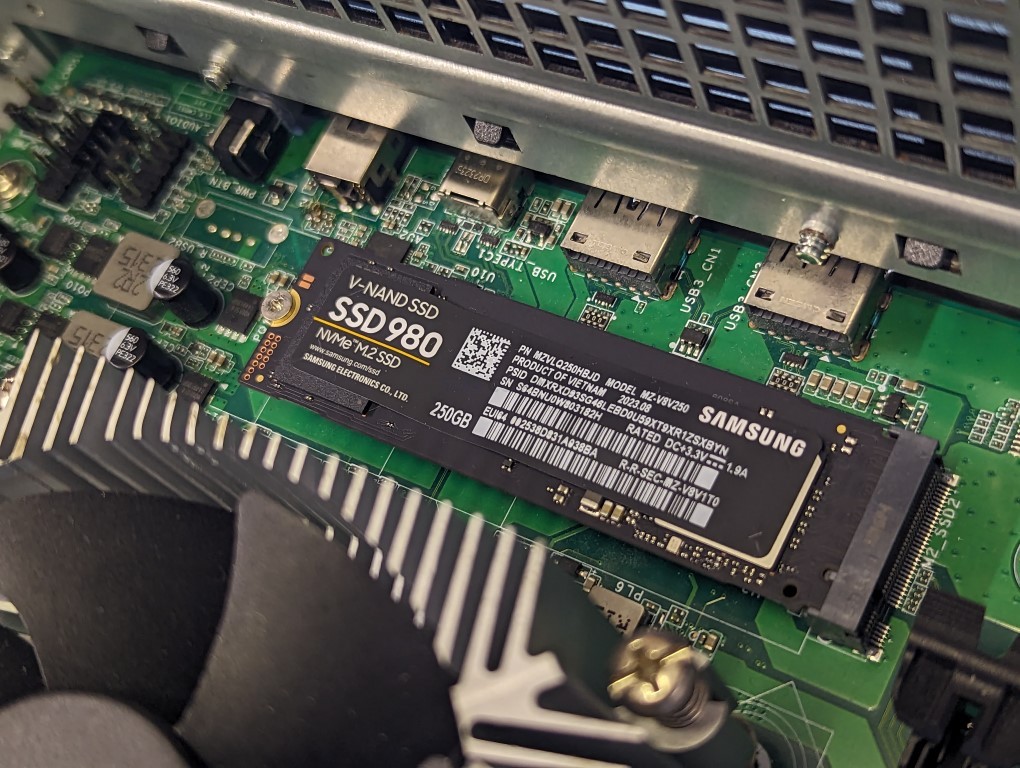

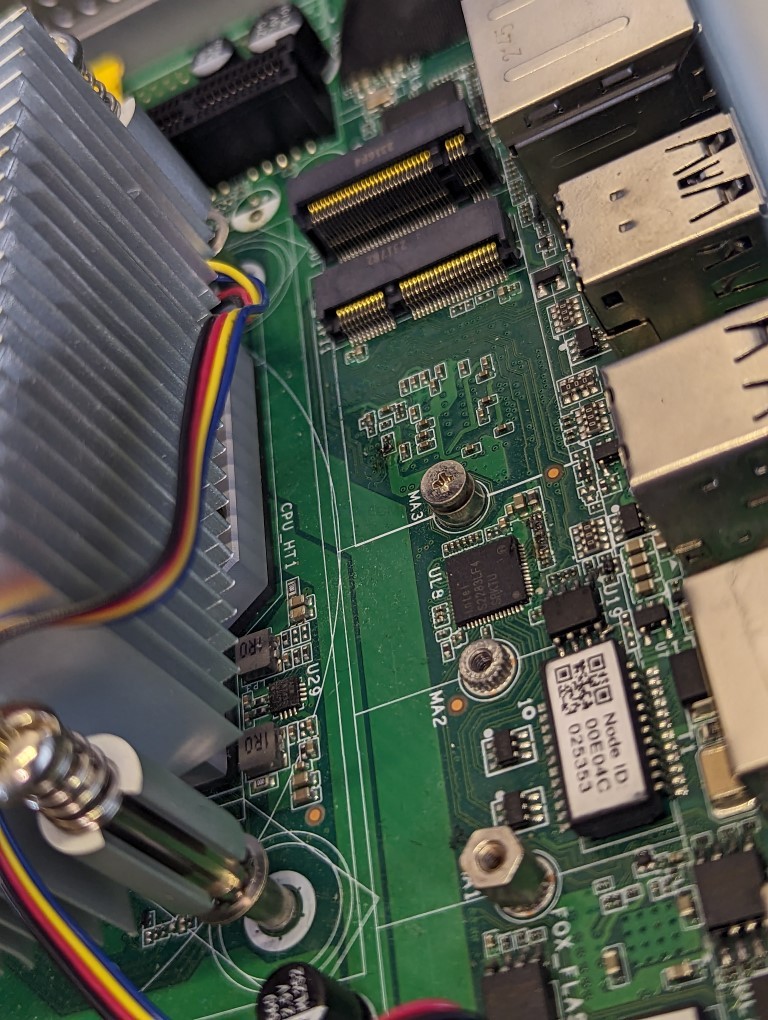
As mentioned in the early promotional materials for this device, there is an additional available M.2 NVMe slot on this motherboard which can be used for further drives for storage, caching, and more depending on the operating system you would intend to use. We are still awaiting further confirmation of how the improved Casa OS is going to manage and allow users to configure storage drives. So the true abilities of this M.2 slot are yet to be confirmed in line with the operating system, as well as support of third-party peripherals too. Nevertheless, this still means that even the N100 model of the ZimaCube is arriving out the gate with six SATA bays and four M.2 bays spread over two different areas of the system. For a price tag of $400 to 500, that is pretty unique in the market. Additionally, closer inspection showed that it wasn’t just a standard M.2 connector, but actually a twin-layered interface that allows you to use not only a standard 2280 length SSD, but also install a much smaller M.2 underneath. Once again, this is not unusual and often some AliExpress motherboards provide this in order to maximize space to add an M.2 network adapter or to use SATA multi-lane M.2 adapters. Although I’ve yet to get full confirmation from Ice Whale that this is a 100% unique board, or a modification of an existing board (or perhaps something in between), it will be interesting to see what is possible with this two-tier M.2 connector.

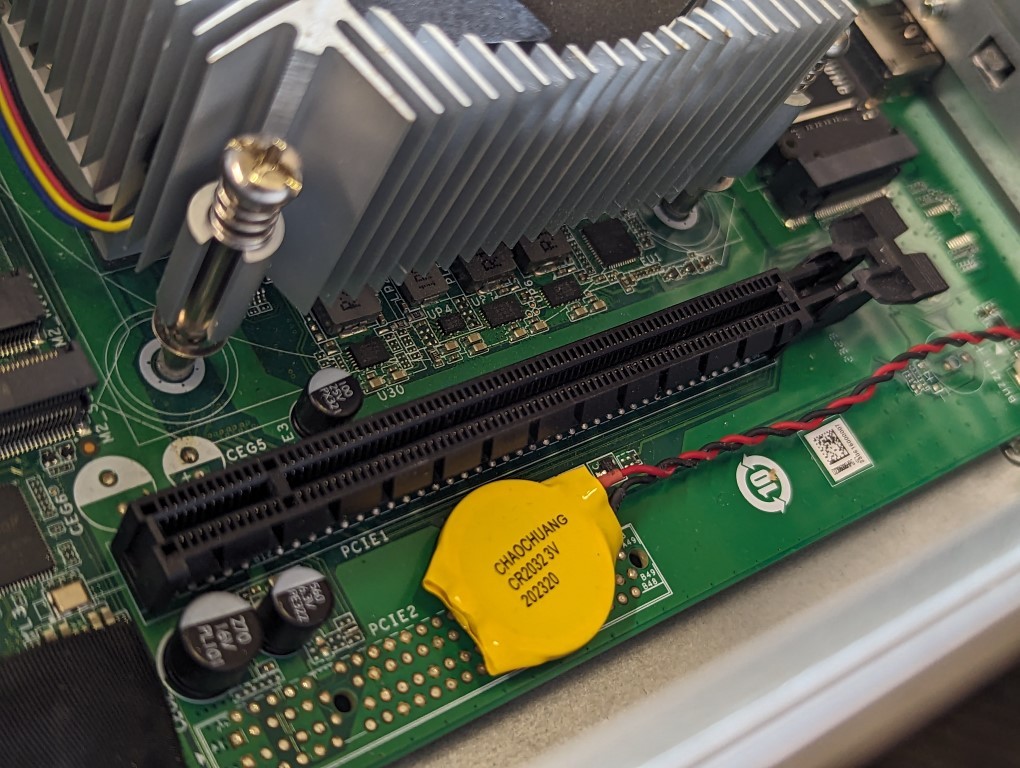
One slight area of confusion is the PCIe slot on this motherboard. I can appreciate that a lot of the components are going to be shared between the standard N100 version of this system and the pro i5 version, as they’re going to be going through similar methods of mass production if this crowdfunding campaign reaches fruition. However, the initial specifications provided by Ice Whale on this system said that the N100 version arrived with a PCIe Gen 3 x 4 slot. However, the prototype I have here clearly has a much larger speed PCIe physical interface. Now, perhaps this is the speed that is afforded to the system layout and this physical slot is simply a case of them reusing the same components across development on multiple systems. Indeed, when you look at the previous single board servers that this brand produced, these were times four speed PCIe but also included cutouts that allowed you to use larger cards. Therefore, I’ll have to hold out on confirming the PCIe architecture on this system when we do our deeper dive into the backend to see if this is a physical anomaly, or if it is a Gen 4 slot in a x16 physical interface, or maybe even that it has been software downgraded out of necessity. We will have to wait and see.

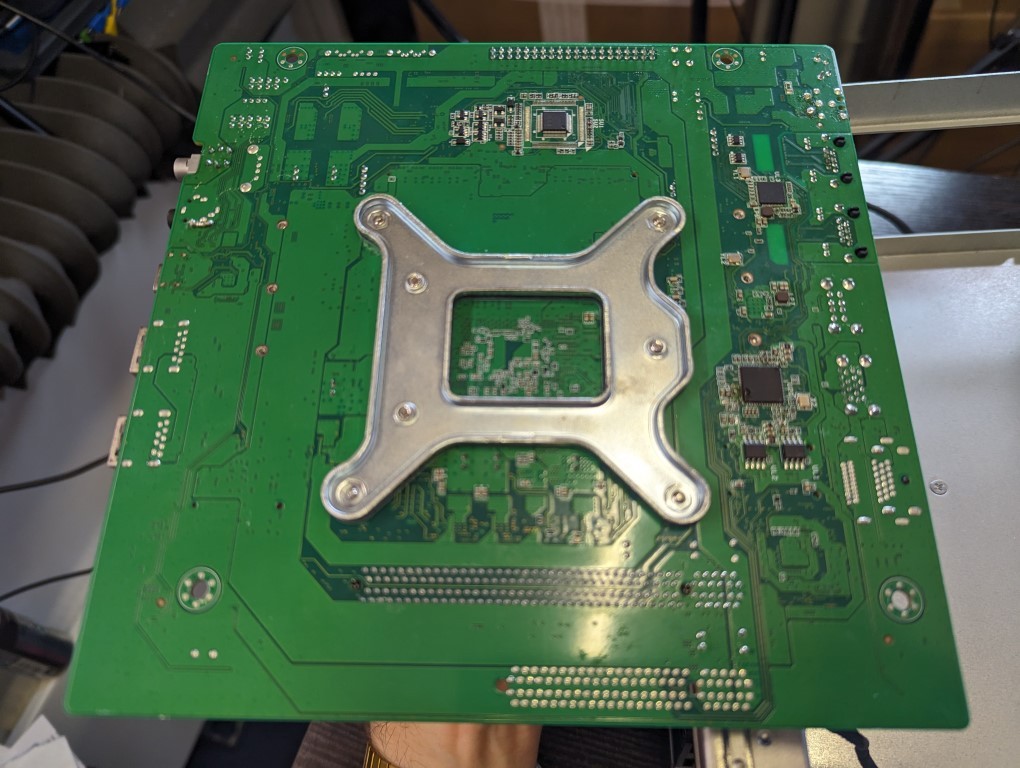
Flipping the motherboard over shows us a very clean board and no further interfaces. Recently, I’ve looked at some of the pre-made mITX boards available on AliExpress, and some boards have provided additional M.2 interfaces on their base. Needless to say, this is not something present here.

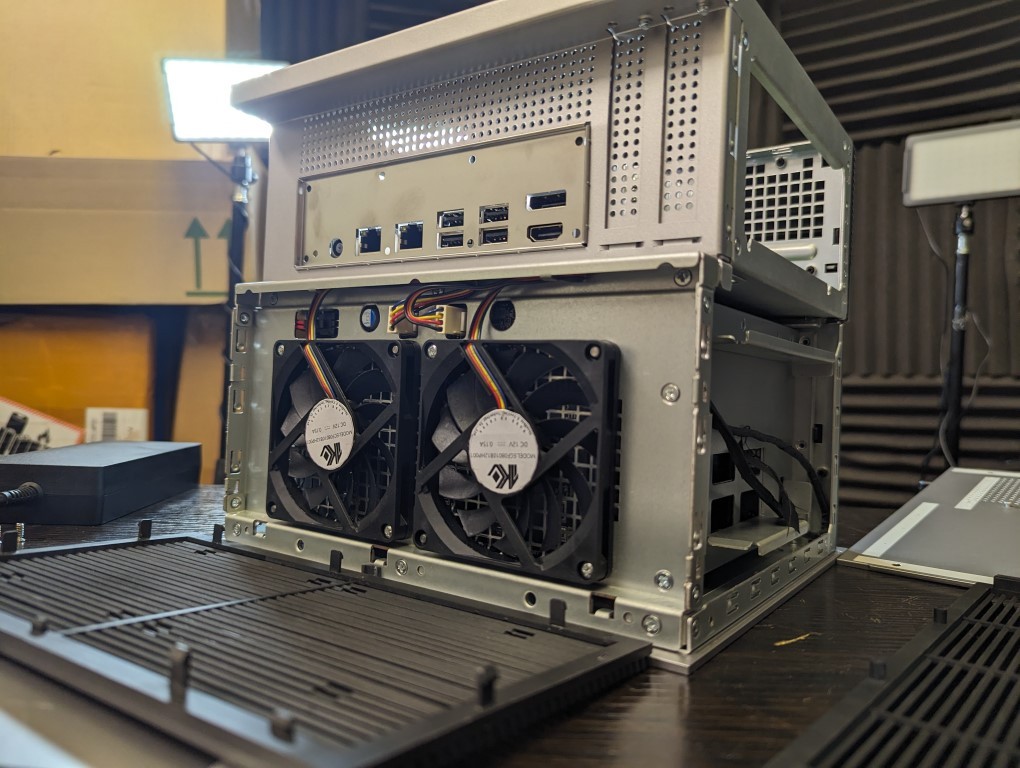
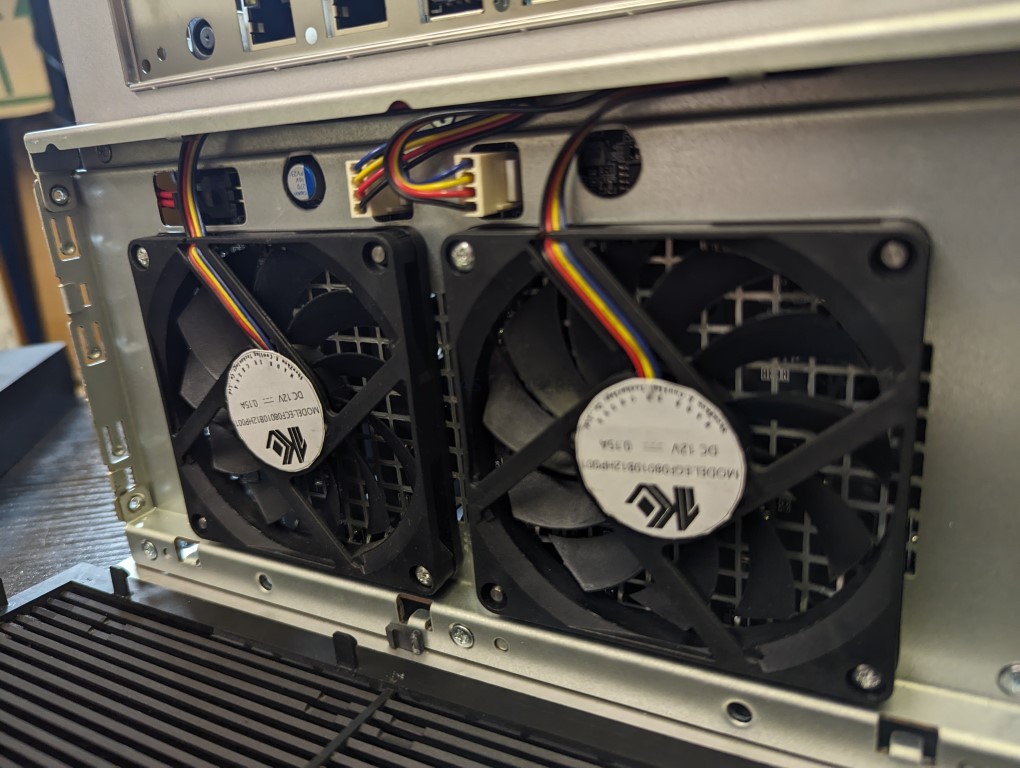
Removing the rear vented panel wasn’t too tricky and revealed two individual active cooling fans. As this system has absolutely tons of ventilation (out of necessity, I’m sure), these two fans are going to have to work pretty darn hard alongside the CPU fan at the top. It’s a very clean installation. The vented panel that lives above these fans, much like the others dotted around this system, is of pretty reasonable quality, I would say, for the price point. It’s definitely plastic and a little bendy, but given the largely exclusive use of metal across the rest of the system, this is absolutely fine.

As mentioned earlier, though, I do have questions about the system temperature on the more aggressive pro version, arriving with a 10 core Intel 12th generation i5 CPU. This teardown is of the much more affordable and comparatively modest N100 version, and I do genuinely believe that the inclusive CPU fan and twin rear fans are more than enough to keep this system cool. But it will be interesting to see if further active and passive ventilation and cooling are required on the more aggressive system and whether these two fans should be further supported by smaller fans in one of the two available panels at the front and back of the motherboard cavity. Equally, until I know for certain what the PCIe speeds are on the M.2 NVMe in that module, it’s hard to say at this time how much of a concern heat dissipation is going to be.

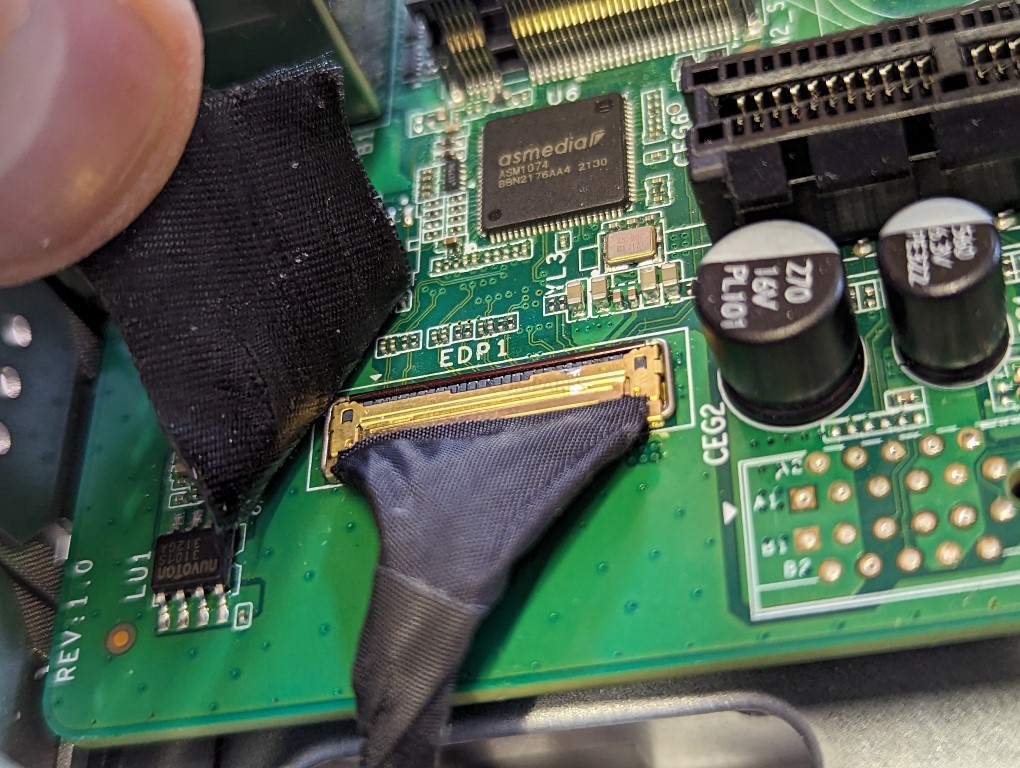
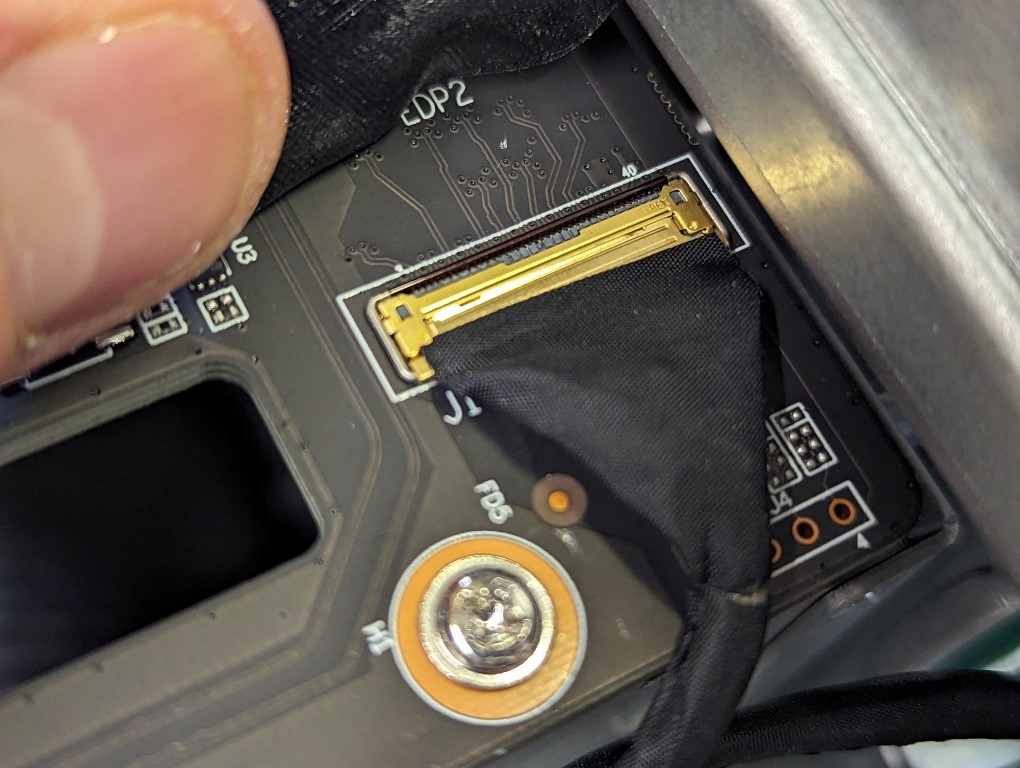
The storage backplane and the main motherboard are connected via a single cable. This really surprised me and was a novel way to get around the traditionally understood limitation of most mITX motherboards having fewer SATA ports. My working knowledge of EDP cables and their bandwidth is pretty slim, and I’m going to have to hit the books a little bit to find out more about the way this system connects these drives to the motherboard.
As mentioned earlier, the two rear fans on the system are the only methods available for active cooling in conjunction with the tons of passive ventilation located across this whole chassis. When you look at the surrounding area where the motherboard is found, there is a ton of passive ventilation available, and I kind of hope that there is at least the option to add further active cooling here, in the event that the i5 runs a little hot. I can’t help but feel that Ice Whale have largely completed development of the N100 model, but the pro series version is still in the closing stages of development. Everything I’m seeing here seems to make a lot of sense and there are some really impressive design choices in order to create a large storage potential box that has a small physical footprint. But nevertheless, I’m not sure a lot of these methods are going to translate one-to-one on the more aggressive system.

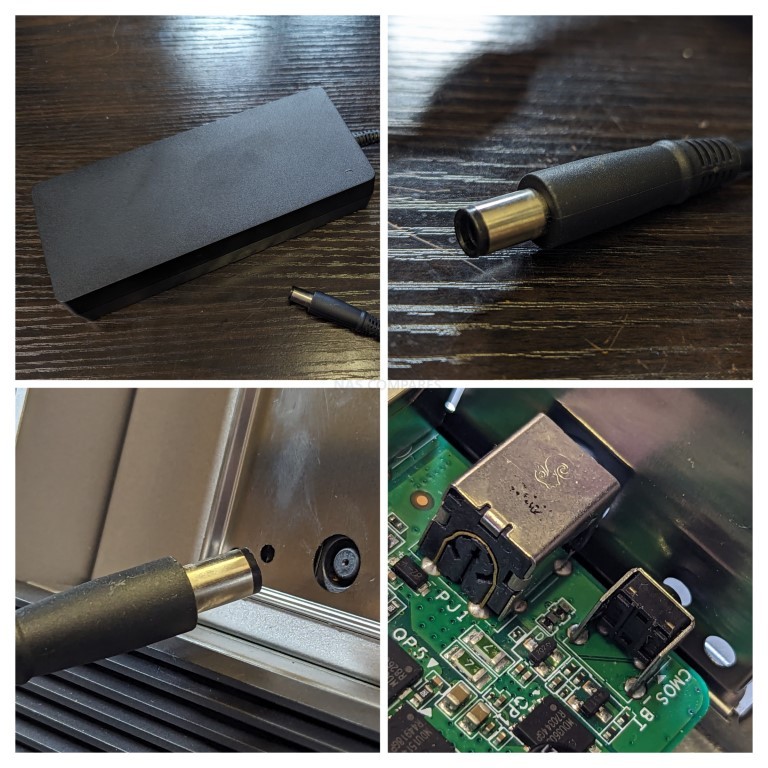
The ZimaCube NAS system features a standard external power jack port, a design choice that significantly contributes to its compactness and storage capacity. By opting for an external power supply unit (PSU), the designers were able to maintain the system’s small size while maximizing storage potential. This approach is in stark contrast to using an internal PSU, which would have inevitably increased the physical dimensions of the device, thus limiting its storage capability. Additionally, the external power connector of the ZimaCube is neatly integrated, connecting directly into an adapted cable that runs into the internal boards. This method differs significantly from some of the cheaper NAS cases available on AliExpress, which are built on Topton or similar motherboards. These often rely on internal power management boards for power distribution, a solution that can sometimes seem makeshift and less reliable, as seen in the CWWK AIO-T6 Power board HERE.

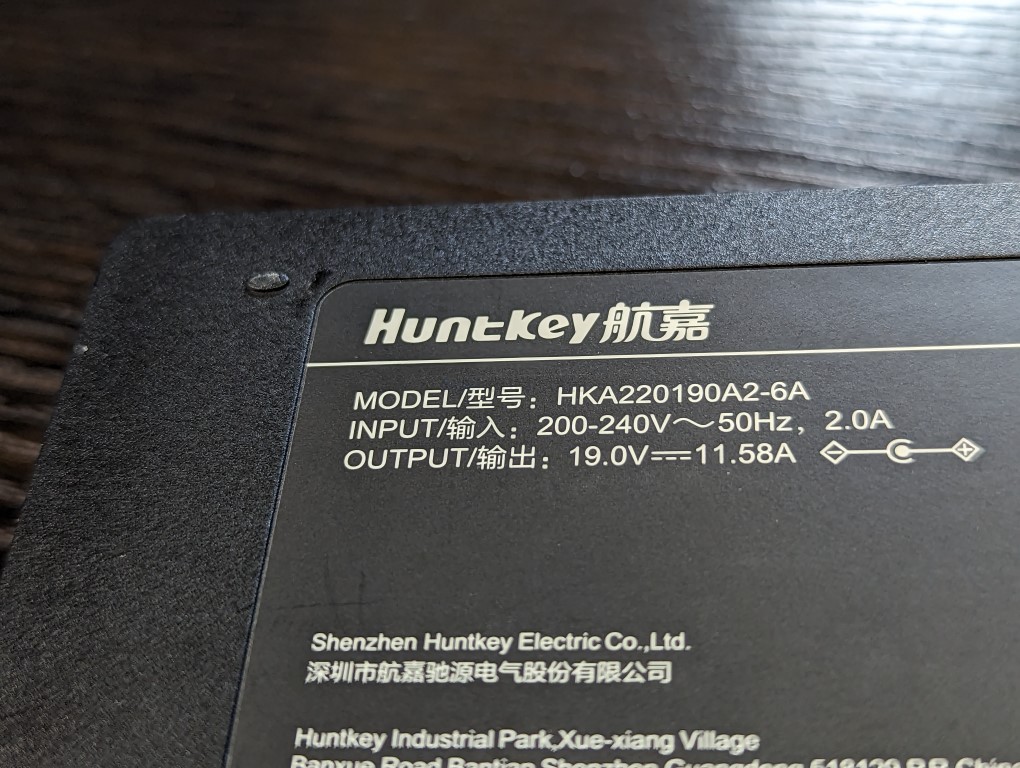
The external PSU accompanying the ZimaCube is fairly standard, rated at 220W. While not from a particularly well-known brand, it fits within the norm for such devices, offering sufficient power without the need for brand recognition. This aspect of the ZimaCube is interesting because it reflects a balance between functionality and cost-effectiveness, a crucial consideration for consumer-level NAS devices. However, it’s important to note that there has not been any confirmation on whether this specific PSU model will be the final choice for both the ZimaCube and ZimaCube Pro NAS devices. Such decisions in hardware, especially regarding the PSU, can have significant implications on the overall reliability and performance of the system, making this an area to watch as the ZimaCube moves from prototype to production. The PSU is connected to a mains cable via a 3 pin ‘micky mouse’ connector.

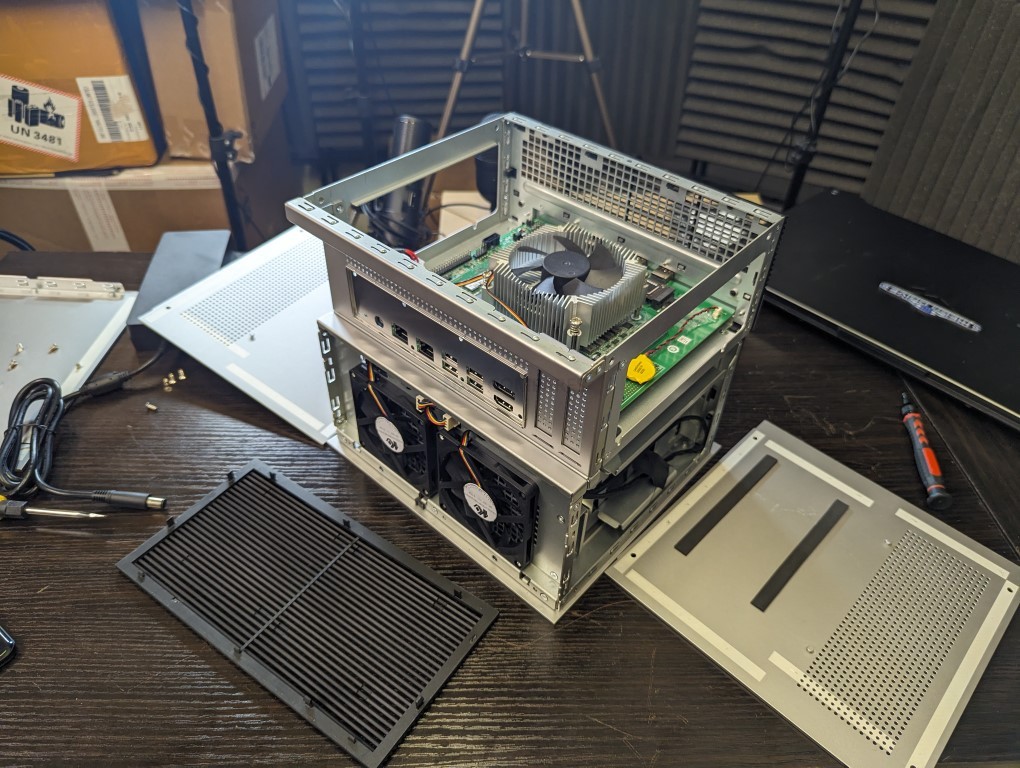
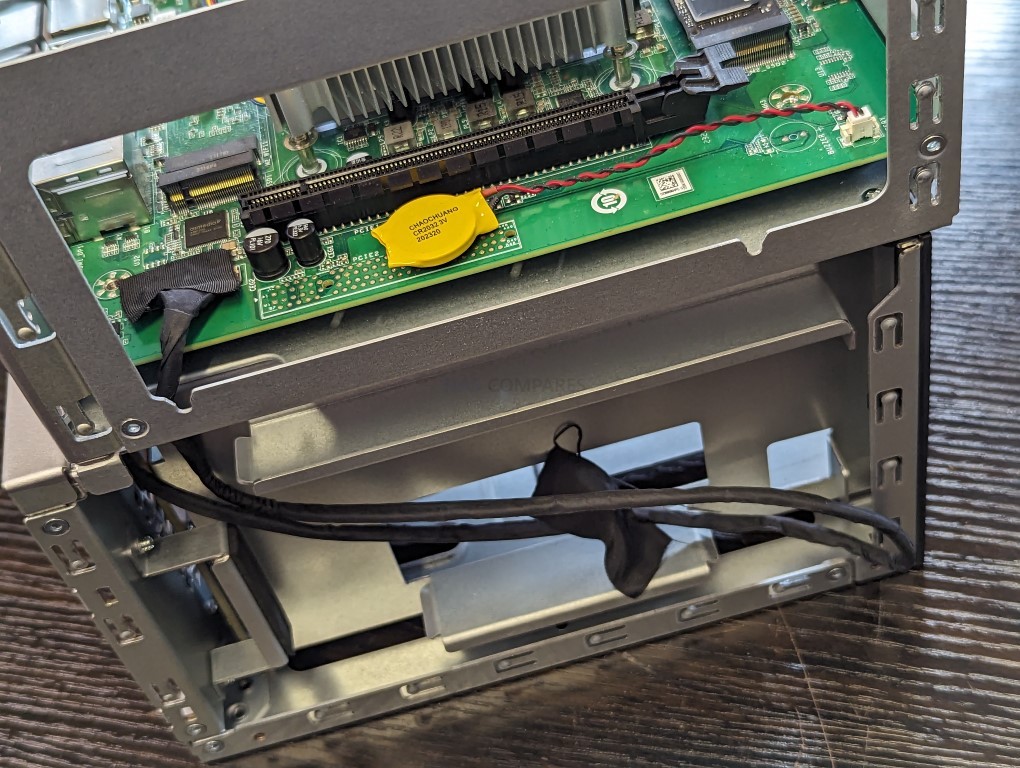
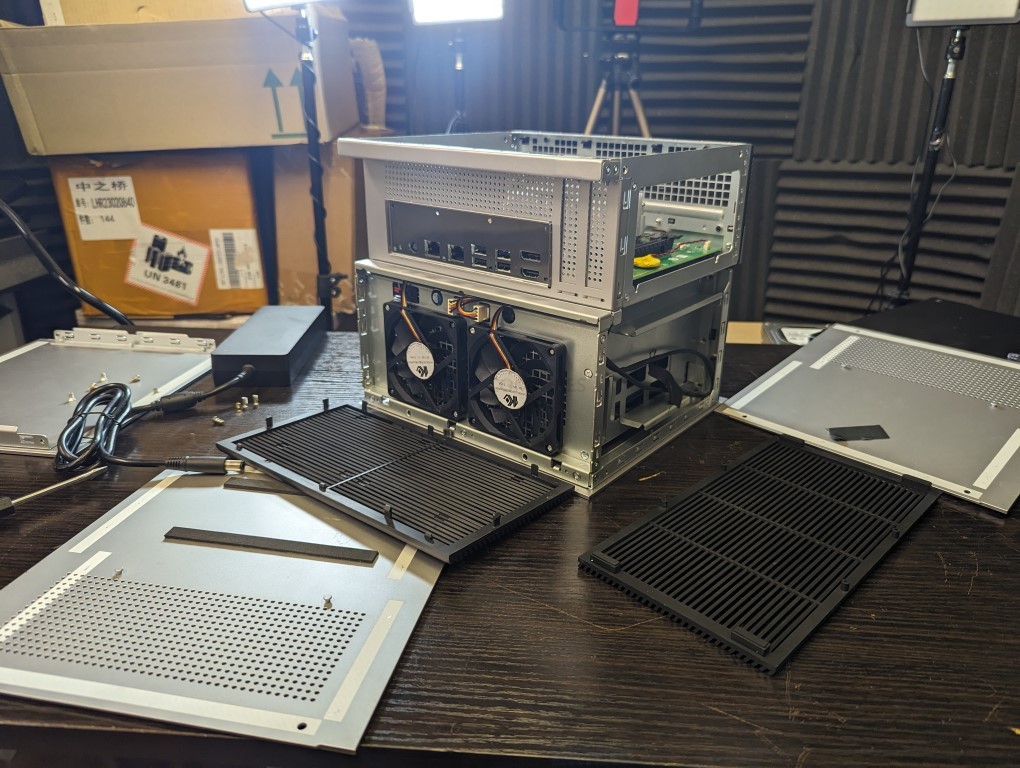
When viewed in its disassembled state, the ZimaCube reveals a thoughtfully designed internal layout, with each component placed to optimize both space and functionality. The image of the device in bits provides a clear view of the internal arrangement, showcasing how each part contributes to the whole. This disassembled view is particularly insightful for understanding the practical implications of design choices like the external PSU. It highlights the space savings and how the internal configuration is tailored to accommodate the unique power delivery method. The decision to use an external PSU, when considered alongside the internal design, underscores the ZimaCube’s balance between compact form factor and robust functionality, a critical aspect for users looking for efficient yet powerful NAS solutions.

ZimaCube NAS N100 Teardown – Conclusion and Verdict

The Ice Whale ZimaCube NAS has real potential to be a noteworthy addition to the compact NAS market right now, as the middle ground between turnkey systems from the likes of Synology & QNAP and full DiY solutions is being split by increasing releases in between!. This prototype showcases a thoughtful internal layout and efficient use of space, particularly in its storage configuration. The innovative design accommodates multiple M.2 and SATA storage bays, maximizing storage potential within a compact form factor. Of particular interest is the cooling system of the ZimaCube. The N100 model demonstrates efficient cooling capabilities, which are crucial given the compact nature of the device. However, the performance of the cooling system in the more powerful i5 model, especially in terms of heat dissipation, remains a point of curiosity and one that will need to be judged on it’s own later on.
The ZimaCube NAS, with its blend of compact design and robust storage options, is poised to be a significant player in the NAS market, especially as this will be the 3rd release by IceWhale (with the ZimaBoard and Zimablade before it meeting largely universally positive responses). As the system hopefully moves from prototype to production, further details about its internal lane allocation, noise levels, system temperature, and power consumption will be vital in understanding its full capabilities.

The upcoming release of the latest Casa OS software will undoubtedly provide deeper insights into the overall performance of the ZimaCube, making it a promising option for those seeking an efficient and powerful NAS solution. As always when we are talking about a device that is built on crowdfunding as its means of production, this prototype needs to be viewed as exactly that – a prototype and a hopeful indication of what is to come. In that regard, I am really impressed with what I am seeing in the ZimaCube N100 model NAS and with it’s crowdfunding entry point hovering around the $400-500 mark for the N100 model (depending on how/when you choose to back), I would certainly consider the NAS I have taken apart today to be worth that price tag – especially factoring it against other 6 Bay NAS systems of a similar architecture right now (and even that does not factor in the unique extras like the 4x m.2 NVMe, 2.5GbE and 8GB memory out the gate).
IMPORTANT – This article will be updated with more information as it is sourced from the prototype. Additionally, a follow-up article and video are in the works to explore the system’s internal lanes allocation, noise levels, system temperature, and power consumption. However, these aspects will be covered in more detail once the latest and most suitable version of the Casa OS software is released, providing a more comprehensive view of the ZimaCube’s performance and capabilities. A quick reminder of the key specifications for both the ZimaCube Quad and ZimaCube Octa models:
| Model | ZimaCube
|
Zimacube Pro
|
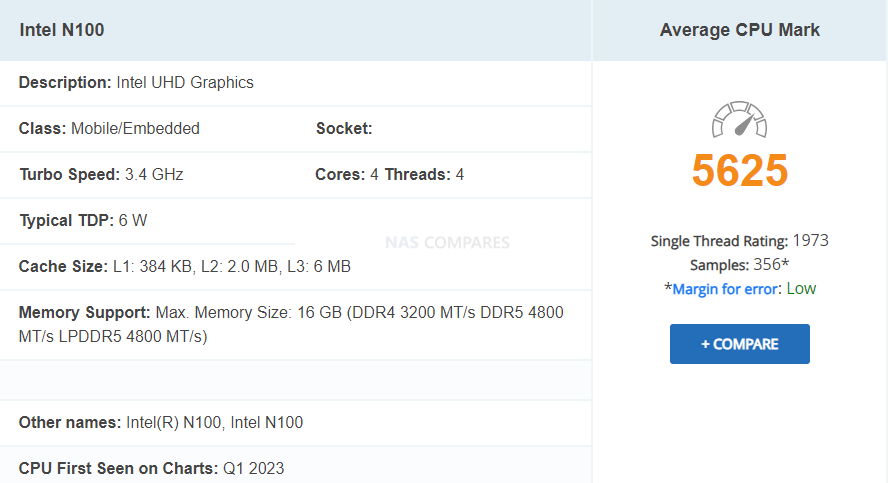
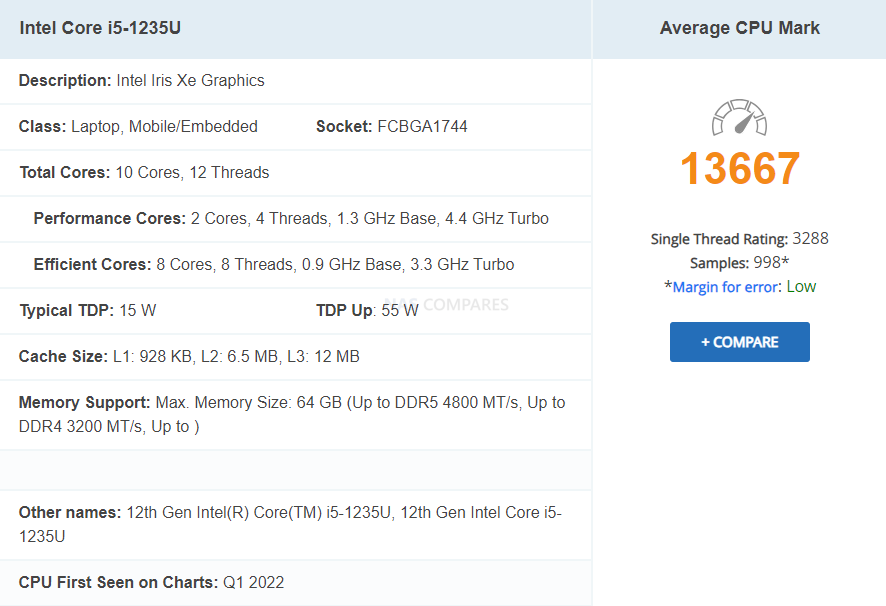
| CPU | Intel N100 | Intel i5-1235U |
| Cores | 4 Core | 10 Core (2P + 8E) |
| Threads | 4 Threads | 12 Threads |
| Clock Speed | 1.0-3.4Ghz | 0.9-4.4Ghz |
| Integrated Gfx | Intel UHD Graphics, 750Mhx Max | Intel Iris Xe Graphics eligible, 1.2Ghz Max |
 |
 |
|
| Memory | 8/16GB* | 64GB |
| Memory Type | DDR4 | DDR5 |
| SATA slots | 6x 3.5”/2.5” | 6x 3.5”/2.5” |
| M.2 NVMe Slots | 4+2 | 4+2 |
| PCIe Slots | 1x Gen3x4 | 1x Gen4x16 |
| Network Ports | 2x 2.5GbE | 4x 2.5GbE |
| Thunderbolt | No | Yes, 2x Type-C |
| USB Type A | 4x USB 3.2 Gen 1 | 6x USB 3.2 Gen 1 |
| USB Type C | 1x USB 3.2 Gen 1 | 2x (TB4) |
| USB 2.0 | 2X | 0 |
| Visual Output | HDMI 2.0 and Display 1.4 | HDMI 2.0 and Display 1.4 |
| Chassis Size | 240 x 221 x 220mm | 240 x 221 x 220mm |
| Power | External 220W 19V PSU* | External 220W 19V PSU* |


This table provides a clear comparison of the two versions of the ZimaCube NAS, highlighting their distinct hardware configurations.
📧 SUBSCRIBE TO OUR NEWSLETTER 🔔 This description contains links to Amazon. These links will take you to some of the products mentioned in today's content. As an Amazon Associate, I earn from qualifying purchases. Visit the NASCompares Deal Finder to find the best place to buy this device in your region, based on Service, Support and Reputation - Just Search for your NAS Drive in the Box Below
🔒 Join Inner Circle
Get an alert every time something gets added to this specific article!
Need Advice on Data Storage from an Expert?
Finally, for free advice about your setup, just leave a message in the comments below here at NASCompares.com and we will get back to you.

![]()

![]()
![]()
![]()
![]()
![]()
![]()
![]()
![]()


Minisforum N5 Pro vs Aoostar WTR Max - The BIG Showdown
Do MORE with Your M.2 Slots - GREAT M.2 Adapters!
5 Top Tips for Content Creators Buying a NAS
Terramaster F4 SSD NAS - Should You Buy? (Short Review)
Minisforum N5 Pro NAS Review - Did Minisforum just WIN at NAS?
What Can You ACTUALLY DO with HDMI on Your NAS?
Access content via Patreon or KO-FI