


Connecting DIRECTLY With Your NAS without Using a Switch or Router
Let’s all be honest for a second about one of the biggest advantages and disadvantages of network-attached storage, namely the speed, external security and method with which you can access your data. Having secure yet unlimited access to the data locked in your NAS from anywhere in the world is all well and good, but often all you want is the quick and easy connectivity more often found in traditional DAS and USB style storage. You want to enjoy the benefits of the software, maybe have the option of remote access and even still share are all the lovely data inside your NAS with multiple users, but you want it via direct connectivity with the NAS over a single cable, not having to play around with routers and switches. Add to this that many users are now taking advantage of connectivity such as thunderbolt and 10Gbe, and you find that it is genuinely desirable to be able to access your NAS via a much more direct method. In today’s article, I am going to show you how to set up a direct, one cable connection between your NAS drive and your Windows PC. The majority of the steps can also be applied to other operating systems, such as Linux and Mac, but this guide should show you how to set up a direct-attached storage style of connection with your NAS, whether you want to access the NAS software GUI or see the NAS Drive storage within the file management tools of your operating system natively (Windows File Explorer, Finder, etc)
Important – This guide is based on the assumption that you have set up your NAS system storage already. This includes physically installing the disks, powering on, installing the system firmware, creating an account, created and completed your RAID storage pool, created at least one volume and created at least 1 shared folder. I appreciate that this is alot of the first-time setup stuff, but don’t worry. Below are video guides for the first time setup of Synology, QNAP, Asustor and Terramaster NAS.

Additionally, it is worth remembering that the speed at which you can interact with the NAS will be heavily dictated by the connection you choose to use. If you connect with the default network interface connection on a NAS and desktop PC of 1Gbe, you will reach speeds of a little over 100MB/s. However, speeds in the thousands of megabytes are possible if you take advantage of 10Gbe, thunderbolt and more recent high-bandwidth card upgrades. Practically no NAS in the market today allows direct data access over USB (a couple of exceptions from QNAP in the TS-x51A series).
Directly Connecting to a NAS – What Do You Need?
In order to take advantage of this guide, you will need the following items:
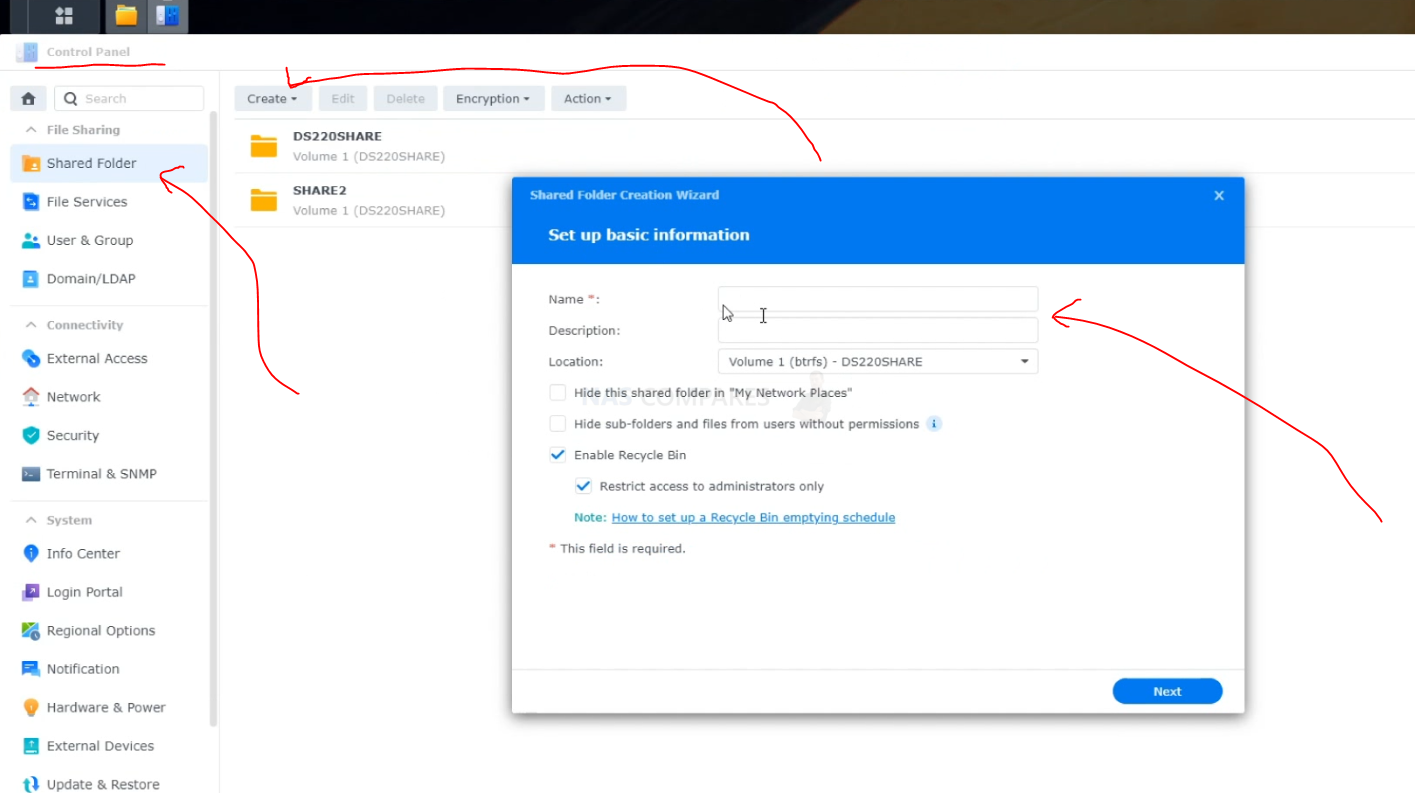
- A NAS system set up and ready, including volumes and at least one shared folder (for Drive Mapping)

- At least one available network interface port available on the NAS, so keep this in mind if you want to maintain network and internet connectivity for others at the same time (so, that needs 2 LAN connections)
- A client computer, in this case, a Windows machine with an available ethernet port. If your client computer does not feature a physical ethernet LAN port, there are numerous USB to network adaptors available on the market TN for less than £30
- An additional RJ45 ethernet cable. It is recommended that this method described today it’s not used with a cable more than 20M long, which is still a huge amount of length anyway and should not be a problem
- The network management and first-time setup tool available for free from your NAS brand manufacturer, such as the Synology Assistant, Qfinder Pro and Asustor Control Panel
Let’s begin.


The first thing you need to do is connect the Ethernet cable to the rear of the NAS via an available network port. Remember, if you want to maintain network and internet connectivity between the NAS and other users, you will need to ensure that you use a second available network port instead.
Next, you need to connect the other end of that Ethernet cable to your computer. You will know that both systems are able to see each other, as any available LED lights on either port will light up green and/or orange, depending on the type of connectivity.


Next head over to the network connections area of your Windows PC to ensure that this connection between the NAS and your computer has been acknowledged. You can reach this area either by clicking network connections in your start menu on the bottom left, or typing network connections into the search bar. The connection should be a different one to your internet connection.
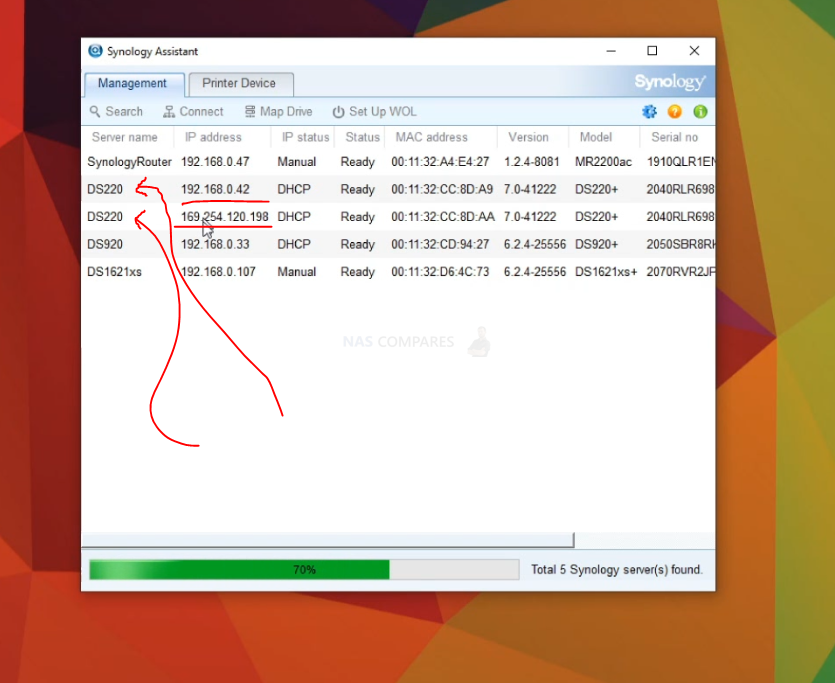

Next, you need to open the NAS brand’s proprietary application that you used when setting up your NAS drive for the first time (ie Synology Assistant or Qfinder Pro). Once you open the application, use the search or scan option and it will then check the network connections available to your computer for the NAS. If your NAS is connected to the internet still and your computer also has a secondary connection with the internet, your NAS will likely be listed twice. One connection, likely starting with IP 192. is your NAS listed on the internet, and the second connection that likely starts with 169. or 10. by default, will be the NAS connected directly via the cable you just attached.
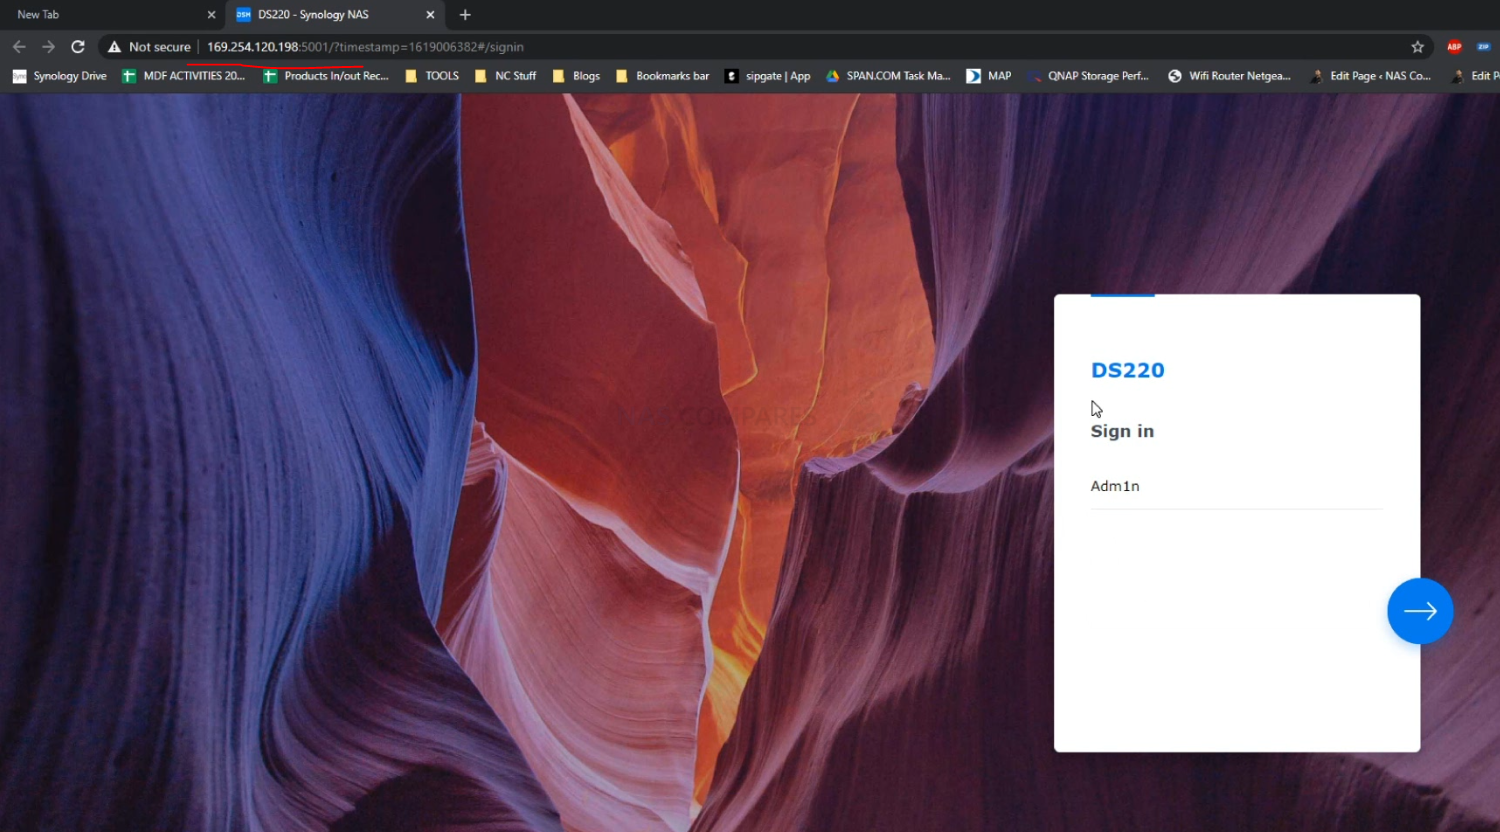
From here you can now interact with your NAS via a direct means of connection, rather than relying on an available network or the internet. Much like traditional connectivity, you have numerous means to interact with the device. If you double click the listed NAS drive on the client software, it will open up the GUI and NAS software in your browser window in a new tab and allows you to interact with the software just as you would via more remote connectivity. Once again though, bear in mind that unless your NAS has a secondary ethernet connection that is linked to an available internet service, your NAS will remain offline (as in no-internet) and features such as automatic firmware updates and new apps will not be possible to download.

Alternatively, many users who connect via this method do it so that they can interact with them with their native, proprietary file management applications, such as Mac Finder or Windows File Explorer. Predominantly, there are two main ways that people do this. The easier but slightly lower performance option is known as creating a Mapped Network Drive. This creates an additional visible storage drive on your computer, but some client software will not allow interaction with mapped network drives. The other way to make your NAS appear via your native file management tools in a far more usable, higher-performing but slightly more complicated way is via the use of iSCSI Targets and LUNs. These utilise a system of creating container areas of storage on the NAS server that are then connected to your computer and visible like any other connected drive with all of the connectivity and usability of localised storage in your PC software.

How to Map A Network Drive to Directly Connect With Your NAS
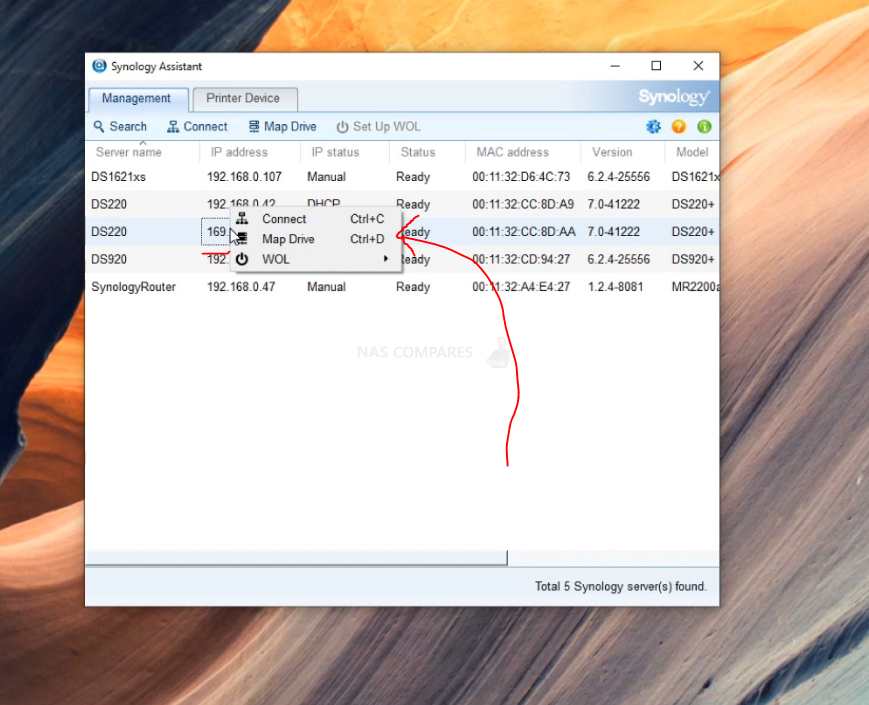
First up, let’s go through how to create a mapped network drive. First, you need to right-click on the NAS that appears on the NAS brand client software you used earlier. Then click the option labelled ‘map network drive‘, or simply ‘map drive‘.

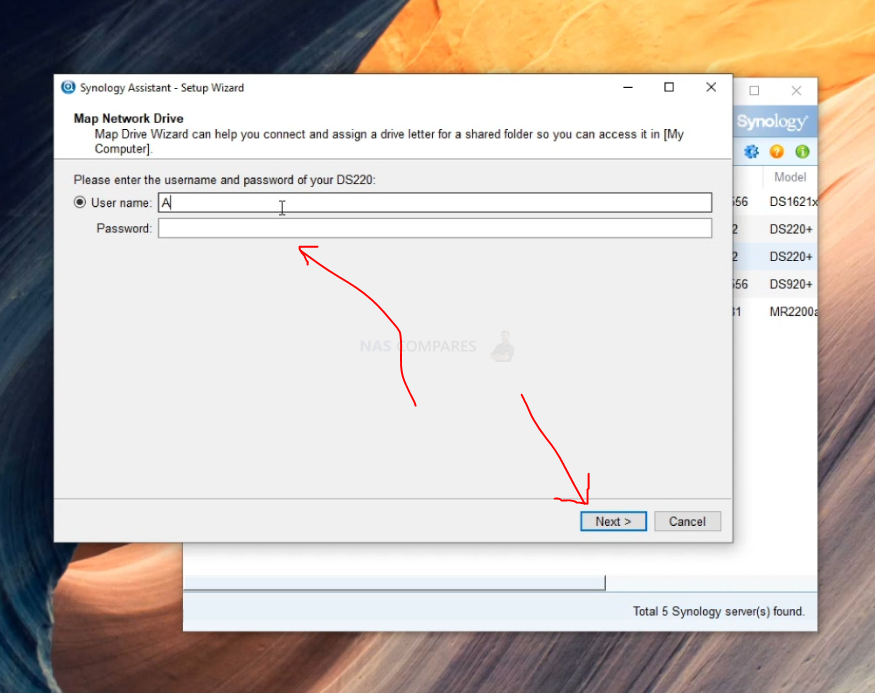
Once you click it, a new window will appear inviting you to enter the login credentials of your NAS system, these will need to be the login details of an account that has access to the shared folder you want to mount on your computer. It is recommended that you do not use the Admin account for your NAS to do this.

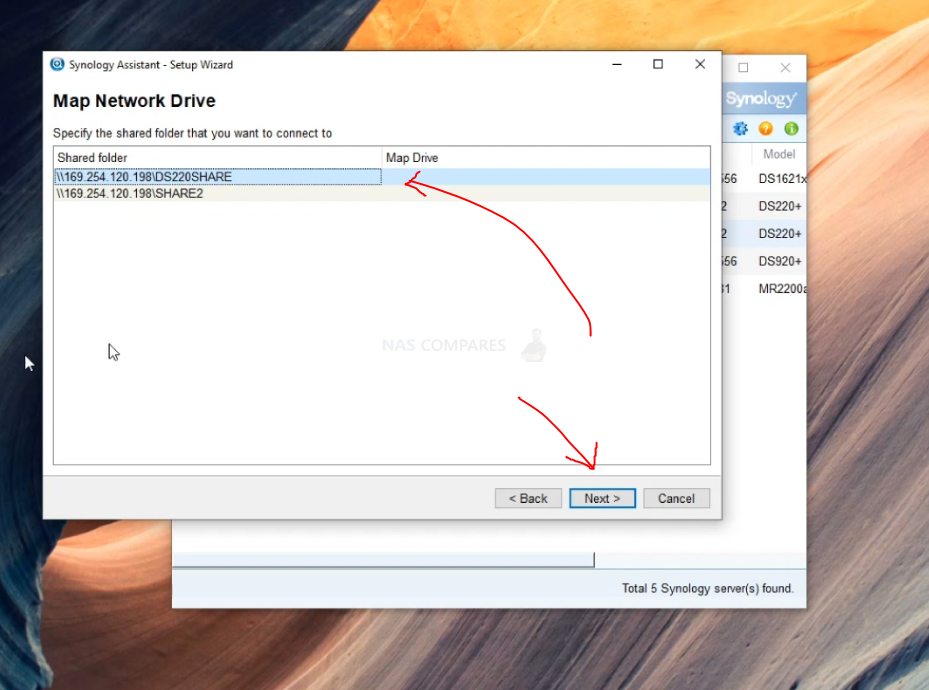
If your login details are correct, the NAS will then ask you to select which one of your available shared folders on the NAS you want to connect via mapped network storage. If you have multiple shared folders, you can connect multiple by repeating this process. Otherwise, simply select the shared folder that you want to interact with locally and click next/ok.

Next, you will need to assign a drive letter to this mapped network drive. The reason for this is so the computer system can assign an identity to the NAS storage that you are connecting with. For example, predominantly the main storage drive in any computer that houses the files for the operating system will typically be labelled as C: drive, whereas an optical drive (CDs, DVDs, etc) is generally labelled D:. So you simply need to select a letter that you want this NAS drive to be identified as. Once you’ve done that, click next
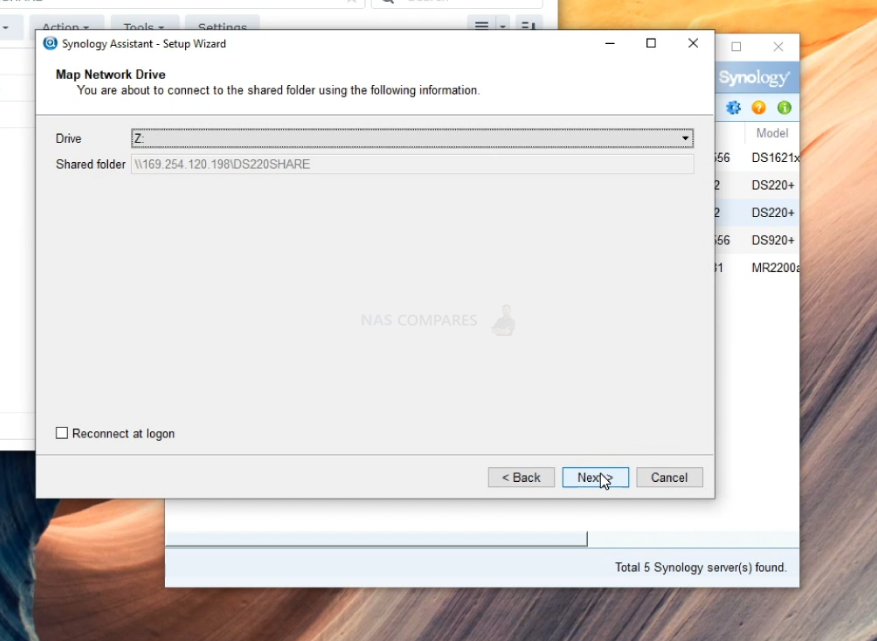

You may be asked to confirm or verify the network settings of this drive. Generally, the settings displayed will be correct as these were used to find the NAS in the first place but double-check the settings nonetheless. After this, you simply need to confirm the settings and it will then add this mapped network drive straight away, allowing you to interact locally with your computer’s file management software (no need to format or sync, it will just appear).
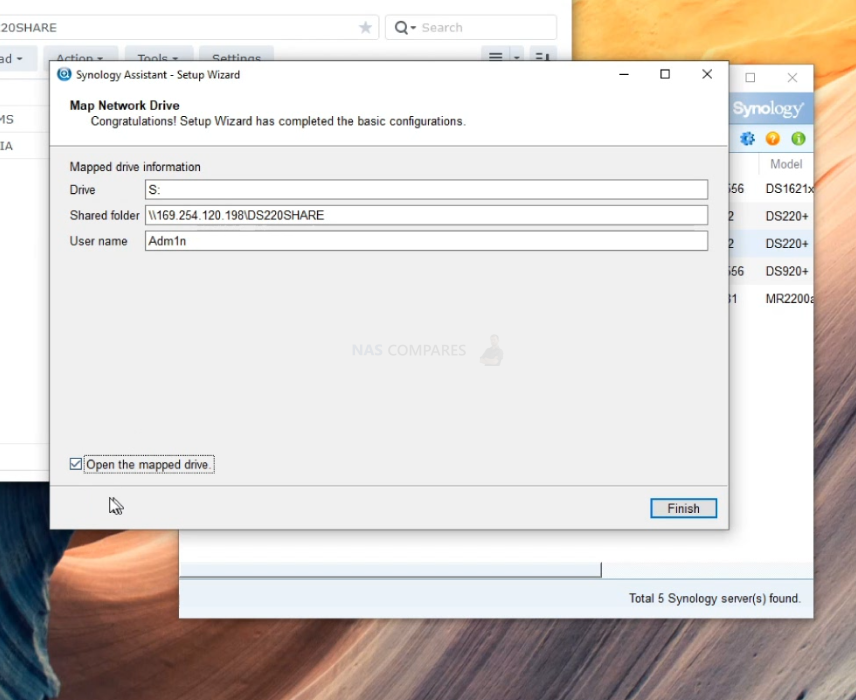

And there you go, that is how to assign your NAS as a mapped network drive locally. From there you can save this drive to favourites or create a shortcut as you see fit.


However, if you want to connect with your NAS in a more native and universally software supported way, then you will need to look into iSCSI targets and LUNS. Below I will take you through each step in creating a LUN on your NAS in order to better connect with your PC file management software and applications. These steps are from a Synology NAS, but the steps are quite universal across most known NAS brands and should be easy to adapt as needed.
How to Connect An iSCSI LUN Drive to Directly Connect With Your NAS
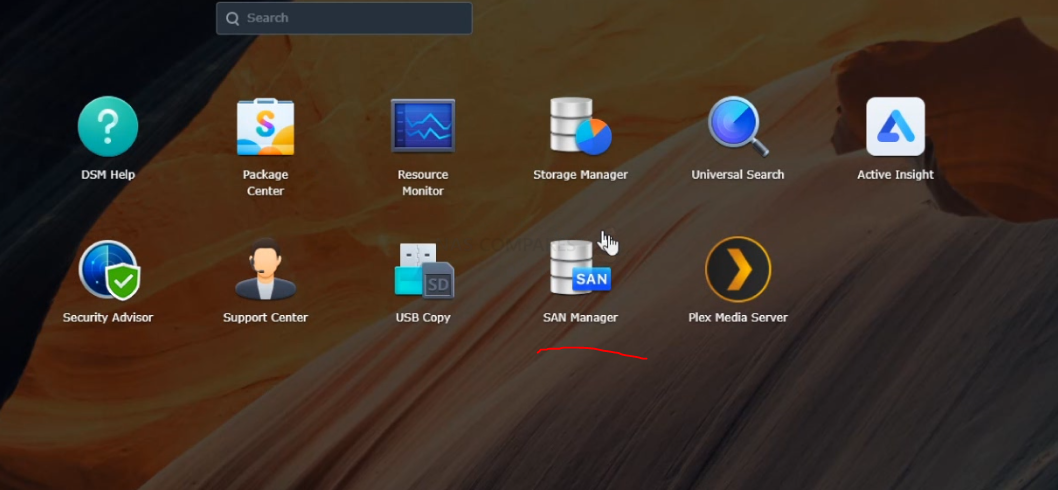
First, you need to head into the iSCSI manager, also known as SAN manager on Synology DSM 7.0

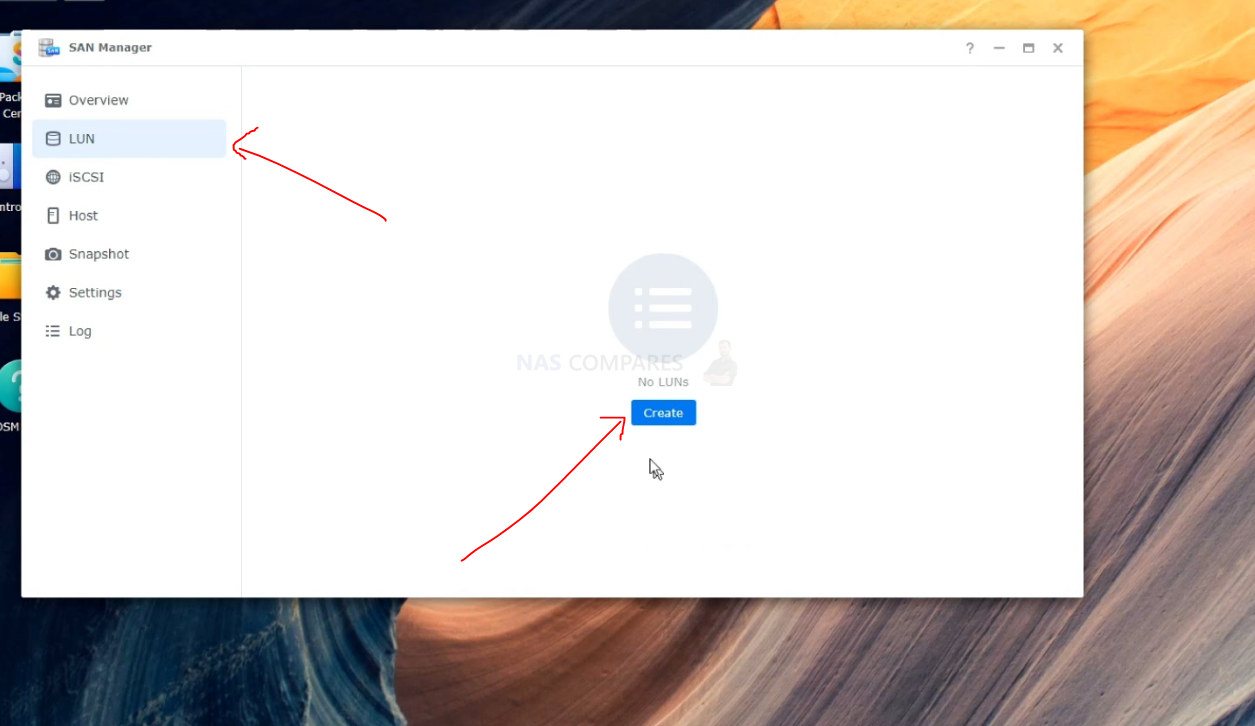
This tool is the one you will need to use in order to create a container of storage that can be interacted with in a more native way on your OS. The process of creating a target (the funnel with which your storage will be visible) and a LUN (the actual container of storage) has simplified considerably over the years and in modern NAS can be done quite easily and by even the most novice of users. If you are going to create a business class setup, or want to create a very unique iSCSI Target identity, you should go ahead and select the target option and then create. However, if you just want to set up your LUN quickly and easily, you can skip this and select the LUN tab and then click create, as the system will create a default target during this process.

After you click create LUN, you will be asked to name the area of storage, which storage area on the NAS you wish to use (if you have multiple) and give an available capacity (based on provisioning, you can exceed the total available NAS storage if you choose, to expand it later), otherwise just leave the other setting as their defaults.


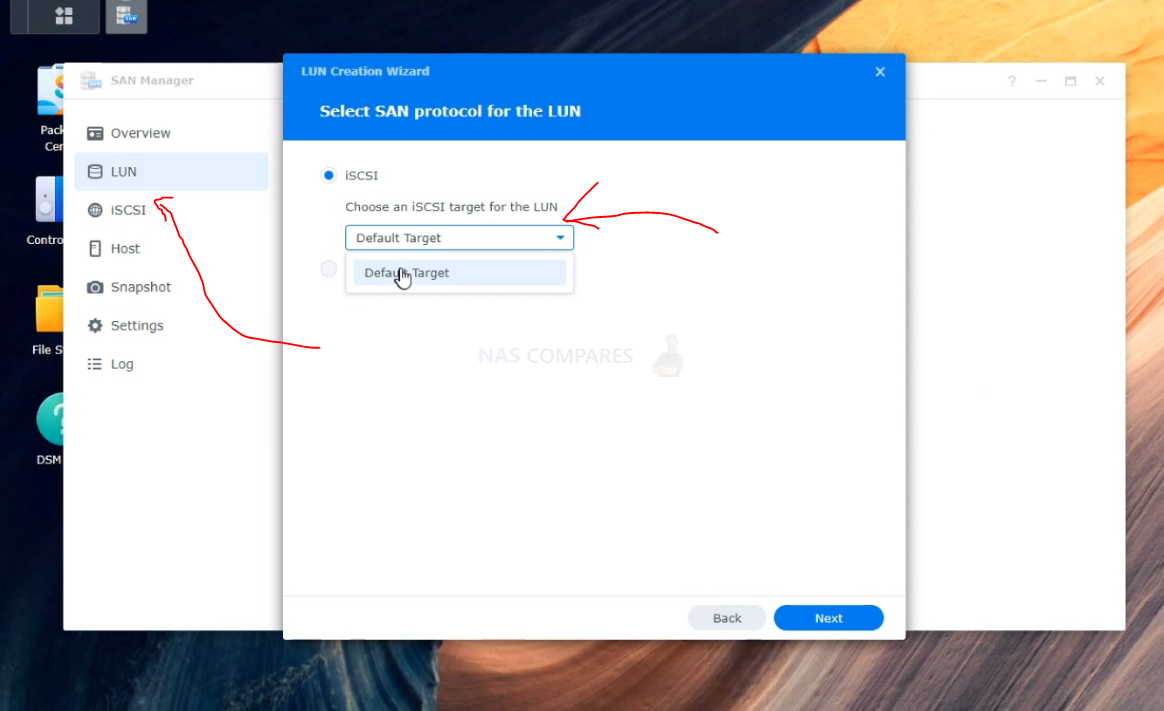
Next, you will be asked which iSCSI target you wish to attach this LUN to. As mentioned, but default the system will create one during the LUN creation process (listed as default), so go ahead and choose this or any other target you have previously set up.

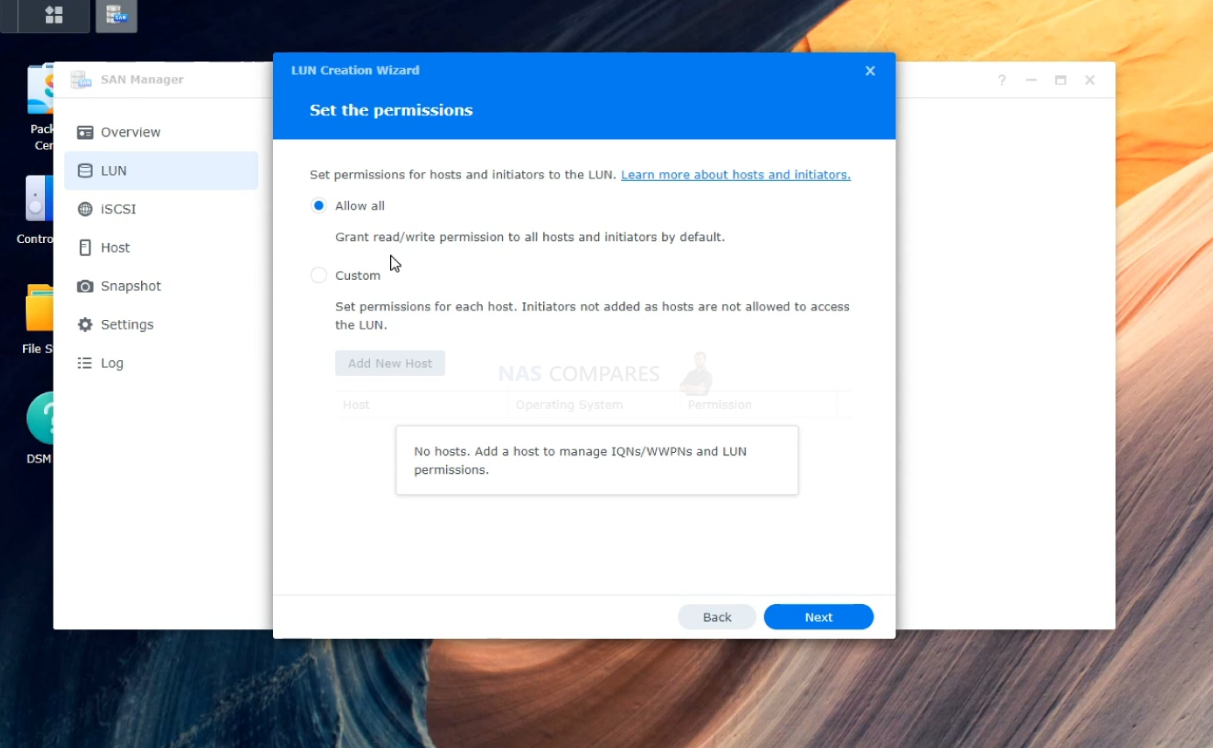
Next, you can choose which user(s) has access to this LUN and their respective iSCSI tool equipped systems. If you are going to be the only one using this NAS directly, you can leave this at defaults. However, maybe check that your default account (not just admin) has access privileges)

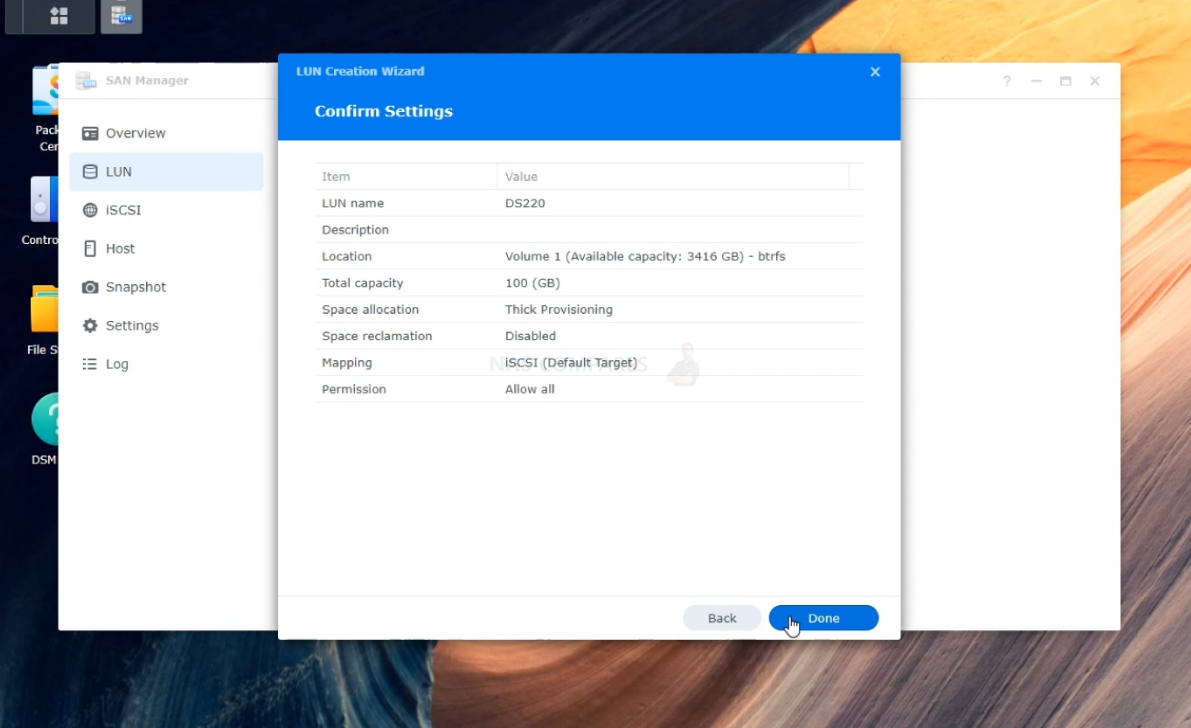
On the last screen, you will simply need to confirm that all the settings you have created are correct and then click confirm. The system will quickly create your iSCSI LUN (though larger capacity LUNs might take longer)

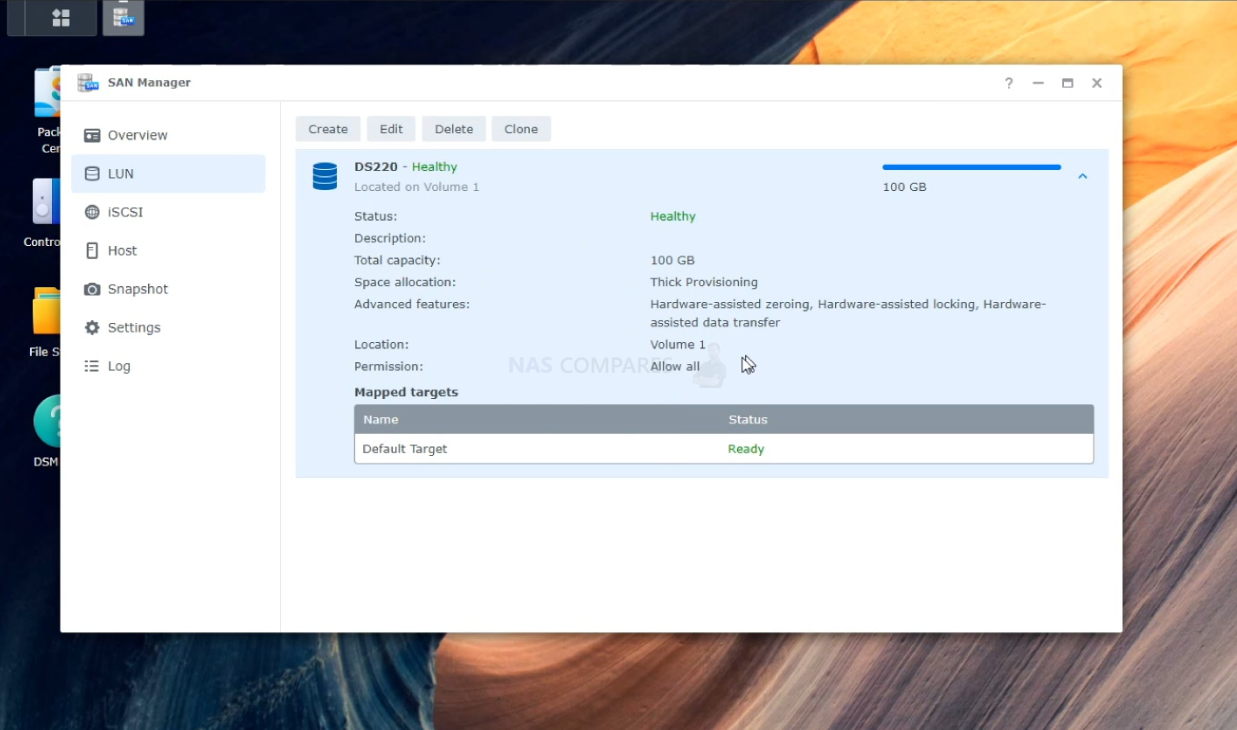
The LUN is now created and you can use the SAN Manager / iSCSI manager to edit and change the settings and access to this whenever you need.

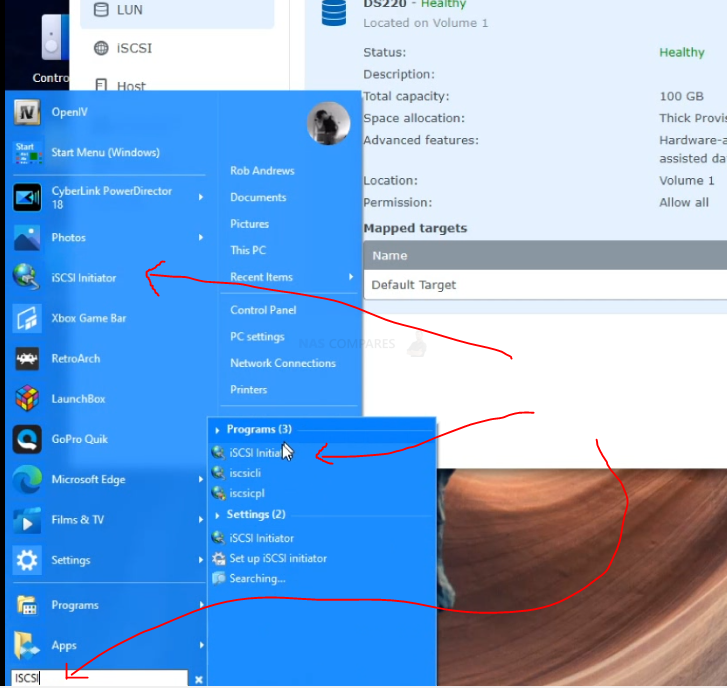
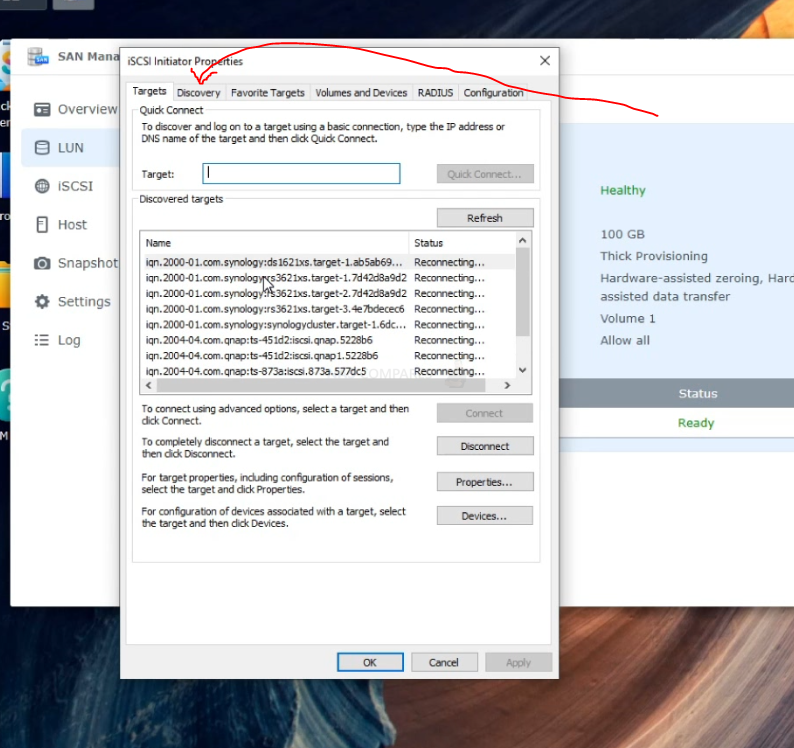
Next, on your Windows PC, you need to head to the Start menu of your computer and then look for/type iSCSI Initiator (which should be available by default in recent windows updates, otherwise is free and available from the Microsoft update center), then run the application/service.

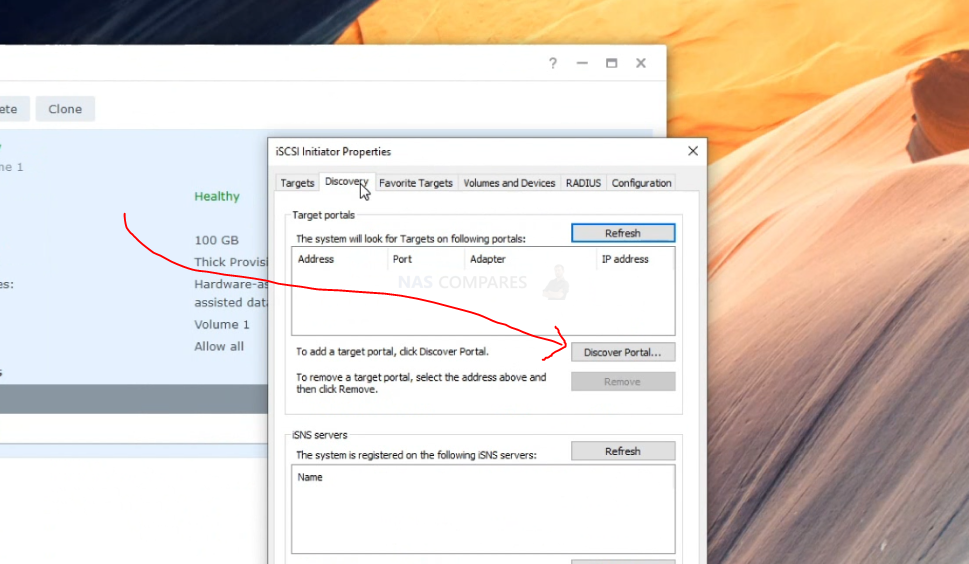
When the iSCSI initiator is open, click the Discovery tab at the top and get ready to configure your PC to see the Target you create on the NAS.

From the Discovery window, select the Discover button and then you will need the IP Address of your NAS (those numbers in the URL window when interacting with the NAS in the web browser)

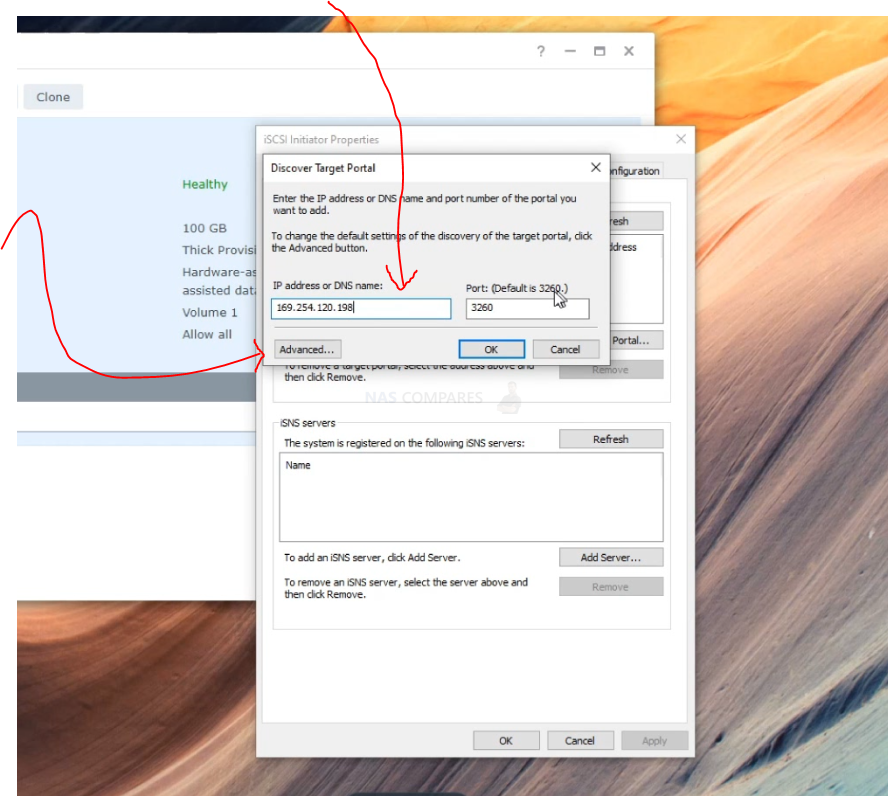
I the next window, you have several options and things to do. First, you need to enter the IP of your NAS (do not include https://), add the port number of your NAS (if you have not manually changed this, you can leave it as the default one on your screen) and if you are concerned about people on your local area network access the iSCSI target and the LUN(s), you can head into the security options in order to add an additional login security layer (CHAPS).

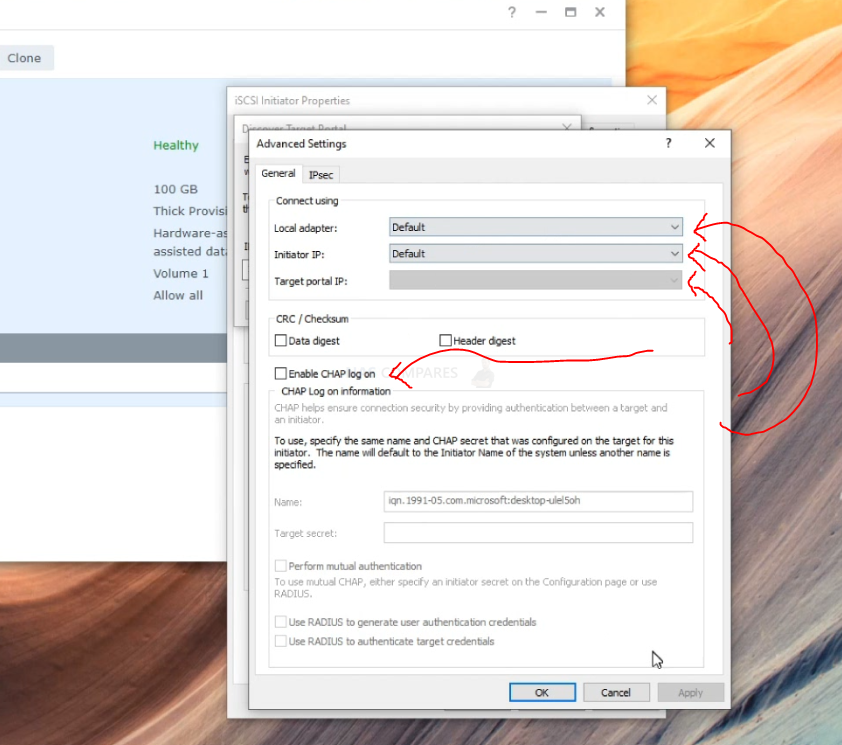
You also have the choice of selecting different network adapters (if you have more than one on your PC, along with further security settings and defaults you can change). It is advised not to change these unless you know what you are doing or have an experienced IT/Networking person on site.

Next, on the iSCSI initiator window, click back to Targets and your newly available iSCSI target (the pathway) to your NAS will be available, but shown as ‘inactive’. In order to activate and use this iSCSI target, you need to click the connect button and from there a pop-up window will appear.
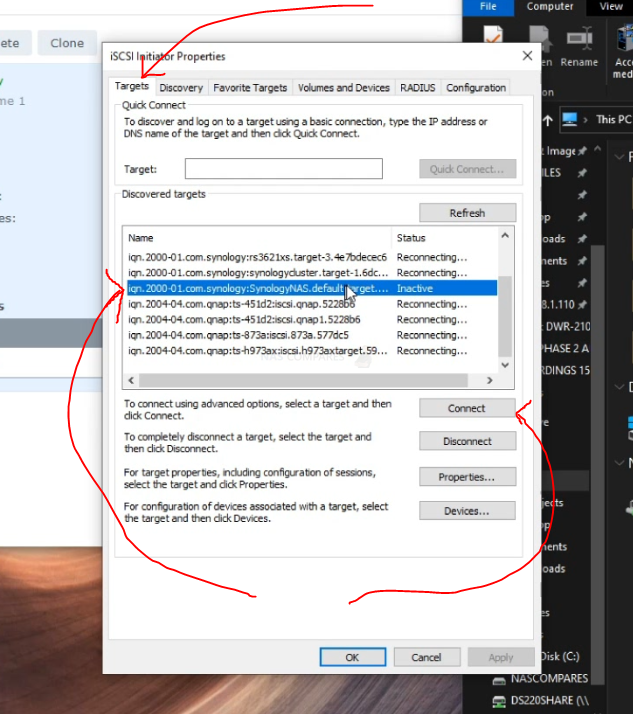

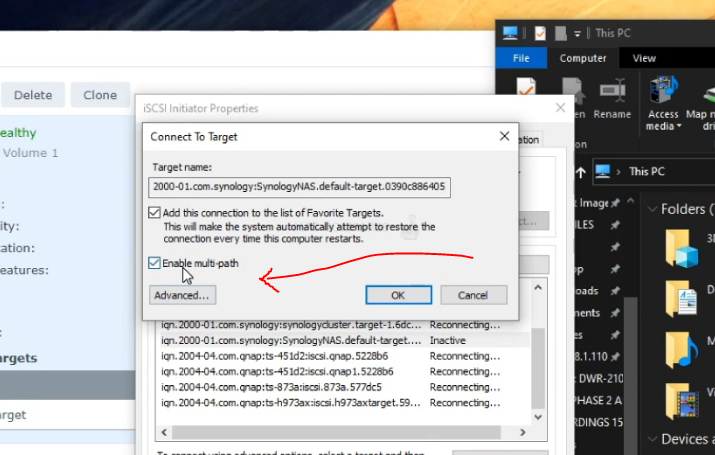
You can enable/chaps again here, but you can also enable multi-path usage here. If you plan on multiple users or services interacting with this iSCSI target, it is advised to tick this box. Then click ok/confirm

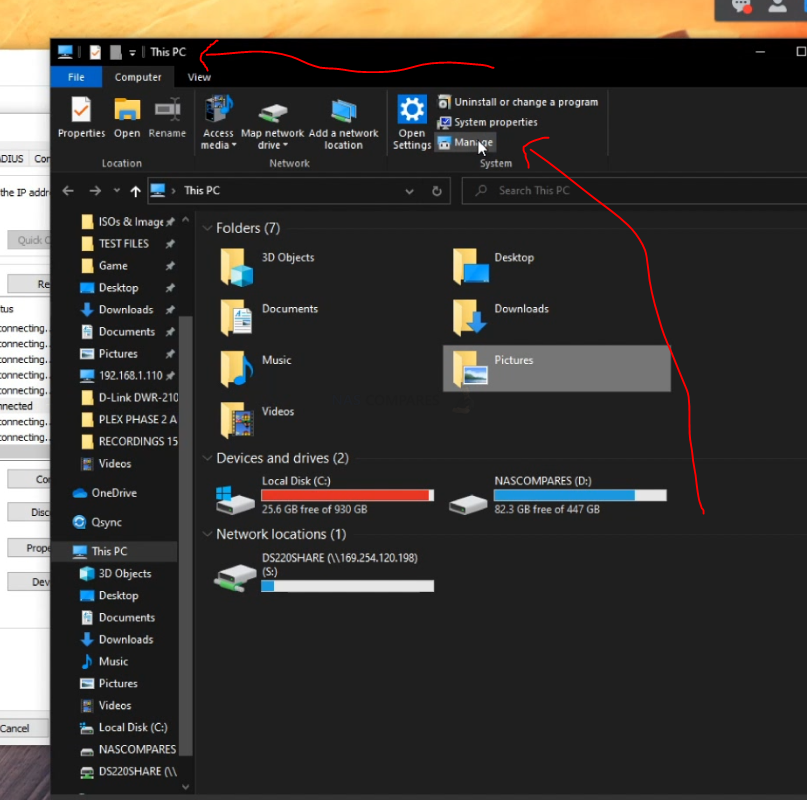
The iSCSI target and the LUN will now be accessible and connected. Next, you need to head back to the My Computer / This PC / My PC window and from there select the ‘Manage’ tab at the top

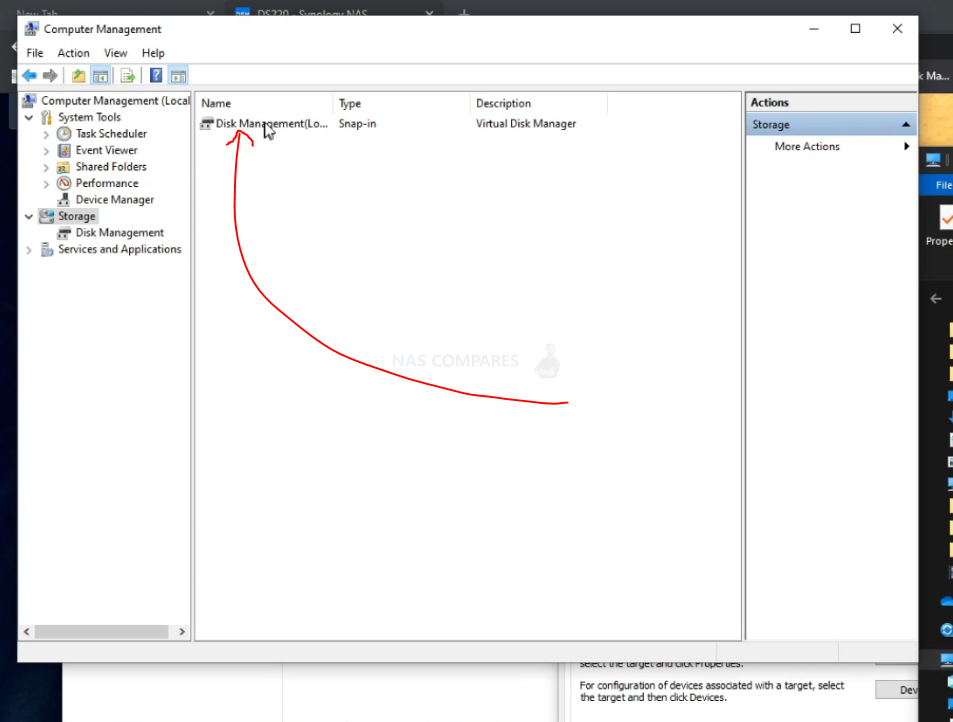
An administrative window will appear. From here you need to double click the Storage choice
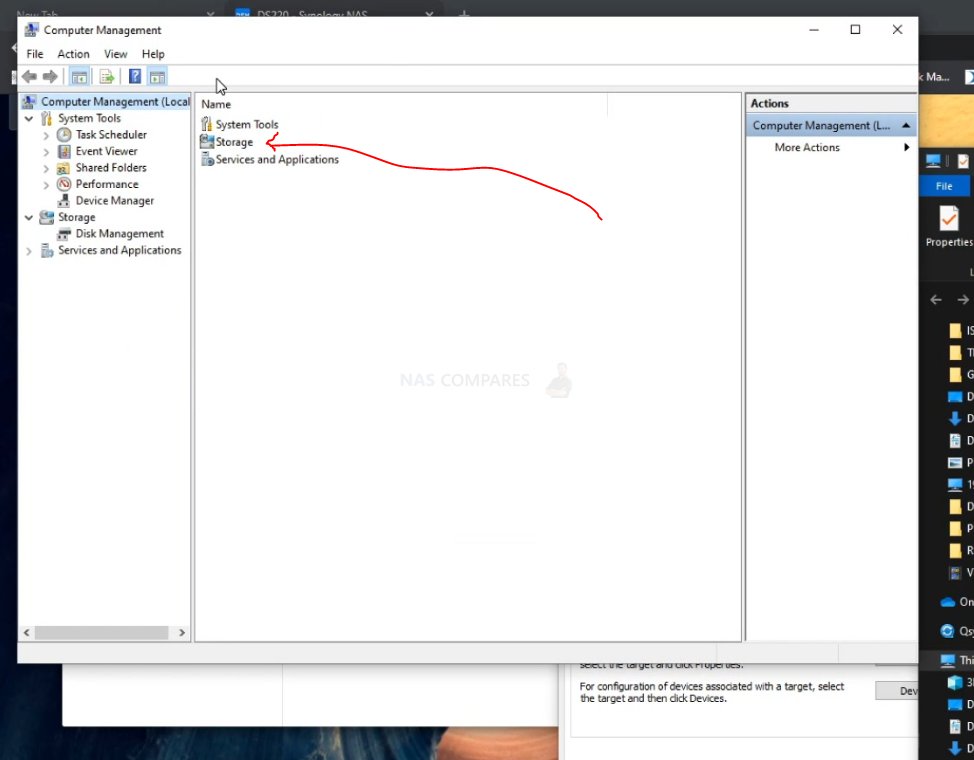

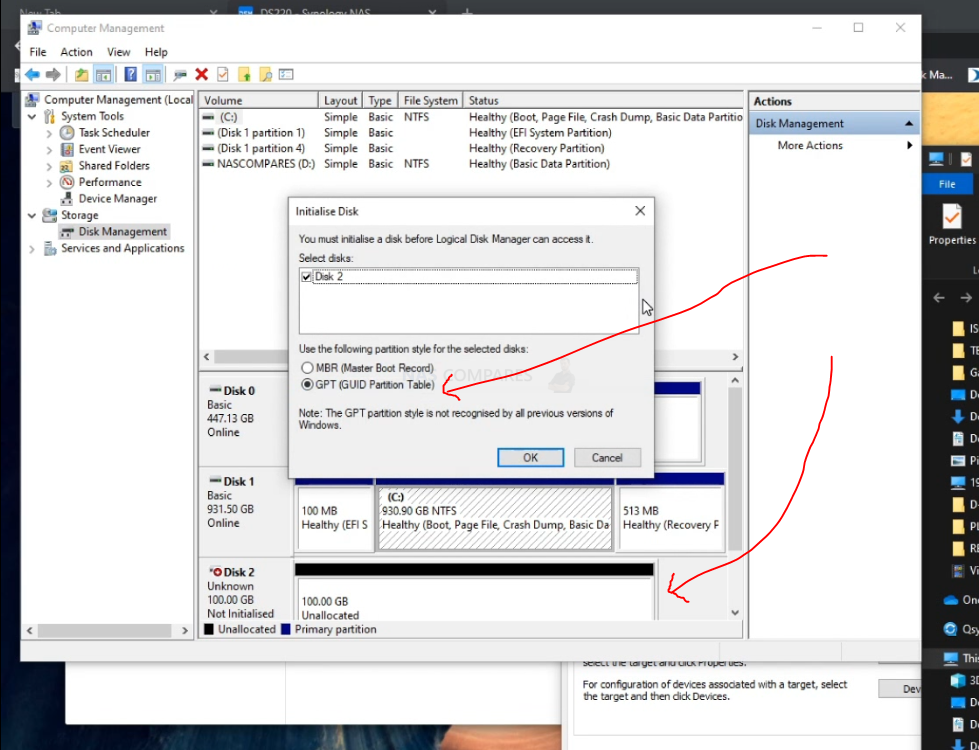
Next you need to double click Disk Management and then you will be shown a list of the connected drives on your PC, as well as available drives (like the iSCSI LUN) that are yet to be connected

If you have followed these steps correctly, there should immediately be a pop-up window to acknowledge that the iSCSI LUN is found and if you want to add it. It is important that you DO NOT SELECT MBR as a drive choice, as this is generally a drive for a system operating system and will stop your PC booting correctly. So select the other one and click ok/confirm

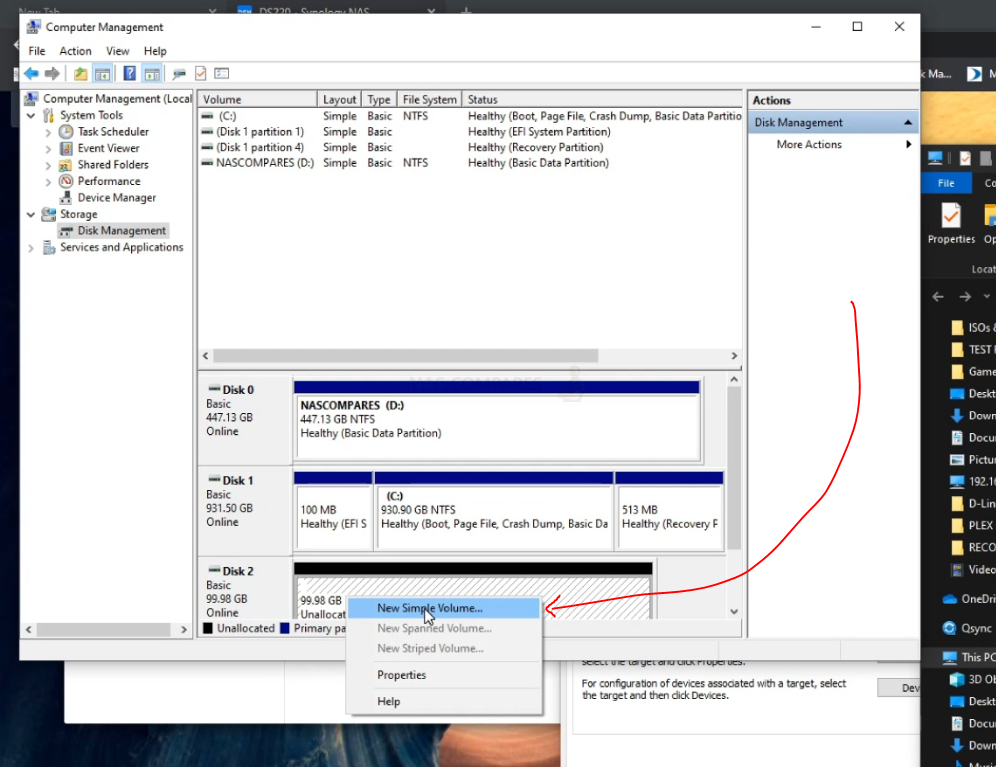
After confirming this, you will need to begin in adding the drive to your system. Right-click the newly appeared drive (likely in black as it is not formatted or connected yet) and select New Simple Volume

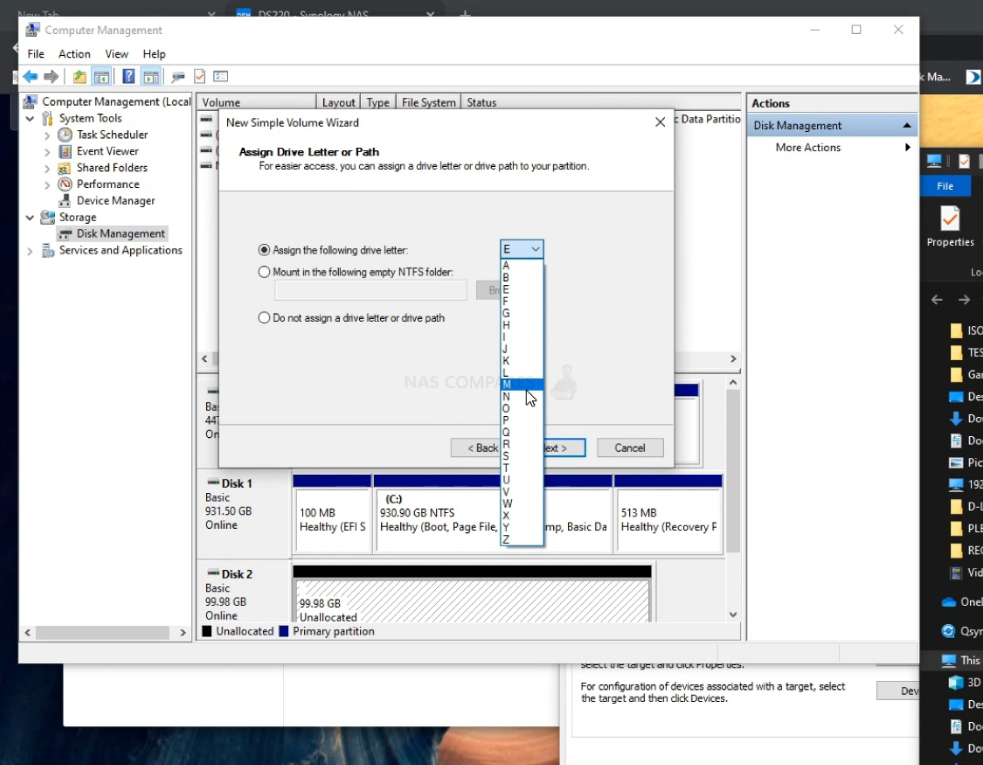
You are now in the initialization and storage setup wizard. You will be asked to confirm the storage space (you can leave this as default if you do not know what you are doing). Then you will need to select a drive letter for this LUN to be identified as. On.y available drive letters will be selectable.

Next, you will need to give the drive a name (it can be left as the default New Volume if you like). you can choose the file system (this can be default for most users) and if you want to use this area of storage straight away, yo ucan format it. Do not format this drive if it already has data on it that you want to access (ie you are connecting a 2nd user to an existing LUN). Then click Next
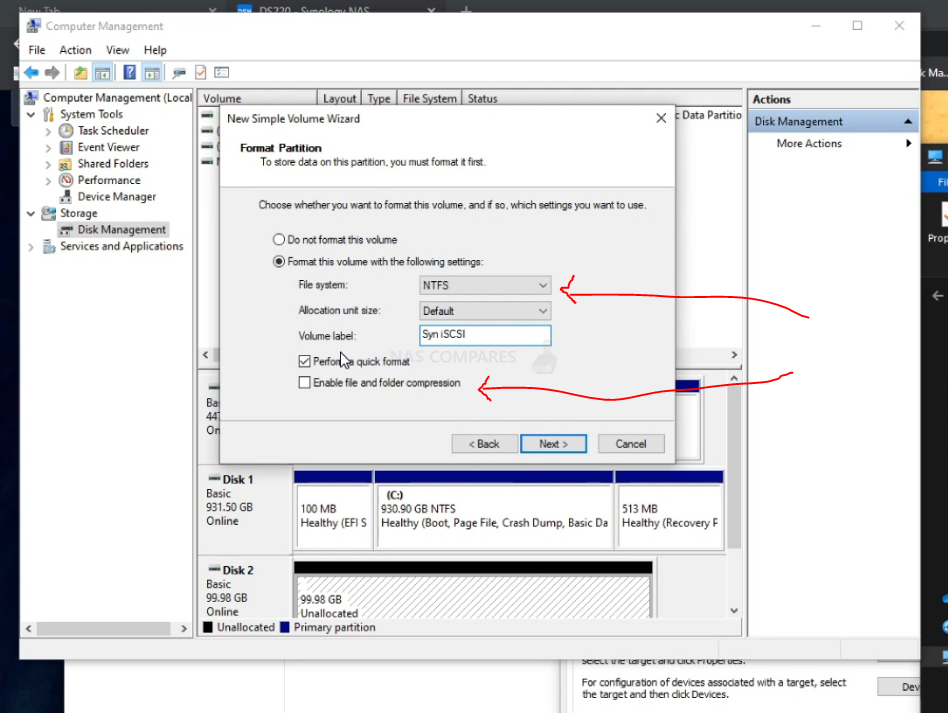

Finally, you will be asked to confirm the settings you have created and click confirm. If you selected to format the drive, this may take extra time (depending on if you selected quick format or not)
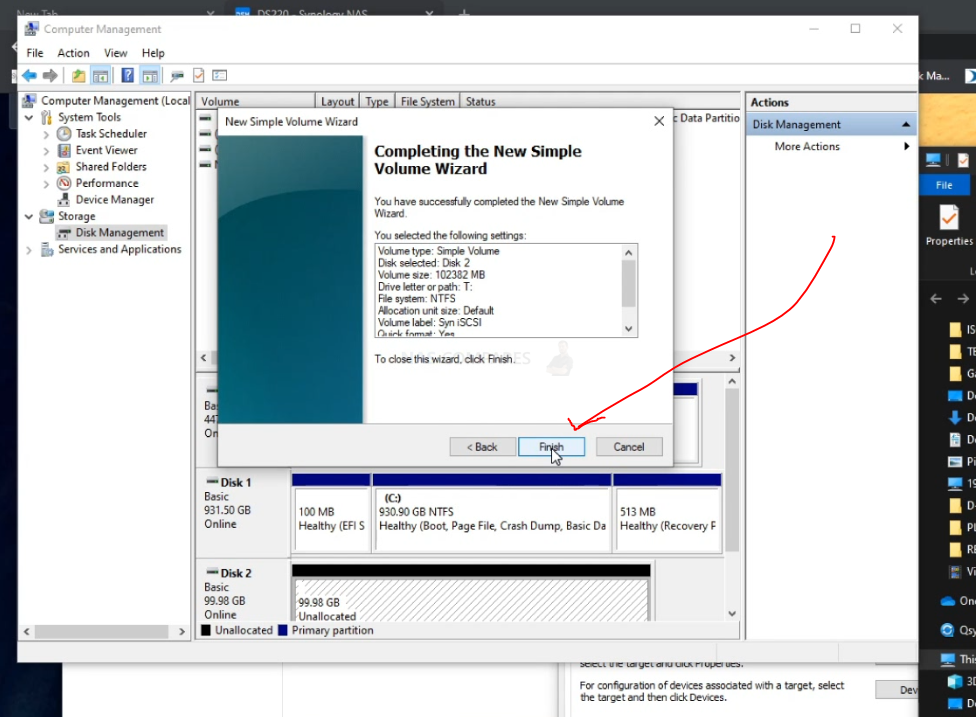

Now the iSCSI LUN is visible to your Windows PC and in a much, MUCH more user-friendly way for your file manager and PC software to interact with (i.e Video Editing, Steam Gaming, VM files, etc)
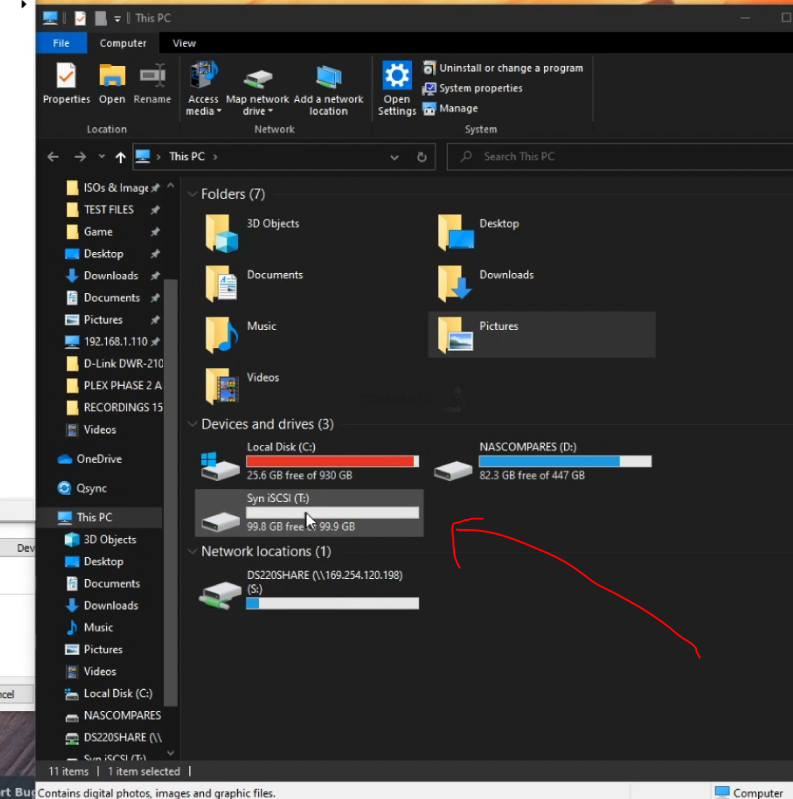

And there you go, that is how to add an iSCSi LUN to your Windows PC from a NAS (in this case a Synology NAS). It is with highlighting that this will work almost identically with a QNAP NAS with the iSCSI manager on QTS and QuTS Hero.
Still need help? Feel free to use the NASCompares free advice section below for completely free, unbias and unpaid support for your data storage needs. It is managed by me (Robbie) and Eddie, so replies might take an extra day or so – but it’s free and we just want to help! Thanks for reading and don’t forget to subscribe.
📧 SUBSCRIBE TO OUR NEWSLETTER 🔔
🔒 Join Inner Circle
Get an alert every time something gets added to this specific article!
This description contains links to Amazon. These links will take you to some of the products mentioned in today's content. As an Amazon Associate, I earn from qualifying purchases. Visit the NASCompares Deal Finder to find the best place to buy this device in your region, based on Service, Support and Reputation - Just Search for your NAS Drive in the Box Below
Need Advice on Data Storage from an Expert?
Finally, for free advice about your setup, just leave a message in the comments below here at NASCompares.com and we will get back to you.


 |
 |


