

Connecting DIRECTLY With Your NAS without Using a Switch or Router
Let’s all be honest for a second about one of the biggest advantages and disadvantages of network-attached storage, namely the speed, external security and method with which you can access your data. Having secure yet unlimited access to the data locked in your NAS from anywhere in the world is all well and good, but often all you want is the quick and easy connectivity more often found in traditional DAS and USB style storage. You want to enjoy the benefits of the software, maybe have the option of remote access and even still share are all the lovely data inside your NAS with multiple users, but you want it via direct connectivity with the NAS over a single cable, not having to play around with routers and switches. Add to this that many users are now taking advantage of connectivity such as thunderbolt and 10Gbe, and you find that it is genuinely desirable to be able to access your NAS via a much more direct method. In today’s article, I am going to show you how to set up a direct, one cable connection between your NAS drive and your Windows PC. The majority of the steps can also be applied to other operating systems, such as Linux and Mac, but this guide should show you how to set up a direct-attached storage style of connection with your NAS, whether you want to access the NAS software GUI or see the NAS Drive storage within the file management tools of your operating system natively (Windows File Explorer, Finder, etc)
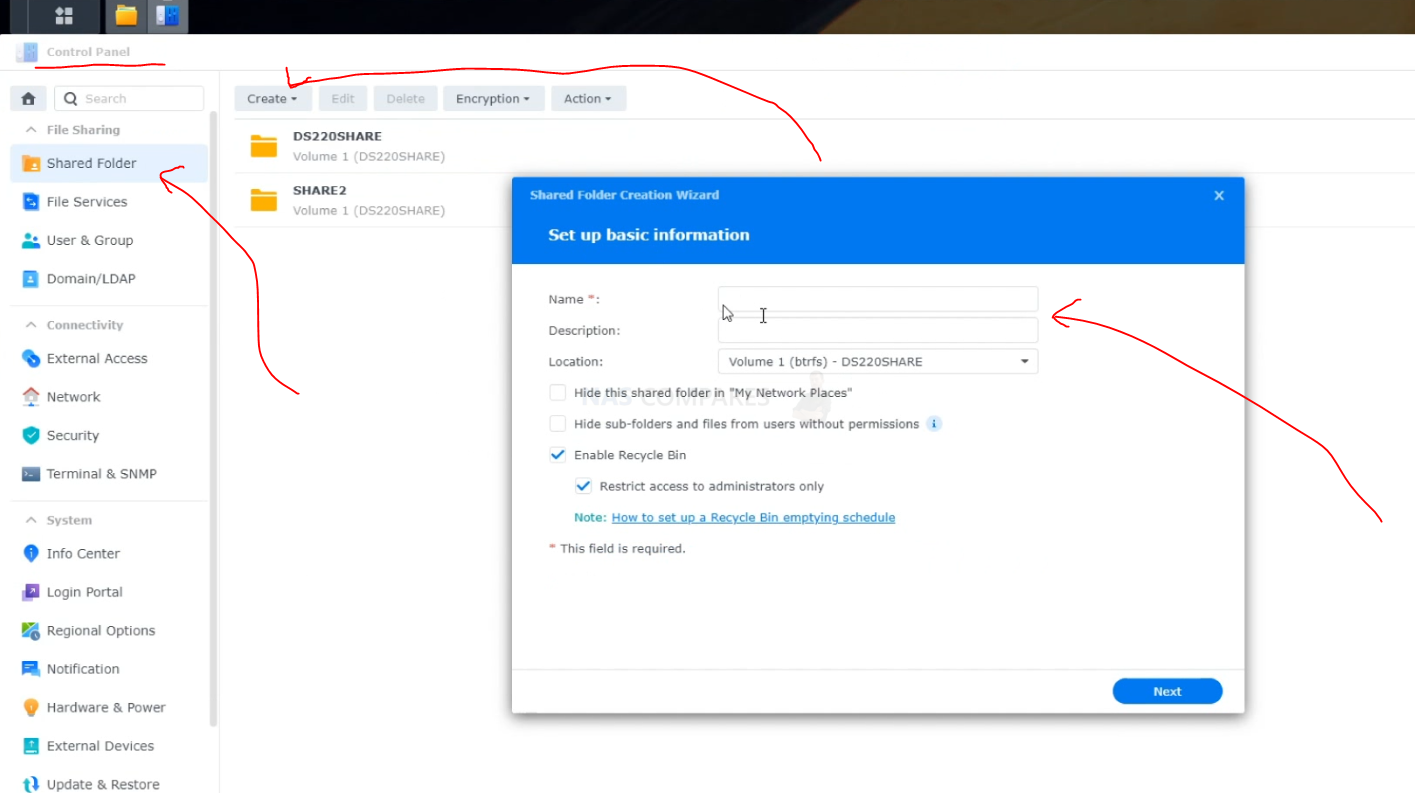
Important – This guide is based on the assumption that you have set up your NAS system storage already. This includes physically installing the disks, powering on, installing the system firmware, creating an account, created and completed your RAID storage pool, created at least one volume and created at least 1 shared folder. I appreciate that this is alot of the first-time setup stuff, but don’t worry. Below are video guides for the first time setup of Synology, QNAP, Asustor and Terramaster NAS.
Additionally, it is worth remembering that the speed at which you can interact with the NAS will be heavily dictated by the connection you choose to use. If you connect with the default network interface connection on a NAS and desktop PC of 1Gbe, you will reach speeds of a little over 100MB/s. However, speeds in the thousands of megabytes are possible if you take advantage of 10Gbe, thunderbolt and more recent high-bandwidth card upgrades. Practically no NAS in the market today allows direct data access over USB (a couple of exceptions from QNAP in the TS-x51A series).
Directly Connecting to a NAS – What Do You Need?
In order to take advantage of this guide, you will need the following items:
- A NAS system set up and ready, including volumes and at least one shared folder (for Drive Mapping)
- At least one available network interface port available on the NAS, so keep this in mind if you want to maintain network and internet connectivity for others at the same time (so, that needs 2 LAN connections)
- A client computer, in this case, a Windows machine with an available ethernet port. If your client computer does not feature a physical ethernet LAN port, there are numerous USB to network adaptors available on the market TN for less than £30
- An additional RJ45 ethernet cable. It is recommended that this method described today it’s not used with a cable more than 20M long, which is still a huge amount of length anyway and should not be a problem
- The network management and first-time setup tool available for free from your NAS brand manufacturer, such as the Synology Assistant, Qfinder Pro and Asustor Control Panel
Let’s begin.

The first thing you need to do is connect the Ethernet cable to the rear of the NAS via an available network port. Remember, if you want to maintain network and internet connectivity between the NAS and other users, you will need to ensure that you use a second available network port instead.
Next, you need to connect the other end of that Ethernet cable to your computer. You will know that both systems are able to see each other, as any available LED lights on either port will light up green and/or orange, depending on the type of connectivity.

Next head over to the network connections area of your Windows PC to ensure that this connection between the NAS and your computer has been acknowledged. You can reach this area either by clicking network connections in your start menu on the bottom left, or typing network connections into the search bar. The connection should be a different one to your internet connection.
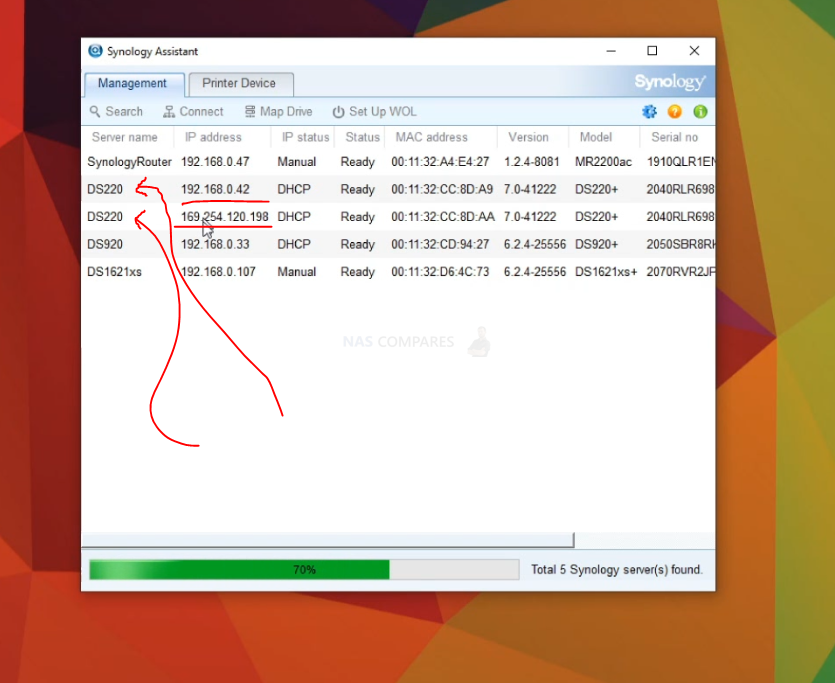
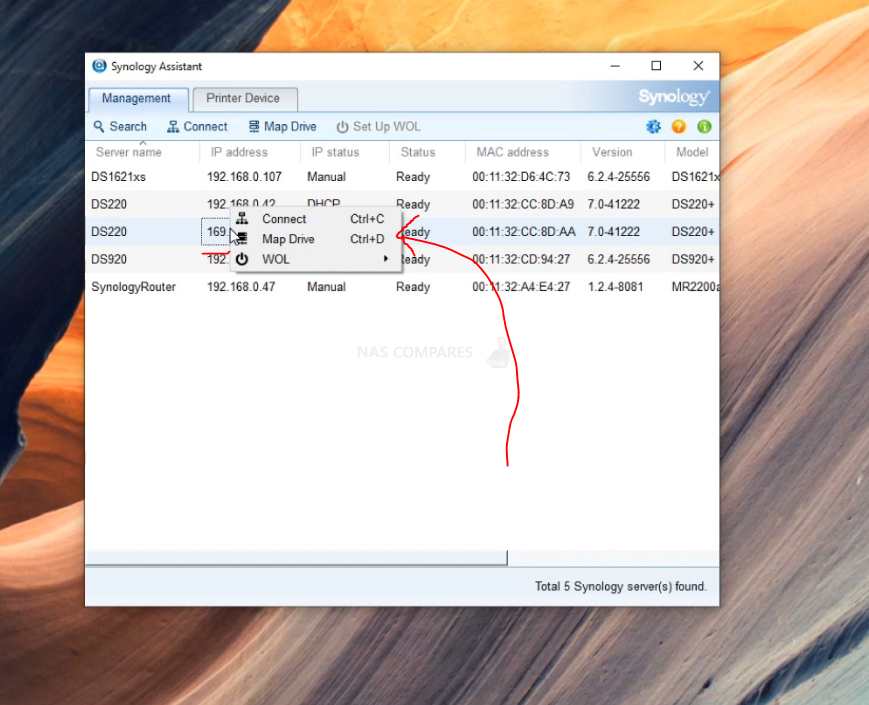
Next, you need to open the NAS brand’s proprietary application that you used when setting up your NAS drive for the first time (ie Synology Assistant or Qfinder Pro). Once you open the application, use the search or scan option and it will then check the network connections available to your computer for the NAS. If your NAS is connected to the internet still and your computer also has a secondary connection with the internet, your NAS will likely be listed twice. One connection, likely starting with IP 192. is your NAS listed on the internet, and the second connection that likely starts with 169. or 10. by default, will be the NAS connected directly via the cable you just attached.
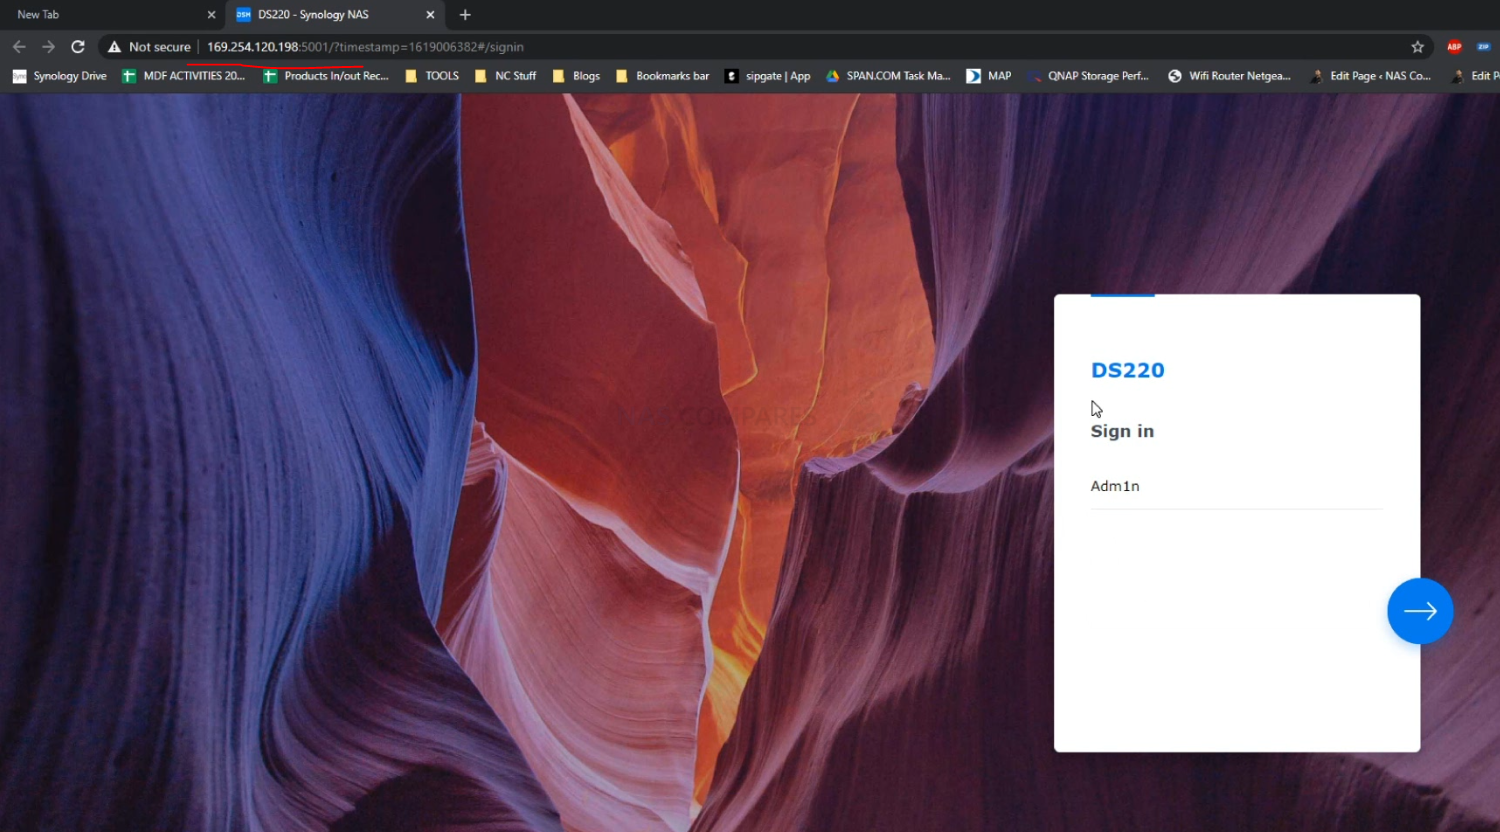
From here you can now interact with your NAS via a direct means of connection, rather than relying on an available network or the internet. Much like traditional connectivity, you have numerous means to interact with the device. If you double click the listed NAS drive on the client software, it will open up the GUI and NAS software in your browser window in a new tab and allows you to interact with the software just as you would via more remote connectivity. Once again though, bear in mind that unless your NAS has a secondary ethernet connection that is linked to an available internet service, your NAS will remain offline (as in no-internet) and features such as automatic firmware updates and new apps will not be possible to download.
Alternatively, many users who connect via this method do it so that they can interact with them with their native, proprietary file management applications, such as Mac Finder or Windows File Explorer. Predominantly, there are two main ways that people do this. The easier but slightly lower performance option is known as creating a Mapped Network Drive. This creates an additional visible storage drive on your computer, but some client software will not allow interaction with mapped network drives. The other way to make your NAS appear via your native file management tools in a far more usable, higher-performing but slightly more complicated way is via the use of iSCSI Targets and LUNs. These utilise a system of creating container areas of storage on the NAS server that are then connected to your computer and visible like any other connected drive with all of the connectivity and usability of localised storage in your PC software.
How to Map A Network Drive to Directly Connect With Your NAS
First up, let’s go through how to create a mapped network drive. First, you need to right-click on the NAS that appears on the NAS brand client software you used earlier. Then click the option labelled ‘map network drive‘, or simply ‘map drive‘.
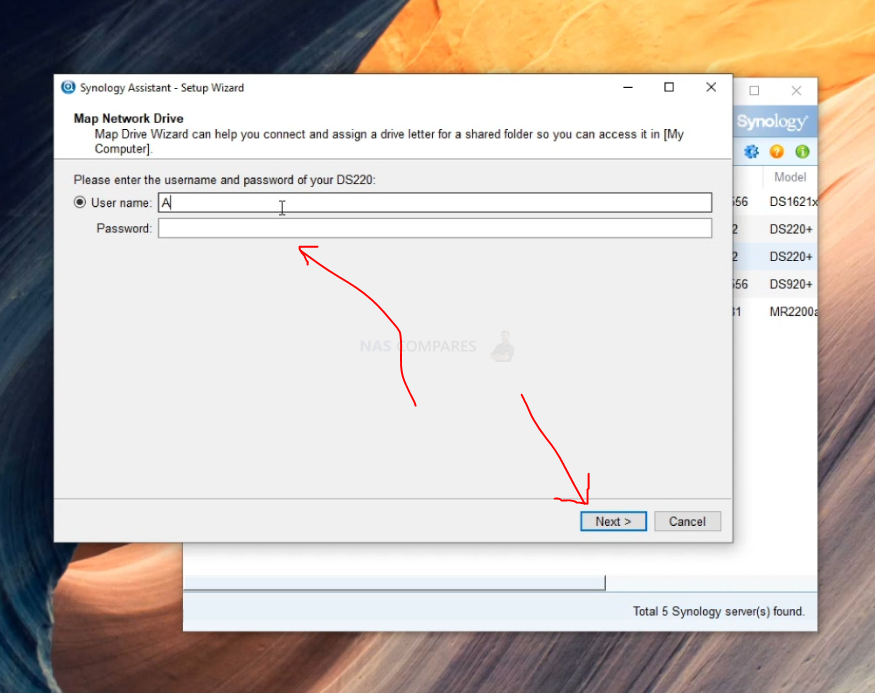
Once you click it, a new window will appear inviting you to enter the login credentials of your NAS system, these will need to be the login details of an account that has access to the shared folder you want to mount on your computer. It is recommended that you do not use the Admin account for your NAS to do this.
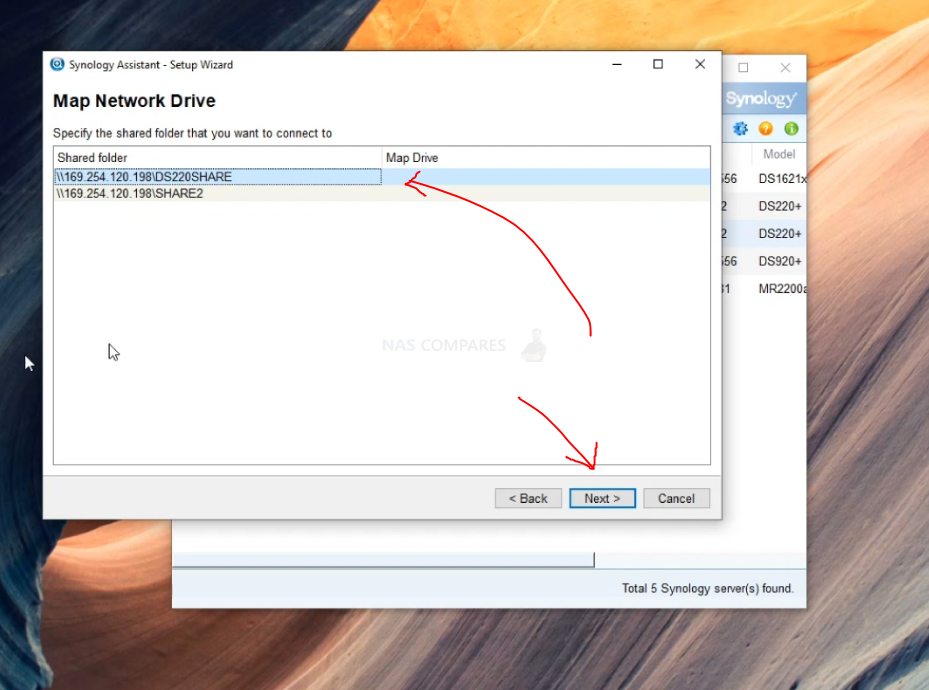
If your login details are correct, the NAS will then ask you to select which one of your available shared folders on the NAS you want to connect via mapped network storage. If you have multiple shared folders, you can connect multiple by repeating this process. Otherwise, simply select the shared folder that you want to interact with locally and click next/ok.
Next, you will need to assign a drive letter to this mapped network drive. The reason for this is so the computer system can assign an identity to the NAS storage that you are connecting with. For example, predominantly the main storage drive in any computer that houses the files for the operating system will typically be labelled as C: drive, whereas an optical drive (CDs, DVDs, etc) is generally labelled D:. So you simply need to select a letter that you want this NAS drive to be identified as. Once you’ve done that, click next
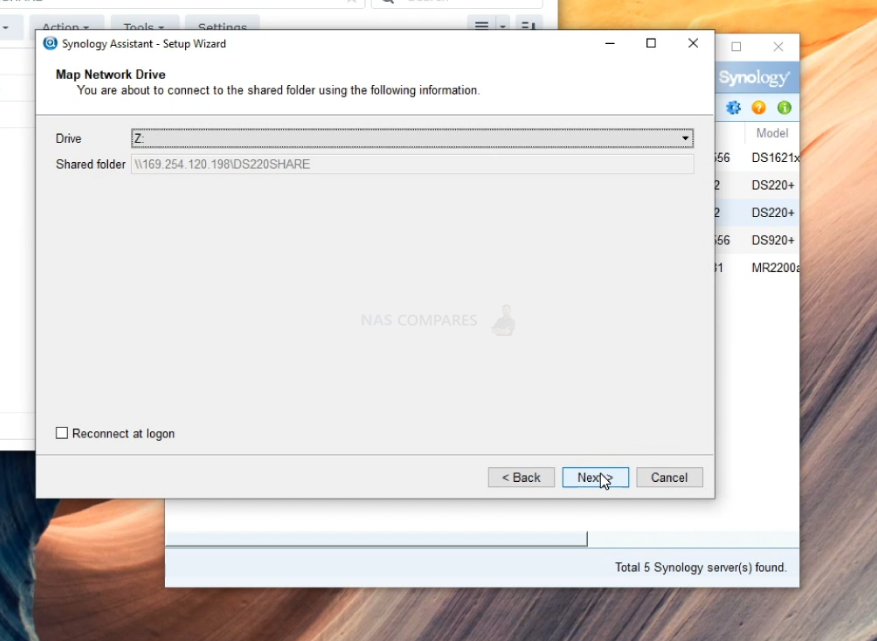
You may be asked to confirm or verify the network settings of this drive. Generally, the settings displayed will be correct as these were used to find the NAS in the first place but double-check the settings nonetheless. After this, you simply need to confirm the settings and it will then add this mapped network drive straight away, allowing you to interact locally with your computer’s file management software (no need to format or sync, it will just appear).
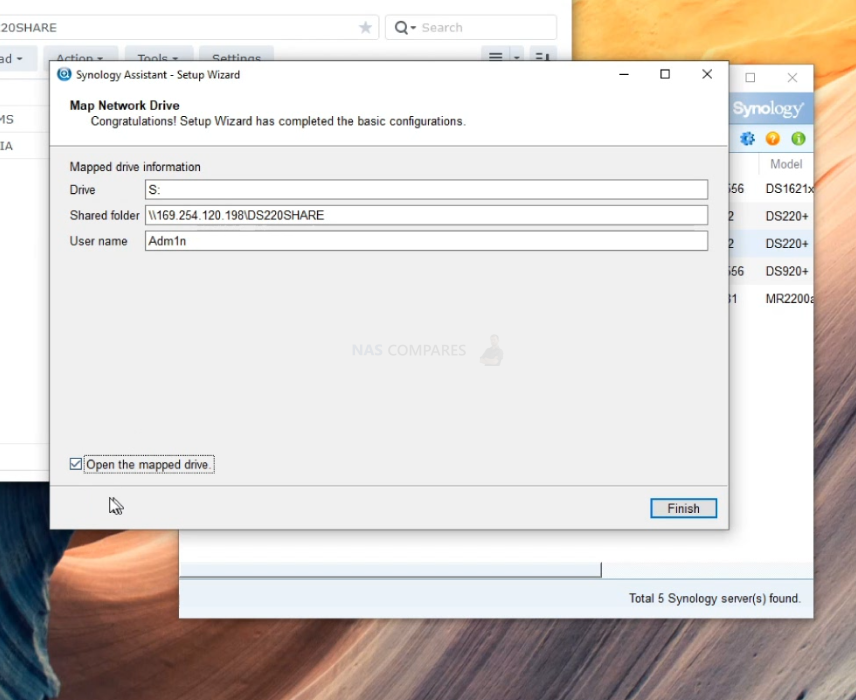
And there you go, that is how to assign your NAS as a mapped network drive locally. From there you can save this drive to favourites or create a shortcut as you see fit.

However, if you want to connect with your NAS in a more native and universally software supported way, then you will need to look into iSCSI targets and LUNS. Below I will take you through each step in creating a LUN on your NAS in order to better connect with your PC file management software and applications. These steps are from a Synology NAS, but the steps are quite universal across most known NAS brands and should be easy to adapt as needed.
How to Connect An iSCSI LUN Drive to Directly Connect With Your NAS
First, you need to head into the iSCSI manager, also known as SAN manager on Synology DSM 7.0
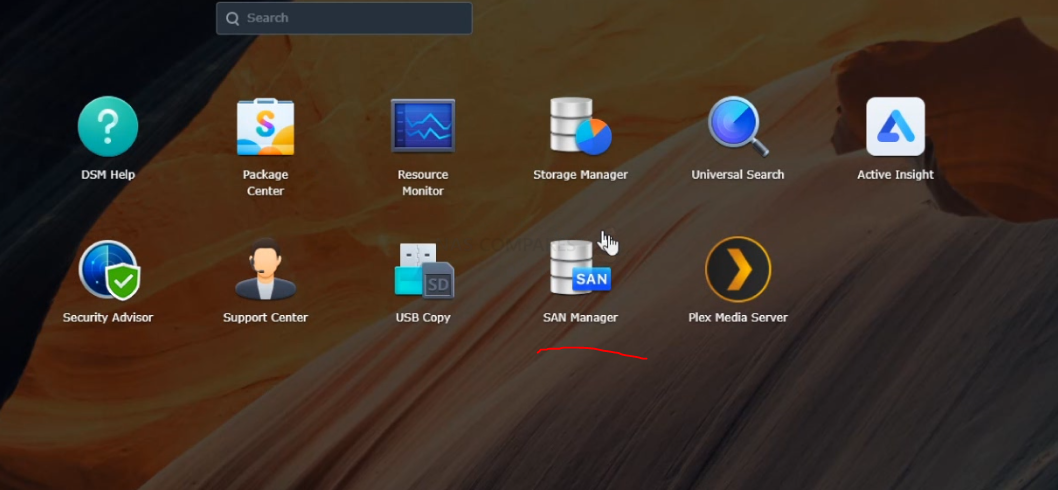
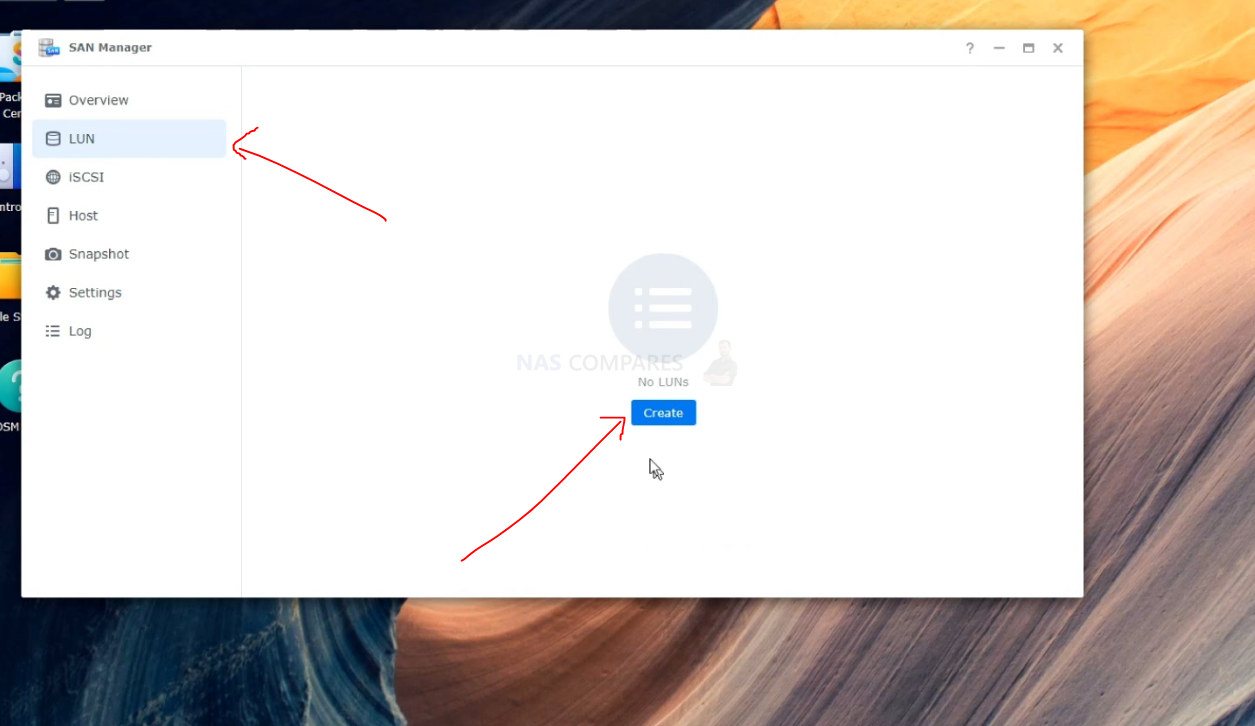
This tool is the one you will need to use in order to create a container of storage that can be interacted with in a more native way on your OS. The process of creating a target (the funnel with which your storage will be visible) and a LUN (the actual container of storage) has simplified considerably over the years and in modern NAS can be done quite easily and by even the most novice of users. If you are going to create a business class setup, or want to create a very unique iSCSI Target identity, you should go ahead and select the target option and then create. However, if you just want to set up your LUN quickly and easily, you can skip this and select the LUN tab and then click create, as the system will create a default target during this process.
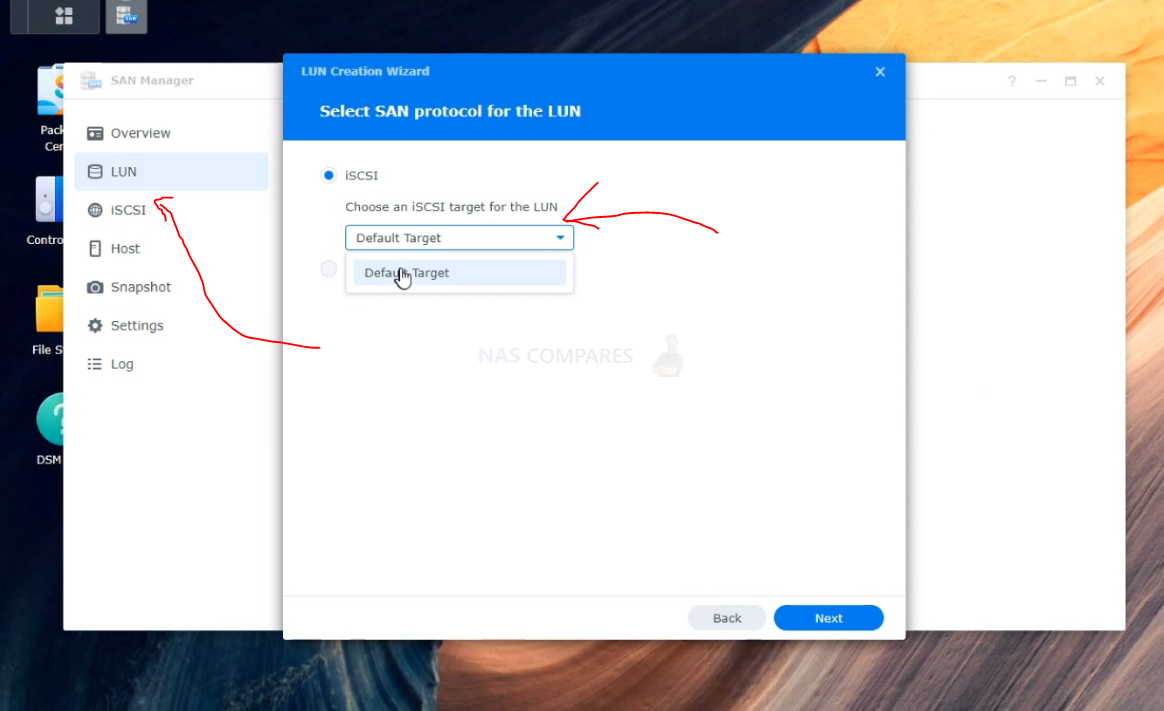
After you click create LUN, you will be asked to name the area of storage, which storage area on the NAS you wish to use (if you have multiple) and give an available capacity (based on provisioning, you can exceed the total available NAS storage if you choose, to expand it later), otherwise just leave the other setting as their defaults.

Next, you will be asked which iSCSI target you wish to attach this LUN to. As mentioned, but default the system will create one during the LUN creation process (listed as default), so go ahead and choose this or any other target you have previously set up.
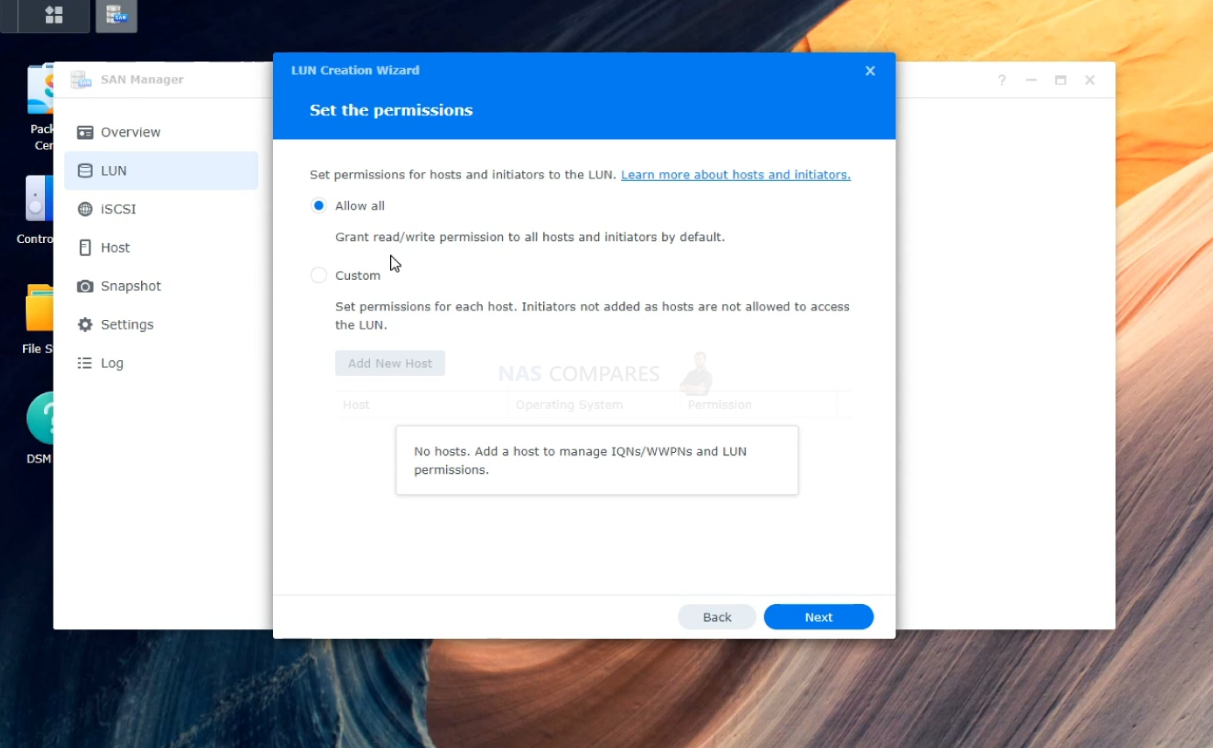
Next, you can choose which user(s) has access to this LUN and their respective iSCSI tool equipped systems. If you are going to be the only one using this NAS directly, you can leave this at defaults. However, maybe check that your default account (not just admin) has access privileges)
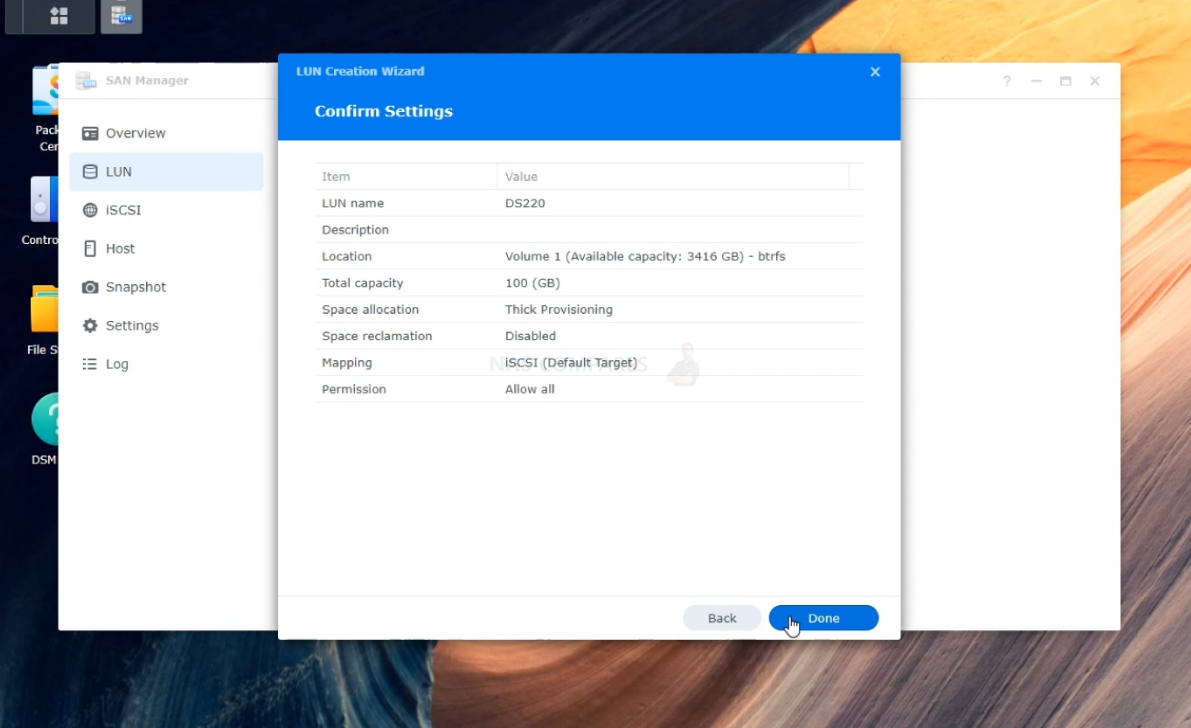
On the last screen, you will simply need to confirm that all the settings you have created are correct and then click confirm. The system will quickly create your iSCSI LUN (though larger capacity LUNs might take longer)
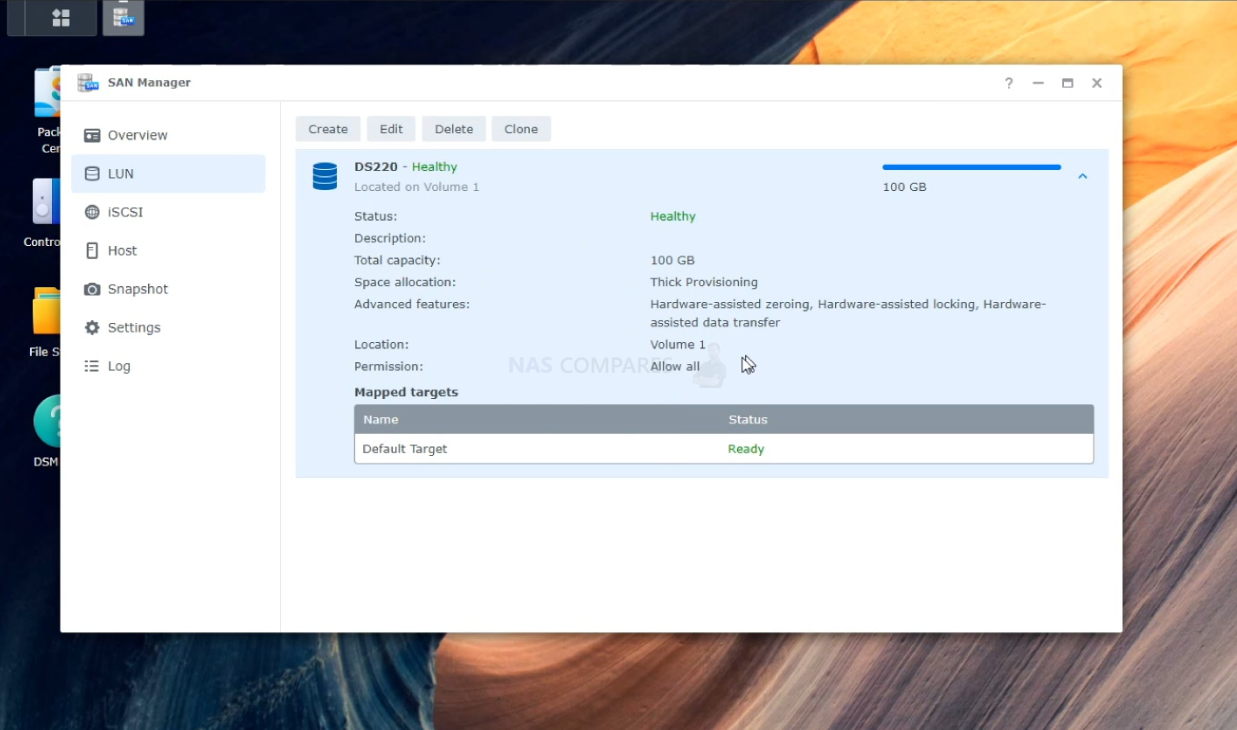
The LUN is now created and you can use the SAN Manager / iSCSI manager to edit and change the settings and access to this whenever you need.
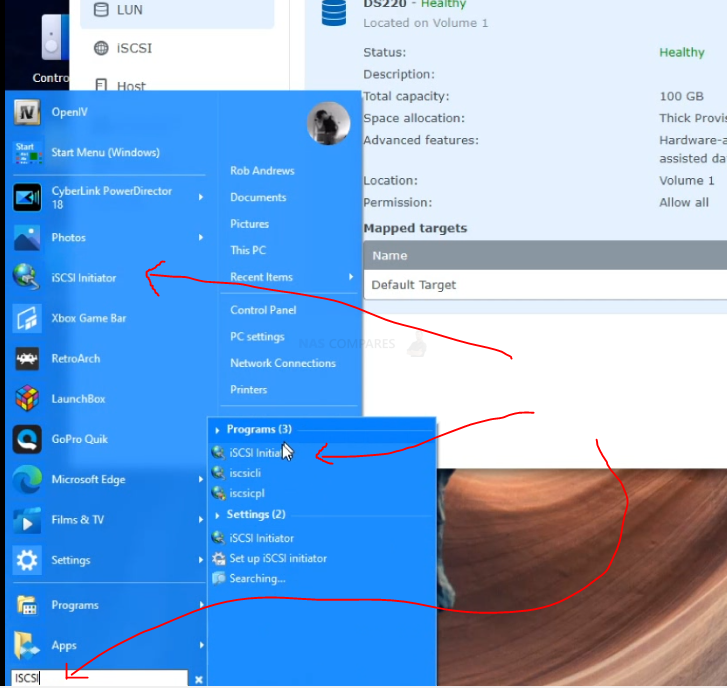
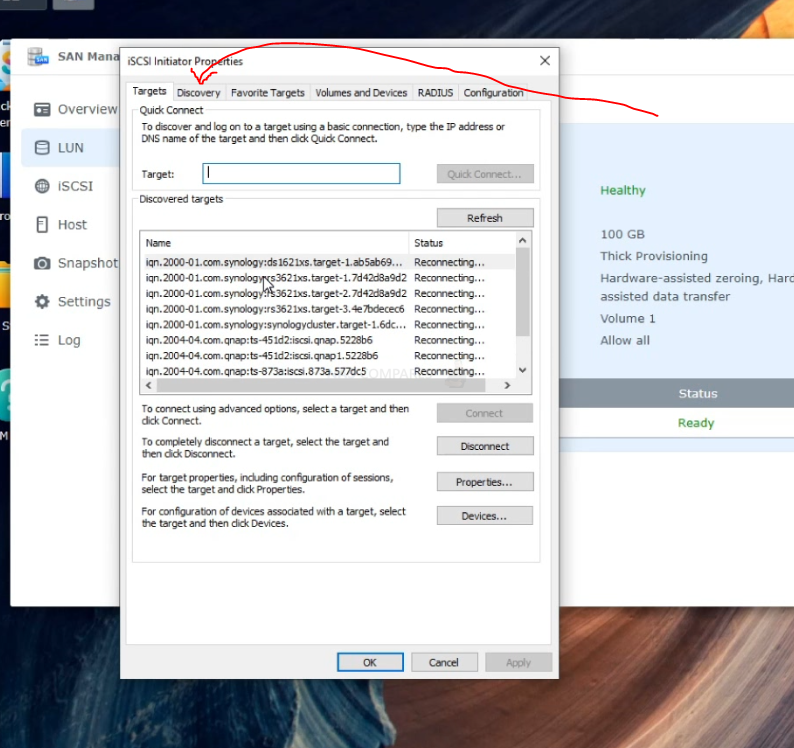
Next, on your Windows PC, you need to head to the Start menu of your computer and then look for/type iSCSI Initiator (which should be available by default in recent windows updates, otherwise is free and available from the Microsoft update center), then run the application/service.
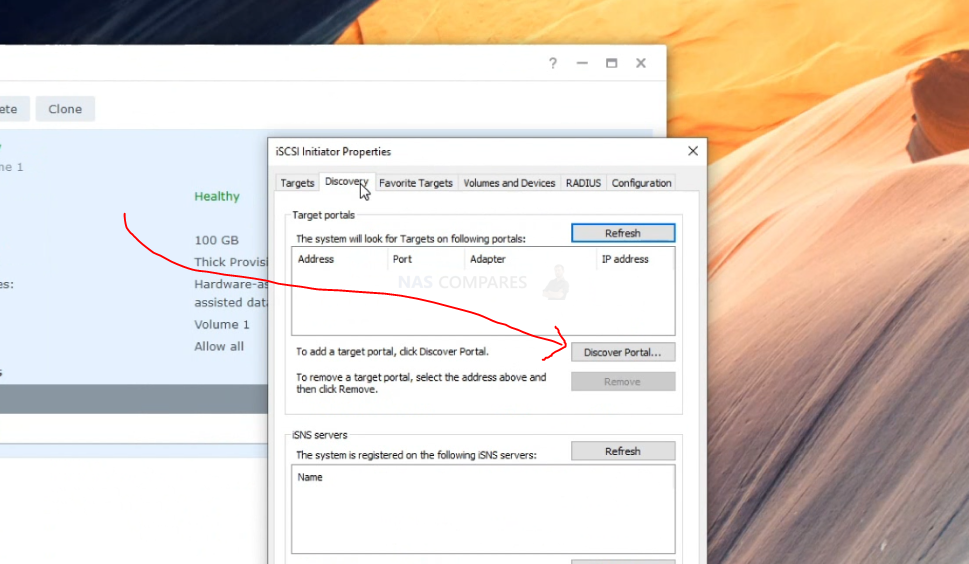
When the iSCSI initiator is open, click the Discovery tab at the top and get ready to configure your PC to see the Target you create on the NAS.
From the Discovery window, select the Discover button and then you will need the IP Address of your NAS (those numbers in the URL window when interacting with the NAS in the web browser)
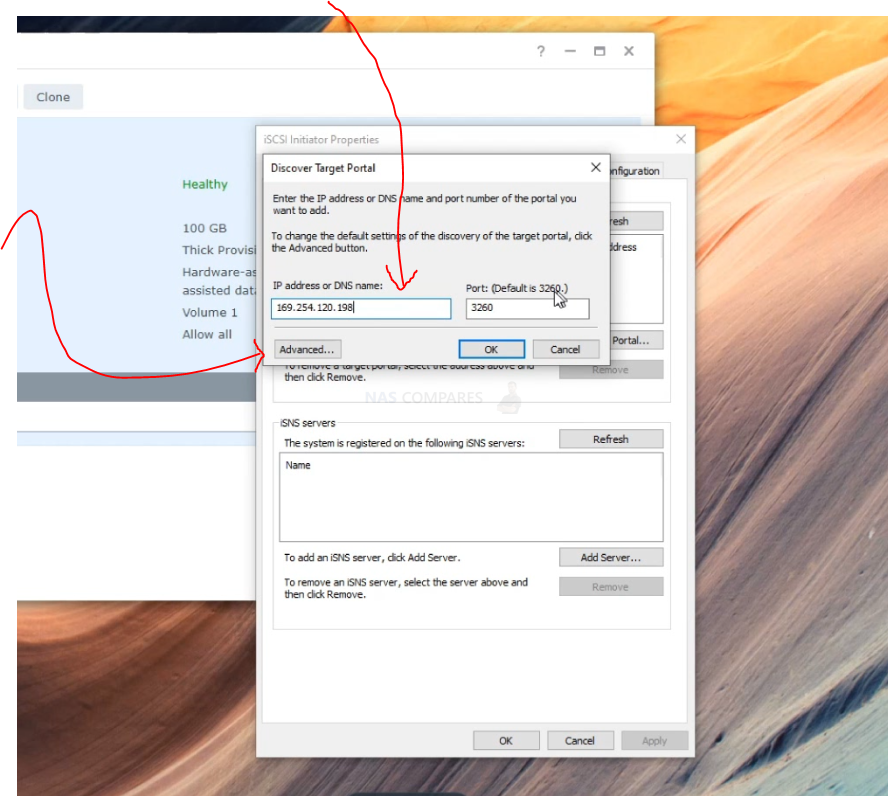
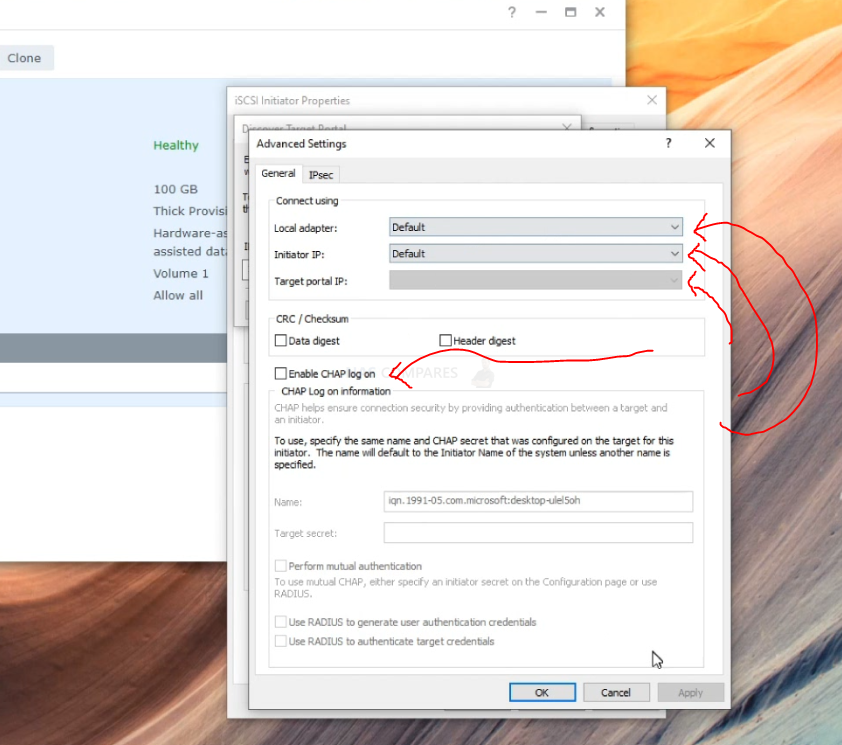
I the next window, you have several options and things to do. First, you need to enter the IP of your NAS (do not include https://), add the port number of your NAS (if you have not manually changed this, you can leave it as the default one on your screen) and if you are concerned about people on your local area network access the iSCSI target and the LUN(s), you can head into the security options in order to add an additional login security layer (CHAPS).
You also have the choice of selecting different network adapters (if you have more than one on your PC, along with further security settings and defaults you can change). It is advised not to change these unless you know what you are doing or have an experienced IT/Networking person on site.
Next, on the iSCSI initiator window, click back to Targets and your newly available iSCSI target (the pathway) to your NAS will be available, but shown as ‘inactive’. In order to activate and use this iSCSI target, you need to click the connect button and from there a pop-up window will appear.
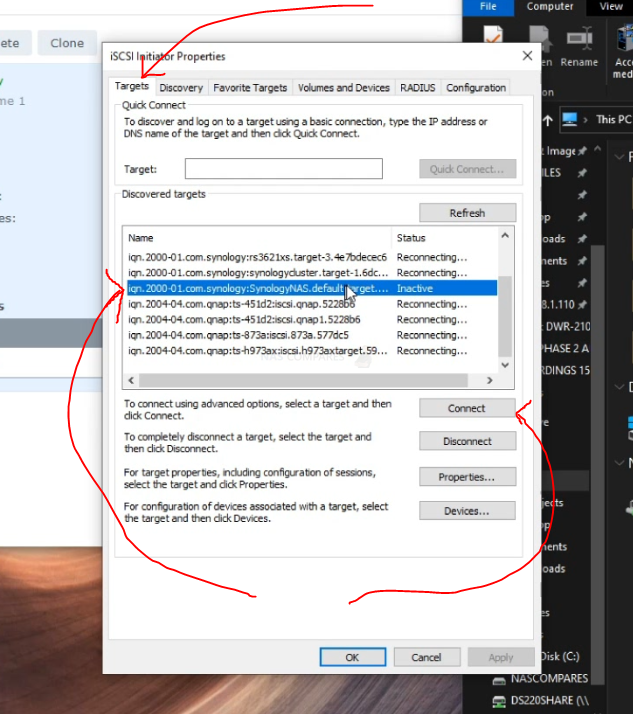
You can enable/chaps again here, but you can also enable multi-path usage here. If you plan on multiple users or services interacting with this iSCSI target, it is advised to tick this box. Then click ok/confirm
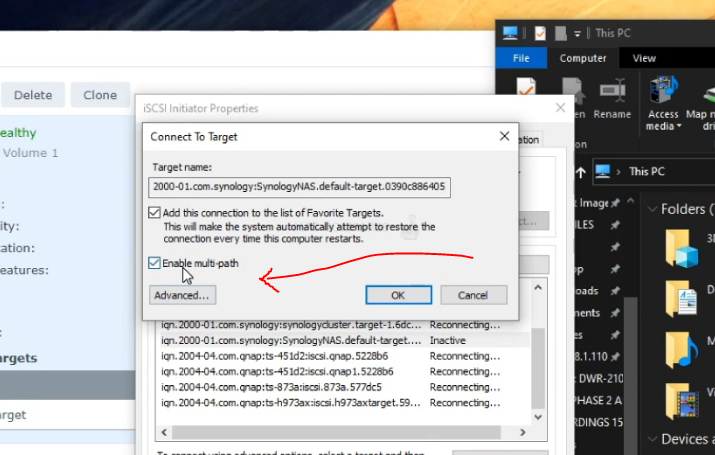
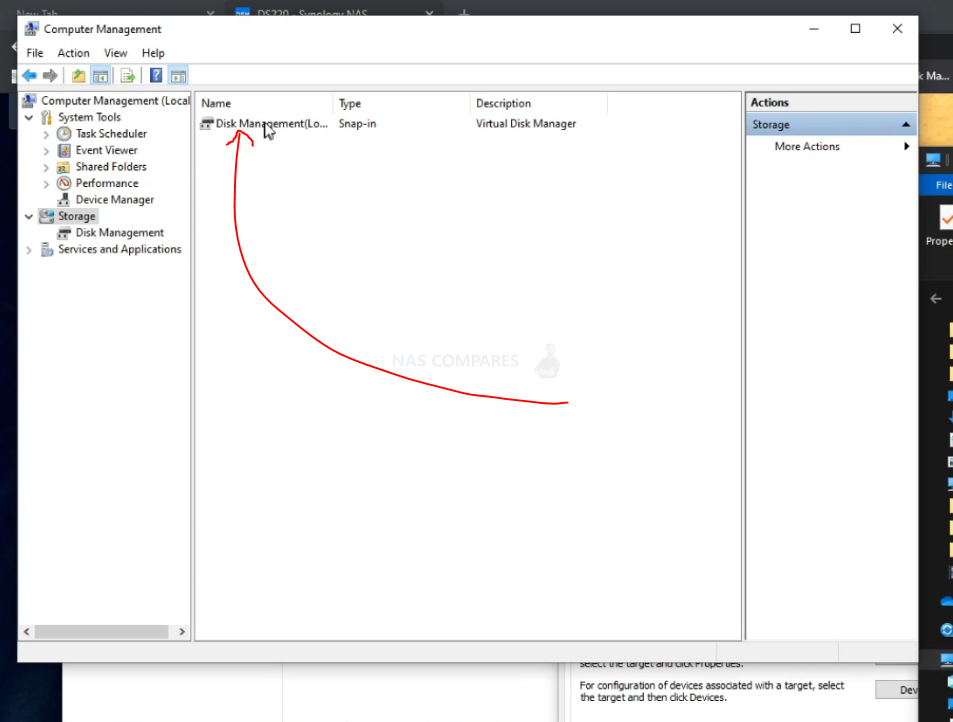
The iSCSI target and the LUN will now be accessible and connected. Next, you need to head back to the My Computer / This PC / My PC window and from there select the ‘Manage’ tab at the top
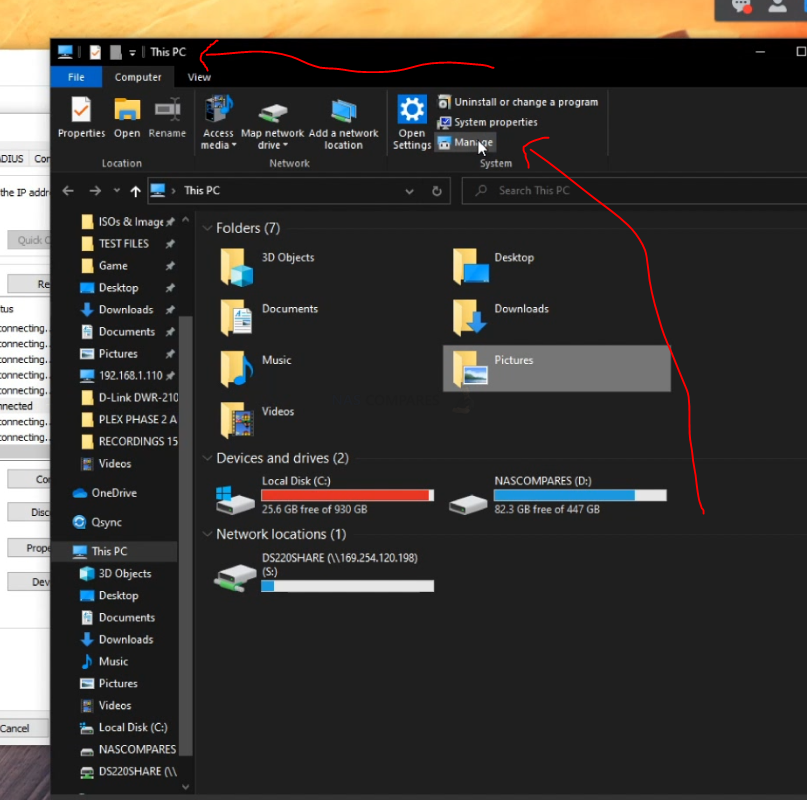
An administrative window will appear. From here you need to double click the Storage choice
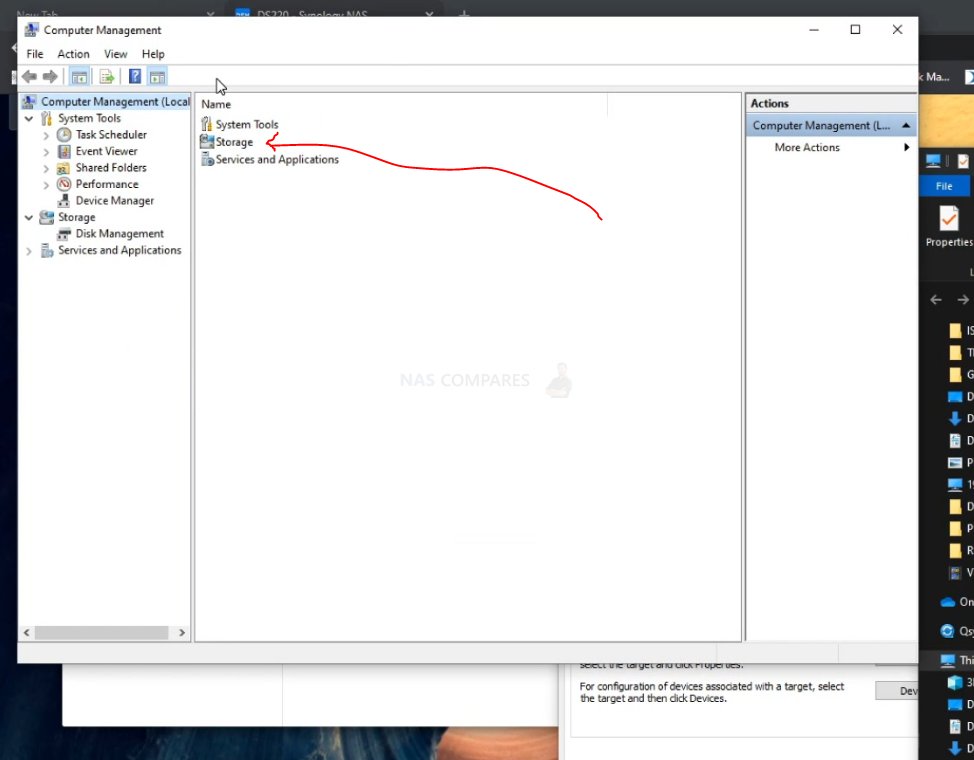
Next you need to double click Disk Management and then you will be shown a list of the connected drives on your PC, as well as available drives (like the iSCSI LUN) that are yet to be connected
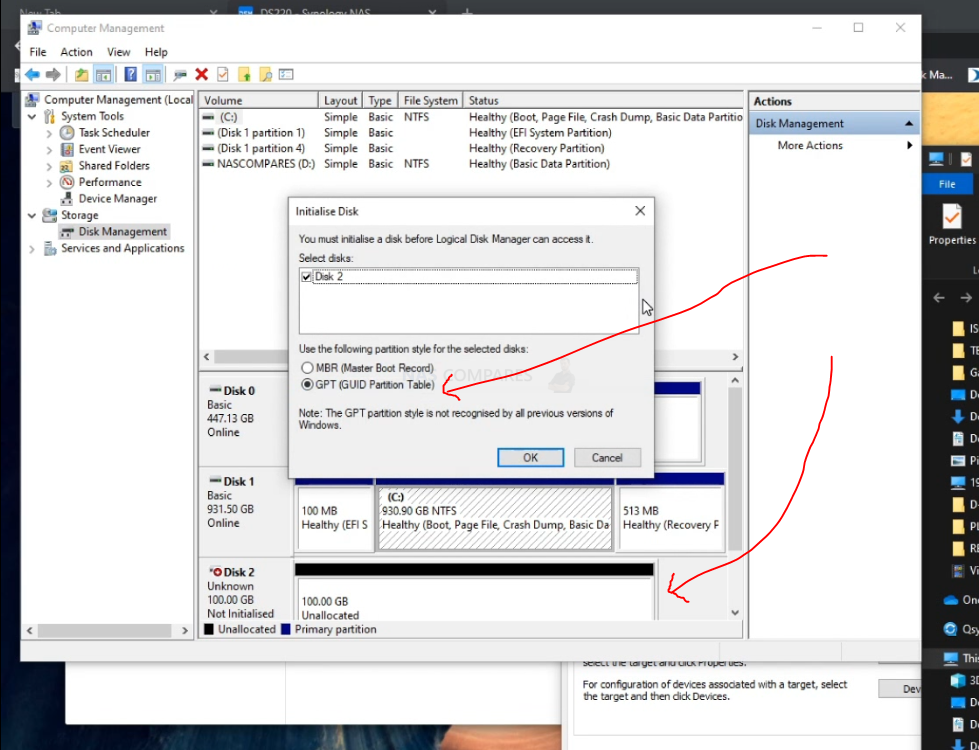
If you have followed these steps correctly, there should immediately be a pop-up window to acknowledge that the iSCSI LUN is found and if you want to add it. It is important that you DO NOT SELECT MBR as a drive choice, as this is generally a drive for a system operating system and will stop your PC booting correctly. So select the other one and click ok/confirm
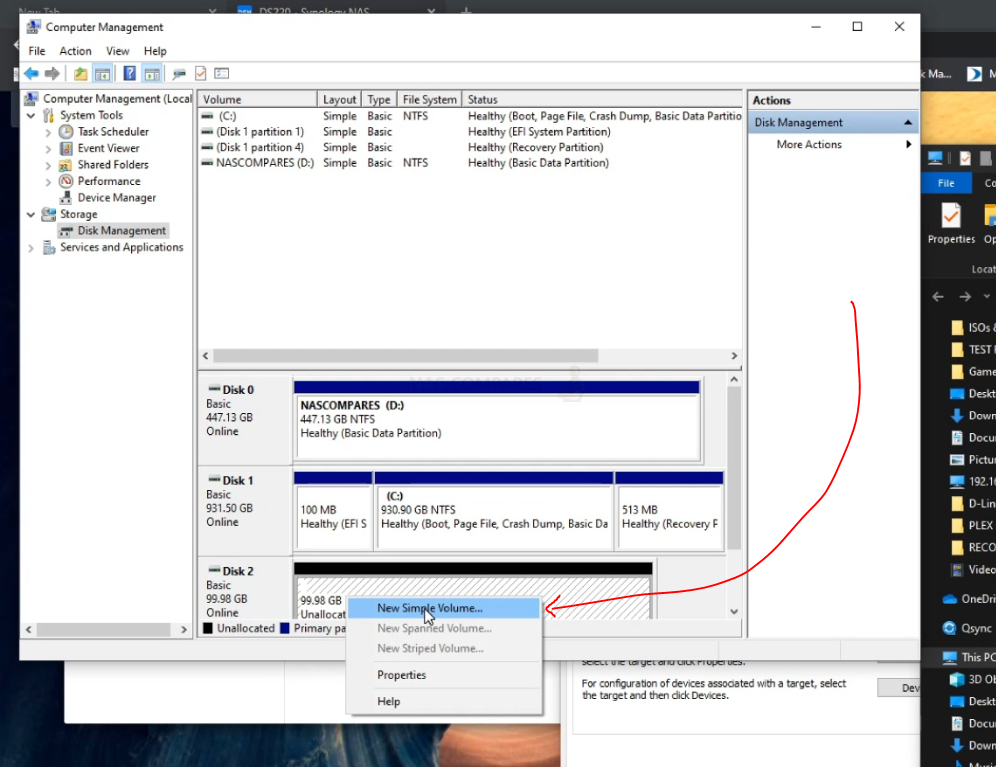
After confirming this, you will need to begin in adding the drive to your system. Right-click the newly appeared drive (likely in black as it is not formatted or connected yet) and select New Simple Volume
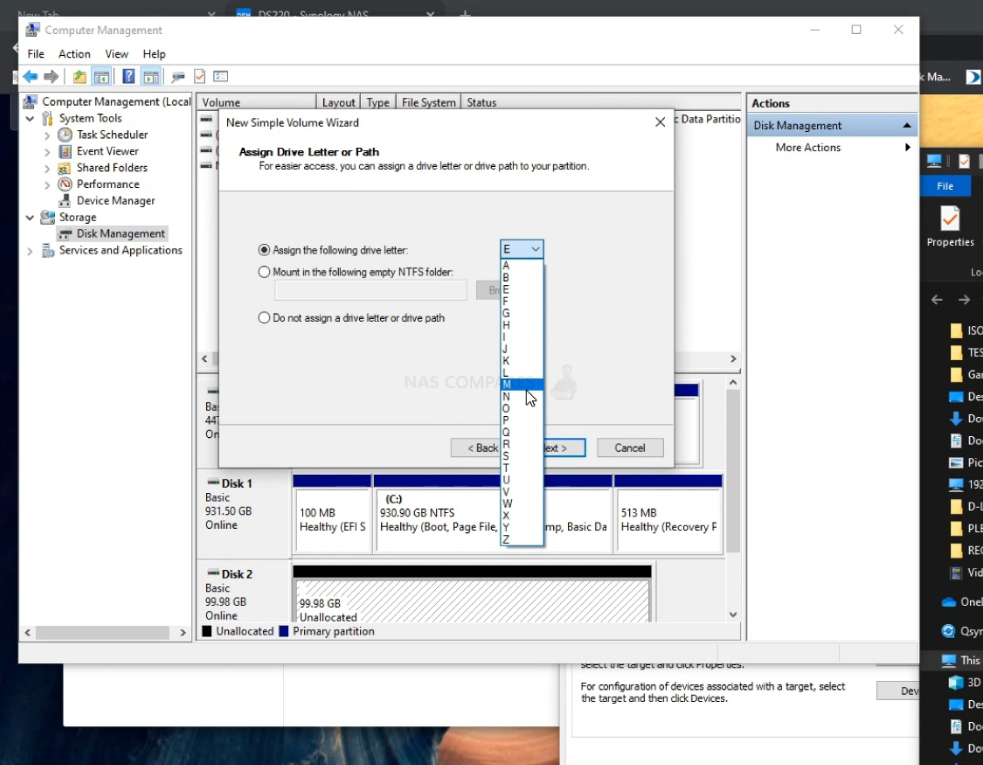
You are now in the initialization and storage setup wizard. You will be asked to confirm the storage space (you can leave this as default if you do not know what you are doing). Then you will need to select a drive letter for this LUN to be identified as. On.y available drive letters will be selectable.
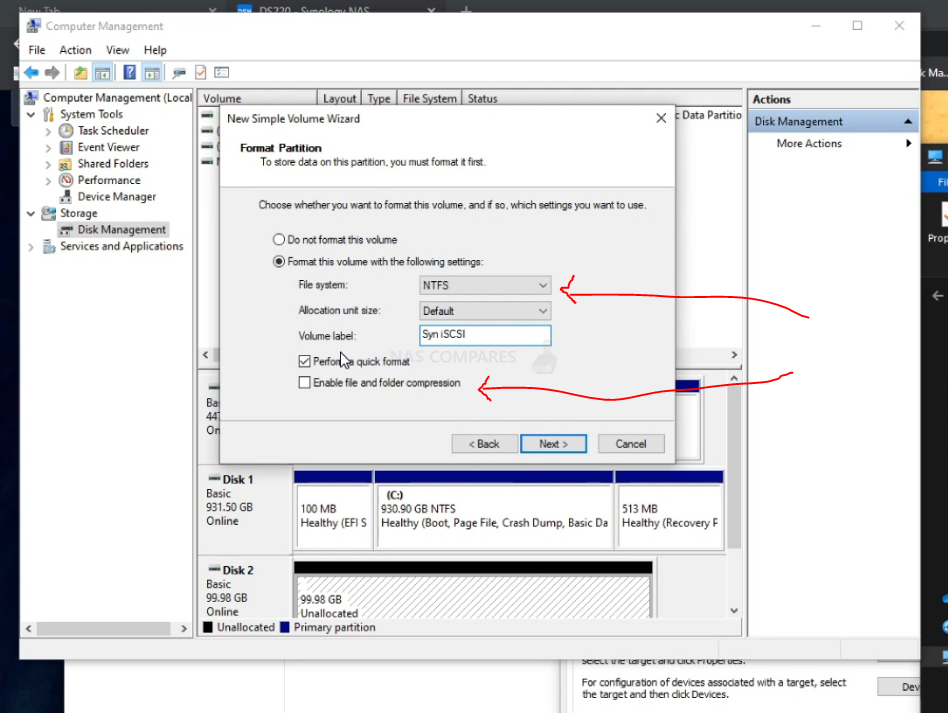
Next, you will need to give the drive a name (it can be left as the default New Volume if you like). you can choose the file system (this can be default for most users) and if you want to use this area of storage straight away, yo ucan format it. Do not format this drive if it already has data on it that you want to access (ie you are connecting a 2nd user to an existing LUN). Then click Next
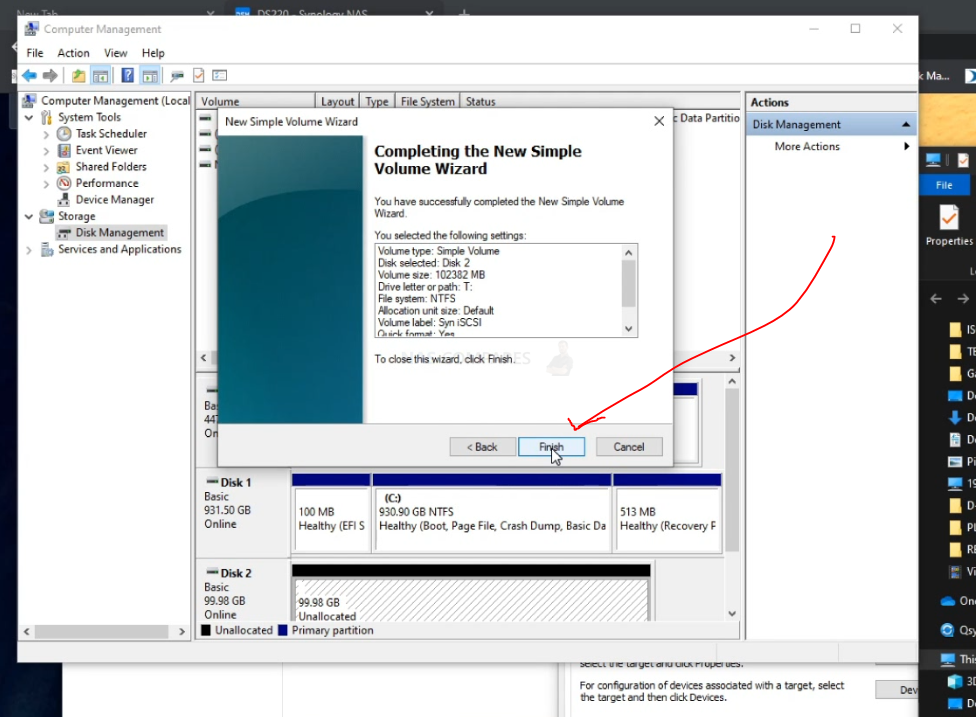
Finally, you will be asked to confirm the settings you have created and click confirm. If you selected to format the drive, this may take extra time (depending on if you selected quick format or not)
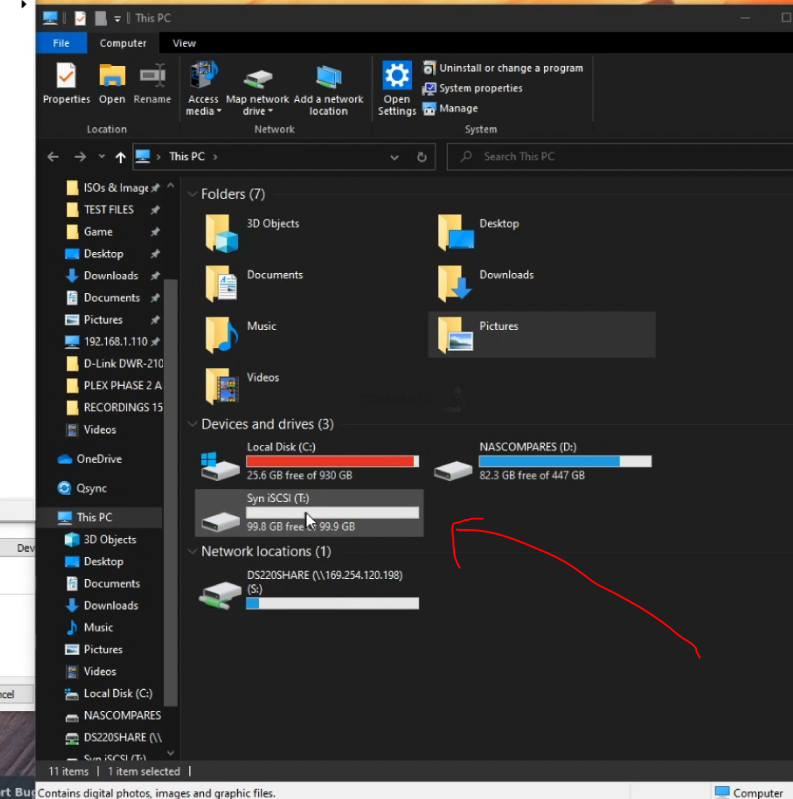
Now the iSCSI LUN is visible to your Windows PC and in a much, MUCH more user-friendly way for your file manager and PC software to interact with (i.e Video Editing, Steam Gaming, VM files, etc)
And there you go, that is how to add an iSCSi LUN to your Windows PC from a NAS (in this case a Synology NAS). It is with highlighting that this will work almost identically with a QNAP NAS with the iSCSI manager on QTS and QuTS Hero.
Still need help? Feel free to use the NASCompares free advice section below for completely free, unbias and unpaid support for your data storage needs. It is managed by me (Robbie) and Eddie, so replies might take an extra day or so – but it’s free and we just want to help! Thanks for reading and don’t forget to subscribe.
📧 SUBSCRIBE TO OUR NEWSLETTER 🔔
🔒 Join Inner Circle
Get an alert every time something gets added to this specific article!
This description contains links to Amazon. These links will take you to some of the products mentioned in today's content. As an Amazon Associate, I earn from qualifying purchases. Visit the NASCompares Deal Finder to find the best place to buy this device in your region, based on Service, Support and Reputation - Just Search for your NAS Drive in the Box Below
Need Advice on Data Storage from an Expert?
Finally, for free advice about your setup, just leave a message in the comments below here at NASCompares.com and we will get back to you. Need Help?
Where possible (and where appropriate) please provide as much information about your requirements, as then I can arrange the best answer and solution to your needs. Do not worry about your e-mail address being required, it will NOT be used in a mailing list and will NOT be used in any way other than to respond to your enquiry.
Need Help?
Where possible (and where appropriate) please provide as much information about your requirements, as then I can arrange the best answer and solution to your needs. Do not worry about your e-mail address being required, it will NOT be used in a mailing list and will NOT be used in any way other than to respond to your enquiry.


|
 |


Terramaster F4 SSD NAS - Should You Buy? (Short Review)
Minisforum N5 Pro NAS Review - Did Minisforum just WIN at NAS?
What Can You ACTUALLY DO with HDMI on Your NAS?
Best NAS for under $499
Best NAS for Under $250 (2025)
Minisforum N5 Pro NAS - FIRST IMPRESSIONS
Access content via Patreon or KO-FI

Ok I have a Qnap drive
I have input 18tb and a 16tb
I am currently transferring movies from anther sata drive to my Qnap which I set to raid 1 as I only had 2 drives I plan to add the other sata drives once my movies are sent across to the nas.
Issue is once I have finished this I pop my 18tb into my nas to expand the drive pool can I do this on a raid 1 I don’t want to lose any data so I can run 3 drives
Also transferring to the nas drives am getting 30.mbs so odd so taken ages as I have like 16tb movies and shows to transfer from my other sata drive.
If only I could pop it into my nas and copy directly then format it once it’s done lol
Any advice
REPLY ON YOUTUBE
Sadly, didn’t work for me. Got all the way to getting it connected and I get Connection failed / Ready, and doesn’t take any IP address I enter.
REPLY ON YOUTUBE
At one point I set this up using the Synology Assistant desktop app to connect using a “Manual Configuration” instead of the DHCP since it would keep a more stable connection with the drives mapped in Windows Explorer. Now I keep getting “Connection failed / Ready” as the status in Synology Assistant. When picking ‘Use manual configuration’ again it hits me with the warning “The IP address and the default gateway belong to two different subnets.”
Any idea how to resolve this?
Digging through the suggested tips and documentation from Synology hasn’t helped. The only thing between it working yesterday and it not connecting today was I turned the NAS off overnight then forgot to turn it back on BEFORE turning on my computer.
It would be so useful to know if there is a certain protocol to follow to ensure the LAN connectivity. Per the video title I found this since I’m directly connected via 10 GbE from my computer to the Synology NAS.
REPLY ON YOUTUBE
Thanks You!
REPLY ON YOUTUBE
Will this work on the basic Synology NAS? Synology 2-Bay DiskStation DS223j with white case.
REPLY ON YOUTUBE
Can i backup 1 tb data out of 10 tb hdd to second hdd of 1 tb in synology nas 224+?
REPLY ON YOUTUBE
Can the nas offline be updated if you laptop or pc has WiFi enabled?
REPLY ON YOUTUBE
Can it be used as nas tfor backing up between two or more drives as raids?
REPLY ON YOUTUBE
Strangely enough, on TrueNAS all you need is to manually set IPs on NAS and computer’s network cards from different range and all the existing shares start working through the direct connection.
REPLY ON YOUTUBE
Garcia Anthony Rodriguez Timothy Davis Sharon
REPLY ON YOUTUBE
Perez Kimberly Perez Margaret Anderson Timothy
REPLY ON YOUTUBE
thenx for all <3
REPLY ON YOUTUBE
Hey man thanks for the insightful video mate!
Would it be possible to do iSCSI keeping the visibility of the whole root of the Syn as we seen in a mapped drive?
Thank you
REPLY ON YOUTUBE
I have just followed your steps to set up a iSCSI drive via my direct Ethernet connection to my DS723+ NAS.
Unfortunately, the speed of a 4 GByte file copy to this new drive was much slower and even stopped in the middle of the copy process and I reached only an average data transfer speed of about 10 to 20 MByte/sec as in comparison to a mapped network drive, which gave me a very contact transfer range of around 110 MByte/sec which was nearly the max speed to be awaited by my 1 GBit/s connection.
So, I switched back to mapped drives instead of iSCSI drive.
REPLY ON YOUTUBE
how to open synology assistant?
REPLY ON YOUTUBE
can the iSCSI drive be seen by other computers on the same local network?
REPLY ON YOUTUBE
I ADMIT the hardest thing about my SYNOLOGY NAS PLEX Media Server is PATIENCE, because I find it necessary to have my ENTIRE MEDIA COLLECTION on hand before I start my DS SERIES UP. So I have just about EVERY TV Series I have watched and enjoyed plus Movies from 1968-2024. I have ONLY 14 more selections to find and purchase then I’m completely done. *So LORD WILLING by 2025 I should be up and running PRIVATELY like NETFLIX but it’s my PERSONAL OFFLINE Media Server with my PERSONALLY CHOSEN movies over 56 years…. Example UNDER THE DOME, THE ROOK & SANCTUARY (Magnus) the ENTIRE SERIES, I like movies that SPARK MY INTELLECT.
REPLY ON YOUTUBE
hi,
I just updated to the newest DSM and cannot log back in. I have the DS220+
Can you help me out?
When using find synology, it is undetected.
The only time the lights come back on, is if I remove the drives and push them back in, after a hard restart/holding the on/off button for 10 seconds.
Is my info backed up on the 2nd drive automatically and is it still there, if the info was wiped from the first drive?
thanks
REPLY ON YOUTUBE
We need the mac version pleeaaase 🙁
REPLY ON YOUTUBE
Looks easy!! Did yyou get the Mac version done?? A a mac user I would love a mac version
REPLY ON YOUTUBE
This video would be perfect if it were half as long.
REPLY ON YOUTUBE
So can you still access the lum folder anywhere in the world via Internet connection? Or can it only be accessed from the PC?
REPLY ON YOUTUBE
Life saver! Thanks!
REPLY ON YOUTUBE
I have a question about LUN.
If I implement LUN between my PC and my NAS, can I:
1. view the data files on my NAS after copying them over from my PC – as if it is a folder?
2. copy a files (ie photos) from LUN into another Share Folder ie. (Photo directory)?
Thank you
REPLY ON YOUTUBE
Super fantastic video ???? Thank you!
iSCSI is such a useful tool. For giggles, I want to experiment with multiple boxes chained *_in series_* using iSCSI to a storage terminus. I wonder whether data transfers will degrade linearly.
10:10 — “SAN Manager” is a better name than “iSCSI Manager,” capturing what iSCSI’s about. iSCSI targets are more amenable for sharing in a HA or clustered config. Whereas it will be a troublesome affair having two users on separate client PCs as distinct initiators connected to a common iSCSI target.
14:09 — GPT vs. MBR . . . GPT is the right recommendation. A key reason is that GuidPT has more functionality and flexibility with drive partitioning and sizing schema. As the (msft windows) world has largely moved on from MBR, only older ROM-CPU-Windows combos are incompatible with GPT. The iSCSI protocol was available prior to the popularisation of GuidPT, and even then, one could choose all-MBR to initialise one’s boot drives as well as storage, albeit with MBR’s 2TB limit. Whilst one can still opt to do so in 2023 today (including with a new system), these days GPT not MBR is the runaway preferred choice.
Kindest regards, friends and neighbours.
REPLY ON YOUTUBE
I have been watching your videos for years now and about a year or two ago, I bought a Synology DS220j. It was supposed to act as my gateway to NAS world. I wanted to learn about NAS on this and then try to upgrade to a better model. However, within a few short months, the DS220j became absolutely slow. When it worked, I tried almost everything. Now, it takes closed to 10-15 minutes to even show the login page. Please help, is there a way I can improve its performance?
Also, I used to have the Synlogy Drive app installed on my PC and mac and it worked fine until recently. Now, even that is taking ages. So, this video was my last hope and even here it is taking unusually longer. Please help. Is there a way I can reset the NAS without loosing the data on my disks?
REPLY ON YOUTUBE
Perfect timing I just got my new W/S with 10Gb ports. Wondering what to do next is solved. Get a cable and connect to my Synology. Cheer’s mate.
REPLY ON YOUTUBE
Helpful tutorial except I don’t know of a reason I would only want to make a separate drive. I would look at this as just a fast connection to the already made complete Synology drive volume used on the overall network.
REPLY ON YOUTUBE
Thank you. I have like 40 tb that I needed to move to my new NAS and transferring it over my horrible old router would of taken forever. It gave me like 10mibs speeds. Connecting it directly to the PC brought it up to 90 mibs
REPLY ON YOUTUBE
Can we connect nas storage to many pc using lan cable?
REPLY ON YOUTUBE
Have ever done a similar tutorial video for MAC users? Would really like to see it.
REPLY ON YOUTUBE
I have a company with a local network that has multiple routers. The NAS is behind one router, but a department that would like access is behind another. Have you made a video that discusses how to access the NAS across this configuration?
REPLY ON YOUTUBE
But you don’t need to use the 169 ip address and it is dangerous to be using multiple networks
REPLY ON YOUTUBE
I just purchased the Synology 1823xs+, along with 5 Synology 7TB SSD’s for a RAID 5 configuration. Since it is not compatible’ with Samsung EVO and QVO SSD’s, I’m looking for a DAS that will be compatible with those disks. Will any of the Synology NAS’s work with the Samsung EVO and QVO SSD disks?
Yes, all SATA based HDD/SSD will work. Just need to remove annoying scaremongering message. https://nascompares.com/answer/hdd-compatibility-warning-way-to-disable-it-synology-storage-manager-will-display-an-incompatible-or-unverified-message/
Thank you!!
Hey dude, great video. Could realllllllllly use that Mac video you mentioned…
REPLY ON YOUTUBE
this has been helpful but some of the setup has been change. But still got it to work
REPLY ON YOUTUBE
I have Drobo 5N2 if I get Terramaster F4-422 NAS what Raid should I use to act like Drobo?
REPLY ON YOUTUBE
can you advice me why I can’t connect to my via the 1GB route. It just won’t open up even when it sees it on find my synolgy
REPLY ON YOUTUBE
I have some questions about optimizing my first NAS setup for my needs.
QNAP TS-673 (not the “a” version).
I just purchased this (used) and is not yet set up.
I have 6x 6 terabyte hard drives.
Three of the drives are wiped clean and ready for install. Two of them have data from my previous desktop that I used as individual JBOD type setup.
The NAS has spots for two m.2 SSDs.
I want to be able to run my own home lab on this with Plex, a few containers, including pie hole, maybe a Minecraft server for the family, and ability to run OwnCloud for family google photos and apple drive replacement.
I plan on upgrading the memory from the stock two gigs to at least 32 gigs and maybe 64 gigs.
Should I buy an SSD for the drive slot number one {1ssd &5hdd}? My assumption is that will help with performance because the system will utilize that drive slot for the OS.
Combined with that, or possibly Alternatively, what can I actually do with the m.2 slots. Is that only for drive cashing? And do I have any direct control over it or will the system utilize it as it needs and I might or might not see benefits from it?
Or will the speeds be just fine with the WD Red HHDs?
REPLY ON YOUTUBE
Do you have a video on how to increase transfer speeds?
REPLY ON YOUTUBE
is there a mac version of this video?
REPLY ON YOUTUBE
Can I network a printer off of one of these? Seems so much easier than networking a printer normally.
REPLY ON YOUTUBE
Did the direct connect to mac mini ever get posted? That would be super helpful! thx.
REPLY ON YOUTUBE
Hatur nuhun kang
REPLY ON YOUTUBE
What if I want my filesystem to be ZFS? Does iSCSI mounts always have to be reformatted?
REPLY ON YOUTUBE
thx
REPLY ON YOUTUBE
This is my problem. My router is in the basement and would be needing a very long cable to have my NAS upstairs in my bedroom. Any suggestions?
REPLY ON YOUTUBE
Do you have an installation how to video for Synology Disk Station DS420J ?
REPLY ON YOUTUBE
Hi, just found your vidoes and I think they are very useful. I have a question, in this video you connect the NAS to your router, but can you also connect the NAS directly to a computer via a crossover network cable?
REPLY ON YOUTUBE
How can I make my Synology NAS DS920+ to run wireless… at my Wi-Fi ?
REPLY ON YOUTUBE
I have struggled with batching pictures to a NAS for years, always needing to find work arounds, and never understanding why it wouldn’t function correctly. This video finally solved it with the ISCSI mapping! Thank you so much for this tutorial! To others with a similar issue, my problem was that pictures would not move from a local folder to the NAS automatically using a task set up in the Task Manager. If I manually ran the .BAT, the pictures would move, but with the Task Manager running the .BAT, the pictures were stuck in the source folder. Simple mapping to the shared folder on the NAS did not do the trick, but mapping to the LUN works perfectly. Years of struggling all came down to this ~8 minute fix. Thank you, thank you, thank you!!!!!
REPLY ON YOUTUBE
I’ve just bought a 412plus, and it’s not coming with any instruction, so thank you for this video. You are an absolute Godsend. I’ll be following your instruction to the letter.
REPLY ON YOUTUBE
I’m looking for a Nas internet setup without useing a landline
REPLY ON YOUTUBE
Great video and exactly what I was looking for just one question. Can you physically see on your screen what exactly is in the drive videos photos etc. Let’s say your looking for something and it’s in this drive ?
REPLY ON YOUTUBE
Just a perfect explanation. Thanks!
REPLY ON YOUTUBE
Thanks for this video. However, I am having trouble with something else. I am trying to connect my NAS to another Linux machine (the one currently connected will be given away), but to no avail: the NAS isn’t detected through QuickConnect. How can I solve this? Thank you in advance.
REPLY ON YOUTUBE
Great video. Much appreciated.
REPLY ON YOUTUBE
Can I use a Usb from my NAS to a Usb to my MacBook Pro to speed up copying files?
REPLY ON YOUTUBE
Yoir a life saver. This helped me fix my 11.bs speeds to over 100+ thank you!
REPLY ON YOUTUBE
please add a description regarding link aggregation on a unmanaged switch (switch does not have an option for link aggregation)
REPLY ON YOUTUBE
thanks for the great video. But *please upgrade* your local drive. 😛
REPLY ON YOUTUBE
Why when backing up my data from my windows to nas its backed up as. Zip files not as. Bak extension
REPLY ON YOUTUBE
Is it possible to only mirror a portion of the two disks and then use the remainder as regular storage? I only need 20% mirrored for important files and want to use the rest for media files that I don’t care to lose.
REPLY ON YOUTUBE
recently I bought a Synology 1821+, I am able to connect it with my window 10 PC but unable to do so with with my window7 PC, do you know what could be the issue ?
REPLY ON YOUTUBE
Does synology ds720 plus can be used without Internet (with local network)
REPLY ON YOUTUBE
i got the lun set up and the iscsi drive, but how can i get them to connect to each other?
REPLY ON YOUTUBE
Great video. Thnx. But I do not understand completely the iSCSI thing. Is it just a way to add additional storage to my PC (hence the example of 100 GB of space), or I can connect the existing two volumes with existing data in my DS414 and access it via iSCSI like I did before but faster?
Thank you in advance.
REPLY ON YOUTUBE
Here’s a question. When transferring the data from my old NAS to my new one, how can I do it through ethernet? The default transfer method seems to be wireless which transfers at a dismal 25Mb/s
REPLY ON YOUTUBE
Thank you for the helpful video!
REPLY ON YOUTUBE
How do we know in which disk OS has been installed?
REPLY ON YOUTUBE
I can RUN MY SYNOLOGY without linking it to the INTERNET with the same RESULTS as Netflix, Tubi, Plex, Vudu, Pluto, hula, or peacock.
REPLY ON YOUTUBE
Will it work with netgear’s to?
REPLY ON YOUTUBE
Thanks dude really saved me a headache 🙂
REPLY ON YOUTUBE
Thanks for this fantastic video. Very straightforward and to the point!
REPLY ON YOUTUBE
Just boughs a 1621+ with 4x10Tb drives. I want the majority to be used for media, but I need 1tb for web hosting, 2TB for my backup from my laptops and 2TB for encrypted cloud storage. Can all this go on one volume or do I need to fence off? I’m feeling a bit overwhelmed.
REPLY ON YOUTUBE
I wanted to setup this same setting… except that I wanted faster transfer speed… what should I do? 100mbs transfer rate is too slow for me… can I buy an adapter for usb? how should it be done?
REPLY ON YOUTUBE
This is the best feature I learned how to use since I got my NAS 2 years back. Never was to crazy about Mapping drives that lose their connects every now and then. Using Scsi was easy to set up. Got it going in less than 10 mins. You earned a big thumbs up for this one. Thanks
REPLY ON YOUTUBE
WHY NO ONE EXPLAID BYPES PER INODE
REPLY ON YOUTUBE
Hi thanks for the video. I got a problem doing that. When i go to the synology assistant, i can’t clic on “map” the option is grey. does someone know why ?
REPLY ON YOUTUBE
Take a shot everytime he says “but for now”
REPLY ON YOUTUBE
An amazingly detailed video! I suppose there is no need to even ponder about which NAS to buy now. Thanks so much! Cheers!
REPLY ON YOUTUBE
Great video, thumbs up. But please, pretty please, leave out that awful stop watch. Ok, a minute timer or even one with seconds. But what’s the benefit of 1/1000 seconds running hugely on your screen, constantly distracting you from the video content :)?
REPLY ON YOUTUBE
and what do you do if you get to the 8:29 mark of your video and you don’t see your NAS ?
REPLY ON YOUTUBE
if I do this. will my pc still be able to connect the internet?
REPLY ON YOUTUBE
I would love to have multiple storage pools, so I could have a couple of TB of media that I don’t care about losing, and the rest in an SHR for stuff that I do care about. Can it do that?
REPLY ON YOUTUBE
did you ever make the follow up mac video for this?
REPLY ON YOUTUBE
you say connect to the NAS directly *proceeds to show you how to indirectly connect to the NAS* you are still using a router and switch to access the NAS the way you explained it. shared drive uses ur lAN which means ull need a router or switch to create a LAN
REPLY ON YOUTUBE
Is there a possibility to create a folder that can only be reached via your local network and not via the internet? For example map1 that I can access anywhere via my mobile or pc ad my moms home. but I can only access Map2 when I am on my wifi or cabeld network at home. So that if my account were hacked, people wouldn’t be able to access this data from map2 from outside?
REPLY ON YOUTUBE
1. Any drive added will be formated with initial install?
2. Can I start with 1 drive raid 0 and add drives later, months later, and change the raid configuration and not loose or have data formated from drive originally placed there from install?
3. Can the NAS run without hard drive inside? Where is QTS software installed?
REPLY ON YOUTUBE
Thank you, this was very informable as I needed a refresh on setting up NAS for my home. It has been a long time so this really helped
REPLY ON YOUTUBE
If I plug my 453-d into my router will I be able to access thru WiFi from my pc in the other room?
REPLY ON YOUTUBE
This way is bottle neck with LAN Speed 1Gbps.
REPLY ON YOUTUBE
WIll there be an updated Video 2021 soon? – otherwise I will use this tutorial.
REPLY ON YOUTUBE
So good. Thank you.
REPLY ON YOUTUBE
Thank you very much for the work you do. 🙂 Is it possible for you to create a video in which you tell how to create user accounts on the server to which they have to log in using a password. Have a good one ! thx
REPLY ON YOUTUBE
Thank you so much for all your amazing lessons. Highly educational and highly appreicated.
REPLY ON YOUTUBE
Video starts at 5:05
REPLY ON YOUTUBE
Typical. No Mac support
REPLY ON YOUTUBE
Is it possible to connect two Synology NAS (both RS1221+) together without a switch in between?
I’d like couple 2 of my 4 NAS ports for LAN use, and then couple the other 2 directly to my backup NAS for maximum throughput when backing up.
Would I just assign a static IP to the bound interface, and then use that IP as a backup destination (no need to add a static route to the NAS or anything?)
REPLY ON YOUTUBE
Any update for a Mac setup video?
REPLY ON YOUTUBE
Can you use a streaming stick direct to a nas to just hook up to a tv and not be part of a network
REPLY ON YOUTUBE
Three weeks ago I set up a DS420+ running DSM 7.0. I have the two Ethernet ports bonded using LACP. If I go to Control Panel/Network/Network Interface and look at the Bond1 interface it tells me that the MTU is 1500, both for the bond and for the individual interfaces. I cannot find anywhere to change this, the edit button just lets me choose different protocols for bonding the ports. I would like to be able to use Jumbo Frames; is this not possible?
REPLY ON YOUTUBE
Could you connect the nas to a switch but still have no Internet
REPLY ON YOUTUBE
Does it make any difference if you connect all the ethernet cables
REPLY ON YOUTUBE
Hi,
I have a QNAP TS-253D that I can not get in to the web interface.
The web page prompts for username and password and then sits on the loading screen forever. What shoul I do?
REPLY ON YOUTUBE
Thank you Mate
REPLY ON YOUTUBE
Your videos really big helps, thank you for your work.
REPLY ON YOUTUBE
Thanks this was a great video and help for me to setup my NAS!!!!!!!!
REPLY ON YOUTUBE
I really like your Youtube-Tutorial, to connect a NAS directly with a Computer, without the use of Internet (https://www.youtube.com/watch?v=Zh0FEhdBdpE). But I have one question: Is it possible to do this with two computers, on one Synology 220+?
I want to realize this for the Synology 220+ and two Desktop PCs. And I want to have a shared directory on the NAS, so that both PCs can access it. I don’t know if both ways you showed in the video (network folder and iSCSI) will make this possible, but for me only one way would be enough. So can I do this with two PCs on the two LAN-Ports of the Synology 220+?
The aim is, that the NAS is not at all connected to the Internet, only to this 2 PCs. So updating firmware manually with an USB Stick or so, would be the best option for that, I guess.
I have not bought the 220+ yet, but if it is possible, I would go for it!
Thank you very much!
Petra
Can I use my two 8TB SATA drives in it? Means, is there any HDD size limit?
REPLY ON YOUTUBE
Thanks a million for this clear explanation! Very straightforward but exactly the things you need to understand right after unboxing. Excellent!
REPLY ON YOUTUBE
Very helpful video! Thanks!!
REPLY ON YOUTUBE
OK, but what are the tradeoffs?
* Can a LUN mapped to iSCSI on some computer still be accessed via mapped drive on other computers?
* Is there any advantage to doing this if you want to have a more powerful computer running plex do transcoding instead of the NAS?
REPLY ON YOUTUBE
Thank you for the video. This was very helpful in setting up my NAS. I followed your steps. Does that mean that when I copy items to the mapped drive they’ll be backed up on the second drive automatically?
REPLY ON YOUTUBE
Hi, thank you so much for this video guide, it is extremely thorough! It’s my first time setting up a NAS system and I would not have been able to do it if not for this video (considering the manual from synology wasn’t very helpful). Having said that, when I tried to click on “map drive” in the synology assistant, for some odd reason the buton/option is greyed out and I can’t create the drive on my local pc. I tried running the software as admin and still the same, do you know what may have caused this? Thanks
REPLY ON YOUTUBE
13:50 – SHR will take half the RAW drive space???
REPLY ON YOUTUBE
According to you who’s best nas for first time user
REPLY ON YOUTUBE
Thank you very much for this!
REPLY ON YOUTUBE
Anyone else breath a sigh of relief at 13:50 when the camera finally achieves focus on the screen and you can see what he’s doing?
REPLY ON YOUTUBE