


How to Install TrueNAS Core on a QNAP NAS Drive – Step By Step Guide
Have you always wanted to test out or run your very own TrueNAS Core NAS setup, but are intimidated by the building of it? It’s understandable. As respected as the ZFS-powered server software is in the IT community, it is not really as user-friendly at the start as many of the Turn-Key solutions in the market from QNAP. So, what if you want to buy an already built server from QNAP (so, its been 100% built, has a manufacturers warranty and is designed for efficient and cool 24×7 use) BUT you also want to use the open-source (i.e free) TrueNAS Core software with abilities like ZFS architecture, app jails, fast build/rebuild, RAID resilvering, triple parity and near limitless scalability? Perhaps you have an older QNAP that is long out of warranty and you want to experiment? Well, good news for you! It is actually surprisingly easy to install TrueNAS Core on a QNAP NAS, takes around 15-20mins and is completely reversible (if done right)!
Note – a FULL 30 Minute Installation Guide for TrueNAS Core on a QNAP NAS is available HERE on the NASCompares YouTube Channel
Important – It’s important to note that TrueNAS Core is NOWHERE NEAR as user-friendly as QNAP QTS/QuTS and before making any switch to a new NAS OS, it is important that you understand the process, risks and differences in the platforms. I made a HUGE QNAP QTS vs TrueNAS Core comparison video HERE that you can use to see how each software compares before making any changes to your NAS. This guide is designed to help you use your QNAP NAS to run TrueNAS Core as it’s primary OS. If you go ahead with this and use the same HDD/SSDs in the system that you are currently using in the QNAP QTS/QuTS Setup, it will likely format them, so IF you want to reverse your QNAP NAS back to its QTS/QuTS set up with all your data/drives the same, you will need to remove them before using the TrueNAS setup, put them to one side safely and use new HDD/SSDs for your TrueNAS installation. Lastly, although this whole process is reversible, you are technically using the QNAP in a means that the brand does not state as ‘intended use’ and this MIGHT lead to support/warranty problems down the line if a fault appears in the QNAP or the software installation that was the result of the TrueNAS Core installation (the bios records everything!). This is HIGHLY UNLIKELY but not impossible (eg you work a TrueNAS Core server so hard and/or push the CPU to breaking point running particularly aggressive TrueNAS jails and/or use the inline compression/deduplication expensively in TrueNAS and it burns out the CPU – this would not be covered by your QNAP NAS support, as they did not certify that the system can handle this.
TrueNAS Core Software on QNAP NAS Hardware – What You Need?
It is worth highlighting that having just a QNAP NAS is not quite enough and in order to get TrueNAS Core up and running on a QNAP NAS requires a few extra checks and use of a few items you might have already in the home/office, or a quick $10 shop online at most. In order to upgrade your system to TrueNAS Core, you will need to consider/have the following:
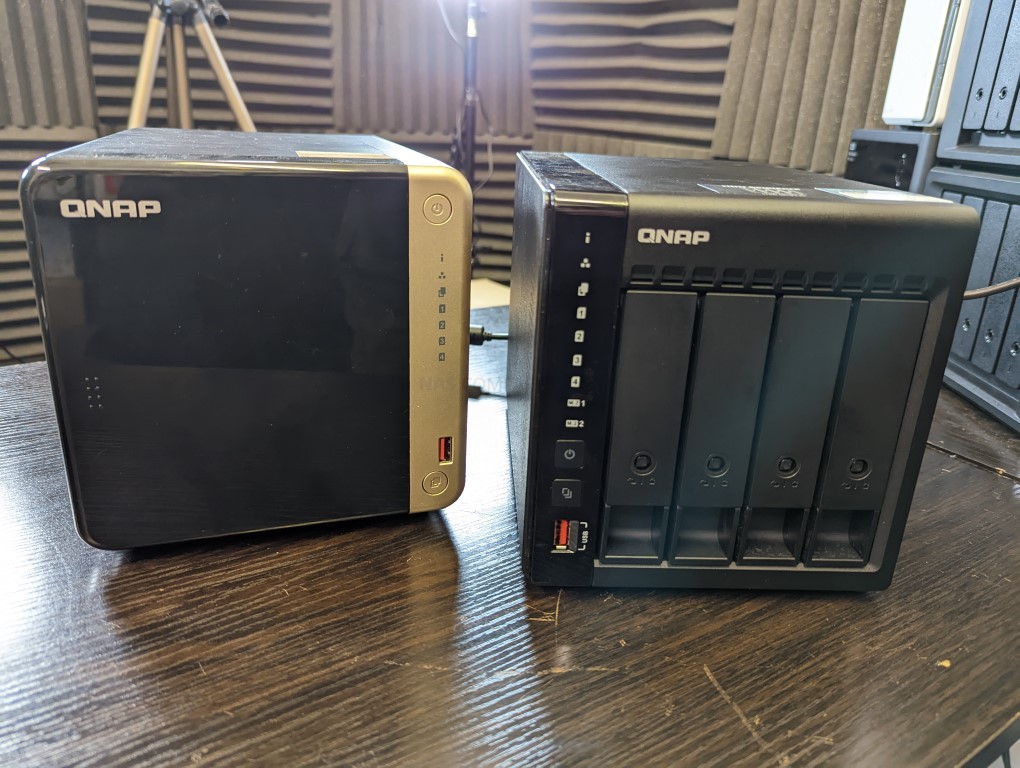
- A QNAP NAS Drive with (minimum) an Intel 64bit x86 CPU and a minimum 4GB of Memory (recommended 8GB+)
- Download the latest stable release of TrueNAS Core here as a system image (you will be converting this to USB later on) – DOWNLOAD
- Any Data that is currently on the QNAP NAS RAID that is mission critical to be backed up or moved (as it will be completely formatted)
- A USB drive to use as the TrueNAS installation drive ( I recommend THIS ONE here from Sandisk, as it is low price and incredibly small, even at 32GB)
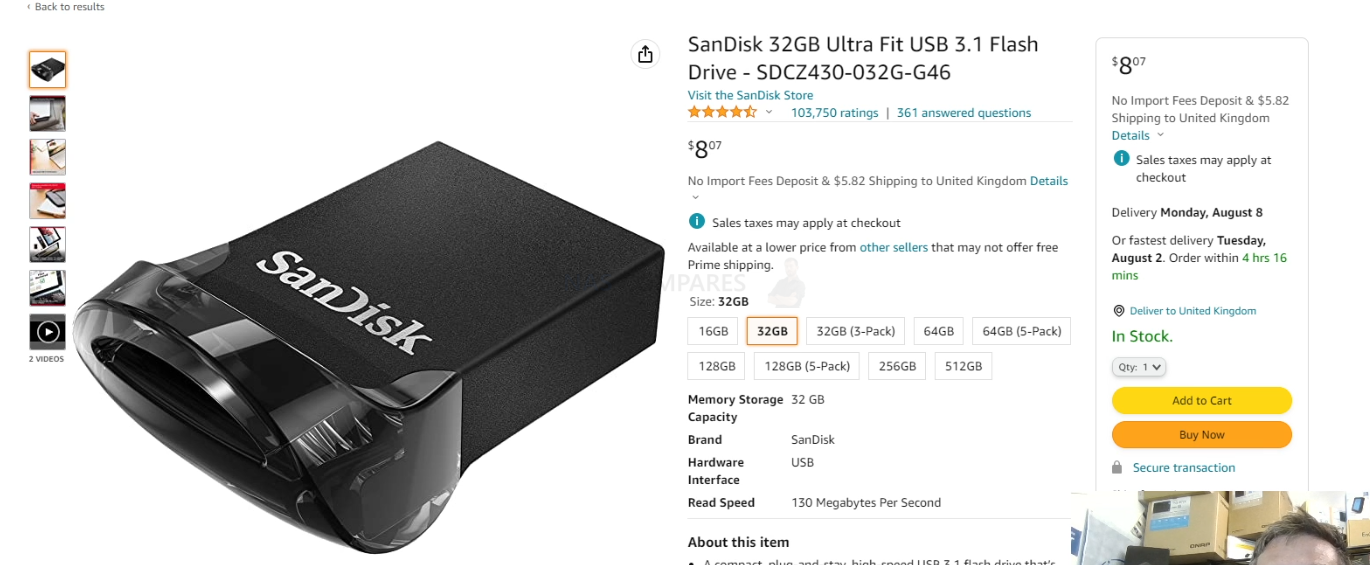

- I recommend not using a USB larger than 32GB, due to the constraints of 1st party software to format larger than this in FAT32. Don’t be tempted to spend like $2 more for a 64GB, as the TrueNAS Core installation will occupy the full USB space (as you will create a system-image-USB) and space is utterly irrelevant when the TrueNAS Core installation is so small
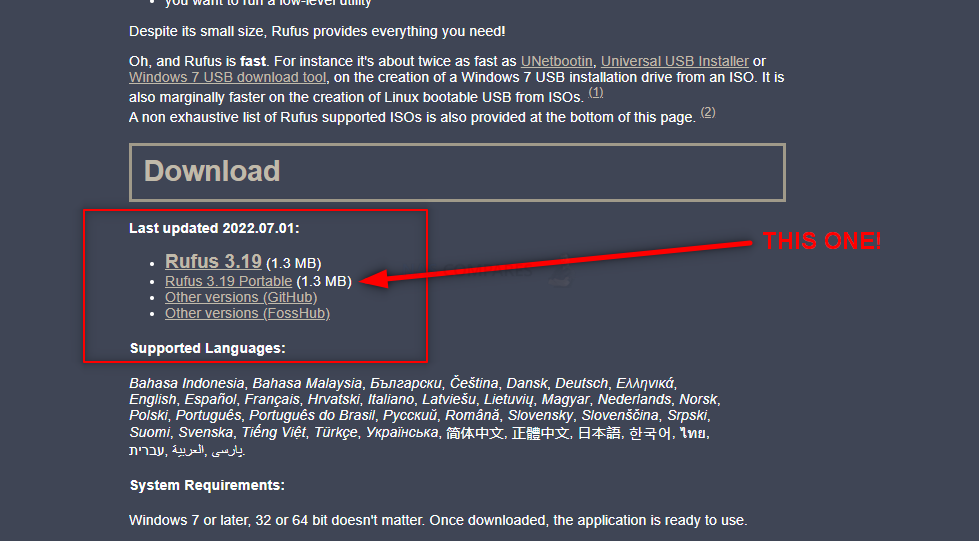
- A Disk Image to USB conversion too. I recommend ‘Rufus’, currently in ver 3.19 and can be run in a portable .exe form that doesn’t require installation – DOWNLOAD
- A basic USB Keyboard (example HERE but really, any will do) and an HDMI Monitor (or simply any device that has an HDMI input – NOT output) such as a TV or Capture card
- Hard Drive and/or SSD media (you should already have these, but just in case) for your storage Pool / RAID
- Optional M.2 NVMe SSD of at least 120GB, but highly recommended – Installing TrueNAS Core is not unlike installing a Windows OS on a new PC, as you are connecting a USB to run the installer, but you need to target a drive in the QNAP NAS to install TrueNAS onto. Whichever drive you use, it will make that drive largely inaccessible for anything but the TrueNAS operating system. Therefore IF you are running a QNAP NAS that has internal m.2 NVMe SSD bays OR one with dedicated 2.5″ SSD bays, I highly recommend getting a low-capacity drive of between 60-120GB (these will be very cheap compared with larger HDDs that start in the Terabyte scales) and then use this for the TrueNAS software. This means that ALL of the main SATA storage bays of the QNAP are then used for your storage pool(s) (aka the RAID). Do NOT install TrueNAS on another USB drive during installation, as this is less stable.
- Optional – Download Advanced IP Scanner HERE, as it is a really useful tool for analyzing your network and finding your new TrueNAS Core NAS for remote access
That is about it. Most of these are devices are that you will almost certainly already have to hand.
Can I Reverse the TrueNAS Core Installation and go back to QNAP QTS?
Almost certainly YES! I say ‘almost certainly’, as there is one small caveat. When you make the change from QNAP QTS to TrueNAS Core on the NAS hardware, the drives (HDD and/or SSD) inside used in TrueNAS pools used in the new system software architecture. This works both ways if you want to revert back to QTS on the NAS too. You CANNOT use the Storage Pool, Volume structure, Folders etc of drives from a QNAP NAS in a TrueNAS setup (you will need to format these in TrueNAS). So, although the act of reinitializing the NAS to its original software is very easy (you just need to go into the BIOS of the QNAP using the same method in the guide below, then change the boot drive order BACK to the QNAP OS internal SSD), it will mean that any data that resides on the disks inside will be formatted. So, if you are choosing to make a change from one NAS OS to another, make sure you have your data appropriately backed up elsewhere OR move the drives that were in your QNAP (with their QTS/QuTS Storage structure) to one side safely and install new 3.5″ storage media for the TrueNAS pools etc. So, let’s begin the installation of TrueNAS Core on the QNAP NAS.

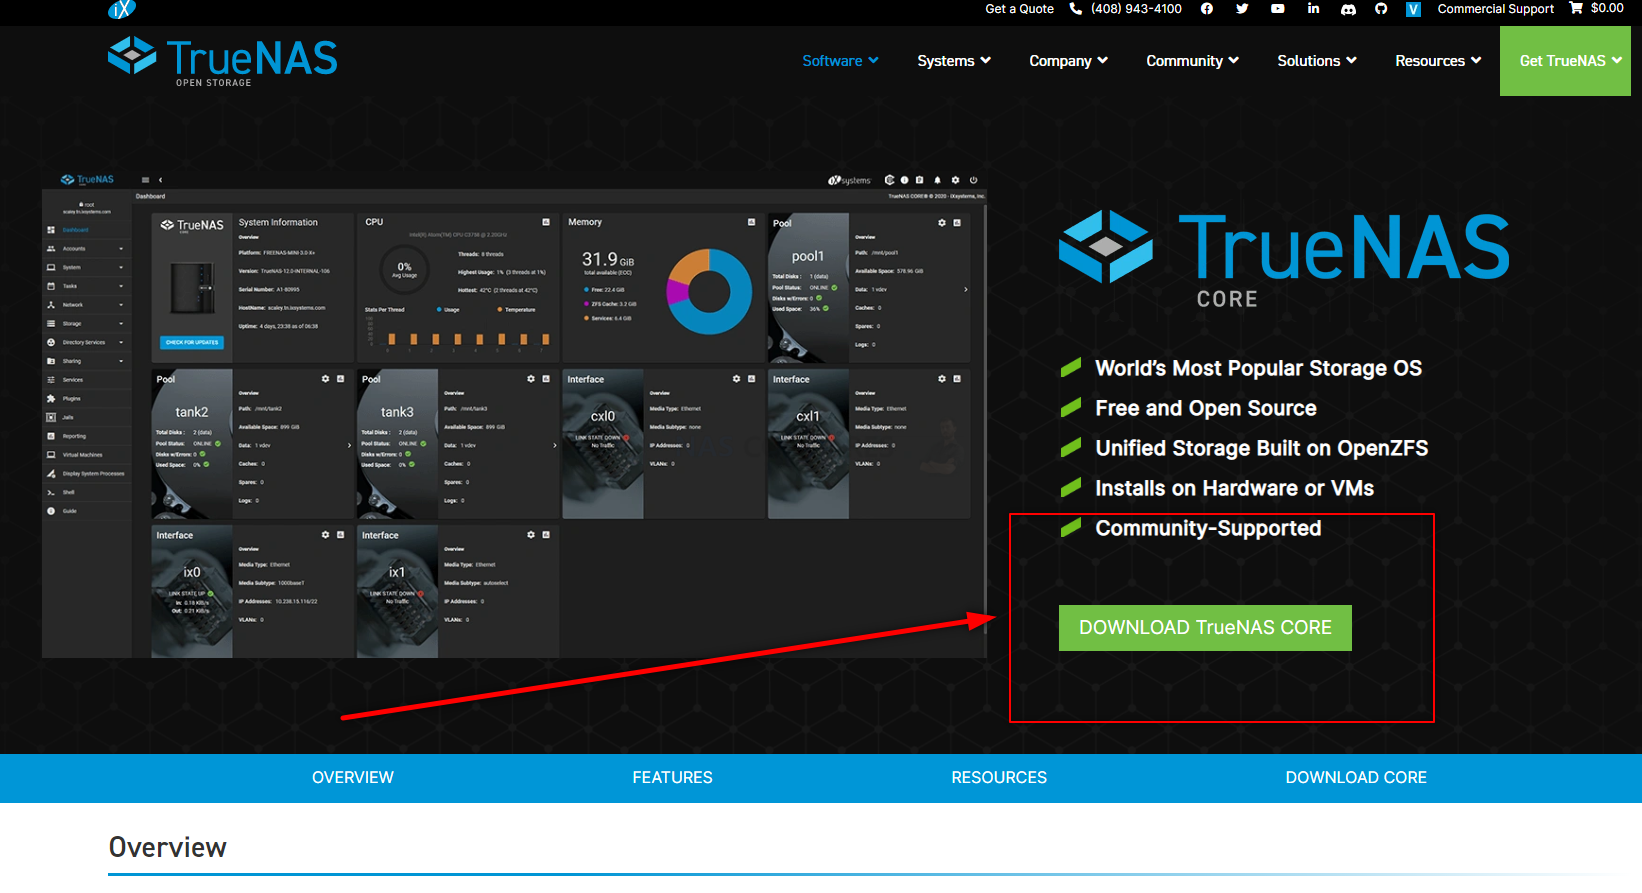
TrueNAS Core on a QNAP NAS – Step 1, Download TrueNAS Core
Head to the TrueNAS Core website HERE and download the latest stable release of the software to your local PC, Linux or Mac system. Make sure to remember where you downloaded it.

TrueNAS Core on a QNAP NAS – Step 2, Download Rufus USB Image Tool
Head to the Rufus website and download the latest version of that tool – I recommend downloading the standalone executable file here, as then it will immediately run when you double-click the file, without installation etc. It may redirect you to Github, but it will be the same executable file. Once again, remember where you downloaded it.

TrueNAS Core on a QNAP NAS – Step 3, Preparing the USB
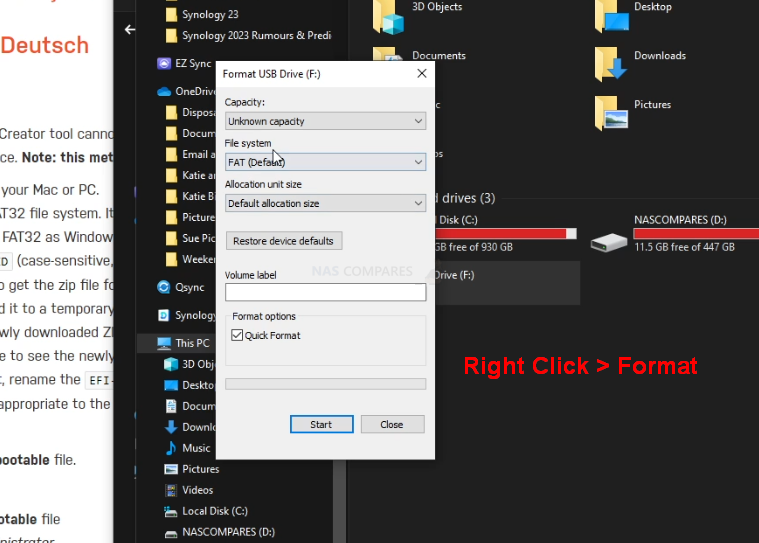
Connect the small form factor USB Drive to your system (again, this is the one I used from Sandisk) and after a few seconds, it should appear as an available USB Drive. The drive MAY need formatting (you will be prompted to do so), if that is the case, then you can format it via the system prompts and by default, it will format it to FAT32 (as long as your USB is less than 32GB). If you are not presented with a system prompt to format your USB, then you can head into My PC, or My Computer via a windows computer and right-click the drive, select ‘format’ and format it that way.

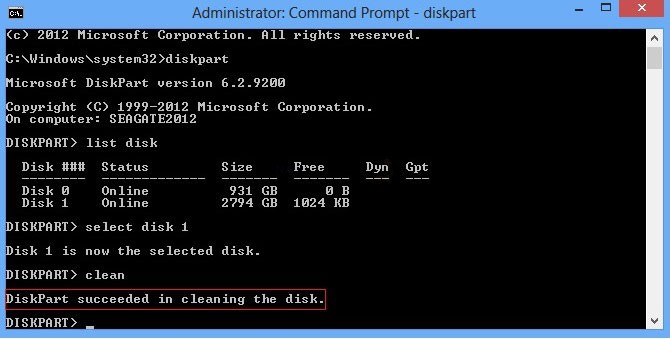
If you have used the USB for other things previously, there is a chance that the drive has existing partitions in place. For that, the quickest way to completely remove any partitions is to open up the bottom-left windows system menu as normal, and then just type diskpart and open the command-line GUI tool. From there, use the command list disk to show the available drives that are connected, you will see your USB (normally disk 1 or 2, but can differ depending on your system layout and can be spotted by the storage amount). From there, type select disk # (where # is the drive number that your USB is shown as) and then type clean, which will then remove any index structure for the drive (i.e the partitions and existing format) and then you can go back to the My Computer/My PC page and format the drive to FAT 32 as normal.

TrueNAS Core on a QNAP NAS – Step 4, Creating a USB Installer Image of TrueNAS Core
Open the Rufus application and from there you will see the USB Drive (listed as NO NAME, or ‘UNTITLED’, ETC) at the top. From there, look to the select image/find image option (depending on the ver. of Rufus or your USB Image Creator tool of choice) and find the TrueNAS Core disk image you downloaded earlier). If the drive is not listed, it may have downloaded as a compressed/archive file. If that is the case, head to the location of where you downloaded TrueNAS Core (in your file explorer, not in Rufus) and right-click the file you downloaded. If the option to ‘extract‘ is visible, then you can extract it (i.e unpack it to the original form) in that same download directory. From there, head back into RUFUS and then the TrueNAS Core system image should be visible. Select it, then run the Rufus System image creator tool and create your USB bootable TrueNAS Core disk image.
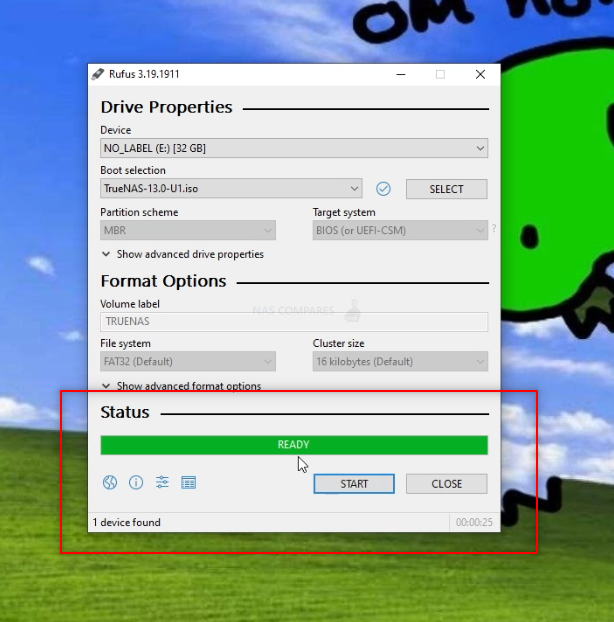

REMEMBER! This will completely format your USB drive and any files that are on that USB will be destroyed. The system image creator tool will turn the USB into a pure boot image tool – the USB will not be usable for traditional storage again unless you completely format it again.
TrueNAS Core on a QNAP NAS – Step 5, REMOVE THE USB FROM YOUR PC!!!!!!!!!
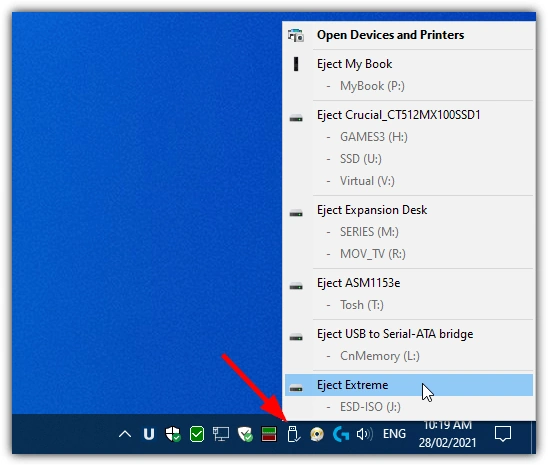
Really, really important and sometimes overlooked. Once the USB creation is completed, you need to remove the USB (using the eject hardware safely option at the bottom right of your windows machine taskbar as normal). DO NOT accidentally leave the USB in your USB Ports for any longer than necessary. If you leave it in and your system reboots at any point (eg in a normal ‘end of day shut down, go home, reboot tomorrow’ scenario), then the system might boot directly into the TrueNAS Core installation and although it is easy to exit from, it can change your system default boot preferences, maybe even remove your primary boot drive as the OS drive – requiring a little messing with a windows installation disk to change it back. The odds of this are very small, but not zero, so make sure to safely remove your USB drive when the TrueNAS Core system image creator tool is completed.

TrueNAS Core on a QNAP NAS – Step 6, (OPTIONAL) – Install an NVMe SSD
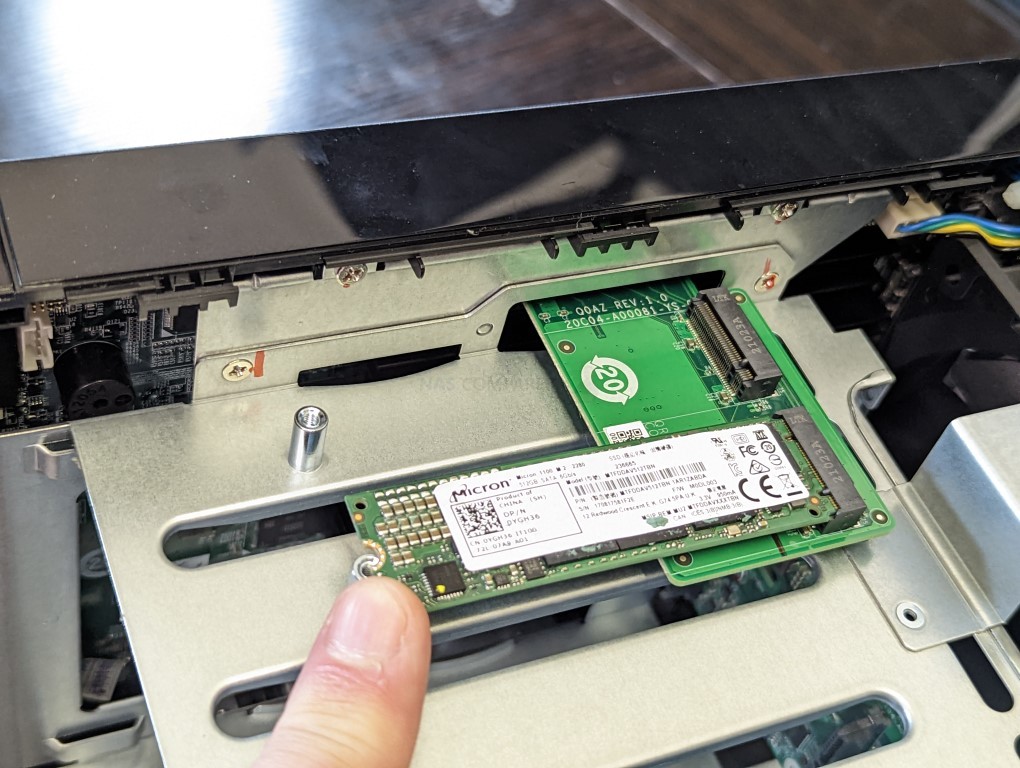
This is an optional step, but one I would certainly recommend for newer-generation QNAP NAS devices. TrueNAS is a lot like a traditional computer operating system (eg Windows or macOS) in it’s architecture and will run at its best when the necessary boot files are located on a seperate, smaller and faster area of SSD/flash storage away from the general bulk storage. So, if possible/available in your QNAP NAS, I would recommend installing a smaller m.2 NVMe SSD drive and then using that as the target/location for your TrueNAS Core installation. This is not compulsory and you can also use a single HDD or SSD in one of the main storage bays of your QNAP, however, it means that this drive will unusable for general storage (i.e in any RAID configuration or storage pool). This CAN be negated with some creative portion creation, but I wouldn’t recommend it. Additionally, do NOT try to install TrueNAS Core on another USB drive that is connected to the system – this isn’t particularly stable and tends to result in a poorer TrueNAS Core experience. M.2 NVMe bays and their location in the QNAP NAS changes depending on the system. Some allow you to access these bays via the main HDD 3.5″ bays (eg the TS-464), whilst others (the majority) require you to remove the external chassis casing to access these bays (eg the TS-453E, TVS-872X, TS-873A, etc).
Reminder – TrueNAS is NOT a big program and you can use an SSD as small as 32GB and still have a tonne of provision for future storage space. However, M.2 NVMe SSDs are not available in smaller sizes than 120GB. Lower size than this and you will generally only find 2240 SSDs and/or SATA M.2 SSDs. These are still perfectly fine to use, but the performance difference between SATA and NVMe (PCIe) is HUGE! You can find many SSD options here on amazon for as little as $30 – Find Low Capacitiy and Low Price M.2 NVMe SSDs HERE on Amazon (already filtered the results)

NOTE – If you plan on upgrading the memory of your NAS to 4GB-8GB-16GB or higher (in order to use ALL of the features of TrueNAS Core to their fullest extent), I would recommend doing so at this point before rebuilding the physical chassis again, as many QNAP NAS have the 2nd SODIMM memory slot in really tight locations.
TrueNAS Core on a QNAP NAS – Step 7, Connecting the USB, Keyboard and HDMI Monitor
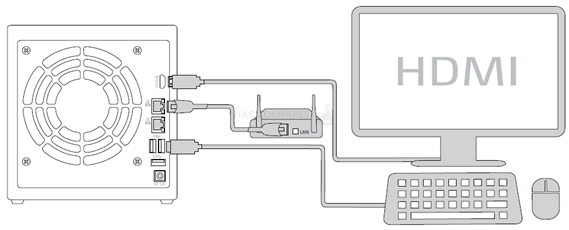
Next, we need to connect the external means to install TrueNAS Core on the QNAP NAS. Unlike when you set up your QNAP NAS for the first time, TrueNAS cannot typically be installed via the network like QTS. TrueNAS requires you to use a KVM (keyboard, Video Mouse – though you won’t need a mouse!) and go through the installation using a low-res graphical user interface. Now you will ONLY need this setup/items for the installation and initialization of your TrueNAS Core server and after that, you will be able to use the server over the network/internet as normal. You are going to need a basic USB Keyboard (not a Bluetooth or wireless one, as these may need drivers to run and you cannot install drivers at this point) and an HDMI Monitor/TV. You CAN use a mouse, but it is not hugely necessary and 99% of the choices in the setup of TrueNAS core can/will be via keyboard input. Also, I would also recommend connecting the NAS to the network during setup as this will allow the system to assume certain network values during setup that will save a tonne of time later. Once that is all connected, do NOT turn the NAS on yet – there is one small and slightly time-sensitive thing to do.

TrueNAS Core on a QNAP NAS – Step 8, Accessing the BIOS Menu of your QNAP NAS
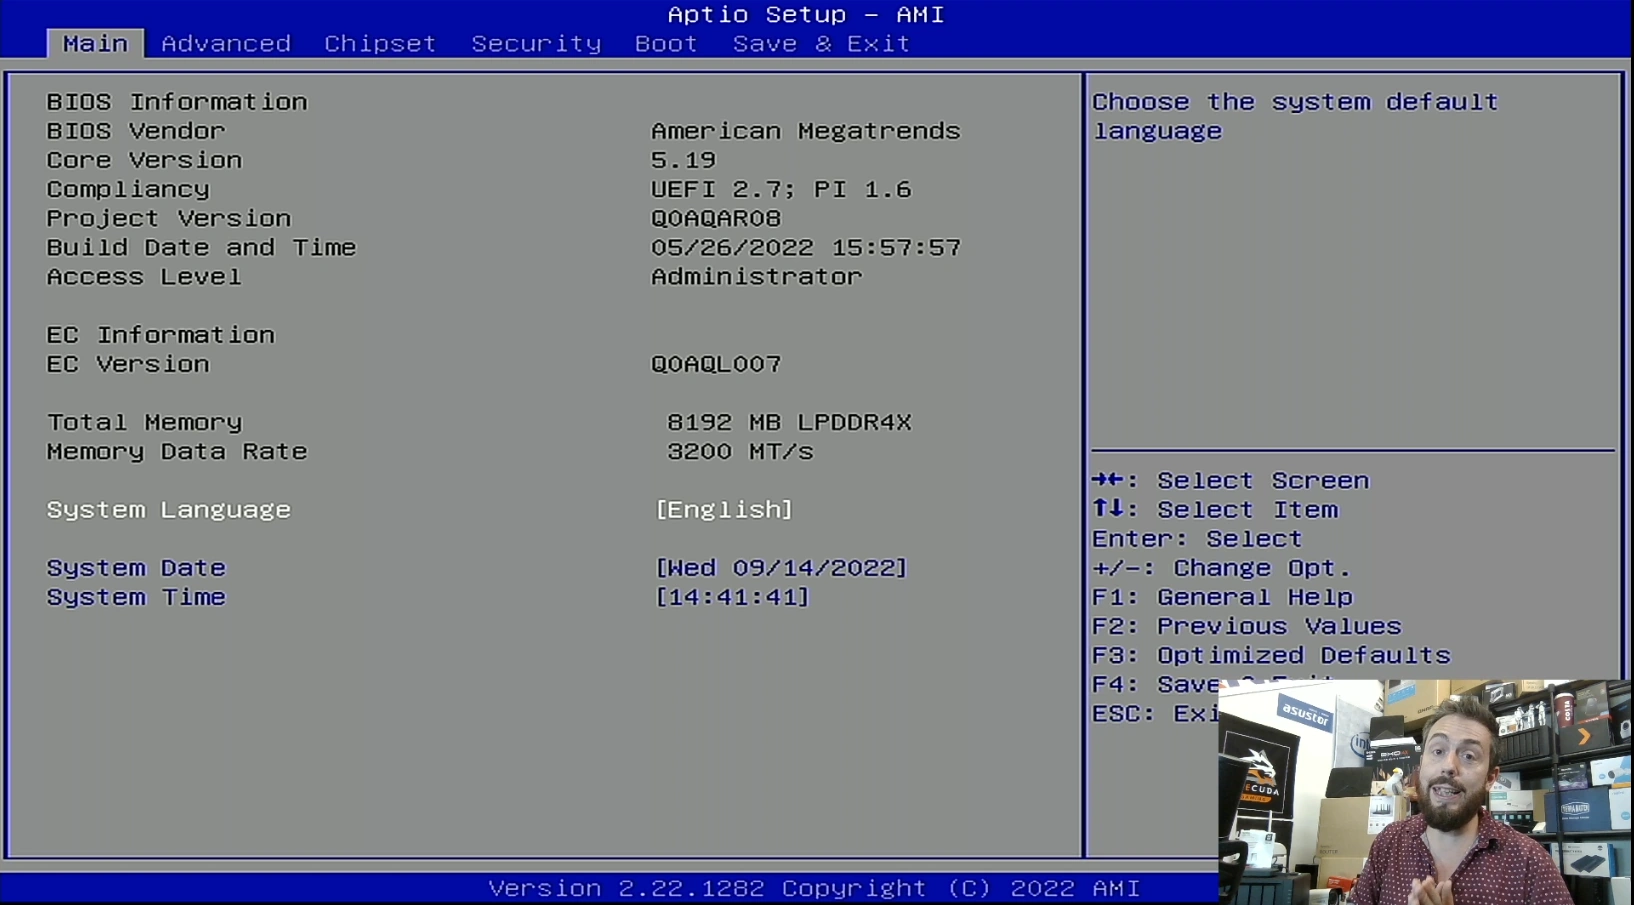
Now that your QNAP NAS is all connected and you are ready at your keyboard/Monitor, turn the NAS on and wait till you hear a beep (should take between 5-15secs depending on the QNAP NAS). As soon as your hear that noise (and likely see a flashing character or underscore on the monitor screen), you need to continuously hit the F12 and/or DEL keys (not at the same time, just back and forth). One of these will result in the system displaying the blue BIOS menu (it changes between motherboards and QNAP uses a mixture of mobos in their Intel and AMD-powered systems). You need to be quick, as you only have about 3 seconds to do this before the QNAP will automatically boot from the small internal 5GB flash OS module that boots into QNAP.

TrueNAS Core on a QNAP NAS – Step 9, Booting from the New TrueNAS Installer USB
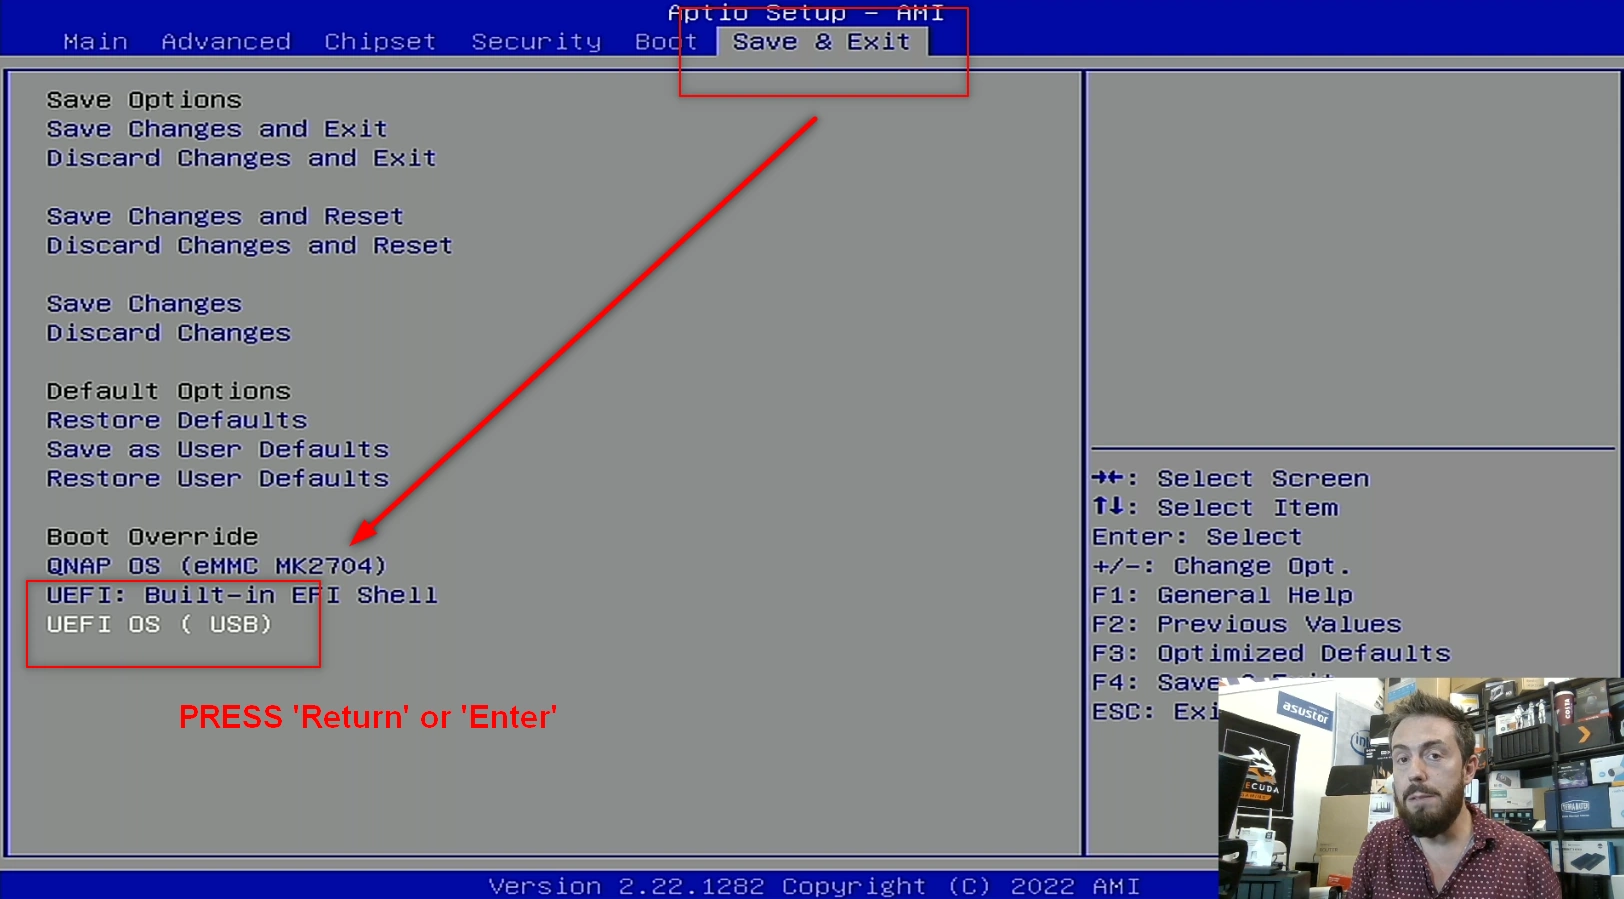
Next you need to tap ‘RIGHT‘ on the keyboard and head to the ‘Save & Exit’ option. At the bottom, you should see, under the ‘boot override‘ option, your USB Drive. Tap ‘DOWN‘ until you are highlighting the USB and then tap ‘Enter‘ or ‘Return‘ on your keyboard, as this will push the QNAP to boot from that USB and begin the TrueNAS Core installation. Later on I will show you how to force the system to ALWAYS boot into TrueNAS Core, but for now, we just need it to read from this USB this one time.

TrueNAS Core on a QNAP NAS – Step 10, Rebooting and Starting the TrueNAS Installer
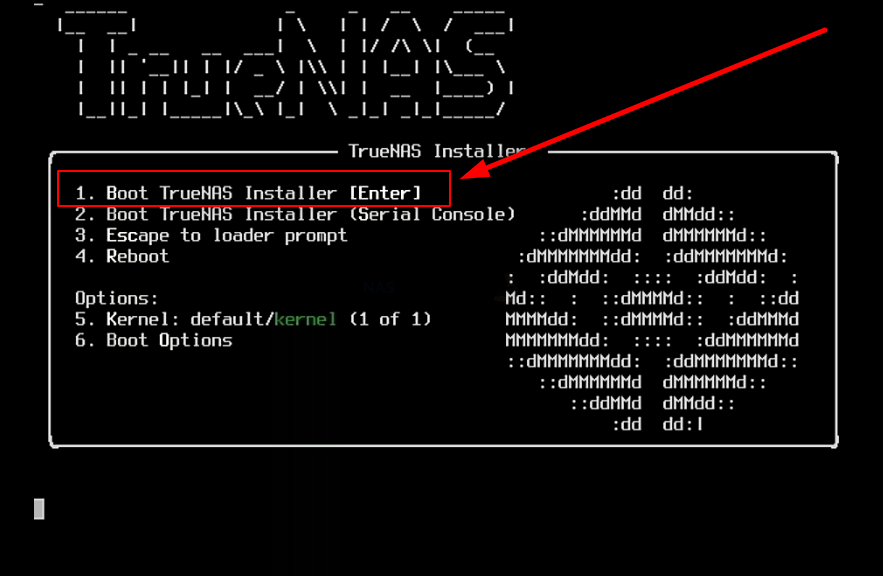
This next step is a bit of a quick one. Around 5-15 seconds after you selected the USB Drive in BIOS, the screen will display the TrueNAS Installer option page. Tap ‘Enter’ as soon as you see it, as the page is on a countdown and when it reaches zero it will (possibly, depending on the version) reboot and then you will have to repeat the last few steps again!), So, in order to avoid this, tap ‘ENTER‘ as soon as this page appears.

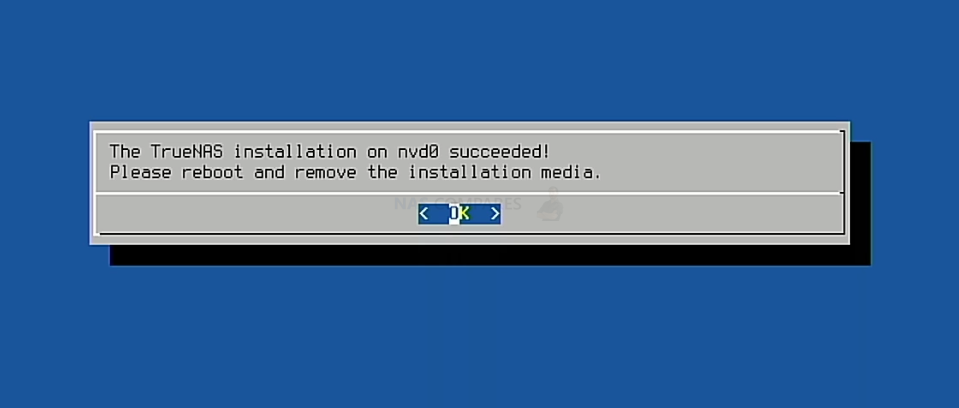
After a few minutes, the TrueNAS Core GUI/Command will appear on your monitor and all you need to do is navigate the config choices to set up your TrueNAS Core NAS the first time.
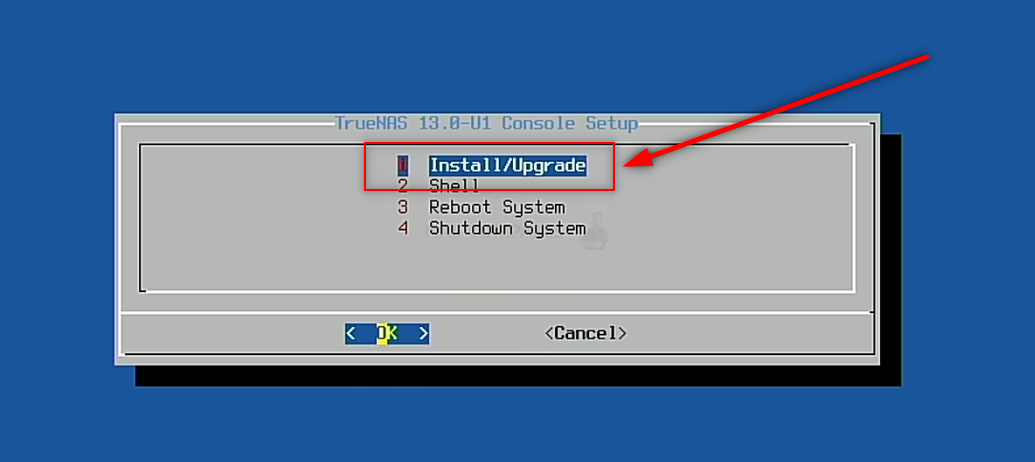

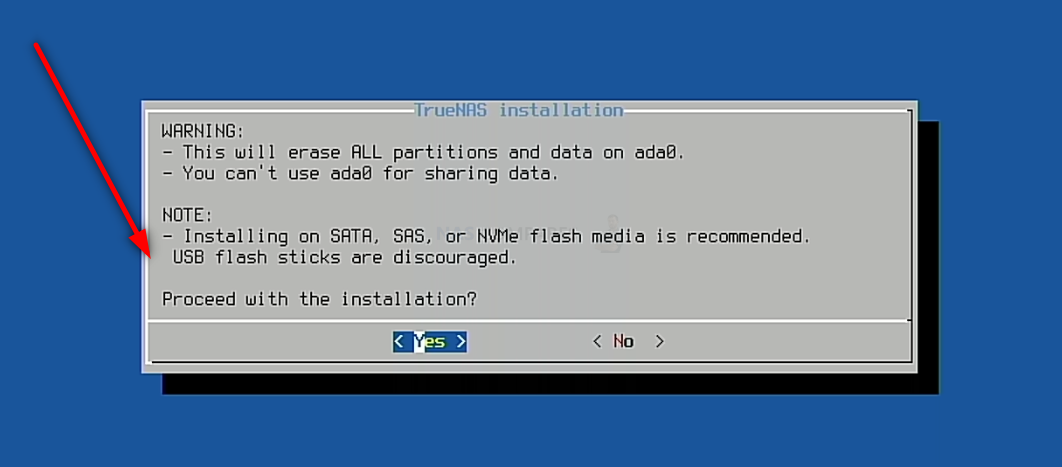
Important – TrueNAS Core runs at its best when it is run on a separate drive from your storage. Much like an Operating System, you can install TrueNAS Core on an available SSD in a SATA or NVMe SSD slot in the QNAP NAS, then (after initialization) you can go into the TrueNAS Core > Storage area and create a pool of storage using the available storage media bays,


It is NOT recommended that you install it on a USB drive, for reasons of speed and power-connections.

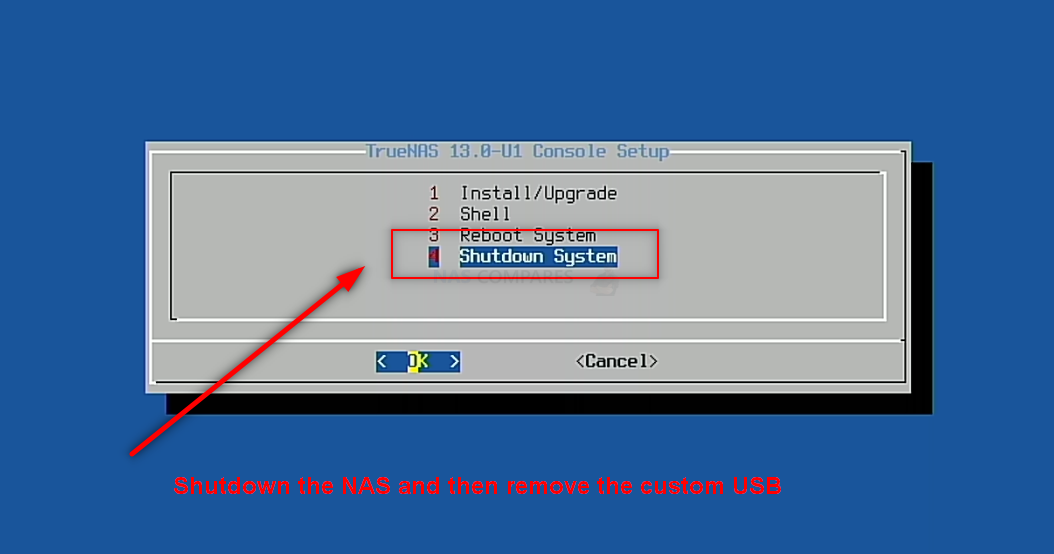
After you have completed the setup and are back at the initial TrueNAS Core boot menu, select the ‘SHUTDOWN‘ option (not reboot/restart, for reasons I will explain in a moment).

TrueNAS Core on a QNAP NAS – Step 8, Remove the Boot USB Drive AND CHANGE BIOS!!!
Once your QNAP NAS has fully powered down, you need to disconnect the USB drive you installed earlier with TrueNAS Core boot loader on it. You need to do this otherwise, when you reboot the QNAP NAS, it can potentially reboot into the bootloader again. You can skip past this and/or it will not action a reinitialization without your input, but better to remove the USB and therefore allow the system to always immediately boot into the TrueNAS Core system you just created.

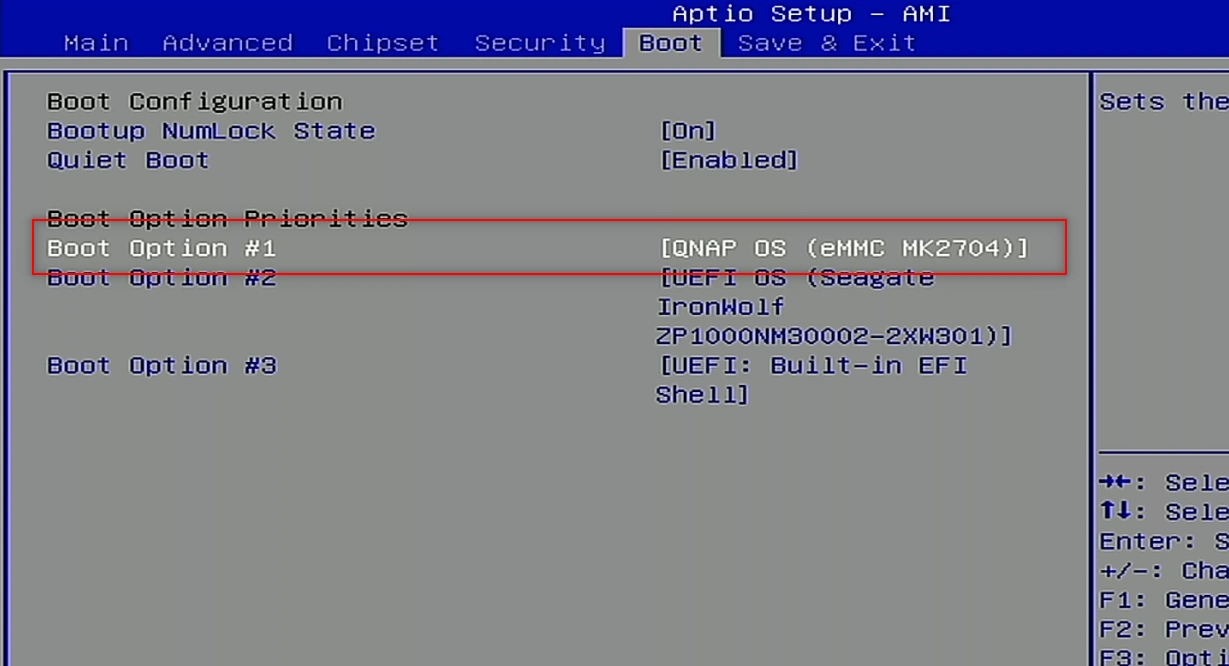
Next, you need to head back into the BIOS from earlier. Keep the Keyboard and HDMI Monitor connected and use the same method you used earlier during the initial boot of the QNAP (pressing F12 and/or Delete repeatedly when you hear the first QNAP beep after about 10-15 secs) and as soon as you are greeted with the familiar blue BIOS screen. From here, tap right a few times to highlight the ‘Boot’ option and change the option for Boot Priority #1. The default is QNAP OS, you need to change it to the drive you installed TrueNAS on (whether that is a SATA/NVMe SSD or one of the main storage bays).
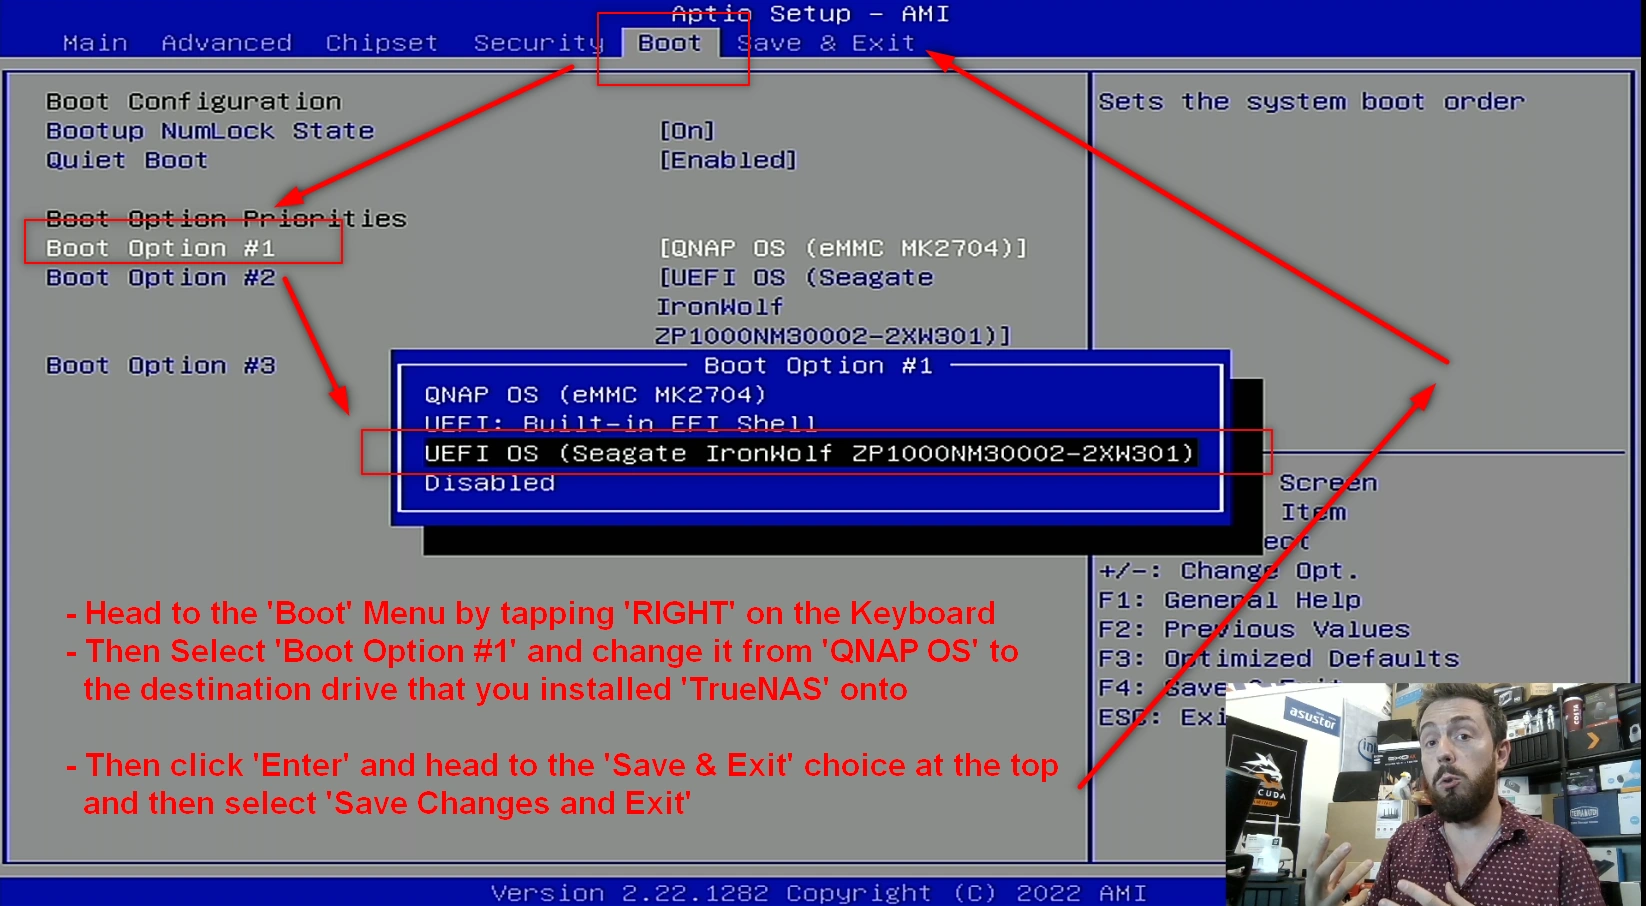

This will change the boot order to allow the system when it is first powered on to always boot into TrueNAS. After this, you can click right again in the BIOS menu to select the option to Save and restart. The system will then boot into the TrueNAS initialization (first time setup).
TrueNAS Core on a QNAP NAS – Step 9, Reboot the NAS
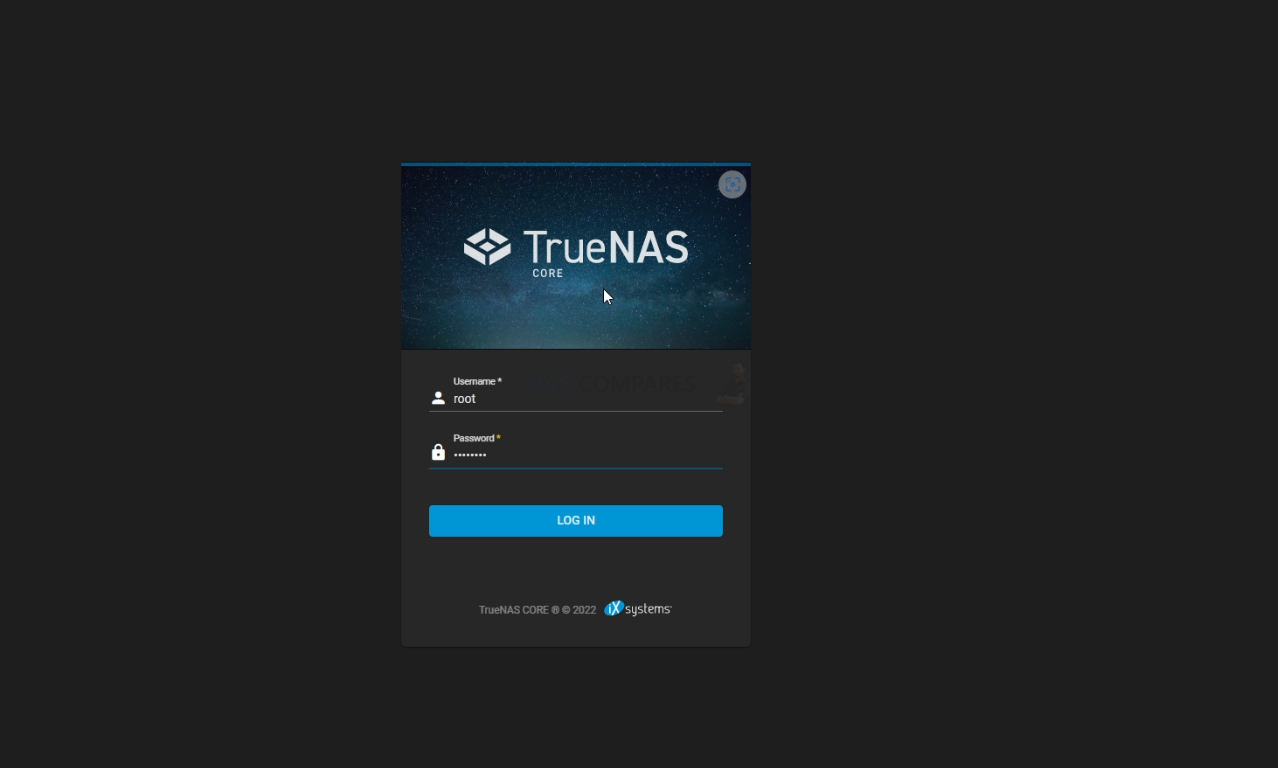
Upon rebooting the QNAP into TrueNAS Core (can take up to 5 mins, but usually much quicker). You have two options with how to access the configuration and controls. You can use the HDMI+Keyboard if you choose for console/command level access. Alternatively (much more recommended), use a program such as Advanced IP Scanner, which is free and VERY useful anyway, or even network command prompt) to scan your local area network and find where the QNAP with TrueNAS Core is located (i.e it’s IP). This IP (eg 192.168.1.111) is what you put into the URL bar ofay web browser and it will load into the login GUI for TrueNAS Core. From here you will need to use the username ‘root’ in combination with the password that you created during initialization.

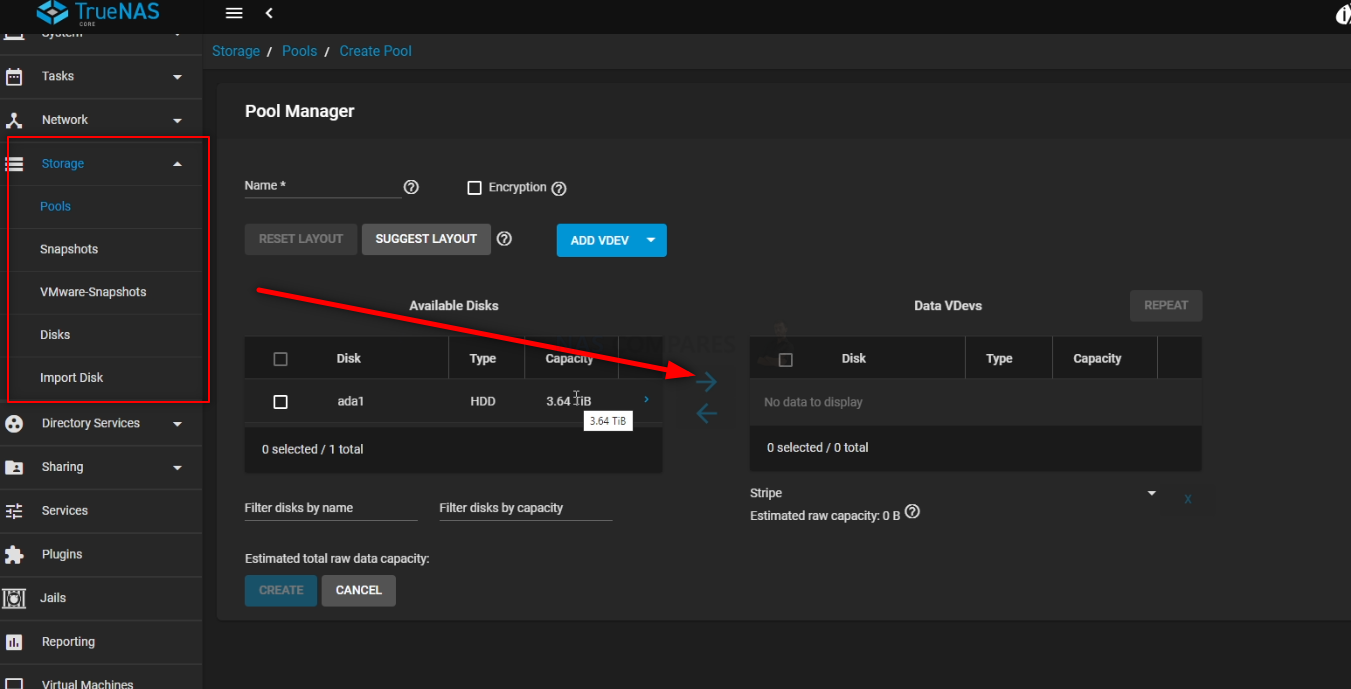
And that is about it. You now have TrueNAS Core installed as the default OS of your QNAP NAS. From here you can do anything and everything that his highly regarded ZFS powered server software offers. Head into the Storage area and start creating pools, as well as areas for caching and lots more features.
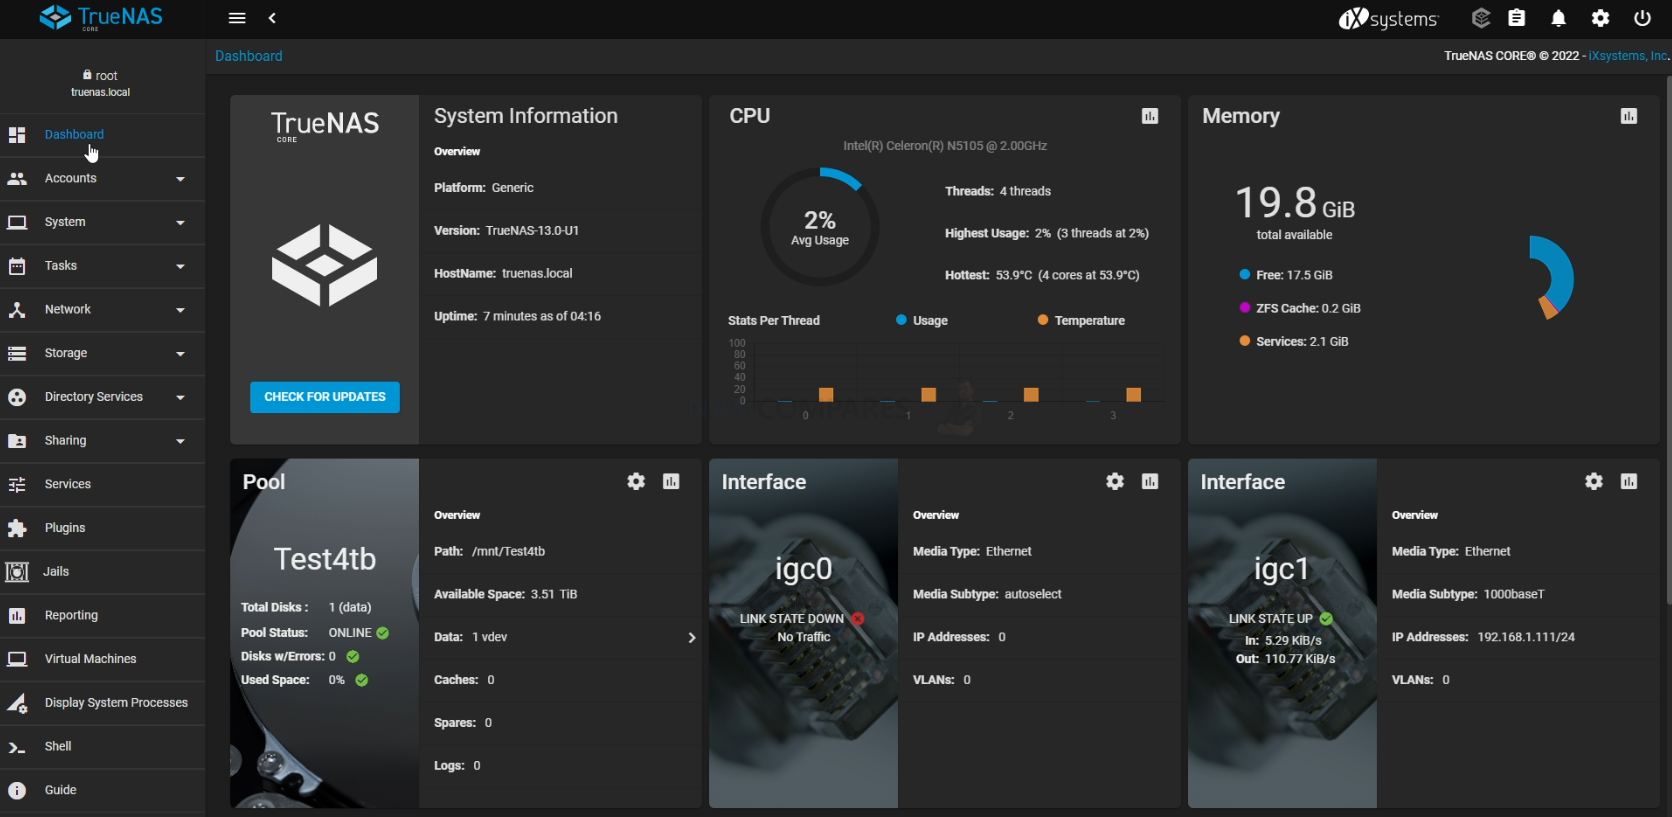

TrueNAS was recently updated to ver.13 in a stable release of the FreeBSD format, as well as new improvements in the Linux-based version ‘TrueNAS Scale’. The first thing you are going to need to do when setting up your TrueNAS Core > QNAP NAS server is set up your storage. Do this by heading into the storage tab and following the handy steps on screen. After that, you can pretty much do anything on your new ZFS NAS!

EXTRA – How to Reverse Your QNAP NAS from TrueNAS Core to QNAP QTS / QuTS Software Again
Now, it is worth remembering that switching your QNAP NAS to run TrueNAS Core instead of QTS/QuTS is not a one-way street and you can reverse this relatively easily. Do remember first though that:
- Any data on the HDD/SSDs inside the QNAP that were used in TrueNAS Core server setup will not be accessible/usable with the QNAP NAS system and will likely be flashed/formatted during the QNAP QTS reinitialization
- You will need your Keyboard and HDMI Monitor again in order to get back into BIOS
- If you kept your original QNAP RAID Pool on HDDs etc to one side (i.e you removed the already configured storage media in their RAID from the QNAP when you changed to TrueNAS and put these drives safely to one side), you should be able to migrate this data back into the QNAP NAS during re-initialization with ease. That said, YOU SHOULD ALWAYS HAVE A BACKUP FOR THIS DATA REGARDLESS
In order to reverse the QNAP NAS from TrueNAS Core back to QNAP QTS/QuTS Software, you need to (from a cold boot) access the BIOS menu again (so, at boot, with your Keyboard and monitor connected, press the DEL and/or F12 key over and over when the QNAP beeps, like before) and when you reach the BIOS menu, tap RIGHT until you reach the ‘Boot page. Then change the ‘Boot Option #1’ option from the TrueNAS installation drive back to the QNAP OS (internal flash 5GB module). Once that is done, head into the ‘Save & Exit‘ and then select ‘Save Changes and Restart‘. Doing this will restart the QNAP NAS and it will automatically boot into the QNAP QTS/QuTS boot sequence. From here your NAS will either automatically boot into the QNAP Setup page OR (if you have your original QNAP NAS RAID drives, with their Pools, Volumes, etc) it will just boot into the QNAP NAS software as normal.

You can find out more about TrueNAS in my full review below that covers everything I like and dislike about the platform:

Thanks for reading! I hope you found this helpful and that it really helped you to make the most of your storage. Want to help me continue to make more guides, reviews and tutorials on the subject of NAS? Then you can do so in a few different ways (any of which I will be eternally grateful for if you choose to!). You can visit the ‘Support NAS Passion’ page HERE and see a few different ways that you can help us keep the lights on. Alternatively, you can use one of the links below to shop for your hardware today or in future (visiting those sites via the link below ensures that we get a mall commission on absolutely anything you purchase – and doesn’t cost you anything extra). Finally, if you want to support us in spirit rather than financially, recommend our blog to a friend or professional colleague or share a link on your social media site of choice. Thank you for reading and have a fantastic week!
| Where to Buy a Product | |||
 |
|
|
VISIT RETAILER ➤ |
 |
|
|
VISIT RETAILER ➤ |
 |
|
|
VISIT RETAILER ➤ |
 |
|
|
VISIT RETAILER ➤ |


📧 SUBSCRIBE TO OUR NEWSLETTER 🔔
🔒 Join Inner Circle
Get an alert every time something gets added to this specific article!
This description contains links to Amazon. These links will take you to some of the products mentioned in today's content. As an Amazon Associate, I earn from qualifying purchases. Visit the NASCompares Deal Finder to find the best place to buy this device in your region, based on Service, Support and Reputation - Just Search for your NAS Drive in the Box Below
Need Advice on Data Storage from an Expert?
Finally, for free advice about your setup, just leave a message in the comments below here at NASCompares.com and we will get back to you.


 |
 |


