A Step-by-Step Guide to Install TrueNAS on a Ugreen NAS
Installing TrueNAS on a Ugreen NAS can significantly enhance your network storage capabilities by providing a robust, open-source operating system designed for managing and sharing data. This guide will walk you through the detailed process of setting up TrueNAS on your Ugreen NAS, from initial preparation and data backup to BIOS configuration and final installation. Whether you are replacing the existing SSD or disabling it to install TrueNAS, these steps ensure a smooth and efficient setup. Additionally, we provide an alternative method for installing other third-party operating systems, such as UnRAID, using the Ugreen NAS GUI and BIOS modifications.
Important – The UGREEN NAS Software is still in it’s first year of active development, and this follows several months of Kickstarter crowdfunding. Therefore the software is still in it’s early stages of development. It IS a decent enough NAS operating system, that the manufacturer assures users will see more and more AAA+ features added to it in a planned roadmap. So, I would recommend taking some time with the UGOS NAS software before making a switch to a 3rd Party OS. Additionally, it is worth noting that UGREEN have also made it clear that choosing to use a 3rd Party NAS OS will not invalidate your hardware warranty, as long as the software does not negatively impact the hardware (eg overclocking the CPU to fry it, disabling fans and that harms the internal components through overheating, etc).
What You Need:
- Ugreen NAS system
- USB drive (at least 8GB recommended)
- HDMI output cable
- Keyboard (and optionally, a mouse)
- USB docking station or splitter (recommended)
- New SSD (if replacing the existing one)
Preparation:
Ensure you have all the necessary tools and components before starting the installation.
1. Backup Data:
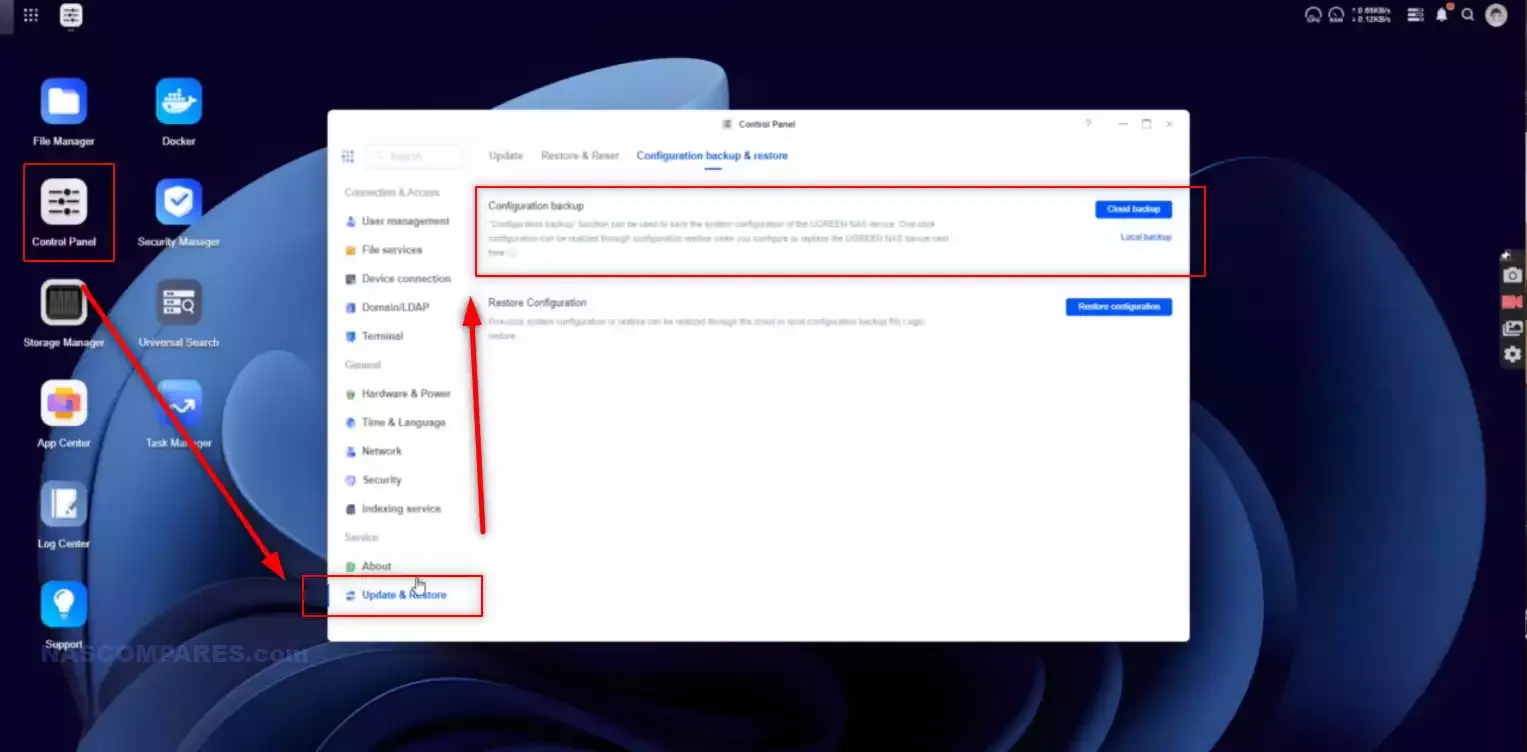
- Access Ugreen NAS settings:
- Login to the Ugreen NAS management interface.
- Backup configuration and data:
- Backup configuration to a local file or Ugreen cloud.
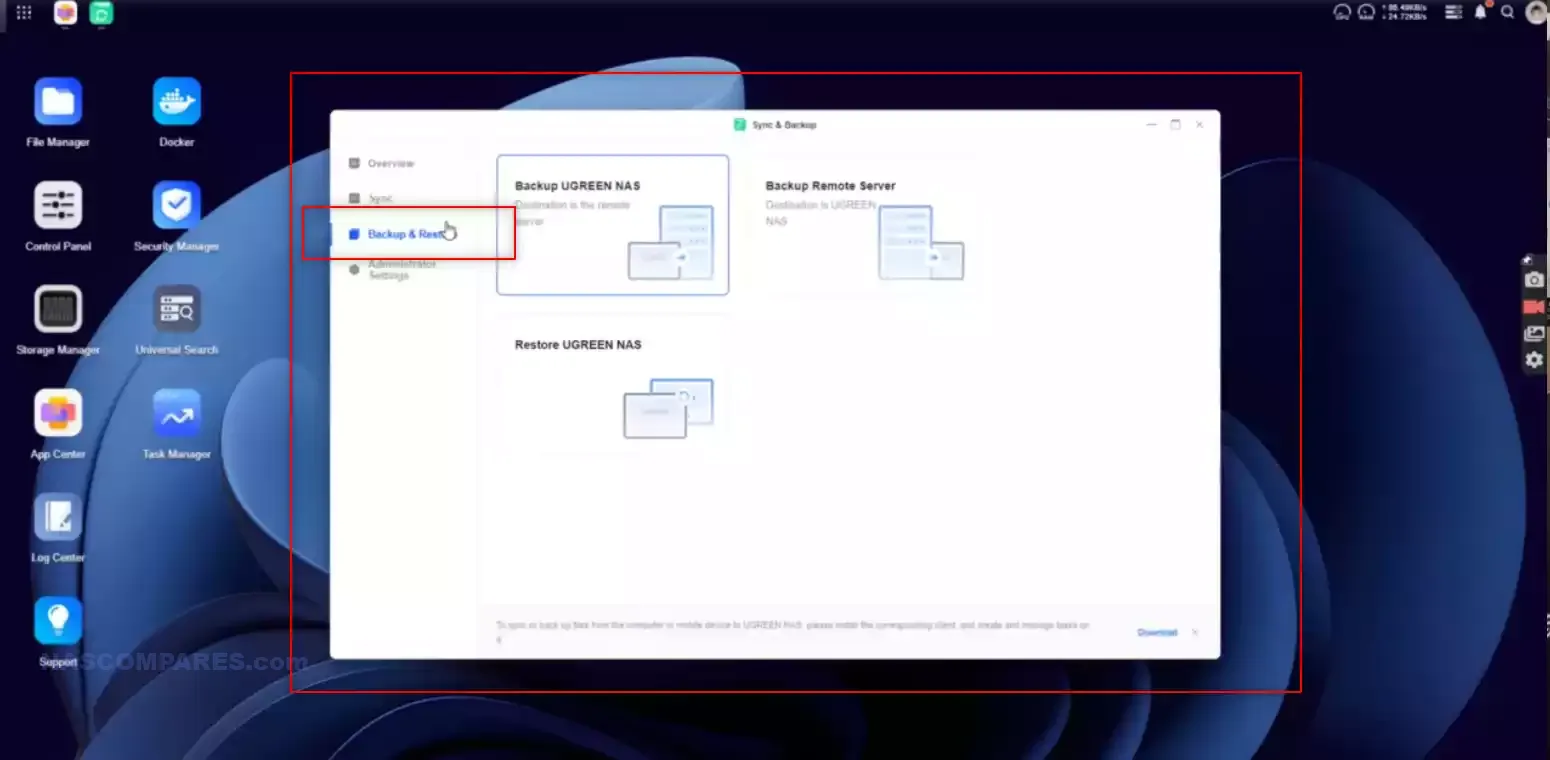
- Use the Backup and Sync tool or the Net Tool to back up files to OneDrive, another remote NAS, or another Ugreen NAS system.
- Ensure all critical data is securely backed up to prevent data loss during the installation process.
2. Prepare the NAS:
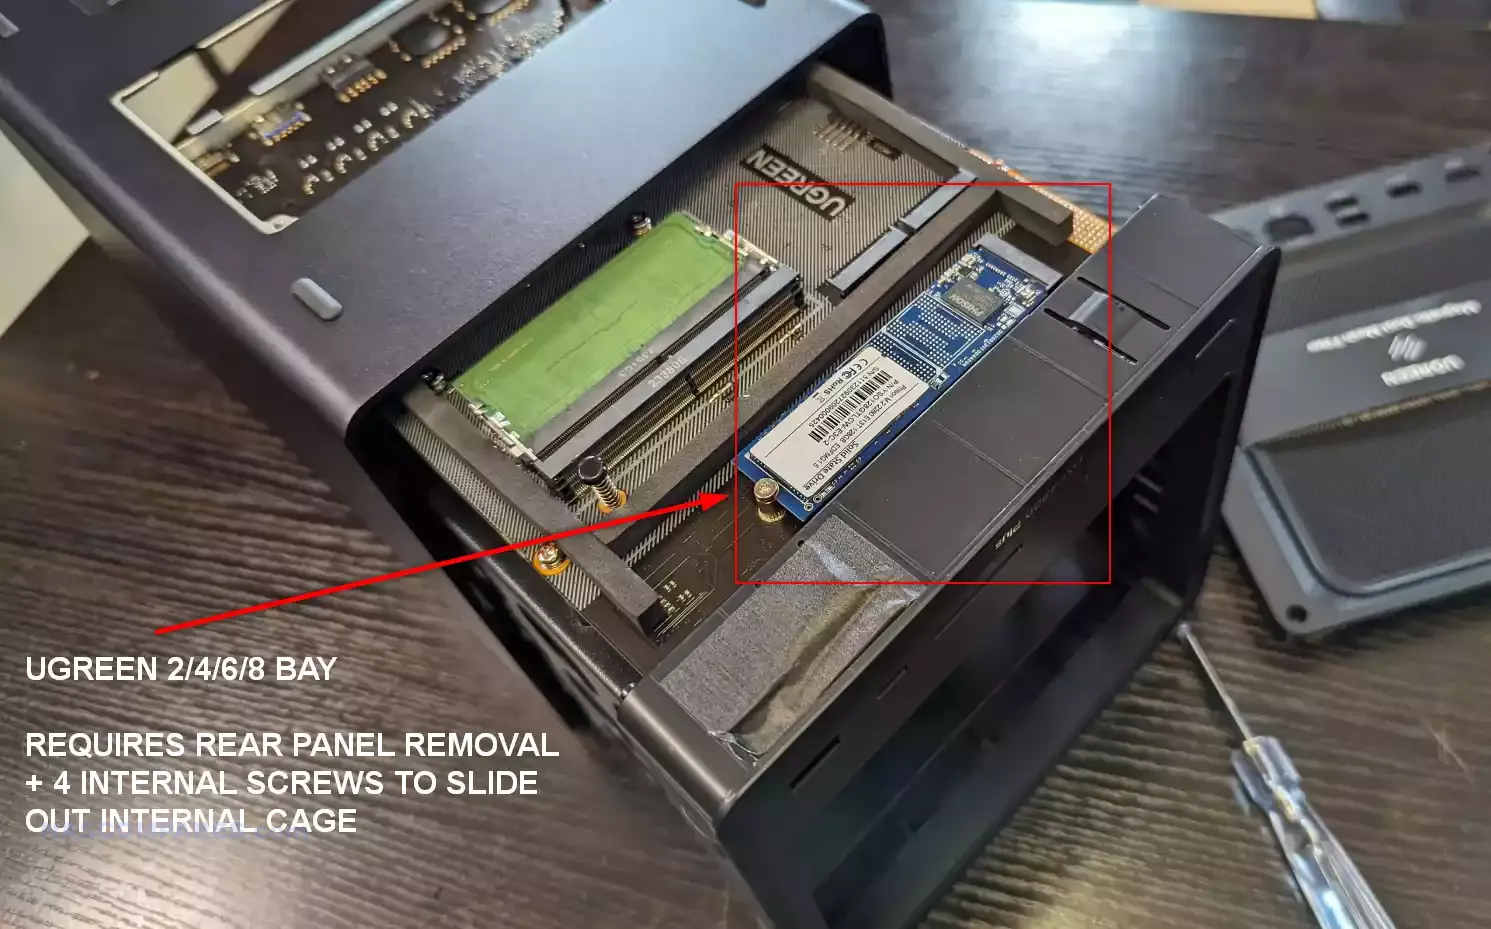
- Decide on OS SSD usage:
- If you plan to use the existing SSD, note that it will be wiped during the installation.
- If replacing, open the NAS and remove the SSD.
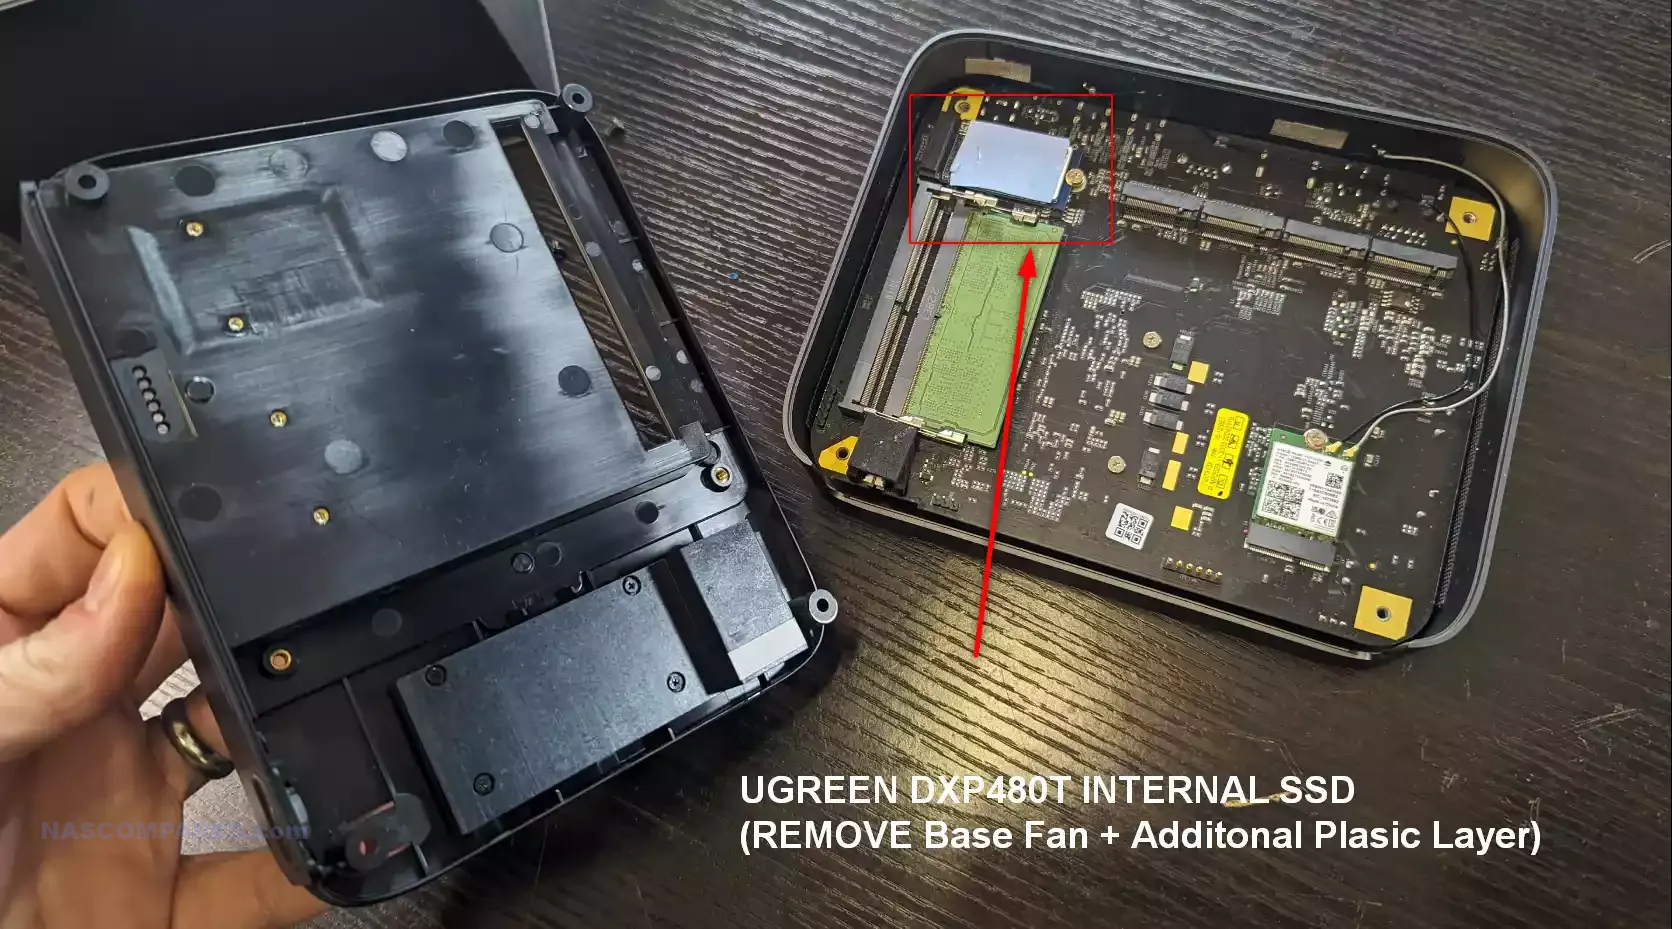
- Refer to specific guides for your model (2-bay, 4-bay, etc.) to dismantle the NAS and access the SSD. Ugreen models typically use a 2280 SSD, while smaller models may use a 2242 SSD.
- Alternatively, (LATER ON) disable the internal SSD in BIOS to prevent overwriting.
3. Download Necessary Tools:
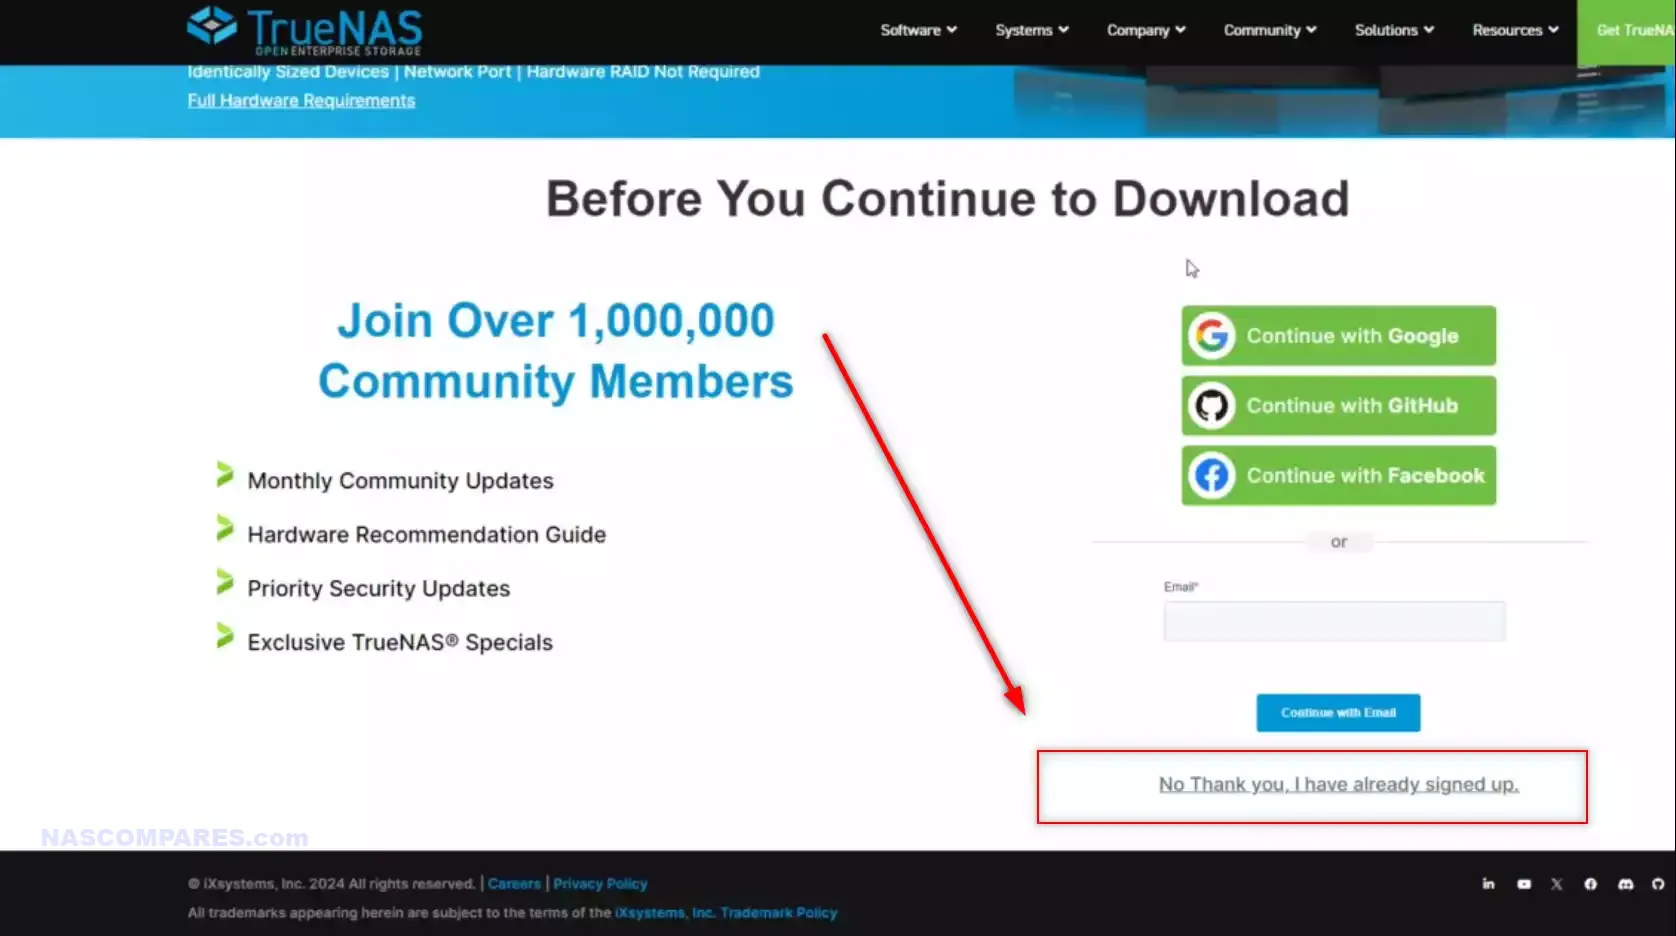
- Download TrueNAS ISO:
- Go to the TrueNAS website and download the TrueNAS Core ISO.
- Alternatively, you can download TrueNAS Scale from the TrueNAS Scale download page.
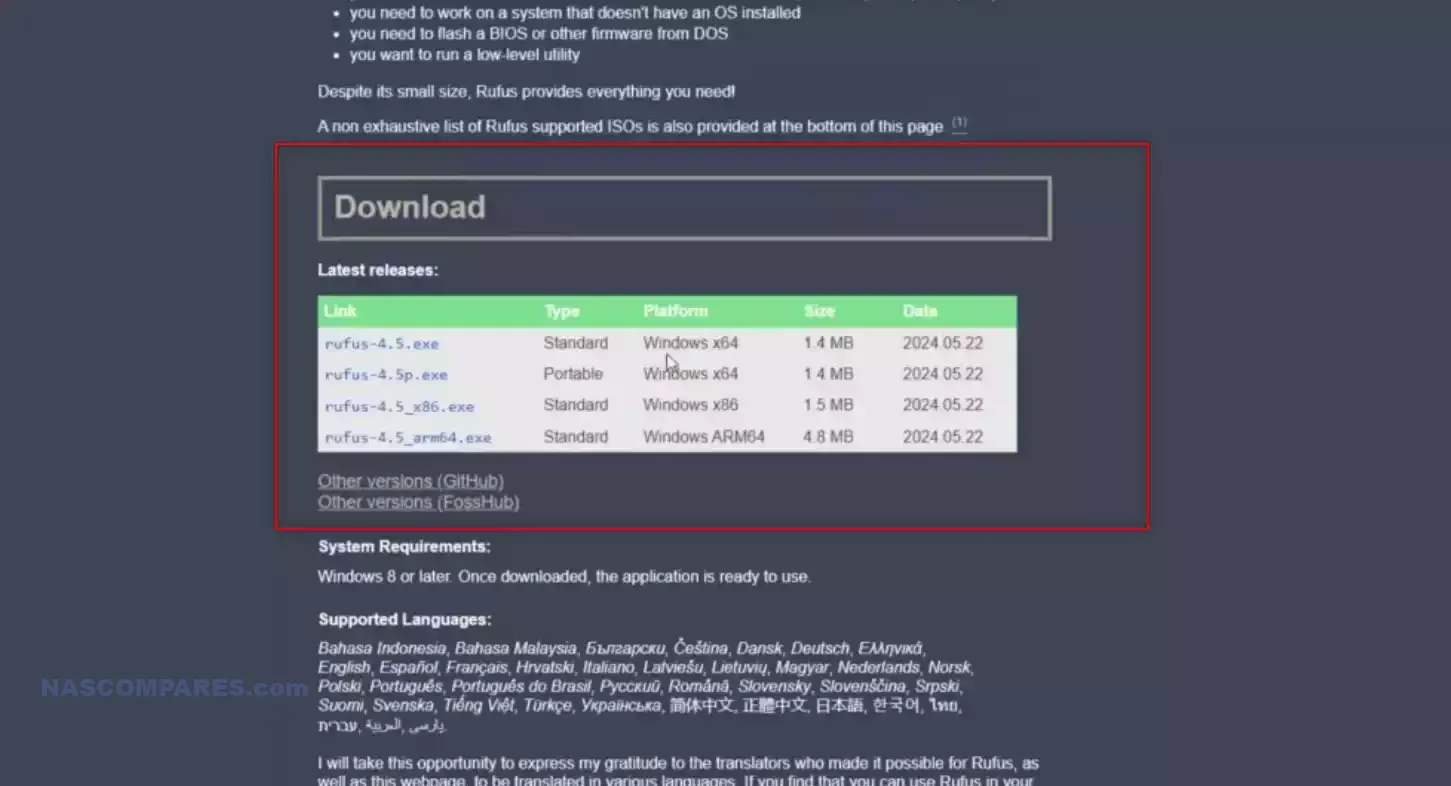
- Download Rufus:
- Visit the Rufus website and download the latest version of Rufus.
4. Create a Bootable USB:
- Insert the USB drive into your PC.
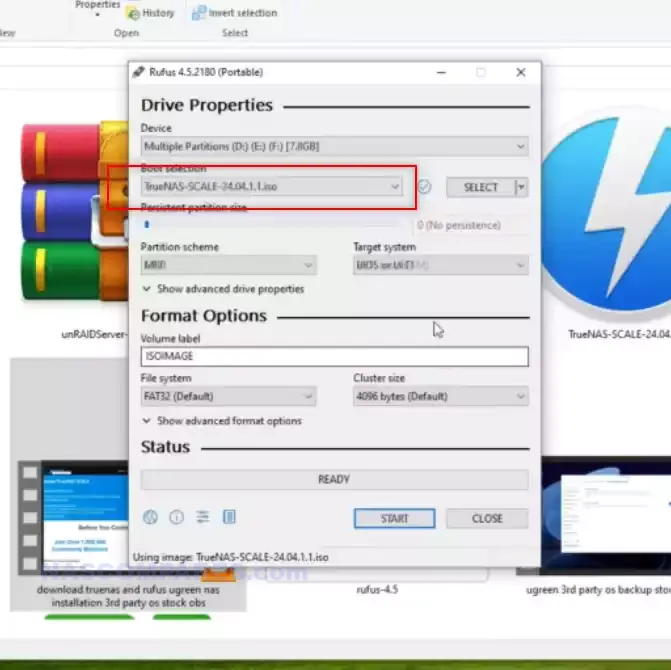
- Open Rufus:
- Launch Rufus.
- Select the USB drive in the “Device” dropdown.
- Click “SELECT” and choose the TrueNAS ISO you downloaded.
- Leave other settings at their default and click “START” to create the bootable USB.
- Safely remove the USB drive after the process completes.
5. Setup the NAS for Installation:
- Insert the bootable USB into the Ugreen NAS.
- Connect the NAS to a monitor using an HDMI cable.
- Connect a keyboard (and mouse if available).
- Connect the NAS to a network via an Ethernet cable.
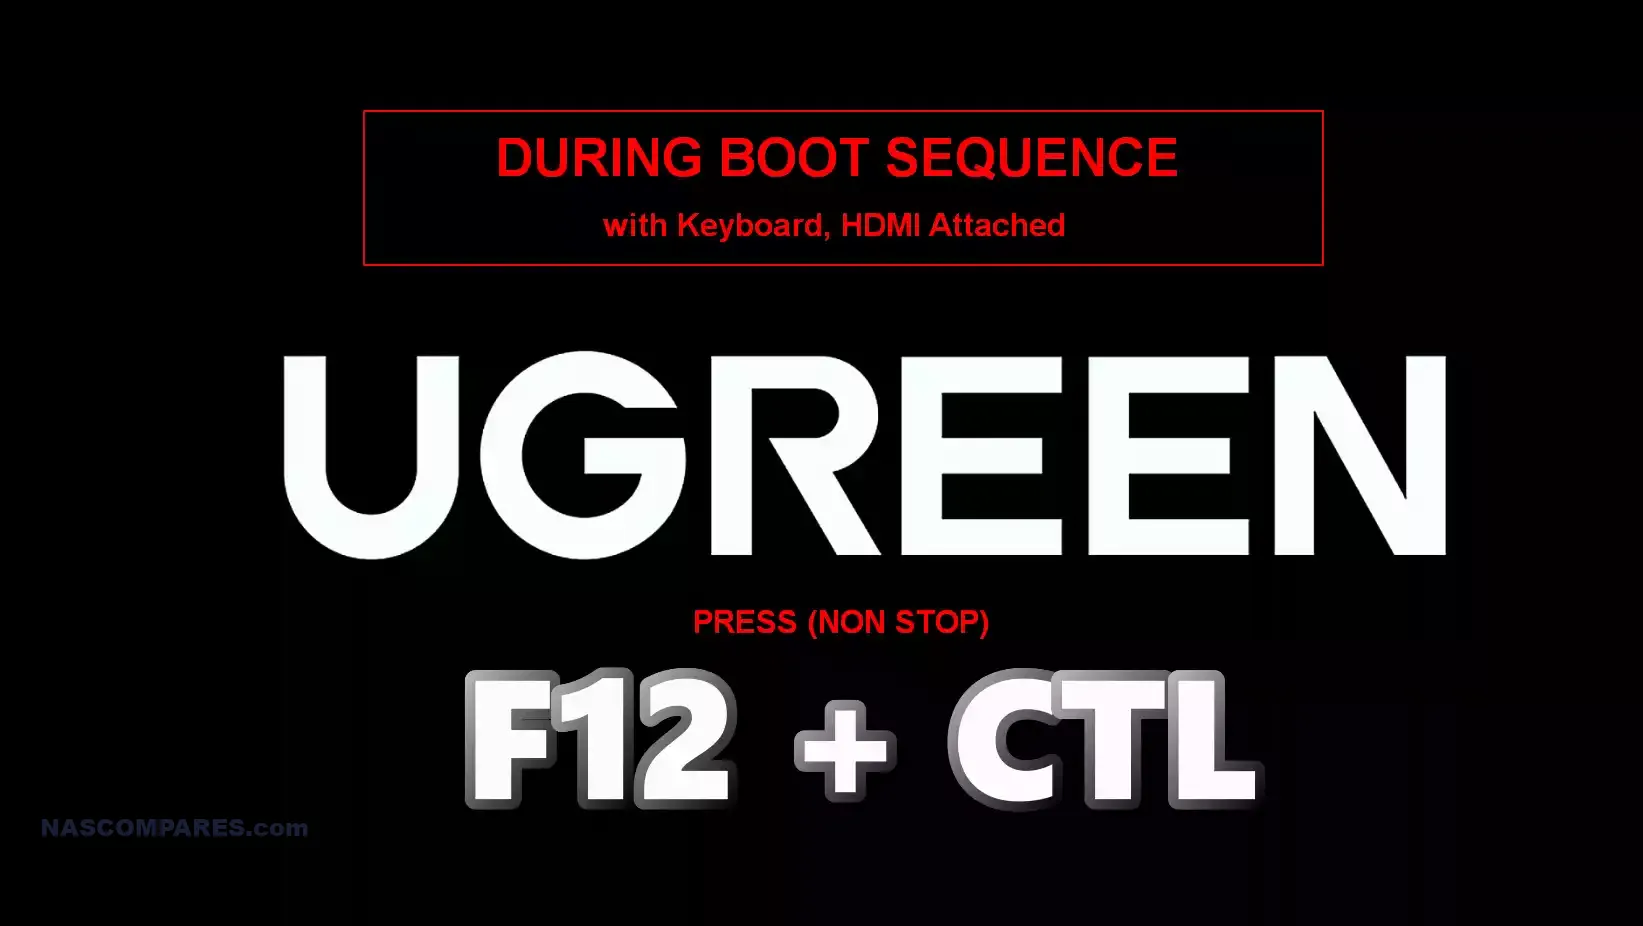
6. Boot and Enter BIOS:
- Power on the NAS and repeatedly press the F12 and Delete keys to enter BIOS.
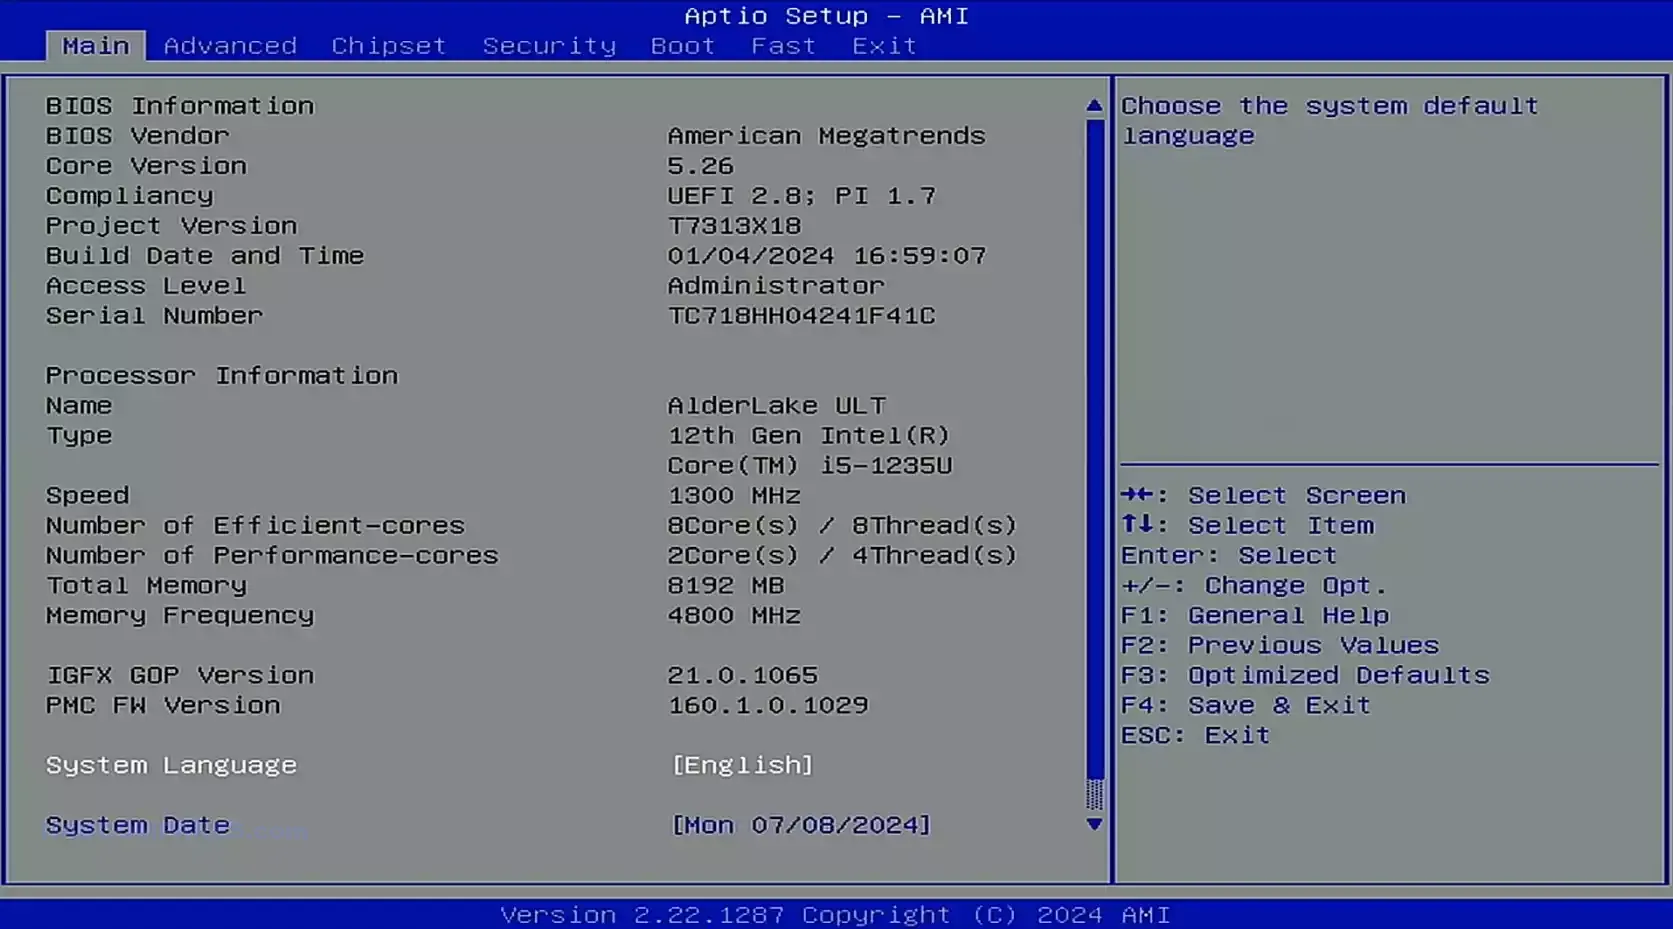
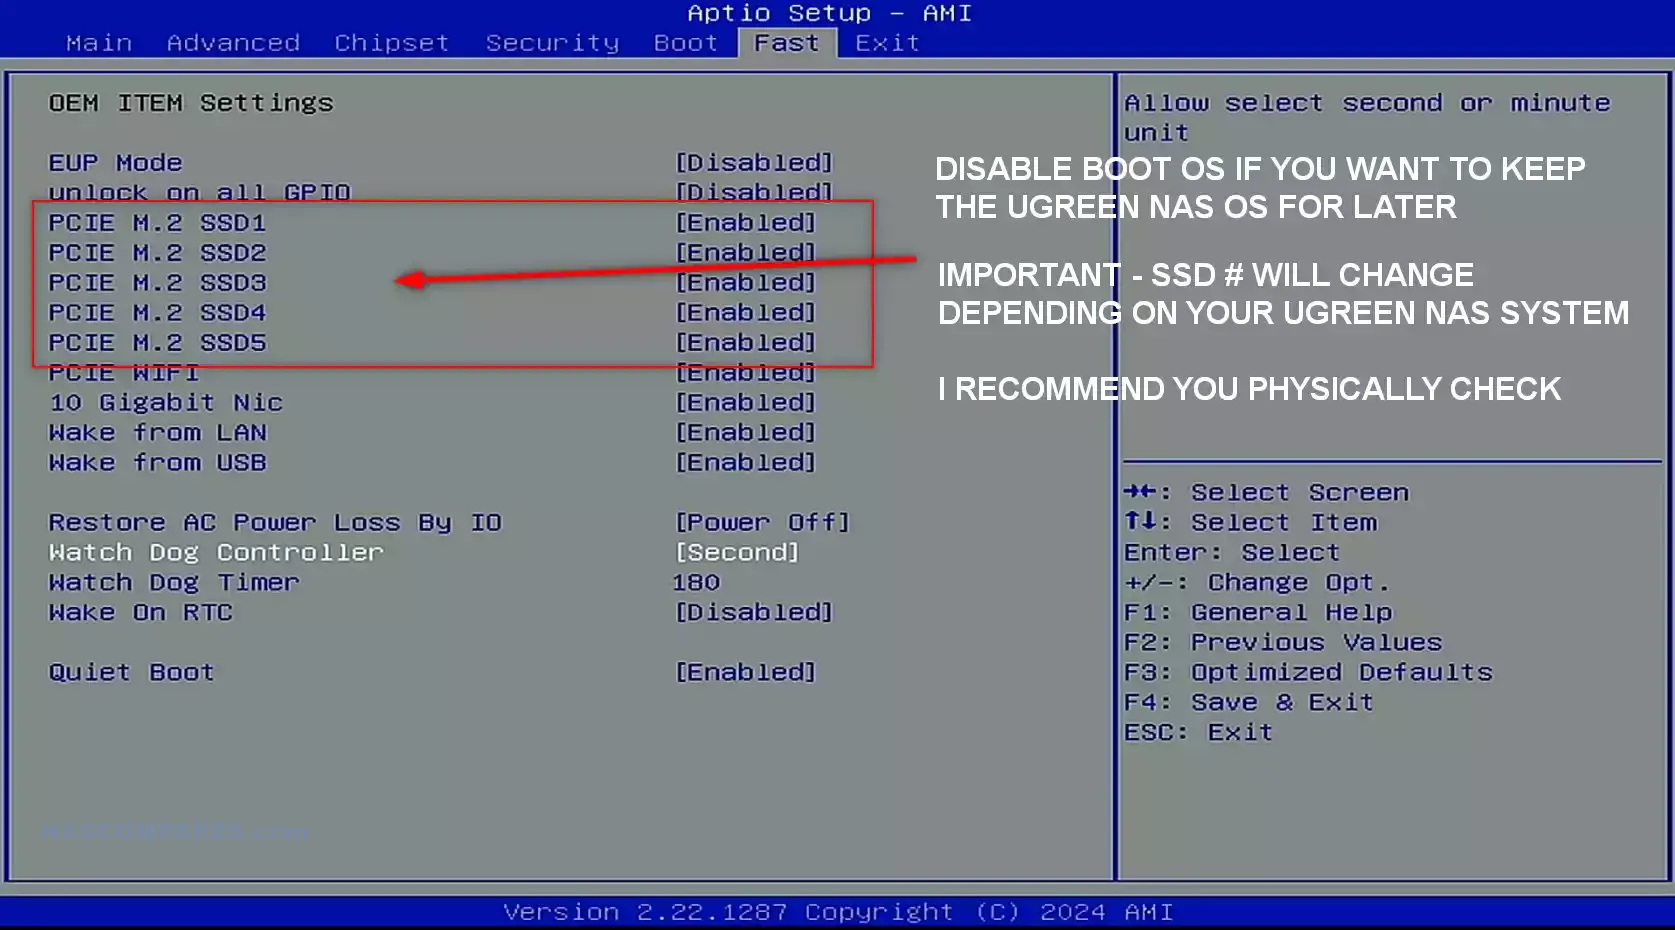
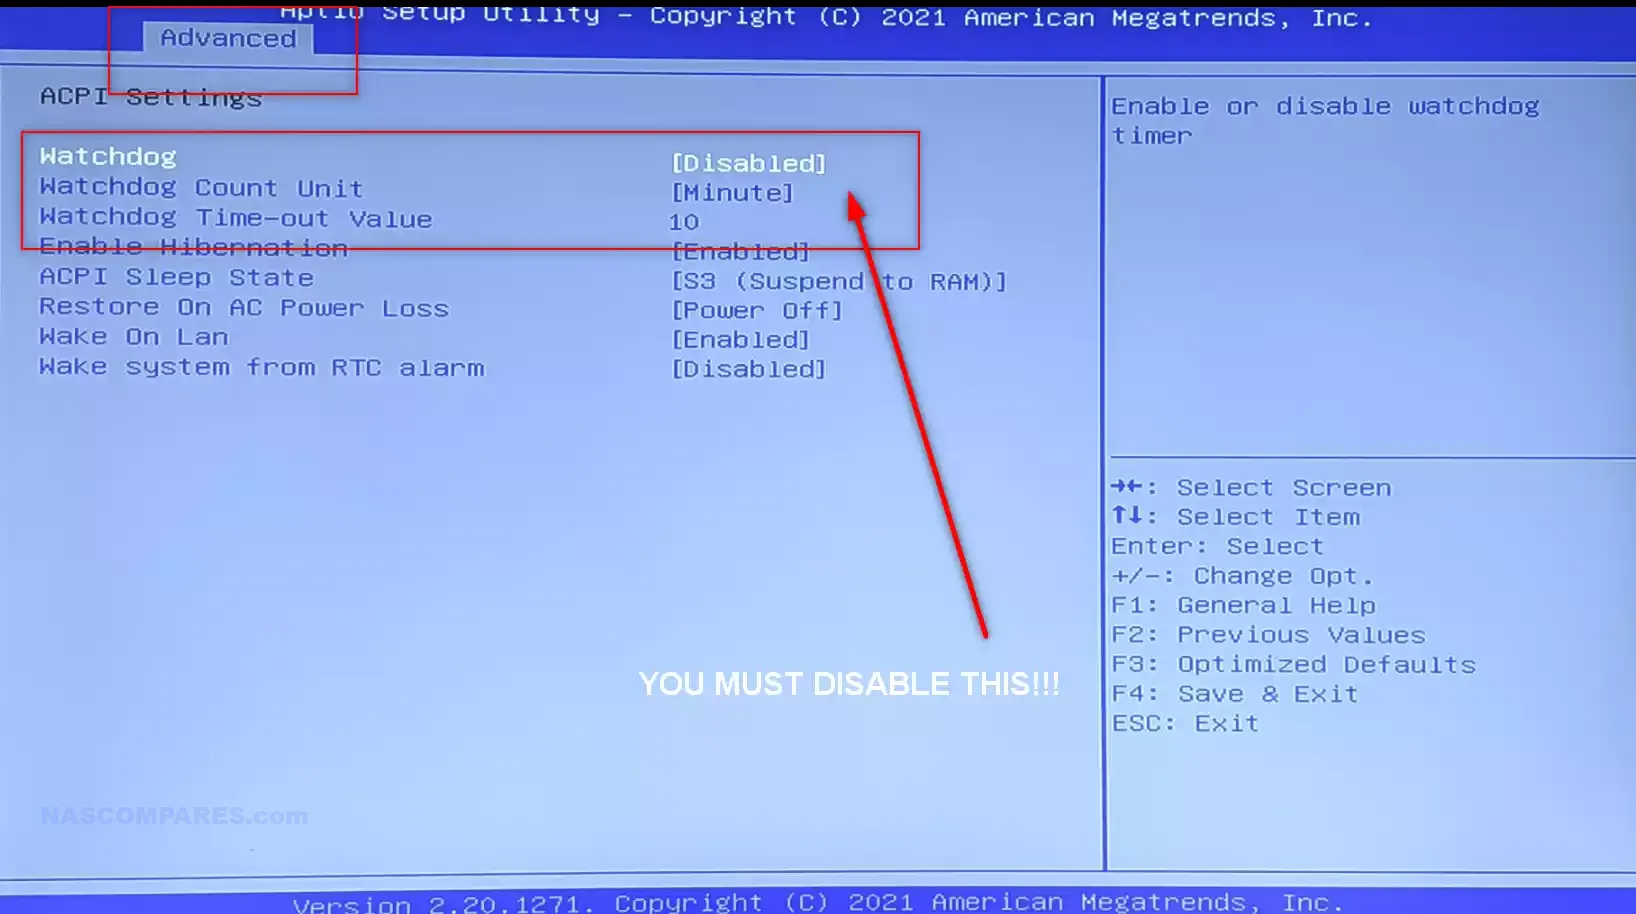
- Disable the Watchdog timer:
- Navigate to the “Advanced” tab.
- Locate the “Watchdog Timer” option and disable it to prevent the system from shutting down during installation.
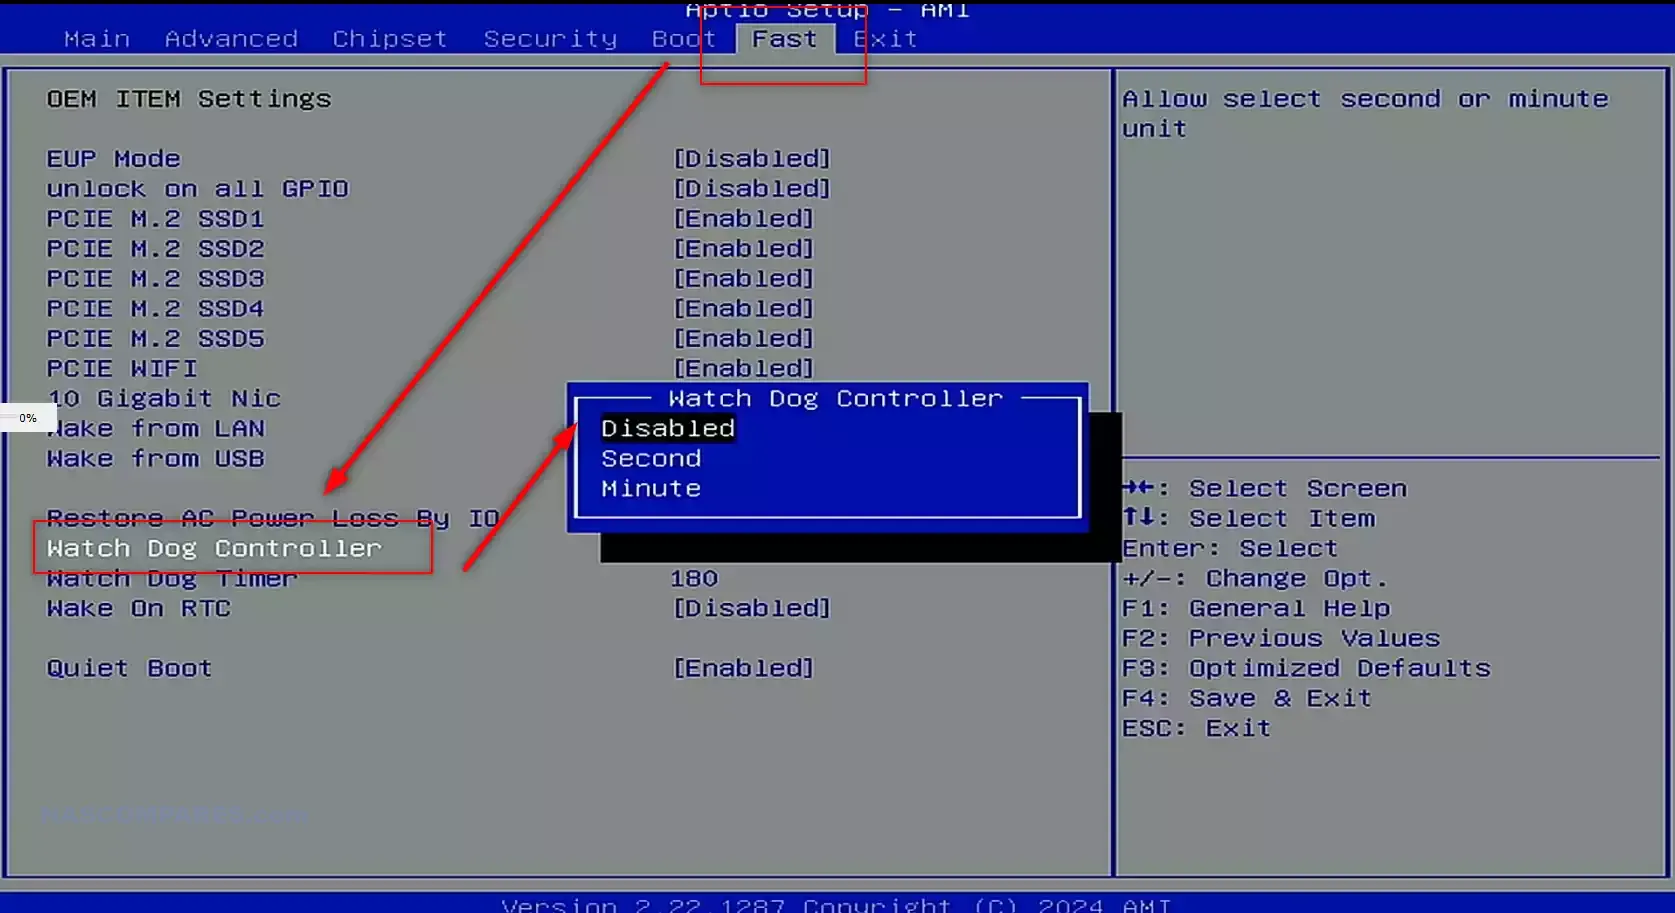
- Note – if you are running the i5 UGREEN NAS systems, the Watchdog option might be in the ‘FAST’ tab – see below:
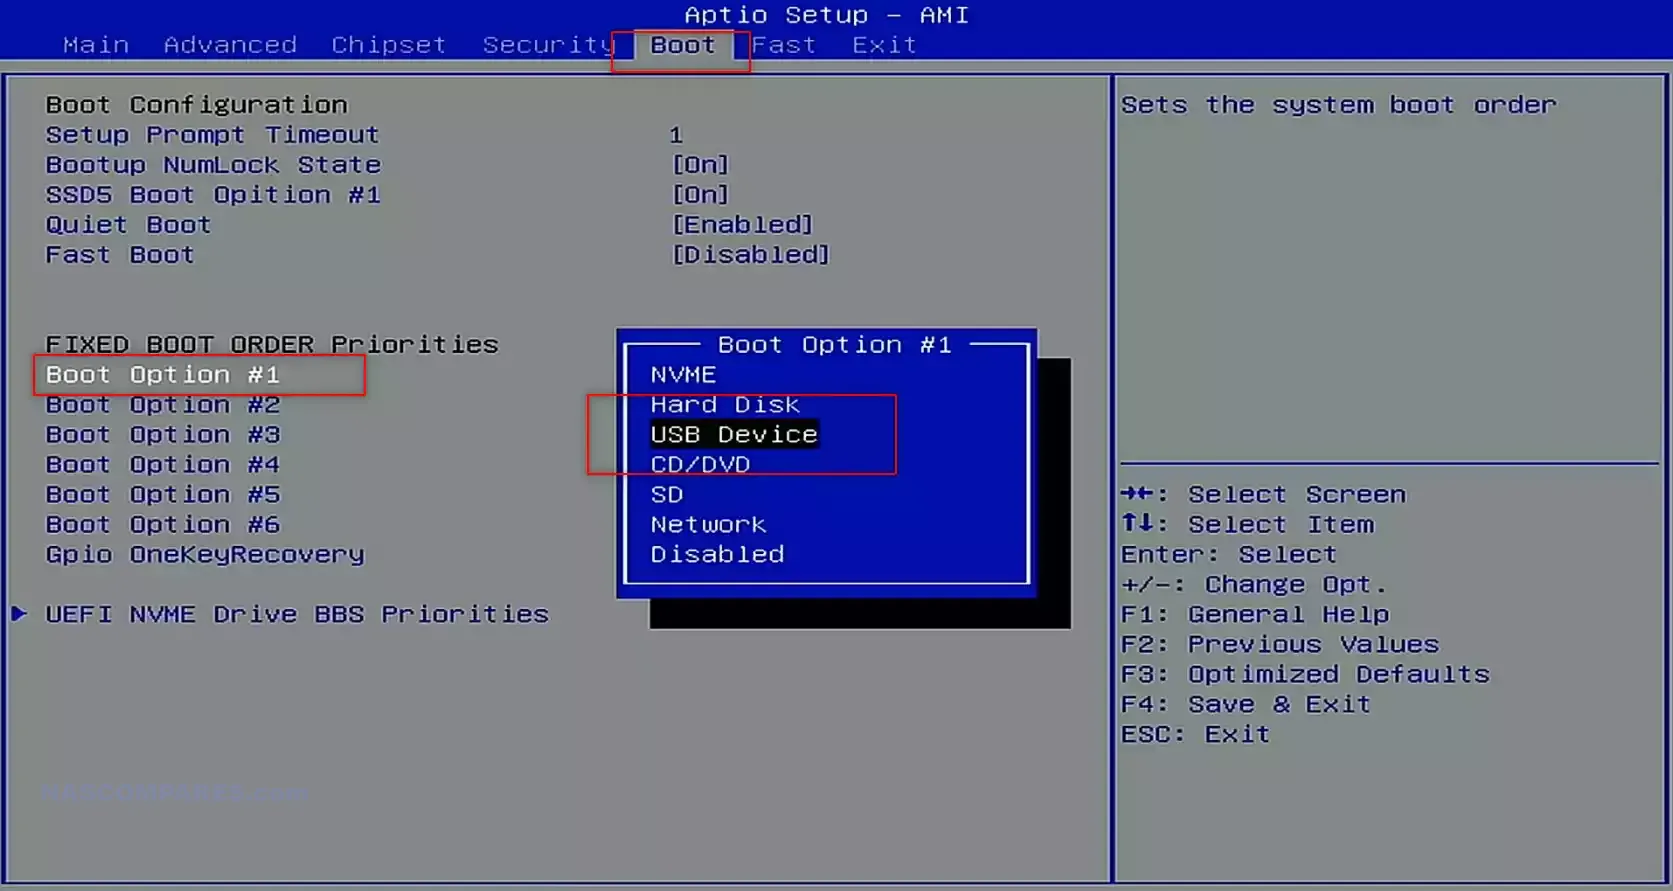
- Change the boot order:
- Navigate to the “Boot” tab.
- Set the USB drive as the first boot option.
- Disable the internal SSD drive:
- Navigate to the “Boot” tab or “Advanced” tab (depending on your BIOS version).
- Find the internal SSD listed in the drives and disable it to ensure it isn’t used during the installation.
- IF you want to keep the internal UGREEN NAS OS on the internal SSD, but do not want to risk ‘overwriting it’ or booting from it in error, you can DISABLE the SSD bay in the BIOS

7. Install TrueNAS:
- Save BIOS settings and reboot.
- The system should boot from the USB and start the TrueNAS installation process.
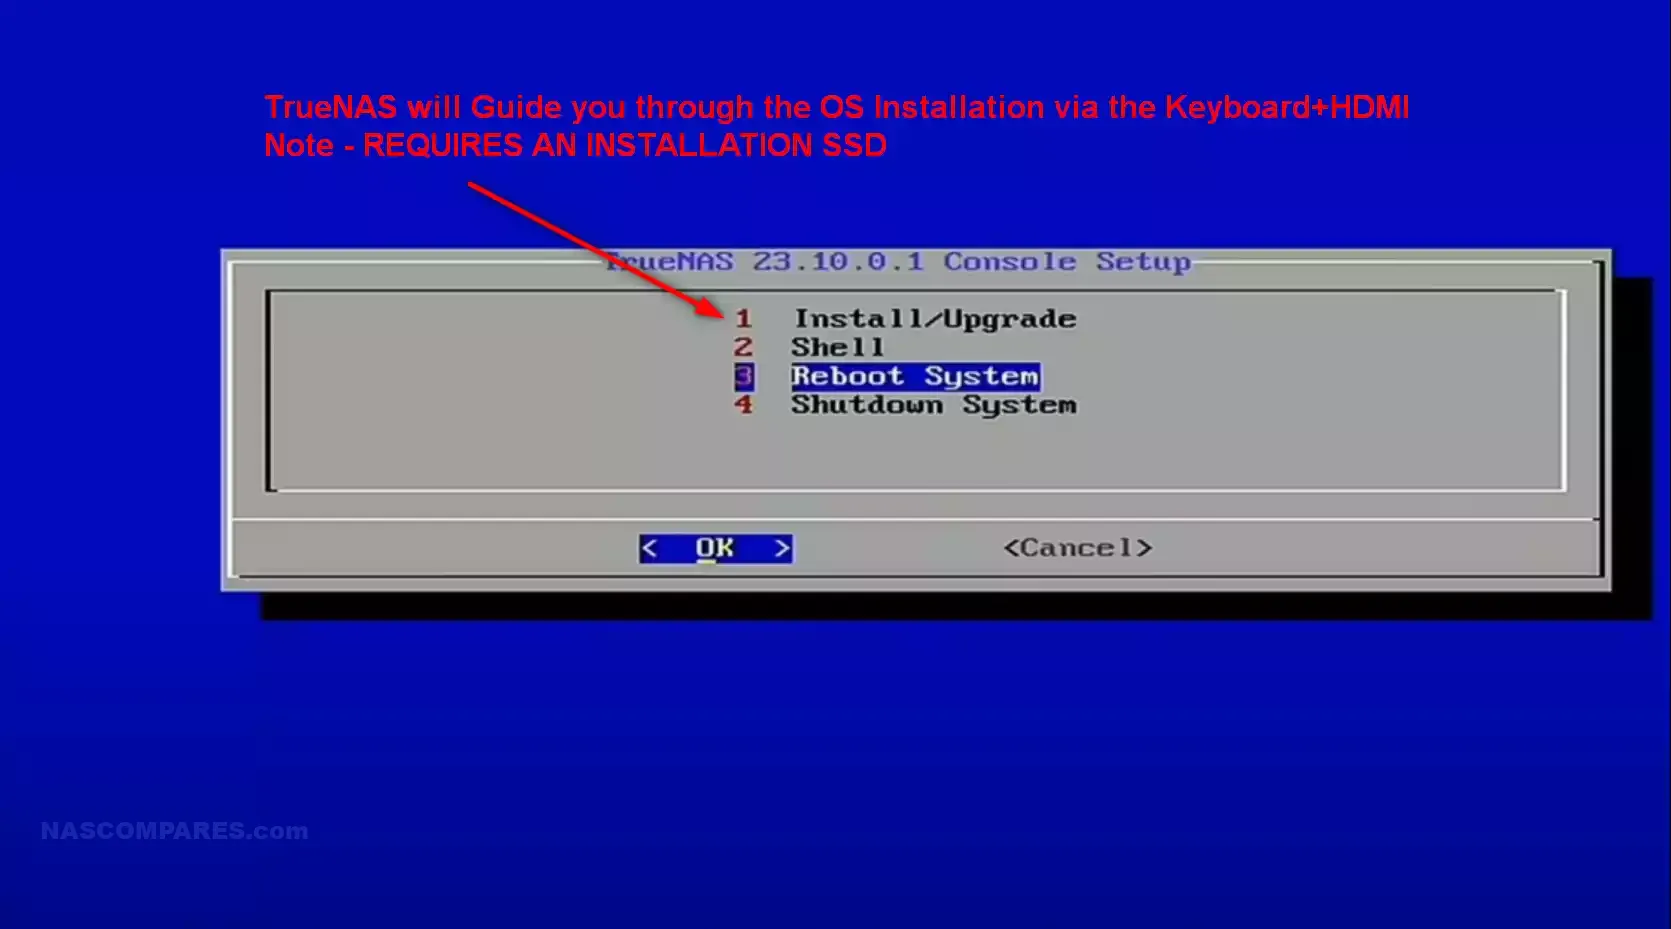
- Follow the on-screen instructions to install TrueNAS on the SSD or chosen storage.
- Set up TrueNAS with a name, root/admin access, and other configuration details.
8. Complete Installation:
- Reboot the system after installation.
- Ensure the NAS is connected to the network for easier access.
9. Access and Configure TrueNAS:
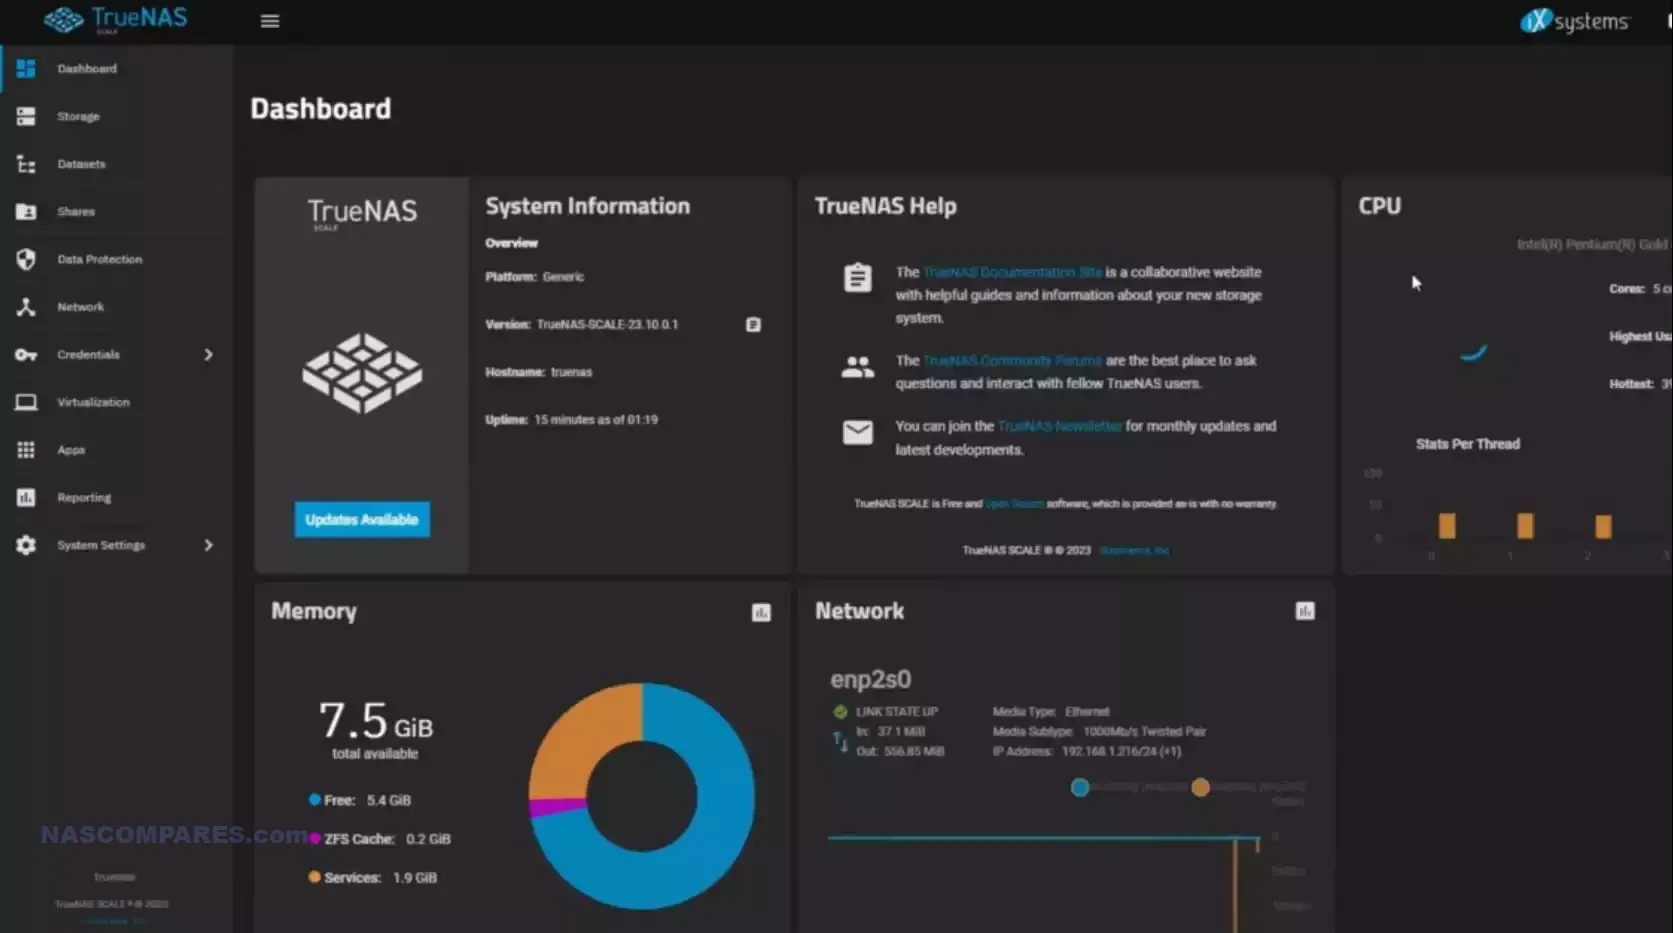
- Once rebooted, TrueNAS should be accessible on the network.
- Use a web browser on a PC connected to the same network to find the NAS IP address.
- Example: Open a browser and enter
http://<NAS_IP_ADDRESS>.
- Example: Open a browser and enter
- Complete the TrueNAS setup:
- Create storage pools.
- Configure shares and other settings as needed.
Additional Resources:
- Detailed instructions and troubleshooting:
- Refer to guides provided in the video description.
- Check specific Ugreen NAS model guides for dismantling and SSD replacement.
- Further setup and advanced configurations:
- Visit Tom @ Lawrence’s YouTube channel for comprehensive TrueNAS tutorials.
By following these steps, you should be able to install and set up TrueNAS on your Ugreen NAS efficiently.
Alternative Way to Install a Third-Party OS on a Ugreen NAS
If you want the system to boot into BIOS without having to spam the Ctl+F12 keys, you can arrange this via the UGREEN UGOS NAS software GUI. Below outlines an alternative method to install a third-party OS (e.g., UnRAID or TrueNAS) on a Ugreen NAS using both the Ugreen NAS GUI and BIOS modifications. You will still need a Keyboard/Video output, however, later on:
Initial Setup Using Ugreen NAS GUI:
- Power on and connect the NAS:
- Connect your NAS to a monitor via HDMI.
- Connect a keyboard and mouse to the NAS.
- Connect the NAS to your network via an Ethernet cable.
- Download the Ugreen app:
- Install the Ugreen app on your mobile device (available on iOS and Android).
- Initialize the NAS:
- Open the Ugreen app and follow the prompts to initialize your NAS.
- Set an admin account and configure basic settings.
- Skip setting up a Ugreen Cloud account if not needed.
- Enable SSH Access:
- In the Ugreen NAS GUI, go to
Control Panel. - Navigate to
Terminaland enable SSH access.
- In the Ugreen NAS GUI, go to
Modifying UGOS and BIOS:
- Access the NAS via SSH:
- On your PC, open Command Prompt.
- Type
ssh [username]@[NAS IP]and press Enter. - Type
yesif prompted to continue connecting. - Enter the NAS user password when prompted.
- Identify the Boot Partition:
- In the SSH session, type
lsblkto list block devices. - Identify the nvme drive with the boot partition (usually labeled as
nvme0n1p1).
- In the SSH session, type
- Gain Superuser Access:
- Type
sudo suand press Enter. - Enter your password when prompted.
- Type
- Mount the Boot Partition:
- Type
mkdir /mnt/nvme_efiand press Enter to create a mount directory. - Type
mount /dev/nvme0n1p1 /mnt/nvme_efiand press Enter (replacenvme0n1p1with your actual partition name).
- Type
- Rename EFI Directory:
- Type
cd /mnt/nvme_efiand press Enter. - Type
lsto list the directory contents. - Type
mv EFI EFI_RENAMEand press Enter to rename the EFI directory. - Type
lsagain to confirm the directory has been renamed.
- Type
- Reboot to BIOS:
- Type
rebootand press Enter. - The NAS should reboot and enter the UEFI setup screen.
- Type
- Disable Watchdog Control in BIOS:
- Navigate to the
Advancedtab. - Select
Watchdog Settings. - Disable
Watchdog Controlto prevent the system from rebooting every 3 minutes if UGOS is not detected.
- Navigate to the
Installing UnRAID or TrueNAS:
- Prepare UnRAID or TrueNAS Bootable USB:
- For UnRAID: Create a bootable UnRAID USB drive using the UnRAID USB Creator tool on your PC.
- UnRAID USB will load the NAS software into the system cache/memory.
- For TrueNAS: Download the TrueNAS Core or Scale ISO from the TrueNAS website.
- Use Rufus to create a bootable USB from the TrueNAS ISO.
- TrueNAS installation USB will load into the installer, which installs the TrueNAS Core/Scale OS onto an internal SSD.
- Insert Bootable USB:
- Plug the UnRAID or TrueNAS USB drive into the NAS.
- Save BIOS Changes and Reboot:
- Save the BIOS changes and reboot the NAS.
- The NAS should now boot from the USB drive and start the respective OS installation process.
By following these steps, you should be able to install a third-party OS on your Ugreen NAS.
📧 SUBSCRIBE TO OUR NEWSLETTER 🔔🔒 Join Inner Circle
Get an alert every time something gets added to this specific article!
This description contains links to Amazon. These links will take you to some of the products mentioned in today's content. As an Amazon Associate, I earn from qualifying purchases. Visit the NASCompares Deal Finder to find the best place to buy this device in your region, based on Service, Support and Reputation - Just Search for your NAS Drive in the Box Below
Need Advice on Data Storage from an Expert?
Finally, for free advice about your setup, just leave a message in the comments below here at NASCompares.com and we will get back to you. Need Help?
Where possible (and where appropriate) please provide as much information about your requirements, as then I can arrange the best answer and solution to your needs. Do not worry about your e-mail address being required, it will NOT be used in a mailing list and will NOT be used in any way other than to respond to your enquiry.

|
 |
UGREEN DXP4800 PRO NAS Review
Minisforum G7 Pro Review
CAN YOU TRUST UNIFI REVIEWS? Let's Discuss Reviewing UniFi...
WHERE IS SYNOLOGY DSM 8? and DO YOU CARE? (RAID Room)
UniFi Routers vs OpenWRT DIY Routers - Which Should You Choose?
WHY IS PLEX A BIT S#!t NOW? IS 2026 JELLYFIN TIME? (RAID Room)
Access content via Patreon or KO-FI
Discover more from NAS Compares
Subscribe to get the latest posts sent to your email.




Thank you for the video! Any issues with heat distribution after installing TrueNAS?
REPLY ON YOUTUBE
does DXP2800 have the swappable SSD also? all I could find is that it’s a soldered eMMC
REPLY ON YOUTUBE
My question is, @ 7:52 you went and turned off watch tower or watch dog. So that’s the thing that is making the ugreen’s chatty on the network logs. Can we just turn that off and leave it off. I have no issue with ugreen software besides it being chatty.
REPLY ON YOUTUBE
Will the TruNAS accept the backup from the Ugreen system via a USB Flash drive stick?
REPLY ON YOUTUBE
Had me chuckling at ‘I hate seagulls’ ????
REPLY ON YOUTUBE
Hi. How to remove 128gb nvme. I can’t do it physically. I tried to remove by Terminal on Unraid tower but Permission denied. Thanks
REPLY ON YOUTUBE
For anyone Unraid on a Ugreen DXP6800 Pro or DXP8800 Pro what does the command ‘ethtool eth0’ (or something else, check with ‘ip link show’ command to know what your ethernet interface is called) gives as output. Want to know if that Marvell Aquantia supports WOL and Energy Efficient Ethernet modes?
REPLY ON YOUTUBE
Can you create a dual boot with the UGOS as backup?
REPLY ON YOUTUBE
When you call a flash drive a USB 00:35 …. NEXT!
REPLY ON YOUTUBE
Great video, thanks for putting this together!
REPLY ON YOUTUBE
Rufus method doesnt work it boots to welcome to grub.
REPLY ON YOUTUBE
Can you make a video of transferring or where the location of the Plex metadata is on truneas so you can replace it with metadata from a an older NAS that you’re replacing with Trudeau’s on
REPLY ON YOUTUBE
Does watchdog need to be turned back on after install?
REPLY ON YOUTUBE
i need to sync/backup to Dropbox, multiple accounts, should i just go with Synology, even though they are limiting, HD , forcing to buy theirs, with their newer models?
REPLY ON YOUTUBE
Thanks for that. I’m about to upgrade from DS220+ and thought about DS223+ or 923+. However, now I’m thinking even about DIY built (a headache with Jonsbo and motherboards) or perhaps Ugreen with Unraid, as I have a bunch of different size drives (12TB, 2x 4TB, 3TB, 2TB) and would like to utilise them.
REPLY ON YOUTUBE
PSA: The production version of these (February 2025) uses eMMC in place of the old built in SSD.
Can still turn it off, but then you’ll need to boot off USB each time, and leave it in there for the inevitable unexpected power cycling while you’re on vacation and your brother isn’t answering his phone…. ????
REPLY ON YOUTUBE
Oh man can you do a vid on how to connect the a ugreen nas to a computer using 10gb ethernet?
REPLY ON YOUTUBE
When I go to the Ugreen Support Website there is actually a download section for the firmware (*.img file). Isn’t that the UGOS system?
REPLY ON YOUTUBE
It’s got the 2fa now. Great news uses Microsoft Authenticator. Could you do the other videos as I bought this due to your review. Thank you .
REPLY ON YOUTUBE
I have a DXP8800 bought on Dec 11, 2024, Here is what I have found.
The system has a bad “coil whine” that appears to come from the power supply, NOT the fan.
The fans in “Default Mode” and the system in idle mode can’t cool 8 HDD below 110f, in “performance mode” there is no way you can call this a “Desktop NAS” unless you are Deaf.
The 10GB Net cards are a joke as the most transfer rate I have seen is about 400MB. They need to prioritize the MTU change to 9014 and allow Jumbo Frames.
I have 64GB memory and 1TB of M.2 drive and tried using them (M.2) as caching only to find the file transfer will actually “Studder”.
I have all 8 bays filled with the Seagate 2X18, 18TB Mach-2 HDD with dual actuators. I have half configured in Raid 5 and the other 4 in Raid 0.
I have changed all the performance settings in the OS to achieve the best performance, with little to no change.
My Desktop system is running an I-7 running at 4.0GHZ, 64GB Memory, and a dual port 10GB genuine Intel (550 chip) Net card, all Net cables are Cat-8.
I have tried transfering from a 4 SSD raid-0 to and from the NAS with not much better results at to speed.
I tried transferring 9GB of data to the NAS and it took 36 hours to complete.
Even transferring from one storage pool to another is much slower the expected.
I do believe the entire problem is within the OS’s ability to handle the transfer rates of SATA-3.
So I shall load another OS M.2 and try TrueNAS and possibly UnRaid next.
REPLY ON YOUTUBE
regarding the installation process via USB-Stick you said hitting the keys F12+Delete key in order to enter the BIOS… but as your video overlay says: F12 + Ctrl. …what’s correct now?
REPLY ON YOUTUBE
I whiped my ugos and I did get an iso, which was created for my serial number.
The ugreen support was very, very nice.
REPLY ON YOUTUBE
I just dd’d it and saved the UGREEN install as a disk image, backed up to the NAS. 😛
REPLY ON YOUTUBE
Amazing video. Thanks so much for this. I have the same nvme nas from Ugreen. I found their docker & virtualization software very lacking. And I wanted to run unraid on it instead since it’s so much better and has mountains of community support. Your video gave me the assurance and instruction to do it!
REPLY ON YOUTUBE
Are you please able to make a video on how to enable the ugreen nas led in truenas
REPLY ON YOUTUBE
It’s sus
REPLY ON YOUTUBE
For anyone wondering (DXP4800 Plus):
Yes, you have to tear the warranty sticker when changing the OS SSD.
Why the outer case won’t come off when changing the OS SSD – it’s because of the damn spring in the RAM section.
(there are a total of 16 screws that need removing)
REPLY ON YOUTUBE
If I replace the OS SSD and boot/install from the USB first will I always have to boot from the USB or can I remove it from there forward?
REPLY ON YOUTUBE
Why not just boot a live Linux system and create an image copy with dd from the internal SSD before overwriting it? This way you should be easily able to roll back whenever you like, right? You could even start that vanilla uGreen OS from an external USB drive whenever you want.
REPLY ON YOUTUBE
would be better of software was open source. what backdoors are there?
REPLY ON YOUTUBE
Can UGOS catch up to DSM soon? Consumers really need a shake up in the space.
REPLY ON YOUTUBE
Lopez Kenneth Perez Timothy Lee Matthew
REPLY ON YOUTUBE
Robinson Nancy Clark Carol White Jennifer
REPLY ON YOUTUBE
I don’t understand NAS hardware vendors’ obsession with making subpar software that their clients will have to subsidize
REPLY ON YOUTUBE
You know, I just can’t help getting the feeling that doing a preinstall of truenas would have just been a better option. I get why they did it from a market/business perspective, but it feels like until the segment was more built and mature for them, sticking truenas or unraid (though, unraid has its own cons related to annual/lifetime license charges) as the os would have been a wiser move initially. They could have then taken the first several models as they grew to understand what is wanted and better tailor an os to the market instead of charging off first run like this.
REPLY ON YOUTUBE
Some avi file don’t play correctly using the ugreen app. However, using Windows file manager and vlc app the files play correctly.
REPLY ON YOUTUBE
Now I want to go back to UGOS, but I’m not sure how to undo step “4.2 Modifying UGOS and BIOS”. Does anyone have any idea or experience with the file system? What are the steps to undo /mnt/nvme_efi etc.
REPLY ON YOUTUBE
Time for a new review!
REPLY ON YOUTUBE
Lopez Ronald Walker John Young Lisa
REPLY ON YOUTUBE
Marguerite Extension
REPLY ON YOUTUBE
just install debian and be done with it
REPLY ON YOUTUBE
Felipa Ramp
REPLY ON YOUTUBE
Will Plex be adding native support to Ugreen without the need for docker?
REPLY ON YOUTUBE
What OS would you recommend if this os isn’t great, for a noob as well lol
REPLY ON YOUTUBE
These other companies are holding us up with a tier system. Ugreen has seen a massive hole in these companies holding us to ransom and not giving the consumer what they want at a reasonable price . Too many variants without top end performance . Things have changed now spinning hard-drive are becoming more affordable. All I want is the highest spec CPU for 4k plex, with high end expendability for memory, cache ,and ethernet . It doesnt need to be high end memory etc at time of purchase because we can always upgrade. It is that simple. High end chip with expandability at consumers expense .
REPLY ON YOUTUBE
Hi there @nascompares. Love your videos… They’re super informative and unbiased. I see that Ugreen NAS are hitting the market (can be purchased in Germany now). Are you planning an updated review with the production version of UGOS? Have you heard of any planned updates or features now that sales have started? Thanks a lot!
REPLY ON YOUTUBE
Ugreen have put the NAS’ up for sale on at least their german shop, with a 10% discount. Meaning the DXP4800 is 540€ after discount and the DXP4800 Plus is 720€ , which makes them collide with Terramaster F4-424 and F4-424 Pro. Comparing the Ugreen plus to the F4 pro , i would prefer the more mature Terramaster software , and probably the N305 , over the 4800 Plus ????
REPLY ON YOUTUBE
Hi!, is there any way i can encrypt the data in the hard drives. in case the hard disk is removed all data is readable. that’s the only reason i am trying to switch to different Nas OS.
REPLY ON YOUTUBE
Anyone else worried about the “custom” Ugreen Linux kernel? This discovery is what made me cancel my order. As someone who works in cyber security, this is very concerning coming from a Chinese company. Please don’t take this the wrong way, there are cyber attacks every day coming from China, and pretty much none coming from Taiwan, where most other NAS companies are based.
REPLY ON YOUTUBE
is there any news on the ugreen nas lineup restocking
REPLY ON YOUTUBE
Excellent Video! You are my go-to guy when it comes to everything NAS. Could you please make a dedicated video on best security settings to follow in trunas scale? Basically how to lock it down or prevent it being hacked or preventing unwanted access? It would really help a lot of us using this os.
REPLY ON YOUTUBE
Can I add full HDD’s with this? Or will it format into raid config?
REPLY ON YOUTUBE
I can’t find a way to sync folders from my ugreen to external usb. Looking I only see rsync nas to nas. Has anyone found a way to back up your folder shares to USB drive?
REPLY ON YOUTUBE
Not available for the uk market?
REPLY ON YOUTUBE
Great video! Please link the Spaceinvader One video for the Unraid setup…..he’s got alot of videos
REPLY ON YOUTUBE
Strange request for a Ugreen NAS video. Showcase how to run Plex using content on an external hard drive. I current am out of space and am using this as a temporary stopgap until I size up.
REPLY ON YOUTUBE
trying to get truenas scale installed but i get the grub rescue mode and cant fine anything on it
REPLY ON YOUTUBE
is ugreen nas os linux??? can install jellyfin on that os?
REPLY ON YOUTUBE
BTW, UGreen NAS VM USB passthrough doesn’t work. The option is there but it simply doesn’t work at all.
REPLY ON YOUTUBE
I actually think a video covering how to backup the UGreen UGOS Pro OS would helpful to a lot of UGreen NAS owners looking to migrate away from UGOS but still retain the ability to go back. Also a UGOS image could be useful for running it in a VM.
REPLY ON YOUTUBE
The writing is on the wall for Synology and QNAP. The pace of improvement of UGREEN is very promising. Finally a competitor that’s not trying to sell 5-10 year old hardware like the newest and greatest.
REPLY ON YOUTUBE
Does anyone know if one can reinstall Ugreen native OS after one have installed a 3rd party OS, like TrueNAS?
REPLY ON YOUTUBE
I get booted into Grub rescue mode? idk what to do
REPLY ON YOUTUBE
It’s not available yet anywhere. Maybe give it 3 months more???? The hardware is otherwise pretty decent. Can they actually do anything if people just installs TrueNas or Unraid on it instead of the lackluster software it comes with ?
REPLY ON YOUTUBE
Thanks for the video. Are the Ugreen NASs available for the UK yet?
REPLY ON YOUTUBE
great video, I have install unraid to my DXP480T Plus and the Unraid is not able to recognize and display my thunderbolt 3 ssd case. is is any method to solve this problem? thank you.
REPLY ON YOUTUBE
If i have to buy a new ssd i have to factor that into the cost and the value proposition.
REPLY ON YOUTUBE
just wish i could actually buy one of these
REPLY ON YOUTUBE
I hate seagulls! ????
Nice and useful video, I never booted the UGreen SSD before replacing it, just in case.
REPLY ON YOUTUBE
Great, now they have to *become* available to purchase
REPLY ON YOUTUBE
The UGos got today a really big update, with a lot of improvements in all the Apps and a new online document app. might be worth it soon to check it out 🙂
REPLY ON YOUTUBE
One point of clarification – I believe DXP2800 does NOT have to OS on an m.2 ssd but rather it is on a 32GB eMMC.
REPLY ON YOUTUBE
Where can You buy ugreen nas?
REPLY ON YOUTUBE
https://nas.ugreen.com/pages/downloads
Check under your model and Firmware tab – Seems like the UGOS is maybe there.
Not .iso but it’s a .img and seems to refer to latest version.
REPLY ON YOUTUBE
There is a new big UGOS update with lots of fixes.
REPLY ON YOUTUBE
Love the channel but your studio needs a makeover
REPLY ON YOUTUBE
ok why buy one of those COTS NAS device and then put a different OS on it, the main part of the cost on those is the software. A DIY NAS would be cheaper and have higher performance.
REPLY ON YOUTUBE
Soon … switching my previous setup (jonsbo n3 with unraid) for this all-flash baby! Just thinking about installing Nas OS on top of proxmox 🙂
REPLY ON YOUTUBE
Can we even buy a ugreen nas right now?
REPLY ON YOUTUBE
When the turkey (turkey solution nas) is still raw , no worries just cook it ourself????
REPLY ON YOUTUBE
Damn, we’re early today on this one.
REPLY ON YOUTUBE
Sucks they can’t be found anywhere
REPLY ON YOUTUBE
Could you add a quad this SABRENT 4-Drive NVMe M.2 SSD to PCIe 3.0 x4 Adapter Card [EC-P3X4] SSD PCIe card in DXP8800 Plus?
REPLY ON YOUTUBE
What audio chipset is the nas using
It’s not intel Realtek???
REPLY ON YOUTUBE
Where can these be purchased? I missed out on the kickstarter (cold feet).
REPLY ON YOUTUBE
It is interesting how many people are putting other things on this, basically paying for the hardware.
REPLY ON YOUTUBE
Bought the 8 bay in KS, booted their OS once just to check around, then immediately installed TrueNAS Scale because they don’t have the features I need yet, iSCSI and a few others. Very happy with the system though, 8 16TB HDDs with NVME cache.
REPLY ON YOUTUBE
I bought the 6 Bay / DXP6800, haven’t even opened it yet. Will wait a couple more months before I do to save myself from the first round of bugs / limited OS challenges. I am brand new to NAS and don’t have the comfort level to run / install TrueNAS, UNRAID, etc.. Thanks for the update video!
REPLY ON YOUTUBE
Still not available to buy, and some complaints from people who haven’t yet received their Nas – I can’t see whether that is 1% or 10%, and I think they made it too complicated with that whole discount the $5 reservation fee thingy, and having to fill out forms with address, etc. I’m looking forward to seeing where they expand availability – hint: pick me, pick me, pick the UK. I need iSCSI but I don’t suppose that is in yet. It’s early so we have no idea if the h/w is reliable, but all their other h/w seems very reliable.
REPLY ON YOUTUBE
uh-oh. pink casio video. another banger
REPLY ON YOUTUBE
for only 3 months, this is pretty good progress
REPLY ON YOUTUBE
Do you think UGreen will have a comparable software to synology ? Or will synology still remain supreme
REPLY ON YOUTUBE
Is vadility similar to validity? Hmm…smdh
REPLY ON YOUTUBE
So far almost unusable. New errors are added every day. There are a lot of complaints in the Facebook group and on the Discord. Often the whole raid breaks down and cannot be restored. The support ignores requests. I am currently very unhappy with this.
REPLY ON YOUTUBE
Great summary of the OS so far, I decided to keep using the UGOS instead of using an 3rd party. However, you’ve missed that the connection to active directory doesn’t work and that fine for home users but for homelabs and businesses it’s major oversight.
REPLY ON YOUTUBE
I agree with your review. It’s still beta for the UGOS.
REPLY ON YOUTUBE
I would never use it since I don`t have a use case for a prebuild NAS like this, but if i had one I would be very please with this. Looking at it being their first try on NAS Systems from a company that was not in that business before is quite good and sure, a lot of things aren’t there yet, but as long as the support and development continues, that’s mostly fine with me. I will follow their development and maybe in the future I`ll even recommend them to my friends
REPLY ON YOUTUBE
No snapshots?
REPLY ON YOUTUBE
chinesium software should be avoided at all costs
if I’d buy one of their NASes, I’d put TrueNAS on it immediately
REPLY ON YOUTUBE
It looks like it works well if used as a basic file sharing storage locally
But those promised/soon/will be there/in progress functions seem still not there “yet” ????
There is even no timetable for those things
If just need a basic storage device there are many options in the market
REPLY ON YOUTUBE
Great update video, do wish ugreen had more useful apps. Is it possible u can do a video on how to install tailsacle thru docker on the ugreen NAS?
REPLY ON YOUTUBE
What is the consumption with 6 disks in the ugreen dxp6800?
And temperature?
REPLY ON YOUTUBE
They need to launch in the UK soon! Or I might just bite the bullet and get a Synology 🙂
REPLY ON YOUTUBE
Running proxmox with a truenas VM since day 1, and it’s been perfectly reliable.
REPLY ON YOUTUBE
I picked up the 4 bay “pro” model. I have only used it to host some SMB shares and for those its run flawlessly. I am very happy with it, but my usage is pretty limited.
REPLY ON YOUTUBE
What desktop OS does he run? Is that Fedora Linux?
REPLY ON YOUTUBE
I really need to set mine up its still in box waiting for bugs and other issues to get ironed out
REPLY ON YOUTUBE
Haven’t seen it done yet, but will this run Xpenology? The hardware seems to be a great value, but hearing about shared keys and lack of proper security features worries me. This could be the perfect host for gray-market Synology DSM! And I do realize that’s very much a gray area since DSM isn’t properly open-sourced – though it possibly should be.
But licensing aside, will it run?
REPLY ON YOUTUBE
One of the huge drawbacks is that they override permissions on the homedir every reboot. This makes SSH unusable with keys, only password! I asked the support and got a response that nothing they can do about permission change on the .ssh directory, that’s by design.
REPLY ON YOUTUBE
is the OS outsourced by Synology? it looks too similar in every way I can’t imagine being developed independently and without lawsuits?
REPLY ON YOUTUBE
Is there any official relase date for those NAS Systems?
REPLY ON YOUTUBE
I hate seagulls! But I will admit the YouTube algorithm loves them.
I am waiting to purchase enough drives to fill my 6 bay up, but hopefully soon I can replace two of my Synology NAS with this running TrueNAS. I appreciate your updates on the Ugreen software.
REPLY ON YOUTUBE
I don’t trust them. They added and removed links to NAS from their homepage with no indication of a wider release to the public. I’ll wait for the next Asustor and Qnap offerings
REPLY ON YOUTUBE
Sadly, still not available to buy.
REPLY ON YOUTUBE
Cannot wait for the retail! SSDs are waiting for the lovely 4 bay all ssd nas (and pendrive with unraid)
REPLY ON YOUTUBE
I didn’t even boot into it, I have been running Unraid since I got it and it works flawlessly
REPLY ON YOUTUBE
iSCSI LUN support wouldn’t go amiss either. Support for accessing external (USB and Thunderbolt) storage with MacOS Finder and Windows Explorer (not just through UGOS) is a sorely missed feature.
REPLY ON YOUTUBE
I would have bought one if it were a quiet rack mount solution.
REPLY ON YOUTUBE
Happy owner of a UGREEN NAS, great hardware????!
The software is nice but lacks essential features like encryption and snapshots.
I recommend installing TrueNAS Scale, you don’t need to open the device, and I’ve backed up the original OS on a USB stick.
Zero risk, TrueNAS is 100x better for advances users ????
REPLY ON YOUTUBE