DAS for RAID-6 or SHR-2 TYPE CONFIG
I am wanting to invest in an emulator system, which will require 34-40TB of disk space, and to have a local hard drive letter D: in order to install and maintain the games. Having a NAS from someone like Synology obviously will not work, as it would behave as mapped instead of physical drive.
I have a USB-C port on the back of my NVidia graphics card which I could utilize for connection, but I do not have the Thunderbolt 3 that I see in various DAS configurations.
Any ideas on a good manufacturer, and maybe few brands I should be aiming towards? In the past I have settled for a Drobo, which I guess would be fine for just storage without a lot of additional features. This might be okay, but wanted to bounce it off of you for advice, as this is much more of your cup of tea.
You, can connect a NAS to be seen as a physical internal disk. There is function called iSCSI. This will trick your Windows or other operating system thinking that it has a new internal drive attached. You can in fact add additional iSCSI disks if you need to. Remember that only one user can see the drive and store data on it. So if you have several computers- create several iSCSI disks.
Here is how to set this up:
About Microsoft iSCSI Software
The Microsoft iSCSI Software Initiator enables the connection of a Windows
host to an external iSCSI storage array using Ethernet NICs. Windows iSCSI
Initiator Version 2.08 can be installed on Windows Server 2003, Windows XP,
and Windows 2000. For Vista and Windows Server 2008, the iSCSI initiator is
included in box.
Please visit link below for more information on Microsoft iSCSI
http://www.microsoft.com/downloads/details.aspx?familyid=12cb3c1a-15d6-4585-b385-befd1319f825&displayl
ang=en
First enable iscsi connection on your NAS:
Qnap – https://www.qnap.com/en-au/how-to/tutorial/article/how-to-create-and-use-the-iscsi-target-service-on-a-qnap-nas/
Part .1 Connecting iSCSI target with Windows iSCSI initiator
1. To launch the iSCSI initiator in Windows 7, please go to Control Panel > Administrative
Tools.
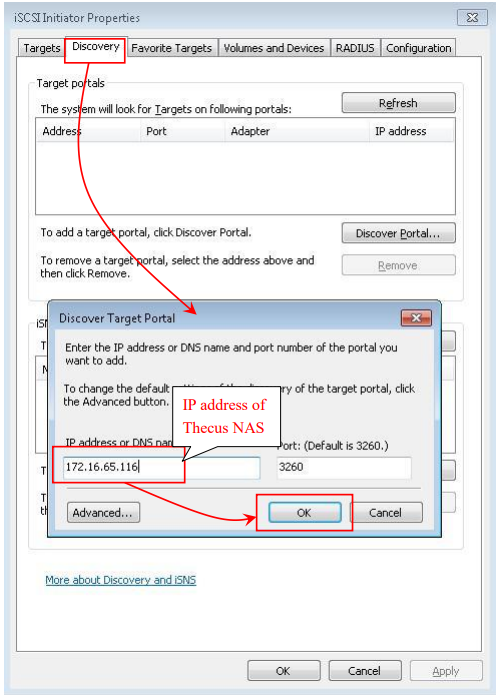
2. On the iSCSI Initiator Properties page, click on Discovery, enter the IP address of
NAS and click OK to proceed. Please refer to the picture below:
3. Next, click on Targets to display and select the available iSCSI targets you wish to
connect and click the Connect button to continue. A Connect to Target window will pop
up. Click OK to continue.
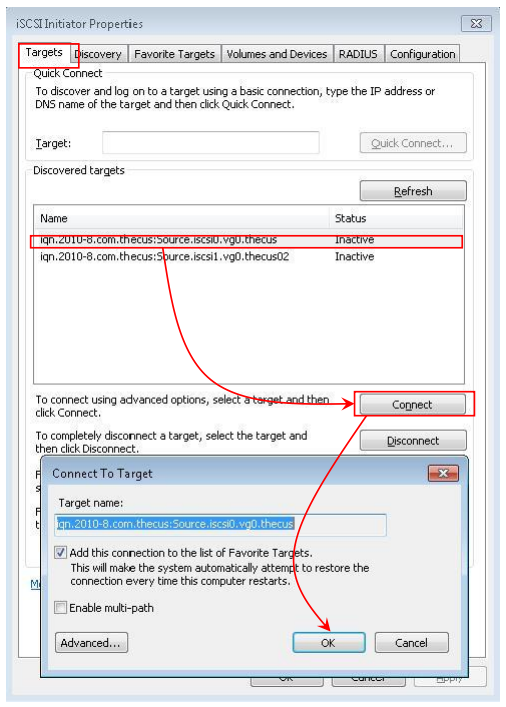
*If you have enabled authentication on the iSCSI target, please click on the Advanced…
button to configure CHAP Log on Information.
4. Upon successful connection, the status will change to Connected as shown in the picture
below:

Part .2 Format iSCSI target on Windows
Now that the iSCSI target has been successfully connected, the iSCSI target will be displayed
as an Unallocated Disk on Windows. Next, you will need to make the disk online and format it
before you can start using it as a local disk to store data.
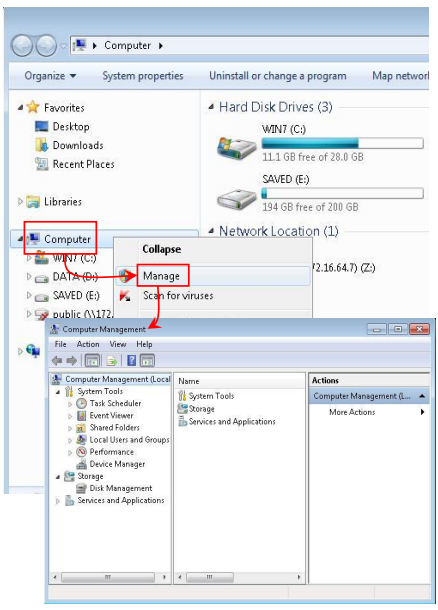
1. Right click on Computer and click on Manage to open the Computer Management page
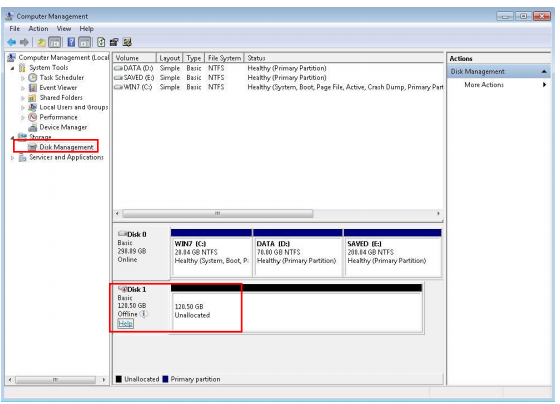
2. Click on Disk Management on the Computer Management page to display current disks
information. On this page, you will see the iSCSI target now displayed as Disk 1. Please
see picture below for reference:
3. Right click on Disk 1 and click Online to activate the disk.
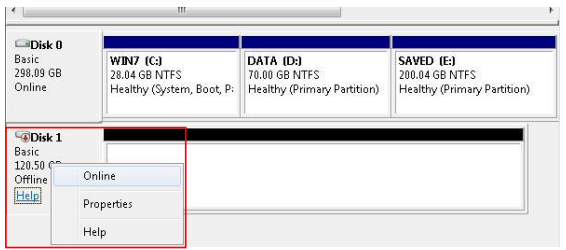
4. Right click on Disk 1 again and the New Simple Volume Wizard window will popup as
shown below:
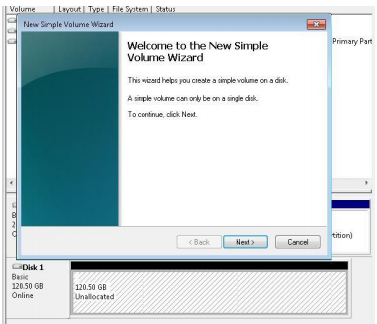
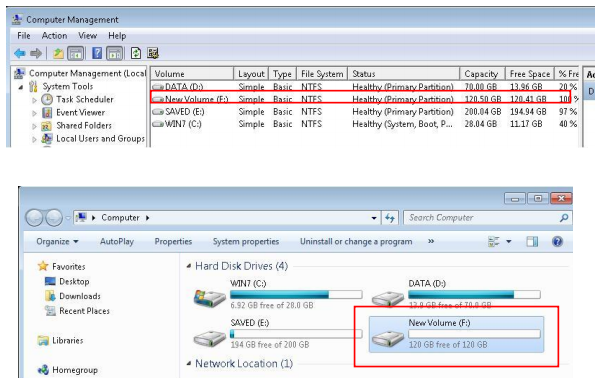
5. Follow the steps to complete formatting the disk. When completed, the disk will be
displayed as a local hard disk drive which can then be utilized as extra storage space.
Please see picture below for reference.
More reading about iscsi setup on Windows server :
https://www.synology.com/en-uk/knowledgebase/DSM/tutorial/Virtualization/How_to_use_iSCSI_Targets_on_a_Windows_Server
https://www.synology.com/en-global/knowledgebase/DSM/tutorial/Virtualization/How_to_Use_iSCSI_Targets_on_Windows_Computers_with_Multipath_I_O
| Where to Buy a Product | |||
|
|
    
|

|
VISIT RETAILER ➤ |
 |
    
|

|
VISIT RETAILER ➤ |
We use affiliate links on the blog allowing NAScompares information and advice service to be free of charge to you. Anything you purchase on the day you click on our links will generate a small commission which is used to run the website. Here is a link for Amazon and B&H. You can also get me a ☕ Ko-fi or old school Paypal. Thanks! To find out more about how to support this advice service check HERE
Do You NEED 5GbE NAS? (Or Should You Skip Ahead to 10GbE)
UGREEN DXP4800 PRO NAS Review
Minisforum G7 Pro Review
CAN YOU TRUST UNIFI REVIEWS? Let's Discuss Reviewing UniFi...
WHERE IS SYNOLOGY DSM 8? and DO YOU CARE? (RAID Room)
UniFi Routers vs OpenWRT DIY Routers - Which Should You Choose?
Access content via Patreon or KO-FI
Discover more from NAS Compares
Subscribe to get the latest posts sent to your email.


DISCUSS with others your opinion about this subject.
ASK questions to NAS community
SHARE more details what you have found on this subject
IMPROVE this niche ecosystem, let us know what to change/fix on this site