

I have an 1813+ and it currently has 4 GB of ram … I would like to go to 8 or 16 if possible … have you heard of anything like that ?
Based on Synology specification you can upgrade DS1813+ up to 4GB with official Synology RAM. But CPU specs say max is 4GB per channel. So think you can unofficially go up 8GB using Crucial RAM. There is no warranty to lose at this point.
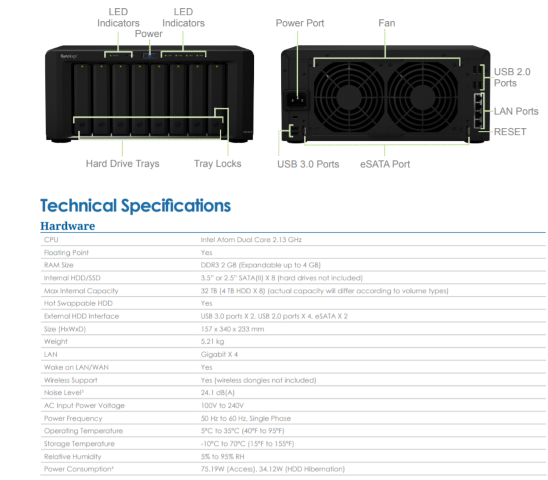
Synology built in RAM is 2GB RAM memory DDR3 SO DIMM 1333MHz.
If you find a matching RAM it should work.
Here is what I would get:
In Australia : 8GB Kit (4GBx2) DDR3 1333 MT/s (PC3-10600) CL9 SODIMM 204pin 1.35V/1.5V RAM for Mac, CT2K4G3S1339M
Crucial 8GB Kit (4GBx2) DDR3/DDR3L 1600 MT/S (PC3-12800) Unbuffered SODIMM 204-Pin
With regret, I can inform you that using the DDR3 SO DIMM 1333MHz RAM does not work.
I appreciate all of your assistance.
8GB Kit (4GBx2) DDR3 1333 MT/s (PC3-10600) CL9 SODIMM 204pin 1.35V/1.5V RAM for Mac, CT2K4G3S1339M
–Campbell
Add a RAM Module on DiskStation
The optional Synology RAM module 2GB (DDR3) is designed for DiskStation memory expansion. Follow the
steps below to install, check, or remove a RAM module on your DiskStation.
To install the RAM module:
1 Shut down your DiskStation. Disconnect all cables connected to your DiskStation to prevent any possible
damages.
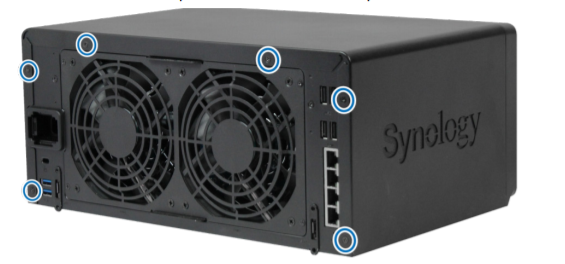
2 Remove the 6 screws that secure the top case. Lift off the case and place it to the side.
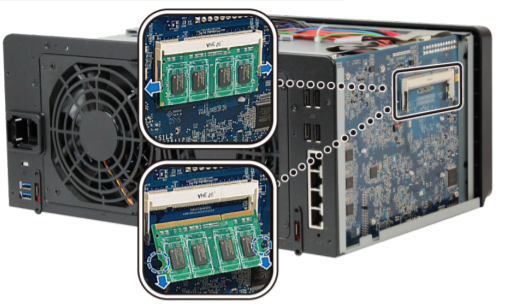
3 Insert the new memory module in the slot:
a Align the notch on the gold edge of the module with the notch in the lower memory slot.
b Tilt the card and push the memory into the slot. Make sure the module is pushed in all the way.
c Use two fingers with firm, even pressure to push down on the memory module. You should hear a click
when the memory is inserted correctly.

4 Replace the top case. Replace and tighten the 6 screws you removed in step 2.
5 Reconnect the cables you removed in step 1, and then press and hold the power button to turn on your
DiskStation.
To make sure DiskStation recognizes the new memory capacity:
1 Install DiskStation Manager (DSM). (See the next chapter for more information.)
2 Log in to DSM as admin or a user belonging to the administrators group.
3 Check Total Physical Memory in Main Menu > System Information.
If your DiskStation does not recognize the memory or does not start up successfully, confirm that the memory is
installed correctly.
To remove the RAM Module:
1 Follow step 1 and 2 of the “To install the RAM module” section to shut down your DiskStation, disconnect the
cables, and then remove the top case.
2 Push the levers on the sides of the memory module in an outward direction to release the module from the
memory card slot.
3 Hold the memory module by its notches and remove it from the slot.
4 Replace the top case. Replace and tighten the screws you removed in step 2.
5 Reconnect the cables you removed in step 1, and then press and hold the power button to turn on your
DiskStation.


UGREEN iDX6011 Pro NAS Review
Beelink ME PRO NAS Review
UGREEN iDX6011 Pro - TESTING THE AI (What Can it ACTUALLY Do?)
OWC TB5 2x 10GbE Dock, UGREEN NAS Surveillance Software, AceMagic Retro PCs, Gl.iNet Comet 5G @CES
What IS the Digiera OmniCore NAS? Is it Worth $599?
New UGREEN NAS Expansion, DXP4800 PRO NAS and eGPU Revealed
Access content via Patreon or KO-FI
Discover more from NAS Compares
Subscribe to get the latest posts sent to your email.
Hi Werner, I never got the RAM working past 4GB on my DS1813+. I read elsewhere it was possible but couldn’t do it myself. I ended up setting up my old desktop as a less power efficient NAS. Cheers, Campbell
@NAS Compares Team: Is this just a bot generated advertising for memory or can you guarantee, that such a memory expansion works without any flaws?
Hi NAS Compares Team,
Have you tested if the DS1813+ is capable of holding the 8GB of RAM while it continues to function correctly? I understand that it’s theoretically possible just wanted to see if it had been tested. I also understand that the it will lose it’s warranty (which has already expired).
Cheers,
Campbell