

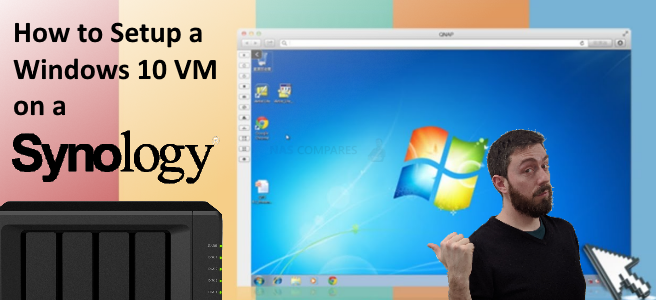
How to Setup a Virtual Machine on your Synology NAS Drive
Regardless of wherever you are in the world right now, the virtues of conducting your business operations remotely, as well as ensuring the security and dependency of your assets (physical or digital) have never been more relevant. Perhaps you are considering shifting a % of your workforce into remote access roles so they can do their jobs from home, or you are an employee or self-employed individual that is weighing up their options need a robust virtual machine solution? Into this arena, we have Synology NAS and their Synology Virtual Machine Manager software, that has developed over the last 2 years into quite an impressively featured, yet user-friendly VM platform. Supporting numerous VM image types (ranging from Windows to Linux Ubuntu, Android and even virtual Synology DSM) it is quite a powerful tool that allows you to create a virtual desktop computer experience that will reside on your NAS drive for access over the network or internet. Despite the technical nature of virtual machines, it is actually surprisingly simple to set up a Windows 10 virtual machine on a Synology NAS, with free tools online to convert your physical Windows PC into a virtual image (with VMware- VMware VCenter Converter and Hyper-V/Microsoft Disk2vhd), as well as the option to download a free trial copy of Windows 10 from the Windows store (if you click that link with a Windows PC, it won’t show the ISO file, so visit it with an Android/iOS/OSX based device to see the link properly), which you can then validate with your own product key, or start with a new one, there are lots of options to set up your Synology NAS based Windows 10 virtual machine. So, let’s go through how to do it.
What you need to Setup a Windows Virtual Machine on your Synology NAS Drive
Setting up a virtual machine is easy, but does require some specific hardware and software available from the beginning. So, go through this checklist to ensure you have the following to hand/ready:
- A virtual image (ISO, VHD, OVA, etc) of Windows that is downloaded from the Windows Image Store, or a virtual image of your own PC that you created with VMware VCenter Converter and Hyper-V/Microsoft Disk2vhd tools as discussed. Be sure to be using a 64bit version of the VM guest
- Sufficient storage space on the Volume you are storing this VM onto within the NAS to save the VM
- An internet connection – not strictly necessary, but you may well need updates to the tools that are used in this Synology VM installation guide, as well as the Synology Guest VMM tool that you will be offered to install during the windows VM installation on your NAS
- A laptop or tablet that is on the same network as your Synology NAS that can be used to input/setup the NAS for the first time. After this, you can arrange for the VM to be internet accessible, but the first time should ideally be conducted locally (not strictly necessary, but really, REALLY makes it easier)
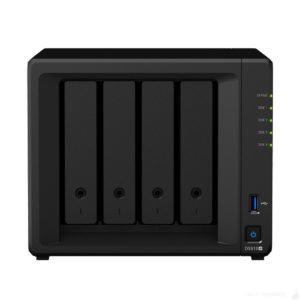
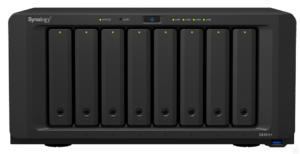
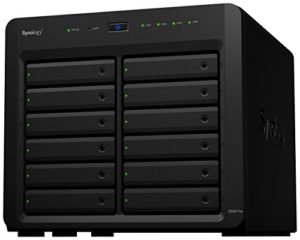
- A Synology NAS that has at least a 4-Core Intel x86 64bit Processor (Intel Celeron, Pentium, Core, Xeon, etc) and 4GB of Memory (ideally 8GB, as you need spare memory to run the Synology in the background). Below are the best options ranging from between £500-2000+.
A virtual machine (VM) is much like a regular physical PC, however, it is a virtual equivalent that, in the case of NAS, lives on your network storage device and can be accessed by one of more users over the local network or via the internet. A virtual machine allows you to create a duplicate of (or replacement for) your physical PC and converts it into a digital format. This version can then be used for software testing, duplication for multiple staff users or as a virtual copy of your existing setup for use when working from home, in coffee shops, the commute or more. Below are three solutions that scale depending on budget and power.
 |
 |
 |
|
| Synology DS918+
££££
|
Synology DS1819+
££££
|
Synology RS1619XS+
££££
|
Synology DS3617xs
££££
|


Install and configure the Virtual Machine Manager package
This guide to install a windows VM on your Synology NAS is based on the idea that you have your Synology NAS already setup, updated to the latest firmware, have your storage pool and volume arranged and have access to the internet or the Synology Virtual Machine Manager already installed. Additionally, the Windows 10 Virtual Machine image you are going to use is already stored on the NAS storage or is on a USB drive connected to the NAS device.
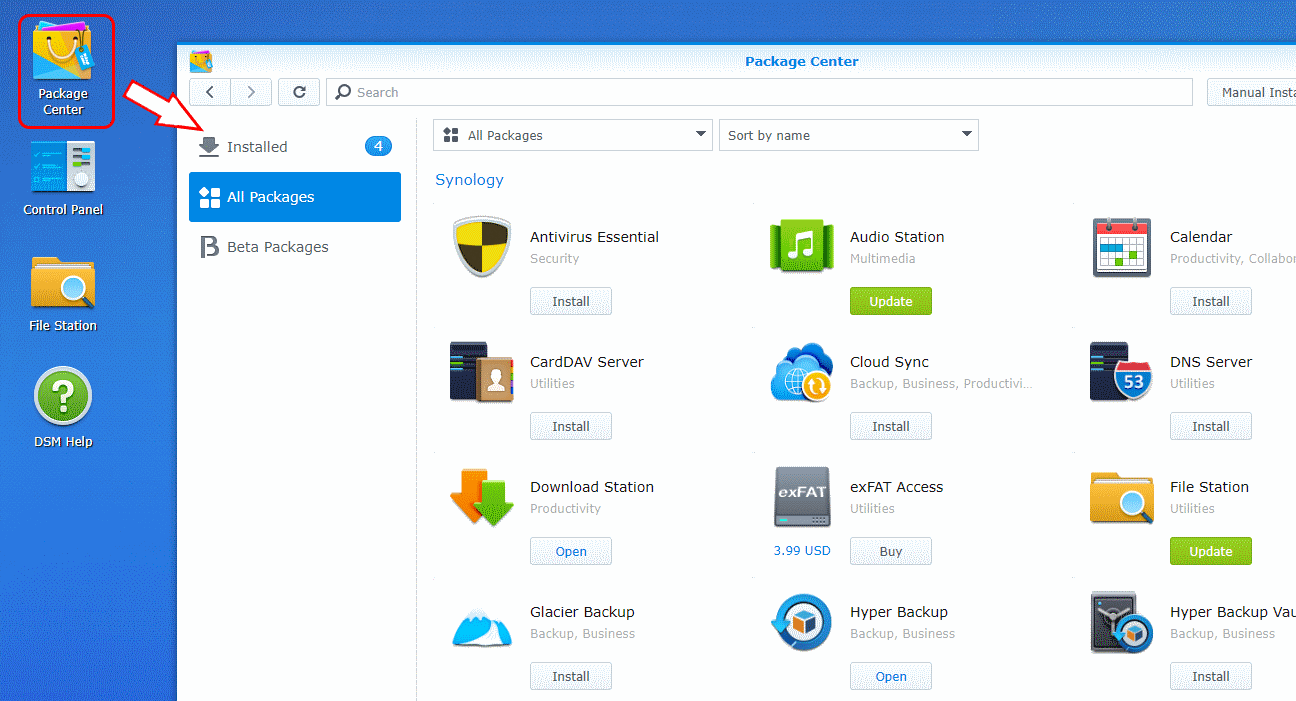
- The Synology Virtual Machine Manager package is one of the many applications available in the Synology NAS application centre (aka Package Center)
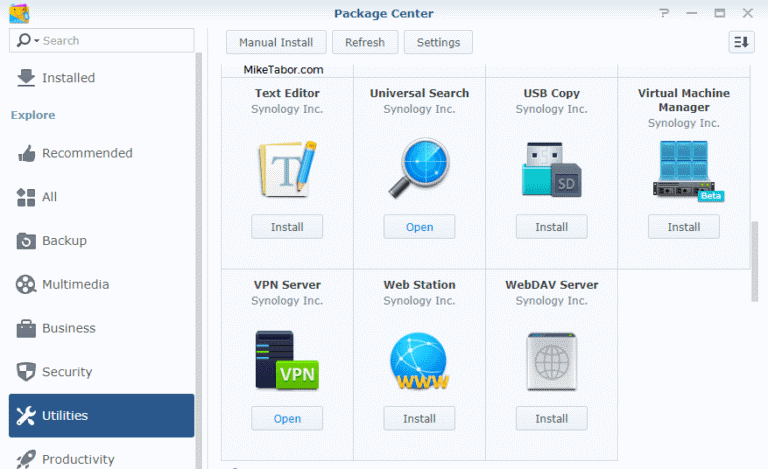
- Now go to Utilities, find Virtual Machine Manager and click on “Install“.
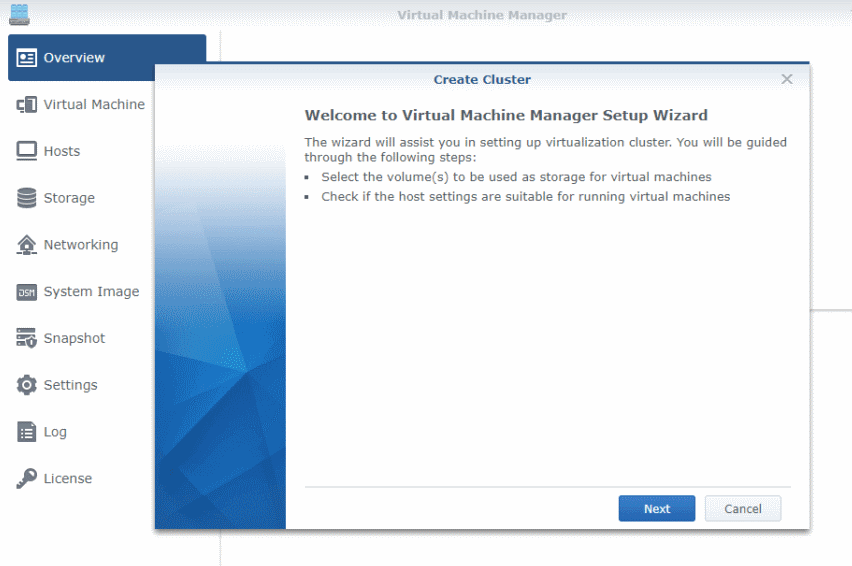
- Open the Virtual Machine Manager package and you’ll be prompted to begin the Virtual Machine Manager setup wizard. Click on “Next“.
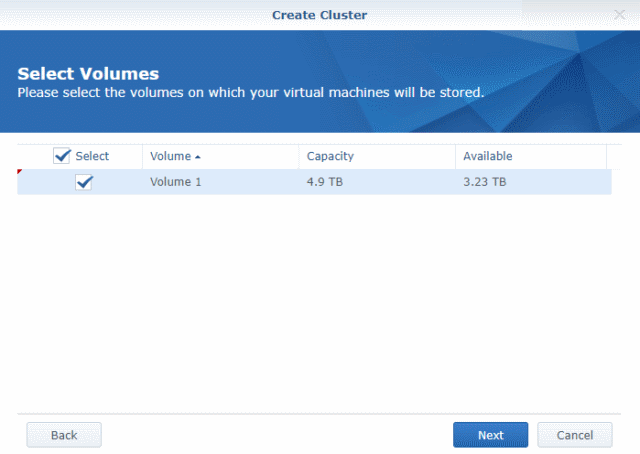
- Select which volume you would like for your virtual machines to be stored and click “Next“.
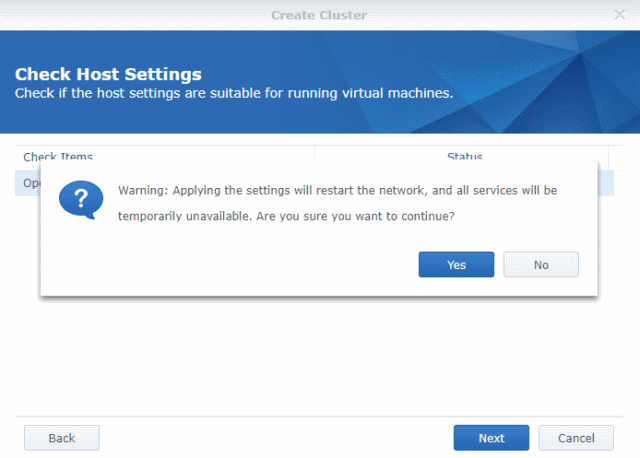
- Select which network interface you want to use then click on “Next” and click on “Yes” to the confirmation prompt.
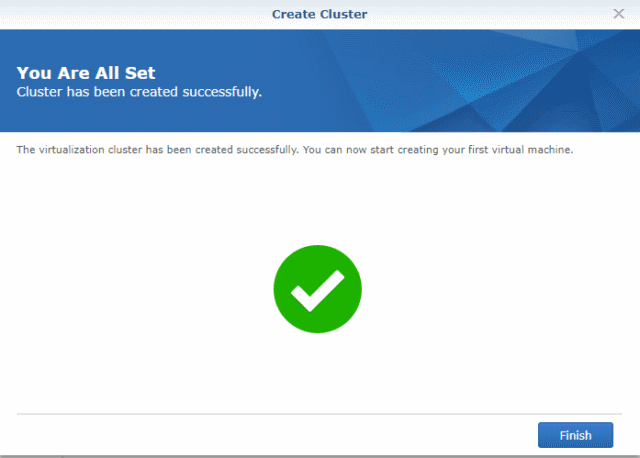
- After the services have been restarted from the step above you should get a “You are all set” message like below, click on “Finish”
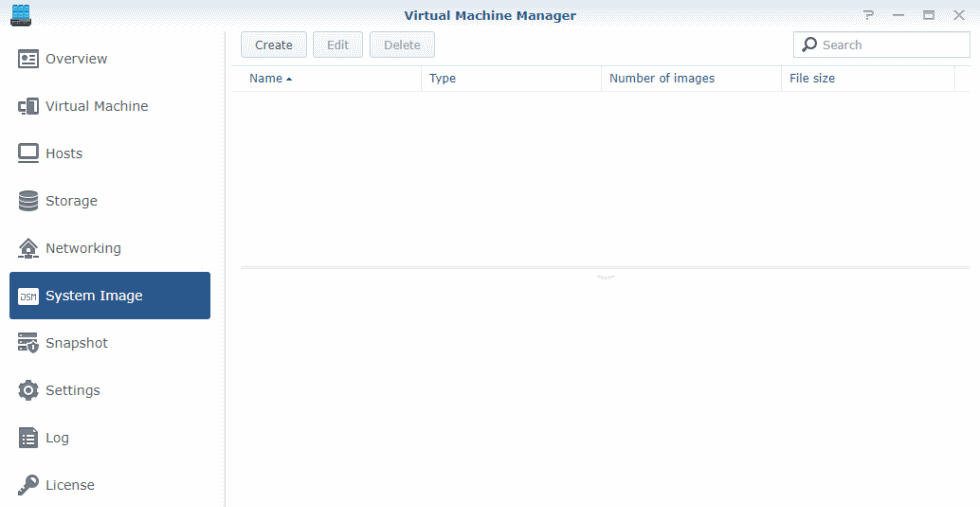
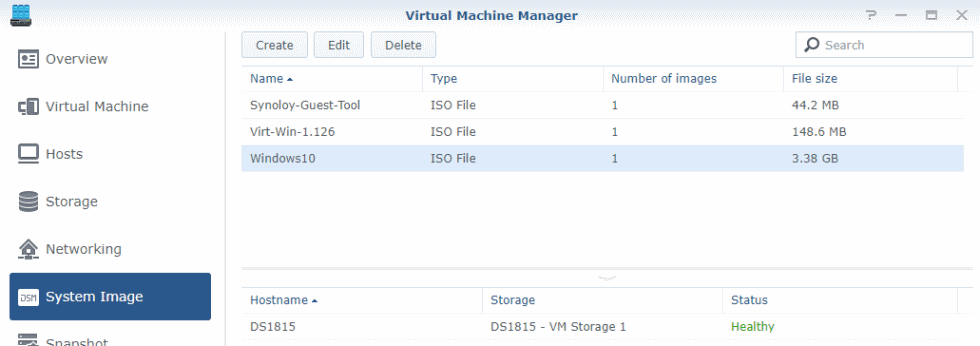
- We now need to upload the ISO’s, from the getting started section above, to the Synology Virtual Machine Manager. So click on System Image and then click on “Create“.
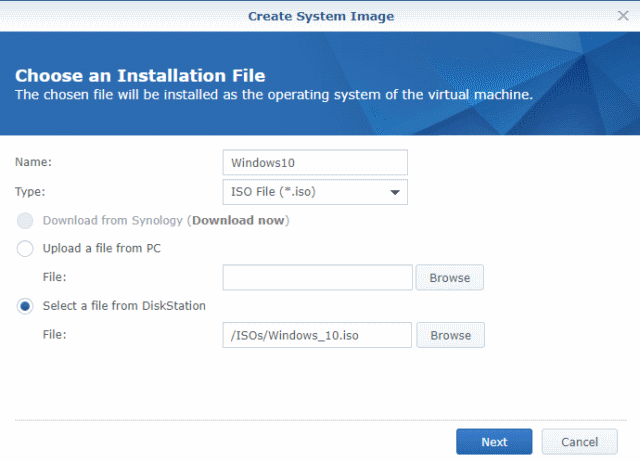
- Enter a name for the image, change the type to ISO File and select the ISO from where it’s located (either your local PC or the Synology NAS) and click on “Next“:
- Next select where the system image should be stored and click on “Apply”.

- You’ll need to repeat steps 7-9 for each of the three ISO’s – operating System, Synology Tools, and Virt-Win drivers. Your system images tab should look something similar to below:
At this point, the Synology Virtual Machine Manager package should be installed and ready to start creating virtual machines.
Creating a virtual machine on a Synology NAS
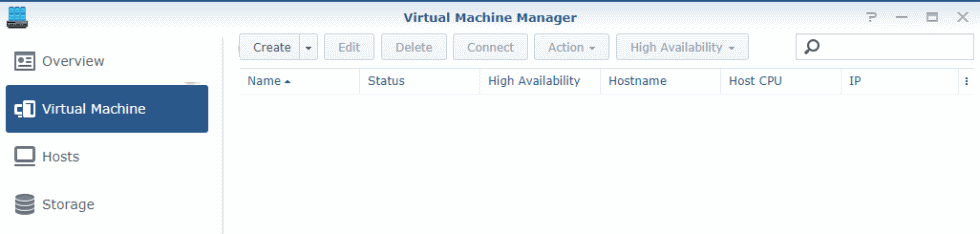
- In Virtual Machine Manager click on “Virtual Machine” then click on “Create“.
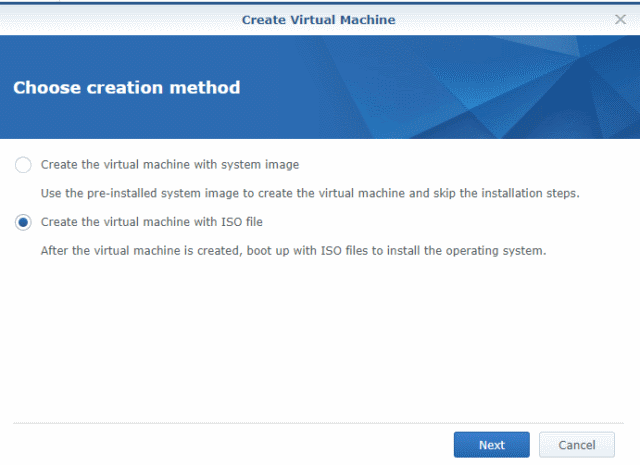
- Next, select “Create the virtual machine with ISO file” and click on “Next“.
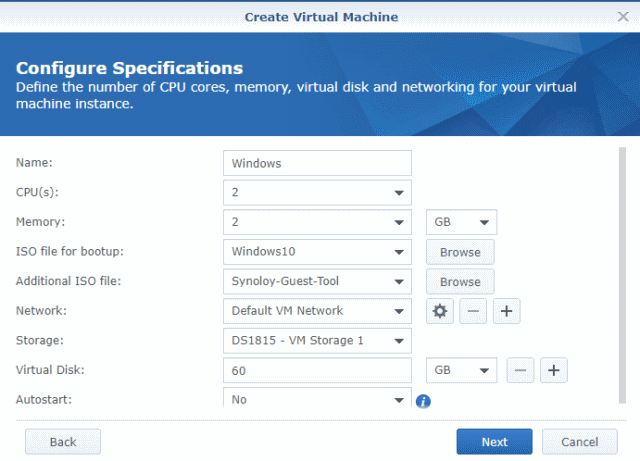
- Now configure the name and specs of your new virtual machine. Make sure you select the Windows 10 image for the ISO file for bootup and the Synology Guest Tools for the additional ISO file as shown below:
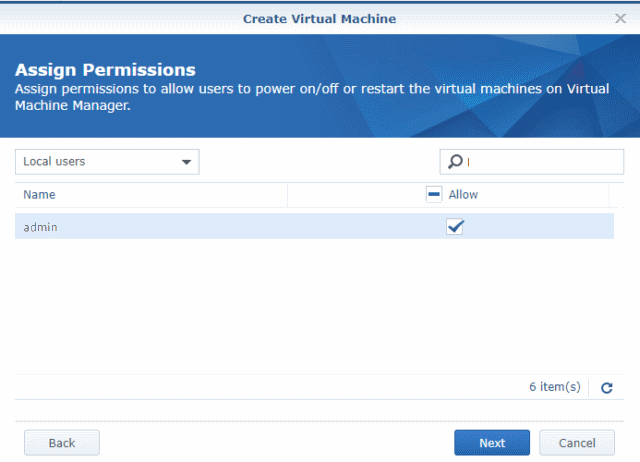
- Assign what users you want to have access to the virtual machine and click on “Next“.
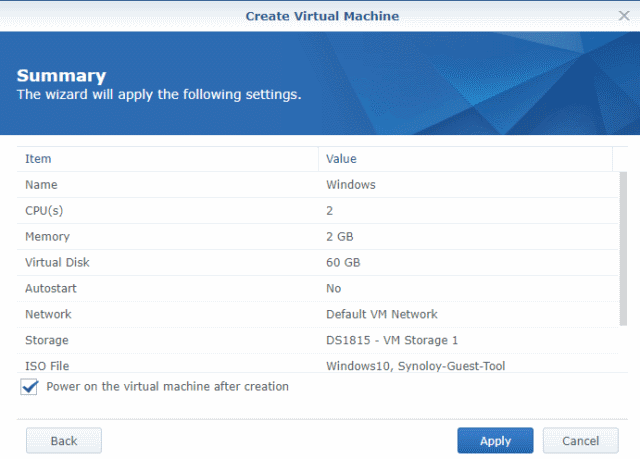
- On the summary screen go ahead and select “Power on the virtual machine after creation” and click on “Apply“.
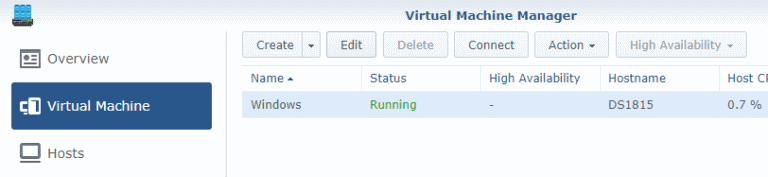
- After a few seconds your newly created virtual machine should have the status of “Running”, if so then click on “Connect“.

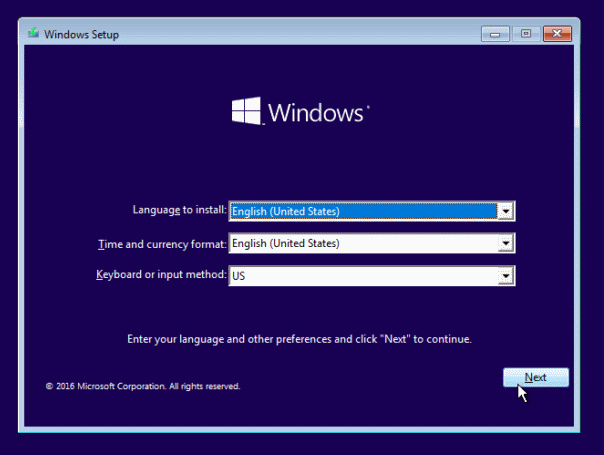
- After clicking on connect your browser should open a new tab with a console to your new virtual machine with the Windows 10 installer running. Go ahead and click on “Next”.
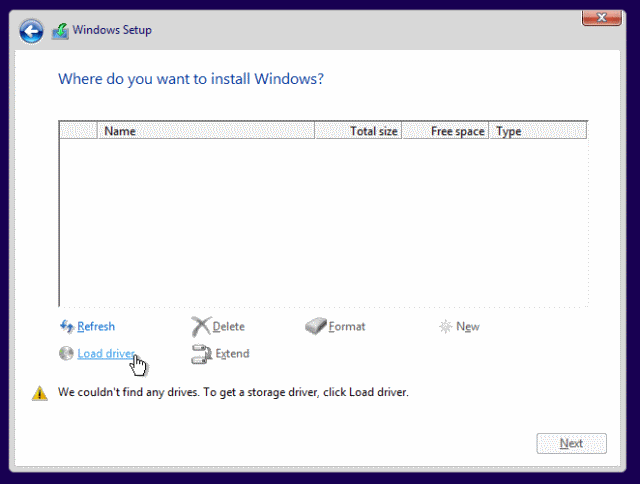
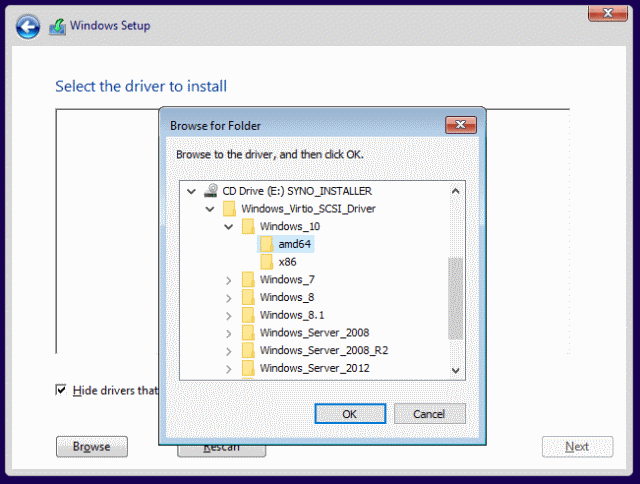
- When selecting which type of installation you want, select “Custom: Install Windows only“. The installer will then ask you where to install Windows. Notice the blank window? We need to load the Synology drivers so that Windows can see the drive. So click on “Load Drivers”.
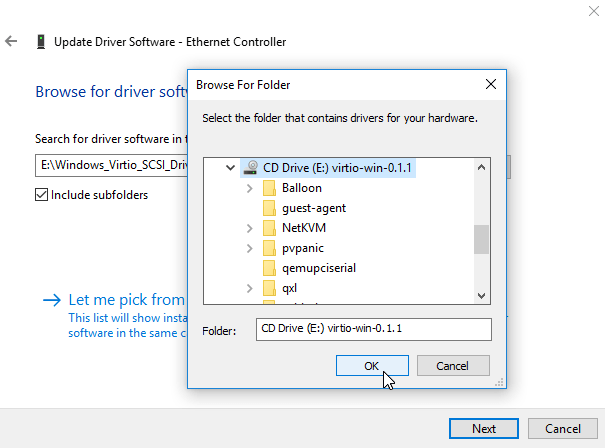
- From the browse dialogue box select the “SYNO_INSTALLER” drive (in my case the E: drive) and select amd64 folder under Windows_Virtio_SCSI_Driver > Windows_10 folder.
- At this point the Windows 10 installer will see the provisioned drive and is ready for install.
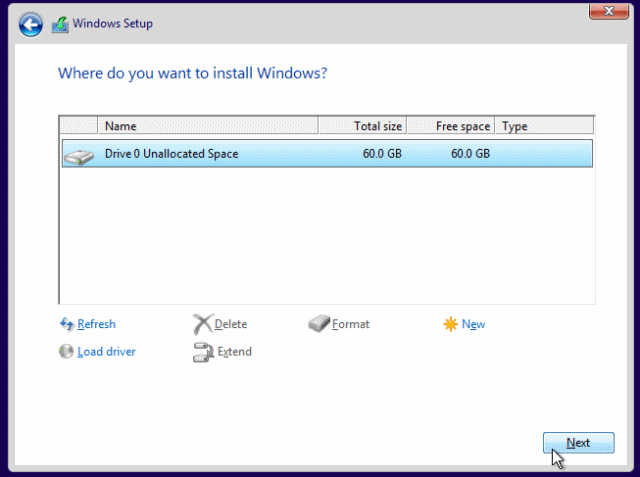
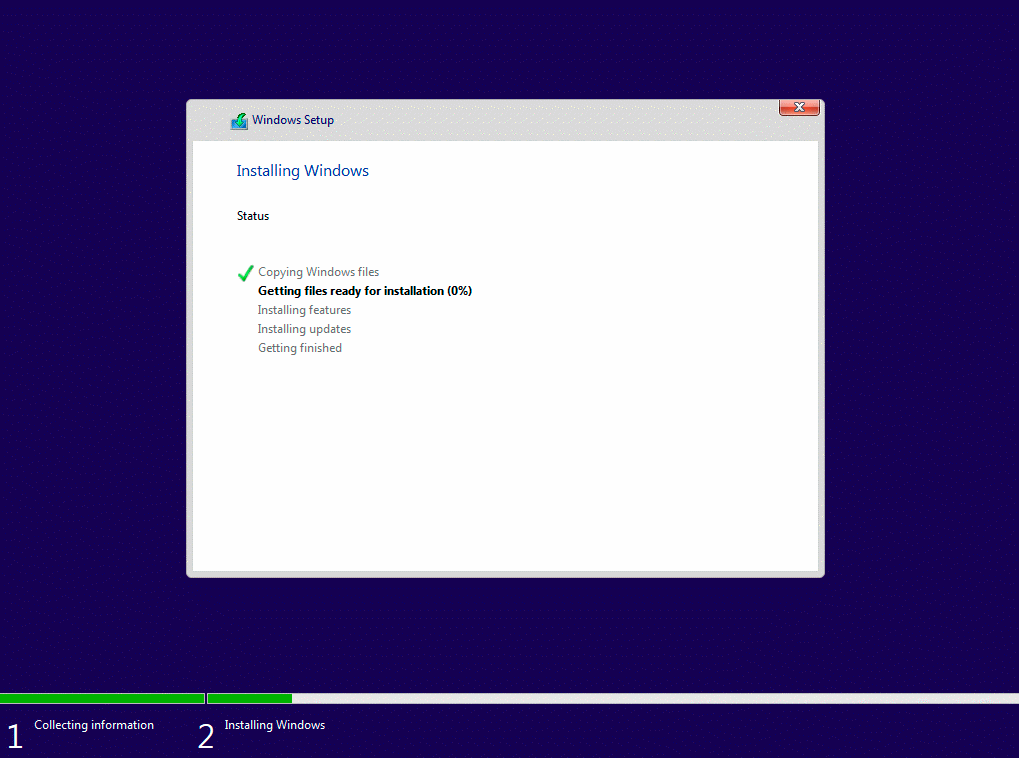
- Now complete the Windows 10 install as normal.
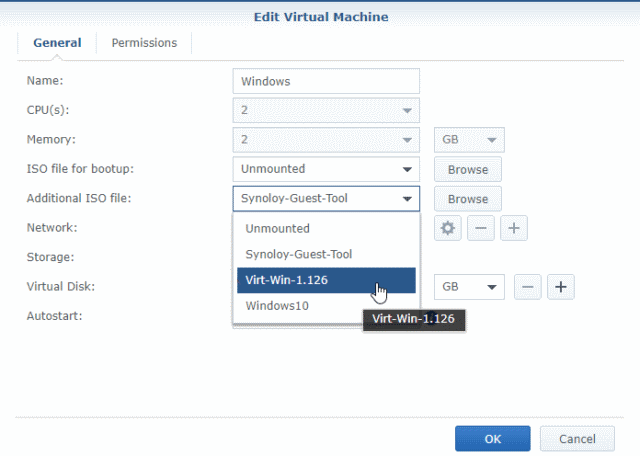
- After the install is complete you’ll notice the network interface card driver along with a couple of other drivers is missing. To install those drivers we’ll need to attach the Windows Virtio Drivers ISO, so back on the Synology Virtual Machine Manager click on “Edit“.
- Now change the ISO file for bootup to “unmounted” and change the Additional ISO file to the “Virt-Win” ISO that we uploaded in steps 7-9 above and click on “OK“.
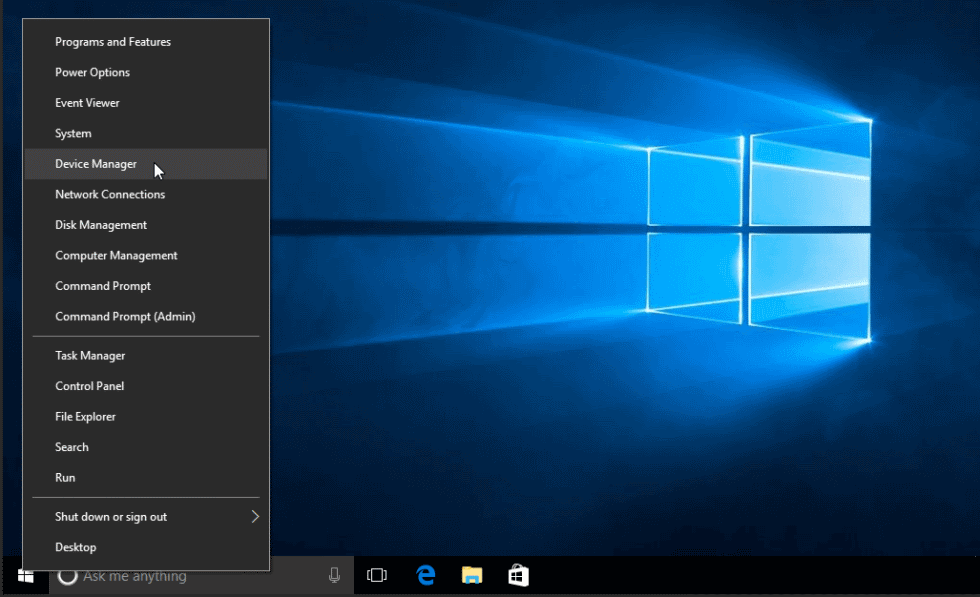
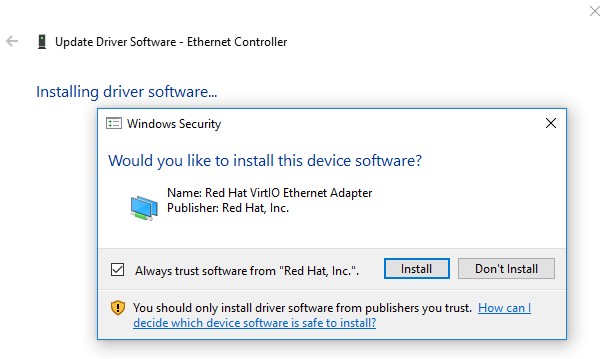
- Go back to the Windows 10 virtual machine browser tab and then right click on the Start menu and click on “Device Manager“.
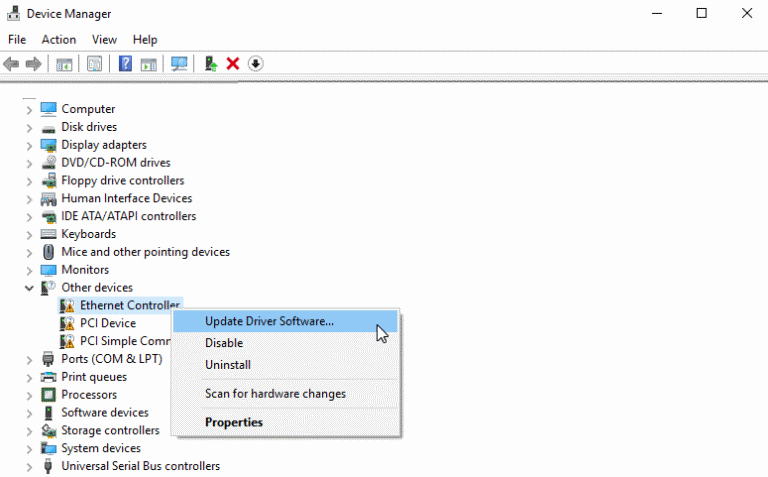
- Now right click on Ethernet Controller and click on “Update Driver Software…”.
- Select “Browse my computer for driver software”.
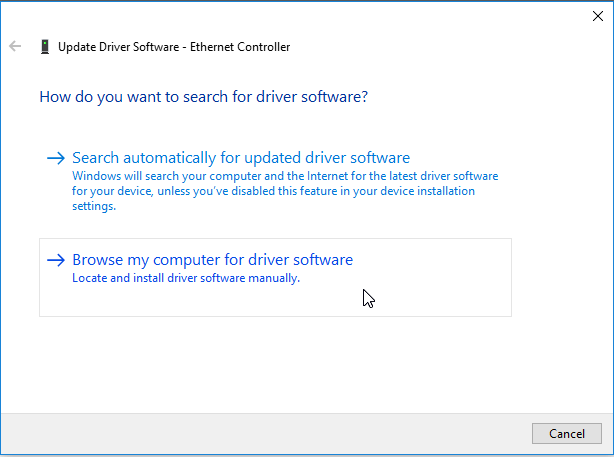
- Browse to the virito-win drive, in my case the E drive.
- After a few seconds Windows will locate the driver and prompt you to install the driver. Click on “Install”.
- Repeat this process for the remaining two devices listed under “Other devices”. Your Windows 10 virtual machine is now ready for use!
That’s it, now you can access the virtual machine using Windows Remote Desktop Tool, Installing Teamviewer or any other remote access tool you’d like to try (or have pre-installed on yoru system). Or you can simply use the VM through the browser tab if you’d like instead, but the refresh rate and response time will not be as fast, due to the fractionally higher latency.
A Quick Question to You – Yes, you reading this!
If you plan on buying your NAS Drive the links below will take you to some Synology NAS Options

🔒 Join Inner Circle
Get an alert every time something gets added to this specific article!
This description contains links to Amazon. These links will take you to some of the products mentioned in today's content. As an Amazon Associate, I earn from qualifying purchases. Visit the NASCompares Deal Finder to find the best place to buy this device in your region, based on Service, Support and Reputation - Just Search for your NAS Drive in the Box Below
Need Advice on Data Storage from an Expert?
Finally, for free advice about your setup, just leave a message in the comments below here at NASCompares.com and we will get back to you. Need Help?
Where possible (and where appropriate) please provide as much information about your requirements, as then I can arrange the best answer and solution to your needs. Do not worry about your e-mail address being required, it will NOT be used in a mailing list and will NOT be used in any way other than to respond to your enquiry.
Need Help?
Where possible (and where appropriate) please provide as much information about your requirements, as then I can arrange the best answer and solution to your needs. Do not worry about your e-mail address being required, it will NOT be used in a mailing list and will NOT be used in any way other than to respond to your enquiry.


|
 |


Gl.iNet Flint 4 10G+2.5G Router Revealed @CES 2026
EVERYTHING NEW from Minisforum @ CES 2026
Gl.iNet Slate 7 PRO Travel Router (and Beryl 7) REVEALED
Minisforum N5 MAX NAS - 16C/32T, 128GB 8000MT RAM, 5xSATA, 5x M.2, 2x10GbE and MORE
The BEST NAS of 2026.... ALREADY??? (UnifyDrive UP6)
How Much RAM Do You Need in Your NAS?
Access content via Patreon or KO-FI
Discover more from NAS Compares
Subscribe to get the latest posts sent to your email.
Hello !!! thank you for the video. Do you have a video that shows how to access the Windows 10 VM remotely over the Internet? WAN Access?
REPLY ON YOUTUBE
btrfs not available it says.
REPLY ON YOUTUBE
The very fist thing – Virtual manager -> how to get that!!! ???
REPLY ON YOUTUBE
Would love to see a Windows 11 video. I can’t seem to make it work. Keep getting the minimum requirements not met on my DS1821+. ????
REPLY ON YOUTUBE
Hi, am I being daft? I can see the link for the Windows installation iso image but where do we get the other two iso images from?
Thanks