

How to Upgrade the RAM in your Synology DS220+ to 18GB Memory
Back in May 2020, when the Synology DS220+ was first revealed, many users were surprised at the maximum memory limit that the manufacturers stated ion the specifications – 6GB of DDR4 to be precise (as well as only 1 memory stick being accessible and the other 4GB secured from access via pre-populated with soldered memory). With the Intel J4025 chip that the Synology DS220+ arrives with, it did seem odd that the maximum or 6GB of DDR4 memory (also for the DS720+ and DS420+) for this chip was listed firmly in the specification.
On the face of it, 4GB by default, as well as 6GB MAX seems like plenty. That will comfortably support the NAS tasks of a plex media server, all those productive first-party NAS applications and backups. However, as file sizes grow, as NAS surveillance gets popular, as virtual machine and container station applications grow in popularity, it will not be too long before you will see that memory use ALWAYS above 60% in the task manager. Sadly, we have asked the manufacturers and they continue to stand by the fact that you cannot exceed this limit, officially. It was also a hot button topic in both the comments in our DS220+ reveal video and the NASCompares DS220+ Review HERE. I am pleased to tell you that I am pleased to confirm that not only can you use non-official own-brand memory in the Synology DS220+, but also that you can install a single module of 16GB DDR4 Memory (in the single available slot) meaning you can have a Synology DS220+ with 18GB of Memory! Read below for my guide, it will detail how to install the RAM, how to check that it is installed correctly and how to test that it is working straight away.
Upgrading your Synology DS220+ to 18GB of Memory – Pay Attention
Before we continue with the guide, it is worth highlighting that the Synology DS220+ manufacturer strongly recommends that you do not exceed the stated memory limit on their specifications page. They also highlight that using non-official memory in your Synology DS220+ may well result in them being unable to provide technical support, as this would be an unsupported setup. We at NASCompares cannot be held accountable for how you use this guide. However below I will show you where to buy the individual memory and Synology DS220+ NAS device you will need. ONLY attempt this upgrade if you are comfortable with the terms laid out above by the manufacturer.
Where to Buy the Synology DS220+ with 18GB Memory
It’s important to know that although there are many different kinds of Synology NAS, this guide is for the DS220+ NAS. Although many of the Diskstation range are similar, there are many differences in Memory module frequency, size and capacity support between the hardware architecture of devices, so make sure you are only following this guide if you want to upgrade the memory unofficially on a Synology DS220+ NAS drive. The details of this NAS are:
| NAS Model |
Synology DS220+ NASCPU: Intel Celeron J4025 Quad-Core 2.0 GHz (up to 2.9 GHz) MEMORY SLOT(S): Default = 1 Available Slot Default Max 6GB = 1x 4GB Synology DDR4 RAM + Soldered 2GB Memory Please note, exceeding 6GB is not officially supported and might invalidate your warranty Suitable for Surveillance: YES Suitable for Virtua Machines: YES 4K Transcoding Support: YES Warranty: 2 Years |
Where to Buy Synology DS220+ 2/6GB Model NAS
|
18GB Synology DS220+ Memory Upgrade – Step 1, Physical Installation
What you will need:
- A Synology DS220+ NAS – Obviously
DS220+ NAS
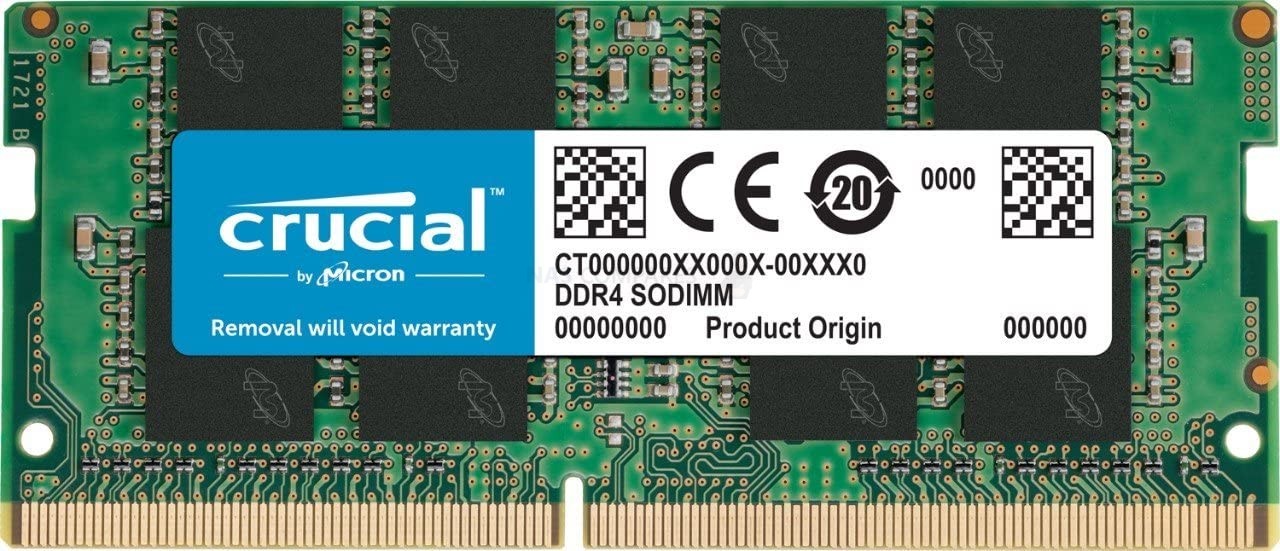
- 1x Crucial 16GB DDR4 SODIMM 2666Mhz (18GB Total) Memory Upgrade – Link below
VERY IMPORTANT – The Links used in the article below towards the correct unofficial memory are occasionally changed (beyond my control) as it will direct you to the site in your own region/country. MAKE SURE to check that the memory module (especially 16 and 32GB SODIMM modules) are DUAL RANK or ‘DR‘, as Synology NAS typically have trouble with SR/SINGLE RANK modules.
| NAS Model | Memory Type | Official Memory | Unofficial Memory | |
| DS220+ | DDR4-2666 non-ECC unbuffered SO-DIMM 260pin 1.2V | D4NESO-2666-4G
|
Crucial 4GB – Buy Here
TimeTec 4GB – Buy Here Kingston 4GB- Buy Here Crucial 8GB – Buy Here TimeTec 8GB – Buy Here Kingston 8GB- Buy Here Crucial 16GB – Buy Here TimeTec 16GB – Buy Here Kingston 16GB- Buy Here Crucial 32GB* – Buy Here * = UNTESTED, TBC |
- Small Phillips Head Screwdriver – (kinda optional but recommended for chassis)

- (OPTIONAL) Anti-static gloves and Envelope – useful to eliminate static charges and also to store the removed older official memory sticks):
 |
 |
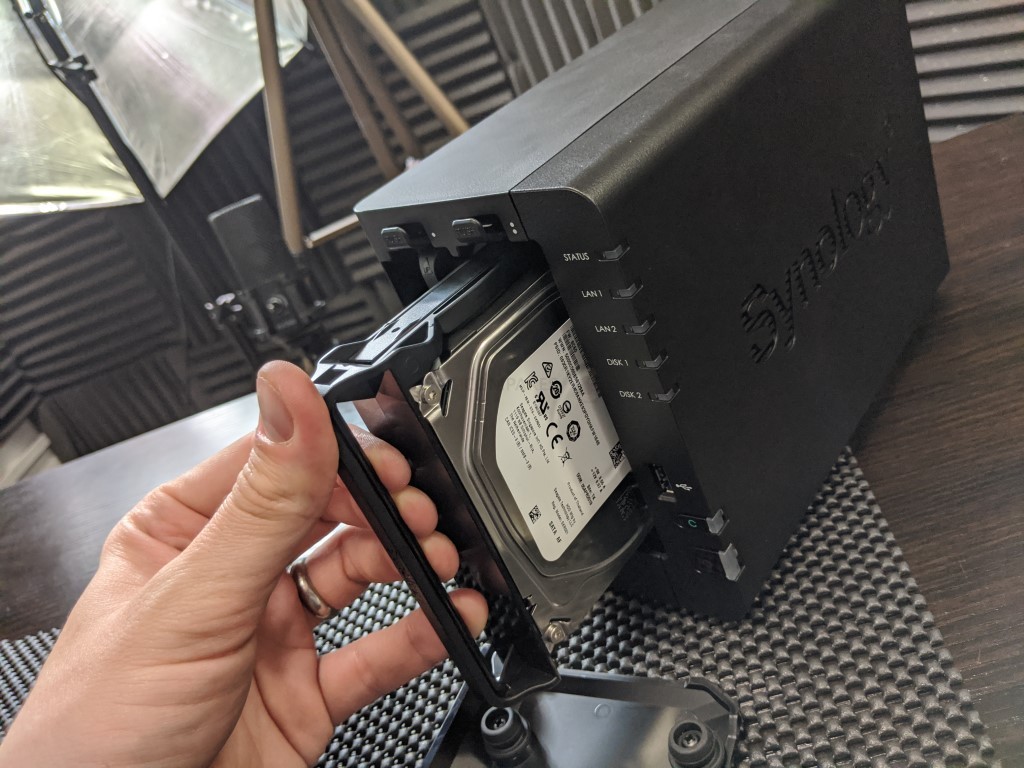
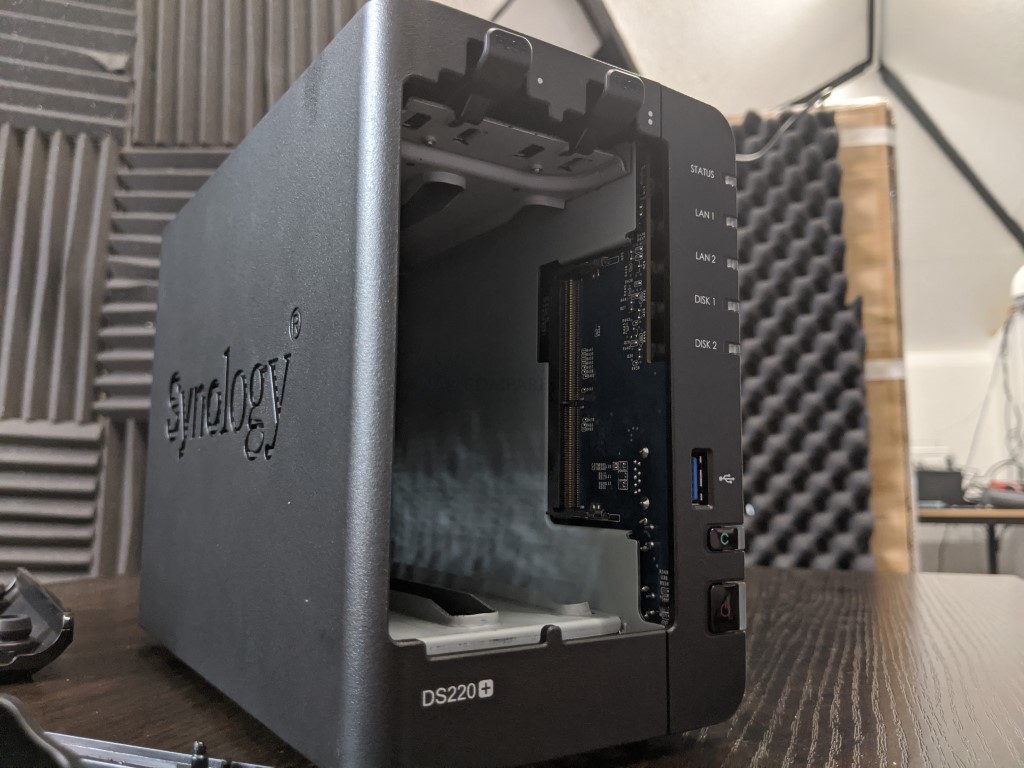
First, we need to ensure the Synology DS220+ is completely powered down/off and the mains power has been disconnected. It is recommended that you remove the Hard Drive or SSD that you have installed before accessing the RAM as it may block the slots. Additionally, you should remove the hard drive media as the unit will be moved around a lot during the memory installation and this could damage the drives. Be sure to keep a note of the drives that you remove and the order they were installed (HDD Bay 1, HDD Bay 2, etc) as installing the drives in the wrong slots could damage any existing RAID you have setup internally.
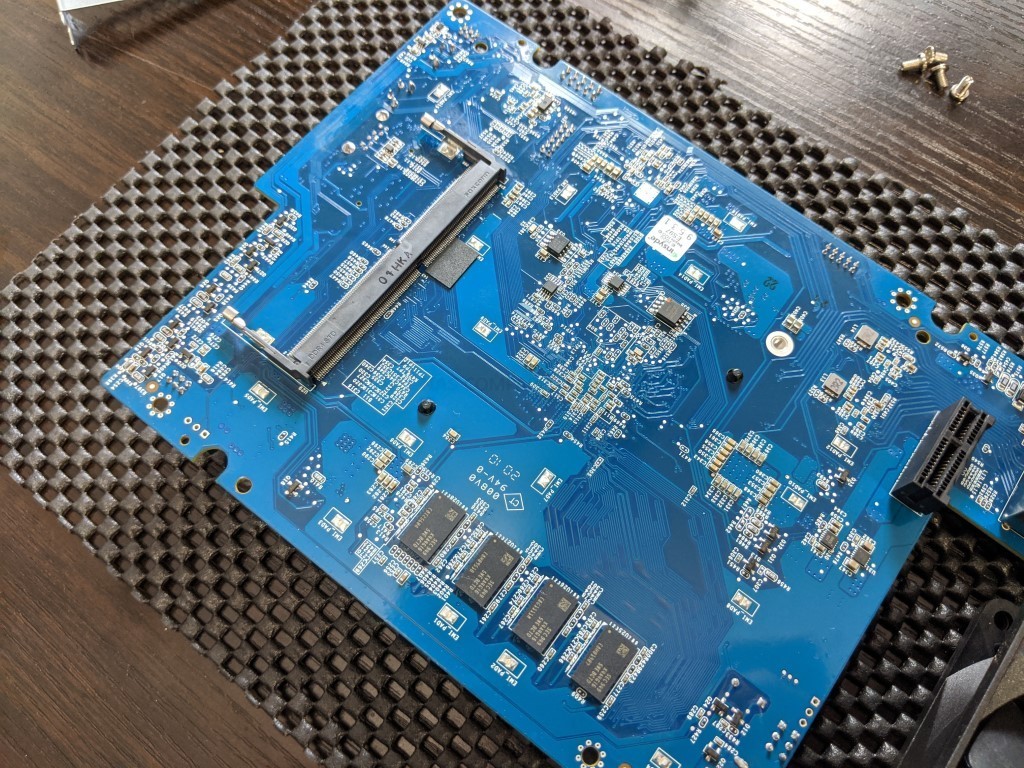
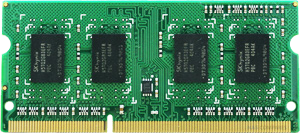
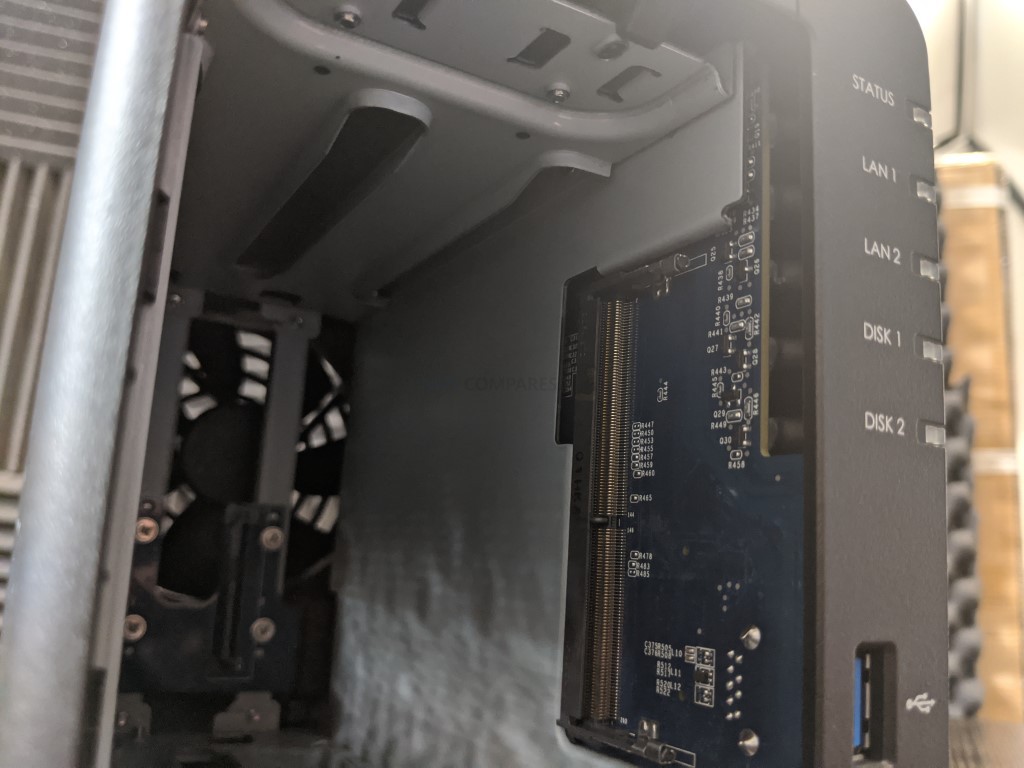
Next, we need to access and remove the existing memory, as the news 18GB of memory for our Synology DS220+ will occupy both slots.
Be sure you eject the official memory sticks using the clips either side of the slot, as well as only holding the memory sticks by the narrow side edges, never touching the chips or board of the money or NAS.
Once you have removed them, they can either be stored away for a later project, installed in a compatible laptop or sold on eBay etc to make a little cash back!
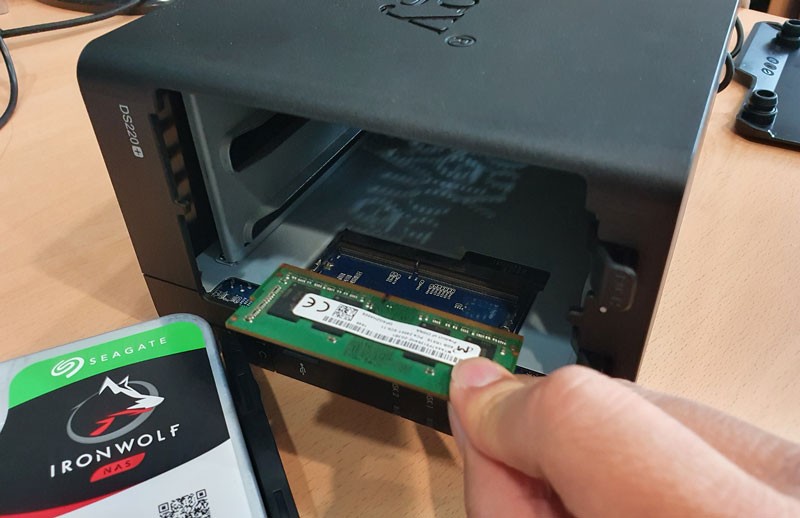
Once they are clear, install a 16GB Crucial Memory stick in the available slot, making sure that you click them both in with the clips either side.
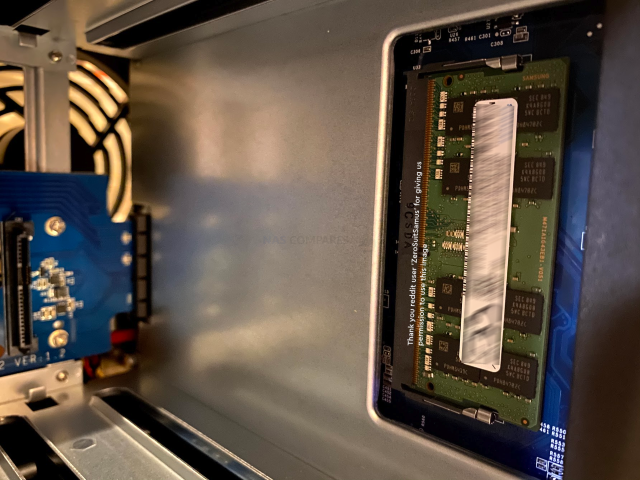
Once down, replace the Synology DS220+ chassis lid if you removed it for ease of access, as well as the hard drives. You have now concluded the physical installation of 18GB of crucial memory in the Synology DS220+.
18GB Synology DS220+ Memory Upgrade – Step 2, Checking the 18GB Memory is Recognized
What you will need:
- A web browser (Chrome, Safari, Firefox, etc) on a Windows, Mac or Android Machine) accessing the Synology DS220+ user-interface as you normally would.
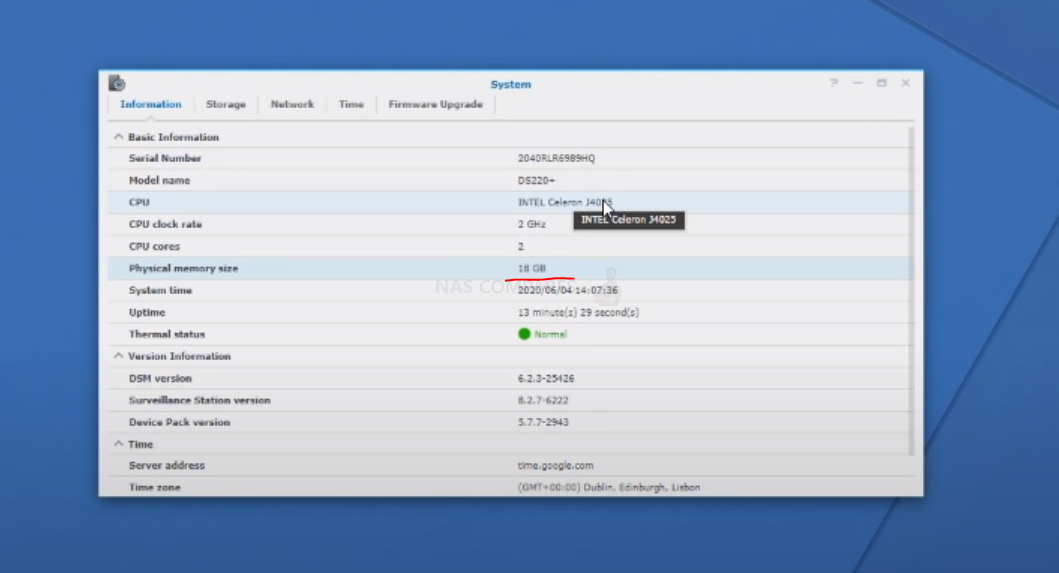
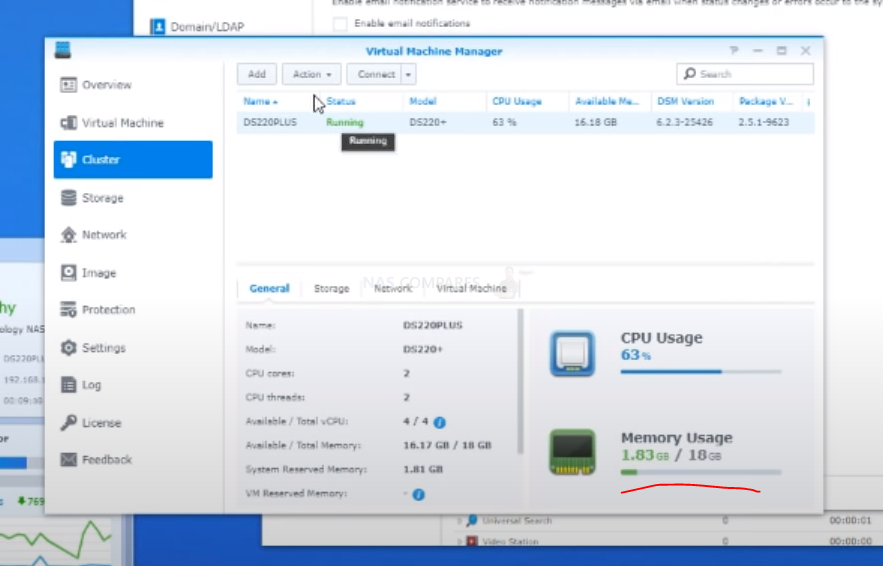
Next you need to power up your Synology DS220+ NAS and access it as you normally would. If you are buying this NAS first time and have yet to set it up, there are numerous first time set up guides and tips on the YouTube channel here – that will get you from the hardware installation to set up the Synology DS220+ NAS for use. Once the NAS user interface (UI) is ready to go, head over to the hardware specification page shown here:
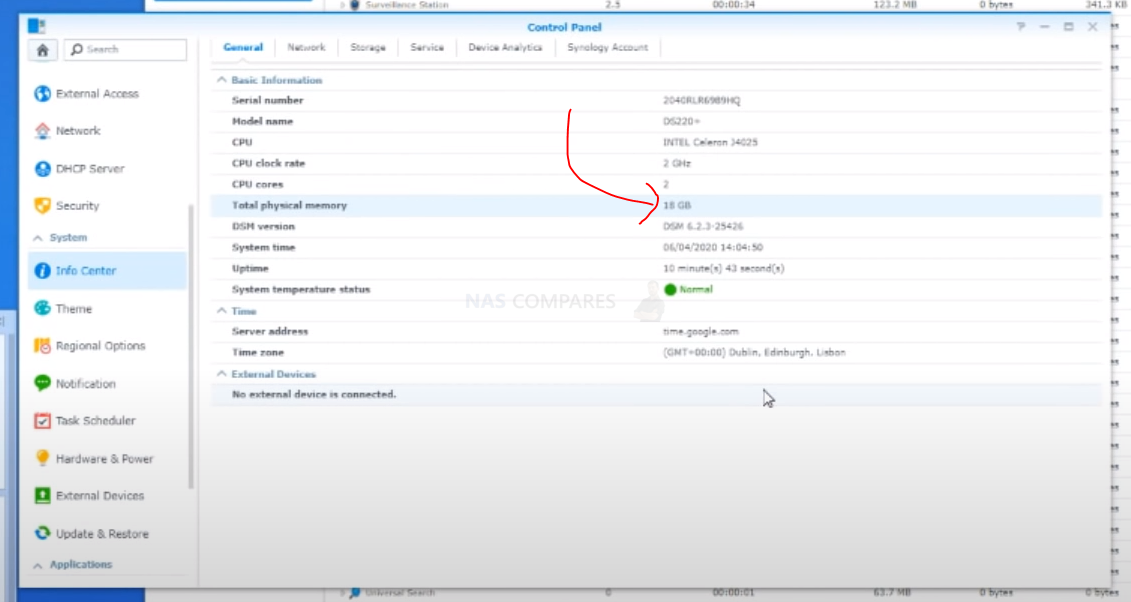
As you can see from this CPU and Memory display, the Synology DS220+ has recognized and made available the 18GB of crucial memory. It will be immediately available for use and you will see that the % amount of use of the RAM in the resource monitor will be much, much lower, as there is significantly more memory available for the system!
18GB Synology DS220+ Memory Upgrade – Step 3, Checking the 18GB Memory is Working
There are several ways to check the memory is working on your Synology DS220+ correctly. One easy method that can be done very quickly is using the Synology Memory Test tool.
To run a memory test:
-
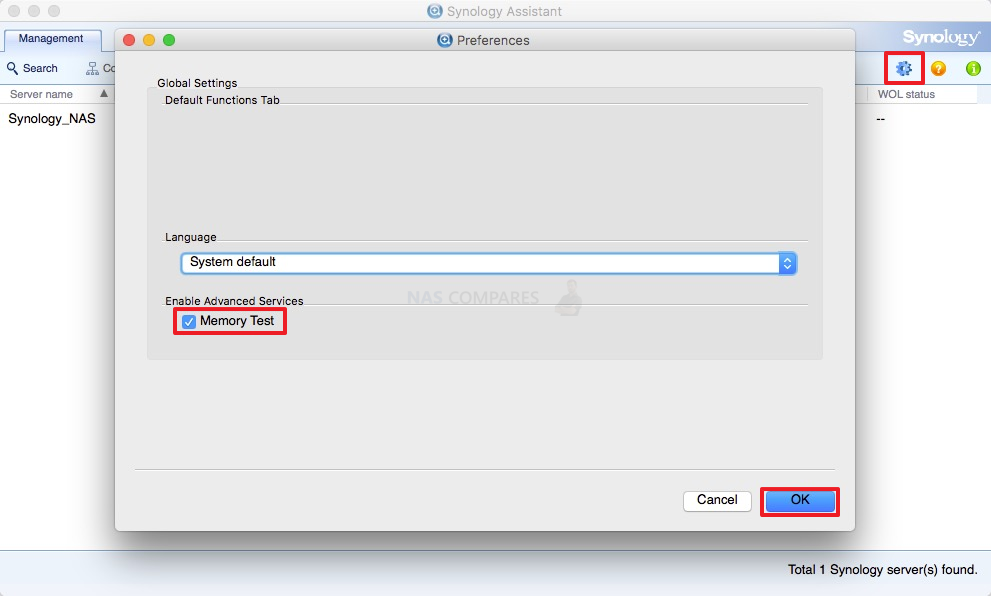
- Download and install the Synology Assistant, where you can find the memory test function. The application is available at Download Center.
- Open Synology Assistant, click and enable the memory test service.

-
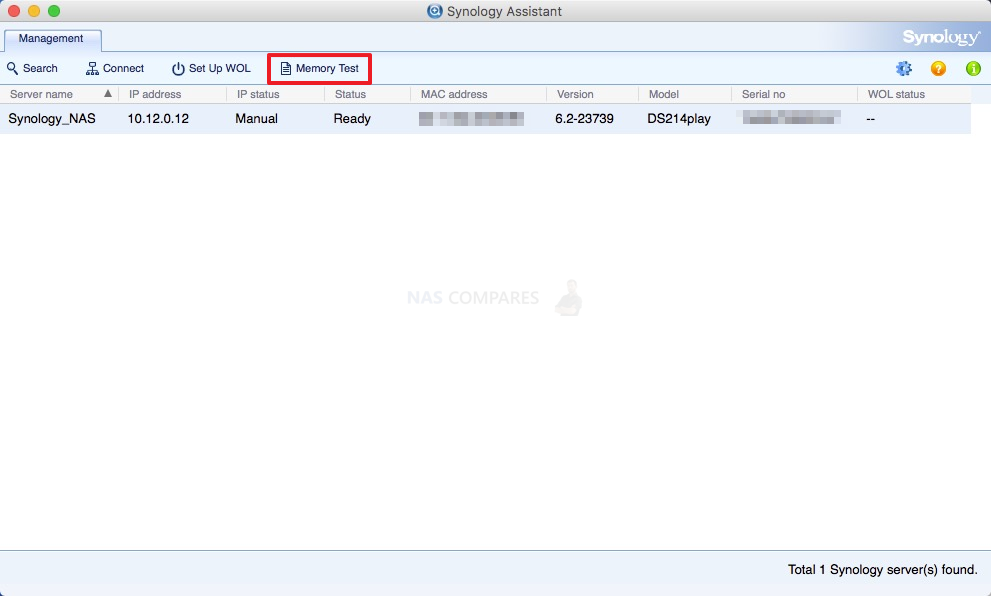
- Select the device where you wish to run the test and click Memory Test.
During the memory test, your Synology NAS will be rebooted. It will recover after another reboot if its memory is normal and passes the test. However, if the memory test fails to finish or shows that there is an error, the memory may be faulty. In this case, you are strongly recommended to return your Synology NAS for repair. Just in case you have installed a non-Synology memory module, please remove it and rerun the memory test. Though once again you should remember that Synology do not recommend using memory modules that are not from Synology themselves, so this test may not be indicative of the health of unofficial memory in your Synology NAS. Alternatively,you can perform as many actions and processes as possible (scans, copy/pastes, thumbnail generation, transcode a 4K file, RAID changes, synchronisation, etc) at once to see how the task manager and resource monitor behaves in the Synology DS220+. It should spike each time and at a greater height as you do more and more and once it exceeds the memory you had previously installed, this is a good confirmation that the installation is working fine.
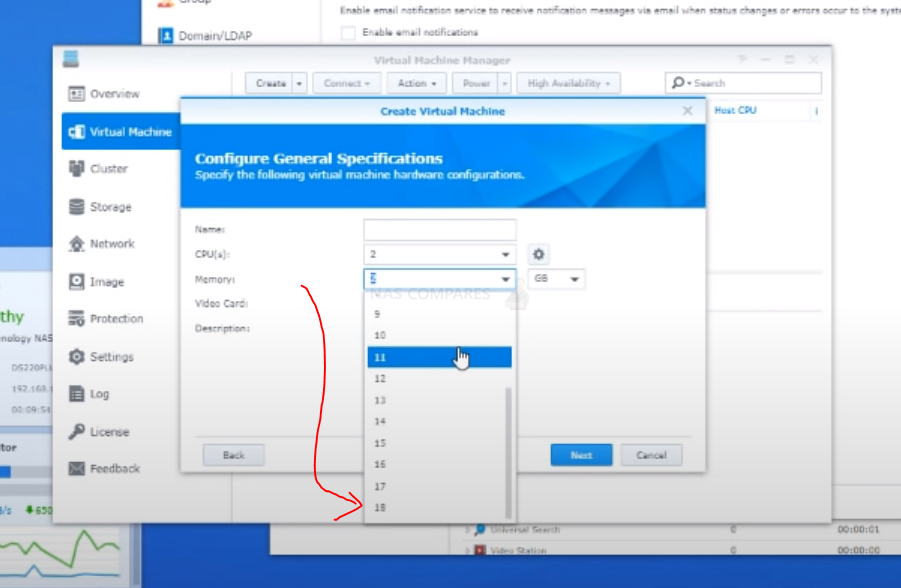
Alternatively, you can temporarily allocate chunks of memory and then that is a much more reliable test. Install the virtual machine application for the Synology DS220+ (P.S. for Synology users it is the Virtual Machine Manager and for QNAP it is the Virtualisation station). Then you can create individual VMs (it is alot easier than it sounds and the Synology DS220+ VM software is very user-friendly) then allocate 3-4GB of memory to each one. When you have created 3 or 4 individual virtual machine containers on the Synology DS220+ software, then you can run them all at once and that will immediately use almost all the memory at once! If there are any issues with the memory, it will show here almost immediately. If no problems, then you know the Synology DS220+ 18GB crucial memory installation as successful. You can then delete the VMs in the virtual machine software and then free up all that memory again.

🔒 Join Inner Circle
Get an alert every time something gets added to this specific article!
This description contains links to Amazon. These links will take you to some of the products mentioned in today's content. As an Amazon Associate, I earn from qualifying purchases. Visit the NASCompares Deal Finder to find the best place to buy this device in your region, based on Service, Support and Reputation - Just Search for your NAS Drive in the Box Below
Need Advice on Data Storage from an Expert?
Finally, for free advice about your setup, just leave a message in the comments below here at NASCompares.com and we will get back to you. Need Help?
Where possible (and where appropriate) please provide as much information about your requirements, as then I can arrange the best answer and solution to your needs. Do not worry about your e-mail address being required, it will NOT be used in a mailing list and will NOT be used in any way other than to respond to your enquiry.
Need Help?
Where possible (and where appropriate) please provide as much information about your requirements, as then I can arrange the best answer and solution to your needs. Do not worry about your e-mail address being required, it will NOT be used in a mailing list and will NOT be used in any way other than to respond to your enquiry.


|
 |
This description contains links to Amazon. These links will take you to some of the products mentioned in today’s video. As an Amazon Associate, I earn from qualifying purchases


Minisforum G7 Pro Review
CAN YOU TRUST UNIFI REVIEWS? Let's Discuss Reviewing UniFi...
WHERE IS SYNOLOGY DSM 8? and DO YOU CARE? (RAID Room)
UniFi Routers vs OpenWRT DIY Routers - Which Should You Choose?
WHY IS PLEX A BIT S#!t NOW? IS 2026 JELLYFIN TIME? (RAID Room)
Synology FS200T NAS is STILL COMING... But... WHY?
Access content via Patreon or KO-FI
Discover more from NAS Compares
Subscribe to get the latest posts sent to your email.
Thanks! This was a huge help! My 220 was on the bottom shelf of my entertainment stand and my dog decided to urinate on the stand and hit the side air vent perfectly watering the MOBO. The NAS was just sitting there with the blue light blinking away. Decided to tear it apart and give it a good clean. Put it back together and it fired up and appears to be 100% fine.
REPLY ON YOUTUBE
Great video, ty
REPLY ON YOUTUBE
16gb works. Period. You don’t wanna do it? Don’t. Thank you for the video. It’s been a few years and most of us have not had a single issue. The cpu can support more memory than recommended without it or your head exploding in this case.
REPLY ON YOUTUBE
Yes it’s irritating, it’s just a RAM man, no rocket science, why would it erase the data on the HDD… I tried with a KCP426SS6 and it didn’t work… neverending blinking blue light. I’m going to try a Crucial.
REPLY ON YOUTUBE
I’m genuinely confused. The manual said “DS220+ comes with 2 GB DDR4 onboard and can support up to 6 GB by adding one optional DDR4 non-ECC 4 GB SO-DIMM.” and Celeron J4025 only supports up to 8 GB. What’s the deal here?
REPLY ON YOUTUBE
Will this work on a Synology DS224+? Thank you.
REPLY ON YOUTUBE
Voiding warranty for installing additional ram is ridiculous. Great job Synology, you just lost one potential customer.
REPLY ON YOUTUBE
You’ve saved me. I needed to change the fan on my DS 220+ and couldn’t find any instructions to do so. Not on Synology or anywhere else. Thanks to your tutorial I’ve been able to get the job done.
REPLY ON YOUTUBE
why does synology ram cost 300 pounds just for 16gb. Are they using more gold in their plates.
REPLY ON YOUTUBE
Thank you for this! All I needed was access to the drive tray clip (which I received broken). Are there such things as replacement slot drive clips? I know its a long shot and I can’t seem to find a p/n.
REPLY ON YOUTUBE
Have you tested if the 4 gb sodimm ddr 4 2666 mhz ram from cruxial works?
REPLY ON YOUTUBE
Perfect, thanks a lot. In this way I was able to disassemble my DS223 because of the very noisy fan.❤
REPLY ON YOUTUBE
stop going on about warnings etc just get on with it, 9 minutes in and you have done fuck all
REPLY ON YOUTUBE
Does someone testing Kingston KSM26SES8/16HC with the DS720+. Is ECC supporting?
REPLY ON YOUTUBE
So u spend half the video explaining “the risks”, but for the actual installation, your camera cant even see u install the ram. Why waste ur audiences time?
REPLY ON YOUTUBE
You’re actually supposed to reinstall DSM after upgrading RAM so it resizes the swap file
REPLY ON YOUTUBE
Just installed the Kingston KCP426SD8/16 memory and it worked like a charm! Now i can run all my docker containers on my nas. Thanks!
REPLY ON YOUTUBE
Just installed the Kingston KCP426SD8/16 memory and it worked like a charm! Now i can run all my docker containers on my nas. Thanks!
Hi. I bought CT16G4SFS8266 for my ds220+ but it does not work. youtube clips shows Crucial CT8G4SFS8266 8G is working so I thought CT15G4SFS8266 should working,too. but it is not..
What should I do? Should I return it and buy new one? or anyother solution to my situation?
I appreciate your advice.
Thank in advance.
Try removing any other RAM module and then leave it overnight to run memory tests in the background (usually takes 20 minutes). Or double check this list https://nascompares.com/answer/synology-nas-compatible-ram/
I just installed Crucial RAM CT8G4SFRA266 8GB DDR4 2666MHz CL19 on a DS220+ and it works like a charm. System seems to be faster than stock.
REPLY ON YOUTUBE
So for me the hardest part is how to physically out the ram in it.
You need to insert it with 45 degrees angle to the wall and press the ram into the wall.
REPLY ON YOUTUBE
Just finished the upgrade with 16gb timetec and it worked like a charm. The only minor issue I encountered is that the NAS didn’t reboot by itself when I did the memory test. I had to unplug and plug it back and only then the memory test started.
Thanks for the guide!
according to output from dmidecode the 2GB memory in my 220+ is Single Rank rather than dual (also shows speed as 2400 rather than 2666 which seems odd); if I want to add additional memory chip should it also be SR or is it okay to mix DR and SR?
Ideally, when adding additional memory to a system, it is recommended to use memory modules of the same type (e.g., single rank or dual rank) and the same speed for optimal performance and stability.
However, mixing single rank and dual rank memory is possible in some cases, but it may result in slightly degraded performance. When mixing memory ranks, the system will operate all memory modules at the speed and timing of the slowest module. This means that if you add a single rank memory module to your existing dual rank memory, the dual rank memory will be forced to operate at the speed and timing of the single rank module, which can result in slightly slower overall performance.
Regarding the speed discrepancy, it’s possible that the original memory module installed in your DS220+ is rated at a lower speed than the maximum supported speed of the system. When adding additional memory modules, it’s important to make sure that they are compatible with the maximum supported speed of the system.
Tried Kingston 16GB – KVR26S19D8/16. Did not work.
I had a 8GB stick of 1rx8 PC$-2666V-SA1-11 HMA81GS6JJR8N – VK (SK-Hynix Korea) from my Dell Inspiron 7590 laying around. Gave it a shot and iot worked. NAS shows 10GB or ram total. If you got it laying around give it a try.
REPLY ON YOUTUBE
Nice video, thank you. I have a question about CPU? CPU is removable or is it soldered?
REPLY ON YOUTUBE
1`6 february 2023: add Crucial Memory: CT16G4SFRA266 works perfecvt. Thanks voor this video
REPLY ON YOUTUBE
Kingston 16 GB DDR4 2666MT/s SODIMM working well with DS220+. System is able to allocate 18GB RAM mostly for cache and it’s fast as rocket. Thanks!
REPLY ON YOUTUBE
I would love to know what amount of memory and company you recommend? Basic user photo backup and plex
REPLY ON YOUTUBE
Of course, because noone will upgrade the memory when you showed that it works.
REPLY ON YOUTUBE
It might have been a more realistic test to have used a 4GB memory module, as Synology only seems to offer this option.
After your other reviews, I ordered a DS220+ NAS with Iron Wolf drives which arrived this evening. I have taken the chance and also ordered 4GB of Kingston memory which is within the amount stated by Synology. Fingers crossed!
I’ve bought the NAS as I have 4 one-drive accounts, drop box and the Apple solution and want to consolidate everything into a single location. I’m looking forward to setting up access to the NAS not just locally, but via the Internet on various devices.
REPLY ON YOUTUBE
DS218+ surely doesn’t need the hard drive tray to be removed in order to get the complete motherboard out of the plastic cover. All I was needed to do after opening and removing the sliding plastic part is to unscrew the first 4 screws, and by slightly banding the back part of the NAS you can pull out the motherboard together with the hard drive tray just as you can see it on the video. I think taking of the hard drive tray in this video was also unnecessary. Anyway you can take of the first, sliding plastic cover also much easier, if you don’t use any tool, but you put your hand into the front opening, turning your palm in the direction of the metal cross bar, and grabbing it with your fingertips from the back (between the plastic and the meal plate) whilst you are pushing the the plastic cover with your thumb up and backwards, away from the metal plate. You may also help with the other hand by pulling the cover upwards and backwards too in the same direction as you thumb does. If you position your thumb under those plastic clips and push them one after other, or a bit stronger exactly in the middle between them over the metal plate that way, the side panel goes off surprisingly easy (compared to that what we se on the video).
However, the video is great, and if you follow it’s steps you can’t do anything wrong, so big thumbs up for your work, it’s very helpful.
REPLY ON YOUTUBE
But the CPU in this box only supports up to 8gb ram. What’s the benefit of putting 16gb ram?
REPLY ON YOUTUBE
I am about to install 32gb lol
REPLY ON YOUTUBE
RAM soldada?
REPLY ON YOUTUBE
Thanks
REPLY ON YOUTUBE
I upgraded my Synology DS 220+ with Crucial 16GB 260-Pin DDR4 SO-DIMM DDR4 2666 (PC4 21300) Laptop Memory Model CT16G4SFRA266, and it never booted up with the memory.
REPLY ON YOUTUBE
Did the same with Crucial the light was flashing for over ten minutes. Took ram out booted up straight away.
I don’t know how Synology is being allowed to push this that we have to use only Synology HDD or RAM parts in the units, they don’t manufacture either HDD or RAM and it is many tech firms have facing huge penalty like Microsoft, Apple etc which does give choice on apps and browsers and do not allow competitors. This is illegal and Synology should be in court and should be facing huge penalty for the same.
REPLY ON YOUTUBE
If the CPU can only use 8GB RAM, will it ignore the RAM above 8GB?
even if the software recognises it.
REPLY ON YOUTUBE
David
What pressure did you use,
Slight pressure until you feel it to click into a place.
I got the TimeTec 16GB ram from the link provided in this tutorial. It didn’t work at first, but that was because it wasn’t seated properly. For the 2nd time, I actually took out both drives, and disconnected the box from all cables, and placed it on my desk. I then carefully removed and re-inserted the memory stick. It took a little more pressure than I am normally use to doing so in laptops. But it seemed to go in further and when pressing down, the side clips grabbed onto it instantly and with no resistance (as I had felt prior).
I am now showing a full 16 GB of memory on my ds220+, using DSM version 7.1-42661 Update 1.
I suppose you can tear down such and with a couple of PCI-E rise and SATA cables you can put it inside 1U rack enclosure =))
REPLY ON YOUTUBE
Thank you for this, I found it very useful. I have a DS220j, but unfortunately for me it has rather a noisy fan on board, it literally sounds like a pneumatic drill starting up. The good news is though, I do have an identical size 92mm “be quiet!” fan which I’m going to replace it with, so should make a big difference. Cheers! – Neil (UK).
REPLY ON YOUTUBE
These videos are incredibly verbose with a very low signal to noise ratio :/ The first 8 minutes could be summarised into 1 minute with no loss of information.
REPLY ON YOUTUBE
Hi! I have a 220+ with 8GB DDR4 2666MHz SODIMM from Crucial an everything is looking fine. Even the Resource Monitor doesn’t have the artefacts seen in the review.
REPLY ON YOUTUBE
Crucial 16Gb module DS220+ tried what has been suggested. Not worked.
Thanks a lot for this article! I’ve installed Crucial CT16G4SFD8266 16 GB module in DS220+, both purchased a week ago, so both are fresh production as of Jan-2022. DSM version 7.0.1-42218. It worked like a charm, first start was a bit longer than usual, maybe by a couple of minutes (I suspect extended time to test new memory configuration, similar to what happens after laptop memory changes), but then it beeped as usual and booted up perfectly. Monitor shows 18Gb total, RAM utilization dropped from 24% to 3%, VMM shows “eligible for compute” – normally not available on just 2Gb DS220+. No visual “red line” artefacts in the resource monitor’s RAM chart. Thanks again! P.S. To those who try to repeat – make sure you get exactly the CT16G4SFD8266 module, not any Crucial 16Gb module – this specific module is tested by me and several other commenters in this trail.
did you have trouble putting in module.
How much pressure do you use.
I have just upgraded the RAM with 8GB module. Everything works well and memory utilization graph looks fine on DSM 7.
REPLY ON YOUTUBE
After seeing the video I have ordered Crucial CT16G4SFD8266 16 GB and have upgraded my Synology DS220+ . Thanks for the tutorial and a massive KUDDOS to you in explaining step by step process. I can see clearly now 18GB total RAM memory! Thanks again. I have subscribed and watched other few tutorials.
Thank you very much for your video. I was able to disassemble and repair my DS231+, it is disassembled according to the same system.
REPLY ON YOUTUBE
I upgraded with the CT16G4SFD8266 16 GB, just as JIRL above and it worked perfectly. I didn’t feel it was difficult to push the memory into the slot. I went to the Information page and it shows 18GB of memory. Nice tip! Thanks
I upgraded with the CT16G4SFD8266 16 GB, just as JIRL above did – it works perfectly! I had to open the case a second time to seat the SODIMM because, as JIRL says, it needs firm pressure. Thanks for the excellent instructions!
It works. It was enough to wait about 15 minutes and it started
I installed Kingston Technology ValueRAM KCP426SD8 / 16, but only the blue LED flashes in synology. does it mean that the frame is damaged?
Who’s going to pay TEN TIMES the going rate for RAM. It’s a total rip off.
REPLY ON YOUTUBE
which DSM version you are using?
This ds220+ has two slots for ram module? One for onboard modul and second for expand?
REPLY ON YOUTUBE
Correction: memory isn’t installed in “PCI Slots.”
REPLY ON YOUTUBE
Did anyone have issues with this after updating to the latest DSM 7.x version?
Thanks a lot. I upgraded my 1520+ with 16GB Kingston memory and now it is running fine with 20GB. Oficially the Celeron j4125 would not support more than 8GB of memory. It can handle more. Thanks al lot!
REPLY ON YOUTUBE
i have installed Kingston KVR26S19S6/8 Single Rank, but NAS can’t boot. Power led status just blue flashing. Any solution?
REPLY ON YOUTUBE
How to put the memory in, without actually SHOWING how to put the memory in – what a waste of time.
REPLY ON YOUTUBE
Ma non è supportata solo 6 GB di ram?
REPLY ON YOUTUBE
Bel video che hd mi consigli pensavo non meno di 6 tera ma che modello
REPLY ON YOUTUBE
the graphic glitch I think has nothing to do with RAM as I had this when I had no RAM inserted. ive got 32GB and works fine im using Kingston DDR4 2666 SODIMM
REPLY ON YOUTUBE
Hello
this is shit i wanted to upgrade 16GB after this video i bought it and it is not working the company said it does not support it this is fake vid
REPLY ON YOUTUBE
I just installed a 16Gb Samsung M471A2K43CB1-CTD 16GB DDR4 2666MHz Memory Module in my fairly new DS220+ and it went as smooth as silk. The NAS is noticeably faster and more responsive, it’s showing the 18Gb installed memory in the various apps and resource monitors and my memory graphics chart is completely fine, unlike the NASCompares experience.
Perhaps the newer models of DS220+ or the DSM Version nowadays has been adjusted to overcome the memory graphics glitch? Anyway, based on my own experience I can guarantee that the Samsung M471A2K43CB1-CTD 16GB DDR4 2666MHz Memory Module is completely compatible with the latest breed of DS220+ and definitely a very worthwhile and rewarding upgrade.
Also by upgrading the memory I was able to uncheck the “Enable Memory Compression” option in the Power and Hardware settings. This has given me extra responsiveness and an immediate 1% reduction in memory usage (went from 4% usage to 3% straight after reboot). Zero Swap memory being used even though the NAS is pretty heavily loaded up with Surveillance Station, Plex etc.
Having said all that I have been unable to ascertain whether the NAS is actually using all 18Gb of available Ram or just the first 6Gb plus the 2Gb soldered in Ram. The specs for the Intel Celeron J4025 CPU definitely state it can only address up to 8Gb Ram total so I strongly support the latter presumption. Even so, the 8Gb total RAM gives it a huge performance boost and benefits as described above. I got the 16Gb stick cheaper than even an 8Gb from someone who couldn’t use it so I haven’t lost anything and I can re-use the larger stick later if need be in some other unit that supports more RAM.
If one day I have the NAS so loaded up that it clearly shows more than 8Gb of memory used with no Swap amount, I will post this info back here as it would confirm that the NAS is somehow using more RAM than the CPU supports!
EDIT:
Great news. I just noticed during a large file transfer the memory graphics utility in the NAS showed these statistics:
Reserved: 595.4Mb
Used: 783.9Mb
Buffer: 287.7Mb
Cached: 9.2Gb
Free: 7.2Gb
Swap: 0
If my maths is correct this means the NAS was using a total of 10.8Gb of Ram at that instant!
I think this result conclusively proves that the DS220+ can somehow use way more than the 8Gb limit supposedly imposed by the Intel Celeron J4025 CPU!
EDIT 2:
Just transferred several more large files and found the RAM memory cache grew to 16.3Gb leaving only around 160Mb free RAM, Utilisation always remained at 4%. Tried several more file transfers and the cache size remained around the 16Gb mark. I believe this is normal. DSM uses a fair chunk of free ram for a cache at any given time. If it needs more memory for additional tasks it simply reclaims some from the cache as needed. It always seems to leave around 160Mb free as a contingency I guess. At no times has the swap method been used by the system.
So, all in all it seems to be working beautifully and doing everything it should!
Thank you so much to NASCompares for such an informative and helpful video, most enjoyable and well presented.
REPLY ON YOUTUBE
Great video, mate. Please upgrade your microphone or recording software. Frequent clipping/distortion causes an unpleasant listening experience.
You’re very knowledgeable. I just bought the DS220+ and am looking forward to upgrading along with you!
REPLY ON YOUTUBE
The Timetec 16GB part did NOT work for me. Verified is indicates dual rank (2R in part #) and reseated, rebooted multiple times with no dice.
Upgraded with CT16G4SFD8266 16 GB and worked perfect. Thanks for the great instructions.
The SODIMM needs firm pressure to insert fully. The memory test takes hours to run.
At a German Synology user forum, they say that the SFRA266 does not work but the SFS8266 works fine.
Just upgraded to 18GB used Integral IN416GNNELSI. Memory text run and passed. No glitches in resource monitor memory graph as per video but that may be due to a dsm update since it was recorded. Would be interesting to know if it went away for you ROB ANDREWS.
“Integral 16GB DDR4 RAM 2666Mhz SODIMM Laptop/Notebook PC4-21333 memory”
https://amzn.to/3pxNnxR
Bought Crucial 16GB CT16G4SFRA266. Not working, the blue light is blinking, does not want to boot.
Doesn’t look like it’s possible to buy a 8gb DR module in the UK right now. All of your links no longer work, and I am not in need of 16gb.
Can anyone recommend a working 8gb DR ram module? Everything online is SR which is why I assume the people above have had no luck in getting things working.
try getting this Crucial 8GB DDR4 – 2666 SODIMM ( CT8G4SFS8266 ) . Initially i bought a Kingston KVR 8gb but that doesn’t detect, then i got the Crucial ram and it worked like a charm.
Thanks for guide and successfully installed the 16Gb Kingston module (https://amzn.to/3Gk1kq2). N.B. ensure it goes fully in as took a couple of attempts prior to it sitting properly to be recognised. The ‘striping’ that happened in the video when looking at Resource Manager happened before I installed the memory, so perhaps not so much of a sign of the unofficial memory than simply the way the software behaves..?
Also, received a system event message: “Detected non-Synology memory module. Please refer to our official website and select authentic Synology memory modules for better system reliability.”
Able to create a few VMs and assign memory and boot them. So far so good…
Got myself a new Kingston KVR26S19S6/8 8GB ram earlier, seems like it can’t be detected on my DSD220+ , anyone have luck with this RAM so far ?
Hi, I also tried to upgrade Synology DS220+ with Crucial 16GB DDR 2666 SODIMM, but it does not boot (only blue light blinking).
Does the same work on the other models?
Which 8gb crucial module are you referring to? The Amazon link is just showing the 16gb module per default
Which 8gb crucial module are you referring to? The amazon link is just showing the 16gb module per default when clicking the provided link.