

Migrate data from old Synology to a new DS718+ / DS918+ and others
Synology provides three migration methods: HDD Migration, migration via Migration Assistant, and migration via Hyper Backup. Deciding on the right migration method is crucial. This section explains the differences between these three methods and the limitations of each method. Please pay special attention to the limitations of each method when choosing the suitable migration method.
- HDD Migration
- Migration via Migration Assistant
- Migration via Hyper Backup
2.1 HDD migration
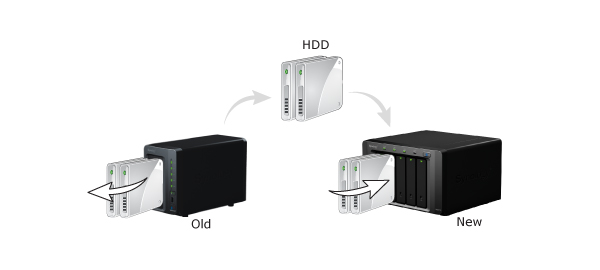 HDD migration allows you to migrate data through migrating HDDs on the source Synology NAS to the target one directly. Therefore, if you wish to keep using the same hard drives on the new Synology NAS, refer to HDD migration. However, this migration method have restriction on the model of the source and target Synology NAS as well as system requirements. Please see the following rules:
- You are unable to use HDD migration if your source Synology NAS is one of the following models:
- 18-series: DS418, DS418j, DS218, DS218play, DS118
- 17-series: DS1817, DS1517
- 16-series: DS416, DS416play
- 15-series: DS2015xs, DS1515, DS715, DS415play, DS215+
- 14-series: DS214, DS214play
- 13-series: DS413, DS213+
- 12-series: DS212+, DS112+
- 11-series: DS211+
- 10-series: DS410, DS210+, DS110+
- If your source Synology NAS is not listed above, refer to the table below to see whether your source and target Synology NAS are able to migrate through HDD migration. An “O” means that HDD migration works, and a “X” means that HDD migration between the two Synology NAS is not allowed.
Source/Target J Series Value Series Plus Series XS/XS+ Series FS Series J Series O O X X X Value Series O O X X X Plus Series X X O O X XS/XS+ Series X X O O X FS Series X X X X O - If any of the following is applicable, please migrate via Migration Assistant or Hyper Backup.
- File system: Please make sure the target Synology NAS supports the required file system. If the target Synology NAS does not support the file system you are using, the volumes cannot be mounted and data stored on the volumes cannot be accessed.
- Number of drive slots: The target Synology NAS must have enough drive slots to accommodate all of the drives belonging to the RAID volume on the source Synology NAS. For example, if you have a DS214 with a RAID 1 volume consisting of two hard drives, then your target Synology NAS must have at least two hard drive slots.
- Single-bay and multiple-bay models: Due to differences in the disk partition system, single-bay models cannot migrate hard drives to multiple-bay models and vice versa. For example, hard drives from a DS114 cannot be migrated to a DS214 or DS414. Likewise, you cannot migrate hard drives from a DS214 or DS414 to a DS114.
- DSM version: If the target Synology NAS is not in the brand-new out-of-the-box status, the DSM version running on the target Synology NAS must be the same or newer than the version on the source Synology NAS. For example, you cannot perform migration from a DS411 running DSM 5.1 to a DS411 running DSM 5.0.
- SSD cache: If your SSD cache fits any of the following conditions, you will need to remove it on the source Synology NAS before migrating its data to the target Synology NAS to proceed. Otherwise, the SSD cache can be migrated directly.
- The target Synology NAS does not support SSD cache
- The SSD read/write cache was built before DSM 5.2 and the target Synology NAS runs on an Alpine CPU
- Single volume size beyond 16TB: Most Synology NAS models in the J Series and Value Series support a single volume size up to 16TB. If the single volume size in the source Synology NAS is larger than 16TB, please select a target Synology NAS that supports a single volume size of 108TB before migration.
2.2 Migration via Migration Assistant
If you wish to replace all hard drives along with replacing your old Synology NAS, Migration Assistant simplifies the migration process by allowing you to migrate data (volumes and block-level LUNs), packages, and system configurations, without the hassle of manually moving hard drives to your new Synology NAS. However, there are some restrictions for this migration method:
- Please refer to this article for the list of models that are supported by Migration Assistant. If the models of your source and target Synology NAS are not supported, we recommend migrating via Hyper Backup.
- The DSM version on the target server will remain unchanged.
- Migration Assistant does not support High Availability cluster, SSD cache, MailPlus cluster, and Time Backup. Please remove those services on the source Synology NAS before migration.
2.3 Migration via Hyper Backup
This migration method allows you to migrate data, packages, and system configurations with several backup tools and has less restrictions. Therefore, this method is recommended if you are unable to use the above two migration methods.
Which Synology NAS models does Migration Assistant support?
The below table lists Synology NAS models which are supported by Migration Assistant to work as either source or target server. The source server refers to the original Synology NAS from which data is moved, and the target server refers to the new Synology NAS.
| Series | Models |
|---|---|
| 19-series | RS1619xs+, RS1219+, DS2419+, DS1819+, DS1019+ |
| 18-series | FS1018, RS3618xs, RS2818RP+, RS2418+/RS2418RP+, RS818+/RS818RP+, DS3018xs, DS1618+, DS918+, DS718+, DS418play, DS218+ |
| 17-series | FS3017, FS2017, RS18017xs+, RS4017xs+, RS3617xs+, RS3617RPxs, RS3617xs, DS3167xs, DS1817+, DS1517+ |
| 16-series | RS18016xs+, RS2416+/RS2416RP+, DS916+, DS716+II, DS716+, DS416play, DS216+II, DS216+ |
| 15-series | RS815+/RS815RP+, RC18015xs+, DS3615xs, DS2415+, DS1815+, DS1515+, DS415+ |
| 14-series | RS3614xs+, RS3614xs/RS3614RPxs, RS2414+/RS2414RP+, RS814+/RS814RP+ |
| 13-series | RS10613xs+, RS3413xs+, DS2413+, DS1813+, DS1513+, DS713+ |
| 12-series | RS3412xs/RS3412RPxs, RS2212+/RS2212RP+, RS812+/RS812RP+, DS3612xs, DS1812+, DS1512+, DS412+ |
| 11-series | RS3411xs/RS3411RPxs, DS3611xs |
The models in below table are also supported by Migration Assistant as either source or target server. However, please note that they cannot be used as target servers for the models mentioned in above table.
| Series | Models |
|---|---|
| 17-series | DS1817, DS1517 |
| 15-series | DS2015xs, DS1515, DS715 |
Source
Note:
- Neither source nor target server can be VDSM or DDSM.
- We recommend migrating to a Synology NAS with better hardware specification to ensure all packages and services will work properly after migration. Please visit Synology Download Center to find your product’s datasheet for more information.
Migration Assistant
Migration Assistant is an application for migrating data from one Synology NAS to a new one. With only a few simple steps to set up, this tool streamlines the traditional migration process and seamlessly migrate system settings and data.
Source and Target Synology NAS
In these Migration Assistant articles, the original Synology NAS from which data is moved shall be called the source Synology NAS or source server, while the new one shall be called the target Synology NAS or target server.
Migratable Items
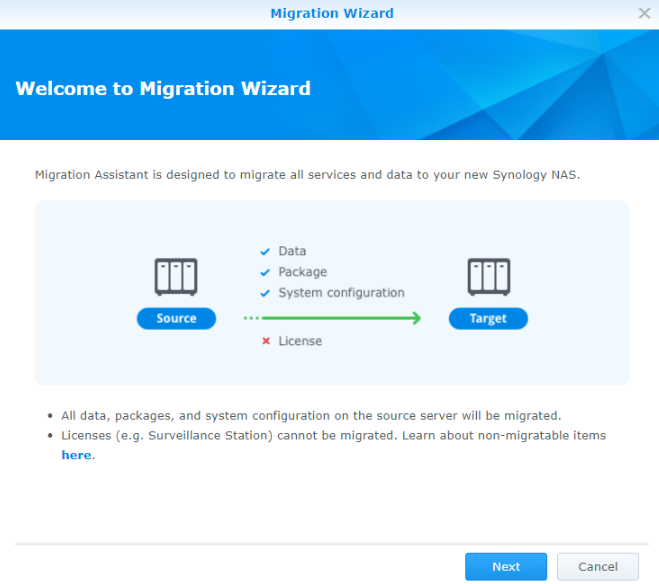
Migration Assistant is designed to migrate all services and data to a new Synology NAS. The following are migratable items:
- Data (migrated on a volume/block-level LUN basis)
- Packages, package settings, and package data
- System configuration
Non-Migratable Items
The following items will not be migrated by Migration Assistant:
- The DSM version on the target server will remain unchanged
- Synology Account settings
- Licenses
- Network settings in Control Panel
- Server name, Default gateway, IPv6 default gateway in General tab
- Network Interface (except for VPN profile, IPv6 Tunneling, MTU value in IPv4 settings, and 802.1X)
- Static Route
- Wireless settings in Control Panel
- External Access settings in Control Panel
- Push Service settings in Control Panel > Notification
- Log Center’s un-archived local logs
- Security Advisor (except for Advanced setting)
- OAuth Service (except for Common Settings)
- Agreement settings
- Device analytics
- Package Center
- Performance Alarm logs in Resource Monitor
- Desktop widget and taskbar settings
- Virtual Machine Manager’s settings
- File or folder’s sharing links. These will become invalid after migration
Note:
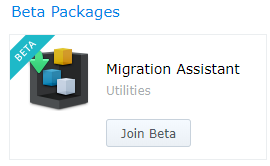
- Please install Migration Assistant on the target server.
- The DSM version required for the source server is DSM 6.0 or above. However, we recommended upgrading to DSM 6.0.3, 6.1.7, or 6.2.2.
- The DSM version required for the target server is DSM 6.2.2 or above.
- Migration Assistant supports certain Synology NAS models as source/target servers. Please refer to this article to learn more.
Migration Wizard
The Migration Wizard will be automatically launched when no migration tasks had ever been performed on this Synology NAS. The Migration Wizard will guide you through the migration task setup process. If you have executed migration tasks before, you can choose Run New Task from the main page to set up and start a new migration task.
Before You Start
Before you start, please check the settings on your Synology NAS servers:
- On the source server:
- High Availability cluster, SSD cache, MailPlus cluster, and Time Backup must be removed first.
- We recommend updating the source server to DSM 6.0.3, 6.1.7, or 6.2.2, and also updating all packages to the latest version.
- Please note that if the source server is the destination of Snapshot Replication and is running 6.1.2-0173 or earlier version, the replicated shared folders and LUNs will be deleted from the source server after migration. If you want to retain the Snapshot Replication data on the source server, you must upgrade to at least DSM 6.1.3 and Snapshot Replication 7.0.3-0310.
- On the target server:
- Set up storage pool(s) in Storage Manager first, as data will be migrated on a volume/block-level basis. The total capacity of storage pool(s) must be larger than the total capacity of all volumes on the source server. Alternatively, if the target server supports SHR, you can keep the storage empty, and the system will create storage pool and migrate the volumes/LUNs automatically. Please refer to Migration Assistant’s Rules for Creating Storage Pool below for more information.Tip: You can also create volumes on the target server first, and the system will migrate volumes on the source server to the same location on the target. The volumes must be fully identical (including volume number, file system, and capacity) to the ones on the source server, or identical but with larger capacity.
- We recommend setting up the target server in the same local network as the source server.
- Ports between 7400 and 7499 are reserved for migration. If the source and target servers are connected to different routers, you must set up port forwarding first, and make sure that there is no firewall blocking the ports.
- Migration Assistant will not transfer your Synology Account and licenses, and the following services require manual configuration after migration. Please refer to this article to manually configure them after migration is complete:
- Services such as QuickConnect, DDNS, DHCP Server, SSO Client, domain clients
- Server-related packages such as CMS, Directory Server for Windows Domain, VPN Server, MailPlus
- Sync-related and backup-related packages such as Synology Drive Server, Cloud Station Server, Active Backup for Business, Hyper Backup, Shared Folder Sync, Snapshot Replication, Cloud Sync, Glacier Backup
- Other packages such as Surveillance Station, Docker, Virtual Machine Manager
Migration Assistant’s Rules for Creating Storage Pool
If there’s no existing storage pool on the target server, the system will automatically create one. The following explains how Migration Assistant creates storage pool.
- The system will utilize all installed drives on the target server to create a higher flexibility storage pool with SHR.
- The system will not use drives installed in expansion units or drives in critical or failing status.
- The system will not automatically create storage pool on models supporting RAID group.
- If the installed drives include different drive types (e.g. HDD, SSD, SATA, SAS, etc.), the system will not automatically create storage pool.
Choose Source Server
In Migration Wizard, enter the following information to connect to the source server and click Next:
- Enter the Source server name, IP, or IP: custom port number. If the source server has set up http or https custom ports, please enter the source server’s IP address and custom port directly (e.g., 10.12.1.1:24300). You can also use the drop-down menu to search for Synology devices within the same LAN.Tip: You can simply copy the URL of the source server and paste it here.
- Enter the account and password belonging to the administrator group of the source server.
Note:
- Migration Assistant does not support inputting IPv6 and QuickConnect for connecting to the source server.
- Migration Assistant does not support logging in with Domain/LDAP accounts.
- Please DO NOT input dynamic domain name or IP for connecting to the source server. This may cause connection failure during migration.
- After successfully connecting to the source server, Migration Assistant will automatically enable the SSH service on the source server. The connection and transfer from that point onward will be through SSH protocol.
- By default, Migration Assistant does not encrypt the data during migration to optimize the transfer performance. If you want to transfer data encrypted, please choose the VPN interface or create a VPN interface if you do not have one.
Confirm Settings
Please confirm the migration summary on this page and click Apply to continue. The table shows a preview of volume/LUN allocation, including capacity, file system, and location, on the target server. The data in volumes/LUNs on the source server will be migrate to the same location on the target server. For example, data in volume 1 on the source server will be migrated to volume 1 on the target server.
Note:
- After clicking Apply, all services on the source server will be stopped temporarily until the syncing environment is ready.
- After clicking Apply, all volumes, LUNs, packages, system configurations on the target server, including administrator credentials, will be deleted and replaced by the ones on the source server.
- When the migration process begins, the encrypted shared folders on the source server will be unmounted.
- If the system automatically creates storage pool, all data on the drives will be erased.
The following actions CANNOT be performed during the migration process:
- Disabling the SSH service on the source server.
- Editing or removing the user account named Migration Assistant on the source server. This account was automatically created by Migration Assistant for the migration task and will be removed after the migration task is completed.
- Changing the storage location of packages on the source server.
- Changing any settings on the target server.
- Adding or removing volumes or Block-Level LUNs on either source or target server.
- Editing the administrator account (such as disabling the account or changing the password) which is being used to connect to the source server.
- Creating or deleting Bond on either source or target server.
- Enabling or disabling Open vSwitch on either source or target server.
Troubleshooting
This section will explain the errors and alerts you may encounter, as well as the ways in which you can troubleshoot each problem to ensure a successful migration.
To troubleshoot issues when creating a migration task:
- If you have set up the target server with SHR or SHR-2 storage pool, and the capacity is larger than or equal to the capacity of all volumes / LUNs on the source server, Migration Wizard may still display a message about insufficient storage capacity. This indicates that the size of storage pool metadata on the target server is greater than that on the source server. In this situation, we recommend setting up the target server’s storage pool with Basic, RAID 5, or RAID 6 and try again.
- If you have set up the target server with higher flexibility storage pool, and the capacity is larger than or equal to the capacity of all volumes / LUNs on the source server, Migration Wizard may still display a message about insufficient storage capacity. This may be the result of higher flexibility storage pool using more metadata. In this situation, we recommend creating the target server’s storage pool with better performance or bigger capacity.
- If the system cannot automatically create storage pool on your target server, this may indicate that the capacity of the RAID type selected by the system is not sufficient to accommodate all volumes / LUNs on the source server. Please manually create storage pool with less data redundancy RAID type or insert more drives on the target server. Refer to the RAID calculator to choose a suitable RAID type for your target server.
Progress and Status
This page displays the progress or status of the current migration task, or the result of the last migration task.
Managing Your Migration Tasks
To pause your migration task:
- Click Pause to pause your migration task.
Note:
- While pausing a task, the target server needs to push the task back to a restorable state. Thus, it may take a short period for the task to be completely paused.
To resume your migration task:
- Click Resume to resume your migration task.
To cancel your migration task:
- Click Cancel to cancel your migration task.
- A confirmation window will be displayed. Click Yes to confirm.
Note:
- After canceling, the system will delete the current migrating volume or LUN to prevent system error. Thus, it may take a short period for the task to be completely canceled.
- After canceling, the volumes or LUNs which were migrated will not be deleted. They will be kept on the target server.
To restart the target server in the System stage:
The target server needs to be restarted to apply the settings and terminate the connection between the two servers.
- A confirmation window will appear when it’s time to restart the target server. You can choose to Restart Now or Restart Later.
- Tick the checkbox to confirm that you understand the actions which will be taken. Click Restart Now to confirm. The target server will now proceed to reboot.
- If you choose Restart Later, the status will show Restart Required. Click Proceed when you are ready to restart the target server.
To take over all services to target:
The target server needs manual configuration to take over all services from the source server. Click the tutorial link to learn the best practice to ensure all services can work properly on the target.
Note:
- When migrating between Synology NAS with different package architectures, manually repairing packages is required after the migration process is finished. Please go to Package Center on the target server to repair packages.
- When migrating between two Synology NAS with different DSM versions, some packages’ versions on the source server may not be compatible with the target server’s DSM version, and will require an update after the migration task is finished. Please go to Package Center on the target server to update packages.
To check the migration summary:
When the migration task was successful, you can click the View Summary button to see a summary about the migration task.
To start a new migration task:
When the migration task was successful or canceled, you will be able to start a new migration.
- Click Run New Task to start a new migration task.
- Follow the instructions provided by the Migration Wizard to complete setting up the migration task. For more information, please refer to the Migration Wizardpage.