

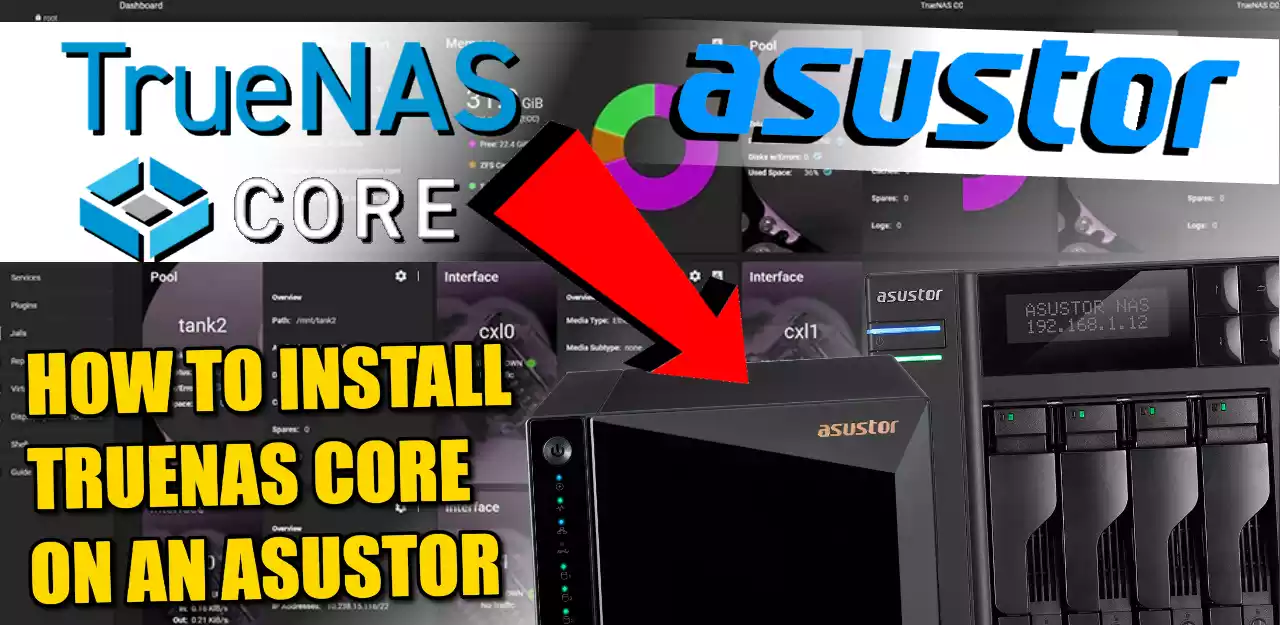
How to Install TrueNAS Core on an Asustor NAS Drive – Step-By-Step Guide
Most new or relatively inexperienced NAS users can be separated into two clear categories. There are those that want to get their hands dirty, spend sensibly on a DiY system in order to take advantage of community-built platforms such as TrueNAS Core, and then there are those that are happy to pay extra for the system to arrive prebuilt, but also know that the software that it comes with can be a little more restrictive. However, it is NOT impossible to have the best of both! Today, I want to show you how to turn the remarkably affordable NAS solutions from Asustor (one of the best Value NAS in the market right now, even when the 2022 range is pretty well hardware equipped with NVMe, 2.5G, Embedded Graphics CPUs and more) into a TrueNAS Core ZFS Powered NAS system. It is considerably easier than you might think, is very easy to reverse and allows you to have the full customization and freedom of TrueNAS Core, a prebuilt 24×7 designed server system and all whilst still getting exceptional value for money for the hardware. Cool right? Let’s begin the step-by-step guide.
Note – a FULL 30-Minute Installation Guide for TrueNAS Core on an NAS is available HERE on the NASCompares YouTube Channel

Important – It’s important to note that TrueNAS Core is NOWHERE NEAR as user-friendly as Asustor ADM and before making any switch to a new NAS OS, it is important that you understand the process, risks and differences in the platforms. This guide is designed to help you use your Asustor NAS to run TrueNAS Core as it’s primary OS. If you go ahead with this and use the same HDD/SSDs in the system that you are currently using in the Asustor ADM Setup, it will likely format them, so IF you want to reverse your Asustor NAS back to its ADM set up with all your data/drives the same, you will need to remove them before using the TrueNAS setup, put them to one side safely and use new HDD/SSDs for your TrueNAS installation. Lastly, although this whole process is reversible, you are technically using the Asustor in a means that the brand does not state as ‘intended use’ and this MIGHT lead to support/warranty problems down the line if a fault appears in the Asustor or the software installation that was the result of the TrueNAS Core installation (the bios records everything!). This is HIGHLY UNLIKELY but not impossible (eg you work a TrueNAS Core server so hard and/or push the CPU to breaking point running particularly aggressive TrueNAS jails and/or use the inline compression/deduplication expensively in TrueNAS and it burns out the CPU – this would not be covered by your Asustor NAS support, as they did not certify that the system can handle this.
TrueNAS Core Software on Asustor NAS Hardware – What You Need?
It is worth highlighting that having just an Asustor NAS is not quite enough and in order to get TrueNAS Core up and running on an Asustor NAS requires a few extra checks and use of a few items you might have already in the home/office, or a quick $10 shop online at most. In order to upgrade your system to TrueNAS Core, you will need to consider/have the following:
- an Asustor NAS Drive with (minimum) an Intel 64bit x86 CPU and a minimum 4GB of Memory (recommended 8GB+)
- Download the latest stable release of TrueNAS Core here as a system image (you will be converting this to USB later on) – DOWNLOAD
- Any Data that is currently on the Asustor NAS RAID that is mission critical to be backed up or moved (as it will be completely formatted)
- A USB drive to use as the TrueNAS installation drive ( I recommend THIS ONE here from Sandisk, as it is low price and incredibly small, even at 32GB)
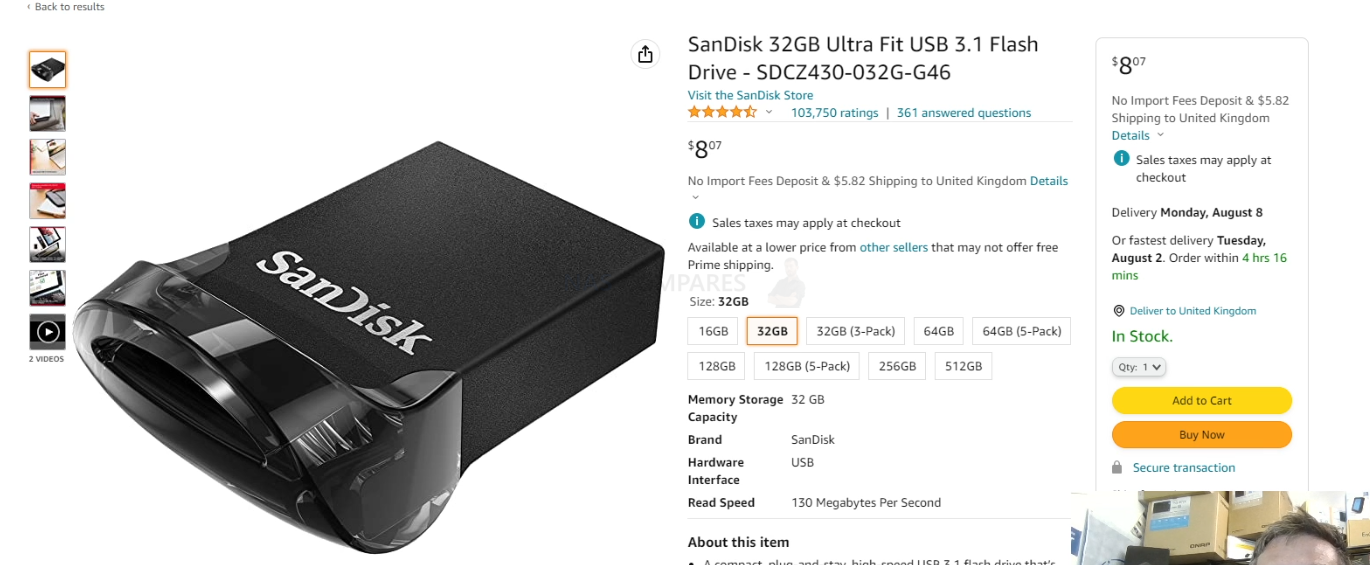
- I recommend not using a USB larger than 32GB, due to the constraints of 1st party software to format larger than this in FAT32. Don’t be tempted to spend like $2 more for a 64GB, as the TrueNAS Core installation will occupy the full USB space (as you will create a system-image-USB) and space is utterly irrelevant when the TrueNAS Core installation is so small
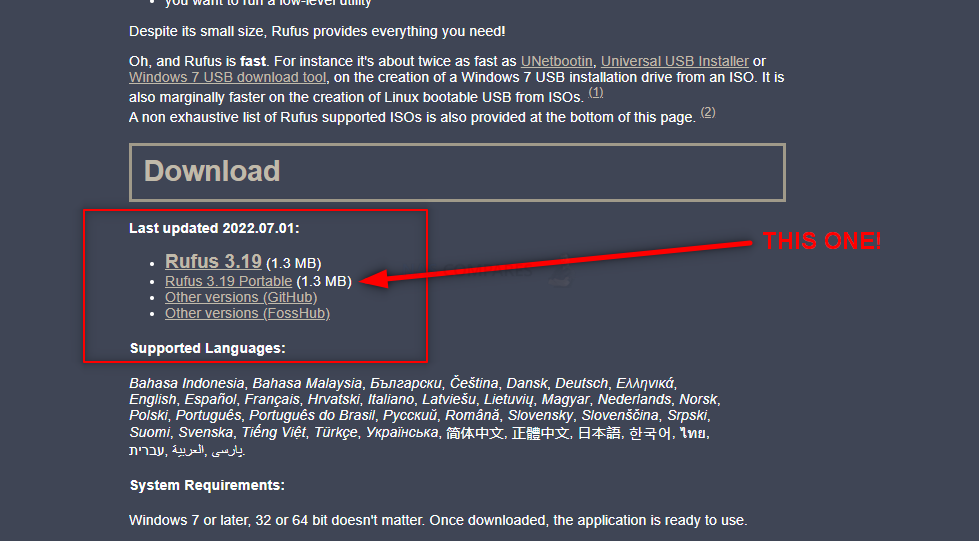
- A Disk Image to USB conversion too. I recommend ‘Rufus’, currently in ver 3.19 and can be run in a portable .exe form that doesn’t require installation – DOWNLOAD
- A basic USB Keyboard (example HERE but really, any will do) and an HDMI Monitor (or simply any device that has an HDMI input – NOT output) such as a TV or Capture card
- Hard Drive and/or SSD media (you should already have these, but just in case) for your storage Pool / RAID
- Optional M.2 NVMe SSD of at least 120GB, but highly recommended – Installing TrueNAS Core is not unlike installing a Windows OS on a new PC, as you are connecting a USB to run the installer, but you need to target a drive in the Asustor NAS to install TrueNAS onto. Whichever drive you use, it will make that drive largely inaccessible for anything but the TrueNAS operating system. Therefore IF you are running an Asustor NAS that has internal m.2 NVMe SSD bays OR one with dedicated 2.5″ SSD bays, I highly recommend getting a low-capacity drive of between 60-120GB (these will be very cheap compared with larger HDDs that start in the Terabyte scales) and then use this for the TrueNAS software. This means that ALL of the main SATA storage bays of the Asustor are then used for your storage pool(s) (aka the RAID). Do NOT install TrueNAS on another USB drive during installation, as this is less stable.
- Optional – Download Advanced IP Scanner HERE, as it is a really useful tool for analyzing your network and finding your new TrueNAS Core NAS for remote access
That is about it. Most of these are devices are that you will almost certainly already have to hand.
Can I Reverse the TrueNAS Core Installation and go back to Asustor ADM?
Almost certainly YES! I say ‘almost certainly’, as there is one small caveat. When you make the change from Asustor ADM to TrueNAS Core on the NAS hardware, the drives (HDD and/or SSD) inside used in TrueNAS pools used in the new system software architecture. This works both ways if you want to revert back to ADM on the NAS too. You CANNOT use the Storage Pool, Volume structure, Folders etc of drives from an Asustor NAS in a TrueNAS setup (you will need to format these in TrueNAS). So, although the act of reinitializing the NAS to its original software is very easy (you just need to go into the BIOS of the Asustor using the same method in the guide below, then change the boot drive order BACK to the Asustor OS internal SSD), it will mean that any data that resides on the disks inside will be formatted. So, if you are choosing to make a change from one NAS OS to another, make sure you have your data appropriately backed up elsewhere OR move the drives that were in your Asustor (with their ADM Storage structure) to one side safely and install new 3.5″ storage media for the TrueNAS pools etc. So, let’s begin the installation of TrueNAS Core on the Asustor NAS.
TrueNAS Core on an Asustor NAS – Step 1, Download TrueNAS Core
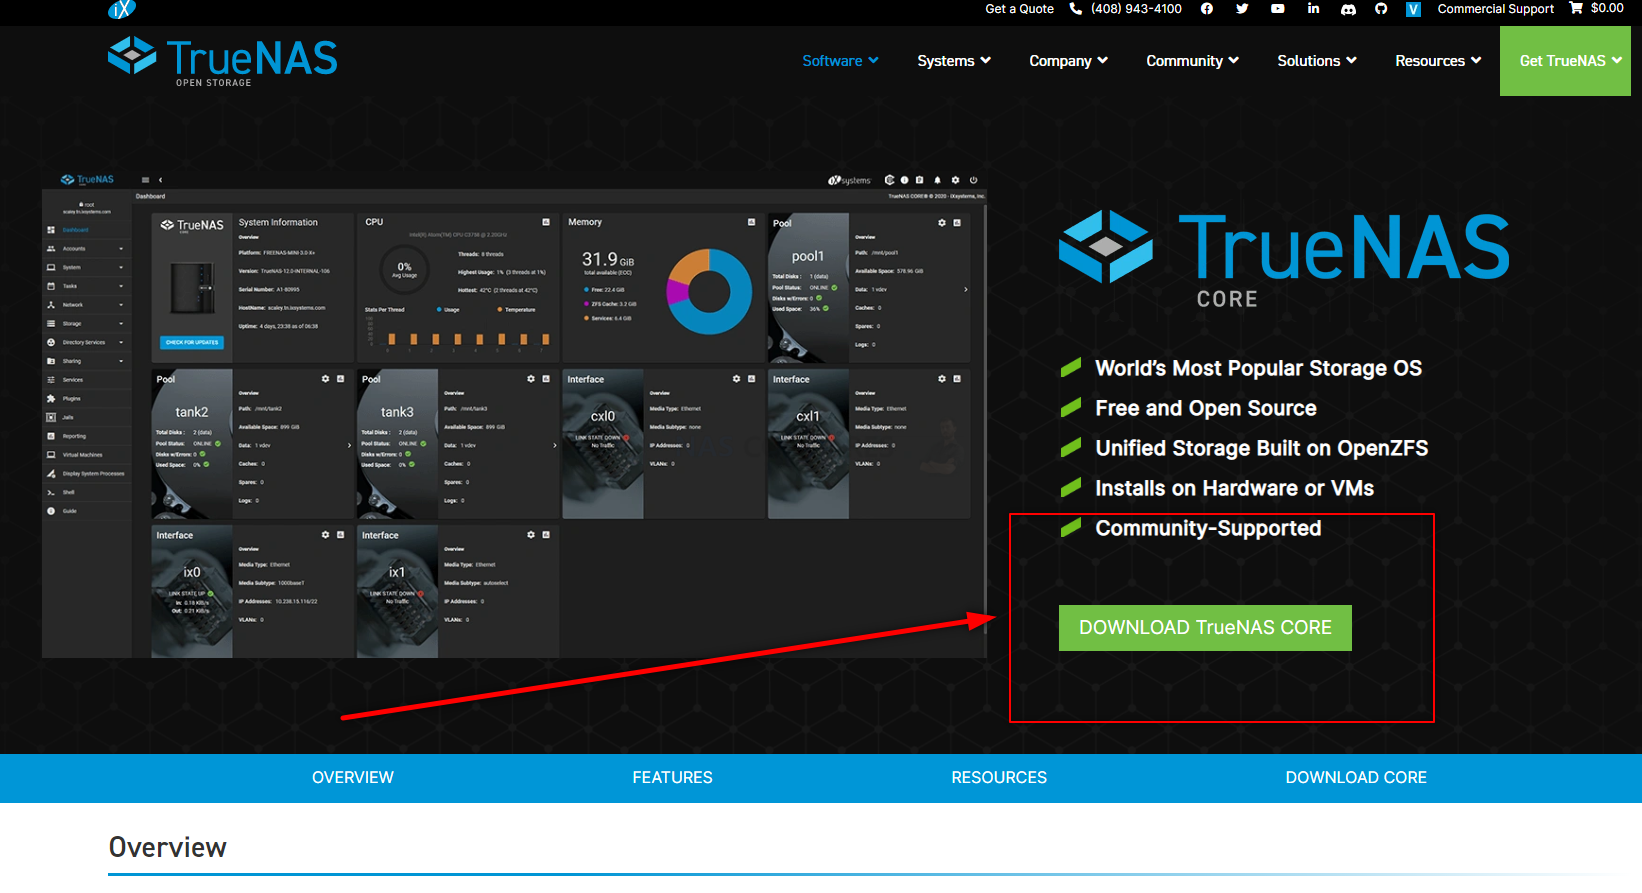
Head to the TrueNAS Core website HERE and download the latest stable release of the software to your local PC, Linux or Mac system. Make sure to remember where you downloaded it.
TrueNAS Core on an Asustor NAS – Step 2, Download Rufus USB Image Tool
Head to the Rufus website and download the latest version of that tool – I recommend downloading the standalone executable file here, as then it will immediately run when you double-click the file, without installation etc. It may redirect you to Github, but it will be the same executable file. Once again, remember where you downloaded it.
TrueNAS Core on an Asustor NAS – Step 3, Preparing the USB
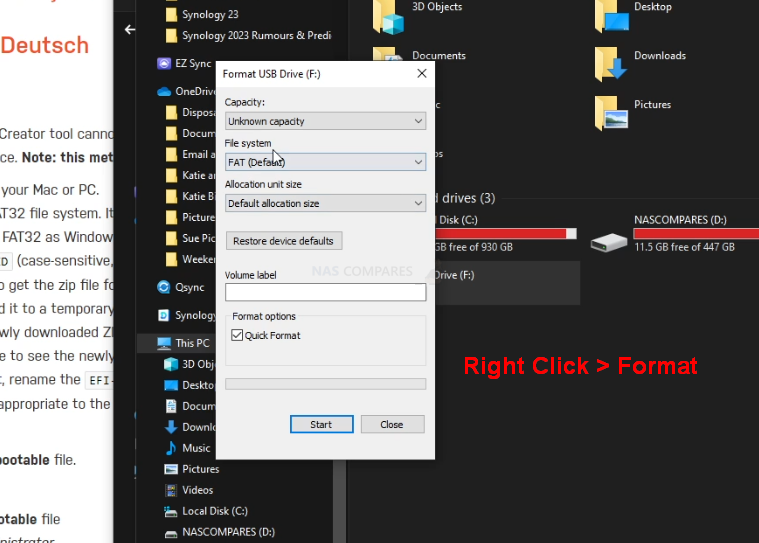
Connect the small form factor USB Drive to your system (again, this is the one I used from Sandisk) and after a few seconds, it should appear as an available USB Drive. The drive MAY need formatting (you will be prompted to do so), if that is the case, then you can format it via the system prompts and by default, it will format it to FAT32 (as long as your USB is less than 32GB). If you are not presented with a system prompt to format your USB, then you can head into My PC, or My Computer via a windows computer and right-click the drive, select ‘format’ and format it that way.
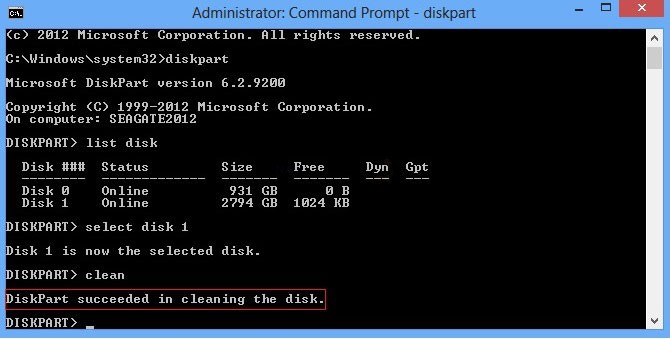
If you have used the USB for other things previously, there is a chance that the drive has existing partitions in place. For that, the quickest way to completely remove any partitions is to open up the bottom-left windows system menu as normal, and then just type diskpart and open the command-line GUI tool. From there, use the command list disk to show the available drives that are connected, you will see your USB (normally disk 1 or 2, but can differ depending on your system layout and can be spotted by the storage amount). From there, type select disk # (where # is the drive number that your USB is shown as) and then type clean, which will then remove any index structure for the drive (i.e the partitions and existing format) and then you can go back to the My Computer/My PC page and format the drive to FAT 32 as normal.
TrueNAS Core on an Asustor NAS – Step 4, Creating a USB Installer Image of TrueNAS Core
Open the Rufus application and from there you will see the USB Drive (listed as NO NAME, or ‘UNTITLED’, ETC) at the top. From there, look to the select image/find image option (depending on the ver. of Rufus or your USB Image Creator tool of choice) and find the TrueNAS Core disk image you downloaded earlier). If the drive is not listed, it may have downloaded as a compressed/archive file. If that is the case, head to the location of where you downloaded TrueNAS Core (in your file explorer, not in Rufus) and right-click the file you downloaded. If the option to ‘extract‘ is visible, then you can extract it (i.e unpack it to the original form) in that same download directory. From there, head back into RUFUS and then the TrueNAS Core system image should be visible. Select it, then run the Rufus System image creator tool and create your USB bootable TrueNAS Core disk image.
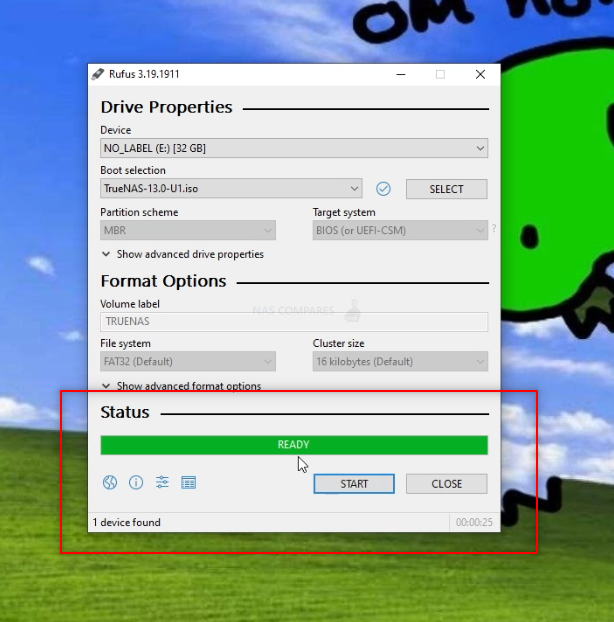
REMEMBER! This will completely format your USB drive and any files that are on that USB will be destroyed. The system image creator tool will turn the USB into a pure boot image tool – the USB will not be usable for traditional storage again unless you completely format it again.
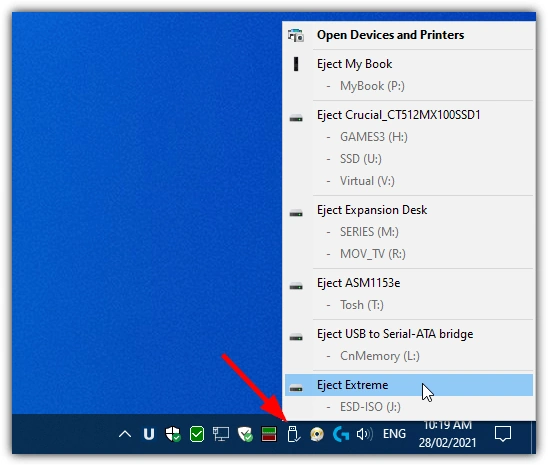
TrueNAS Core on an Asustor NAS – Step 5, REMOVE THE USB FROM YOUR PC!!!!!!!!!
Really, really important and sometimes overlooked. Once the USB creation is completed, you need to remove the USB (using the eject hardware safely option at the bottom right of your windows machine taskbar as normal). DO NOT accidentally leave the USB in your USB Ports for any longer than necessary. If you leave it in and your system reboots at any point (eg in a normal ‘end of day shut down, go home, reboot tomorrow’ scenario), then the system might boot directly into the TrueNAS Core installation and although it is easy to exit from, it can change your system default boot preferences, maybe even remove your primary boot drive as the OS drive – requiring a little messing with a windows installation disk to change it back. The odds of this are very small, but not zero, so make sure to safely remove your USB drive when the TrueNAS Core system image creator tool is completed.
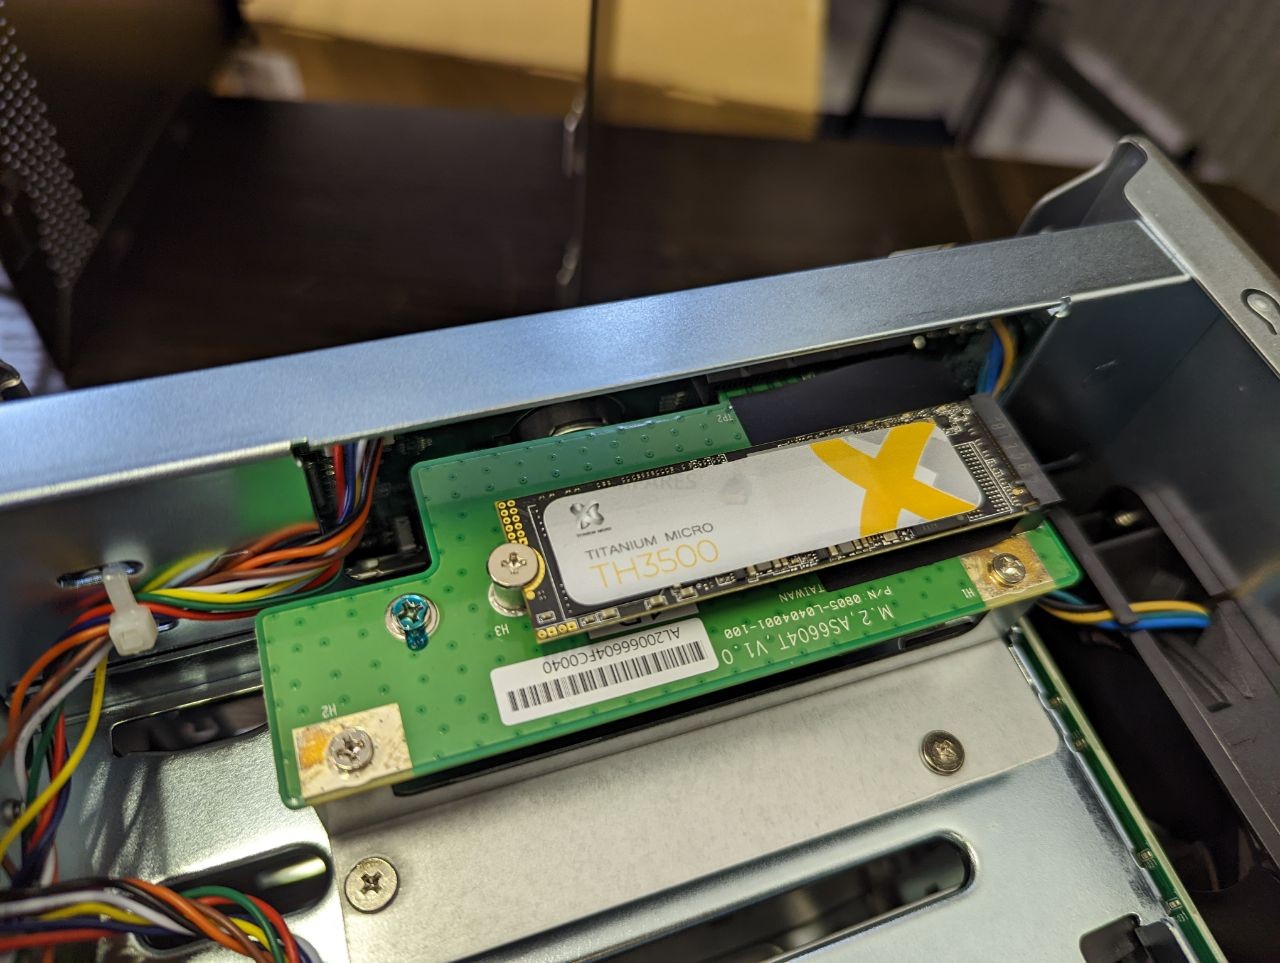
TrueNAS Core on an Asustor NAS – Step 6, (OPTIONAL) – Install an NVMe SSD
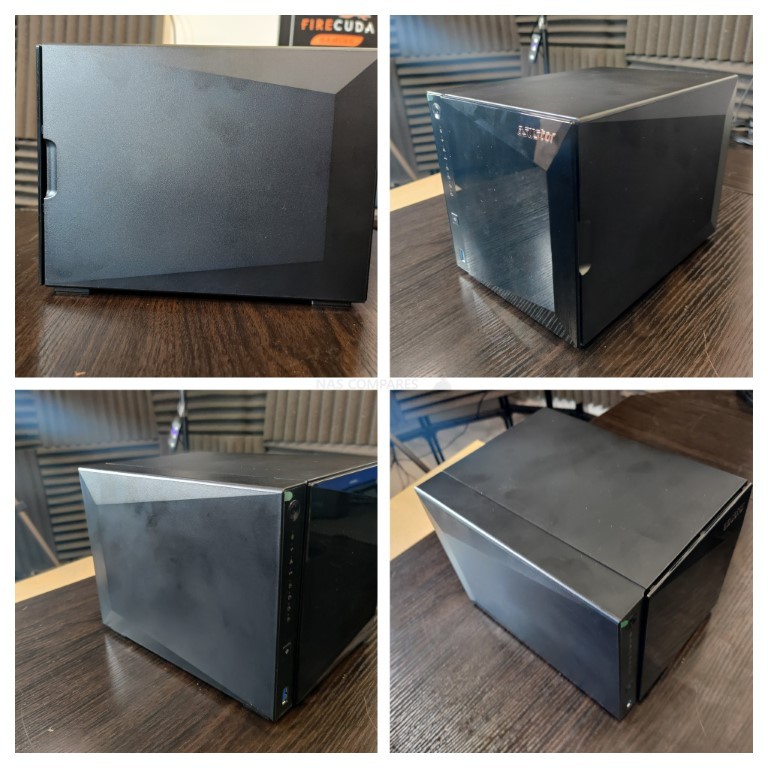
This is an optional step, but one I would certainly recommend for newer-generation Asustor NAS devices. TrueNAS is a lot like a traditional computer operating system (eg Windows or macOS) in it’s architecture and will run at its best when the necessary boot files are located on a separate, smaller and faster area of SSD/flash storage away from the general bulk storage. So, if possible/available in your Asustor NAS, I would recommend installing a smaller m.2 NVMe SSD drive and then using that as the target/location for your TrueNAS Core installation. This is not compulsory and you can also use a single HDD or SSD in one of the main storage bays of your Asustor, however, it means that this drive will unusable for general storage (i.e in any RAID configuration or storage pool). This CAN be negated with some creative portion creation, but I wouldn’t recommend it. Additionally, do NOT try to install TrueNAS Core on another USB drive that is connected to the system – this isn’t particularly stable and tends to result in a poorer TrueNAS Core experience. M.2 NVMe bays and their location in the Asustor NAS changes depending on the system. Some allow you to access these bays via the main HDD 3.5″ bays, whilst others (the majority) require you to remove the external chassis casing to access these bays (eg the Lockerstor 2 and 4).
Reminder – TrueNAS is NOT a big program and you can use an SSD as small as 32GB and still have a tonne of provision for future storage space. However, M.2 NVMe SSDs are not available in smaller sizes than 120GB. Lower size than this and you will generally only find 2240 SSDs and/or SATA M.2 SSDs. These are still perfectly fine to use, but the performance difference between SATA and NVMe (PCIe) is HUGE! You can find many SSD options here on amazon for as little as $30 – Find Low Capacitiy and Low Price M.2 NVMe SSDs HERE on Amazon (already filtered the results)
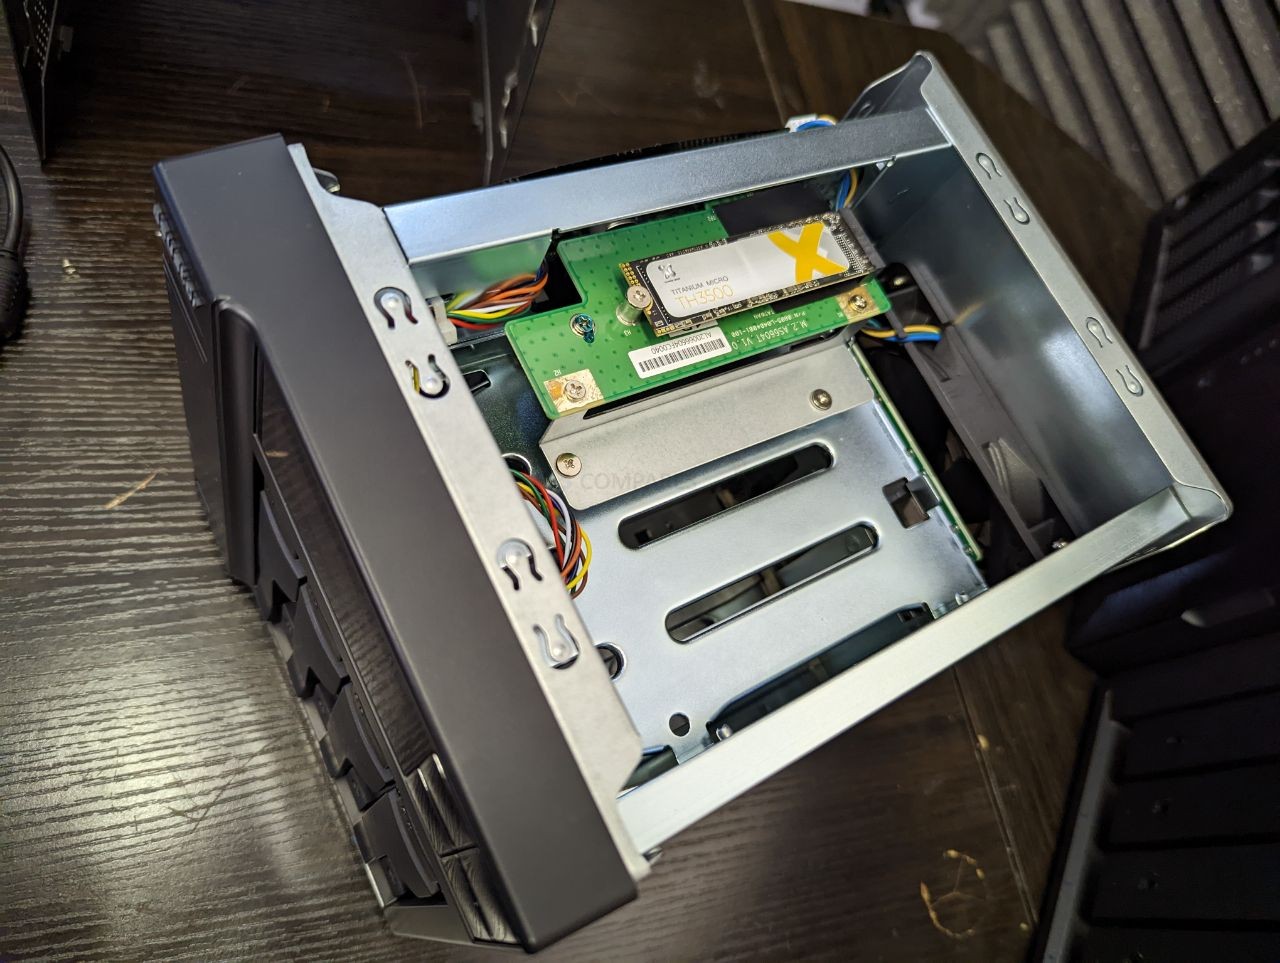
NOTE – If you plan on upgrading the memory of your NAS to 4GB-8GB-16GB or higher (in order to use ALL of the features of TrueNAS Core to their fullest extent), I would recommend doing so at this point before rebuilding the physical chassis again, as many Asustor NAS have the 2nd SODIMM memory slot in really tight locations.
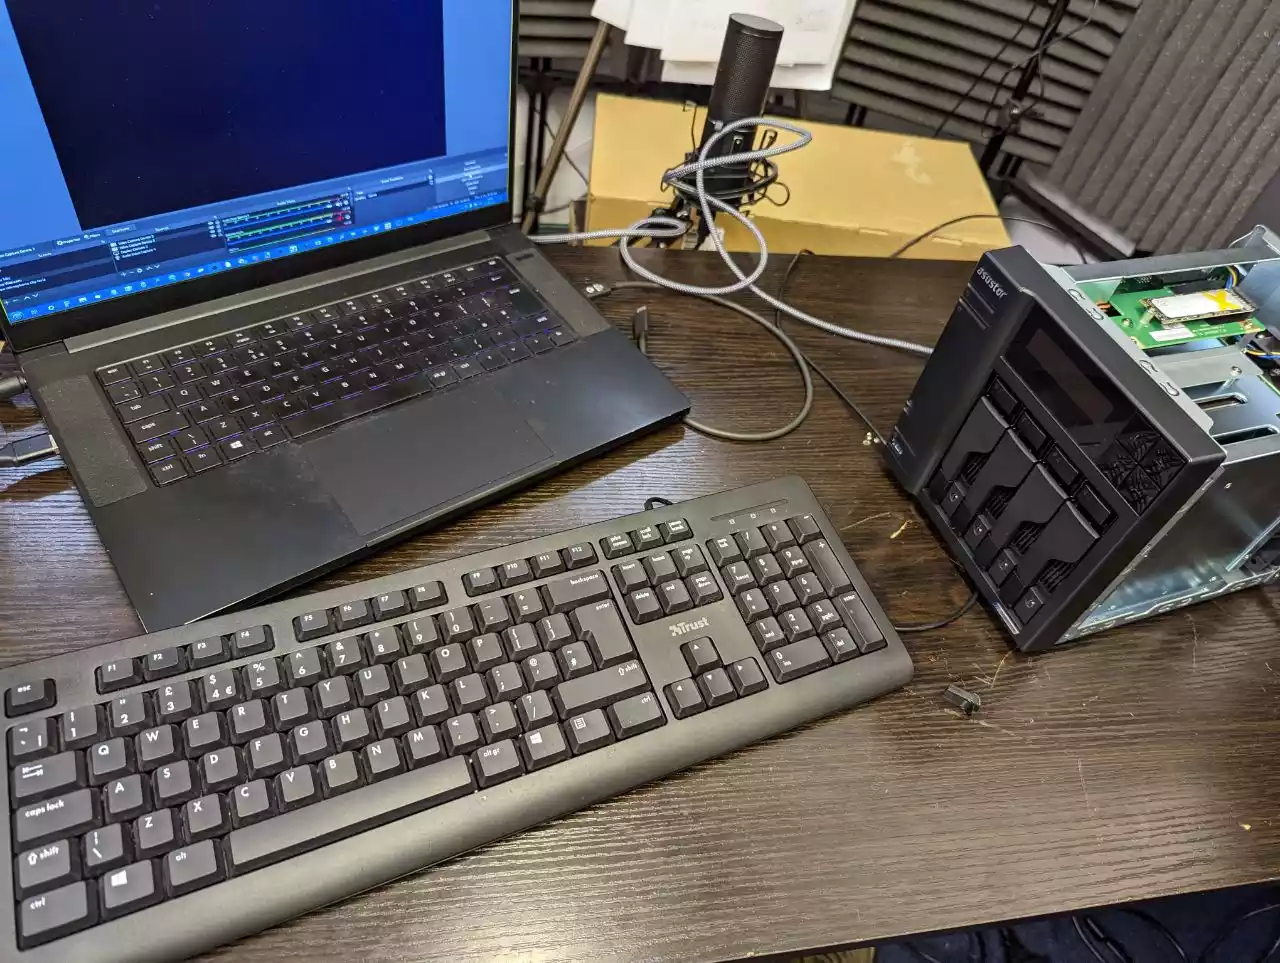
TrueNAS Core on an Asustor NAS – Step 7, Connecting the USB, Keyboard and HDMI Monitor
Next, we need to connect the external means to install TrueNAS Core on the Asustor NAS. Unlike when you set up your Asustor NAS for the first time, TrueNAS cannot typically be installed via the network like ADM. TrueNAS requires you to use a KVM (keyboard, Video Mouse – though you won’t need a mouse!) and go through the installation using a low-res graphical user interface. Now you will ONLY need this setup/items for the installation and initialization of your TrueNAS Core server and after that, you will be able to use the server over the network/internet as normal.

You are going to need a basic USB Keyboard (not a Bluetooth or wireless one, as these may need drivers to run and you cannot install drivers at this point) and an HDMI Monitor/TV. You CAN use a mouse, but it is not hugely necessary and 99% of the choices in the setup of TrueNAS core can/will be via keyboard input. Also, I would also recommend connecting the NAS to the network during setup as this will allow the system to assume certain network values during setup that will save a tonne of time later. Once that is all connected, do NOT turn the NAS on yet – there is one small and slightly time-sensitive thing to do.
TrueNAS Core on an Asustor NAS – Step 8, Accessing the BIOS Menu of your Asustor NAS
Now that your Asustor NAS is all connected and you are ready at your keyboard/Monitor, turn the NAS on and wait till you hear a beep and you should see the boot screen of the motherboard splash on screen

As soon as you hear that noise (and likely see a flashing character or underscore on the monitor screen), you need to continuously hit the ESCAPE key.
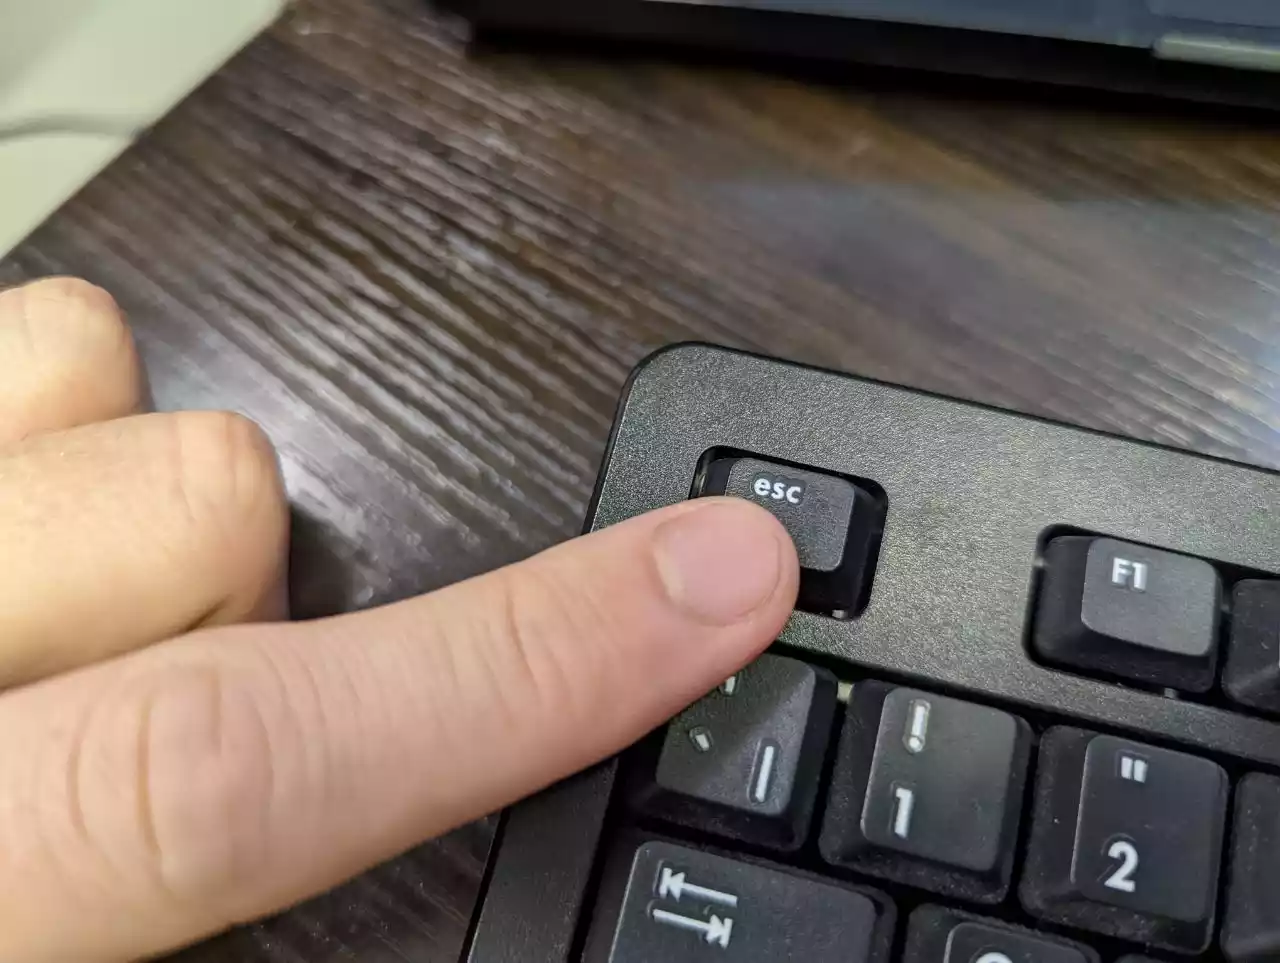
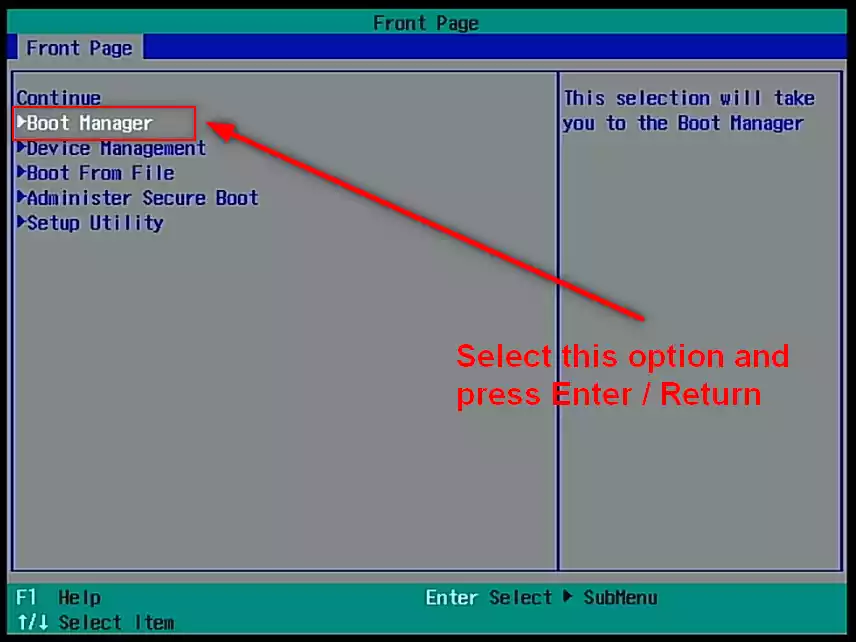
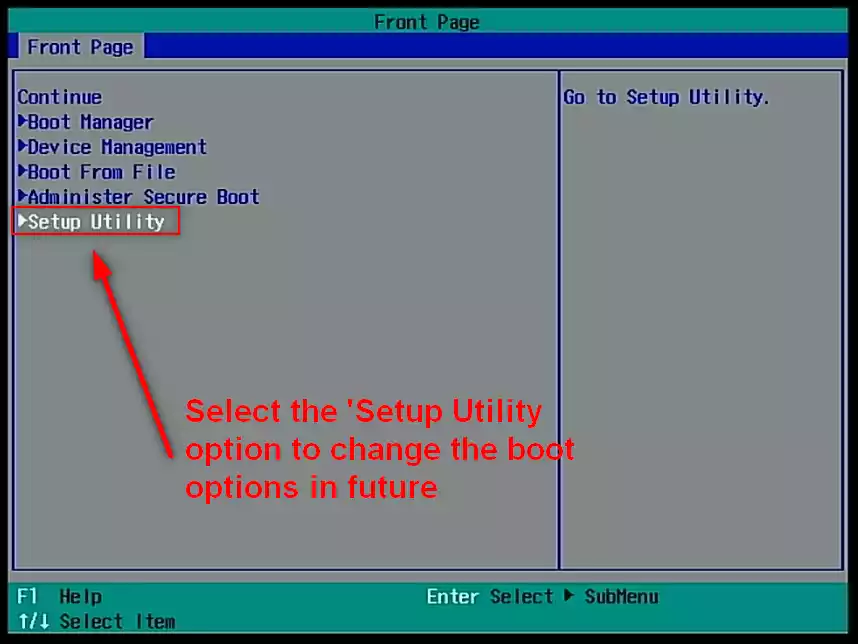
Doing this will (eventually!) result in the system displaying the blue BIOS menu (it changes between motherboards and Asustor uses a mixture of mobos in their Intel and AMD-powered systems). You need to be quick, as you only have about 3 seconds to do this before the Asustor will automatically boot from the small internal flash OS module that boots into Asustor. Once you see the page shown below, you need to select the ‘Boot Manager’ option:
TrueNAS Core on an Asustor NAS – Step 9, Booting from the New TrueNAS Installer USB
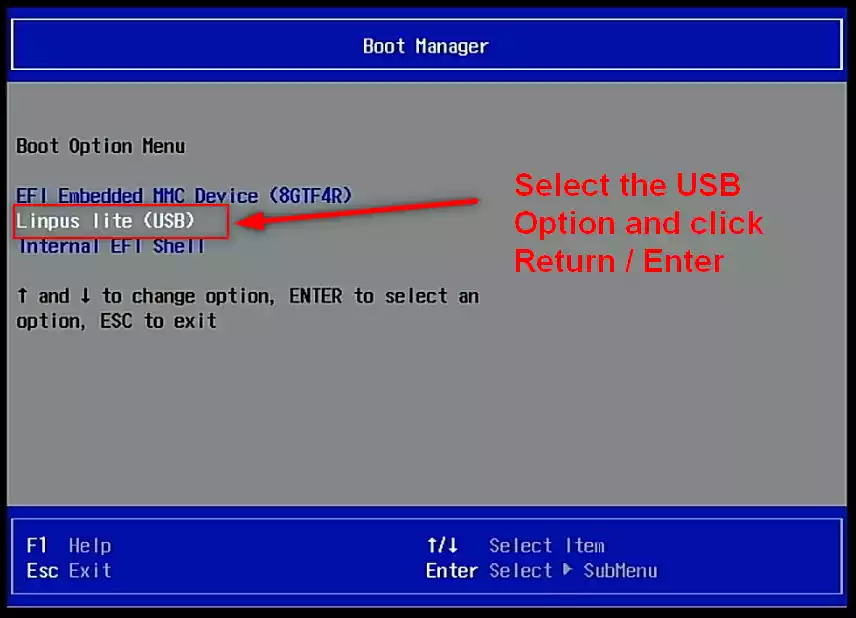
Tap ‘DOWN‘ until you are highlighting the USB and then tap ‘Enter‘ or ‘Return‘ on your keyboard, as this will push the Asustor to boot from that USB and begin the TrueNAS Core installation. Later on, I will show you how to force the system to ALWAYS boot into TrueNAS Core, but for now, we just need it to read from this USB this one time.
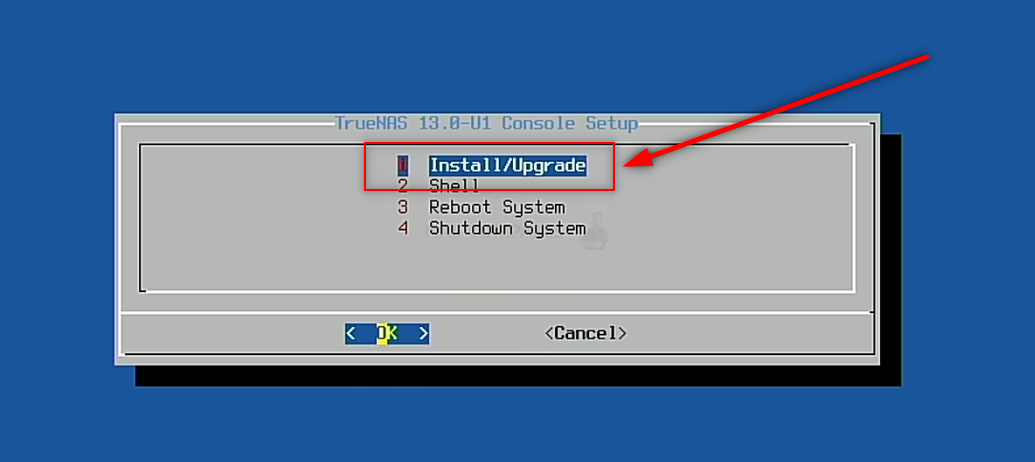
TrueNAS Core on an Asustor NAS – Step 10, Rebooting and Starting the TrueNAS Installer
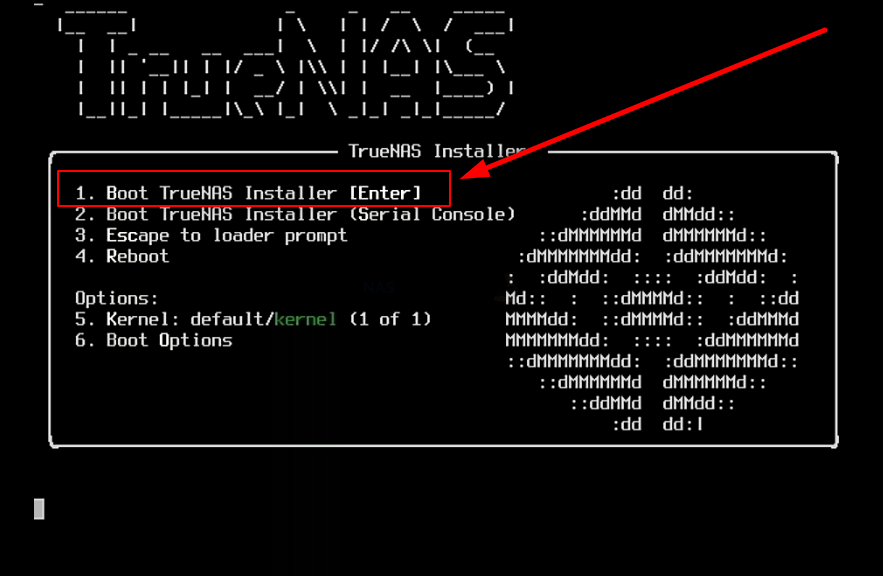
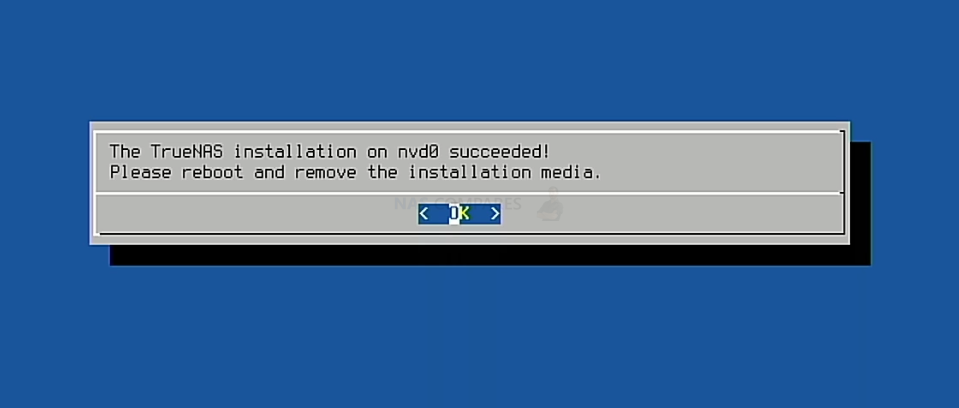
This next step is a bit of a quick one. Around 5-15 seconds after you selected the USB Drive in BIOS, the screen will display the TrueNAS Installer option page. Tap ‘Enter’ as soon as you see it, as the page is on a countdown and when it reaches zero it will (possibly, depending on the version) reboot and then you will have to repeat the last few steps again!), So, in order to avoid this, tap ‘ENTER‘ as soon as this page appears.
After a few minutes, the TrueNAS Core GUI/Command will appear on your monitor and all you need to do is navigate the config choices to set up your TrueNAS Core NAS the first time.
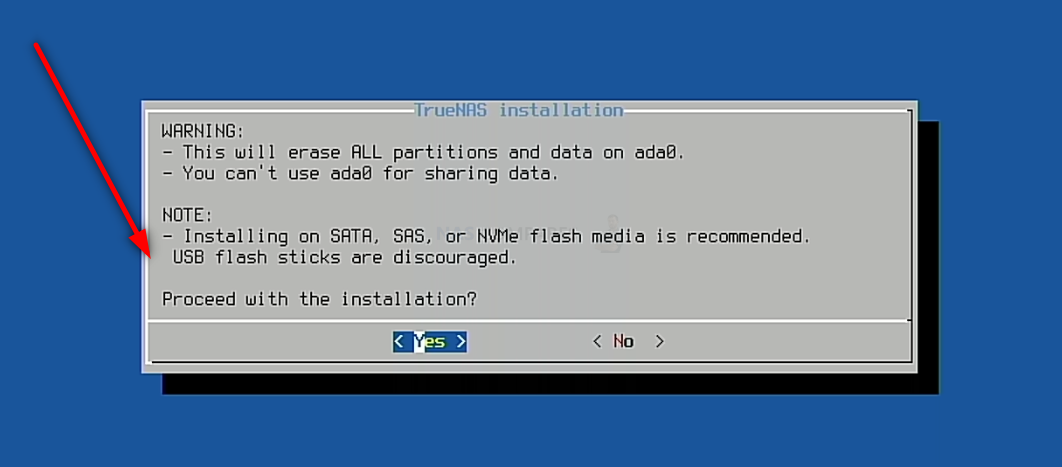
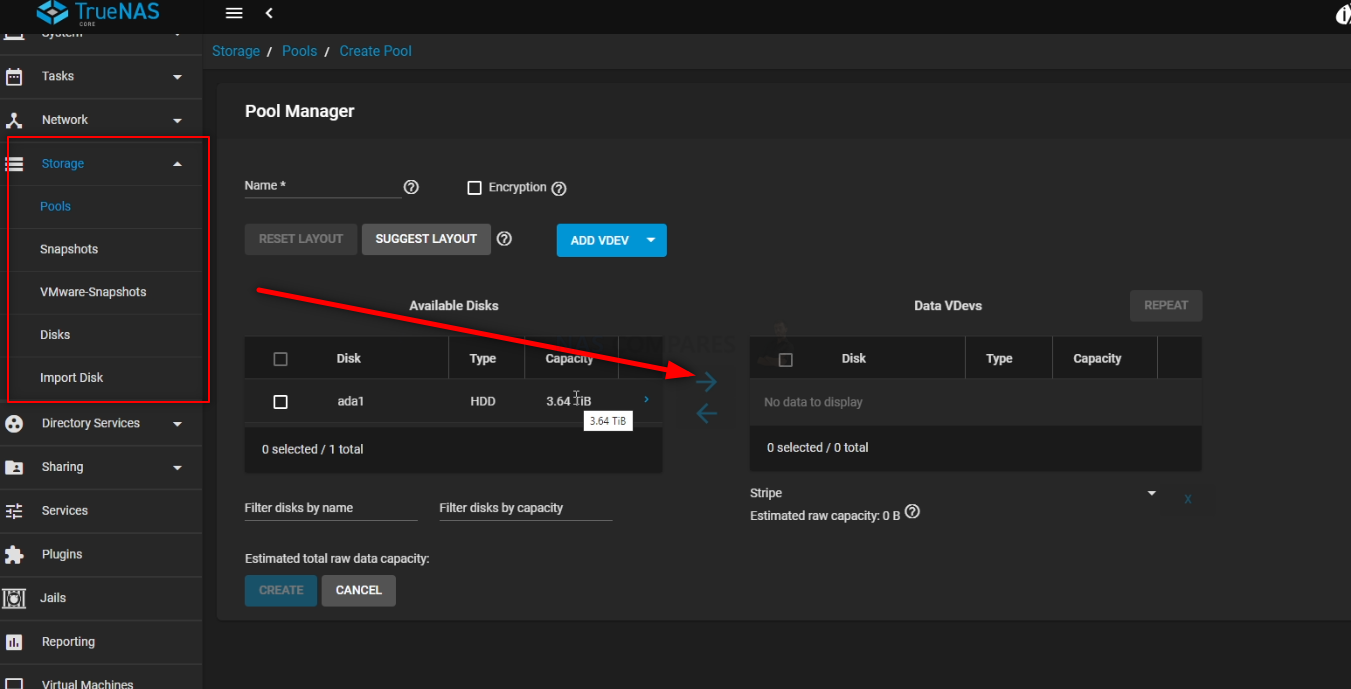
Important – TrueNAS Core runs at its best when it is run on a separate drive from your storage. Much like an Operating System, you can install TrueNAS Core on an available SSD in a SATA or NVMe SSD slot in the Asustor NAS, then (after initialization) you can go into the TrueNAS Core > Storage area and create a pool of storage using the available storage media bays,

It is NOT recommended that you install it on a USB drive, for reasons of speed and power-connections.
After you have completed the setup and are back at the initial TrueNAS Core boot menu, select the ‘SHUTDOWN‘ option (not reboot/restart, for reasons I will explain in a moment).
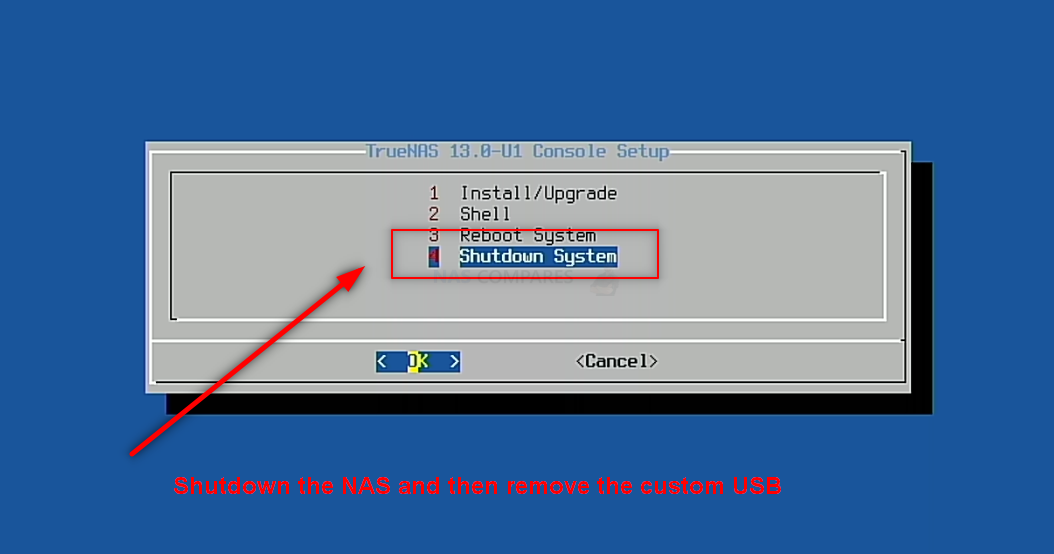
TrueNAS Core on an Asustor NAS – Step 8, Remove the Boot USB Drive AND CHANGE BIOS!!!
Once your Asustor NAS has fully powered down, you need to disconnect the USB drive you installed earlier with TrueNAS Core boot loader on it. You need to do this otherwise, when you reboot the Asustor NAS, it can potentially reboot into the bootloader again. You can skip past this and/or it will not action a reinitialization without your input, but better to remove the USB and therefore allow the system to always immediately boot into the TrueNAS Core system you just created.
Next, you need to head back into the BIOS from earlier. Keep the Keyboard and HDMI Monitor connected and use the same method you used earlier during the initial boot of the Asustor (pressing ESC / ESCAPE repeatedly when you hear the first Asustor beep after about 10-15 secs) and as soon as you are greeted with the familiar blue BIOS screen. At the initial screen, tap Down and select the ‘Setup Utility’ Option:
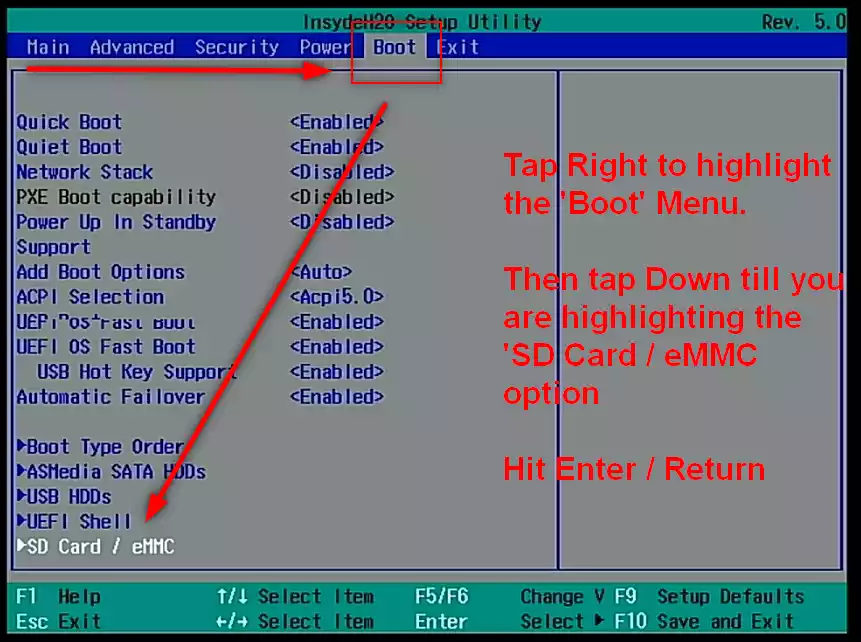
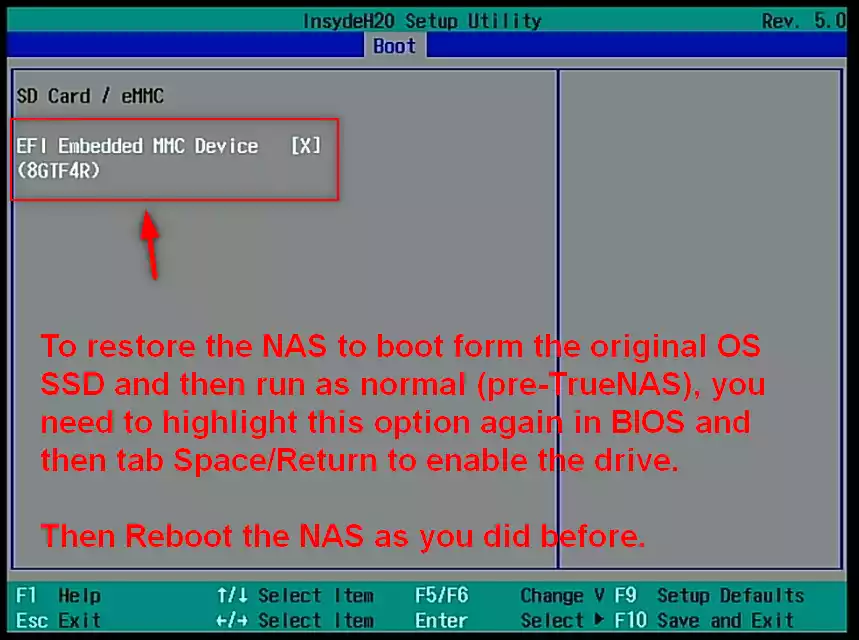
On the next screen, tap Right until you have highlighted the ‘Boot’ Menu. Then tap Down until you have highlighted the ‘SD Card / eMMC’ option, then press Enter / Return:
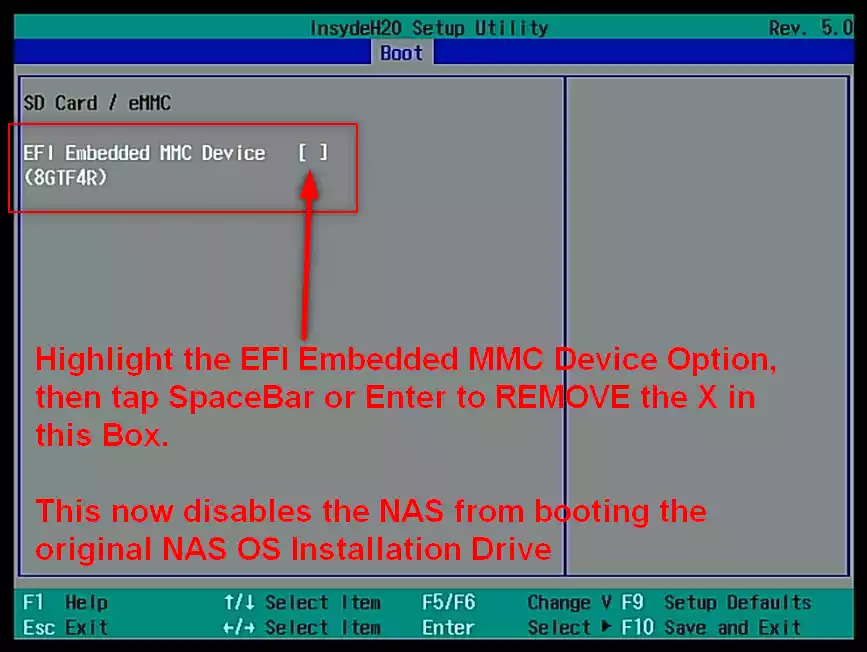
The next screen should show you the internal SSD/FLASH drive that the Asustor NAS arrives with (that contains the ADM software, accessed for initializing the NAS the first time, as well as assisting with any issues/repairs in the ADM software down the line). You need to highlight the drive (the name will differ, depending on the Asustor NAS model) and then press Space / Enter to REMOVE the X from the box. This means that the NAS will no longer attempt to access this drive and from this moment, the drive you installed TrueNAS Core onto will be booted from first.
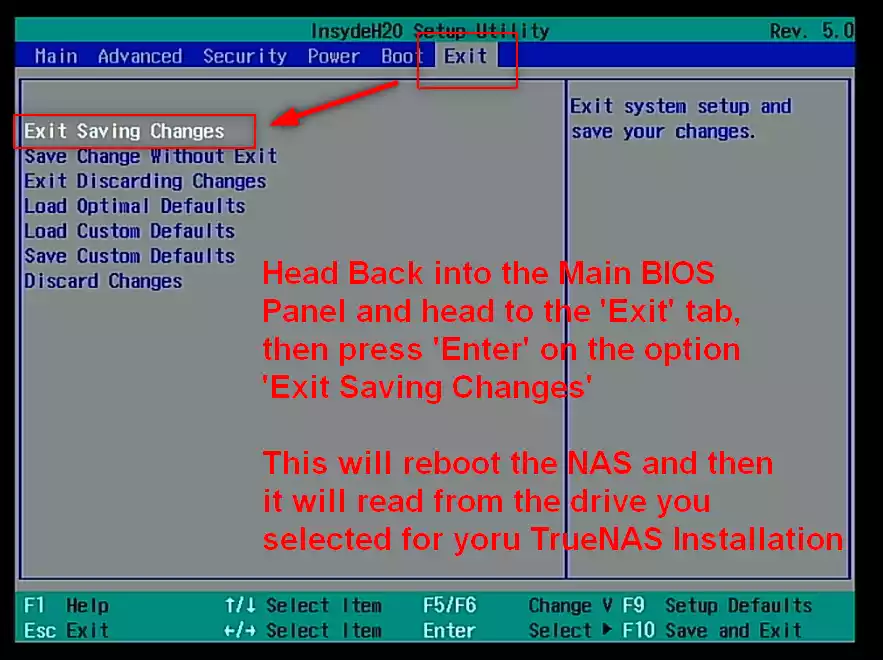
After this, you can click right again in the BIOS menu to select the option to Save and restart. The system will then boot into the TrueNAS initialization (first-time setup).
TrueNAS Core on an Asustor NAS – Step 9, Reboot the NAS
Upon rebooting the Asustor into TrueNAS Core (can take up to 5 mins, but usually much quicker). You have two options with how to access the configuration and controls. You can use the HDMI+Keyboard if you choose for console/command level access.
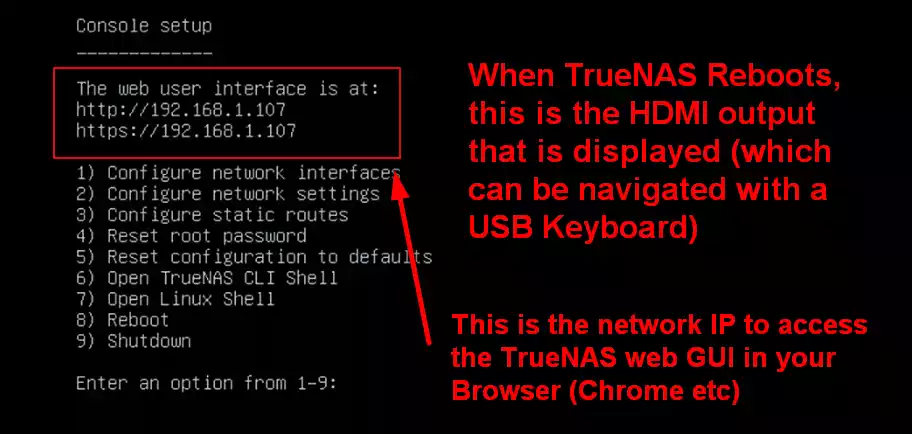
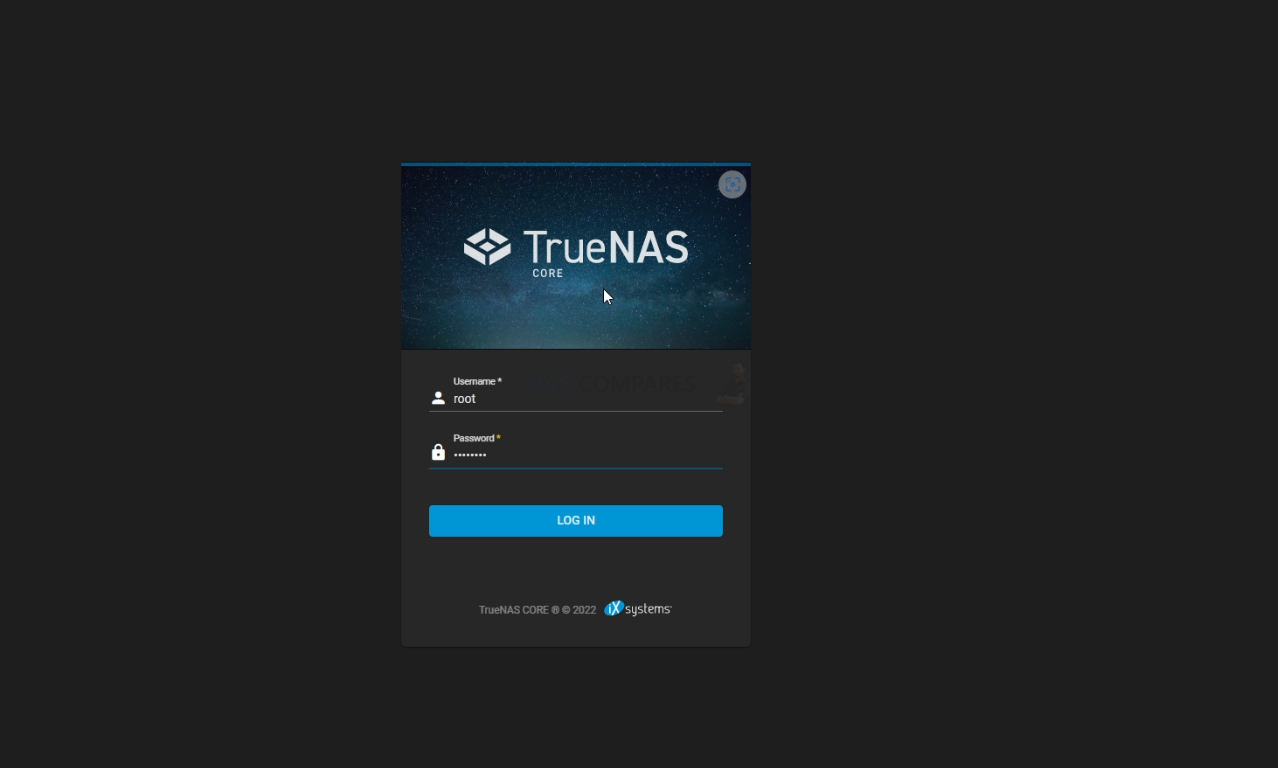
Alternatively (much more recommended), use a program such as Advanced IP Scanner, which is free and VERY useful anyway, or even network command prompt) to scan your local area network and find where the Asustor with TrueNAS Core is located (i.e it’s IP). This IP (eg 192.168.1.111) is what you put into the URL bar ofay web browser and it will load into the login GUI for TrueNAS Core. From here you will need to use the username ‘root’ in combination with the password that you created during initialization.
And that is about it. You now have TrueNAS Core installed as the default OS of your Asustor NAS. From here you can do anything and everything that his highly regarded ZFS powered server software offers. Head into the Storage area and start creating pools, as well as areas for caching and lots more features.
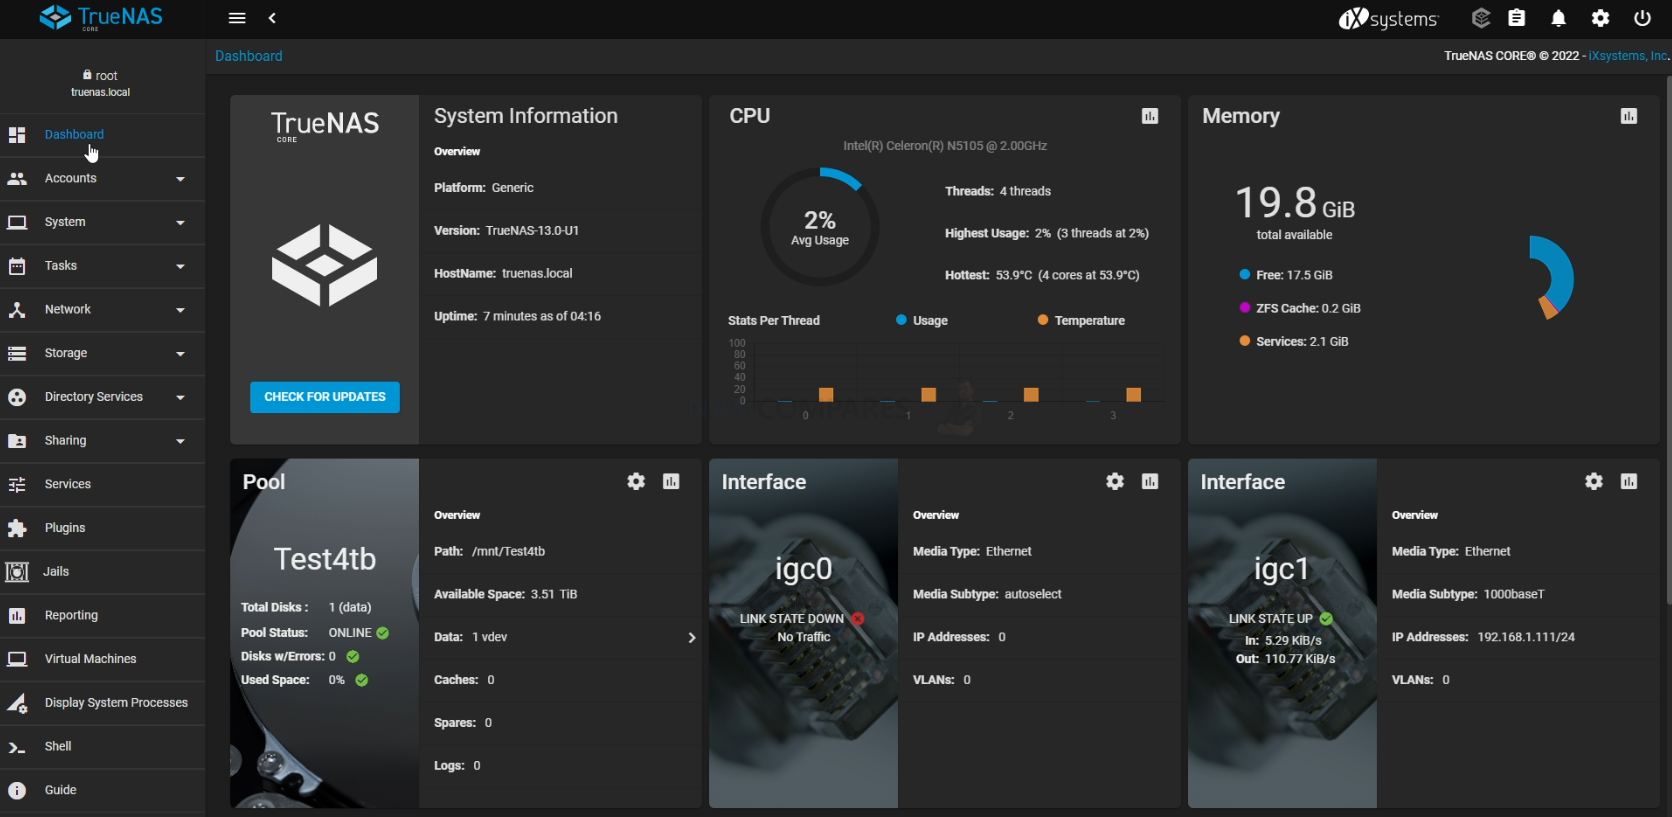
TrueNAS was recently updated to ver.13 in a stable release of the FreeBSD format, as well as new improvements in the Linux-based version ‘TrueNAS Scale’. The first thing you are going to need to do when setting up your TrueNAS Core > Asustor NAS server is set up your storage. Do this by heading into the storage tab and following the handy steps on screen. After that, you can pretty much do anything on your new ZFS NAS!
EXTRA – How to Reverse Your Asustor NAS from TrueNAS Core to Asustor ADM / ADM Software Again
Now, it is worth remembering that switching your Asustor NAS to run TrueNAS Core instead of ADM is not a one-way street and you can reverse this relatively easily. Do remember first though that:
- Any data on the HDD/SSDs inside the Asustor that were used in TrueNAS Core server setup will not be accessible/usable with the Asustor NAS system and will likely be flashed/formatted during the Asustor ADM reinitialization
- You will need your Keyboard and HDMI Monitor again in order to get back into BIOS
- If you kept your original Asustor RAID Pool on HDDs etc to one side (i.e you removed the already configured storage media in their RAID from the Asustor when you changed to TrueNAS and put these drives safely to one side), you should be able to migrate this data back into the Asustor NAS during re-initialization with ease. That said, YOU SHOULD ALWAYS HAVE A BACKUP FOR THIS DATA REGARDLESS
In order to reverse the Asustor NAS from TrueNAS Core back to Asustor ADM Software, you need to (from a cold boot) access the BIOS menu again (so, at boot, with your Keyboard and monitor connected, press the ESCAPE over and over when the Asustor beeps, like before) and when you reach the BIOS menu. Then repeat the steps from earlier in this guide to get back to the ‘SD Card / eMMC’ option. Then you just need to use the Space/Enter key to put a cross back in the confirmation box. Doing this will restart the Asustor NAS and it will automatically boot into the Asustor ADM boot sequence. From here your NAS will either automatically boot into the Asustor Setup page OR (if you have your original Asustor NAS RAID drives, with their Pools, Volumes, etc) it will just boot into the Asustor NAS software as normal.
You can find out more about TrueNAS in my full review below that covers everything I like and dislike about the platform:
Thanks for reading! I hope you found this helpful and that it really helped you to make the most of your storage. Want to help me continue to make more guides, reviews and tutorials on the subject of NAS? Then you can do so in a few different ways (any of which I will be eternally grateful for if you choose to!). You can visit the ‘Support NAS Passion’ page HERE and see a few different ways that you can help us keep the lights on. Alternatively, you can use one of the links below to shop for your hardware today or in future (visiting those sites via the link below ensures that we get a mall commission on absolutely anything you purchase – and doesn’t cost you anything extra). Finally, if you want to support us in spirit rather than financially, recommend our blog to a friend or professional colleague or share a link on your social media site of choice. Thank you for reading and have a fantastic week!
| Where to Buy a Product | |||
 |
    
|

|
VISIT RETAILER ➤ |
 |
|
|
VISIT RETAILER ➤ |
📧 SUBSCRIBE TO OUR NEWSLETTER 🔔
🔒 Join Inner Circle
Get an alert every time something gets added to this specific article!
This description contains links to Amazon. These links will take you to some of the products mentioned in today's content. As an Amazon Associate, I earn from qualifying purchases. Visit the NASCompares Deal Finder to find the best place to buy this device in your region, based on Service, Support and Reputation - Just Search for your NAS Drive in the Box Below
Need Advice on Data Storage from an Expert?
Finally, for free advice about your setup, just leave a message in the comments below here at NASCompares.com and we will get back to you. Need Help?
Where possible (and where appropriate) please provide as much information about your requirements, as then I can arrange the best answer and solution to your needs. Do not worry about your e-mail address being required, it will NOT be used in a mailing list and will NOT be used in any way other than to respond to your enquiry.
Need Help?
Where possible (and where appropriate) please provide as much information about your requirements, as then I can arrange the best answer and solution to your needs. Do not worry about your e-mail address being required, it will NOT be used in a mailing list and will NOT be used in any way other than to respond to your enquiry.


|
 |


Minisforum G7 Pro Review
CAN YOU TRUST UNIFI REVIEWS? Let's Discuss Reviewing UniFi...
WHERE IS SYNOLOGY DSM 8? and DO YOU CARE? (RAID Room)
UniFi Routers vs OpenWRT DIY Routers - Which Should You Choose?
WHY IS PLEX A BIT S#!t NOW? IS 2026 JELLYFIN TIME? (RAID Room)
Synology FS200T NAS is STILL COMING... But... WHY?
Access content via Patreon or KO-FI
Discover more from NAS Compares
Subscribe to get the latest posts sent to your email.
Thanks for the video! Just wanted to mention everyone should have a USB stick with ventoy on it. It makes a bootable USB drive with some utilities on it but more importantly you can just drop iso images on it in a file manager and when you boot from it it lists all the isos on it and you can run the installers from the menu. A must have
REPLY ON YOUTUBE
Would this same approach work for ZimaOS on a QNAP machine? But I am guessing/hoping the hardware requirements would be lower for that then TrueNAS?
REPLY ON YOUTUBE
Blingedy blongedy! ????????????
REPLY ON YOUTUBE
My TS451+ boot from USB via UEFI but doesnt boot TrueNAS with UEFI-Option…
What can i do?
REPLY ON YOUTUBE
Hi, so i have a m.2 already installed in my qnap and it’s assigned as a cache drive. Can i still use it regardless? Or should i put a second one in and use it instead?
REPLY ON YOUTUBE
Have no idea what is going on those permissions.
However.. on my xcp-ng server all i needed to do was to pass through an lsi controller and plug in a disk and by magic it picked it up immediately. Dropped in 5 more driver and a few seconds later i has a zfs pool.. v cool
REPLY ON YOUTUBE
BIOS Asustor (он же материнская плата Acer) в принципе не предусматривает установку системы на диск. Только на флеш USB.
Потратил 5 дней разбираясь с этим.
Можно установить Xpenology но она рандомно перезагружается в неожиданных ситуациях без явных и видимых причин.
REPLY ON YOUTUBE
Wondering if my TS-559 Pro+ would work well with TrueNAS. I believe it has an 1gb ram and an Atom 1.8ghz Dual core. Yes its 64-bit, but… eeeeeehh… Any thoughts?
REPLY ON YOUTUBE
To get into the BIOS on a newer (Jasper Lake based) Asustor NAS like AS5402T/AS5404T or AS6702T/AS6704T/…, you need to press F2 instead of Escape.
A helpful and clear guide to the install, and how to revert back. Very Good indeed. Thank You.
REPLY ON YOUTUBE
I have a qnap 453D 4bay, but dubious to try as I have truenas core 13 on a 10th gen intel pc and it wont launch in uefa mode and doesnt support 2.5gb
REPLY ON YOUTUBE
mate ..with the volume you speak at the noise of spinning disks and NAS hum is negligible .. lol
REPLY ON YOUTUBE
I just want to say thank you! I have been watching your videos for a bit now and the passion, and need for the truth with no bull sh#t comes through along with the love of what you do. That’s why I can sit and listen to an hour about True Nas and it is compelling at 58 minutes just as it was at 2 minutes. So again thank you for the incredibly tedious and hard work that you do!
REPLY ON YOUTUBE
With this does the front light panel still work properly
REPLY ON YOUTUBE
Great tutorial.
REPLY ON YOUTUBE
I just gave my old QNAP ts-453 mini a second life by installing Truenas with your help. Thanks a lot! I’m eager to try it out. I’m already running a XPenology pc as a “fake” Synology and it works a charm. Luckily I bought the 8 Gb ram modules with the QNAP back in 2015…
REPLY ON YOUTUBE
Ive got the TVS-863+ with an 10Git-NIC. Does TrueNAS support it? Since I didnt have an M2 drive, can I use a 3tb hd for installation? I know its overkill.
REPLY ON YOUTUBE
The only good QNAP unit is one that is running Truenas core. I sold of my other QNAPs 2 years ago as I was completely fed up with the startup/shutdown, firmware update times. I never had my opened to the internet, but the bugs they had. Some of their apps had crazy memory leaks and I would have to run the feature to reclaim the RAM. I installed two M.2 SSD and installed truenas on them as mirrored and currently have 6 12TB seagate EXOS HDDs with 2 spare bays empty. It has been running very well for about 1.5 years. It is my off-line archive unit that I connect power and network once a month to backup and turn off and disconnect again. I had to mcgyver the case as the TS-873A which had the Radeon chip ran very hot and they had a joke of a fan for cooling it. I cut in to the case and mounted an 80mm fan. It is noisy now, but the CPU SoC only get to 50C max instead of reaching 92C. I also replaced the the two internal fans with better ones as well. Also remove the DOM. Have 32GB of RAM and room to go upto 64GB of RAM. Of course installed a video card and room for a 10GB NIC. Friends don’t let friends use QTS. My main truenas uses a supermicro MB with Xeon Silver, 164GB RAM in a supermicro 3U rack chassis case with 16 bays for 3.5″ HDDs and a cage holding two 2.5″ SSD mirrored for booting. Three pools, with the biggest being 30TB for media.
REPLY ON YOUTUBE
I always wonder why I should use an IP scanner, I guess most of us have an DHCP server (e.g. router/firewall) in the network, so you can simply lookup the NAS IP there ????
REPLY ON YOUTUBE
How large is the eMMC storage on a 4TS53D/E, it might not be advisable to doze over it without some backup in place, but let’s say that:
a) I’m out of warranty
b) Im not co concerned about potentially perma-bricking the Device
Could I (At least), in theory install to this eMMC? Or would it be pointless, ’cause QNAP were careful to only bless it with just enough capacity to store its own OS
(i.e. QTS), on it?
REPLY ON YOUTUBE
Could this be done on last gen systems without an embedded m.2 slot(s), via a QM2 Card?
REPLY ON YOUTUBE
I just this year ventured into the universe of having my first NAS. I purchased the QNAP TS32-PX and I am thinking that I cannot switch this unit over to TrueNAS, can someone confirm that for me? I just looked at my manual and I don’t have any sort of port to connect up a monitor, only USB slots and Ethernet. The manual also names an unusual CPU which is Annapurna Labs Alpine AL324 4-core 1.7 GHz ARM 64-bit so I really am leaning to the conclusion that I cannot switch over but still prefer to get some opinions please.
REPLY ON YOUTUBE
TrueNAS Scale works on my as6704t! Installed the OS on an old SATA SSD I had handy. I will install again on when my nvme SSD and two WD reds arrive later this week. The NICs worked without any configuration changes. Will tackle the fan issue once this is all set up.
Just received an AS6704T – can confirm that the BIOS can be accessed by pressing F2 at boot. Drives are arriving on Thursday and I’ll be attempting an TrueNAS install that night. Will report back.
Important information for anyone who is buying the newer ASUSTOR models. I bought the new AS6702T and it appears ASUSTOR started to block BIOS access. Mashing the ESC key game me a BIOS screen for a split second, I had to record a video to even see what it displayed, because after that it just stayed on the flashing cursor and nothing would happen. It said system BIOS and system VIDEO shadowed. No idea what it means exactly but I couldnt get to “normal” BIOS with any key. After about two hours I finally found that F11 would get me to UEFI shell, where it displayed all drives and a startup script (from ASUSTOR). Bit of Googling and typing bootx64.efi managed to boot the USB with TrueNAS install and finally managed to get it installed. Now, after restart, the NAS goes to the TrueNAS automatically. I installed it on new NVMe drive so hopefully it didnt screw the original OS, however Im not sure if I will be able to boot into original OS even after I take out the NVMe with TrueNAS install.. Ill probably test it later on. Just be warned.
@NASCompares it would be great if you could get some info from ASUSTOR regarding this. If they really did hardened the way you can get another OS on their NAS. I mean I get it they want you to use their software but still, shitty move imho
REPLY ON YOUTUBE
If my goal is to have a NAS running TrueNAS in a small enclosure like a QNAP, is buying a QNAP or TerraMaster the best price-performance (and low-noise) option or is buying all the pieces separately better? (Time and effort to buy and assemble are not an issue). Thank you.
REPLY ON YOUTUBE
Couldn’t you just do the installation on a PC and then move the SSD with the TrueNAS system to the Qnap? Could be a way to install TrueNAS on Qnaps without HDMI out like the TS-h973AX.
Someone installed Unraid on a TS-973AX by simply plugging an USB thumbdrive into the USB port and booted without changing the boot order in bios. Seems USB drives have higher boot order than the builtin flash.
Another possibility could be to blindly enter the bios and change the boot order.
REPLY ON YOUTUBE
what are the possibilities for TS-251+, TS-253Be or any other Celeron based NAS that do not have M.2 slot?
REPLY ON YOUTUBE
Looking forward for a installation and setup video for Unraid on a Qnap nas, like TVS h1288x with all setups of the temp. Sensors, fans, etc.
REPLY ON YOUTUBE
Great video.
Polite request – can you sort out the audible thumps from banging the desk please? Either put a blanket over the desk and/or run the audio through a high pass filter set to around 100Hz to remove the low end noise pollution. I’m on ear buds and it drives me nuts…????
REPLY ON YOUTUBE
Is it just me, but the last few videos have had sound synching issues. This is the only channel I experience this and its just the last few. It’s quite distracting
REPLY ON YOUTUBE
So can qts be installed on non qnap hardware
REPLY ON YOUTUBE
I have an extra ts-453be with 4gb and thinking of trying TrueNas. I know you said 16 gb is recommended but will 4 work for Testing/playing and then I can spend the $$ if I think it works ok.
REPLY ON YOUTUBE
Thank u Sir
REPLY ON YOUTUBE
Qnap makes excellent truenas hardware Like really excellent.
REPLY ON YOUTUBE
Would love to see this same type of guide for unRAID on QNAP
REPLY ON YOUTUBE
Think I’ll try this on my now retired 451+
REPLY ON YOUTUBE
Thank you for the information. I have a couple of questions regarding this procedure: 1) What are the startup time difference between the original QTS (on eMMC/internal USB) to the TrueNAS on NVMe ?; 2) Will it be possible to install the QTS on the NVMe to compare startup times and loading of applications?
REPLY ON YOUTUBE
How about a video on How to Install Jellyfin on a QNAP..please?
REPLY ON YOUTUBE
Love this guide!!
REPLY ON YOUTUBE
This was really interesting. Since it is reversible, it could be fun to try maybe Windows, other Linux distros just to see how they work.
REPLY ON YOUTUBE
top guide, as usual, you’re great the most useful and resourceful guides, info, tips and tricks for NAS, amazing channel, incredible work; cheers!
REPLY ON YOUTUBE
Great guide!
REPLY ON YOUTUBE
Thanks!
REPLY ON YOUTUBE
i would only use ZFS when they allow you to expand your errays like raid5 lets you…
REPLY ON YOUTUBE
At first a 1-hour video seemed long, but every point mentioned was pertinent. And it’s the weekend anyway, so. 😉
Only addition I would have liked is an overview of network shares management.
And you are spot-on my user usecase/profile: Home techie power user currently using a Synology that likes its simplicity but that still keeps an eye on other totally open source platforms for a bit more control/flexibility (and lot more verbose logs!!). And so I agree with every single of your comments.
Indeed, an “easy” mode in TrueNAS or more wizards across the system would be greatly helpful because I may be tech-savvy at some level, still maybe not quite the TrueNAS level.
So to have something to bridge the gap between current TrueNAS “complexity” and Synology DSM “simplicity” would be perfect.
The other thing that makes me hesitating from leaving Synology ecosystem is the turn-key/hand-holding/well-integrated (DSM/mobile) apps. But even there — and it’s one of the reasons I’m looking elsewhere — is that in the recent years Synology has seemed to neglect all their non-business apps.
REPLY ON YOUTUBE
Compare this to UnRAID also.
REPLY ON YOUTUBE
I would find it very interesting.
If u would test out TrueNAS scale ad the review u have made now about TrueNAS Core.
It’s out of beta and in the release channel.
And it opens up a tons of possibilities as a Linux user, because of docker and k8s.
I really trust and enjoy ur indept reviews.
It would be great to see that for TrueNAS SCALE.
Best regards from me.
REPLY ON YOUTUBE
Adding a comment here to your most recent upload, hoping to get a reply. Watched 100’s of your uploads now. I need a new nas (4-10 bays). My old one died. Won’t be editing on it or doing anything taxing (fancy) with it, so not bothered with nvme caching etc. Just storing/accessing files locally via LAN. Best option? (Ideally with faster than 1.0GBe)
REPLY ON YOUTUBE
I’d be all over TrueNAS (and/or Proxmox), but I have a QNAP TS-453D and for the life of me I cannot boot off the internal drives. No, I am not happy booting off an external USB drive. Do you, or anyone, have any tricks to be able to boot directly off the internal drives on a midrange QNAP device?
REPLY ON YOUTUBE
Please compare to Unraid too. Thanks. ????
REPLY ON YOUTUBE
There is a debian version of truenas called truenas scale
REPLY ON YOUTUBE
Sweet! Great deep dive as always without being intimidating for us newbies rob! – bit the bullet last year on a tvs-h1288x due to your coverage and don’t regret it as it’s been great overall but with all the gross stuff that’s been happening in the qnap camp, definitely considering potentially repurposing it for a truenas. Possible?
REPLY ON YOUTUBE
I’m looking into a NAS system. But I don’t know how much I want to do with it. Right now I only want storage. But I also bought a raspberry pi 4 just for experimenting, and now I have: an add sinkhole, VPN server, Home Assistent, link to smart meter, DDNS server, selfhosted Bitwarden, node red, ZigBee network, and on and on… In just three months. So yea.. it will probably not only be for storage and will take over all tasks from the pi, start media server, couch potato, radarr, lidarr, security cameras with AI face detection, etc. I think I just have to go with TrueNas because eventually I want it all….
REPLY ON YOUTUBE
I was using freenas/truenas before I got a qnap for ease of use. Truenas wipes the floor with qnap, you just need some patience to get your head around the user interface. Please also advise everyone that you can run truenas on an old pc or in a virtual environment to test.
REPLY ON YOUTUBE
Yayyyyy Robbie is back! I bought a qnap based on your review. Your info was great. Its a shame that qnap decided to, there is no delicate way of saying this, shaft thier user base. I really think this is a fantastic idea and would love to see more of your valuable input. Might be time to get the big hammer out and doctor my tvs-1282. Once more it’s good to see you with your enthusiasm for nas. You are back on the watch list. Thank you Robbie.
REPLY ON YOUTUBE
Thanks for this look at TrueNAS. I’m eagerly awaiting your review of that IXsystems box you’ve got there as well as a “Setting Up” video on it. If at all possible it would be nice if you showed a basic, recommended system setup from the point of view of Joe, Jane and Baby Bag-O’Donuts.
REPLY ON YOUTUBE
is there a light mode?
REPLY ON YOUTUBE
I like to see a video how well Plex would work, for transcoding and server multiple users…????
REPLY ON YOUTUBE
Wow, great timing on this review. Been thinking about setting up a freenas box myself.
REPLY ON YOUTUBE
IX-Systems in the UK????
REPLY ON YOUTUBE
Appreciate the DIY coverage!
REPLY ON YOUTUBE
Will you cover TrueNAS Scale??
REPLY ON YOUTUBE
Make a video on how to set up a personal web server, to host a website. If that is possible, using plugins and addons. On TrueNAS Scale.
REPLY ON YOUTUBE