Hard & Soft Reset a My Cloud EX2 Ultra NAS
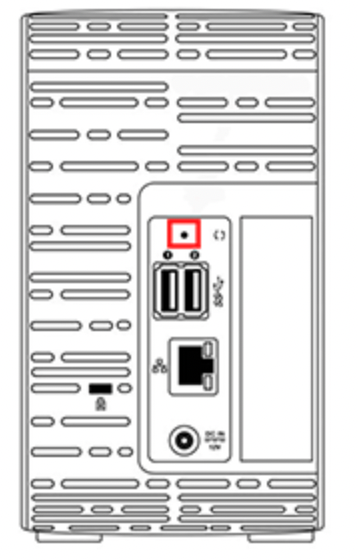
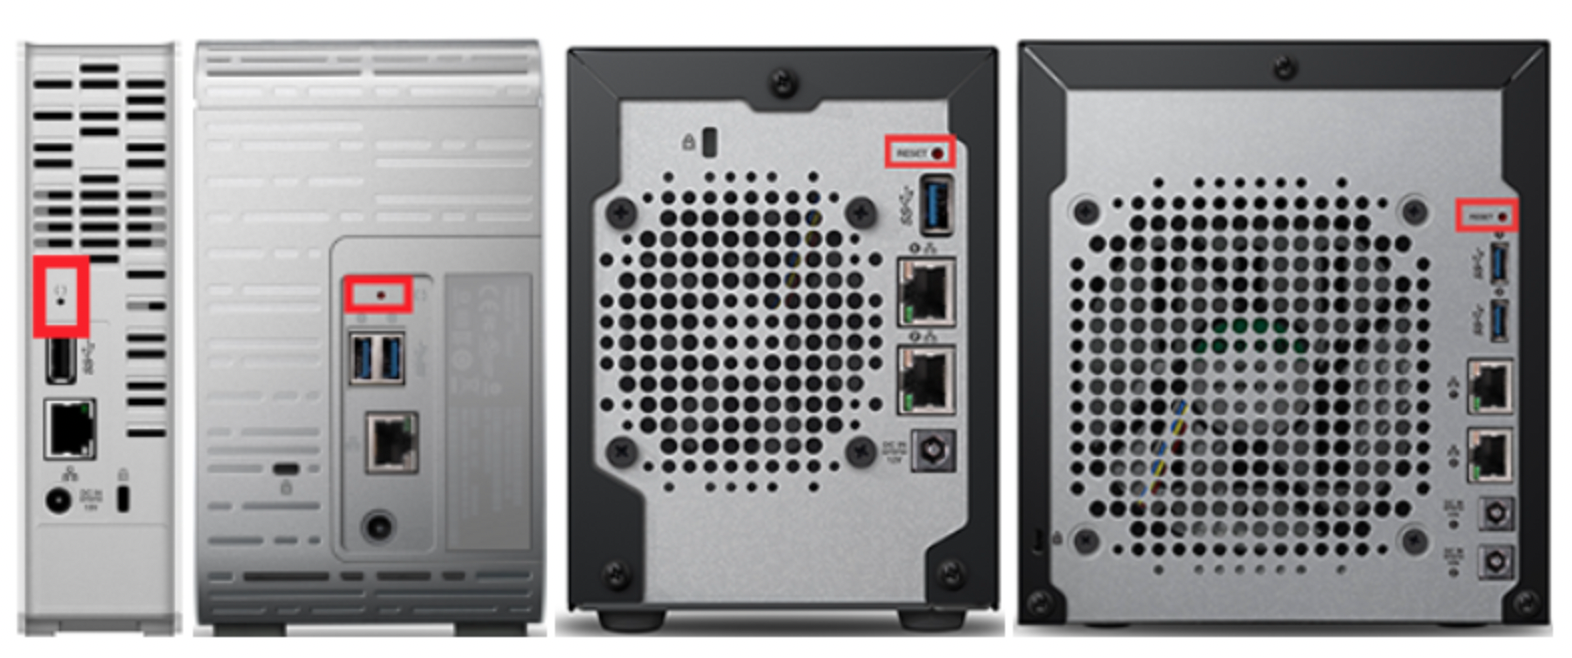
There are two options to Reset a My Cloud EX2 Ultra device, both use the Reset button located on the back of the device (see illustration for exact location). Please see details and instructions below.
| Critical: The following process is Not Data Destructive and will not impact user data on the device. |
My Cloud EX2 Ultra Reset Button Location

Option A: 4 Second Reset (Reset with Power On)
The 4 Second Reset will reset the following:
-
- Admin Password (No password by default)
- Network Mode (Default = DHCP)
Note:
|
The 4 Second Reset will only reset the Admin Password. It will not reset the Admin User Name. In order to reset the Admin User Name perform Option B – the 40 Second Reset outlined below. |
To execute the 4 Second Reset:
- With the power on, using a paperclip or narrow tipped pen, press and hold the reset button for at least 4 seconds. The reset process will cause the device to reboot and may take up to 5 minutes to complete. Please wait until the Power LED is solid blue, indicating the device is ready to use.
Option B: 40 Second Reset (Reset with Power Off)
The 40 Second Reset, also known as System Only Restore, will reset the following:
- Admin User Name (default = “admin”)
- Admin Password (No password by default)
- Device Name (default = “MyCloudEX2Ultra”)
- SSH (Secure Shell) User Name and Password (default = “root” no default password, new password enforced)
- Remove all Users except Admin
- All Share permissions (default = Public)
- Automatic Firmware Update (default = off)
- Network Mode (default = DHCP)
- Remove all Alerts
- Active Directory configuration (default = off)
- mycloud.com account association (default = not configured)
- Mobile app account association (default = not configured)
- WD Sync association (default = not configured)
- Backup jobs (default = not configured)
- Installed Apps and App Settings are removed
To execute the 40 Second Reset:
-
- Power down the device and remove the power cord from the device
- Using a paperclip or narrow tipped pen, press and hold the reset button
- While continuing to hold the reset button, reconnect the power cord to the device and continue to hold the reset button for at least 40 seconds
- After releasing the reset button the device will reboot
Note:
|
This process may take upwards of 15 minutes. Please wait until the Power LED is solid blue, indicating the device is ready to use. |
APPLIED PRODUCTS:
My Cloud OS 5: How to Reset a My Cloud OS 5 Device
There are two options to Reset a My Cloud device. Both use the Reset button located on the back of the device (see illustration for exact location) Please refer to the details and instructions below.

Option A: 4 Second Reset (Reset with Power On)
The 4 Second Reset will reset the following:
-
- Admin Password (no default password, new password enforced)
- Network Mode (Default = DHCP)
Note:
|
The 4 Second Reset will only reset the Admin Password. It will not reset the Admin User Name. In order to reset the Admin User Name perform Option B – the 40 Second Reset outlined below. |
To execute the 4 Second Reset:
- With the power on, using a paperclip or narrow tipped pen, press and hold the reset button for at least 4 seconds. The reset process will cause the device to reboot and may take up to 5 minutes to complete. Please wait until the Power LED is solid blue, indicating the device is ready to use.
- Setup the My Cloud using the dashboard.
For instructions, please refer to Answer ID 29391 My Cloud OS 5 How to Set Up Using the Dashboard
Option B: 40 Second Reset (Reset with Power Off)
| Important:Performing a System Only Restore on a My Cloud OS 5 device will result in the thumbnail index being deleted. Enabling Cloud Access will enable indexing of content in the shares. Indexing can be disabled on the entire device or at the share level. For more information, please refer to: |
The 40 Second Reset, also known as System Only Restore, will reset the following:
- Admin User Name (default = “admin”)
- Admin Password (no default password, new password enforced)
- Device Name Changes to Default
- SSH (Secure Shell) User Name and Password (default = “sshd” no default password, new password enforced)
- Remove all Users except Admin
- All Share permissions (default = Public)
- Automatic Firmware Update (default = off)
- Network Mode (default = DHCP)
- Remove all Alerts
- Active Directory configuration (default = off)
- Cloud Connection (default = Disabled)
- mycloud.com account association (default = not configured)
- Installed 3rd part Apps and App Settings are removed – No Default App
- Backup jobs (default = not configured)
- Windows Protocol = SMB2,SMB3
- NT LAN Manager = NTLMv2 only
To execute the 40 Second Reset:
-
- Power down the device and remove the power cord from the device
- Using a paperclip or narrow tipped pen, press and hold the reset button
- While continuing to hold the reset button, reconnect the power cord to the device and continue to hold the reset button for at least 40 seconds
- After releasing the reset button the device will reboot
Note:
|
This process may take upwards of 15 minutes. Please wait until the Power LED is solid blue, indicating the device is ready to use. |
- Setup the My Cloud using the dashboard.
For instructions, please refer to Answer ID 29391 My Cloud OS 5 How to Set Up Using the Dashboard
SOURCE: https://support-en.wd.com/app/answers/detail/a_id/9343
| Where to Buy a Product | |||
|
|
    
|

|
VISIT RETAILER ➤ |
 |
    
|

|
VISIT RETAILER ➤ |
We use affiliate links on the blog allowing NAScompares information and advice service to be free of charge to you. Anything you purchase on the day you click on our links will generate a small commission which is used to run the website. Here is a link for Amazon and B&H. You can also get me a ☕ Ko-fi or old school Paypal. Thanks! To find out more about how to support this advice service check HERE
Is It OK to Buy a Used NAS? (RAID Room)
Do You NEED 5GbE NAS? (Or Should You Skip Ahead to 10GbE)
UGREEN DXP4800 PRO NAS Review
Minisforum G7 Pro Review
CAN YOU TRUST UNIFI REVIEWS? Let's Discuss Reviewing UniFi...
WHERE IS SYNOLOGY DSM 8? and DO YOU CARE? (RAID Room)
Access content via Patreon or KO-FI
Discover more from NAS Compares
Subscribe to get the latest posts sent to your email.


How do I completely wipe the NAS including the OS to remove ransomware and then re-install the OS?
Any ransomware will live on the harddrive. You will need to format your drive/volume.
To format the drive on your My Cloud EX2 Ultra, you can follow these steps:
Access the web interface of your My Cloud EX2 Ultra. Open a web browser on a computer connected to the same network as the device.
Enter the IP address or network name of your My Cloud EX2 Ultra in the address bar of the web browser. Press Enter to access the login page.
Enter your username and password to log in to the device’s web interface.
Once logged in, click on the “Storage” tab or “Settings” tab (the specific location may vary depending on the firmware version).
Look for the “Volumes” or “Storage” section, where you should see a list of the available drives or volumes.
Find the drive you want to format and click on the corresponding “Format” or “Format Drive” button.
A warning message will appear, informing you that formatting will erase all data on the drive. Make sure you have backed up any important files before proceeding.
Confirm your decision to format the drive by clicking “Yes” or “Format” in the confirmation dialog box.
The formatting process will begin, and it may take some time to complete, depending on the size of the drive.
Once the formatting process is finished, the drive will be formatted and ready for use. You can set it up with a new file system or configure it according to your preferences.
It’s important to note that formatting will erase all data on the drive, so ensure you have backed up any necessary files before proceeding with the format.