

Upgrading compatible RAM on (TS-462, TS-464, TS-664)
Official RAM
 RAM-4GDR4A0-SO-2666 |
DDR type: DDR4(260PIN)
Capacity: 4GB Spec: 512M X 16 Frequency: DDR4-2666 Form(PIN): 260PIN Power Supply: 1.2V Dram Organization: 512M*64 Temperature: 0℃~85℃ Environmental Regulation: RoHS |
 RAM-4GDR4T1-SO-2666 |
DDR type: DDR4(260PIN)
Capacity: 4GB Spec: TS512MSH64V6H Frequency: DDR4-2666 Form(PIN): 260PIN Power Supply: 1.2V Dram Organization: 512M*64 Temperature: 0℃~85℃ Environmental Regulation: Halogen Free |
 RAM-8GDR4T0-SO-2666 |
DDR type: DDR4(260PIN)
Capacity: 8GB Spec: 1G X 8 Frequency: DDR4-2666 Form(PIN): 260PIN Power Supply: 1.2V Dram Organization: 1024M*64 Temperature: 0℃~85℃ Environmental Regulation: RoHS |
Alternative RAM we would consider using:
Crucial 16GB 2666Mhz DDR4 SODIMM Non-ECC CT16G4SFD8266 Check Amazon
Kingston 32GB 2666Mhz DDR4 SODIMM Non-ECC KCP426SD8/32 Check Amazon
Replacing Memory Modules (TS-462, TS-464, TS-664)
The TS-462, TS-464, and TS-664 have two memory slots. You can increase the memory capacity of the NAS
by upgrading the memory modules. When using two modules, use only QNAP modules of the same type
and capacity to maintain system performance and stability. You can purchase QNAP memory modules from
authorized resellers.
1. Power off the NAS.
2. Disconnect the power cord from the electrical outlet.
3. Disconnect all cables and external attachments.
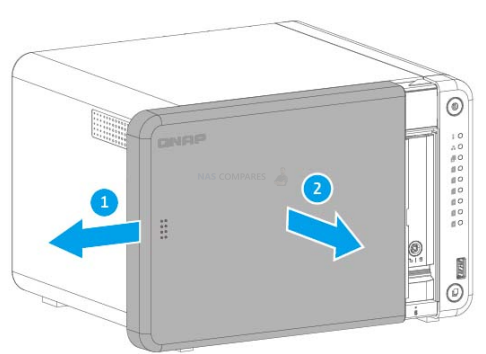
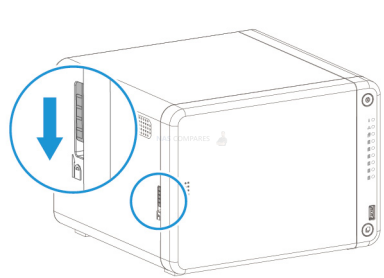
4. Remove the front cover.
a. Locate the locking mechanism on the left side of the NAS.
b. Slide the lock up to release the front cover.
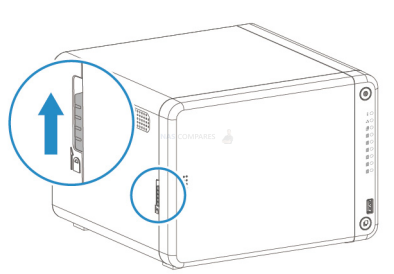
c. Slide the front cover to the left and then pull.
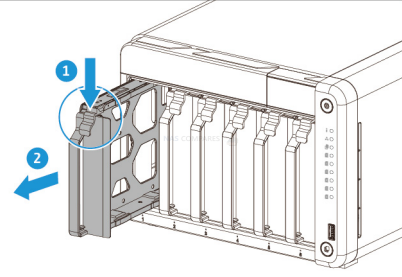
5. Remove each drive tray.
a. Remove a drive tray by simultaneously pressing the latch and pulling the tray
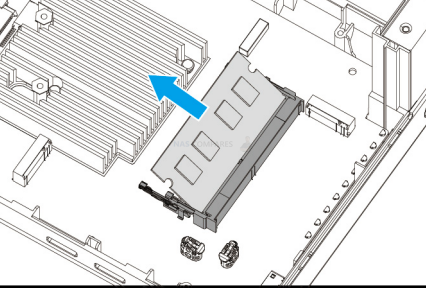
6. Remove an existing module
a. Push the retention clips outward simultaneously to release the module.
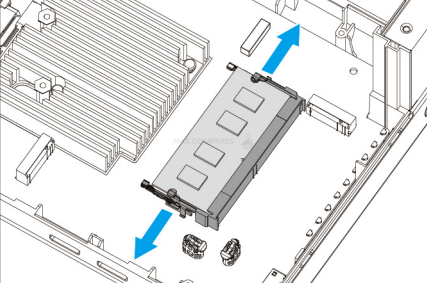
b. Verify that the module has tilted upward and is completely released from the slot.
c. Hold the module by the edges.
d. Carefully slide the module out of the slot.
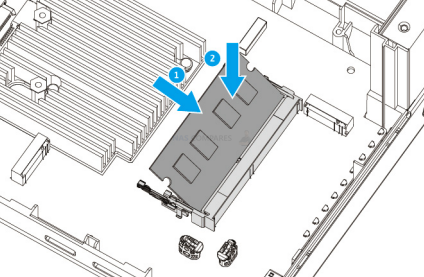
7. Install a new module.
a. Align the notch with the ridge in the slot.
b. Insert the module into the slot.
c. Verify that the metal connectors are completely inserted into the slot.
d. Carefully press down on the module until the retention clips lock the module into place.
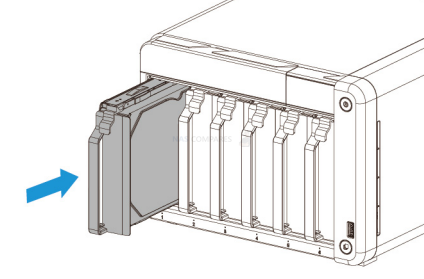
8. Slide each drive tray back into the NAS.
9. Attach the front cover.
a. Align the front cover with the grooves on the case and then slide to the right.
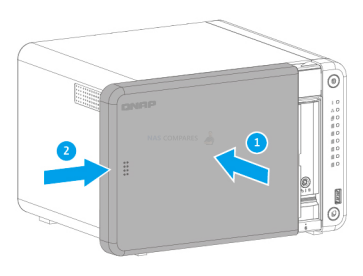
b. Slide the lock down to secure the front cover.
10. Connect all cables and external attachments.
11. Connect the power cord to the electrical outlet.
12. Power on the NAS.
13. Verify that the module is recognized by the NAS.
a. Log on to QTS as administrator.
b. Go to Control Panel > System > System Status > Hardware Information .
c. Check the value for Total memory.


Minisforum N5 Pro NAS - Should You Buy?
UGREEN DH4300 & DH2300 NAS Revealed - Good Value?
Aoostar WTR Max NAS - Should You Buy?
Xyber Hydra N150 NAS Review - Is This COOL?
Minisforum N5 Pro vs Aoostar WTR Max - The BIG Showdown
Do MORE with Your M.2 Slots - GREAT M.2 Adapters!
Access content via Patreon or KO-FI
I really thought this Crucial 32 GB upgrade would work, but after installing, I don’t get the initial beep. Apparently that means it doesn’t pass the POST test. Any chance you can confirm whether this “should” work? I wonder if I missed a step but does not look like it…
https://www.amazon.ca/dp/B08C4X9VR5?ref=ppx_yo2ov_dt_b_fed_asin_title&th=1
I’m in Auckland, New Zealand.
Based on YouTube reviews, I went out and picked up a TS-462 yesterday (31 Dec 2024), planning to upgrade with some old laptop RAM that I have lying around.
Turns out it has a soldered-on 4GB of RAM, and no SODIMM slot.
It seems to have been manufactured in 2023, based on the Q23xxx serial number.
If you’re hoping to buy one of these with a plan to upgrade it, it may pay to double-check before you buy.
Should also now apply to TS-264
Qnap list as SODIMM “ Since 2024/01”
https://www.qnap.com/en-uk/product/ts-264/specs/hardware
The TS-664 comes in a version with 8GB RAM, which is apperently soldered and cannot be removed. However, I can’t find out if it’s possible to fit another compatible 8GB RAM in a second slot, thereby upgrading to 16GB. Do you know if this is possible?
Yes, you can. Remove existing memory and use Crucial memory or similar.
Can I do qnap 4gb + crucial 16 gb?
Yes
QNAP documentation says the TS-464 can take up to 16GB RAM, but many users have installed more with seemingly no ill effects – https://www.reddit.com/r/qnap/comments/v0q6ph/qnap_ts464_ram_options/ . Does anyone know what QNAP’s rationale for setting the ceiling so low if the box can take more?
Mine arrives in a few days, and I’m looking to use it as a multi-session VM box, alongside the regular media/file serving.
Yes, there is no reason. You could simply go by CPU official spec sheets.
Thanks – I’ve added a 16GB in slot 1, and moved the original 4GB into slot 2, and it’s correctly reporting 20GB, so far no problems.
I got the Qnap TS-664 a few months ago & found it a bit slow & drives got noisy if I had a number of apps opened. I fit 2 x Crucial 16gb CT16G4SFD8266 after reading this article and can verify the memory is recognised and qnap runs noticeably better – Thanks.
My TS-464 came with an ADATA 4GB module, I upgraded to 16GB by replacing it with 2 * 8GB ADATA model# AD4S32008G22-RGN2 which has a higher max freq at 3200MHZ, but will down clock ok to 2666MHZ.
Works like a charm!
Is the ram still working for you, encountered any issues ?
I’m looking ot do the same
Yes, DDR3 used to have problems with bigger size RAM. But DDR4 seem to work even with 32GB modules.