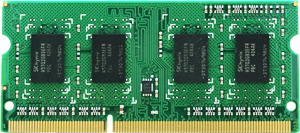
The recommended upgrade from Synology is up to 6GB. But if you dismantle the NAS you can upgrade up to 8GB with a Synology RAM or up to 16GB with Crucial RAM.
DS620 slim built-in two memory slots, pre-installed a single 2GB DDR3L memory
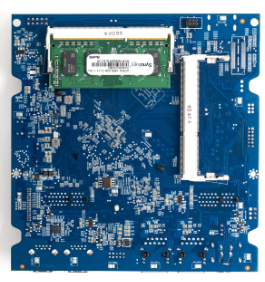
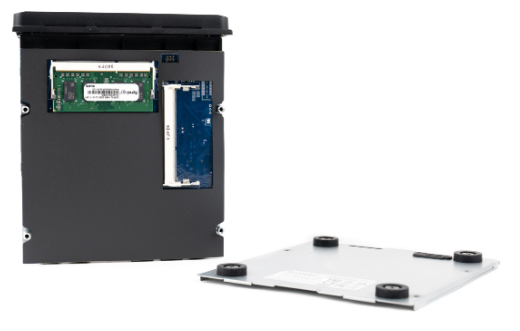
DDR3L RAM, capacity 2GB, frequency is 1866MHz.
Memory (RAM) Upgrade for DS620slim Synology DiskStation Series up to 16GB in total. Unlikely you will want to upgrade Synology DS620slim or DS418play because of the weaker CPU they have. But Synology DS718+ and DS918+ have quad-core CPU which is powerful enough to play with virtual machines and web servers including databases. These things require much more RAM than Synology offers to upgrade to. Then you are left with a dilemma to go Qnap or use alternative RAM manufacturer. In further paragraphs, you will find how other upgraded their NAS and how you can do it yourself.
Synology official RAM upgrade 4 module specs
D3NS1866L-4G 4GB –
DDR3L-1866 unbuffered SO-DIMM 204pin 1.35V
Applied Models
- Synology DiskStation: DS620slim
Upgrades for NAS DS620slim DiskStation
Synology RAM Alternative
Exactly the same RAM memory is manufactured by other companies like Crucial and Hyper. Synology warns that if you use any other but Synology RAM, you will void the warranty. But sometimes this is the only option if you need NAS for specific tasks where more RAM is required and you do not want to use Qnap as an alternative. Crucial is one of the most popular alternative brands for Synology RAM upgrades. The specs will look exactly like Synology, which make someone think that all RAM comes from one place just with a different label on the top.
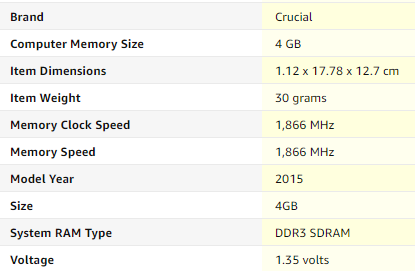
4GB Crucial alternative price:
8GB Crucial alternative price:
8GB Hyper alternative price:
How to Add a Memory Module to DiskStation
1 Shut down your DiskStation. Disconnect all cables connected to your DiskStation to prevent any possible damages
2 The memory slots are located inside your DiskStation.
3 Remove the four drive trays and you will see a pre-installed memory module and an empty slot for memory expansion.
4 Insert the new memory module into the empty slot
5 Insert the four drive trays back into the drive bays.
6 Reconnect the cables you removed in step 1, and then press and hold the power button to turn on your DiskStation.
Need Advice on Data Storage from an Expert?
We want to keep the free advice on NASCompares FREE for as long as we can. Since this service started back in Jan '18, We have helped hundreds of users every month solve their storage woes, but we can only continue to do this with your support. So please do use links to Amazon Amazon UK on the articles when buying to provide advert revenue support or to donate/support the site below. Finally, for free advice about your setup, just leave a message in the comments below here at NASCompares.com and we will get back to you.
 Need Help?
Where possible (and where appropriate) please provide as much information about your requirements, as then I can arrange the best answer and solution to your needs. Do not worry about your e-mail address being required, it will NOT be used in a mailing list and will NOT be used in any way other than to respond to your enquiry.
 Home: https://www.backblaze.com/cloud-backup.html#af9rgr
Business: https://www.backblaze.com/business-backup.html#af9rgr
Comparison with other service providers: https://www.backblaze.com/best-online-backup-service.html#af9rgr
Beelink ME PRO NAS Review
UGREEN iDX6011 Pro - TESTING THE AI (What Can it ACTUALLY Do?)
OWC TB5 2x 10GbE Dock, UGREEN NAS Surveillance Software, AceMagic Retro PCs, Gl.iNet Comet 5G @CES
What IS the Digiera OmniCore NAS? Is it Worth $599?
New UGREEN NAS Expansion, DXP4800 PRO NAS and eGPU Revealed
Gl.iNet Flint 4 10G+2.5G Router Revealed @CES 2026
Access content via Patreon or KO-FI
Discover more from NAS Compares
Subscribe to get the latest posts sent to your email.


