

Upgrading Buffalo LS220D – How to replace existing drives with bigger HDD in Buffalo NAS?
I purchased a Buffalo LinkStation 220D with two 1TB drives. I use them to be a backup of another larger Buffalo network drive.
I should have purchased a larger capacity and wonder if I can simply pop larger drives in this Buffalo LS220D. I’m thinking that I should purchase a couple of Seagate Ironwolf 2TBs or 4TBs. Will these work for me?
I’m just a home user with simple needs – nothing too exotic. I store mostly movies and music files on my network drives.
In order to replace your existing drives with bigger ones is to destroy the RAID and start from scratch. When it is done, copy the backed up data to a new volume. There is no option like with Qnap/Synology to replace drive by drive without destroying the RAID.
I hope this helps.
Here is how to replace the drives on Buffalo – source here.
How to replace a hard drive and rebuild a RAID array in the TeraStation?
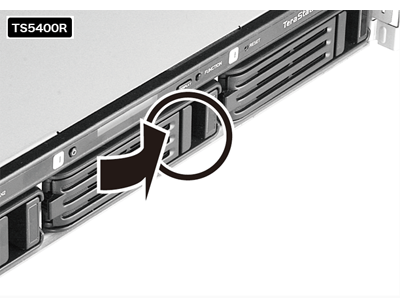
Hard drives in the TeraStation show a blue status LED during normal operation. When a drive fails, its error LED will glow red.
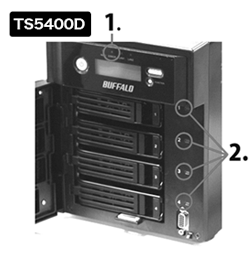
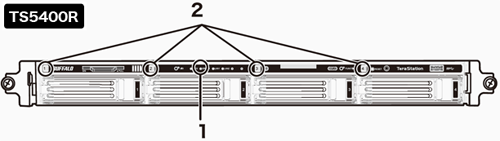
1. Error LED
Glows red if a hard drive has failed.
2. Status LEDs
The failed drive’s status LED will be glowing a steady red. A drive with a red status LED is ready to hot-swap.
Notes:
| • | Do not unplug a drive whose status LED is green instead of red. Dismount it first or shut down the TeraStation before swapping a working drive. If you remove the drive without properly dismounting it, data may be lost or the TeraStation may malfunction. |
| • | Use a Buffalo OP-HDS series drive of the same size or larger for the replacement drive. If a larger drive is used, the extra space will not be usable in a RAID array. |
| • | To avoid damaging the TeraStation with static electricity, ground yourself by touching something made of metal before handling any sensitive electronic parts. |
| • | After a drive is replaced, it takes about 30 minutes before normal file reading and writing are restored. Settings may not be accessible during this period. |
| • | Do not change the order of the hard drives in the TeraStation. For example, pulling out drive 1 and replacing it with drive 2 may cause data to be corrupted or lost. |
| • | If the LCD display does not change after a new drive is installed, click [Rediscover Disk] in Settings. |
Drive Replacement (using a redundant RAID mode such as RAID 1, 5, or 6 with auto-shutdown disabled)
Drive Replacement (using a redundant RAID mode such as RAID 1, 5, or 6 with auto-shutdown enabled)
Drive Replacement (RAID 0 or JBOD)
Drive Replacement (using a redundant RAID mode such as RAID 1, 5, or 6 with a hot spare configured)
Drive Replacement (using a redundant RAID mode such as RAID 1, 5, or 6 with auto-shutdown disabled)
This section describes replacing a drive with the TeraStation on.
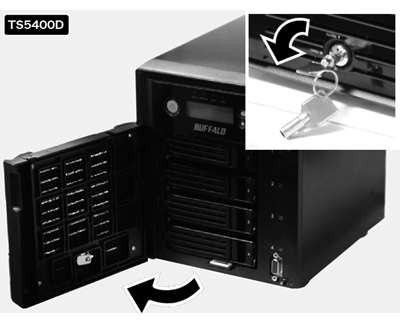
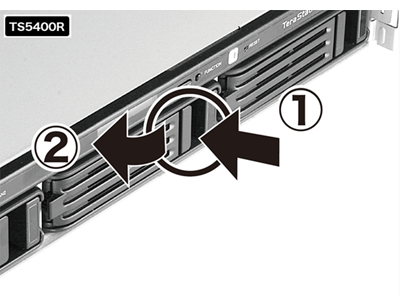
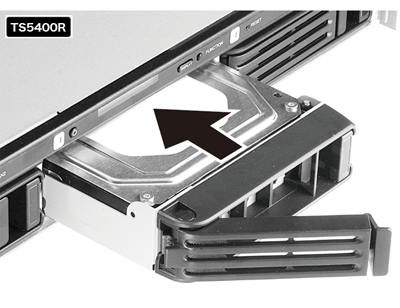
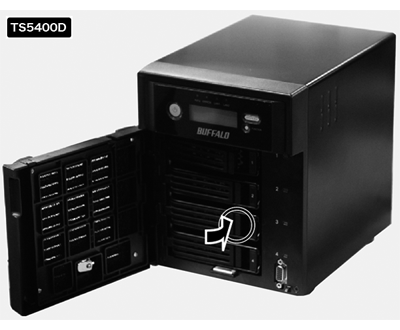
| 1. | TS5800D, TS5600D, TS5400D, TS5200D: Open the front cover with the included key.
|
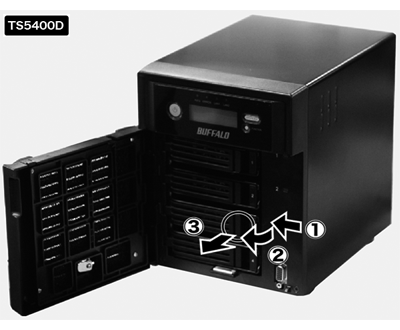
| 2. | The failed drive’s status LED will be glowing red. Push its unlock button and swing the lock mechanism out.
Hard drives without red status LEDs lit are still on. Do not unplug or remove them.
|
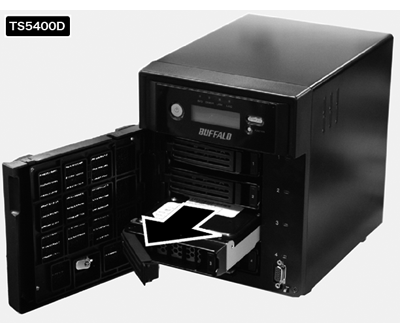
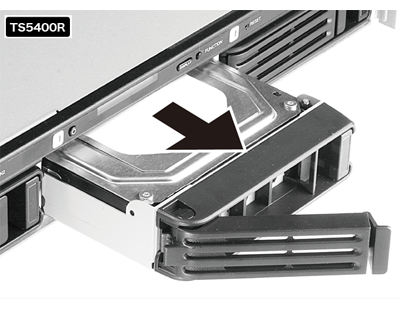
| 3. | Pull out the drive cartridge and remove it from the TeraStation.
|
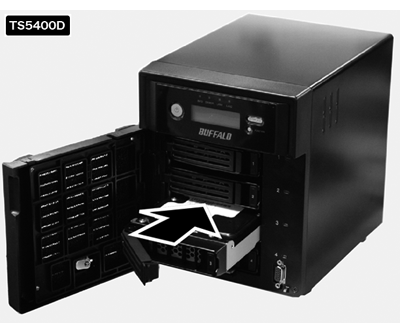
| 4. | Insert the new drive in the empty slot. Slide the drive in with the locking mechanism open.
|
| 5. | Swing the lock back down until it clicks into place.
|
| 6. | When the replacement hard drive is recognized, the status LED will flash red and the message “Press FuncSW I31 New Disk x ready” will be displayed on the LCD panel.
|
| 7. | Hold down the function button on the front of the TeraStation for 3 seconds until it beeps. The TeraStation will start rebuilding the RAID array automatically.
After a few minutes, the message “RAID I18 ARRAYx Rebuilding” will be displayed until the drive is rebuilt.
|
Drive Replacement (using a redundant RAID mode such as RAID 1, 5, or 6 with auto-shutdown enabled)
This section describes the process of replacing a drive while the TeraStation is off.
| 1. | Open the front cover with the key.
|
| 2. | Push the unlock button of the failed hard drive and swing the lock mechanism out.
|
| 3. | Pull out the drive cartridge and remove it from the TeraStation.
|
| 4. | Insert the new hard drive in the empty slot. Slide the drive in with the locking mechanism open. Swing the lock back down until it clicks into place.
|
| 5. | Press the power button on the TeraStation.
|
| 6. | When the replacement hard drive is recognized, the status LED will flash red and the message “Press FuncSW I31 New Disk x ready” will be displayed on the LCD panel.
|
| 7. | Hold down the function button on the front of the TeraStation for 3 seconds until it beeps. The TeraStation will start rebuilding the RAID array automatically. It takes about 5 minutes before the message “RAID I18 ARRAYx Rebuilding” is displayed.
|
Drive Replacement (RAID 0 or JBOD)
Drives in a RAID 0 array or JBOD mode do not automatically turn off in the event of a malfunction. Before replacing the failed drive, either dismount the drive from Settings, or shut down the TeraStation.
This section describes the process of replacing a drive with the TeraStation on.
| 1. | Open the front cover with the included key.
|
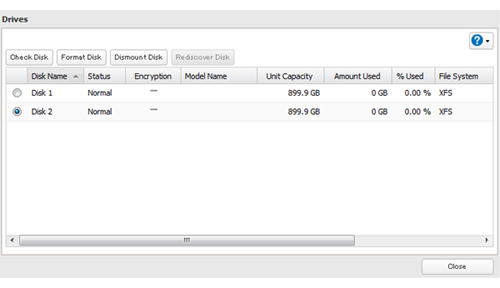
| 2. | In Settings, navigate to [Drives] – [Drives].
|
| 3. | Select the hard drive with the flashing status LED and click [Dismount Disk].
|
| 4. | Enter the number that appears on the screen, then click [OK].
|
| 5. | The status LED will stop flashing and glow steadily.
|
| 6. | Unlock the failed drive by pushing the unlock button and swinging the lock mechanism out.
|
| 7. | Pull out the hard drive cartridge and remove it from the TeraStation.
|
| 8. | Insert the new hard drive (sold separately) into the empty slot. Slide the drive in with the locking mechanism open. Swing the lock back down until it clicks into place.
|
| 9. | For RAID 0
When the replacement drive is recognized, the status LED will flash red and the message “Set From Web I32 New Diskx ready” will be displayed on the LCD panel. Select [Drives] – [RAID] – the RAID array in Settings and click [Delete RAID Array]. Select the replacement hard drive by navigating to [Drives] – [Drives] and clicking [Format Disk] to format the new drive. Configure RAID mode by selecting [Drives] – [RAID] after formatting the hard drive. If a hard drive malfunctions in RAID 0, all data on the RAID array will be lost. All of the settings for the shared folders (such as access restrictions) are erased after replacing a drive from a RAID 0 array. Create a shared folder before use. Enter the number that appears on the screen, then click [OK].
For JBOD When the replacement hard drive is recognized, the status LED will flash red and the message “Press FuncSW I31 New Disk x ready” will be displayed on the LCD panel. Hold down the function button on the front of the TeraStation for 3 seconds until it beeps. The drive will be formatted as an individual drive. If this drive is removed from the TeraStation, shared folder settings such as access restrictions will be lost. Create a shared folder on the drive before use.
|
Drive Replacement (using a redundant RAID mode such as RAID 1, 5, or 6 with a hot spare configured)
If your TeraStation’s drives are in a redundant RAID mode, and you have a hot spare enabled, a malfunctioning drive in the array is replaced by the spare disk and the RAID array is rebuilt automatically. The status LED will continue to glow red for the failed drive even after the RAID array is rebuilt with the hot spare. This section describes the replacement process for a hard drive while the TeraStation is still on.
| 1. | Open the front cover with the included key.
|
| 2. | The failed drive’s status LED will be glowing red. Push its unlock button and swing the lock mechanism out.
|
| 3. | Pull out the drive cartridge and remove it from the TeraStation.
|
| 4. | Insert the new drive in the empty slot. Slide the drive in with the locking mechanism open. Swing the lock back down until it clicks into place.
|
| 5. | When the replacement drive is recognized, the status LED will flash red and the message “Press FuncSW I31 New Disk x ready” will be displayed on the LCD panel.
|
| 6. | Hold down the function button on the front of the TeraStation for 3 seconds until it beeps. The replacement hard drive is automatically registered as a hot spare.
To use the replacement disk as a normal drive rather than a hot spare, navigate to [Drives] – [RAID] and click the RAID array, select the new drive, and click [Set as a normal disk]. |
| Where to Buy a Product | |||
 |
    
|

|
VISIT RETAILER ➤ |
 |
|
|
VISIT RETAILER ➤ |
 |
|
|
VISIT RETAILER ➤ |
|
|
|
|
VISIT RETAILER ➤ |
We use affiliate links on the blog allowing NAScompares information and advice service to be free of charge to you. Anything you purchase on the day you click on our links will generate a small commission which is used to run the website. Here is a link for Amazon and B&H. You can also get me a ☕ Ko-fi or old school Paypal. Thanks! To find out more about how to support this advice service check HERE If you need to fix or configure a NAS, check Fiver Have you thought about helping others with your knowledge? Find Instructions Here


ZimaOS is the BEST Beginner NAS OS - Watch Your Back UnRAID and TrueNAS !!!
30TB Hard Drives are TOO BIG ! (and here is why)
COMPLETE UGREEN NAS Setup Guide - 2025 EVERYTHING VERSION
$110 USB4 to 2x10Gb Adapter Review - What the WHAT?
UGREEN NAS Now has iSCSI, 2FA and Jellyfin (and more) - FINALLY!
Seagate 30TB Ironwolf and EXOS Hard Drive Review
Access content via Patreon or KO-FI
DISCUSS with others your opinion about this subject.
ASK questions to NAS community
SHARE more details what you have found on this subject
CONTRIBUTE with your own article or review. Click HERE
IMPROVE this niche ecosystem, let us know what to change/fix on this site
EARN KO-FI Share your knowledge with others and get paid for it! Click HERE