

Have you ever wondered what Docker and containers are and how they can revolutionize the way you deploy and manage applications? In this beginner’s guide to Docker, we will take you on a journey into the world of containerization. We will explain the concept of Docker, show you where to find popular container images, and demonstrate how to use Docker on your NAS (Network-Attached Storage).
Understanding Docker and Containers
To truly harness the power of Docker, it’s essential to grasp the concept of containers. Containers are lightweight, standalone units that package an application and all its dependencies, libraries, and configuration files. They create an isolated and consistent environment, allowing applications to run seamlessly across different computing environments. Docker, as an open-source platform, enables the creation, deployment, and management of containers. It provides developers with the flexibility to package their applications into containers, ensuring easy portability, scalability, and efficiency. By understanding the fundamentals of Docker and containers, developers can unlock a new level of flexibility and agility in their application development process.
Exploring the Docker App Store
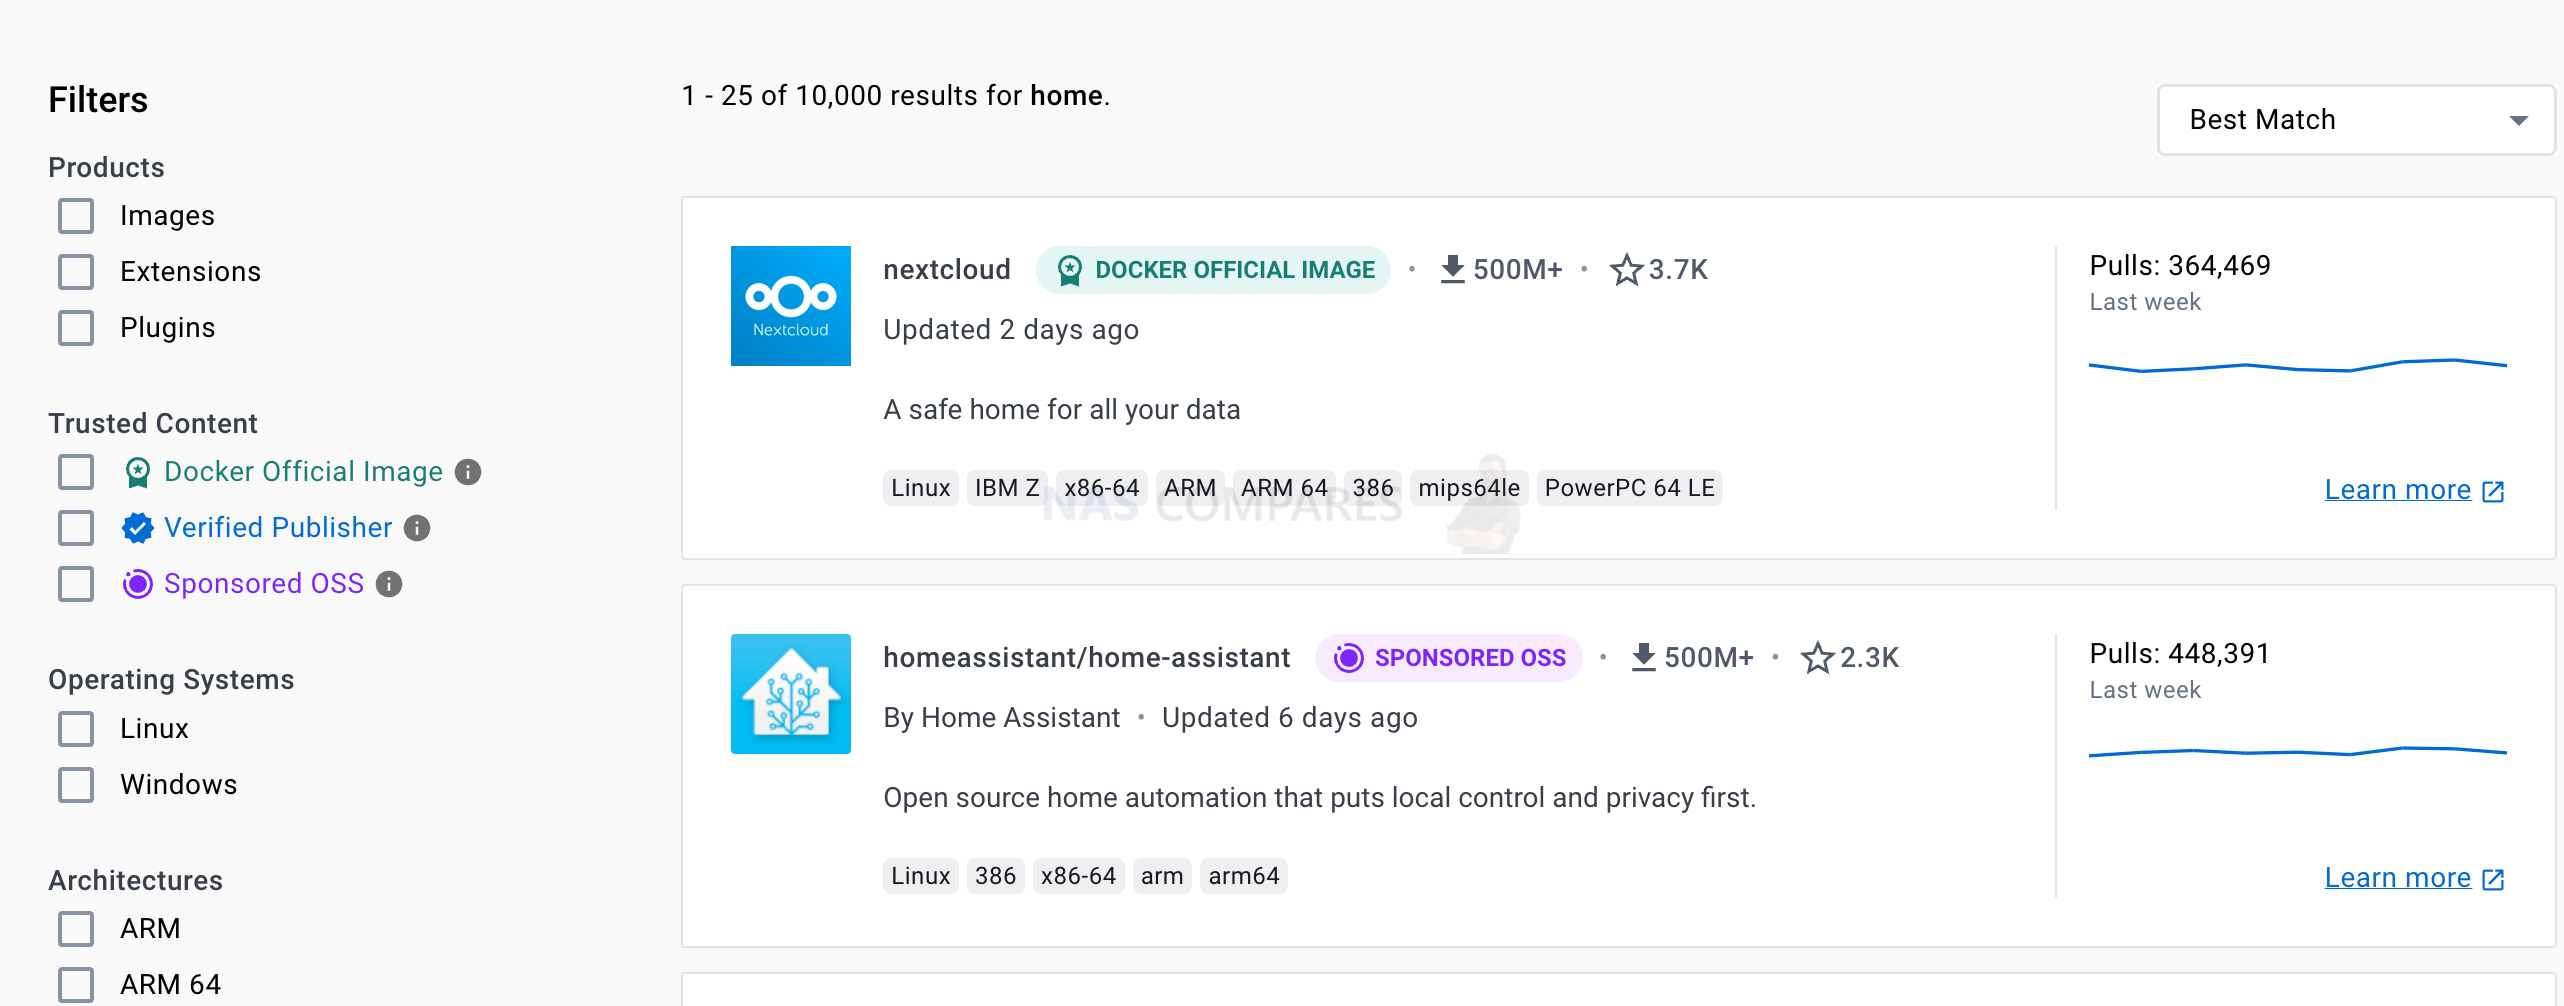
When it comes to finding container images, the Docker App Store (hub.docker.com) is an invaluable resource. It serves as a centralized hub, offering a vast collection of pre-built container images that can be readily deployed. The Docker App Store provides developers with a wide range of options, whether they need popular applications like Plex, Tailscale, Backblaze, or specialized tools for home automation, WordPress, Handbrake, MakeMKV, UniFi Controller, OpenHAB, and Grafana. With the Docker App Store, developers can easily browse, search, and discover container images that meet their specific requirements. This extensive repository of container images simplifies the process of finding and implementing pre-configured solutions, saving developers valuable time and effort. Whether you’re a beginner or an experienced user, the Docker App Store is a treasure trove of resources waiting to be explored.
Showcasing Popular Container Images
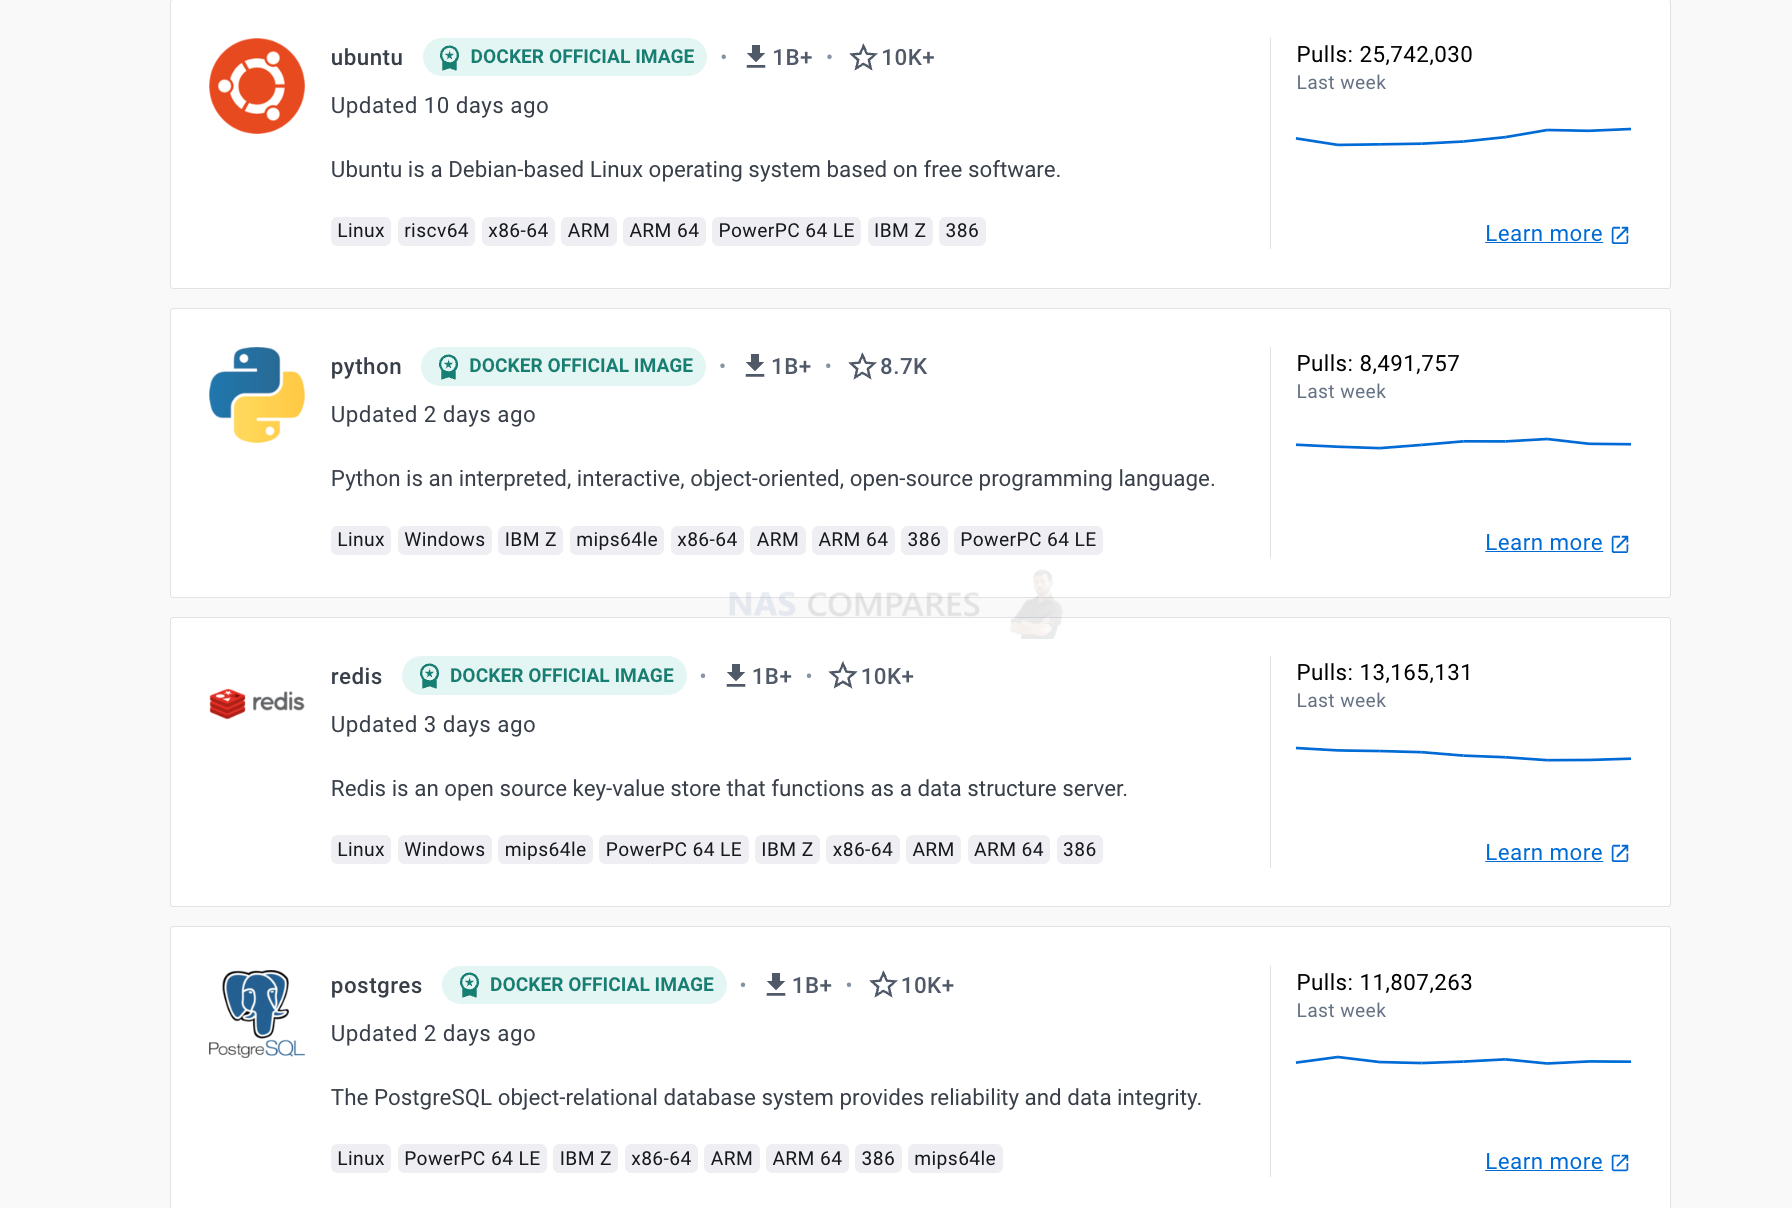
The world of containerization is filled with a multitude of popular container images that can elevate your application development process. Docker offers a wide range of pre-built container images that are widely used by developers across various industries. Some of the most sought-after container images include Plex, Tailscale, Backblaze, CrashPlan, Home Automation, WordPress, Handbrake, MakeMKV, UniFi Controller, OpenHAB, and Grafana.
Plex, for example, is a popular media server that allows you to organize and stream your media collection with ease. Tailscale offers secure network connectivity, enabling you to securely access your resources from anywhere. Backblaze provides reliable cloud backup solutions, ensuring the safety of your valuable data. CrashPlan offers another option for effortless data backup and recovery. Home automation containers help you transform your living space into a smart home, providing control over various devices and systems.
If you’re looking to create a website or blog, the WordPress container image simplifies the process by providing a ready-to-use content management system. Handbrake and MakeMKV containers come in handy when you need to convert or rip media files. UniFi Controller allows you to manage your UniFi network devices, while OpenHAB enables the creation of a smart home automation system. Finally, Grafana offers a powerful tool for data visualization and monitoring.
By exploring and utilizing these popular container images, developers can leverage pre-configured solutions and easily integrate them into their projects. These containers serve as building blocks for creating robust and efficient applications, saving developers time and effort in setting up complex functionalities from scratch. Whether you’re a beginner or an experienced developer, these popular container images are a valuable resource in the world of Docker and can significantly enhance your application development process.
Decoding Docker Scripts: SSH Commands and YAML File Structure
When working with Docker, understanding the various SSH commands and the structure of YAML files is essential. SSH commands allow you to interact with Docker containers and images through the command line interface, while YAML files provide a structured format for defining Docker configurations.
- SSH Commands:
a) Pull: The “docker pull” command is used to download an image from a registry to your local machine. It retrieves the latest version of the specified image or a specific version if specified.
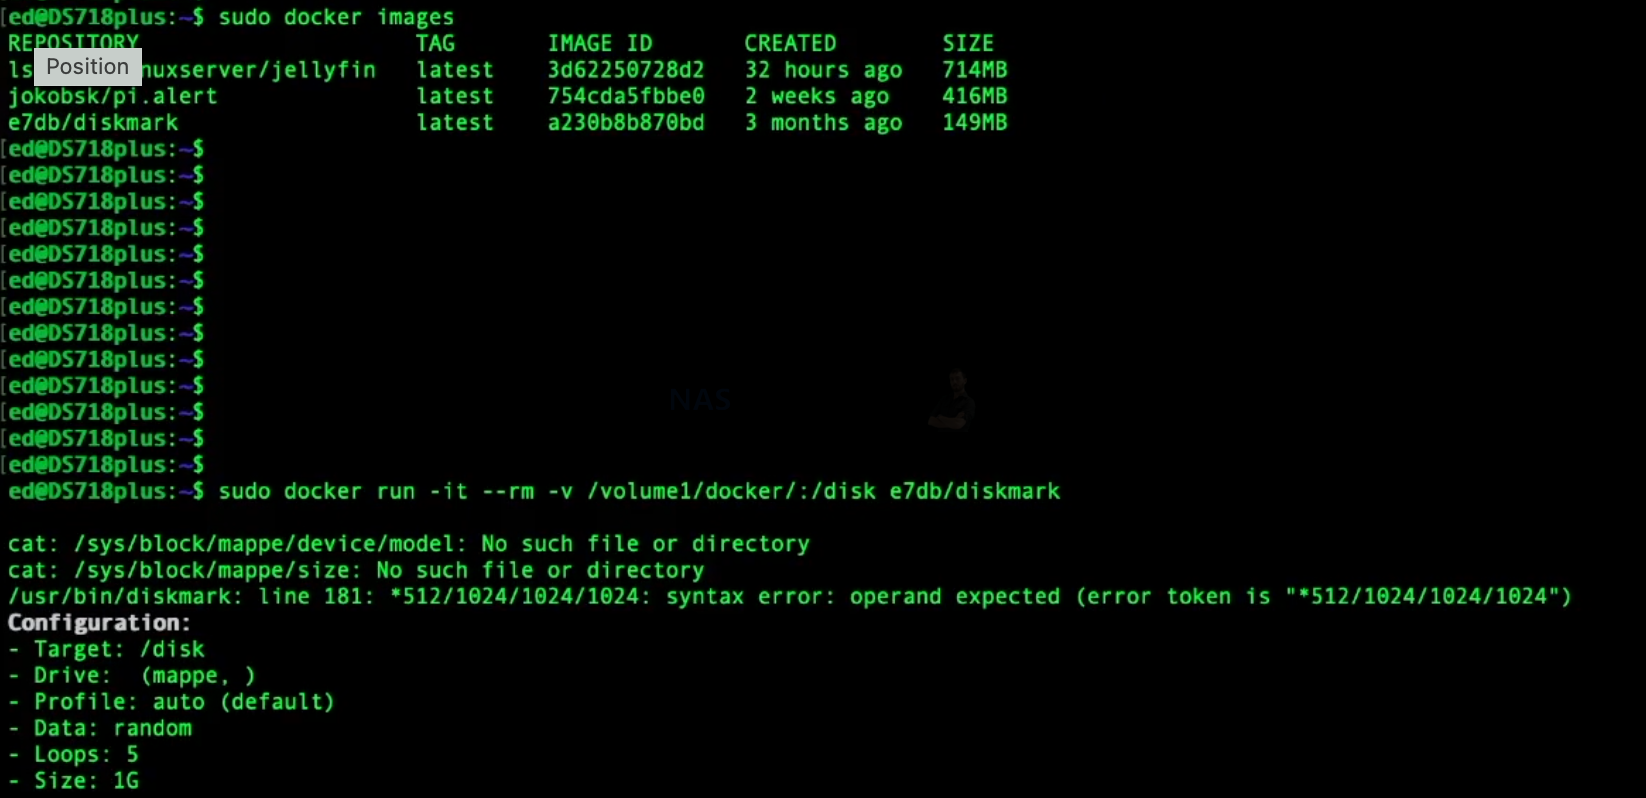
b) Images: The “docker images” command lists all the available images on your local machine. It provides information about the repository, tag, image ID, creation date, and size.
c) Run: The “docker run” command creates and runs a new container from a specified image. It allows you to configure various options such as environment variables, volumes, ports, network settings, and more.
d) Delete: The “docker rm” command is used to remove one or more containers. You can specify the container ID or name to delete it. Additionally, the “docker rmi” command is used to delete one or more images from your local machine.
These SSH commands are fundamental for managing Docker containers and images. They provide the necessary control and flexibility to handle various aspects of containerization, including deployment, configuration, and cleanup.
- YAML File Structure:
YAML (YAML Ain’t Markup Language) files provide a structured way to define Docker configurations using a human-readable format. Docker Compose uses YAML files to define multi-container applications.
The structure of a YAML file typically includes:
a) Version: Specifies the version of the Compose specification being used. It determines which features and syntax are available in the file.
b) Services: Defines the individual services or containers that make up the application. Each service can be configured with properties such as the image, environment variables, ports, volumes, and dependencies.
c) Networks: Specifies the networks that connect the services together. It allows you to define custom networks and assign services to specific networks to enable communication between them.
d) Volumes: Defines the volumes used by the services. Volumes can be used to provide persistent storage or share data between containers.
e) Configs and Secrets: Specify external configurations and secrets that can be mounted into the services.
f) Environment: Allows you to set environment variables for the services.
g) Depends_on: Specifies the dependencies between services, defining the order in which they should be started.
By utilizing the structure of YAML files, developers can define complex Docker configurations, orchestrate multiple containers, and ensure the seamless operation of their applications.
Understanding the SSH commands and YAML file structure is vital for effectively working with Docker. It empowers developers to manage containers and images efficiently while providing a clear and structured approach to configuring multi-container applications. By decoding Docker scripts and comprehending YAML files, developers can leverage the full potential of Docker for their application development and deployment processes.
Running Your First Container
To run your first container using the Container Manager on Synology, follow these steps:
- Open the Container Manager: Access the Synology web interface and navigate to the Docker/Container Manager application.
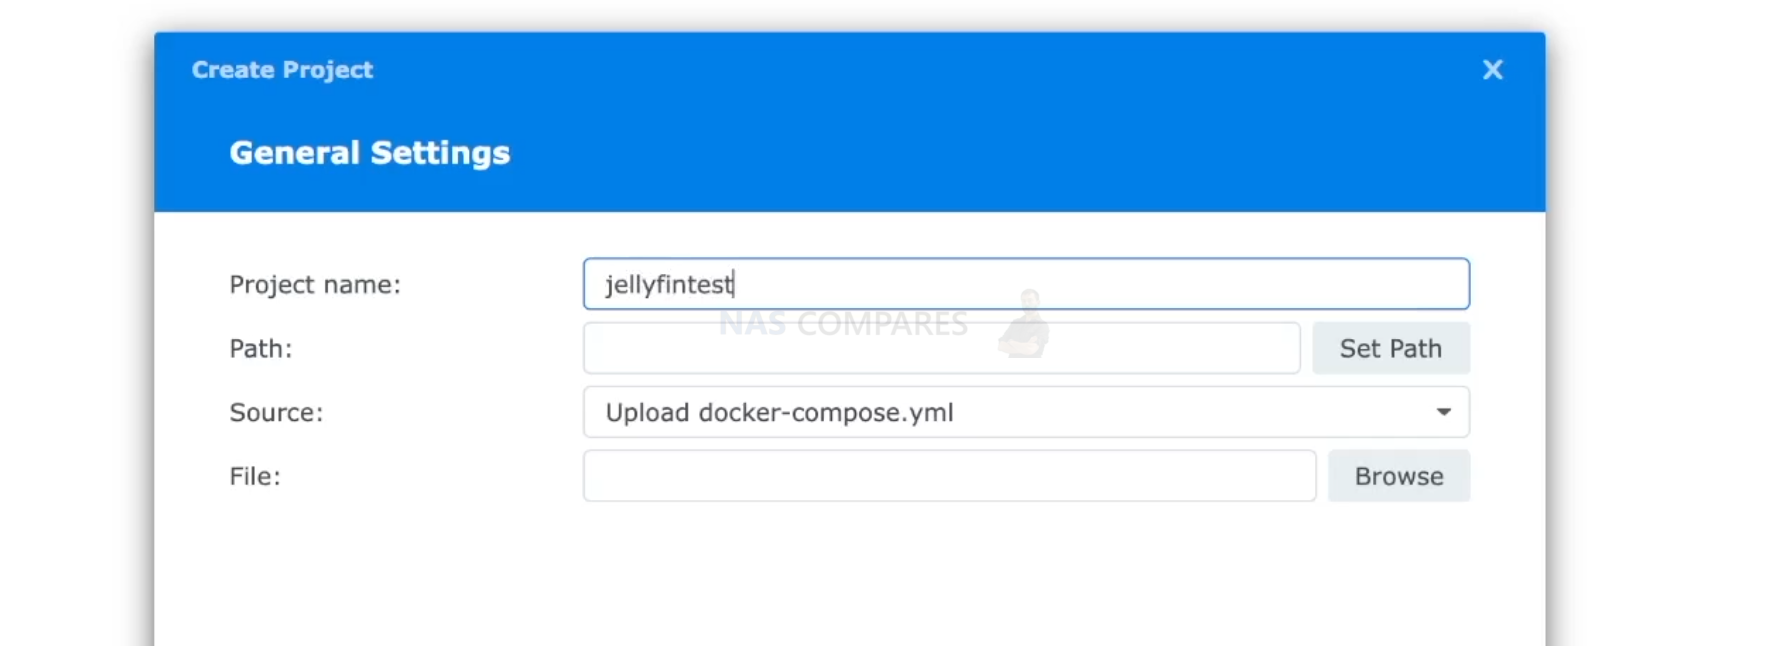
- Create a New Project: Click on “Create” to start a new project. Give it a suitable name that reflects its purpose.
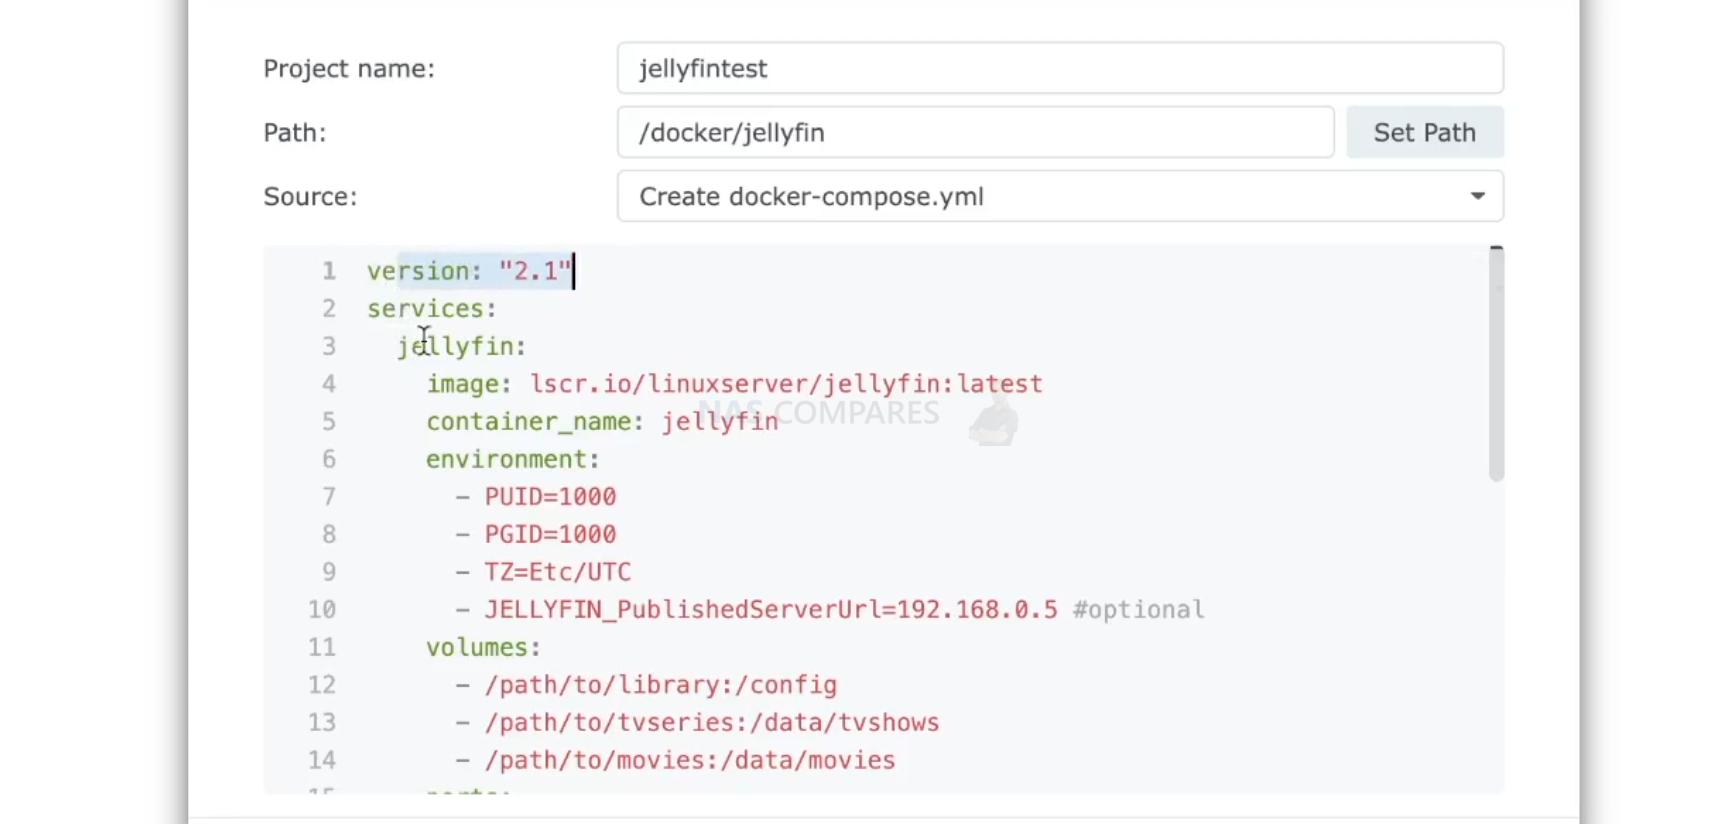
- Paste YAML File: In the project details page, find the section for “YAML file” or “Compose file.” Here, you can paste the contents of your YAML file that defines the container configuration.
- Modify Volume and Network Settings: Within the YAML file, you may have specified volume locations and network settings. Modify these values as per your requirements. For example, you might want to change the
-vflag to specify the desired volume location on your Synology NAS. Similarly, if the YAML file contains anetwork_modeset to “host,” you may adjust it according to your network setup. - Start the Container: Once you have pasted the YAML file and made any necessary modifications, click on “Apply” or “Start” to initiate the container. The Container Manager will take care of pulling the required image and creating the container based on the specified configuration.
By following these steps, you can easily create and start a container from a single script using the Container Manager on Synology. This streamlined process eliminates the need for manual configuration and enables you to quickly deploy containers on your NAS.
Running your first container is an exciting milestone in your Docker journey. It allows you to experience the power and flexibility of containerization, providing a consistent and isolated environment for your applications. With the Container Manager on Synology, you can efficiently manage and deploy containers, simplifying the process of application development and deployment.
Setting Up Containers with the GUI
Setting up containers using the graphical user interface (GUI) of the Synology Container Manager is a user-friendly approach that simplifies the process of configuring and running containers. Here’s how you can do it:
- Open Synology Container Manager: Access the web interface of your Synology NAS and navigate to the Docker/Container Manager application. This will launch the GUI interface for managing your containers.
- Explore the Registry: In the Container Manager, locate and click on the “Registry” tab. The Registry serves as a repository similar to an app store, containing a wide range of container images that you can use for your applications.
- Pull the Image: Search for the desired container image in the Registry. Once you find it, click on the image to view more details. Then, select the option to “Pull” the image. This will download the image from the Registry to your NAS.
- Configure Container Settings: After the image has been pulled, navigate to the “Container” tab in the GUI. Click on “Create” to start the configuration process. Provide a suitable name for your container and select the image you pulled from the Registry.
- Modify Volume and Network Settings: In the container configuration, you can specify volume locations and network settings. Modify these settings according to your requirements. For example, you can set the volume location on your NAS where the container’s data will be stored. Additionally, you may choose to set the network mode to “Host” if you want the container to use the host’s network settings.
- Start the Container: Once you have configured the container settings, click on “Next” or a similar option to proceed. Review the summary of your container configuration and click on “Apply” or “Create” to start the container.
By utilizing the GUI of the Synology Container Manager, you can conveniently explore the Registry, pull container images, and configure container settings with ease. The GUI provides a visual interface that simplifies the process, making it accessible to users who prefer a graphical approach over command-line operations. Enjoy the benefits of containerization by efficiently setting up and managing containers using the intuitive GUI of Synology Container Manager.
Using Containers without GUI
Containers that do not have a graphical user interface (GUI) can still be effectively managed and monitored using command-line interfaces and other methods. Here’s how you can work with containers that lack a GUI:
- Create a New Project: Begin by setting up a new project in the Synology Container Manager. This will allow you to organize and manage your containers efficiently.
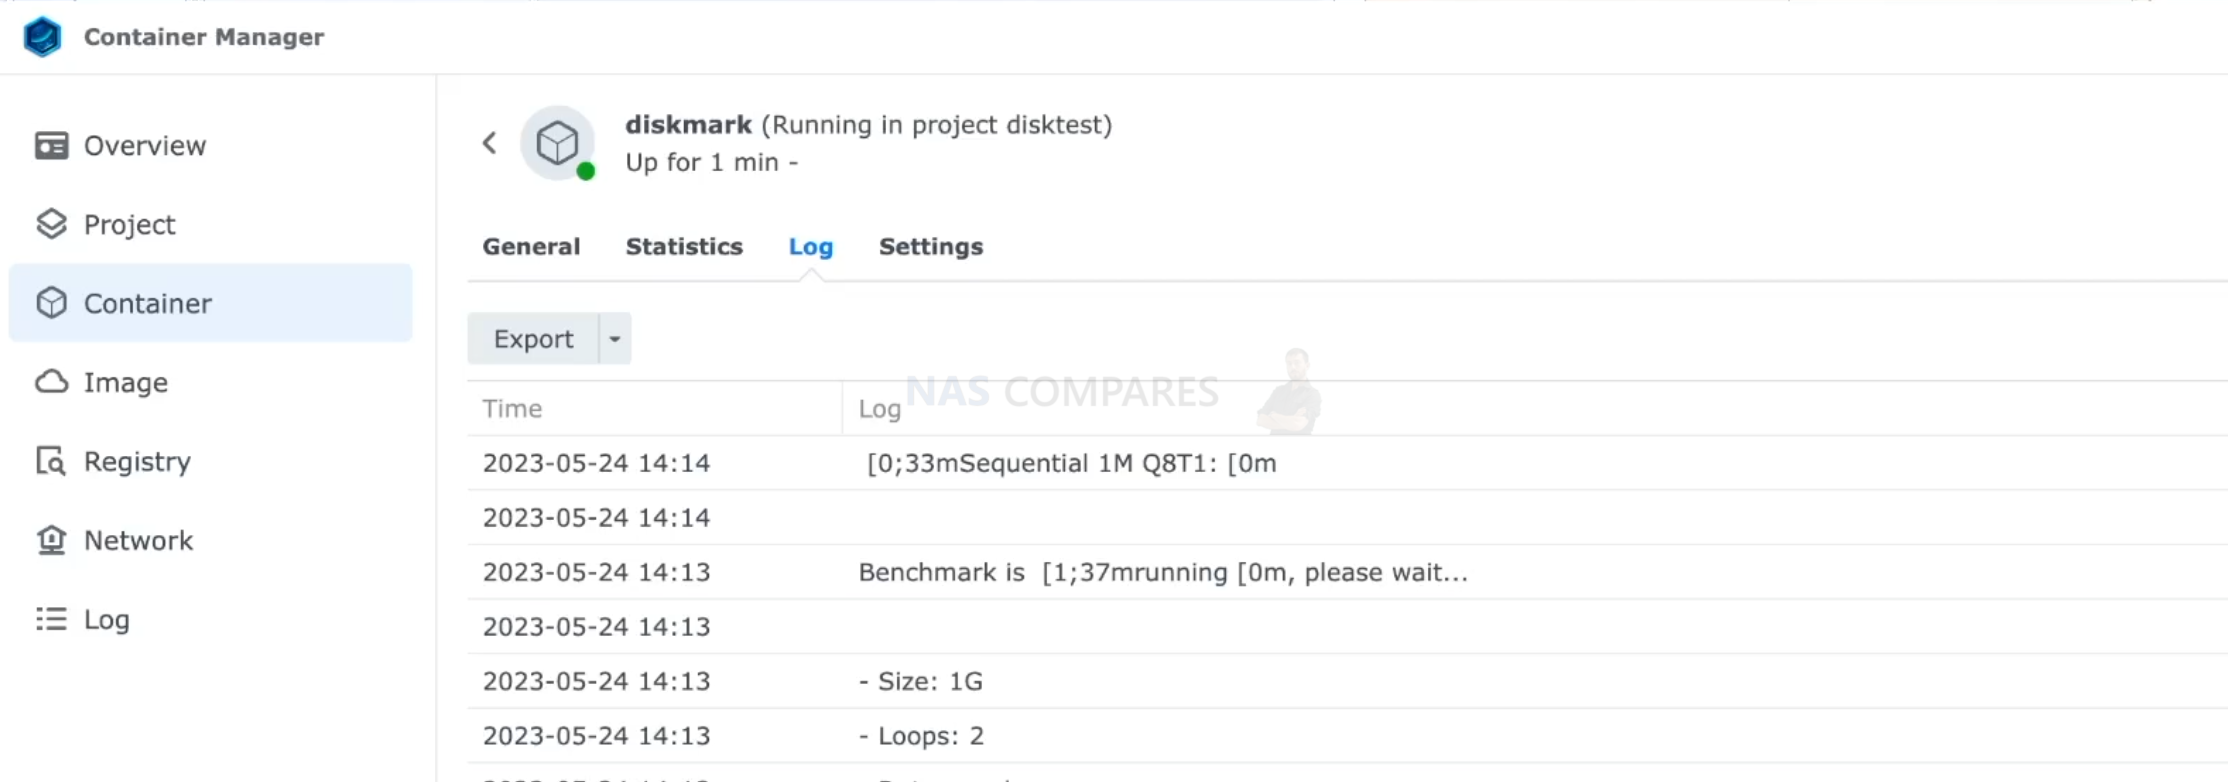
- Monitor Container Output: To view the output of a container without a GUI, you have a few options. First, you can access the Container Manager and navigate to the “Container” tab. From there, select the desired container and click on “Log” to see the log output of the container. This provides valuable information about the container’s activities and any error messages it may generate.
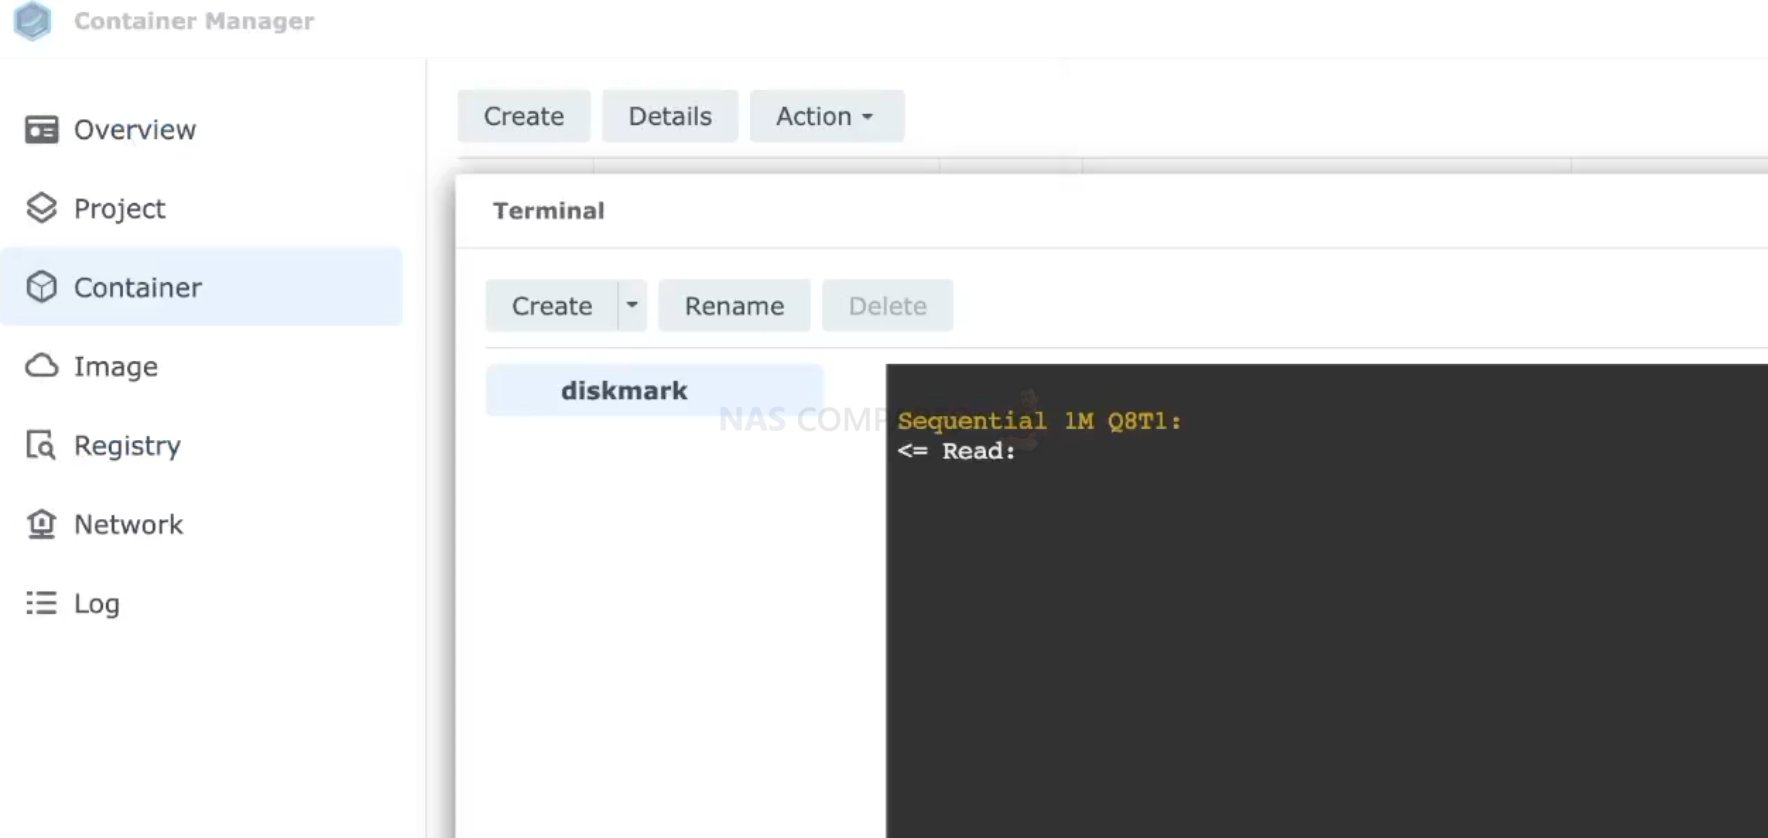
- Access Terminal View: Another way to view the container’s output is through the Container Manager’s “Action” menu. Select the container and click on “Terminal” to access the terminal view of the container. This allows you to see the ongoing output in real-time and interact with the container through the command line.
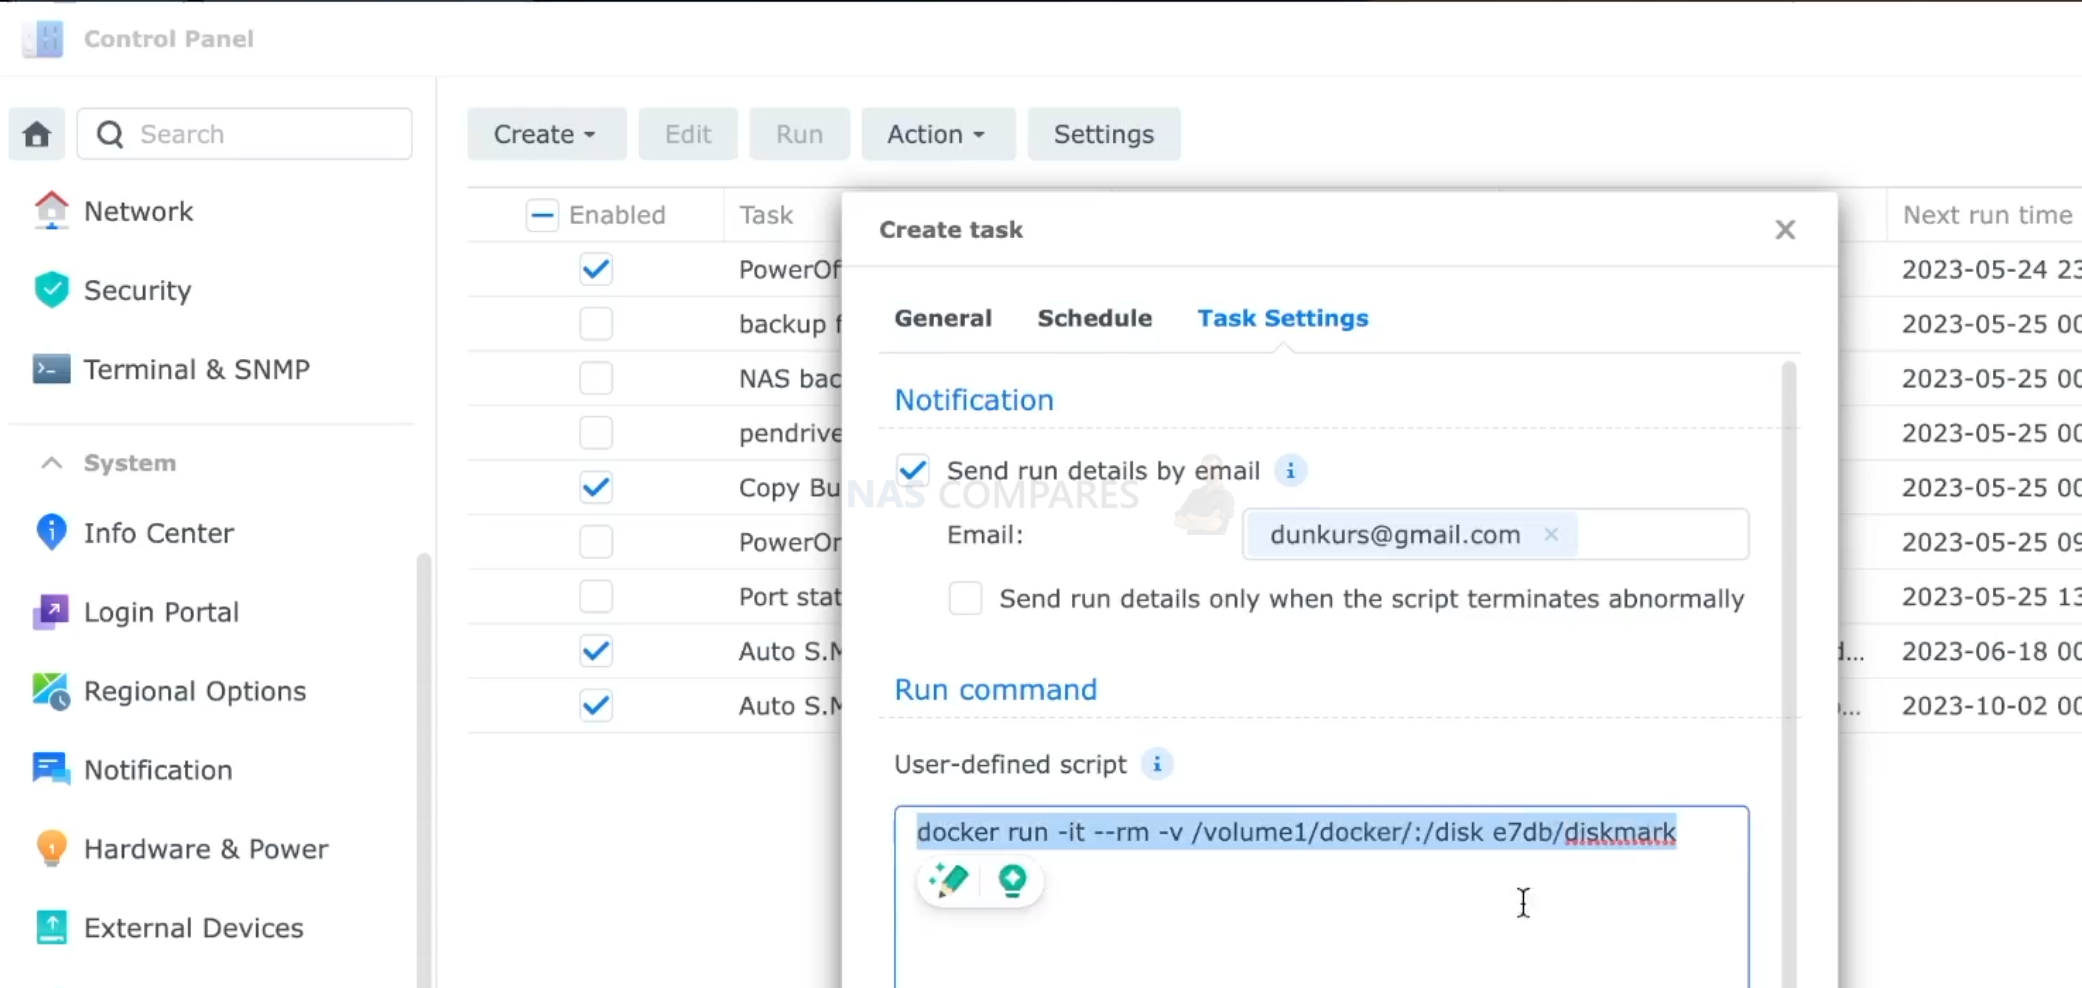
- Configure Schedule Task with Email Notification: If you prefer to receive the container’s output via email, you can set up a schedule task in the Container Manager. Go to the container’s settings, choose the “Task Settings” option, and create a new task. Select the root user and specify the email address where you want the container output to be sent. In the “Run command” box, paste the appropriate Docker SSH command to run the container. This way, you will receive regular updates and notifications about the container’s output.
By leveraging these methods, you can effectively manage containers without a GUI. Whether you choose to monitor the container’s output through the Container Manager’s log page, access the terminal view, or set up email notifications, you can stay informed about the container’s activities and troubleshoot any issues that may arise.
Leveraging SSH Command Line for Docker
To take full advantage of the SSH command line interface for Docker on your Synology NAS, follow these steps:
- Enable SSH: First, ensure that SSH is enabled on your NAS. Go to the NAS settings and enable SSH access. This will allow you to establish a secure connection to the NAS via SSH.
- Connect to the NAS: Use a SSH client such as PuTTY (for Windows) or Terminal (for Mac) to establish an SSH connection with your NAS. Enter the NAS IP address and login credentials to access the command line interface.
- Pull Docker Image: Once you are connected via SSH, you can use Docker commands to interact with container images. To pull a Docker image from a registry, use the command:
docker pull <image-name>. Replace<image-name>with the name of the desired Docker image. - View Active Images and Running Containers: To check the list of active Docker images on your NAS, use the command:
docker images. This will display the images along with their respective tags and sizes. To view the list of running containers, use the command:docker ps. - Run a Container: To start a new container, use the command:
docker run. Specify the image name, along with any additional options or configurations required for the container. For example,docker run -d --name my-container <image-name>will run a container in detached mode with a custom name. - Delete a Container: If you want to remove a running or stopped container, use the command:
docker rm <container-id>. Replace<container-id>with the ID or name of the container you wish to delete. Be cautious when deleting containers, as this action is irreversible and any data stored within the container will be lost.
By leveraging the SSH command line interface, you have direct control over Docker operations on your Synology NAS. You can pull images, manage running containers, start new containers, and delete unnecessary ones, all from the convenience of the command line. This allows for greater flexibility and control when working with Docker on your NAS.
In conclusion, Docker provides a versatile and efficient platform for containerization, allowing users to encapsulate applications and their dependencies into lightweight, isolated containers. Throughout this guide, we explored various aspects of Docker and container management on a Synology NAS. From understanding Docker and containers to leveraging GUI-based container management, or utilizing SSH command line for advanced control, users can confidently harness the power of Docker to deploy and manage their applications effectively. By embracing Docker, users can experience improved efficiency, scalability, and portability in their application development and deployment processes.
Timestamps: 0:00 Introduction 0:57 Understanding Docker and Containers 2:25 Exploring the Docker App Store 2:43 Showcasing Popular Container Images 3:58 Decoding Docker Scripts 5:12 Running Your First Container 9:21 Setting Up Containers with the GUI 12:36 Using Containers without GUI 14:26 Leveraging SSH Command Line for Docker 15:13 Questions
#Docker #Containerization #NAS #Synology


Minisforum N5 Pro NAS - Should You Buy?
UGREEN DH4300 & DH2300 NAS Revealed - Good Value?
Aoostar WTR Max NAS - Should You Buy?
Xyber Hydra N150 NAS Review - Is This COOL?
Minisforum N5 Pro vs Aoostar WTR Max - The BIG Showdown
Do MORE with Your M.2 Slots - GREAT M.2 Adapters!
Access content via Patreon or KO-FI