How to Use Intrusion Detection on the Synology Surveillance DVA3219 NAS
Once your cameras are mounted successfully (Guide for that can be found here), software configurations must be set up for DVA to suit your needs fittingly. This chapter covers the crucial settings to achieve high intrusion-detection precision.
Step 1 – Select a Stream Profile
For optimal detection accuracy, select a resolution of at least 1280×720@20FPS.
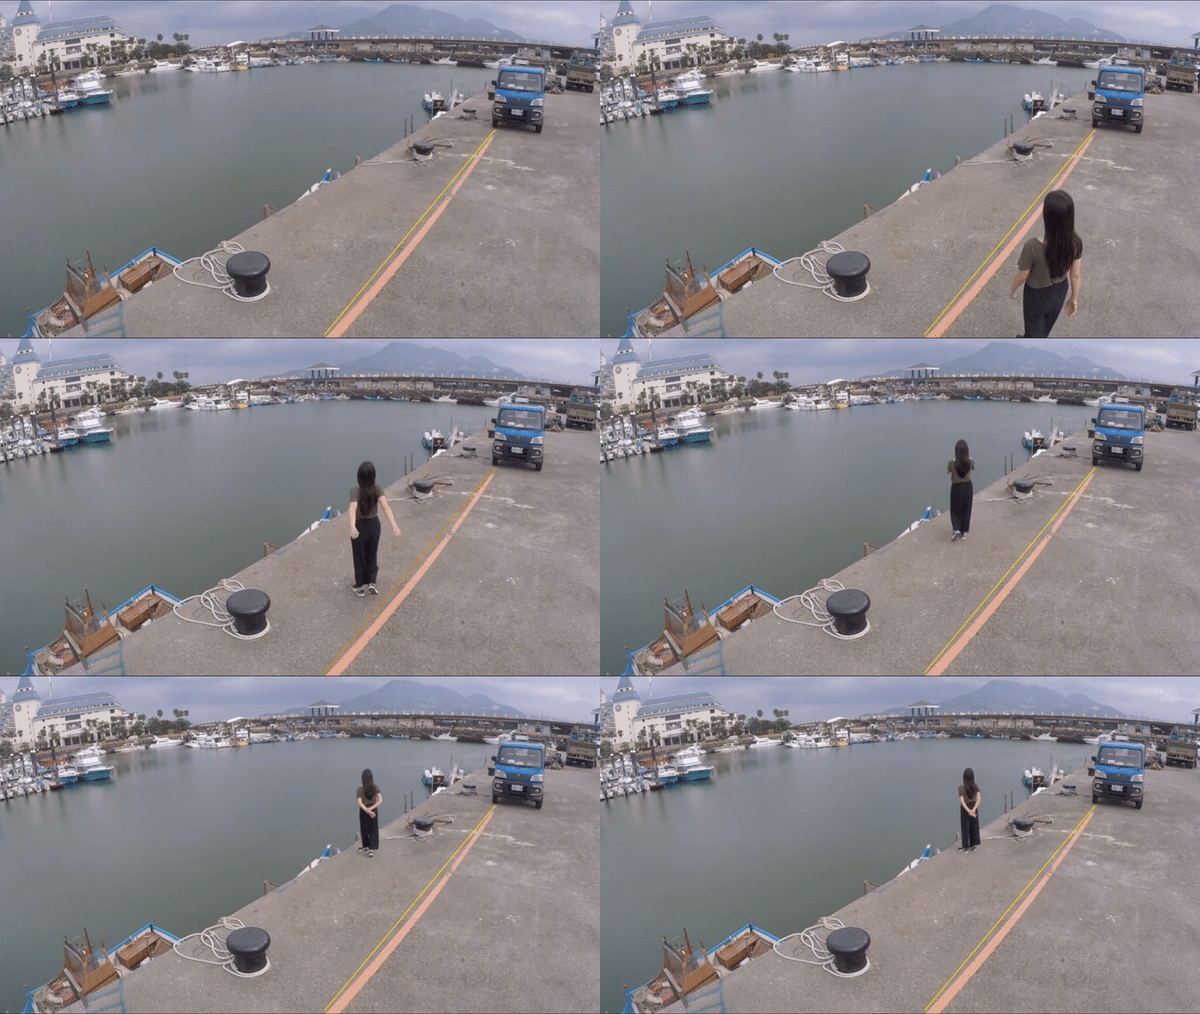
Step 2 – Set Up the Detection Fence
Simply drag the nodes to adjust the position of the detection fence. You can left-click on the fence to add up to 9 nodes, or right-click to delete them.
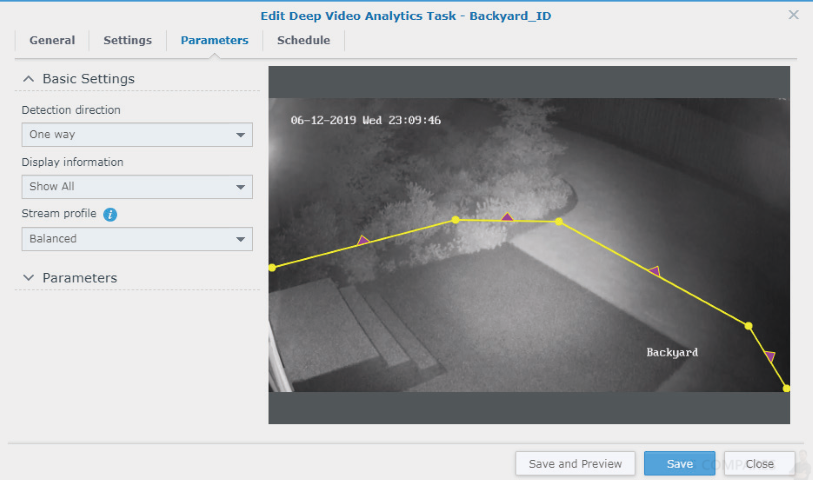
Step 3 – How to Define the Detection Direction
Based on your target surroundings, you can choose to apply one-way or two-way detection. If you choose to monitor only a single direction, purple arrows indicating the detection direction will appear on the fence. Simply click on the arrows to reverse them. Intrusion Detection will be triggered when an object crosses the fence in the direction the arrows point to.
Step 4 – The Triggering Mechanism
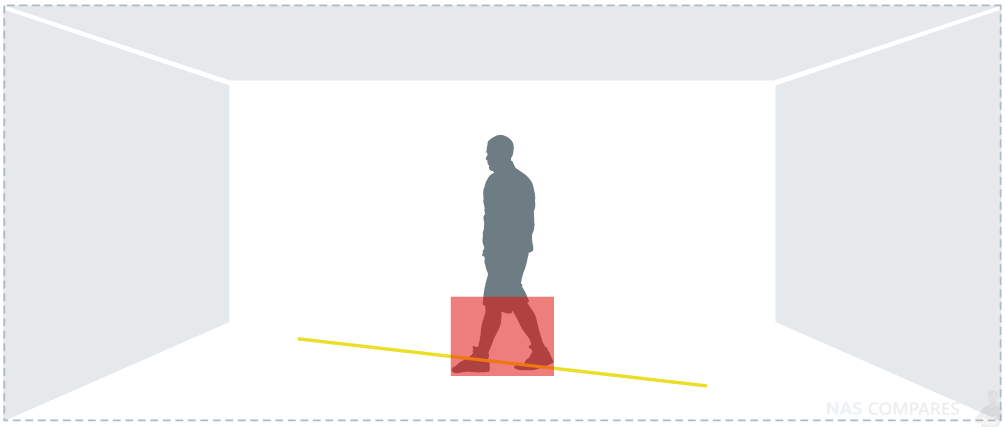
Since Intrusion Detection is mainly applied to wall-mount cameras with recordings taken from high angles, the analysis traces the lower half of moving objects to determine whether they have crossed the virtual fence and triggers events accordingly.
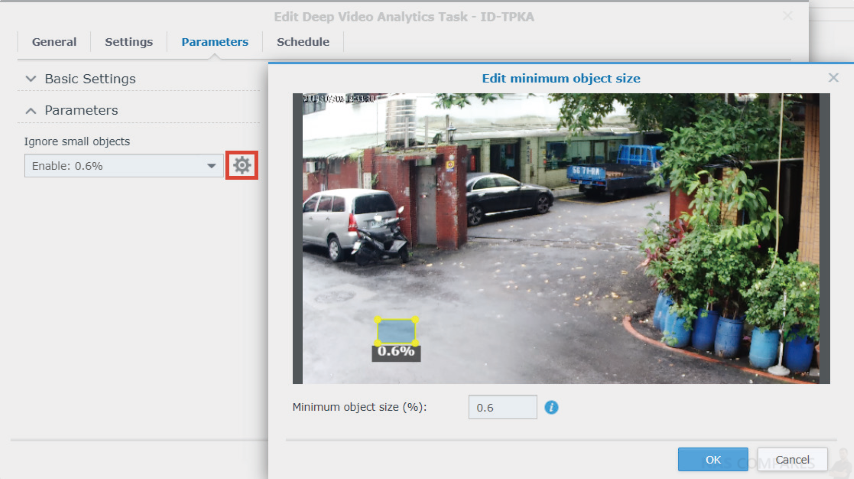
Step 5 – How to Ignore Small Objects
To filter out interferences such as image noise, insects, or small animals, it is important to fine-tune the minimum object size. In the Parameters page, click the Edit button and adjust the yellow object frame to define the minimum object size.
Step 6 – How to Ignore Day-Night Mode Events
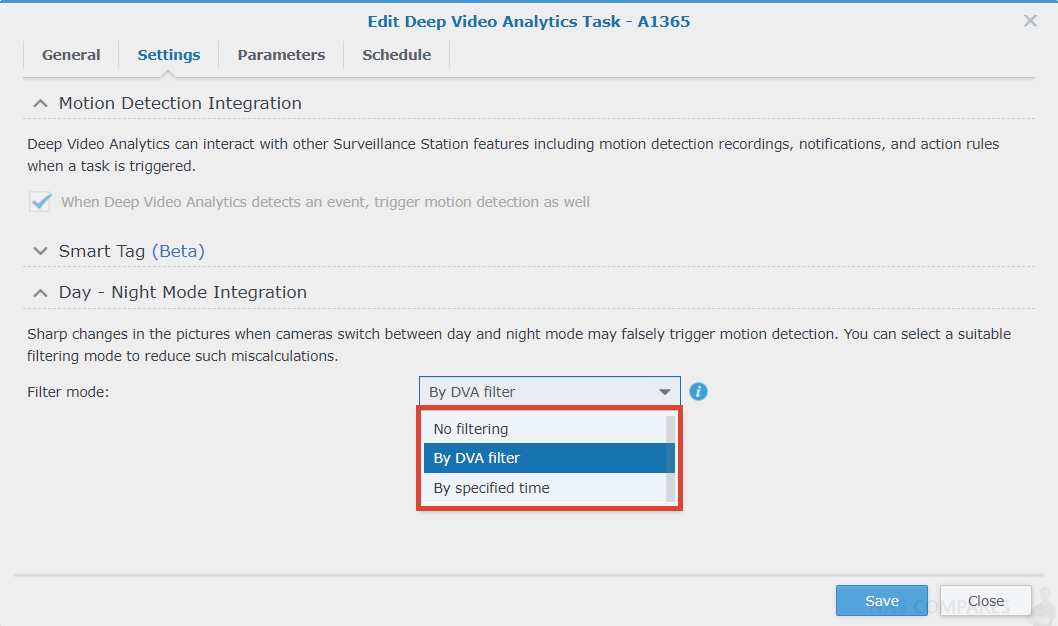
When a day passes to night, cameras switch from using natural daylight to using IR to record videos. Sharp image changes during these times likely cause incorrect detection results. To avoid this, you need to select a suitable filtering method.
On DVA models, filtering by Deep Video Analytics is fully automated and eliminates the sharp image changes of mode-switching through intelligent image analysis technology. Filtering by a specified time, on the other hand, works best when combined with the day-night mode scheduling of the cameras themselves. Please keep the settings consistent so that you can accurately filter out events at the set times.
Synology DVA3219 NAS – Improve Detection Accuracy Settings
After adjusting software parameter settings, there are still some factors that may affect detection accuracy. This chapter lists some possible causes and solutions.
Step 1 – Clear Surroundings
The simpler the surroundings are, the more easily can Intrusion Detection analyze object features and provide accurate reports.
The following are some general guidelines:
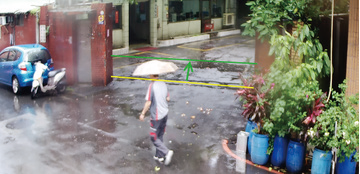
- If there are major roads near where you wish to set up detection fences, move the fences slightly away from the roads. Intrusion Detection can still achieve the same effect while increasing stability and reducing the number of accidental triggers.
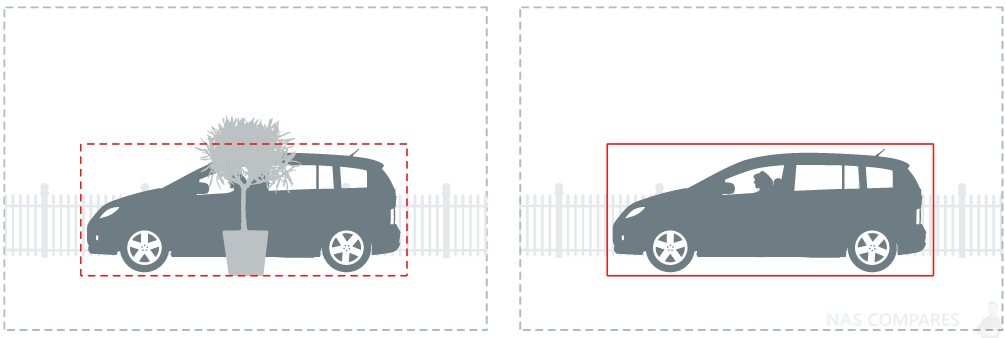
- Place the detection fences in the middle of the screen and remove obstructions like potted plants or columns, so that objects can be properly detected on either side of the fences.
- When the areas your camera footages cover are rather wide, small objects in the distance may not be detected correctly. We recommend adjusting the camera positions or adding new cameras to accommodate the farther corners.

Step 2 – Note Possible Interferences
Even with thorough planning of the camera mounting environment, it is still possible that movements are wrongly identified. Please be advised that the points listed below may affect detection, but be assured that the analysis can still function normally:
- Weather sometimes affects the accuracy of outdoor cameras. Rain and snow, changes of shadows, or differences between day and night are all possible influences
- Detection fences set up in relatively unstable areas, such as in shaking bushes or rippling waters, may sometimes have lower precision
- Flickering or glowing objects, such as neon lights, may disturb the analysis.
Synology DVA3219 NAS – How to Utilize Advanced Features
Besides detailed parameters that allow you to track occurring movements precisely, DVA also offers tagging features which boost the efficiency of file management.
Step 1 – Integrate with Motion Detection
Intrusion Detection can be integrated with Surveillance Station’s motion detection so that cameras’ recording, notifications, action rules, and other settings can also be triggered when an intrusion event is detected.
Step 2 – Make Use of Smart Tags
Intrusion Detection is capable of automatically tagging events according to the objects that appear in the images, such as people, animals, and vehicles. This gives administrators overall knowledge of the video content even without manual processing.
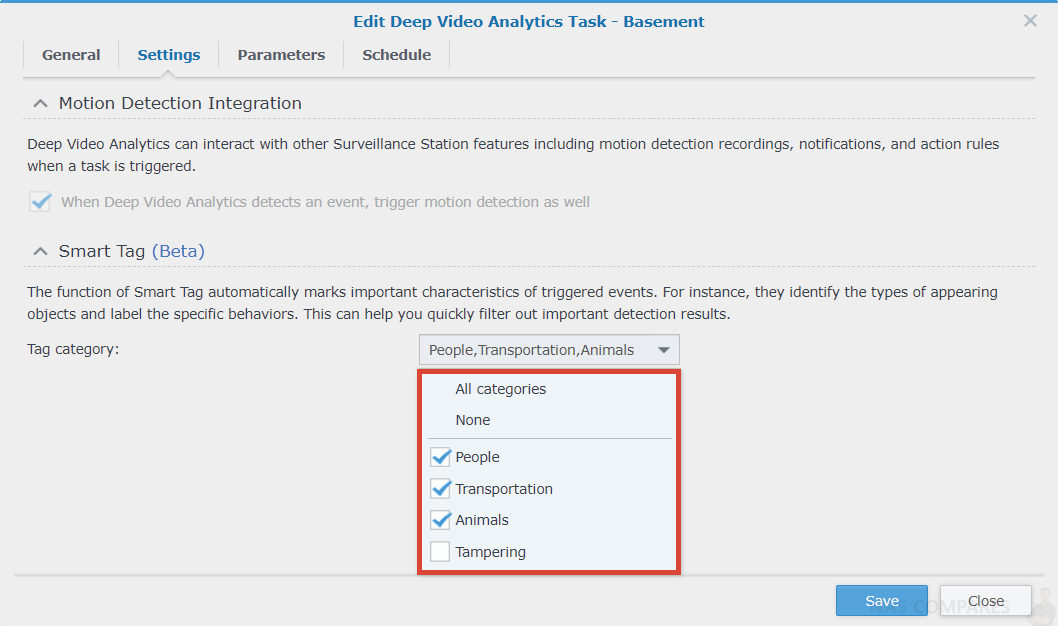
Videos can also be searched for by tags to quickly locate major events.
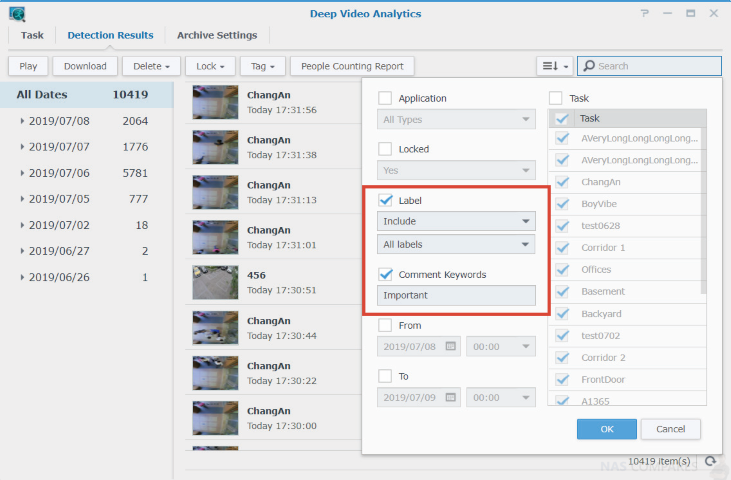
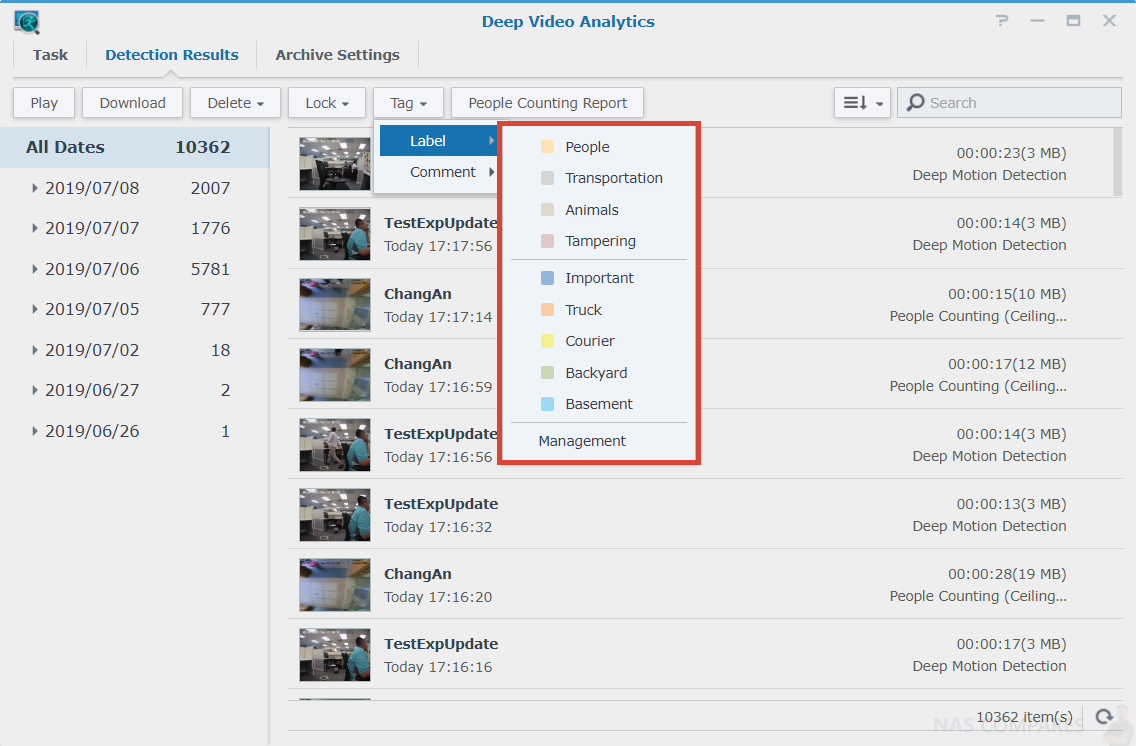
Step 3 – Label and Comment
Detection results can be labelled, sorted, and commented on. For example, you can create a “Courier” label to mark related events or easy access to the video file afterwards.
Still Need Help with your DVA3219 Surveillance Station NAS? Click the Guide that best suits your needs the most, that can help you use your Synology DVA3219 NAS and Surveillance Station:
Synology Surveillance DVA3219 First Time Camera Setup User Guide
Synology Surveillance DVA3219 Deep Motion Detection User Guide
Synology Surveillance DVA3219 People Counting User Guide
Synology Surveillance DVA3219 No-Idle Zone User Guide
📧 SUBSCRIBE TO OUR NEWSLETTER 🔔🔒 Join Inner Circle
Get an alert every time something gets added to this specific article!
This description contains links to Amazon. These links will take you to some of the products mentioned in today's content. As an Amazon Associate, I earn from qualifying purchases. Visit the NASCompares Deal Finder to find the best place to buy this device in your region, based on Service, Support and Reputation - Just Search for your NAS Drive in the Box Below
Need Advice on Data Storage from an Expert?
Finally, for free advice about your setup, just leave a message in the comments below here at NASCompares.com and we will get back to you. Need Help?
Where possible (and where appropriate) please provide as much information about your requirements, as then I can arrange the best answer and solution to your needs. Do not worry about your e-mail address being required, it will NOT be used in a mailing list and will NOT be used in any way other than to respond to your enquiry.

|
 |
ZimaOS is the BEST Beginner NAS OS - Watch Your Back UnRAID and TrueNAS !!!
30TB Hard Drives are TOO BIG ! (and here is why)
COMPLETE UGREEN NAS Setup Guide - 2025 EVERYTHING VERSION
$110 USB4 to 2x10Gb Adapter Review - What the WHAT?
UGREEN NAS Now has iSCSI, 2FA and Jellyfin (and more) - FINALLY!
Seagate 30TB Ironwolf and EXOS Hard Drive Review
Access content via Patreon or KO-FI




DISCUSS with others your opinion about this subject.
ASK questions to NAS community
SHARE more details what you have found on this subject
CONTRIBUTE with your own article or review. Click HERE
IMPROVE this niche ecosystem, let us know what to change/fix on this site
EARN KO-FI Share your knowledge with others and get paid for it! Click HERE