

DS920+ NVME SSD Cache
DS920+ with 4x WD 14TB Drives and 2x Samsung SSD 970 EVO Plus 500GB
Do these SSDs work well as cache drives?
How do you setup/initialize them?
DS920+ or any other model will require the steps to enable cache.
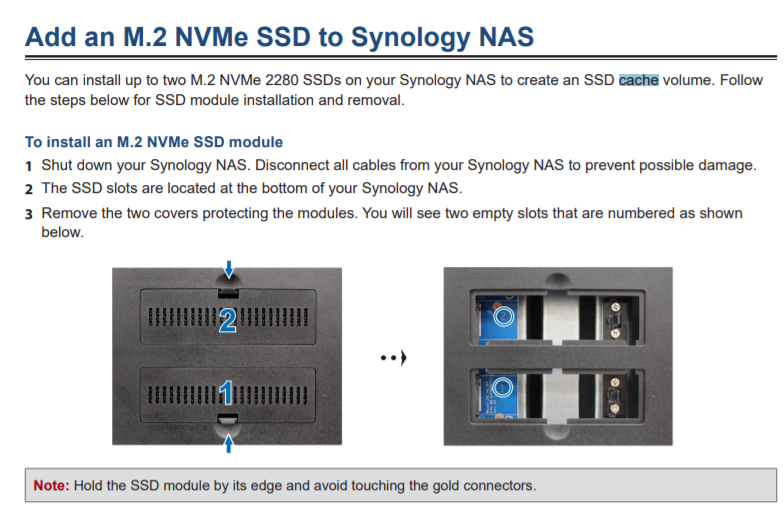
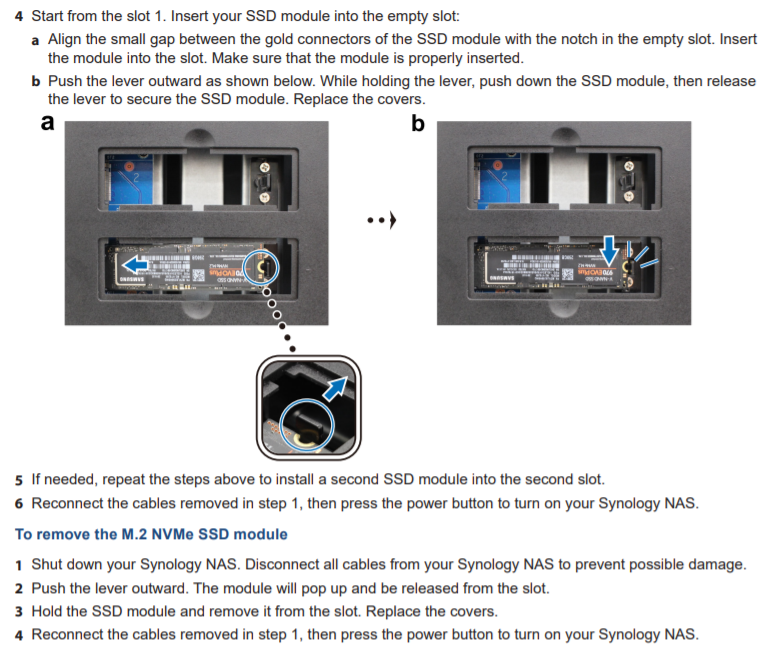
To mount SSD cache:
- Install the SSDs into your Synology NAS. Please see the notes above first.
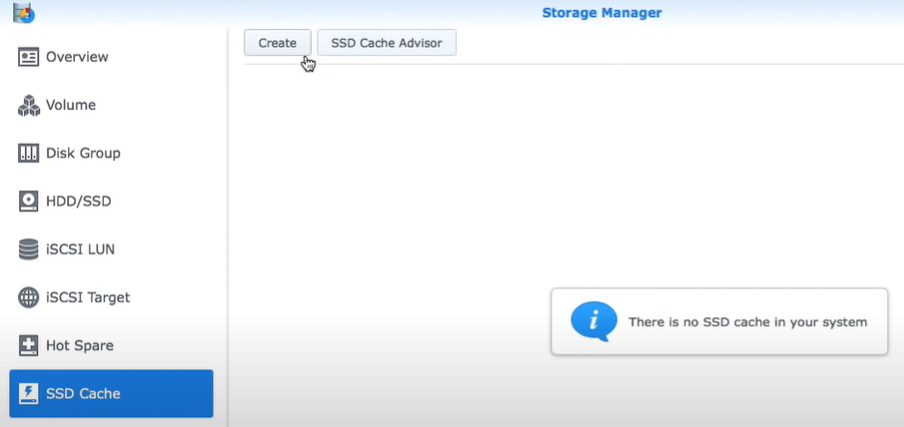
- Go to Storage Manager > SSD Cache. Click Create.
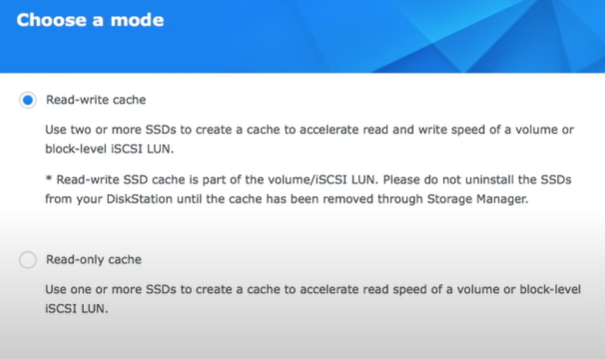
- Select the cache mode (only available for models that support read-write cache).
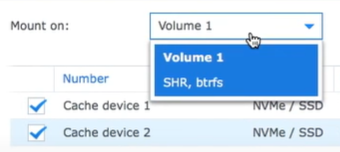
- Find the drop-down menu and select the volume or LUN on which you wish to mount the SSD cache.
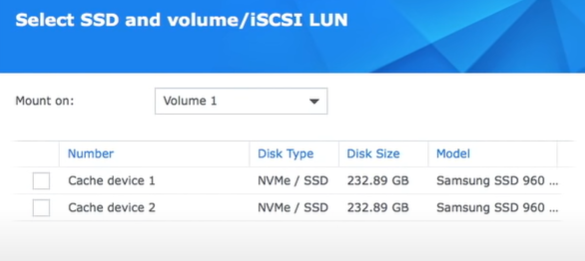
- Choose the SSDs from the list. Data on the SSDs will be erased, so please make sure no important data will be deleted.

- Click Apply.
SSD Cache
SSD cache can improve the performance of random access by storing frequently accessed data on the SSD cache. SSD cache can be mounted on a volume or LUN.
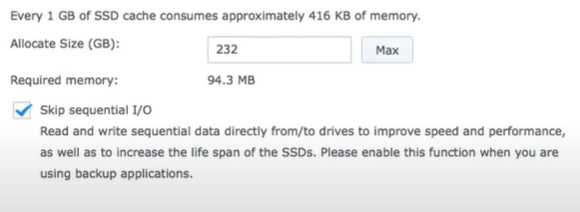
The objective of enabling SSD cache is to increase the performance of random access to a small portion of data that is frequently accessed in the storage space. For example, both large sequential read or write operations (e.g., HD video streaming) and entirely random data reading patterns lack re-reading patterns, and thus will not benefit significantly from SSD caching. For general applications, it is recommended to enable the Skip sequential I/O option, so that sequential I/O can still pass through to the drives of the storage space.
SSD Cache Types
There are two types of SSD cache, both implementing an LRU (Least Recently Used) algorithm to swap the data in the cache:
- Read-only cache can consist of 1 to 12 SSDs and be set to the cache RAID type of RAID 0 to improve the random read performance of the storage space on which it is mounted.
- Read-write cache can consist of 2 to 12 SSDs and be set to the cache RAID type of RAID 1, RAID 5, or RAID 6 to improve the random read and write performance of the storage space on which it is mounted.
Note:
- SSD read-only cache stores copies of data from the volume; thus, no data loss will occur even if the read-only cache has crashed.
- When SSD read-write cache is degraded, Automatic protection mechanism will be activated. It will stop caching new IOs and start writing (i.e., synchronizing) existing new data from the SSDs to HDDs. After the data synchronization is completed, no data loss will occur even if the read-write cache has crashed.
- In normal situations, SSD read-write cache contains new data that has not been synchronized to HDDs yet. Please do not remove SSDs from your Synology NAS (even with the system powered off) before you remove the cache from Storage Manager. Otherwise, the volume may crash.
Memory Requirements
SSD caches require a certain amount of system memory. The larger the allocated cache capacity, the more system memory is required. However, to maintain the stability of Synology NAS, only a quarter of the pre-installed system memory can be used for SSD cache. If you want to create an SSD cache of a larger capacity, you might need to upgrade the memory of your Synology NAS.
Cache Hit Rate
A SSD cache by default only accelerates random I/O and does not accelerate sequential I/O. The Cache Hit Rate of a SSD cache can be calculated according to the following formula:
- Hit Rate of a SSD read-only cache = Accelerated Random Read Counts / Total Random Read Counts * 100%
- Hit Rate of a SSD read-write cache = Accelerated Random Read & Write Counts / Total Random Read & Write Counts * 100%
Managing SSD Cache
To mount SSD cache:
- Install the SSDs into your Synology NAS. Please see the notes above first.
- Go to Storage Manager > SSD Cache. Click Create.
- Select the cache mode (only available for models that support read-write cache).
- Find the drop-down menu and select the volume or LUN on which you wish to mount the SSD cache.
- Choose the SSDs from the list. Data on the SSDs will be erased, so please make sure no important data will be deleted.
- Click Apply.
To stop caching sequential I/O:
If your target volume or LUN has excellent sequential I/O performance, you can make SSD cache stop caching sequential I/O and access data directly from your drives for higher speed and better performance.
- Click Configure to open the configuration window.
- Tick Skip sequential I/O.
To remove SSD cache:
- Click Remove to permanently remove this SSD cache from Synology NAS.
Note:
- For the read-write cache, you must remove it through this procedure (even if your Synology NAS is powered off), otherwise volume crash will occur because partial data resides only on the cache.
- When mounting or removing SSD cache, the system will stop all related services (e.g., shared folders, installed packages, and current connections)
- If a read-write cache on a storage space is not detected when booting up, the system will not mount that storage space. Please find and re-install the SSDs in the Synology NAS and reboot to mount the storage space.
- Please make sure to properly remove the read-write SSD cache before unplugging its corresponding SSDs. Unplugging the SSDs improperly (e.g., when a cache is still in use or when the system is powered off) will cause the data stored in the target volume or LUN to crash.
To cancel removing SSD cache:
- Click Cancel Removal to cancel the cache removing action.
To repair SSD cache:
- For read-write cache: If one of the SSDs has crashed, please follow the steps below to repair it.
- Replace the failed SSD with a new one. (The new SSD must be larger than or equal to the size of the original SSD.)
- Click the Repair button.
- Select the SSD from the list.
- Click Apply.
- For read-only cache: If one of the SSDs has crashed, please remove the cache and replace the failed SSD. Then click Create to make a new cache configuration.
SSD Cache Advisor
This function allows you to calculate and view the total size and number of recently accessed files on a specific volume. If you have not yet created any SSD cache on the selected volume, this information can be referenced when evaluating how much SSD cache is suitable for your system. If you have previously created an SSD cache on the selected volume, the analysis and usage of the cache will also be shown here.
To use SSD Cache Advisor:
- Click SSD Cache Advisor to launch the wizard.
- Select a volume for calculation, and then click Next.
- The wizard will automatically begin totaling the size and number of recently accessed files on the selected volume. Calculation time varies depending on your individual environment.
| Where to Buy a Product | |||
 |
    
|

|
VISIT RETAILER ➤ |
 |
|
|
VISIT RETAILER ➤ |
 |
|
|
VISIT RETAILER ➤ |
 |
|
|
VISIT RETAILER ➤ |
We use affiliate links on the blog allowing NAScompares information and advice service to be free of charge to you. Anything you purchase on the day you click on our links will generate a small commission which is used to run the website. Here is a link for Amazon and B&H. You can also get me a ☕ Ko-fi or old school Paypal. Thanks! To find out more about how to support this advice service check HERE If you need to fix or configure a NAS, check Fiver Have you thought about helping others with your knowledge? Find Instructions Here


Great article, truly saved me hours of putting the steps together.
I picked up 2 x 1TB 970 Evo Plus on Black Friday for my DS920+ (not a really compelling use case, but it’s done). Now I’m feeling paranoid about heat, but I cannot workout which heatsink to use. There’s not a lot of space between the NVMEs and the covers. Any suggestions?