

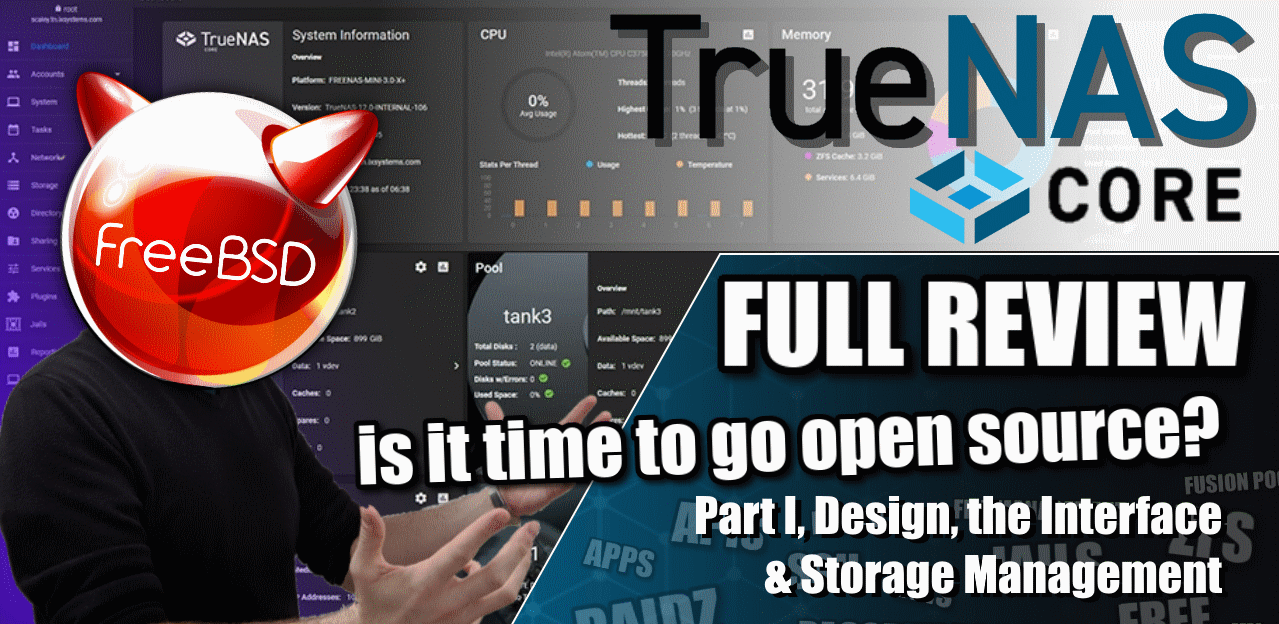
TrueNAS Core Software Review – Part I, Design, the Interface & Storage Management
Have you been considering a NAS for a few years, but looked at the price tag that off the shelf featured solutions from Synology or QNAP and thought “wow, that seems rather expensive for THAT hardware”? Or are you someone that wants a NAS, but also has an old PC system or components around that could go towards building one? Or perhaps you are a user who wants a NAS, but HAS the budget, HAS the hardware, but also HAS the technical knowledge to understand EXACTLY the system setup, services and storage configuration you need? If you fall into one of those three categories, then there is a good chance that you have considered TrueNAS (formally FreeNAS). The community supported and highly customizable ZFS storage platform that is available for free and along with regular updates has adapted over recent years towards diversifying different kinds of users, their setup’s and their requirements of TrueNAS. Today I want to review the TrueNAS software. In order to do this, I have been supplied with a Mini X+ 5 HDD/2 SSD Desktop system (hardware review on that soon) by iXsystems, a company with established ties with TrueNAS and the platform’s official enterprise hardware solution partner. This review is going to be conducted a little different than my normal NAS server reviews. Unlike a review of a new piece of NAS hardware, TrueNAS is a software platform that is significantly more flexible in it’s installation (ultimately available in one form or another on a custom PC build or even much smaller shuttle case builds). Equally, unlike many who have reviewed TrueNAS and it’s previous versions or recent splinters (e.g. FreeNAS, Core, Scale, Enterprise, etc), today’s review is going to be a fresh look at this platform, what it does better than Linux NAS systems like Synology or QNAP, what is does worse and ultimately help users who are thinking of moving towards the steeper learning curve of custom-built TrueNAS. What TrueNAS lacks in the ease and simplicity of traditional NAS drives, it can more than makeup for it in its sheer scope and potential to be more powerful, efficient and flexible overall. So, let me guide you through my highlights of 30 aggregate hours of use with TrueNAS.
Part II of the TrueNAS Review is HERE (23/03)
Part III of the TrueNAS Review is HERE (25/03)
Alternatively, you can read the (LONG) FULL Review of TrueNAS is available HERE.
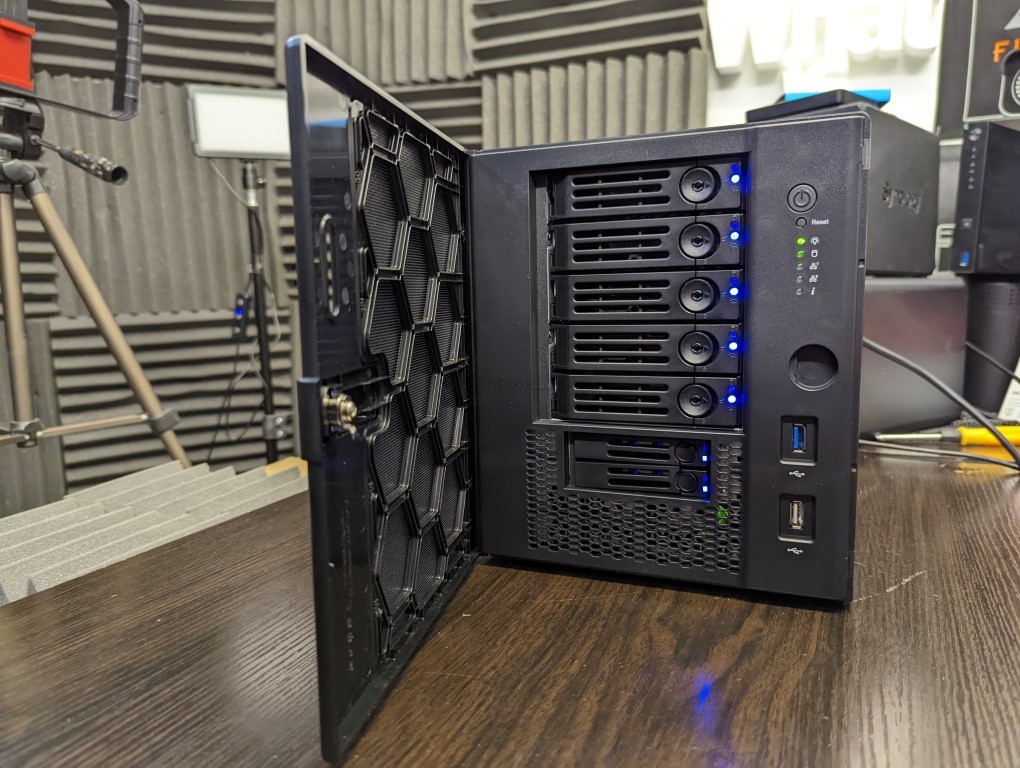
TrueNAS Review Disclaimer – As mentioned in my introduction, my review of TrueNAS today was made on an iXsystem Mini X+, an 8-Core Intel-based system that featured 32GB of DDR4 memory, as well as arriving with 2x 10GbE ports, PCIe Upgradability and mixed storage media support. The system arrived with 5x WD Red Drives and 2x 2.5″ SSDs. This hardware does not impact the bulk of this review as TrueNAS is available as an open-source download that can be installed onto a custom PC, flashed server etc. However, the iXsystem Mini X+ arrives with TrueNAS Core and a few smaller extra bits that are exclusive to this more complete hardware+software package. Where appropriate, I will highlight it, however, the bulk of the features, settings and stand out areas of attention below can be applied to the free, standalone version of this platform. Additionally, there are references to enterprise features and TrueNAS Command (a wider remote deployment monitoring and management portal tool) that may be exclusive to that platform. Finally, my personal background is largely focused on traditional turn-key NAS solutions and therefore I decided to present this review on how things are done differently to NAS brands such as Synology and QNAP. You can find iXsystems Pre-built TrueNAS solutions over on Amazon here.
Review of TrueNAS – GUI & Deployment
First-time deployment of TrueNAS (after the initial installation of the software on the hardware system which will vary based on whether you have opted for an iXsystem solution or a custom build) is very straightforward. Once the system is booted, connected to your network and initialized, finding the device is possible via truenas.local. or obtaining it’s address from your switch or using an IP Scanner.
So, the first thing that I want to discuss about TrueNAS is the design. Finding a very interesting middle ground between providing all the configuration options in a single screen, whilst still not overwhelming the end-user, getting it pretty close to nailing it.
Alot More Hints and Tips than I was Expecting!
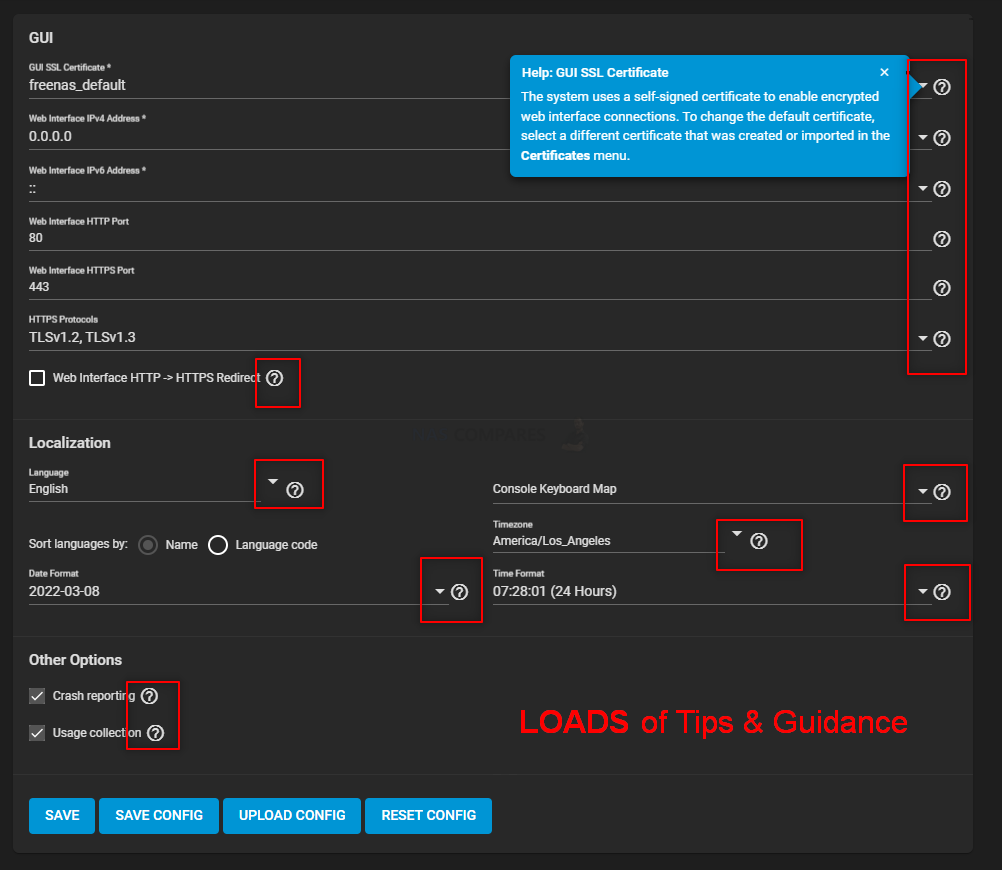
The first thing I was very surprised by in the design and deployment of the TrueNAS GUI was the sheer number of hints and information ‘i’s around every single screen. As TrueNAS and FreeNAS before it are built on FreeBSD, although there I expected a GUI, I did think it would still be rather command-line heavy still. However, not only are the controls of TrueNAS almost all displayed in a clearly visible GUI, but also I struggled to find a single option or choice that didn’t have a tip or guidance suggestion. This was a particular surprise as one of the biggest hurdles for most users considering moving from a turn-key NAS solution towards TrueNAS (custom or an iXsystem) is that intimidating climb up the steeper learning curve. It was a genuine and extremely welcome surprise to see how much guidance was available to even small and insignificant choices in the storage system setup where available.
Presentation of Storage and Resource Use is VERY Clear
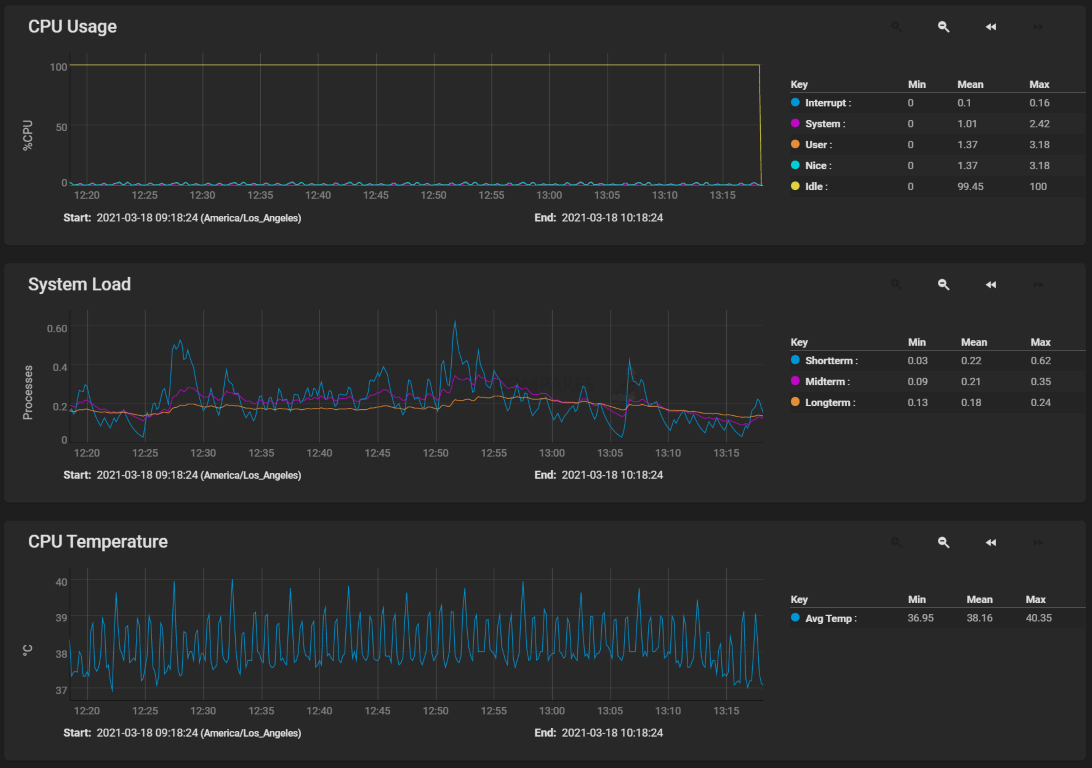
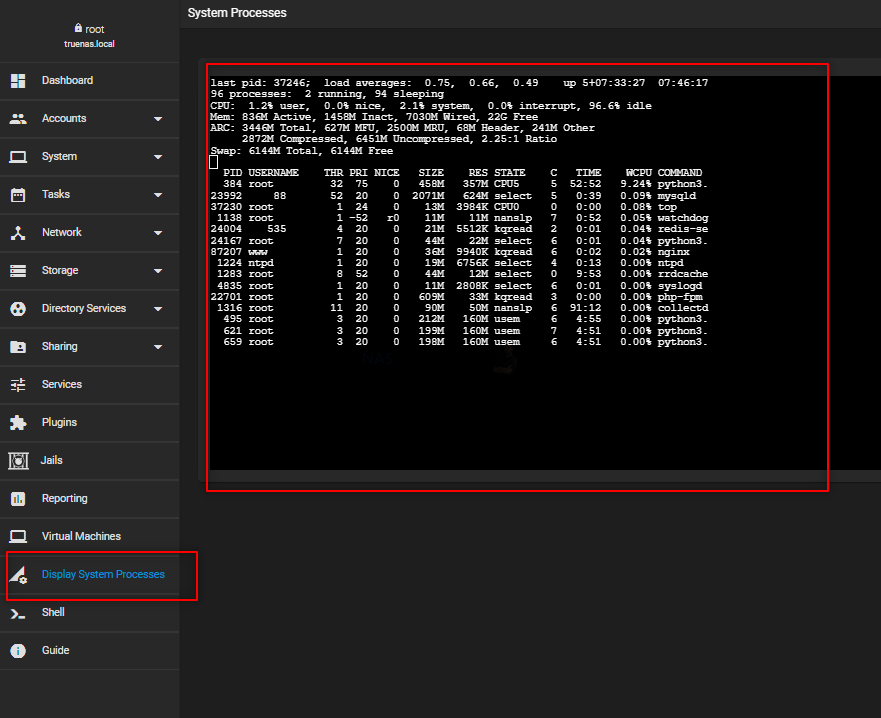
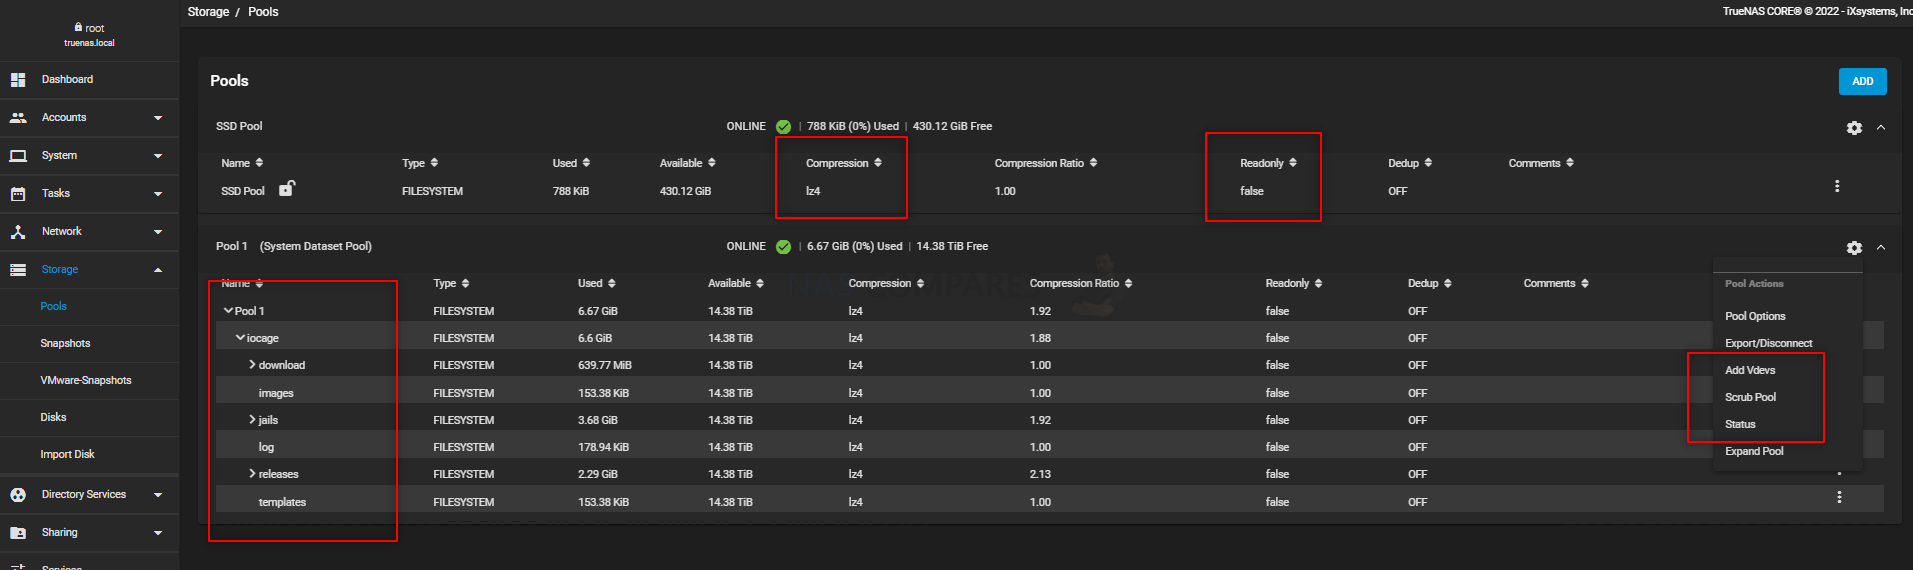
Another thing that I fully expected to be present, but not to this level, was how the information on your storage areas (Pools, data sets, individual drives, etc) and the monitoring of your resources were displayed both analytically AND clearly. Of course, I expected TrueNAS to have the means to assess the system hardware health and status, but like most of my early personal experience with FreeNAS, UnRAID and FreeBSD years before, I thought this information would be available less in the GUI and more in command retrieval. However, the resource monitor and storage status (both, when delving into the system deeper and just via the initial splash screen of the GUI) provide an excellent level of information and in the case of the former, can be broken into a report form. Getting the presentation of storage on a GUI that can suit both the novice and the veteran techie is a tremendously tough line to balance and although there are a few areas where TrueNAS tends to ‘info-dump’ you a little, this area was no one of them.
Sharing Tab and its Breadcrumbs (WebDav, iSCSI, SMB, etc) Are More Intuative than Most
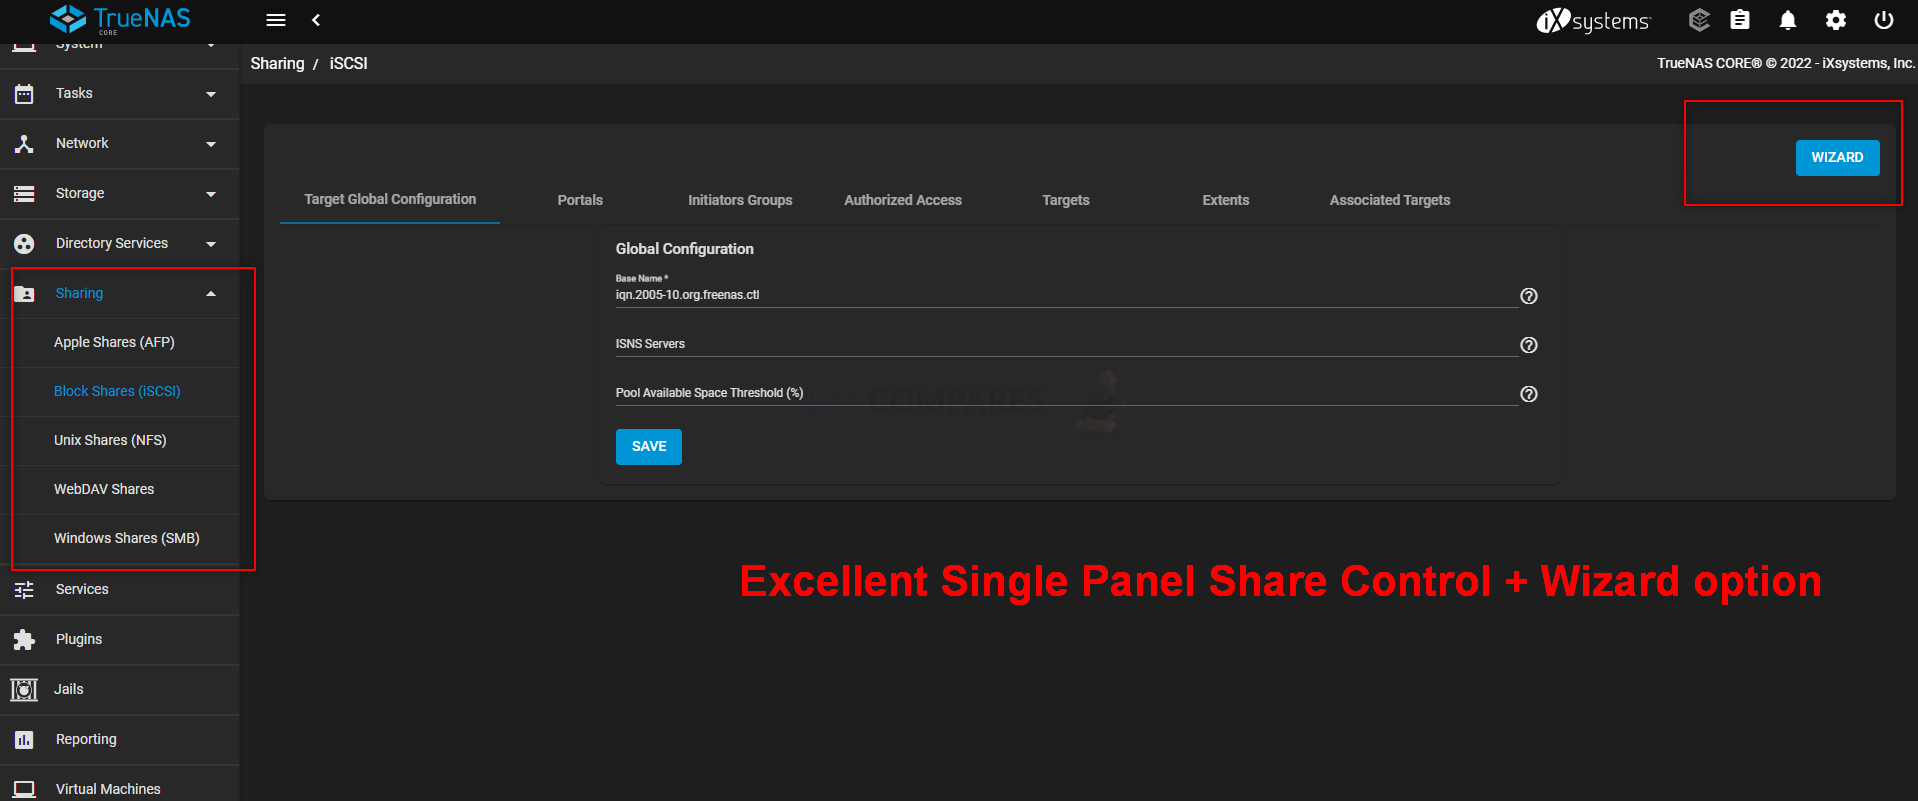
Another part of the TrueNAS graphical user interface that sets it apart a little from off the shelf NAS hardware+software is how the menu bar is displayed. With most NAS brands having their GUI comparable to popular operating system desktops (primarily Windows, MacOS or Android for the most part), TrueNAS’ GUI is a little bit more comparable to WordPress for the most part. The bulk of the config and service options are all located on the left-hand side of the screen and although there is only a handful at first glance, each one breaks down into subcategories quite quickly. The responsiveness of this menu system is particularly impressive and it’s easy to forget that you are accessing a remote system. Although the bulk of the tabs and options are where you would hope, one particular stand out example of things being done in a different and better way than most brands in the sharing tab/menu. Although most NAS brand software and GUI have tabs dedicated to sharing files (as well as contextual menus on files and folders), once you start breaking down into different sharing protocols, things get a little distance out and you end up having to keep multiple windows open to create and manage your cross-platform sharing environment. TrueNAS on the other hand has bulked these all together into the single tab and allows navigation through and between considerably more intuitive. Equally, the customization and configuration of shares and you delve deeper (although increasing the learning curve) are significantly more diverse to allow tweaking and improvements based on your setup.
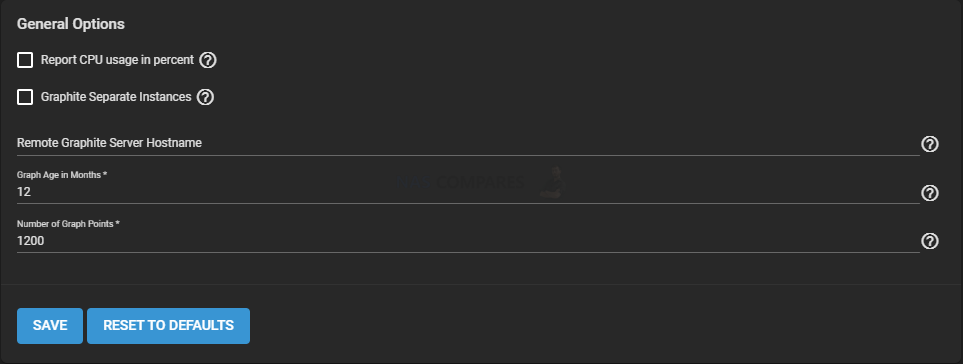
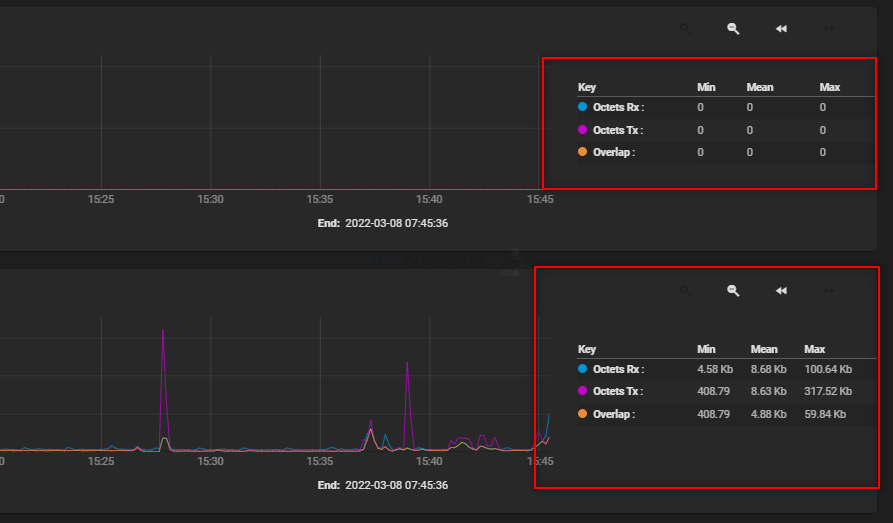
Much like the Storage Presentation and Resource Use, getting reports of historical system information and active processes are much more detailed on the TrueNAS platform than I have seen from many NAS brands. TrueNAS uses Graphite for metric gathering and visualizations. Some general settings can be found in System > Reporting. Once again, it’s a fine line to have information regarding the server be presented in a fashion that is digestible to less storage-experienced users without potentially dumbing things down a little. Luckily these do still seem to present all the information that either tier of user is going to need and is done so by the information being broken down into sections that in turn can be delved deeper into by degrees. The UX of TrueNAS has clearly been thought about a lot and although many FreeNAS veterans might have disliked the changes in some areas towards making it simplified in places, there are still options for drilling down into system heath and history quite significantly.
Lots of Theme Customizations and a Theme Maker
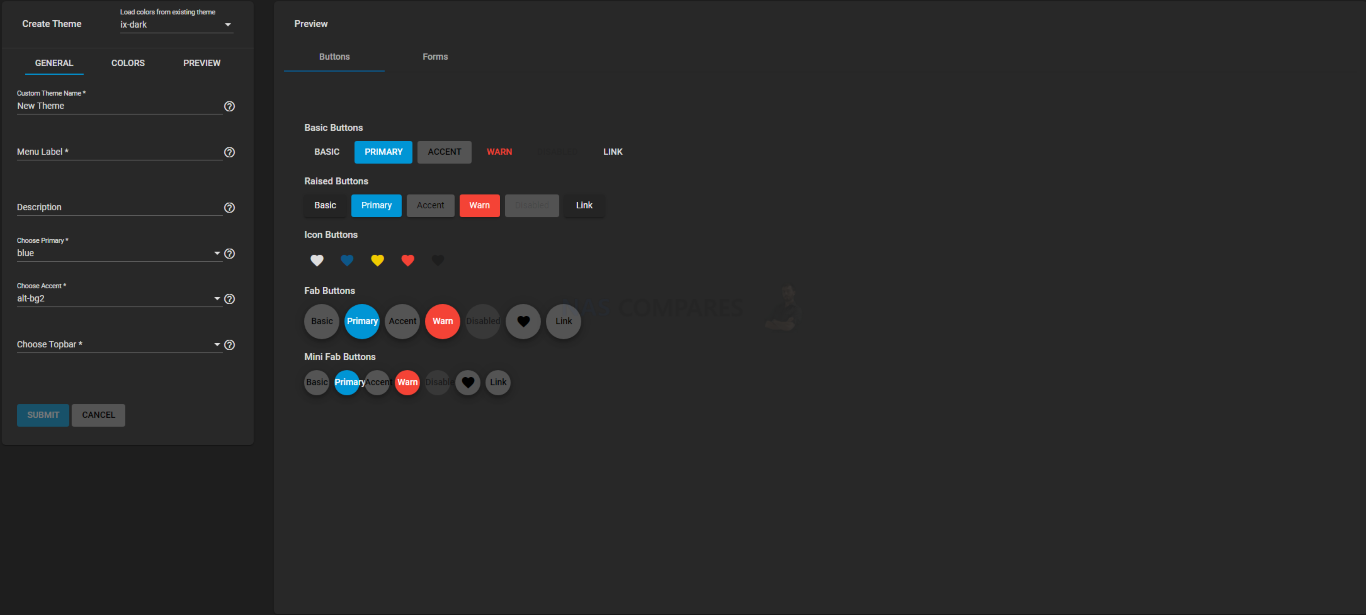
A very surprisingly detail of TrueNAS is how much the GUI can be customized. Most NAS brands and their software allow the end-user (i.e that current user of many that have access credentials) to change minor details. The Wallpaper, their login icon and time/date display and pretty much the full range of choices. Given the fact most off-the-shelf NAS solutions are designed with being more user-friendly and attempting to de-mystified network storage for average users, I was VERY surprised that it was TrueNAS that had a greater degree of customization available in how the GUI is displayed. Colour schemes, logo changes, scaling, icon replacements, fonts, accents and changes to the top bar. There is a comparatively large amount of choice and customization compared with turn-key NAS solutions from Synology and QNAP and leans very well into the already established idea that TrueNAS is designed around custom builds.
No Avoiding That it is Still Very Stat and Tech Heavy some less experienced Users
As much as I like the GUI fo TrueNAS and how it has melded the controls very well to remain accessible to the experienced and inexperienced user, it has to be said that this is not done 50/50 and although there are hints, guides and recommendations by the system through all choices, it is still a very tech-heavy product and although the basic/top-layer decisions are user friendly, it isn’t going to be long before the full pages fo customization and configuration choices presented in the TrueNAS GUI are going to be a little overwhelming for those that are more used to these tougher decisions being hidden behind presets or set up behind a scaled option of security. In a few other areas of TrueNAS, this is addressed with an ‘advanced’ tab or mode option that until pressed will hide these tougher elements of the setup unless needed. Sadly this is not a system-wide design choice in the GUI and the TrueNAS UX is something that can demand accelerated learning. Alot of this might be solved with ‘easy’ ‘intermediate’ or ‘expert’ table opens on the bulk of pages, but as it stands it can sometimes be a bit of a ‘cannot see the wood because of all the trees’ situation when looking for a specific option in a menu, as there are 10-15 choices/boxes on the screen. The TrueNAS UI in the latest version IS very good and considerably more user-friendly than I thought it would be, but I would still be reluctant to call it novice-friendly.
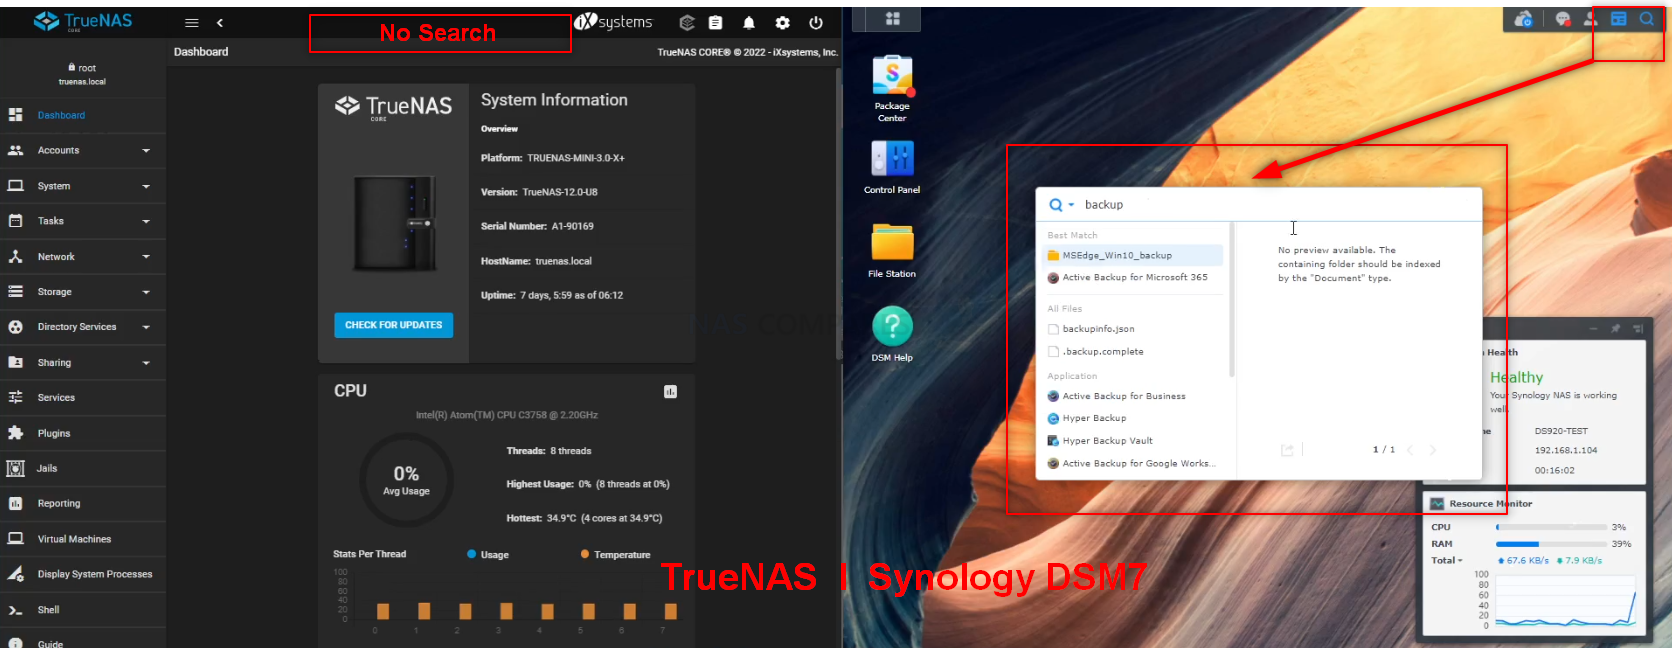
No Search Functionality at the Home Screen
This was something that, despite the arguably higher skill level that TrueNAS commands in it’s user base, I was still surprised was absent – A search feature from the main GUI. It would not be a commonly used feature, however, I have met plenty of less experienced users or those in a rush looking for a specific option/service/setting that would appreciate a search functionality to be available. There ARE a few services and options in the menus that feature search functionality, but they are generally always limited to that specific function and not system-wide.
Review of TrueNAS – Storage
Realistically, THIS is the thing that is going to be paramount to most users of TrueNAS, Storage! But simply storing data is not enough, it is about how well it stores it, how customizable it is to different user environments, how secure it is in terms of backups and redundancy, how robust it is and the maintenance of that storage moving forward. TrueNAS arrives with ZFS (zettabyte File System), an enterprise-ready open source file system, RAID controller, and volume manager with unprecedented flexibility and an uncompromising commitment to data integrity. It eliminates most, if not all of the shortcomings that veteran storage professionals claim are apparent in ‘EXT4’ or the much newer ‘BTRFS’ file systems from brands such as Synology and QNAP NAS devices. Alongside the widest support of ZFS currently available in the market, TrueNAS also is one of the most scalable solutions available in the world (in part thanks to that freedom in building the hardware architecture being available and the open-source design of the platform allowing migration being considerably more seamless as you change out hardware over time. ZFS also brings big advantages in deduplication and compression techniques that improve how much data is being written to the system, whilst simultaneously simplifying the internal pathways of the system to larger bulks of users. In recent years, turnkey solutions from Synology and QNAP (as well as more affordable brands such as Asustorand Terraamster) have provided a degree of duplication on their platforms (QNAP seemingly extending this more than most) but ZFS has most of the architecture for these processes natively built into it and although you WILL need to bulk up on your hardware (16GB memory recommended in most cases if you want both for example), it still allows TrueNAS to stand out. Here are the elements of TrueNAS storage that stood out for me.
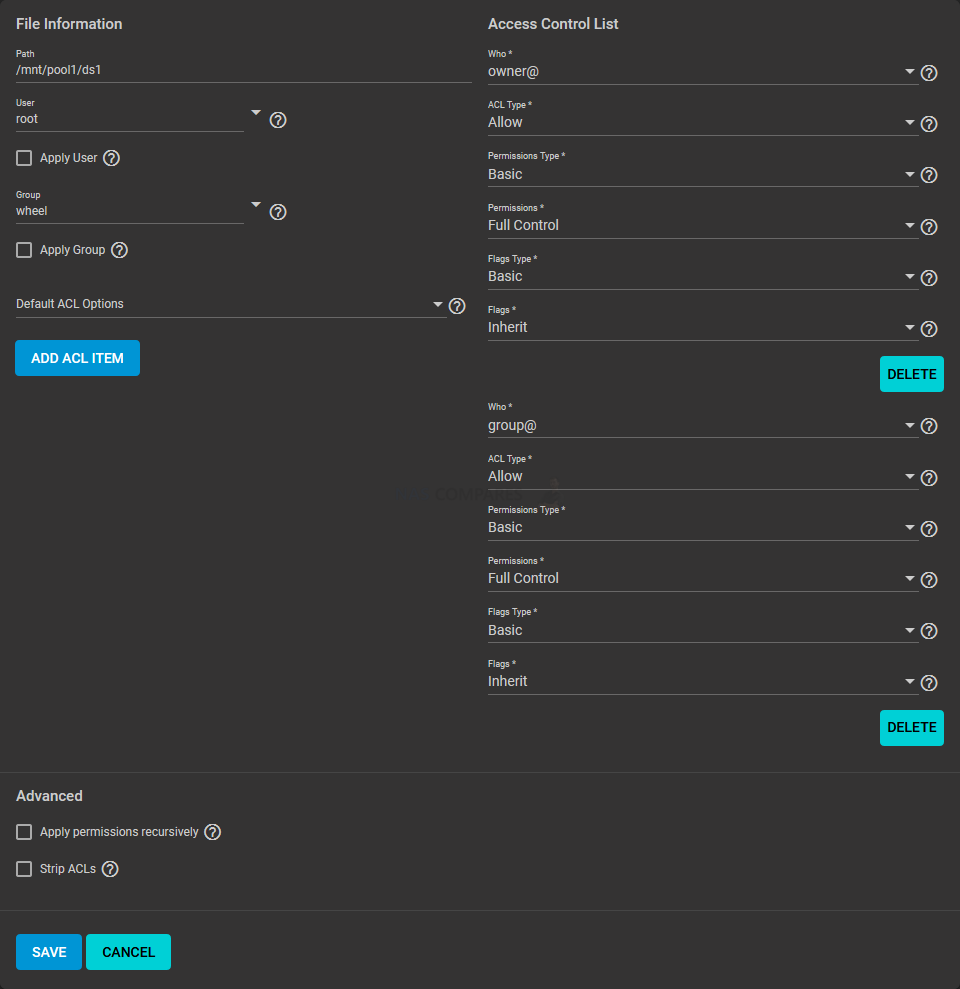
Exceptionally High Level of Access Control Options and Configuration of Data Sets
If there are two areas of consistency throughout TrueNAS storage that need to be highlighted above all others, it would be control and security. At practically every tier of the system’s internal storage management, you are able to apply numerous measures of bespoke user choice protection. More than the fact that standard elements of encryption, ACL and storage segmentation are available here, but more the sheer depth of it. You are able to assign extremely rigid access controls to your storage pools, zDevs, zVols and data sets from the ground up, as well as the branch these security measures into select user and group access (which can be changed by a superuser on the fly with ease). Along with that, ACL support is extremely wide-ranging, giving you the means to create areas of storage that are completely inaccessible (in either direction) by the greater system that ensure that storage can be created quickly, but without opening doors to your mission-critical storage. This bespoke control extends quite heavily to the configuration of Access Control Levels, as access Control List (ACL) is a set of account permissions associated with a dataset and applied to directories or files within that dataset. ACLs are typically used to manage user interactions with shared datasets and are created when a dataset is added to a pool. TrueNAS seemingly allows a create degree of control on this than most NAS systems on the market right now.
Excellent level of support of SED Media and Encryption levels in General
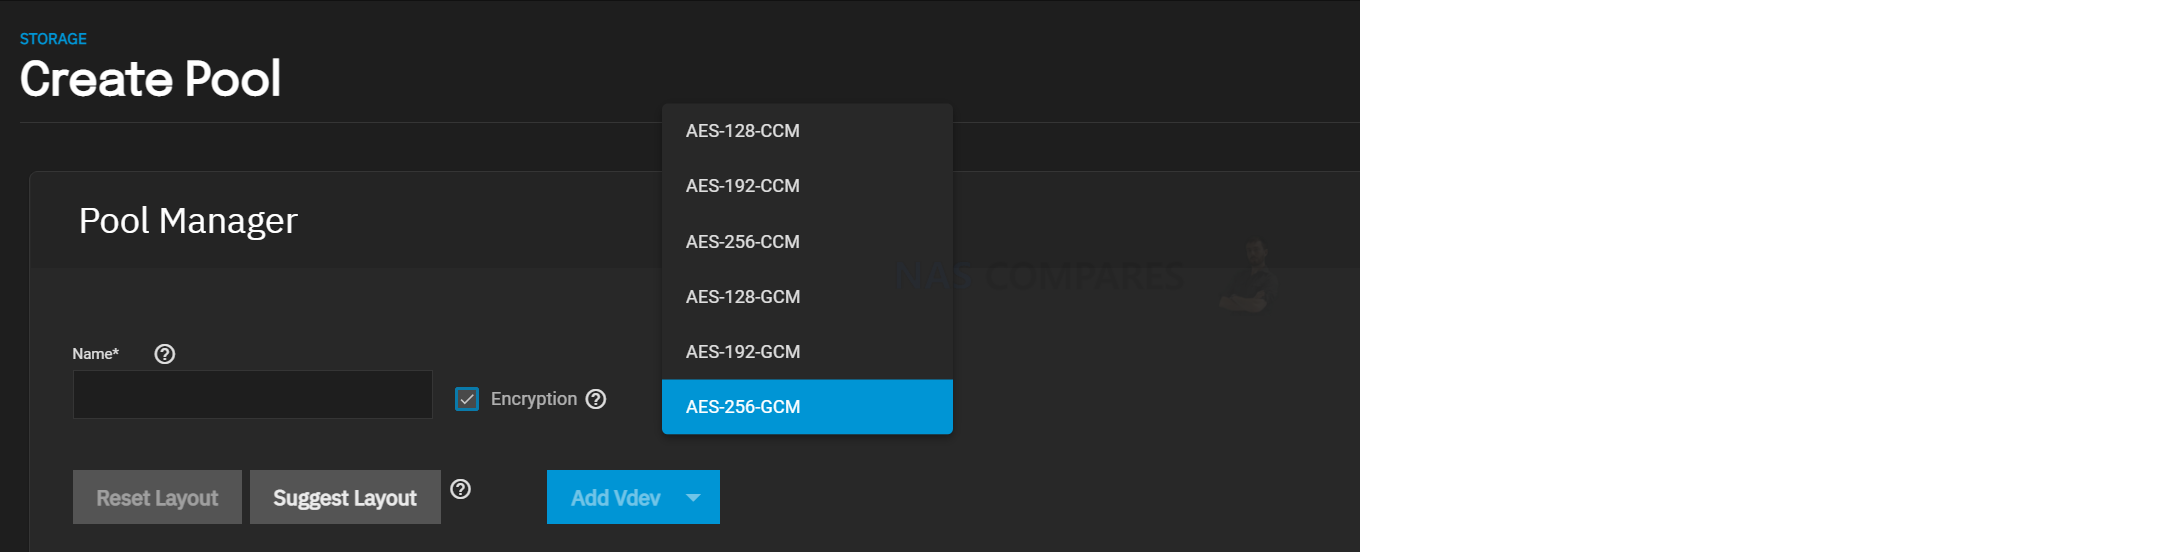
Then with Security, TrueNAS covers this in a few key areas. First off, several methods/protocols of encryption are supported by the system (giving the end-user a choice at the setup level) and generally ‘choosing’ your encryption method is not something offered by most brands to this extent (or at all in many cases). Next, there is the fact that encryption can be applied at every level of thes storage is required. When we look at some other NAS brands that included encryption, they tend to include encryption at the shard folder or volume level (pool level is supported with the use of encrypted drive media). TrueNAS is one of the very few several software on the market that provides native and configurable encryption at every level (storage pool, volumes, data sets, etc) and along with support of key management, there are additional failsafe options available that also passphrase support too. Finally, you have the support of self-encrypted drives (SEDs) in the system that can be fully utilized and that additional encryption be afforded to the greater storage system with the others. In short, you can create a fantastically encrypted storage system to an unparalleled degree in trueNAS. Again, not too shabby for an open-source bit of software!
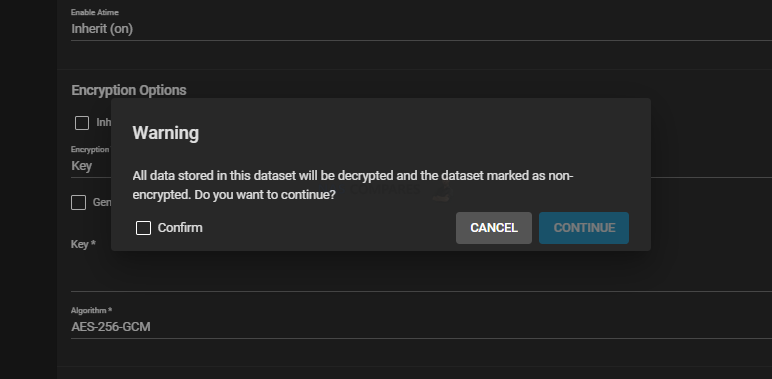
Unrecommended Storage Configuration Choices Need to be ‘Forced’ to be actioned
One issue that will inevitably come to providing software that is highly customizable is giving the end-user too much rope to hang themselves with! Once you make your way past the rudimentary aspects of storage, the end-user can start putting together the building blocks of their storage inefficiently (or worse still dangerously) and run the risk of creating a basis for their storage for years to come that is inherently flawed. Balancing that line of allowing complete control and customization, whilst stopping a user from doing the wrong thing is a tough line to tread (QNAP have been walking this one as best they can for years too). TrueNAS has addressed this with a (very) soft lock system. When building your storage, if you are configuring the resources in a less than optimal/safe way, the system will give you a warning on the screen that details the potential downside/detrimental effect of your action. This warning can then be closed/dismissed and in order to continue, the ‘continue’ option will be joined with a button ‘force’. This is TrueNAS’ middle ground to allow creative freedom, whilst letting the end-user know that the action they are performing has a layer of risk attacked. For example, you are configuring a RAIDZ2 (think RAID 6) and you are using 8 disks that are not all uniform in capacity, but you do not care/want to proceed anyway. This is where the system would present you with a warning to ‘force’ through. The same thing when you build pools without redundancy or use differing media interface types outside of a fusion pool or cache setup. It is by no means a perfect solution, but at least TrueNAS have clearly understood that they need to steer things a bit at times.
Copy on Write Architecture is an additional Layer of File Level Error Recovery
An interesting architectural advantage of TrueNAS utilizing ZFS is the support of CoW (Copy on Write). This is a system of checksum built data health that involves a brief period of two actions of write occurring on any data being sent to the TrueNAS serve, which are then compared for consistency and then a single final, verified version of that data resides. ZFS does not change the location of data until a write is completed and verified. This ensures that your data isn’t lost during an interrupted task such as a power outage. ZFS uses a 256-bit hash of the data in a file system block, known as a checksum. This checksum ensures data integrity during writes. The way it handles and tests writes means that each write is tested, eliminating storage degradation such as bitrot. It also eliminates the write hole which allows for silent data corruption within RAID. Similar methods of data health and verification are utilized in other storage technology (such as ECC memory and in the write actions of BTRFS) but not to this extent and in such a widespread way. Writes do not overwrite data in place; instead, a modified copy of the block is written to a new location, and metadata is updated to point at the new location.

Support of RAIDZ Means that Initial Building is Faster and Recovery More Precise
One of the long understood advantages of ZFS that TrueNAS provides immediately (perhaps to the jealousy of EXT4 and BRTFS system users) is the utility of RAIDZ. RAID (redundant array of independent disks) is the ability to combine multiple media drives into a single storage pool that provides some/all of the benefits of increased storage performance, storage performance and redundancy (eg a safety net to still access/recover your data in the event of a drive failure). RAID and RAIDZ are similar on the face of it (with support of striping and mirroring), but it is a lot of difference in the larger arrays in terms of building, writing and recovery. RAIDZ has some interesting benefits, the first and most obvious is that a RAIDZ compared with a RAID5 takes minutes, not hours to build! Additionally, RAIDZ has a better understanding of empty blocks and that becomes beneficial in the event of a RAID rebuild, as in the event a drive fails and you introduce a new HDD/SSD, RAIDZ will ONLY need to rebuild the areas onto the replacement disk that data original resided on (using parity data from the other present disks) and then just zero’ing the rest of the disk. Similar systems like this have arrived from Synology on their platform for after RAID recovery (still using TBRFS) but still not as fluid and native as in ZFS. Striped VDEV’s, Mirrored VDEV’s and Striped Mirrored VDEV’s are essentially the same as RAID0, RAID1 and RAID10 accordingly with one difference; automatic checksumming prevents silent data corruption that might be undetected by most hardware RAID cards. ZFS uses the additional checksum level to detect silent data corruption when the data block is damaged, but the hard drive does not flag it as bad.
- RAIDZ (sometimes explicitly specified as RAIDZ1) is approximately the same as RAID5 (single parity)
- RAIDZ2 is approximately the same as RAID6 (dual parity)
| RAID5 example of parity | |||
|---|---|---|---|
| Disk 1 | Disk 2 | Disk 3 | Disk 4 |
| 1 | 2 | 3 | P |
| 5 | 6 | P | 4 |
| 9 | P | 7 | 8 |
| P | 10 | 11 | 12 |
RAID5 places blocks in a regular pattern. You only need to know the block number (address) to determine which disk stores the block, at what address, and where the corresponding parity block is. Also, with N disks, exactly one parity block is stored for every N-1 data blocks.
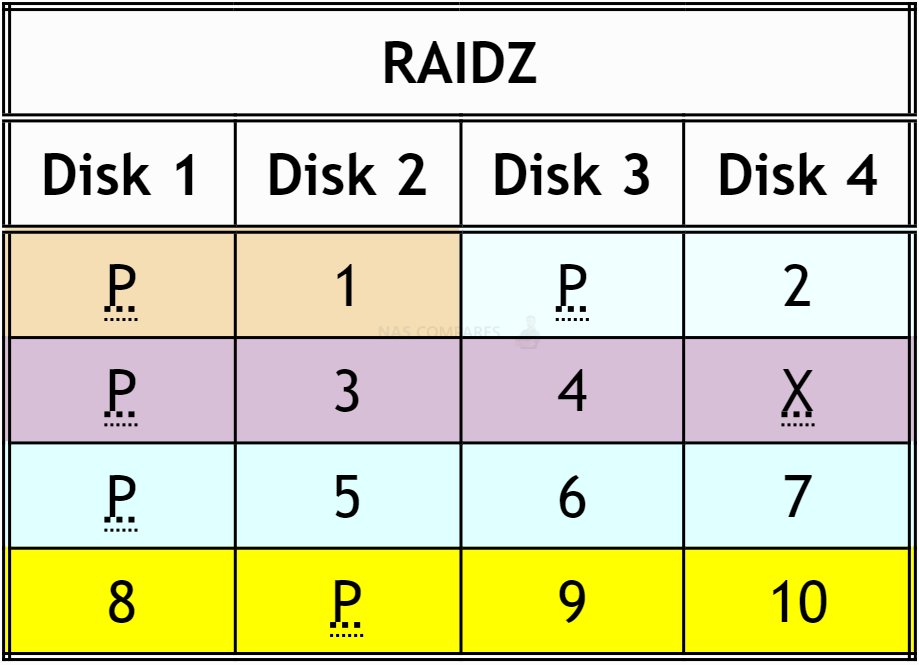
In RAIDZ, ZFS first compresses each recordsize block of data. Then, it distributes compressed data across the disks, along with a parity block. So, one needs to consult filesystem metadata for each file to determine where the file records are and where the corresponding parities are. For example, if data compresses to only one sector, ZFS will store one sector of data along with one sector of parity. Therefore, there is no fixed proportion of parity to the data. Moreover, sometimes padding is inserted to better align blocks on disks (denoted by X in the above example), which may increase overhead. However, we have still not touched on two more core advantages of ZFS and it’s RAID management…
3 Disk Redundancy is Available and Should Get More Kudos!
TRIPLE DISK PARITY! Now, if you don’t know what that is, then you can be forgiven for wondering why I have put that in capital letters. However, those that know, love it. In short, RAIDZ3 is the 3 disk fault-tolerance storage pool configuration that is largely unavailable conventionally in any other RAID configuration, requiring at least 5 disks (again, HDD or SSD) it means that you can withstand 3 drives failing. Now, if that sounds like tremendous overkill, then let me share a fun fact with you! Most drive failures that I have witnessed (and I welcome commentors to contribute on this) do NOT stem from poor treatment of a single drive, dropping an enclosure or poor individual handling. No, the bulk of drive failures I have witnessed have stemmed from three causes (looking at logs and SMART info):
- Inherent fault at the point of manufacture or in the logistics chain that has developed over time
- Overworked system hitting RAID arrays harder than intended 24×7 etc, or just designed drive workloads being exceeded in general
- Critical larger system failure in the middle of a widespread write action (eg power failure as all drives are engaged for writing)
Now, in THOSE three examples, the key factor to keep in mind is that in none of them is an HDD or SSD on its own. At manufacture in bulk, in transit in crates of 20x at a time or in larger setup RAID array – the things that harm the storage media is hitting several at once. Even if you ignore the degenerative factors of exceeding workloads and system critical failure damage, there is no avoiding that when you buy multiple HDD/SSD from a single e-retailer (eTailer?), they do NOT provide you with multiple drive with each drive from a different crate/carton. No, that would be spectacularly inefficient for any retailer. No, you have to accept that there is a % chance that as soon as 1 drive fails that (without identifying to cause) that another drive in the array could fail for the same reason soon. So a double disk redundancy such as RAIDZ2 or RAID 6 would give you extra time – but how much time? Who known. But if your data is mission-critical and you weigh up the cost of another HDD in a custom build design such as TrueNAS, a triple parity RAID system starts to make a lot of sense.
ZFS ReSilvering Often Overlooked Safety Net
Another wildly overlooked and misunderstood advantage of ZFS and TrueNAS’ utility of it is in the support of Re-silvering. For those unaware, resilvering is when a drive that WAS part of the RAID array is disconnected and reconnected in a brief window that allows the system to identify that the drive belongs in the original pool and re-embraces it quickly. In practical terms, imagine your system suffers a very brief SATA/Controller board malfunction and a drive is dismounted (software level). Alternatively (and something surprisingly more command than you might think) an HDD in a tray/bay of the NAS might be accidentally physically ejected. Resilvering would allow the system to KNOW that the drive is part of the set and reintroduce it. In EXT4 or BTRFS, that brief disconnection would result in the RAID pool changing to a degraded status and the end-user would be forced to 1) endure a slower system as data is being exchanged with the pool in this parity-reading state as 2) the system wipes the former HDD/SSD to re-write all the data it had already and 3) unnecessary stress is placed on the system resources throughout. In ZFS and TrueNAS, the system would SEE that the recently ejected/dismounted drive is part fo the pool, verify that it has the data in place and then re-introduce the drive. the time this takes is largely based on how long the drive was disconnected (and data written in the interim) but it can genuinely take seconds or minutes – unlike the hours to days that a RAID recovery from a degraded state would take.
USB Storage Media is Visible and Managed in the Storage Manager
It is a very small detail but one I think is worth highlighting. Namely that USB storage media in TrueNAS is handled much differently than in other turnkey NAS solutions from Synology and QNAP. In those latter examples, USB storage is treated at arms length, visible in the file manager in the GUI of course, but then only really visible for use in the backup tools (which is still great). In TrueNAS however, USB storage media is visible, configurable and manageable directly from the storage manager. Now, obviously spreading a RAID over SATA storage media and a USB drive would be ridiculously dangerous for storage, however, there are still plenty of benefits and management advantages to having external storage visible alongside the management of the rest of the storage – aside from backup management and configuring the access privileges of the drive media, it also allows the USB drive to be managed for scheduled tasks and processes alongside the rest of the system and integrated into the reports and monitoring of the TrueNAS system. It is a small detail, but one that really stood out for me when comparing TrueNAS against Synology DSM and QNAP QTS USB media management overall.
Fusion Pools of Mixed Storage Media is Great and Rarer Than You Might Think
Another (relatively) recent addition to TrueNAS and its use of ZFS is the option to create fusion pools. A comparatively streamlined process, when you think about how technical and advanced the average options of TrueNAS can be to the end-user, fusion pools allow you to introduce mixed tiers of storage of different performance and combine them into a single visible pool, but in the background the system is sending data to the drive media that is best suited to supply it – so metadata on the SSD media, larger bulkier sequential data on the HDDs etc. ZFS sends writes to individual physical disks rather than just a RAID volume. This allows for stripe writes across RAID volumes and can perform synchronous writes to speed up performance. This model also ensures there are no long waits for file system checks. ZFS incorporates algorithms to make sure your Most Recently Used (MRU) and Most Frequently Used (MSU) data are stored in your fastest system storage media. Utilizing MRU & MSU combined with flash/NVDIMM ZILs/SLOGs and ARC/L2ARC devices, you can speed up your performance astronomically. Similar systems to this exist in QNAP’s EXT4 service ‘tiered storage’ and both they and Synology offer NVMe SSD caching services in conjunction with an existing pool/volume, but again this is done to a considerably higher and more customizable degree in TrueNAS. It just takes more time and knowhow to set up though.
Smart/Intuitive Option to Define Drive Media Use
Then there is an interesting storage setup choice that TrueNAS offers that is actually quite a bit of fresh air versus the more complex elements of it’s configuration. Namey that the system also includes an option to specifically designate a soon to be created area of storage to a task/use. So, if you have introduced one or more drives to your custom build server, you can choose whether you want this to be an independent new pool as a hot spare, to factor as additional storage redundancy, dedicated deduplication storage, designate the space for metadata (SSD recommended of course) and more. It is a surprisingly user-friendly option amidst all the complexity and a welcome addition to save time and headaches!
No Native Browser GUI Based File Manager
One missing feature of TrueNAS that really surprised me was the absence of a browser-based file manager. Now, on the face of it, many will argue that the GUI of your storage system should be reserved for system management, configuration and for troubleshooting (some even erring away from browser GUIs entirely in favour of SSHing etc directly into the system as a superuser for these tasks for pace). Equally, once you have correctly created and configured your storage (along with creating shared paths and enabling the right file access protocol in TrueNAS) you will be able to mount and access your storage in a drive, folder and file level in your native OS (arguable BETTER). However, the ease and added benefits of ALSO being able to access your system storage from time to time in even a simple file/folder level in the GUI cannot be overstated. Sure, you CAN create a very based root directly breadcrumb style breakdown in a browser tab – but with most NAS brands offering the same OS-level native file/folder access AND offering a web browser GUI file management option (with copy, paste, archive, thumbnails, sharing, editing) AND mobile applications to do the same. It is really odd that this is not a native option in TrueNAS. You COULD use 3rd party tools of course to do this, but that would be a credit to those and not TrueNAS.
RAIDZ Still Takes Longer than Traditional RAID in ReBuilding Fuller Arrays
This is a small negative in the grand scheme of things and hardly something that leaves TrueNAS/ZFS reflected too badly against EXT4 and BTRFS setups, but although ZFS Raid rebuilding IS much faster if your actual capacity used is smaller (only building the data/space used and hashing/zeroing the rest), that advantage does not help in the event of your storage pool being much fuller and in testing a RAIDZ at 90% full vs a near-identical RAID5 on 4x4TB actually took a pinch longer on the ZFS pool. Again, the difference was small and largely down to the additional checksums and verification of ZFS, but still, something to note.
Potential Defragmentation in Copy On Write Methodology
Earlier, we discussed that ZFS utilizes copy on write (CoW) in order to create a 2nd copy of the data for ensuring the integrity of the write action. Unfortunately, this can mean that TrueNAS can suffer from data fragmentation as time wears on. There are direct performance implications that stem from that fact. This can be avoided with scheduled/periodic de-fragmentation, but this can be time and resource-consuming depending on the volume of your storage. So potentially, the fuller your storage pool is with actual data, the slower it will ultimately get. Write speeds in ZFS are directly tied to the amount of adjacent free blocks there are to write to in order to maintain the CoW process. As your pool fills up, and as data fragments, there are fewer and fewer blocks that are directly adjacent to one another. A single large file may span blocks scattered all over the surface of your hard drive. Even though you would expect that file to be a sequential write, it no longer can be if your drive is full. This can be an often overlooked and direct reason for long term performance drops in some systems over time if left unchecked. I have personally not experienced this, but it has been discussed online (forums, reddit, etc) and therefore I still thought I should address this.
Still Not Especially Novice or even soft IT knowledge Friendly User
Despite the big efforts by TrueNAS to demystify the complexity of storage management in several areas of its storage area (fusion pools being partially automated mixed media pools, the suggested vDev drive drop-down, USB management in that same area and ‘force’ warning options to name but a few), there is still no avoiding that TrueNAS is CONSIDERABLY more complicated to setup your storage and is a large jump from the frank simplicity of Synology and QNAP. Some would argue that the simplicity offered by turnkey/off-the-shelf NAS solutions are incredibly restrictive and inherently limiting, but there is still a substantial learning curve to setting up your storage in TrueNAS that needs to be appreciated and understood at the outset.
In the next part of this review of TrueNAS later this week we will be looking at Account Management, as well as how Business Users who are considering TrueNAS for their enterprise storage can get support and how far that support extends.
Part II of the TrueNAS Review is HERE (23/03)
Part III of the TrueNAS Review is HERE (25/03)
Alternatively, you can read the (LONG) FULL Review of TrueNAS is available HERE.
📧 SUBSCRIBE TO OUR NEWSLETTER 🔔
🔒 Join Inner Circle
Get an alert every time something gets added to this specific article!
This description contains links to Amazon. These links will take you to some of the products mentioned in today's content. As an Amazon Associate, I earn from qualifying purchases. Visit the NASCompares Deal Finder to find the best place to buy this device in your region, based on Service, Support and Reputation - Just Search for your NAS Drive in the Box Below
Need Advice on Data Storage from an Expert?
Finally, for free advice about your setup, just leave a message in the comments below here at NASCompares.com and we will get back to you. Need Help?
Where possible (and where appropriate) please provide as much information about your requirements, as then I can arrange the best answer and solution to your needs. Do not worry about your e-mail address being required, it will NOT be used in a mailing list and will NOT be used in any way other than to respond to your enquiry.
Need Help?
Where possible (and where appropriate) please provide as much information about your requirements, as then I can arrange the best answer and solution to your needs. Do not worry about your e-mail address being required, it will NOT be used in a mailing list and will NOT be used in any way other than to respond to your enquiry.


|
 |


Best NAS for under $499
Best NAS for Under $250 (2025)
Minisforum N5 Pro NAS - FIRST IMPRESSIONS
HexOS Q2 Update - What's Changed?
5 Exciting NAS Coming Later in 2025
Beelink ME Mini vs GMKtec G9 vs CWWK P6 NAS Comparison
Access content via Patreon or KO-FI
RAID5/6 is NOT ZFS RAID!
REPLY ON YOUTUBE