

NAS server for multimedia. I am looking for a home server to link to a mac 2012 late model and my extensive portfolio of iMovie home videos, iTunes music, and iTunes home films to display on a LG Smart TV
currently, use Apple TV 4Generation [will not show iMovie films] so this is not efficient.
I want to use PLEX on server and PLEX on client devices
Mac has Thunderbolt 2 and USB 2 ports
home router has USB 2 port
Sterling GBP500 +10% uup to 4TB

![]() You may have found the solution already. Even Synology budget series NAS will serve very well as an iTunes server. You can keep all your music and video collection in one place. RAID will ensure that you get combines storage capacity and drive failure protection. Not only you can set up iTunes server bet also at the same time PLEX server. and simple DLNA server. You can stream to your Apple TV, smart TV or a TV with a Chromecast stick. The sky is the limit. You can start with simple DS218j (DS418j as a 4-bay) or get something like DS218+ or DS418play for remote playback. Plus series NAS will feature transcoding engine built in which converts video files on the fly so that destination device gets a compatible video file.
You may have found the solution already. Even Synology budget series NAS will serve very well as an iTunes server. You can keep all your music and video collection in one place. RAID will ensure that you get combines storage capacity and drive failure protection. Not only you can set up iTunes server bet also at the same time PLEX server. and simple DLNA server. You can stream to your Apple TV, smart TV or a TV with a Chromecast stick. The sky is the limit. You can start with simple DS218j (DS418j as a 4-bay) or get something like DS218+ or DS418play for remote playback. Plus series NAS will feature transcoding engine built in which converts video files on the fly so that destination device gets a compatible video file.
You can find instruction on how to set it up below:
How to enjoy my Synology NAS music on iTunes (Mac)
Overview
Synology NAS can be your iTunes Server to stream music and videos stored on your DiskStation to an iTunes client within the local network. It also provides the Smart Playlist feature, letting you create playlists containing songs particularly specified. This article will guide you through the steps to stream music and videos with Synology iTunes Server to an iTunes client on a Mac, and use the smart playlist.
Contents
- Before you start
- Manage iTunes server
- Enjoy music and videos on Mac iTunes clients
- Use Smart Playlist
1. Before you start
This article assumes that you have done the following tasks for your DiskStation:
- Create a volume on your DiskStation. (See here)
- Create a shared folder on your DiskStation. (See here)
- Install and run iTunes Server in Package Center.
Refer to Quick Installation Guide for more information about hardware and software installation. You can also see Synology DiskStation User’s Guide (available at Synology’s Download Center) for a general idea about related topics.
2. Manage iTunes server
After iTunes Server is installed on your DiskStation, you can store your music collection in music shared folder and run your iTunes on your Mac computer. In addition, you can change settings of iTunes Server.
To manage iTunes Server:
-
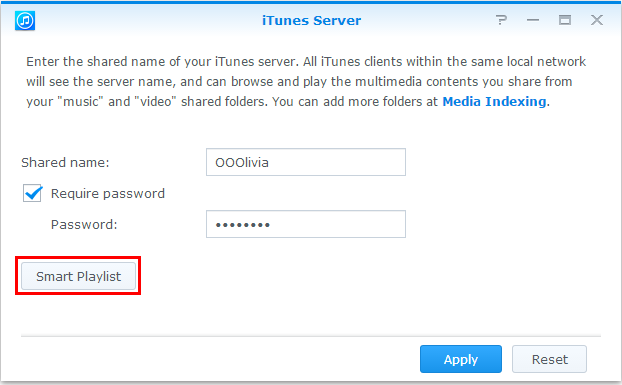
- Log in to your DiskStation as admin or user belonging to the administrators group, and go to iTunes Server.
- Enter your Shared name.
- Tick Require password and enter a password if you want iTunes users to enter a password before accessing your shared folders (optional).
- Click Apply.

- Audio: MP3, M4A, M4P, WAV, AIF.
- Video: MOV, MP4, M4V.
- Playlist: WPL, M3U.
3. Enjoy music and videos on Mac iTunes clients
This section explains how to enjoy music and videos on a Mac iTunes client.
Please note that you cannot use the following devices. The media devices access your DiskStation contents through Home Sharing.
- iPad, iPhone
- Apple TV
To access music and videos on a Mac iTunes client:
-
- Launch iTunes on your Mac. Under SHARED LIBRARIES, browse to the iTunes server with the shared name you entered.

-
- If you had set a password, enter the Password, and click OK.

- You can access all the music and videos stored on your DiskStation.
4. Use Smart Playlist
This section explains how to create a smart playlist, which can automatically include certain types of songs that match specific criterion. iTunes clients will be able to play the smart playlist you created.
To create a smart playlist:
-
- Go to iTunes Server.
- Click Smart Playlist to create smart playlists.
-
- Click Create, enter a name for the playlist, and click OK.

-
- In the window that appears, set rules for the playlist.

- Click OK when finished.
To edit a smart playlist:
-
- Do either of the following to start editing:
- Select the item you want to edit and click Edit.
- Double-click the item.
- Do either of the following to start editing:

-
- Do any of the following to modify the rules:
- Modify the rules by choosing items from the drop-down menus.
- Click + if you want to add a rule.
- Select a rule and click – if you want to delete the rule.

- Click OK when finished.
To delete a smart playlist:
-
- Select the smart playlist you want to delete.
- Click Delete and then click Yes.

To view the newly-created smart playlist on iTunes:
Go to SHARED LIBRARIES, and browse to the iTunes server of the selected shared name. You will see the songs matching the rules of the smart playlist in the main area of iTunes.

| Where to Buy a Product | |||
 |
    
|

|
VISIT RETAILER ➤ |
 |
|
|
VISIT RETAILER ➤ |
 |
|
|
VISIT RETAILER ➤ |
|
|
|
|
VISIT RETAILER ➤ |
We use affiliate links on the blog allowing NAScompares information and advice service to be free of charge to you. Anything you purchase on the day you click on our links will generate a small commission which is used to run the website. Here is a link for Amazon and B&H. You can also get me a ☕ Ko-fi or old school Paypal. Thanks! To find out more about how to support this advice service check HERE If you need to fix or configure a NAS, check Fiver Have you thought about helping others with your knowledge? Find Instructions Here


UGREEN DH4300 & DH2300 NAS Revealed - Good Value?
Aoostar WTR Max NAS - Should You Buy?
Xyber Hydra N150 NAS Review - Is This COOL?
Minisforum N5 Pro vs Aoostar WTR Max - The BIG Showdown
Do MORE with Your M.2 Slots - GREAT M.2 Adapters!
5 Top Tips for Content Creators Buying a NAS
Access content via Patreon or KO-FI
DISCUSS with others your opinion about this subject.
ASK questions to NAS community
SHARE more details what you have found on this subject
CONTRIBUTE with your own article or review. Click HERE
IMPROVE this niche ecosystem, let us know what to change/fix on this site
EARN KO-FI Share your knowledge with others and get paid for it! Click HERE