

Permissions on NAS
I’m looking for a solution of NAS. I need a NAS operating system with more permission that Read, Write/read or nothing.
I want a give permission to Write and save a document but not give permission to eliminate. maybe like ACL on windows.Is this possible?
Yes, Synology allows you to go into the details of write and read permissions. You get following sub-options.
Plus series NAS for expand-ability, upgrades, extra performance
With the plus series, things get more interesting. Not only these NAS models can do all the tasks mentioned above they also will do them much faster allowing multiple apps to be running I the background. You can also attach expansion units and add more drives to your existing RAID or create a separate one. With a 6 bay NAS models and above you can often find a PCIe slot for many different cards including 10GbE for speeding up your data transfer time up to 10 times and more.
If you can not see live deals here, you ad-blocker might be blocking them. You can also use your local link to find the best discounts.
How to migrate ACL from Windows
How to manage ACL settings on your Synology NAS
Overview:
Synology NAS provides you with the ability to fine tune and set multiple rules to manage the privacy of your files and folders using ACL. This is useful for both personal as well as professional use, allowing businesses to combine flexibility with high levels of security regarding the protection of all their data. With DSM, you can manage the data stored on your Synology NAS with ease.
Access Control List (ACL) is a list of access control entries (ACE) attached to an object (such as a file, folder, or program) in the Windows environment. Each entry in an ACL determines a user’s or group’s access permissions to the object. The access permissions of shared folders, as well as individual files and subfolders, can be customized for each user or group. Synology DiskStation’s ACL simplifies the process of defining these rights and permissions, so that users can manage resources through their full ACL security settings.
Contents
- Before you start
- Manage basic permissions of shared folders
- Customize Windows ACL permissions
- Use Permission Inspector to check your permission settings for a file or folder
- Give admin rights to a user
- Set permissions for Anonymous users to access your file directories via FTP
- Refine settings for users that belong to a group
- Disable default admin account access to a shared folder
1. Before you start
- Make sure your Synology NAS is running DSM 5.0 or later.
DSM 5.0 and Windows ACL:
In DSM 5.0, the access permissions of shared folders are based on Windows ACL by default. Newly created shared folders implement the permissions settings of Windows ACL, which also allows for customizing the permissions of individual files and subfolders. In addition, permissions can be customized via File Station or File Explorer in Windows.
Note:
- Users’ personal home folders are located under the homes folder. Because ACL works on a basis of permission inheritance, if you set NA permission for a user/group on homes, users will have no access to their personal home or photo/web folder. Take extra care when you are editing the permissions of your homes folder so you do not accidentally restrict the user from having full read/write access of their own home folder.
- When editing permissions for web or personal web/photo folders, you must give the http user group read or read/write permissions, or it will affect webpage services.
In the section below we’ll walk you through the steps of editing the basic access permissions of a shared folder.
-
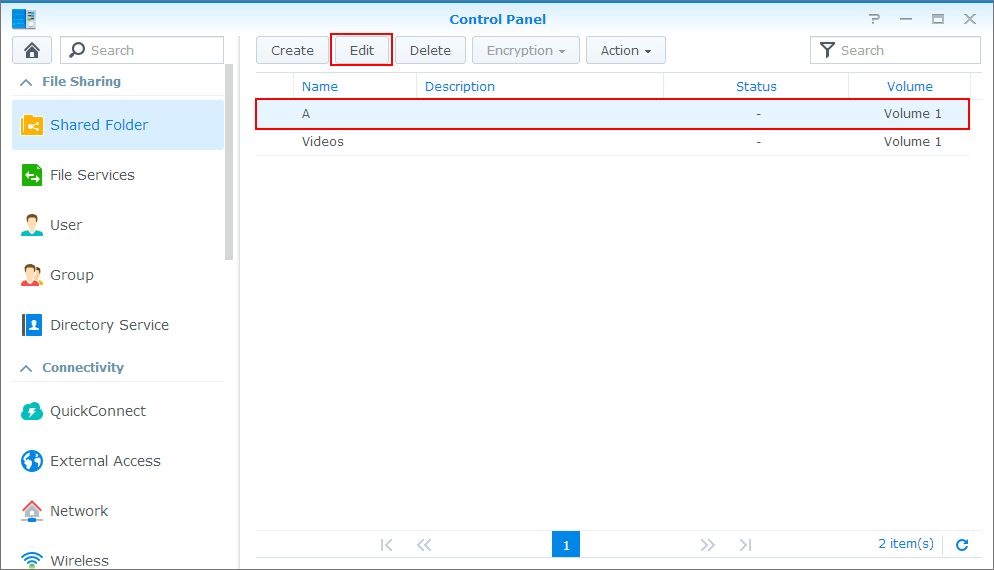
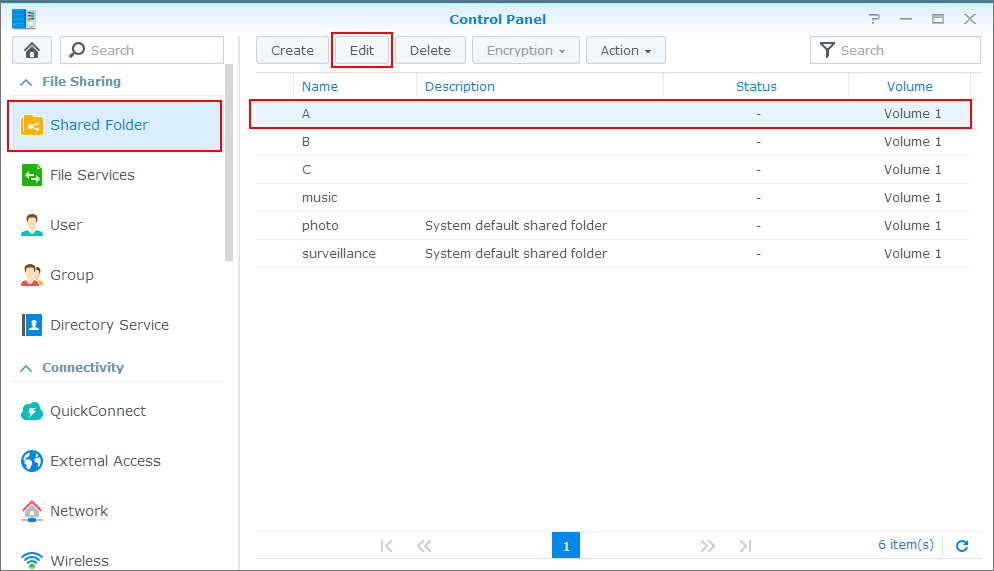
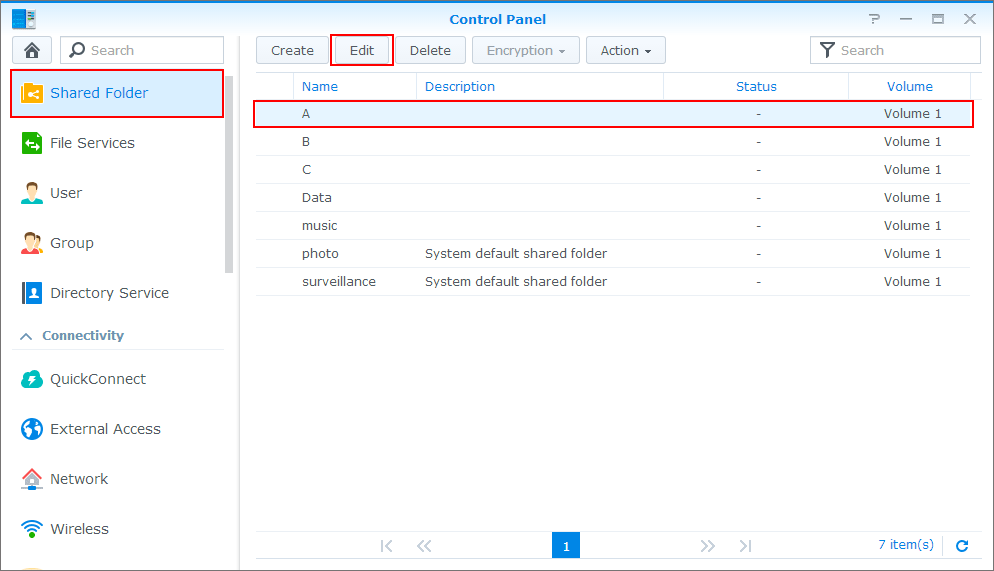
- Go to Control Panel > Shared Folder.
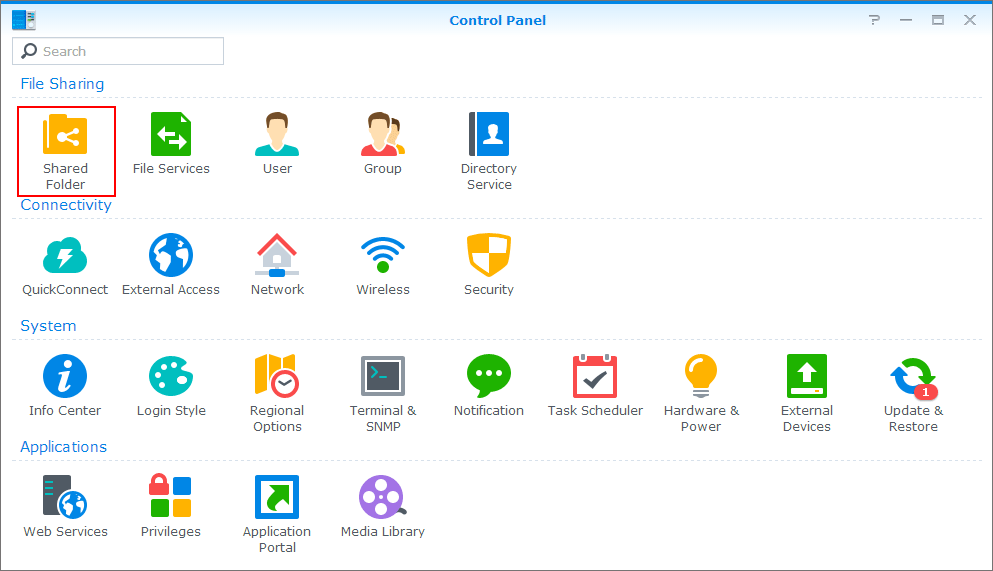
-
- Select the shared folder whose permissions you wish to edit. Click Edit.
-
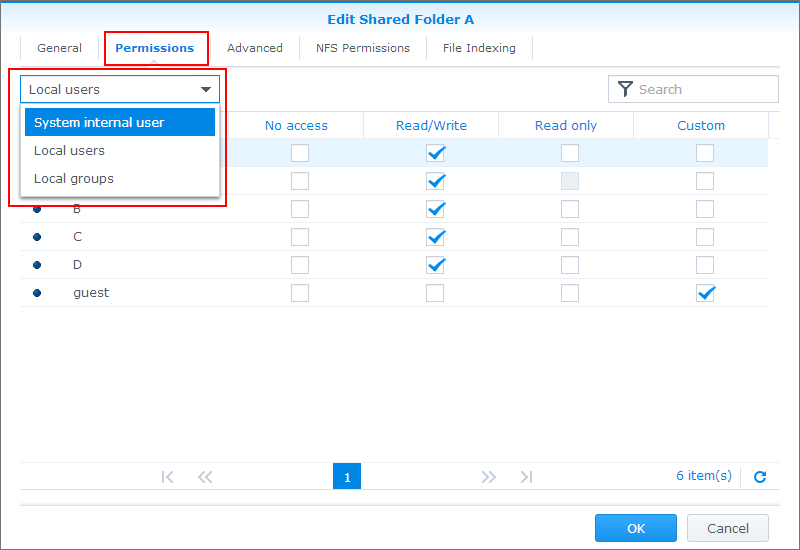
- Go to the Permissions tab.

-
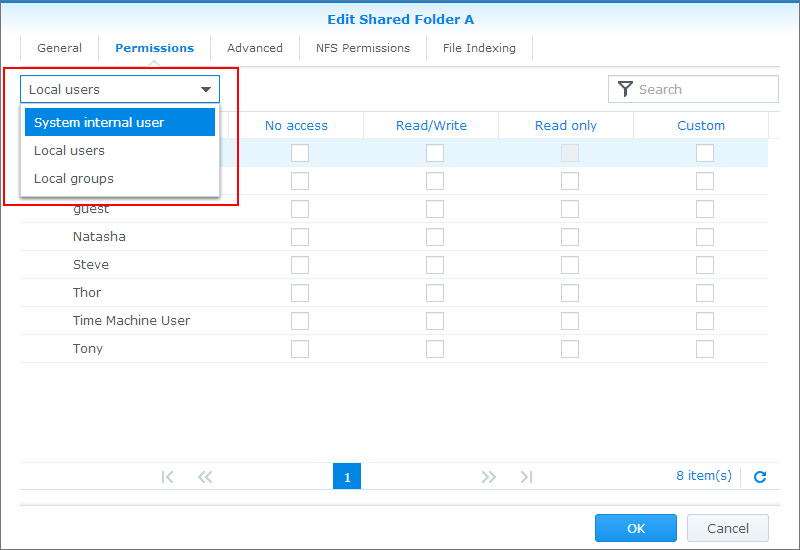
- Select one of the following from the drop-down menu:
- System internal user: Assign permissions for default system users, such as the Anonymous FTP/WebDAV user. Before allowing anonymous FTP users to connect to a shared folder, you need to assign access permissions for this user.
- Local users: Assign permissions for local users (including guest).
- Local groups: Assign permissions for local groups.
- Select one of the following from the drop-down menu:
-
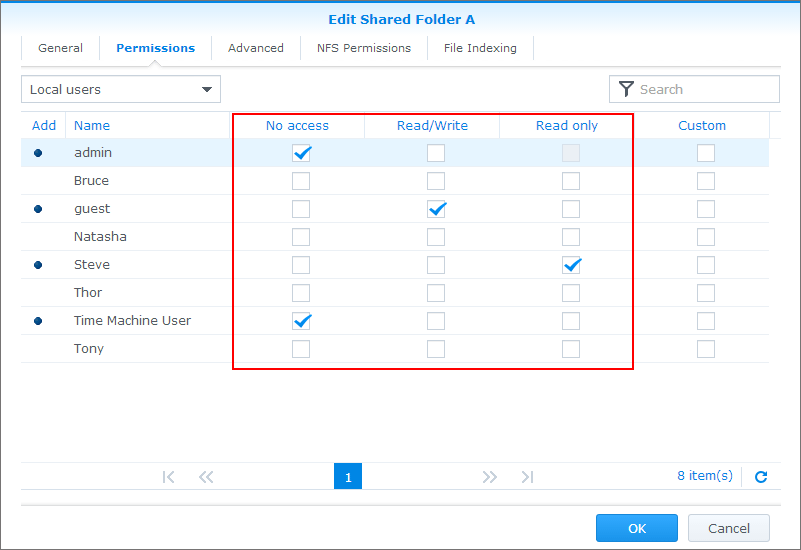
- Check or uncheck the appropriate boxes for each user or group to customize their access permissions for the shared folder:
- Read/Write: The user or group can access and make changes to the files and subfolders in the shared folder.
- Read only: The user or group can access the files and subfolders in the shared folder.
- No access: The user or group cannot access the files or subfolders in the shared folder.
- Check or uncheck the appropriate boxes for each user or group to customize their access permissions for the shared folder:
- Click OK to finish.
Note:
- When you encounter permissions conflicts, the permissions priority is as follow: No access > Read/Write > Read only.
- When creating a new shared folder, if the permissions for the users belonging to administrators group are set to No access, these user will only be able to see the shared folder at Control Panel > Shared Folder.
3. Customize Windows ACL permissions
In addition to the settings described above, you can customize permissions further by following the steps below.
Note:
The below settings cannot be used with the following shared folders: photo, satashare, sdshare, surveillance, usbshare.
To customize permissions:
-
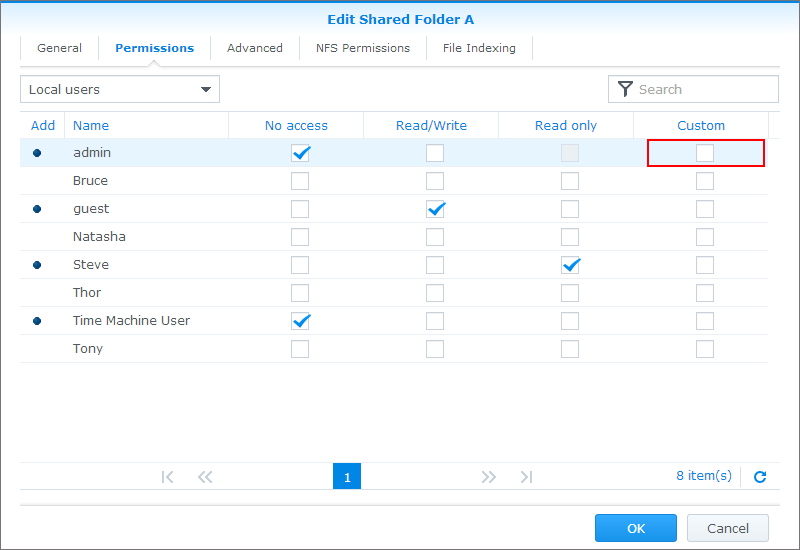
- On the Permissions tab, select the user whose permissions you want to customize. Click anywhere in the Custom column.
- Do any of the following in the Permission Editor window to manage ACL permissions for the file or folder:
-
- User or group: Specify the user or group whose permissions you wish customize.

-
- Inherit from: For view only. View the information here to see if the permission is inherited (from a parent folder) or explicit (shown as None).

-
- Type: Choose Allow or Deny to grant or deny the permission to the user or group.

-
- Apply to: If you are creating a permission entry for a folder, tick the checkboxes to apply the entry to this folder, the folders (or Child folders) or files (or Child files) in this folder, or all files and folders contained in this folder (or All descendants).

- Administration: Tick Read permissions, Change permissions, or Take ownership to specify the user or group’s access permission settings for the entry.
- Read or Write: Tick the checkboxes in these sections to modify the user or group’s permission settings for the file or folder.
-
- Click OK.
About permission inheritance:
ACL permissions can be inherited from parent objects to child objects. For instance, if the Read permission for a folder is granted to a user, then the ACL entry will be applied to all files within that particular folder, meaning that the user will have access to all the files within it. Inherited permissions will be displayed in gray, whereas the object’s own permissions (or explicit permissions) will be displayed in black.
4. Use Permission Inspector to check your permission settings
You can view a user or group’s access privileges to a file or folder using Permission Inspector. To do this, follow the steps below:
-
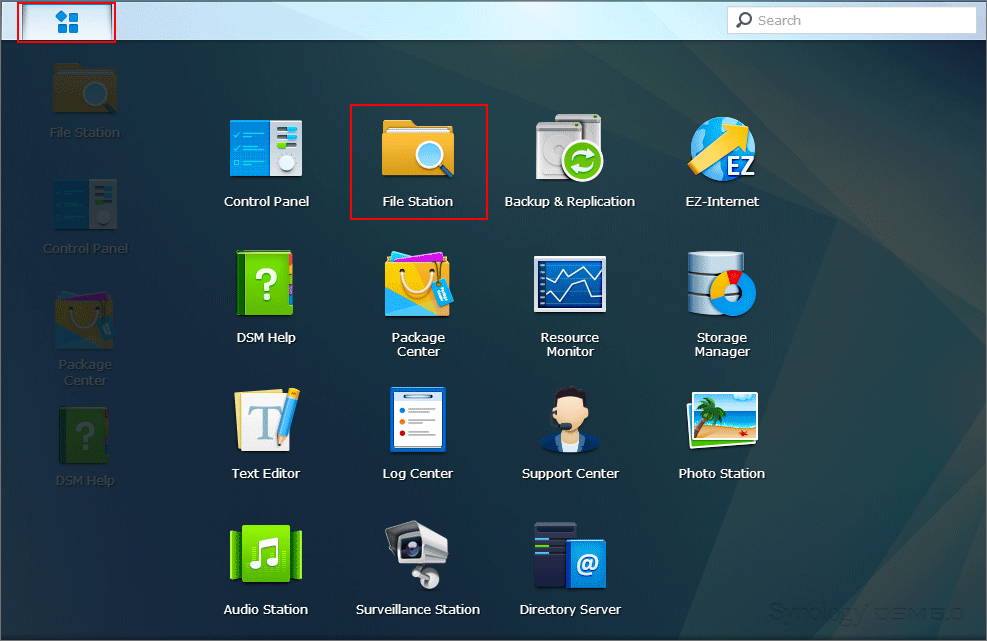
- Go to Main Menu > File Station.
-
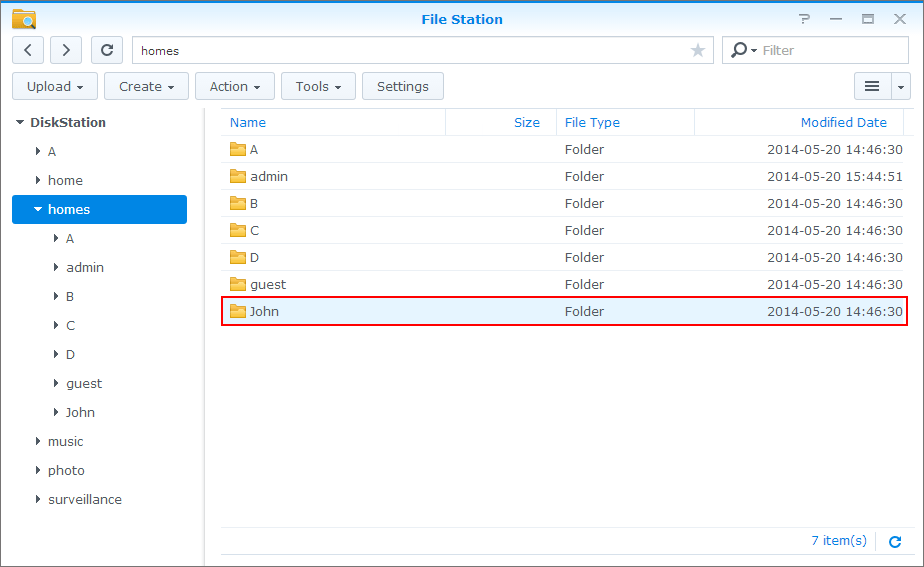
- Select the folder or file whose permission you want to check or view.
-
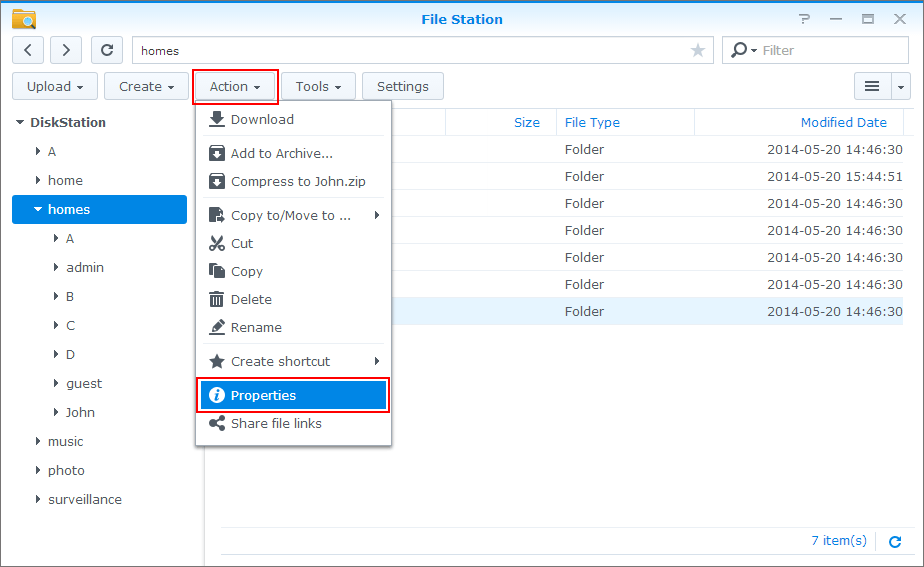
- Click on the Action drop down menu and select Properties.
-
- Go to the Permission tab and select Permission Inspector in the Advanced options drop down menu.

- Select the user or group whose access privileges you want to view.
- Go to the Permission tab and select Permission Inspector in the Advanced options drop down menu.

-
- View the user or group’s Admin, Read, and Write permissions in the field below.
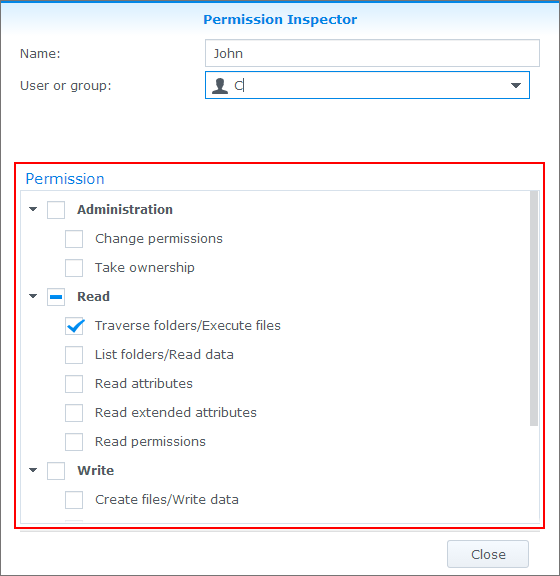
Detailed explanations of ACL permissions found in Permission editor and Permission inspector:
- Administration:
- Change permissions: This controls whether a user can change the permission of the file or folder.
- Take ownership: This controls whether a user has ownership of the file or folder.
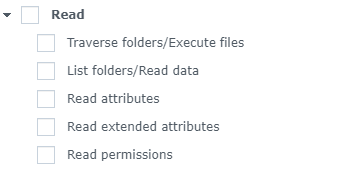
- Read:
- Traverse folders/Execute files: This controls whether a user can run a program file.
- List folders/Read data: This controls whether a user can read data in a file.
- Read attributes: This controls whether a user can view the attributes of a file.
- Read extended attributes: This controls whether a user can view the extended attributes of a file.
- Read permissions: This controls whether a user can read the permissions of the file or folder.
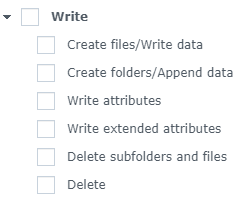
- Write:
- Create files/Write data: This controls whether a user can change the contents of a file.
- Create folders/Append data: This controls whether a user can add data to the end of a file.
- Write attributes: This controls whether a user can change the attributes of a file.
- Write extended attributes: This controls whether a user can change the extended attributes of a file.
- Delete subfolders and files: This controls whether a user can delete a folder.
- Delete: This controls whether a user can delete a file.
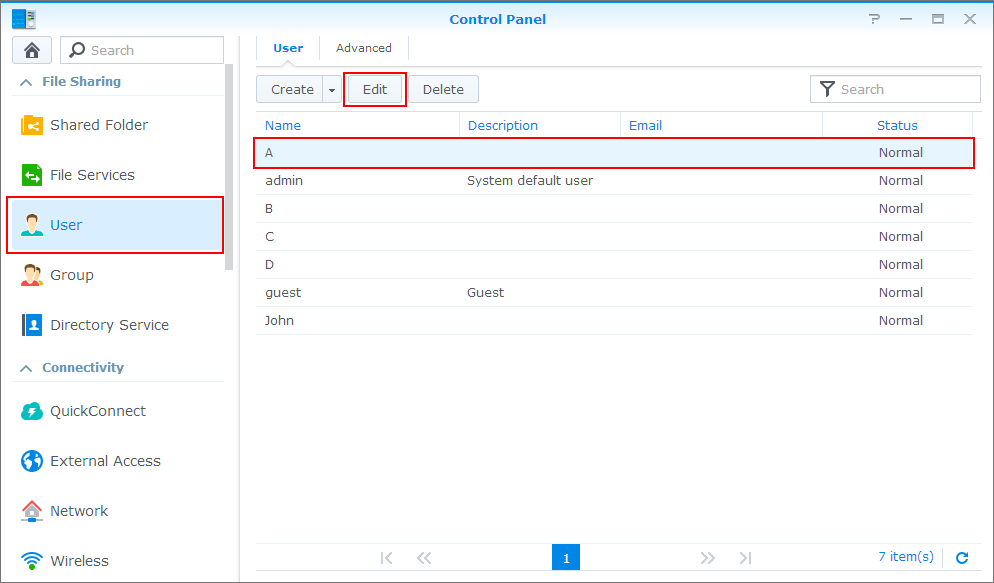
5. Give admin rights to users
In certain situations you may want to give a user the same rights as the default admin account. You can do this easily by adding the user to the system default administrators group.
-
- Go to Users and select the user whose permissions you wish to edit. Click Edit.
-
- Go to the User groups tab and check the box under Add in the administrators row.
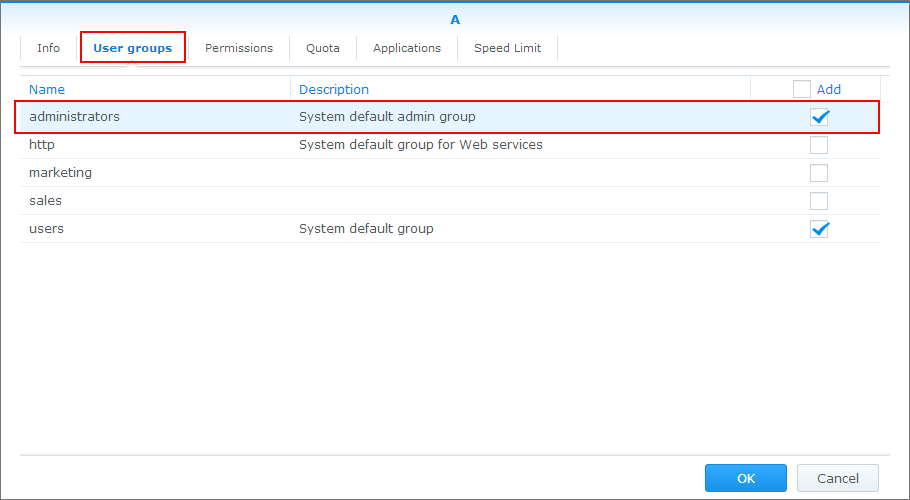
- Click OK.
Now this user will have the same rights and permissions as the default admin account. You can add as many people to the administrators group as you wish.
6. Set permissions for Anonymous users to access your file directories via FTP
You can adjust the permission settings on your files or folders to give anonymous users access to them. In the steps below, we’ll explain how to change the ACL settings of a shared folder so that anonymous parties will have permission to upload files via FTP, but restrict their ability to read, delete, or overwrite existing files.
-
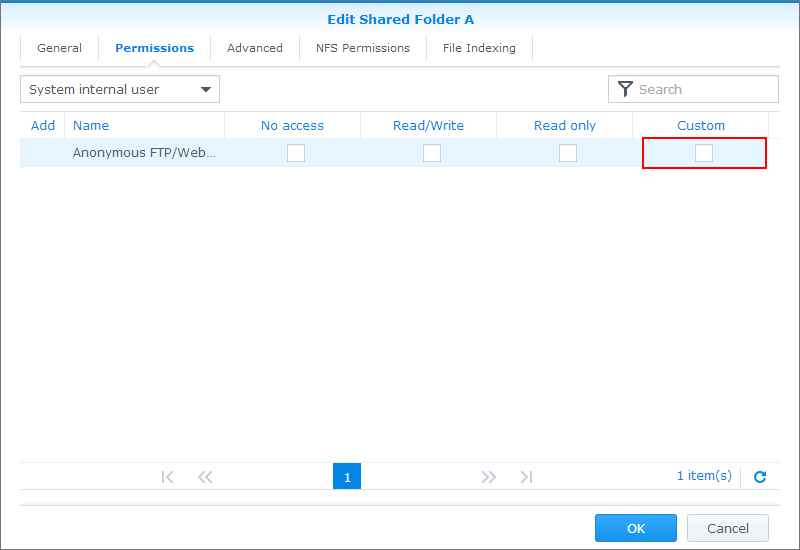
- Go to Shared folder, and select the folder you want to edit. Click Edit.
-
- Go to the Permissions tab, and select System internal user in the drop down menu.
-
- In the Anonymous FTP/webDAV row, click on Custom.
-
- Check the boxes next to ‘Create files/Write data’ and ‘Create folders/Append data’ under the Write category.
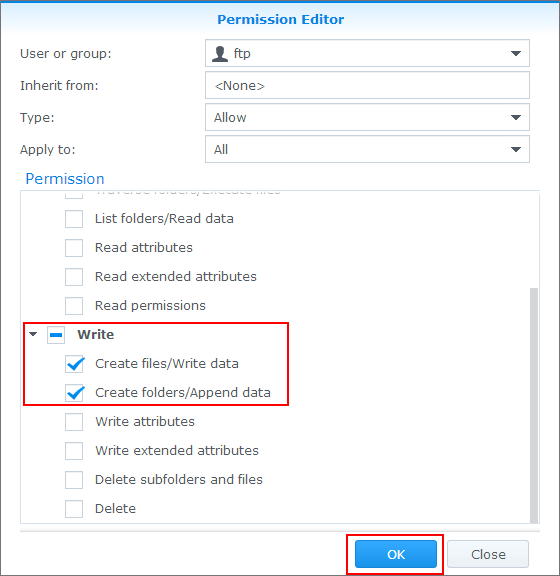
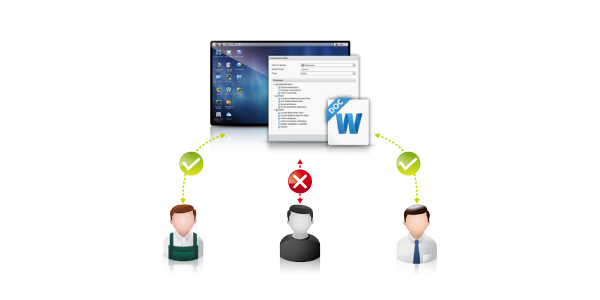
Now when the different parties connect to shared folder A using the anonymous FTP account, they can add files and folders, but they cannot read or overwrite existing files and folders.
7. Refine settings for users that belong to a group
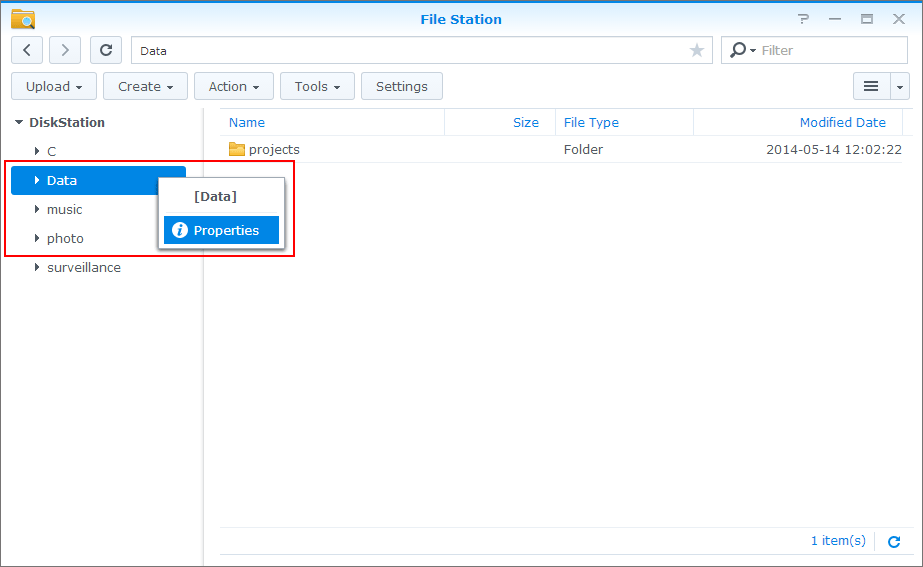
There may be many different situations in which you may want to further refine the permission settings of a user in relation to a file or folder. In this example, imagine that you want to allow the Sales group to be able to access all the information under the Data shared folder, however, you don’t want to give them permission to change, add, or overwrite any of the previous settings. To do this, you can give the group Sales read permissions to the Data folder and its sub-files and folders. However, you also want to give user John, who is in charge of the Datacenter project, read/write permissions to the Datacenter folder, even though he is also part of the Sales group. In the steps below, we will use user John, the Sales group, and the Data shared folder (which contains the folder projects with Datacenter being its subfolder) to demonstrate how to do this.
-
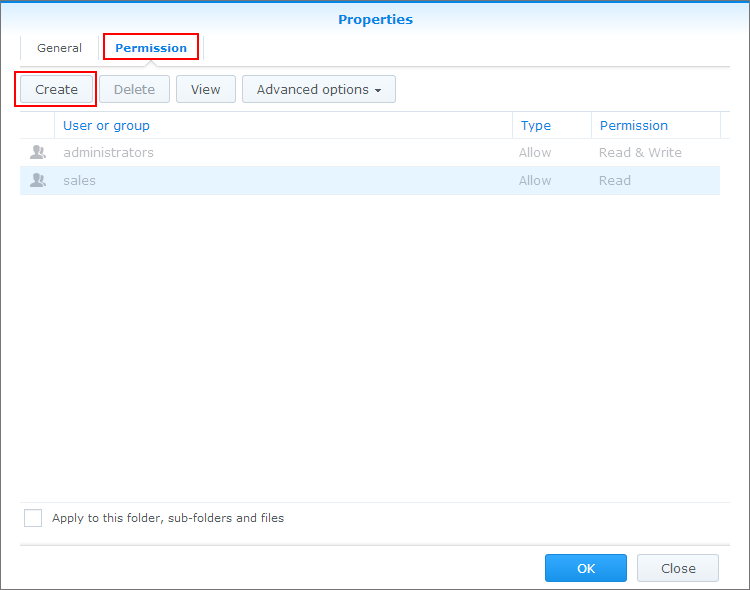
- Go to File Station. Right click on the Data folder and select Properties.
-
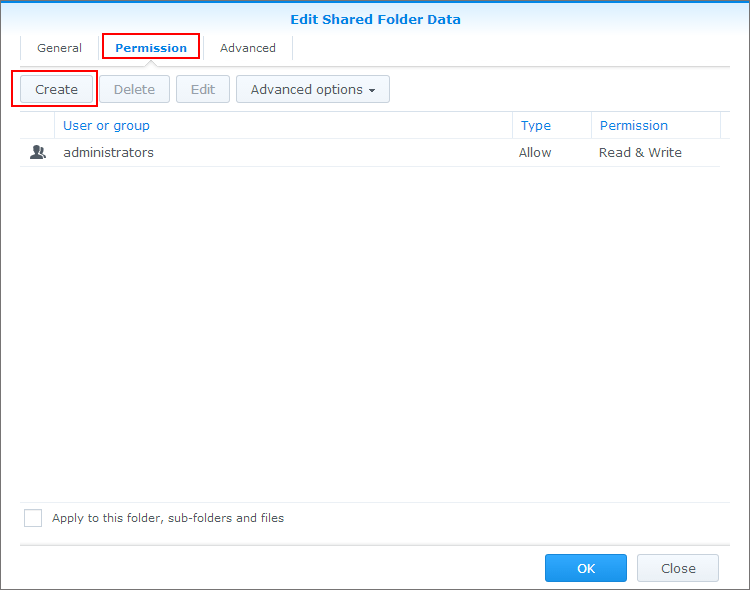
- Go to the Permission tab and click Create.
-
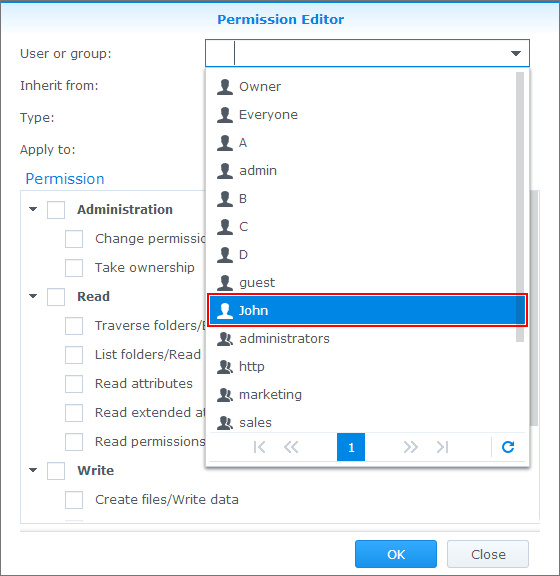
- In the Permission Editor, select Sales from the User or group drop down menu.
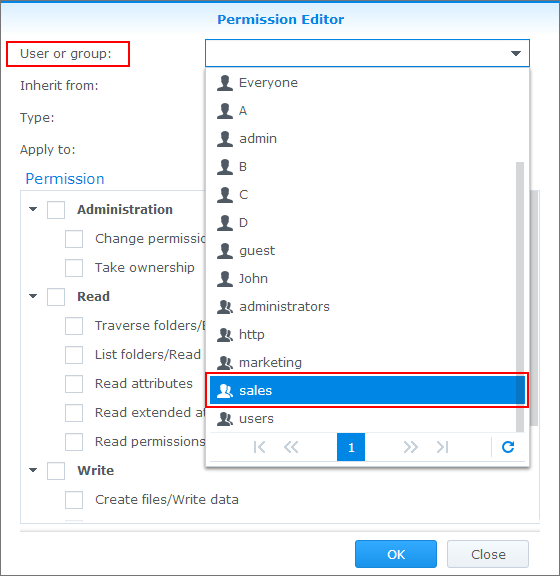
-
- Tick the box next to Read and then click OK.
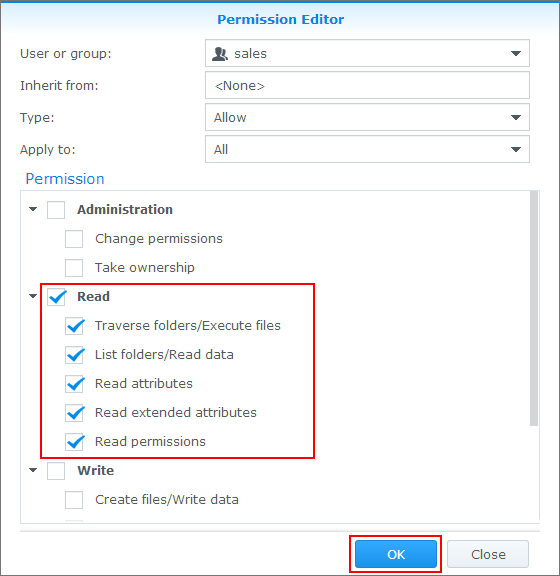
-
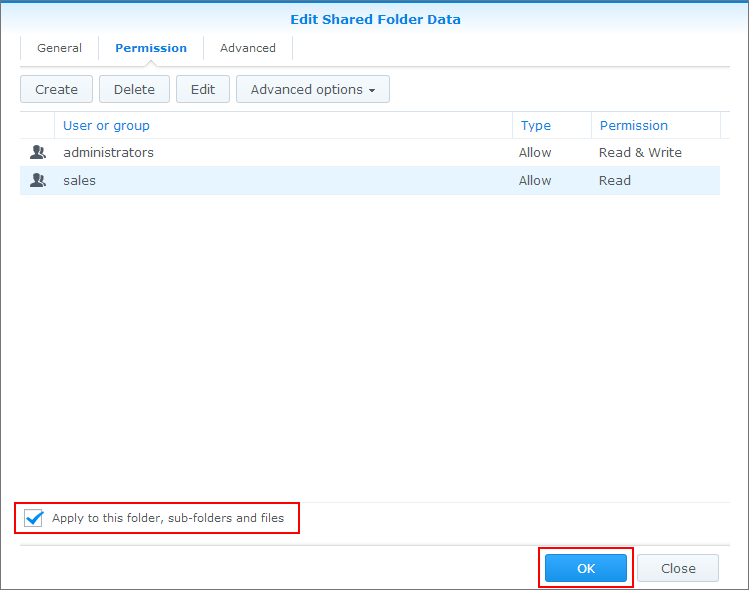
- Tick the box next to ‘Apply to this folder, sub-folders and files’ and click OK.
-
- Now set permissions for the user John. Right click on the datacenter folder and select Properties.
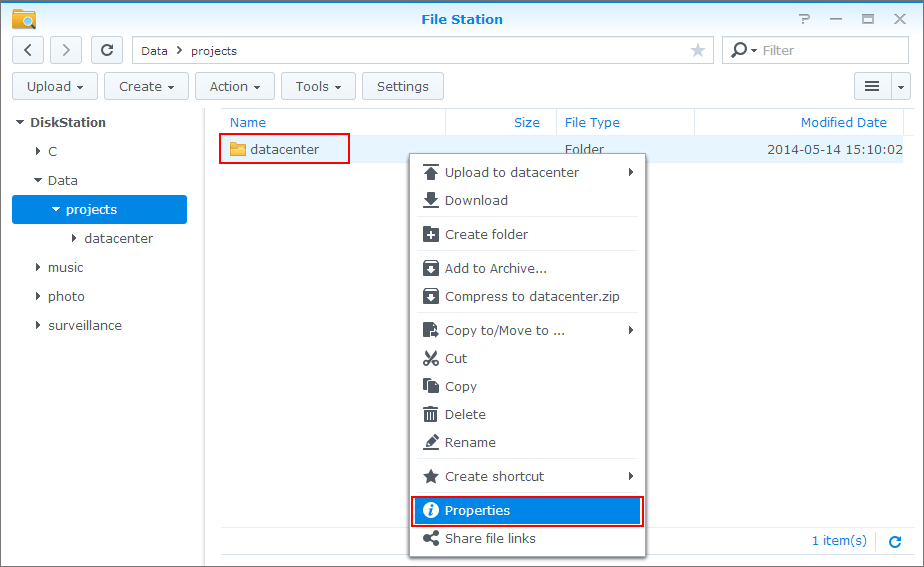
-
- Go to the Permission tab and click Create.
-
- In the Permission Editor, select John from the User or group drop down menu.
-
- Tick the boxes next to Read and Write. Click OK.
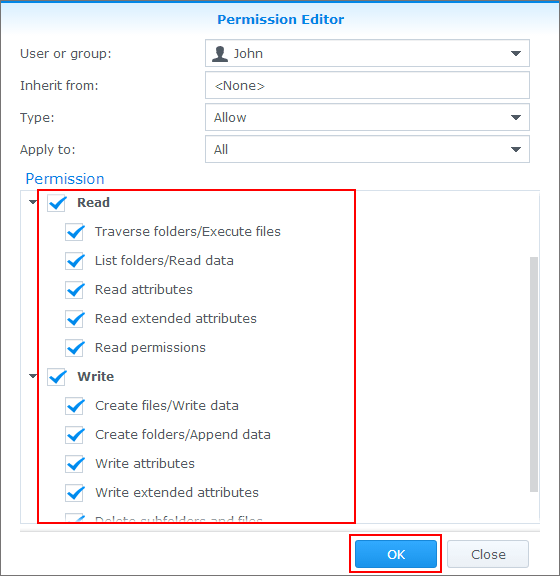
-
- Tick the box next to ‘Apply to this folder, sub-folders and files’ and click OK.
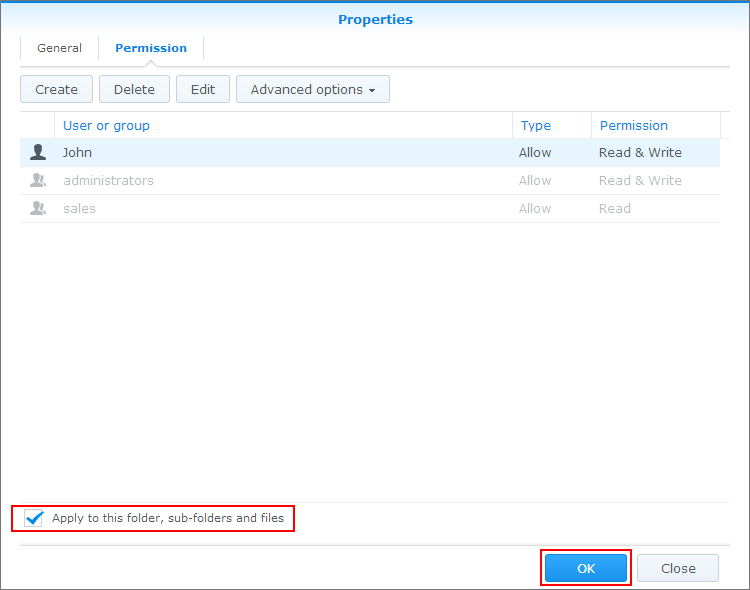
Now John will be the only person in the Sales group who has write permissions in the datacenter folder.
In certain situations, you might want to prohibit the admin account from accessing certain shared folders. To do so, follow the instructions below:
-
- Go to Control Panel > Shared Folder. Select your desired folder and click Edit.
-
- Go to the Permissions tab and tick No access for user admin.
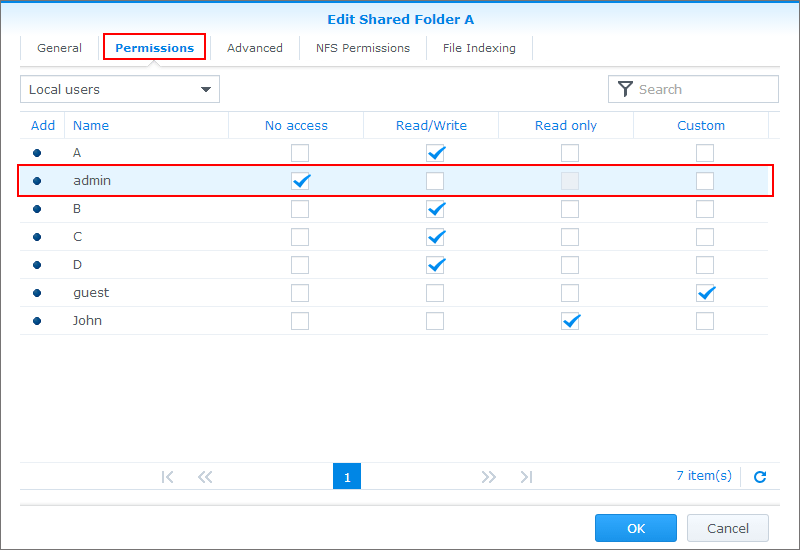
- Click OK.
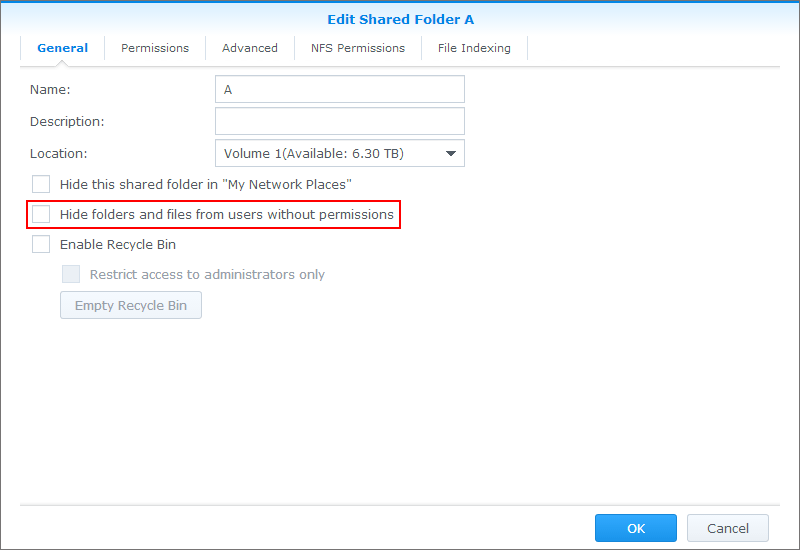
Now admin will be unable to access anything in shared folder A. You can also go a step further and hide folders and files from users without permissions. This will mean that when someone is logged in as admin, they will not even be able to see your shared folder (Shared folder A).
To do this, go to Shared Folder > Edit > General and tick the box next to Hide folders and files from users without permissions. When this option is enabled, if a user without read privileges attempts to access a shared folder via Windows File Sharing protocol, he will not be able to view folders or files within the shared folder. You can also select this option when you are first creating a folder.
How to migrate ACL permissions to Synology NAS
Overview
For an office environment where all computers are joined to the same Windows ADS domain, if the PC server is running out of storage space, IT professionals might want to replace the PC server with a Synology NAS as their company’s data center. Synology NAS is equipped with ACL and ADS support to integrate your existing accounts and permission policies. However, they will be faced with the following nuisance during data migration: the original ACL permissions will not be preserved after files are moved to the destination folder (refer to here for detailed information).
To address this issue, this article explains how to migrate files to your Synology NAS without losing their ACL permissions.
Access Control List (ACL) is a list of access control entries (ACE) attached to an object (such as a file, folder, or program) in the Windows environment. Each entry in an ACL determines a user’s or group’s access permissions to the object. For example, if a file “Sales and Accounting Report” is attached with the following ACL entries: “Grant: sales – read “, “Grant: accountants – modify “, and “Deny: engineers – full control”, any users belonging to the “accountants” group will be granted the permission to modify the file; In comparison, the sales manager can only read the file, and all engineers are denied access.
Contents
1. Before you start
This article assumes that you have done the following tasks for your Synology NAS:
- Hardware installation for Synology NAS
- Software installation for Synology DiskStation Manager (DSM, web-based operating system of Synology NAS)
- Creating volumes and shared folders (See here)
- Creating DSM local users (See here)
- Joining Synology NAS and PC server to the same Windows ADS domain (See here)
- Enabling ACL for the destination shared folder on your Synology NAS. (See here)
- Refer to Quick Installation Guide for more information about hardware and software installation. You can also see Synology DiskStation User’s Guide (available at Synology’s Download Center) for a general idea about topics related to this article.
Note:
- ACL information could only be stored on volumes created by DSM 3.0 or onward. Volumes created by DSM 2.3 or earlier do not support ACL.
- ACL cannot be enabled for the following shared folders: photo, surveillance, web, homes, NetBackup, usbshare, sdshare, esatashare.
2. Perform ACL migration from a PC server
The following instructions demonstrate the steps to migrate ACL permission from a PC server to your Synology NAS.
To perform ACL migration from a PC server to your Synology NAS:
-
- On the PC server, map the destination shared folder on your Synology NAS as a network drive (refer to here for Method 3).
-
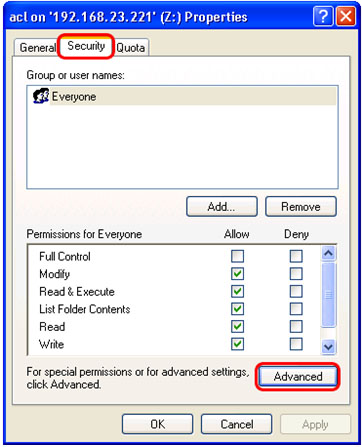
- Modify the destination shared folder’s security settings:
- Right-click the folder (which is now mapped as a network drive), click the Security tab, click Advanced, and then do the following:
- Modify the destination shared folder’s security settings:
-
-
-
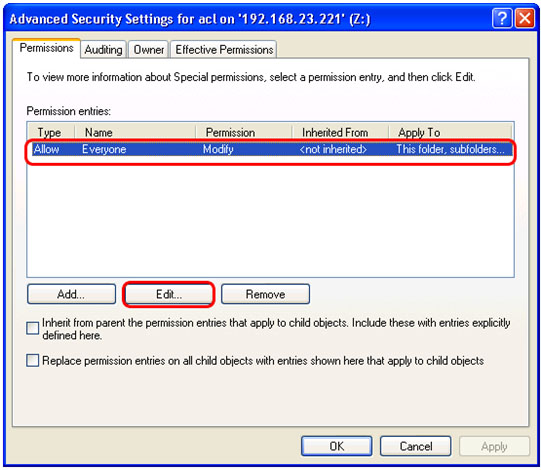
- Windows 2008 Server and Windows 7 Ultimate: Click Change Permissions, select Everyone, and then click Edit.
- Windows Vista: Click Edit, select Everyone, and then click Edit.
- Windows Server 2003 Enterprise and Windows XP: Select Everyone, and then click Edit.
-
-
-
-
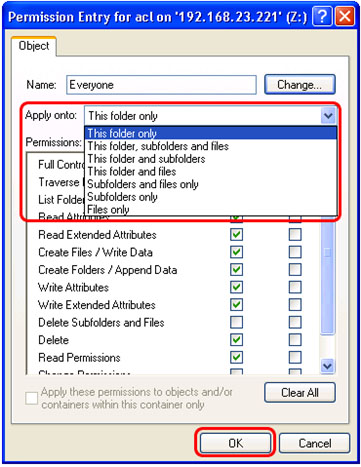
- Choose This folder only from the Apply onto drop-down menu, and then click OK.
-
-
- Download and install FastCopy.
- Do the following to migrate data and ACL from the PC server to the shared folder on your Synology NAS:
- Click Source and select a source folder on the Windows server.
- Click DestDir and select the destination shared folder on your Synology NAS (which is now mapped as a network drive).
- Select ACL.
- Click Execute.
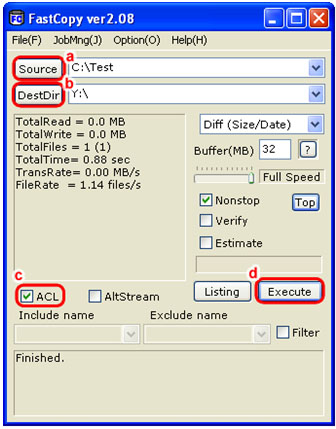
FastCopy will start copying files along with their ACL privilege settings from the Windows server to the shared folder on your Synology NAS.
Note:
- Only domain users’ or groups’ ACL permissions will be migrated.
- ACL permissions inherited from PC server’s root folder will not be migrated.
| Where to Buy a Product | |||
 |
    
|

|
VISIT RETAILER ➤ |
 |
|
|
VISIT RETAILER ➤ |
 |
|
|
VISIT RETAILER ➤ |
|
|
|
|
VISIT RETAILER ➤ |
We use affiliate links on the blog allowing NAScompares information and advice service to be free of charge to you. Anything you purchase on the day you click on our links will generate a small commission which is used to run the website. Here is a link for Amazon and B&H. You can also get me a ☕ Ko-fi or old school Paypal. Thanks! To find out more about how to support this advice service check HERE If you need to fix or configure a NAS, check Fiver Have you thought about helping others with your knowledge? Find Instructions Here


ZimaOS is the BEST Beginner NAS OS - Watch Your Back UnRAID and TrueNAS !!!
30TB Hard Drives are TOO BIG ! (and here is why)
COMPLETE UGREEN NAS Setup Guide - 2025 EVERYTHING VERSION
$110 USB4 to 2x10Gb Adapter Review - What the WHAT?
UGREEN NAS Now has iSCSI, 2FA and Jellyfin (and more) - FINALLY!
Seagate 30TB Ironwolf and EXOS Hard Drive Review
Access content via Patreon or KO-FI
DISCUSS with others your opinion about this subject.
ASK questions to NAS community
SHARE more details what you have found on this subject
CONTRIBUTE with your own article or review. Click HERE
IMPROVE this niche ecosystem, let us know what to change/fix on this site
EARN KO-FI Share your knowledge with others and get paid for it! Click HERE