

Network Attached Storage (NAS) devices are an essential part of any home or office network. They provide a central storage location for all your digital files, making it easy to access and share them across multiple devices. However, connecting to a NAS device can be complicated, and choosing the right connectivity option can make all the difference in terms of speed and security.
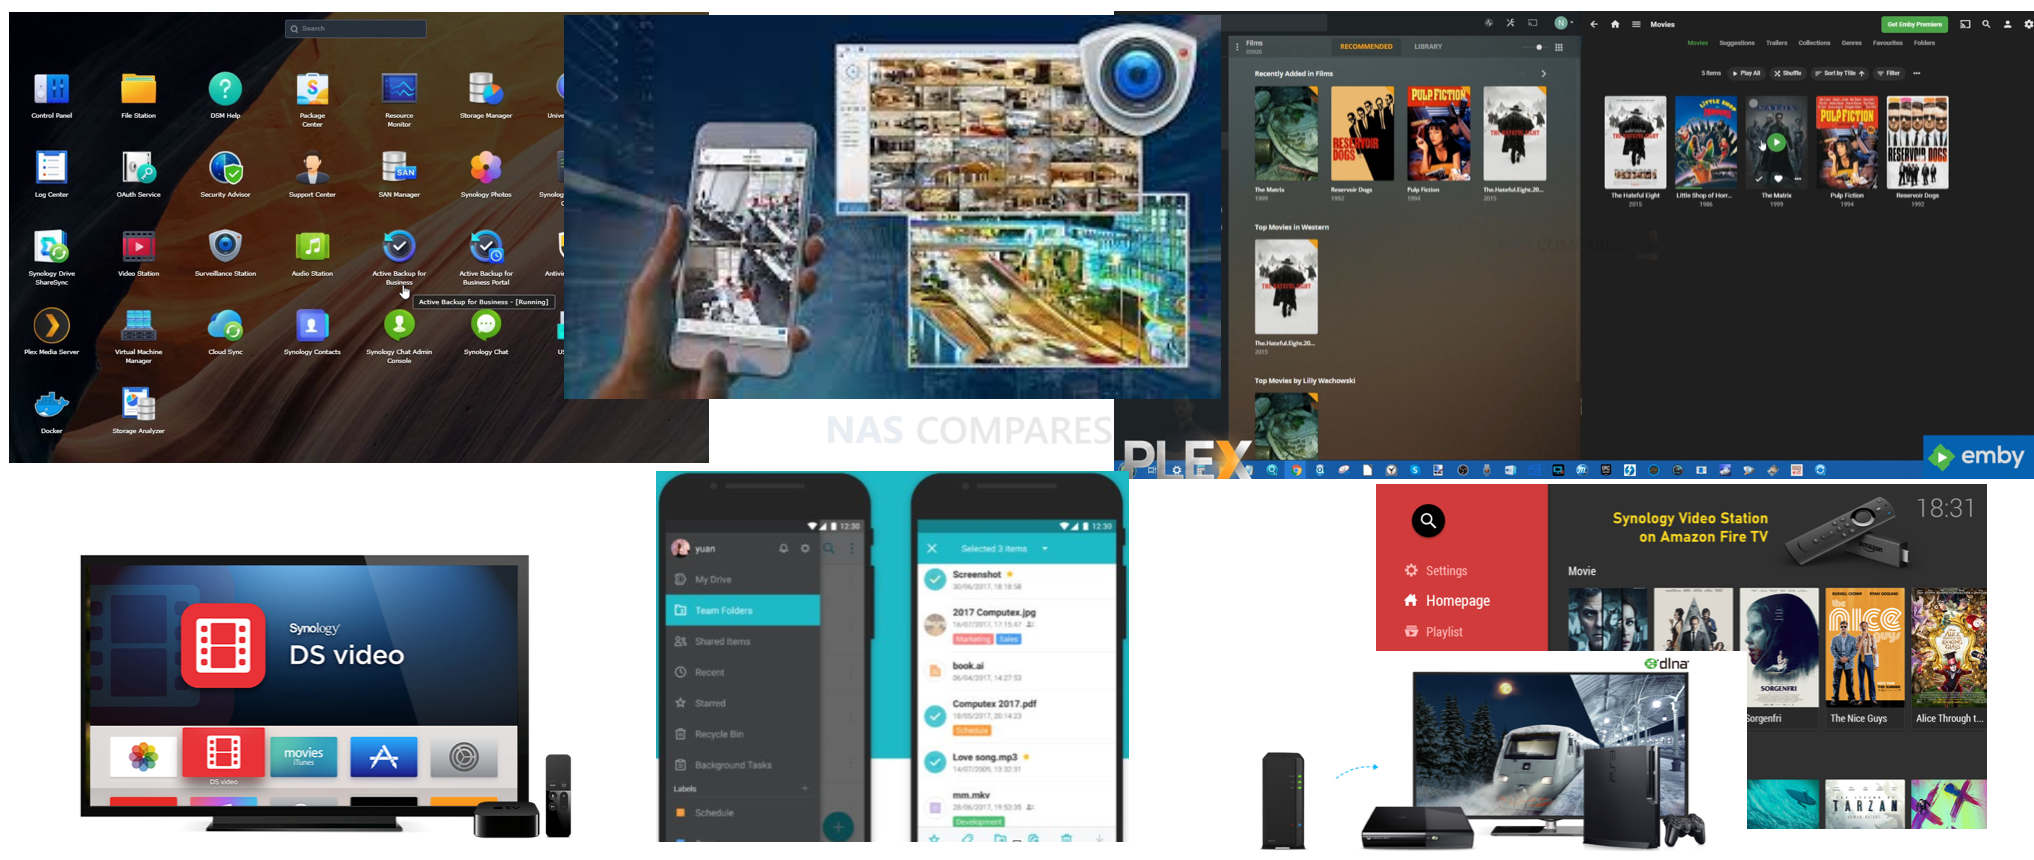
Network Attached Storage (NAS) devices are used for a variety of purposes. Some of the most popular uses for NAS devices include:
- File Storage and Backup: NAS devices provide a centralized location for storing and backing up all types of files, including documents, photos, videos, and music.
- Media Streaming: NAS devices can serve as media servers, allowing users to stream music, videos, and photos to multiple devices in the home.
- Surveillance: NAS devices can be used to store and manage video footage from surveillance cameras.
- Virtualization: NAS devices can host virtual machines, allowing users to run multiple operating systems on the same hardware.
- Cloud Storage: NAS devices can be configured to serve as a personal cloud, allowing users to access their data from anywhere with an internet connection.
- Downloading and Managing Torrents: NAS devices can be used to manage torrent downloads and automate the process of downloading, organizing and seeding files.
- Web and Mail Hosting: NAS devices can be used to host websites and mail servers, providing a cost-effective and low-maintenance solution for small businesses and individuals.
When deciding on the method for remotely accessing a Network Attached Storage (NAS) device, several factors should be considered. Here are some steps to help you make a decision:
- Determine your needs: The first step is to determine what you need to access on the NAS device. Will you be accessing the administration panel, multimedia files, or other data? Knowing your needs will help you determine what method is best suited for your needs.
- Consider security: Security is a critical factor when accessing NAS devices remotely. Consider the level of security you need and choose a method that provides the appropriate level of security for your needs.
- Check compatibility: Some methods may not be compatible with your NAS device, so it’s important to check compatibility before choosing a method.
- Evaluate ease of use: Consider the ease of use of the method you are considering. Some methods may be more user-friendly than others, and may be more suitable for users who are less tech-savvy.
- Cost: The cost of the method you choose may be a factor in your decision-making process. Some methods may be more affordable than others, while some may offer more features for a higher cost.
- Performance: Consider the performance of the method you are considering. Some methods may provide faster access times and better performance than others, while some may have more latency or other performance issues.
- Technical Support: Consider the level of technical support available for the method you are considering. Some methods may have more robust support than others, which may be important if you need help setting up or using the method.
- User Reviews: Consider user reviews and feedback from other users who have used the method you are considering. User reviews can provide valuable insight into the strengths and weaknesses of a particular method.
By considering these factors, you can make an informed decision about the best method for accessing your NAS device remotely for different purposes and applications.
Different connectivity options for NAS
-
Port forwarding
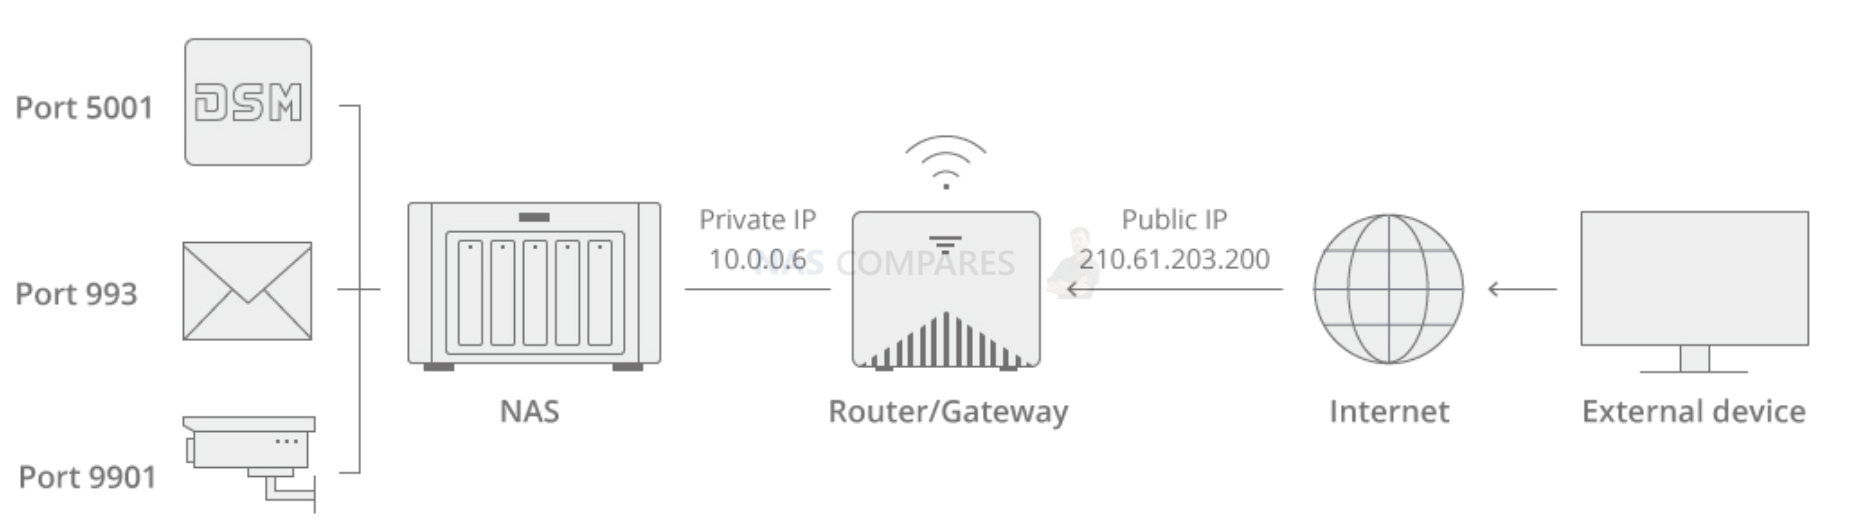
Port forwarding is a common method of connecting to a NAS device. It is a complicated setup that requires manually opening each port for each service. The advantage of this method is that it is fast, with speed depending on the network quality in the region. However, it is not secure as it leaves the NAS device open to attack from anyone on the internet.
Port Forwarding can be a simple and effective way to remotely access a NAS device, but it may not be suitable for all users. Port Forwarding can be complex to set up, and may require a high level of technical knowledge to configure. Additionally, Port Forwarding can be a security risk, as it can expose the NAS device to potential attacks from the internet. It’s important to weigh the benefits and risks of using Port Forwarding before deciding to use it.
Here is a general guide to set up Port Forwarding for a Network Attached Storage (NAS) device:
- Determine your internal IP address: Before you can set up Port Forwarding, you need to determine the internal IP address of your NAS device. You can typically find this information in the administration panel of your router or by using a network scanner tool.
- Access your router’s administration panel: To set up Port Forwarding, you need to access the administration panel of your router. This is typically done by entering the IP address of the router into a web browser.
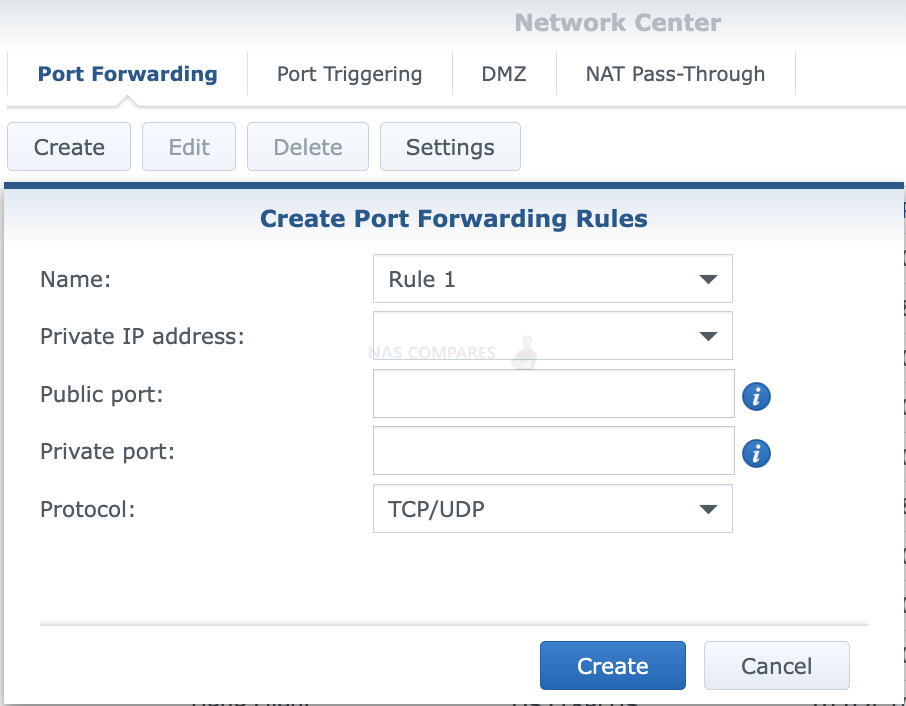
- Find the Port Forwarding section: Once you have access to the administration panel, navigate to the Port Forwarding section. This section may also be called “NAT” or “Virtual Servers”.
- Add a new Port Forwarding rule: To set up Port Forwarding, you need to add a new rule to your router. The specific steps for adding a rule may vary depending on your router, but you will typically need to enter the following information:
- Protocol: Select the type of protocol to use for the Port Forwarding rule. The most common options are TCP, UDP, or both.
- External port range: Enter the range of external ports that will be forwarded to the internal device.
- Internal IP address: Enter the internal IP address of the NAS device.
- Internal port range: Enter the range of internal ports that will be forwarded.
- Save the rule: After entering all of the required information, save the rule to apply the Port Forwarding.
- Test the Port Forwarding: After setting up the Port Forwarding rule, you should test the connection to ensure that it is working as expected. You can typically do this by accessing the service you set up Port Forwarding for from a remote location.
- Verify the connection: Verify the connection by checking the logs or the status page of your router. You should see the Port Forwarding rule listed and the connection status should indicate that the rule is active.
Note: This is a general guide and the specific steps to set up Port Forwarding may vary depending on your router and the specific requirements of your NAS device. If you have any issues with Port Forwarding, consult the documentation for your router and NAS device, or seek assistance from a technical support representative.
-
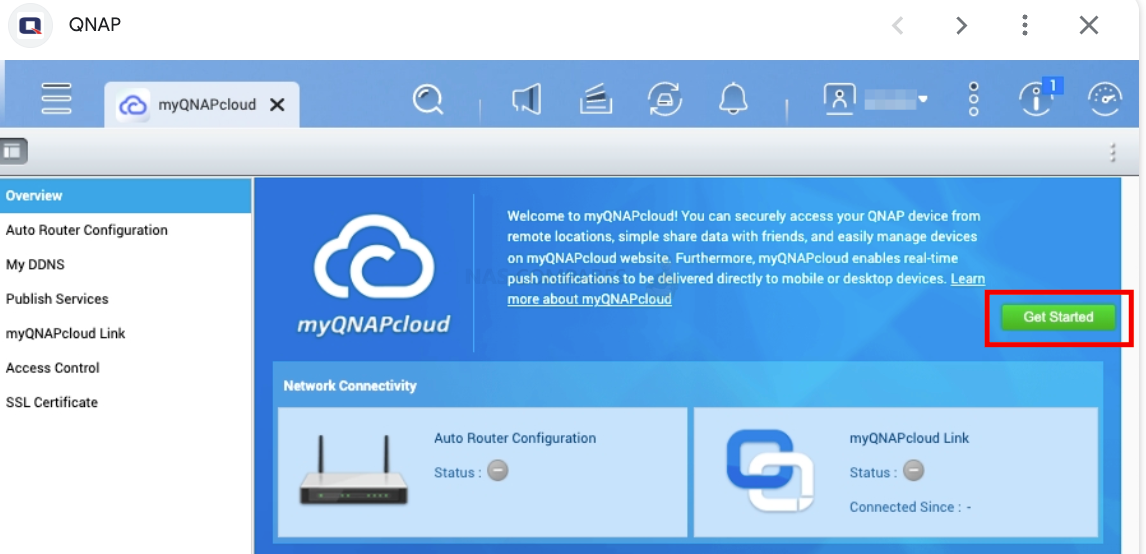
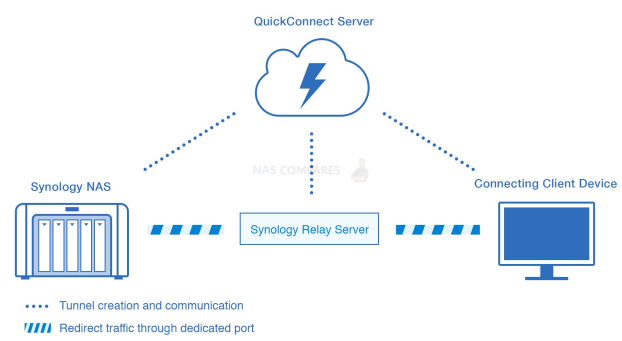
Quick connect / myQNAPcloud
Quick connect and myQNAPcloud are proxy-based connectivity options that allow you to connect to your NAS device remotely. They are easy to set up, but have the disadvantage of not allowing access to third-party apps like Plex. They are semi-secure, but everyone who knows your cloudID can try to hack into your device. The speed of this option depends on the proxy server limit, with Synology being limited to 1 MB/s.
Here is a guide to set up Quick Connect / myQNAPcloud for a Network Attached Storage (NAS) device:
- Log in to the NAS device: Start by logging in to the administration panel of your NAS device. This can typically be done by entering the IP address of the device into a web browser.
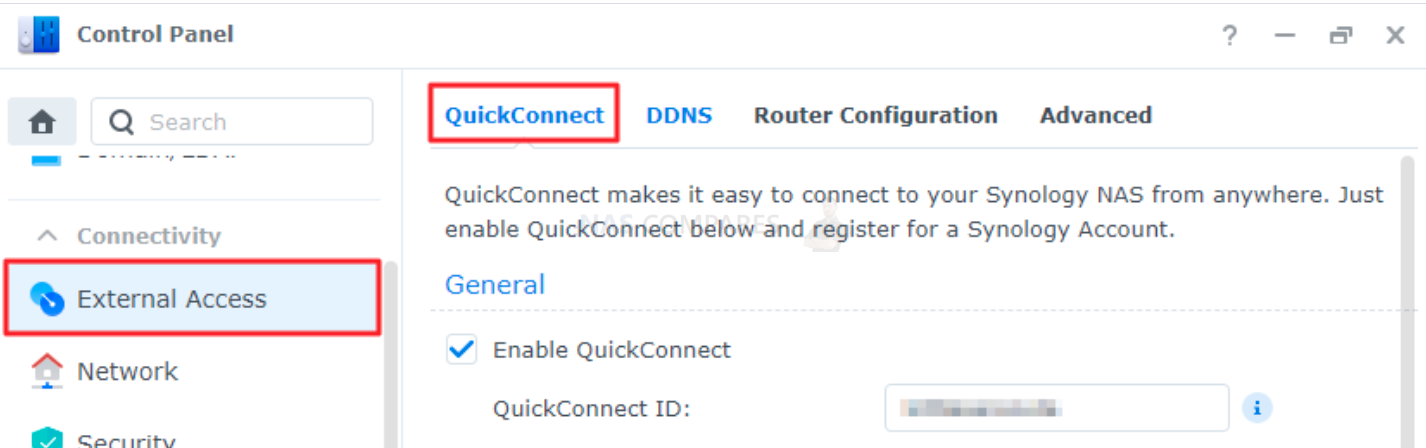
- Access the Quick Connect / myQNAPcloud settings: Navigate to the Quick Connect / myQNAPcloud settings in the administration panel. This section is typically found under “External Access” or “Cloud Services”.
- Enable Quick Connect / myQNAPcloud: To use Quick Connect / myQNAPcloud, you need to enable the feature in the settings. Follow the on-screen instructions to enable the feature and create a Quick Connect / myQNAPcloud account if you do not already have one.
- Set up port forwarding: Quick Connect / myQNAPcloud uses port forwarding to allow remote access to your NAS device. You will need to set up port forwarding on your router to ensure that the feature works correctly.
- Register your device: Once Quick Connect / myQNAPcloud is enabled, register your device by entering the required information. This will typically include the device name, IP address, and port information.
- Verify the connection: Verify the connection by checking the logs or the status page of your NAS device. You should see the Quick Connect / myQNAPcloud connection listed and the status should indicate that the connection is active.
- Access the NAS device remotely: Once the Quick Connect / myQNAPcloud connection is established, you can access your NAS device from a remote location. Simply enter the Quick Connect / myQNAPcloud address into a web browser to access the device.
Note: The specific steps to set up Quick Connect / myQNAPcloud may vary depending on your NAS device. If you have any issues with the setup process, consult the documentation for your device or seek assistance from a technical support representative.
-
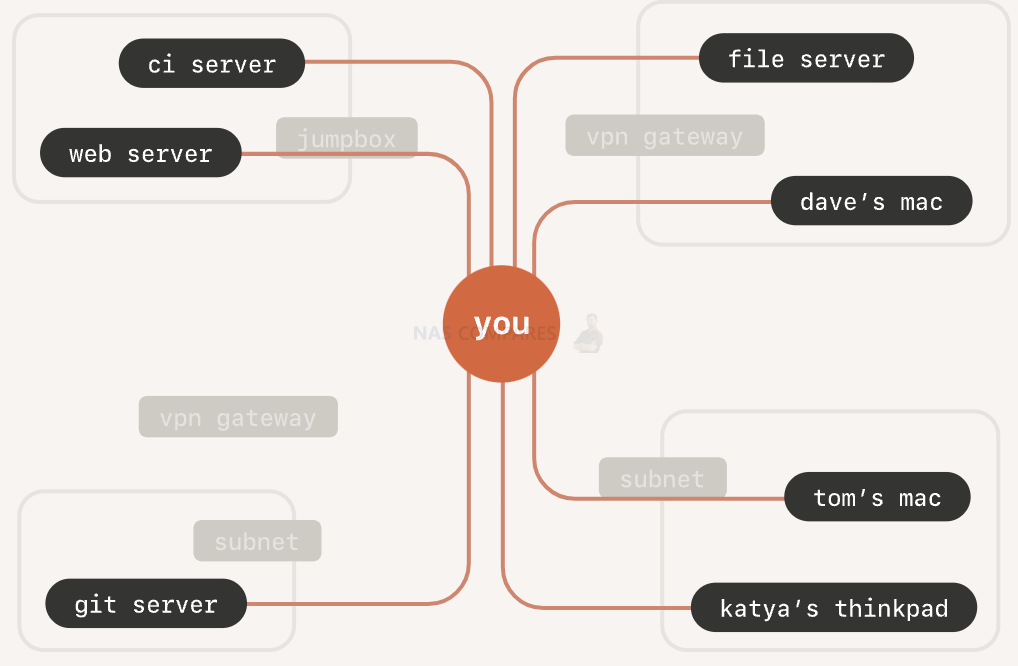
Tailscale
Tailscale is a point-to-point connectivity option that is easy to set up with a two-click process. It is secure, as no one knows about your NAS device’s existence. However, if someone gains access to your Tailscale admin panel, they can see a list of connected devices and potentially access them. The speed of this option depends on the network quality in the region.
Here is a guide to set up Tailscale on a Network Attached Storage (NAS) device and a personal computer:
- Install Tailscale: To use Tailscale, you will need to install the software on both your NAS device and personal computer. You can download the software from the Tailscale website and follow the on-screen instructions to install it.
- Create a Tailscale account: Before you can set up Tailscale, you will need to create a Tailscale account. This can be done from the Tailscale website or from within the Tailscale software.
- Configure the NAS device: After installing Tailscale on your NAS device, launch the software and sign in to your Tailscale account. Follow the on-screen instructions to configure the device for Tailscale.
- Configure the personal computer: Repeat the steps above to install Tailscale on your personal computer and sign in to your Tailscale account. Follow the on-screen instructions to configure the device for Tailscale.
- Verify the connection: Once both the NAS device and personal computer are configured for Tailscale, verify the connection by checking the status of the connection in the Tailscale software. You should see both devices listed and the connection status should indicate that the devices are connected.
- Connect to the NAS device: To connect to the NAS device from your personal computer, you will need to use the Tailscale address for the device. This address can typically be found in the Tailscale software or by contacting the technical support representative for Tailscale.
Note: The specific steps to set up Tailscale may vary depending on your NAS device and personal computer. If you have any issues with the setup process, consult the documentation for your devices or seek assistance from a technical support representative.
-
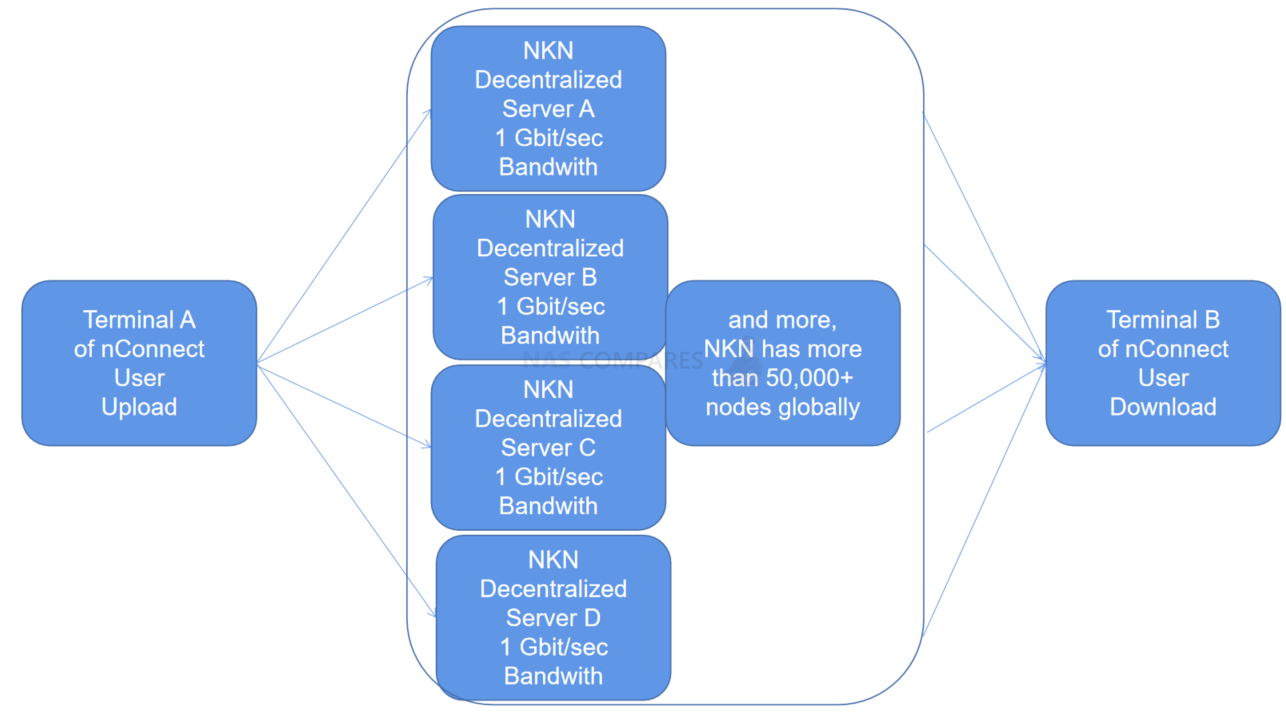
nConnect
nConnect is a blockchain/torrent-style connectivity option that is easy to set up with a scan code installation process. It is very secure as no one knows about your devices or networks. Additionally, data is sent over multiple channels, making it the fastest option.
Here is how to install nConnect
How to access your NAS remotely? A Comparison of NKN nConnect and Tailscale
-
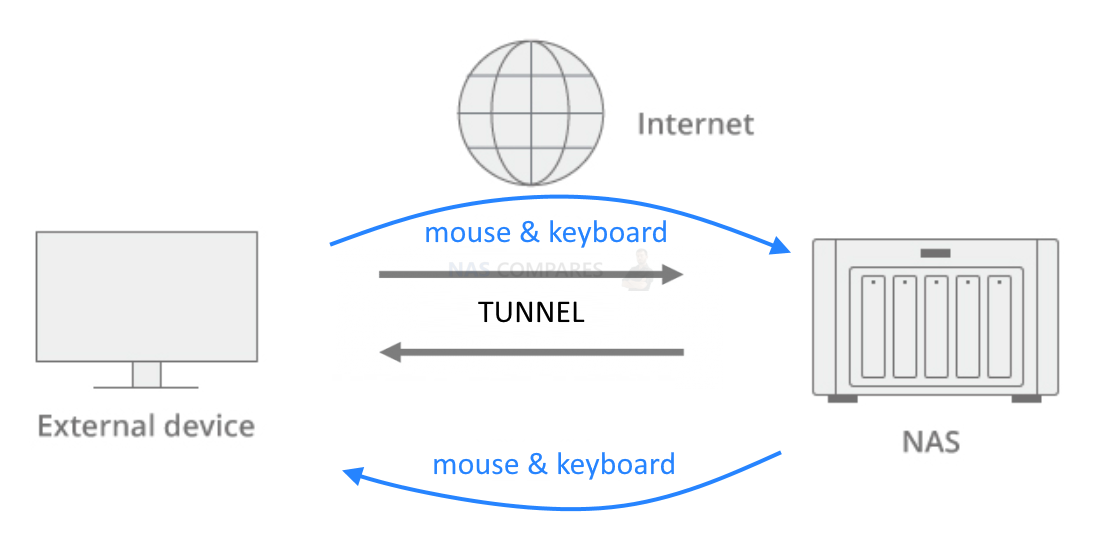
Team viewer
Team viewer is a remote control connectivity option that allows you to access and control your NAS device from anywhere. However, it does not support drive mapping, Time Machine, or Plex access. It is secure, but if someone gains access to the Teamviewer admin panel, they can potentially access other devices. The speed of this option is slow due to the constant remote desktop view data exchange.
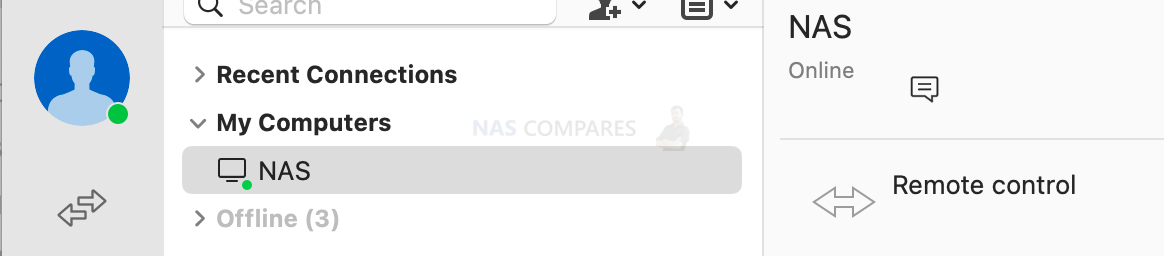
Here is a guide to set up TeamViewer on a Network Attached Storage (NAS) device and a personal computer:
- Install TeamViewer: To use TeamViewer, you will need to install the software on both your NAS device and personal computer. You can download the software from the TeamViewer website and follow the on-screen instructions to install it.
- Create a TeamViewer account: Before you can set up TeamViewer, you will need to create a TeamViewer account. This can be done from the TeamViewer website or from within the TeamViewer software.
- Configure the NAS device: After installing TeamViewer on your NAS device, launch the software and sign in to your TeamViewer account. Follow the on-screen instructions to configure the device for TeamViewer.
- Configure the personal computer: Repeat the steps above to install TeamViewer on your personal computer and sign in to your TeamViewer account. Follow the on-screen instructions to configure the device for TeamViewer.
- Verify the connection: Once both the NAS device and personal computer are configured for TeamViewer, verify the connection by checking the status of the connection in the TeamViewer software. You should see both devices listed and the connection status should indicate that the devices are connected.
- Connect to the NAS device: To connect to the NAS device from your personal computer, you will need to use the TeamViewer address for the device. This address can typically be found in the TeamViewer software or by contacting the technical support representative for TeamViewer.
-
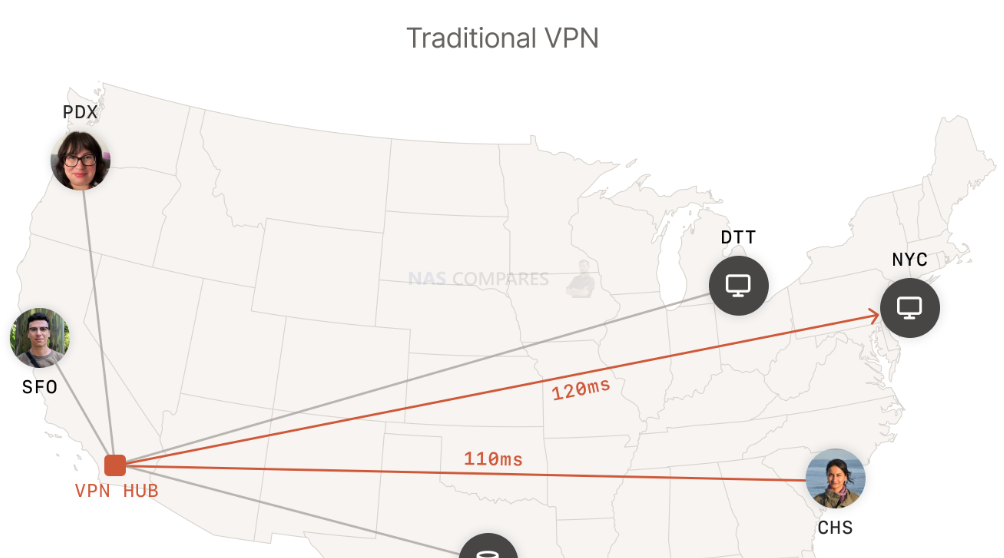
Synology VPN server/ open VPN
Synology VPN server/open VPN is a point-to-point connectivity option that requires a complicated setup process and still requires opening ports. While it is secure, with only one port open, it can still be compromised if not updated. The speed of this option depends on the network quality in the region.
What is the best way to connect remotely based on APP you use
| DSM or QTS Admin panel | tailscale | NKN | Team viewer |
| Phone Audio Station | Quick connect | ||
| Synology Chat Server | Quick connect | ||
| Synology Mail Server | port forwarding | ||
| SMB Service | NKN | tailscale | |
| Surveillance Station | Quick connect (1MB/s) | port forwarding | |
| Synology Drive Server | Quick connect (1MB/s) | port forwarding | |
| Phone / TV Synology Photos | Quick connect | ||
| Phone/ TV Video Station | Quick connect (1MB/s) | port forwarding | |
| Web Station | port forwarding | ||
| Plex Media Server | Plex relay server (1-2MB/s) | port forwarding | |
| Synology MailPlus Server | port forwarding | ||
| Virtual Machine Manager | Quick connect | ||
| RSYNC | tailscale | NKN |
Comparison of the different connectivity options
When comparing the different connectivity options, it is important to consider security, speed, and ease of setup and configuration.
In terms of security, nConnect is the most secure, followed by Tailscale, Team viewer, Synology VPN server/ open VPN, Quick connect / myQNAPcloud, and Port forwarding.
In terms of speed, nConnect is the fastest, followed by Tailscale, Synology VPN server/ open VPN, Port forwarding, Quick connect / myQNAPcloud, and Team viewer.
When it comes to ease of setup and configuration, Tailscale is the easiest, followed by nConnect, Quick connect / myQNAPcloud, Synology VPN server/ open VPN, Port forwarding, and Team viewer.
|
Technology |
Configuration |
Security |
Speed |
Remarks |
|
Port forwarding |
Complicated setup, need to open each port manually for each service |
Not secure (public, everyone on internet can try to hack it) |
Fast (depends on network quality in that region) |
Access to open ports only |
|
Quick connect / myQNAPcloud |
Easy Proxy |
Semi secure (everyone that knows your cloudID can try and hack it) |
Slow (depends on proxy server limit (Synology = 1MB/s)) |
Only access first party apps. No access to 3rd like Plex. No SMB etc |
|
Tailscale |
Easy two-click setup |
Secure (no one knows about your NAS existence, but if someone gains access to Tailscale admin panel, they can see a device list and get into connected devices) |
Fast (depends on network quality in that region) |
Access everything |
|
nConnect |
Easy Install-scan code setup (blockchain/torrent style) |
Very secure (no one knows about your devices and networks) |
Fastest (data sent over multiple channels) |
Access everything |
|
Team viewer |
Easy Remote controlling |
Secure (but someone gaining access to Teamviewer admin panel could access other devices) |
Slow (constant remote desktop view data exchange) |
No drive mapping, Time Machine. PC/ Mobile – not TV |
|
Synology VPN server/ open VPN |
Complicated setup, still require opening ports |
Secure (NAS is still public but with only one port open, could be compromised if not updated) |
Fast (depends on network quality in that region) |
Access everything |
Conclusion
In conclusion, remote access to your NAS offers several benefits such as being able to access your files and data from anywhere in the world. However, it is important to consider the security and speed implications of the different remote access methods. The five methods discussed in this article, Port Forwarding, Quick Connect, Tailscale, nConnect, Team Viewer, and Synology VPN, each offer their own set of pros and cons.
Port forwarding is fast but not secure as it requires manual port opening for each service and is public, making it vulnerable to hacking attempts. Quick Connect and myQNAPcloud are semi-secure and slow as the speed depends on the proxy server limit. Tailscale is fast, secure, and easy to set up, but access to the Tailscale admin panel can be a potential security concern. nConnect is the most secure with multiple channels for data transmission but may not be accessible to third-party apps. Team Viewer is secure but slow due to constant remote desktop data exchange and limits access to drive mapping and Time Machine. Synology VPN is fast, secure, but requires a complicated setup and needs to be regularly updated to maintain security.
In choosing the right remote access method for your NAS, it is important to consider your specific needs, priorities, and risk tolerance. Whichever method you choose, make sure to regularly update your security measures and keep your device software up to date to ensure the protection of your data.
| Where to Buy a Product | |||
 |
    
|

|
VISIT RETAILER ➤ |
 |
|
|
VISIT RETAILER ➤ |
 |
|
|
VISIT RETAILER ➤ |
|
|
|
|
VISIT RETAILER ➤ |
We use affiliate links on the blog allowing NAScompares information and advice service to be free of charge to you. Anything you purchase on the day you click on our links will generate a small commission which is used to run the website. Here is a link for Amazon and B&H. You can also get me a ☕ Ko-fi or old school Paypal. Thanks! To find out more about how to support this advice service check HERE If you need to fix or configure a NAS, check Fiver Have you thought about helping others with your knowledge? Find Instructions Here


Best NAS for under $499
Best NAS for Under $250 (2025)
Minisforum N5 Pro NAS - FIRST IMPRESSIONS
HexOS Q2 Update - What's Changed?
5 Exciting NAS Coming Later in 2025
Beelink ME Mini vs GMKtec G9 vs CWWK P6 NAS Comparison
Access content via Patreon or KO-FI
What are your thoughts on using Cloudflare Tunnels? It requires a domain, but it’s otherwise free and allows easy access via web browser (no apps required like Tailscale or nConnect).
Compared to Tailscale it is more difficult to set up. You need domain and comand line. Not for home users at all.