


Play Arcade and Retro Games your QNAP NAS
One of the most interesting and entertaining ways in which you can take advantage of the HDMI port on your QNAP NAS, is to turn your NAS drive into an arcade gaming emulation device. It is no secret that there is a big community of freeware and modders in the QNAPClub that are constantly releasing new apps for their popular desktop NAS platform, QTS. Today, I want to tell you how to install the popular gaming emulation platform, retroarch, on your QNAP NAS easily and output the software over HDMI. This is an incredibly straightforward and easy guide and should have you playing your Arcade ROMs, from the comfort of your sofa/desk in no time.
QNAP NAS and RetroArch Games – A Disclaimer
Although the retroarch software and use of the retroarch game emulator is legal, it is worth remembering that in order to play popular ROMs (the games themselves), you are legally obliged to either own an original version of the game hardware (a cartridge or official retail CD) or are playing a game that is classed freeware or community owned. There are numerous websites where you can obtain gaming ROMs easily and download them in minutes, but as the legality of the sources is sometimes questionable, I will not be including links to these sites. You can simply Google these and it will help you find them, but I still advise strongly that you keep things safe and legal, ensuring that you do not do anything that infringes copywrite.
QNAP and RetroArch – What you will need
In order to build your perfect gaming hub that supports everything from Arcade MAME and Retro Sega and Nintendo classics, all the way through to Dreamcast, PlayStation and N64, you will need the following hardware:
- A QNAP NAS that features an Intel/AMD CPU and an HDMI port
- A USB keyboard, mouse, Free QRemote Mobile App or physical Remote control that is included with your QNAP NAS
- AUSB control pad – pretty much any one will do and they can be picked up remarkably cheap
- Alternatively, you can use the Keyboard and Mouse, but that will be a bit clunky!
- An HDMI monitor or TV – 720p, 1080p, 4k etc
- A PC, Mac or Mobile device to interact with your QNAP NAS and QTS as normal
That is it, most of these devices you will already own and therefore it is not a big stretch to prepare a QNAP NAS to run as a retro Arcade platform.
Another cool benefit of running the retroarch emulation software on your QNAP drive, is that much like any software you run on your NAS drive, all other features and functionality of the device will run in the background. So in real terms, this means that even though your NAS will be Retro Gaming emulation and Arcade powerhouse, it will still be able to be useable by other users for a Plex Media Server, DLNA media sharing, surveillance with IP Cameras, multi-device backups, and all the usual things at exactly the same time. Very Cool!
QNAP NAS and RetroArch – Step by Step Guide
Below are the easy and simple steps to install RetroArch on your QNAP NAS, to play all those gaming classics. This guide relies on the fact you have already setup your QNAP NAS for use.
QNAP NAS and RetroArch – Step 1
Log into your QNAP NAS to make sure you have HD station installed and updated to the latest version. You can check this by going into the app centre on the QTS user interface and if there is an update available, it will tell you straight away.
QNAP NAS and RetroArch – Step 2
Head to the link below and download the latest version of the Retroarch QNAP .QPKG file (thanks again to QNAP and Stephanie on their forum). Then download and save it to your desktop PC or Mac.
QNAP NAS and RetroArch – Step 3
Once the Retroarch .zip file is downloaded, right-click the file and extract the zip file open. This will produce two files.

QNAP NAS and RetroArch – Step 4
On your QNAP NAS, get back to the app centre and click the cog/settings icon at the top right corner. This will open up a window that allows you to install custom and unofficial files.
QNAP NAS and RetroArch – Step 5
Click browse and head to where you downloaded the RetroArch software onto your local PC or Mac and click open the larger of the two files you unzipped earlier. Then click the install button to begin the installation of RetroArch on your QNAP NAS. Depending on your QNAP NAS system, this will take somewhere between 1 and 5 minutes.
QNAP NAS and RetroArch – Step 6
Once the installation is complete, you will need to switch over to the HDMI output in order to continue with your retro arcade system setup.
QNAP NAS and RetroArch – Step 7
In order to navigate the options on HD station via the HDMI interface, you will need to use a USB peripheral device, such as a keyboard, mouse, QRemote control application for iOS and Android or the remote control that your QNAP arrived with. If you have not logged into HD station before, you will be prompted to enter your username and password. You can auto save this information to make it easier later.
QNAP NAS and RetroArch – Step 8
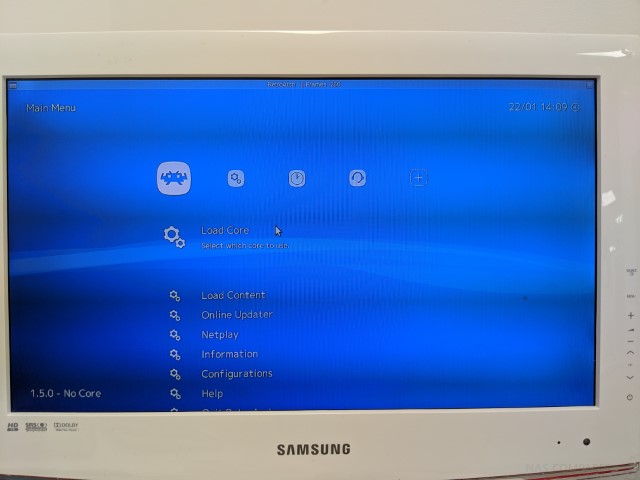
Once using the HD station HDMI interface you, will notice numerous QNAP and third-party applications, amongst them the retroarch icon. If you want HD station to automatically load the retroarch arcade software by default over HDMI, head to the settings option at the top and select retro armchair as the default app at boot.

QNAP NAS and RetroArch – Step 9
If you want to control Retroarch and/or the games with a control pad, you can now connect the controller and RetroArch will automatically recognize it. If it doesn’t recognize it first time, then head to the ‘input’ and enable the controller + key inputs. As long as you quit/exit the software correctly, these settings will be saved for future use.
QNAP NAS and RetroArch Finished
That’s it, RetroArch is now fully installed on your QNAP NAS. If you want to learn more about the RetroArch user interface, then do visit the official guide below. However, as a brief guide to the important menu options:
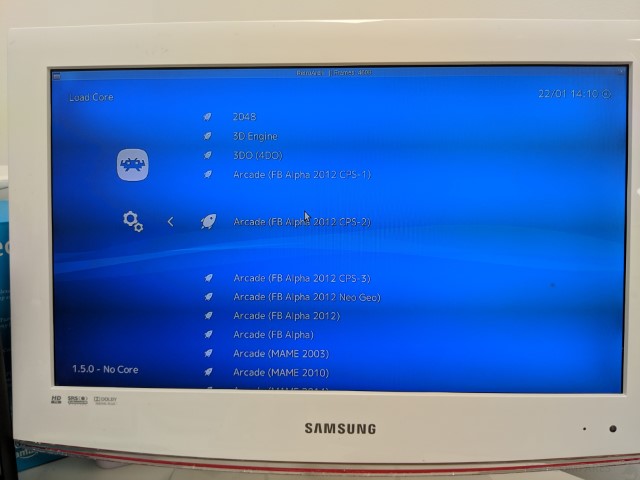
Load Cores – Here is where you select which system you wish to play on, eg MAME, NES, PSX, etc
Load Content – Here is where you select ROMs to play. In order to access the folders on your QNAP NAS, you need to look for a directory called ‘share’ or ‘shares’
Input – Here is where you can adjust the controls of the emulator and RetroArch user interface to be controlled by a USB control pad.
Save/Load State – Save and/or load your progress whenever you want
Favourites – As you play ROMS, they will appear on this list and save you time later.
https://www.retroarch.com/
📧 SUBSCRIBE TO OUR NEWSLETTER 🔔
🔒 Join Inner Circle
Get an alert every time something gets added to this specific article!
 Need Help?
Where possible (and where appropriate) please provide as much information about your requirements, as then I can arrange the best answer and solution to your needs. Do not worry about your e-mail address being required, it will NOT be used in a mailing list and will NOT be used in any way other than to respond to your enquiry.
Need Help?
Where possible (and where appropriate) please provide as much information about your requirements, as then I can arrange the best answer and solution to your needs. Do not worry about your e-mail address being required, it will NOT be used in a mailing list and will NOT be used in any way other than to respond to your enquiry.
 TRY CHAT
Terms and Conditions
TRY CHAT
Terms and Conditions

This description contains links to Amazon. These links will take you to some of the products mentioned in today’s video. As an Amazon Associate, I earn from qualifying purchases
🔒 Join Inner Circle
Get an alert every time something gets added to this specific article!
Want to follow specific category? 📧 Subscribe
This description contains links to Amazon. These links will take you to some of the products mentioned in today's content. As an Amazon Associate, I earn from qualifying purchases. Visit the NASCompares Deal Finder to find the best place to buy this device in your region, based on Service, Support and Reputation - Just Search for your NAS Drive in the Box Below
Need Advice on Data Storage from an Expert?
Finally, for free advice about your setup, just leave a message in the comments below here at NASCompares.com and we will get back to you.
Need Help?
Where possible (and where appropriate) please provide as much information about your requirements, as then I can arrange the best answer and solution to your needs. Do not worry about your e-mail address being required, it will NOT be used in a mailing list and will NOT be used in any way other than to respond to your enquiry.
If you like this service, please consider supporting us.
We use affiliate links on the blog allowing NAScompares information and advice service to be free of charge to you.Anything you purchase on the day you click on our links will generate a small commission which isused to run the website. Here is a link for Amazon and B&H.You can also get me a ☕ Ko-fi or old school Paypal. Thanks!To find out more about how to support this advice service check HEREIf you need to fix or configure a NAS, check Fiver
Have you thought about helping others with your knowledge? Find Instructions Here
Or support us by using our affiliate links on Amazon UK and Amazon US


Alternatively, why not ask me on the ASK NASCompares forum, by clicking the button below. This is a community hub that serves as a place that I can answer your question, chew the fat, share new release information and even get corrections posted. I will always get around to answering ALL queries, but as a one-man operation, I cannot promise speed! So by sharing your query in the ASK NASCompares section below, you can get a better range of solutions and suggestions, alongside my own.

|
 |


Private 🔒 Inner Circle content in last few days :
Why Do Cheap NAS Boxes EXIST????
Minisforum N5 Pro NAS - Should You Buy?
UGREEN DH4300 & DH2300 NAS Revealed - Good Value?
Aoostar WTR Max NAS - Should You Buy?
Xyber Hydra N150 NAS Review - Is This COOL?
Minisforum N5 Pro vs Aoostar WTR Max - The BIG Showdown
Access content via Patreon or KO-FI
Why Do Cheap NAS Boxes EXIST????
Minisforum N5 Pro NAS - Should You Buy?
UGREEN DH4300 & DH2300 NAS Revealed - Good Value?
Aoostar WTR Max NAS - Should You Buy?
Xyber Hydra N150 NAS Review - Is This COOL?
Minisforum N5 Pro vs Aoostar WTR Max - The BIG Showdown
Access content via Patreon or KO-FI
would this work on synology ds423+
REPLY ON YOUTUBE
What I have is a TS464C(n5095-8G) version, followed the guide, runs fine but the fan went crazy, somehow it triggered the fan to work at maximum speed, so I delete the app
REPLY ON YOUTUBE
it can work on a ts x70 series?
REPLY ON YOUTUBE