

How to Setup a Windows 11 VM on Your Synology NAS
As Many of you may have heard, Microsoft has formally announced that Windows 11 is coming and after several high-profile presentations and numerous published references online, you are now able to begin the formal process of testing this new operating system to see if it brings any impressive improvements to your existing Windows 10 machine. When it is fully released later this year, you will be able to purchase Windows 11 for your new PC build or upgrade from your existing copy of Windows and onto this new software revision. Many of us have horror stories of bench testing a new OS either in beta or alpha release form, as it can often result in our working processes and workflow to suddenly wobble and fall over. When it comes to testing an entire operating system, not just an individual application or service, it is highly recommended that instead of upgrading your existing system blind, that you choose to run this operating system as a virtual machine. Also more commonly referred to as a ‘VM’, it is a virtual equivalent of a regular PC. Although you still need a physical bare-metal computer to host this VM and software for it to live within, known as a hypervisor, a virtual machine is an incredibly small alternative to a standard computer with all of its hardware specifications merely being a fractional and digital version of the physical computer that it lives within. A virtual machine can exist as a duplicated virtual version of your physical computer or as an entirely new computer that allows you to bench test Windows updates and whole system versions like Windows 11 without putting your existing setup at risk.
Why use a Synology NAS to host a Windows 11 VM?
In the last few years, we have seen a tremendous increase in the number of people that are using a Synology NAS to host one or more virtual machines. Not only because a NAS can be remotely accessed locally via the network or anywhere in the world via the internet, but it features a dedicated virtual machine hypervisor software that allows the system to efficiently host multiple VM and allow users to simply connect via a single portal tunnel and deploy the VM for use. Additionally, NAS VM software such as Synology Virtual Machine Manager allows you to take snapshots to revert a VM to a previous version, configure hardware assets and resources on the system up/down to improve your VM/bare-metal server as needed and also allows you to duplicate virtual machines very quickly and turn one successful VM deployment into many. Therefore if you have a Synology NAS with available resources to spare, it makes a lot of sense to test out windows 11 on your NAS with its free and inclusive software.

What You Will Need to Run Windows 11 on Your Synology NAS as a VM
In order to deploy a Windows 11 virtual machine on your Synology NAS, you are going to need a few things. These include:
- I Synology NAS, obviously. But a Synology NAS with at least a 4 core Intel or AMD 64-bit x86 processor and at least 4GB of memory
- A Windows VM beta image. There are numerous methods online to get the windows 10 ISO image file that I will discuss in this guide, that there is also the option to get a Windows 11 licence code directly from their website as long as you have an existing and authenticated copy of Windows 10 available.
- It is recommended that you have at least 50GB of storage available for the test and likely more if you want to give Windows 11 an extensive preview experience.
- Ideally, a desktop or laptop computer in order to conduct the steps in setting up the VM as it is a little bit more tricky (the UI) to perform with just a mobile device like a phone or tablet.
That is about it, everything you need to deploy a Windows 11 VM on your Synology NAS will likely already be in your possession if you are reading this guide. I recommend at minimum that you should have a mass such as DS920+ or DS1621+ in order to install this VM and still have sufficient system resources to run the NAS simultaneously.
Setting Up the VM software on Your Synology NAS Drive
The first thing we need to do is set up the virtual machine manager software on your Synology NAS. If you already have Synology VMM (Synology Virtual Machine Manager) on your NAS, you can skip this step and head to the next one. Otherwise, head into the DSM GUI on the NAS and onto the app centre.
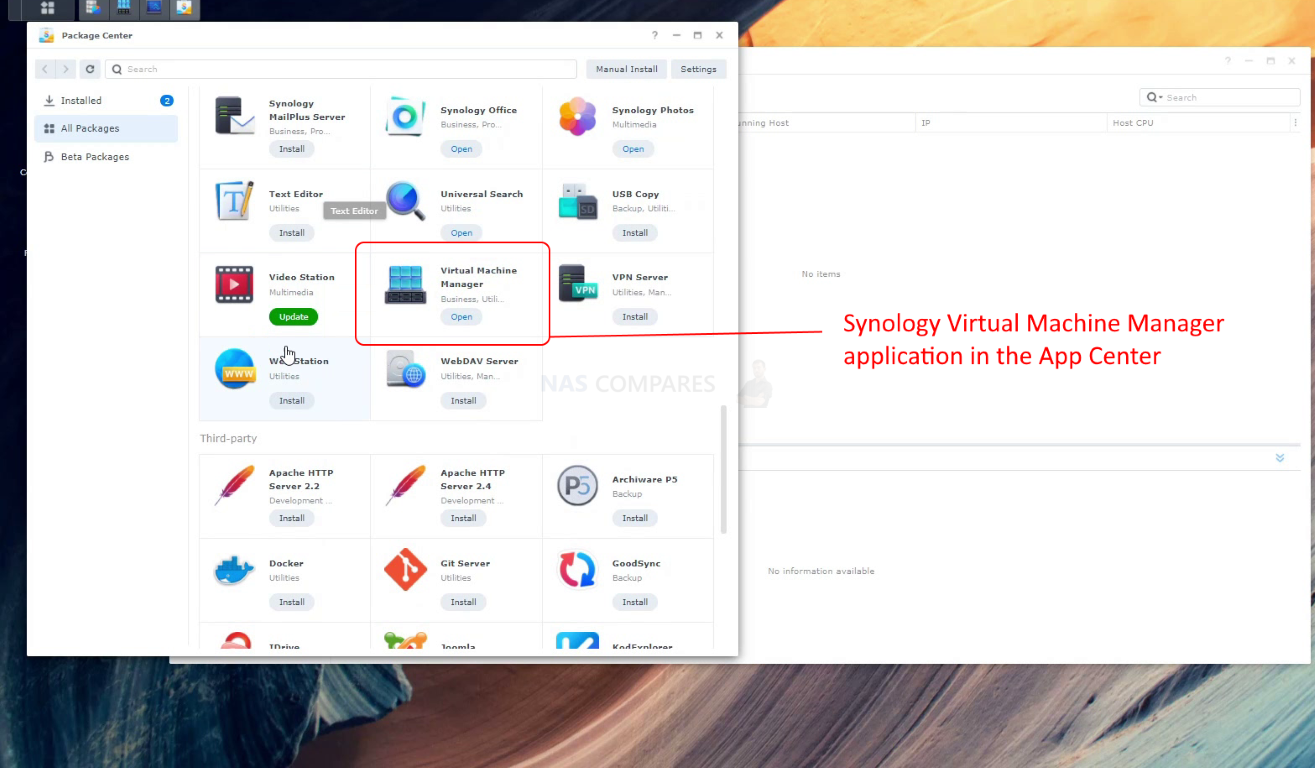
From here, scroll down and find or use the search box, for the Synology virtual machine manager tool. It should allow you to click within a single button and it may ask you to install further applications such as the replication tool and system tools, go ahead and allow these as these will help you run the virtual machine fluidly.
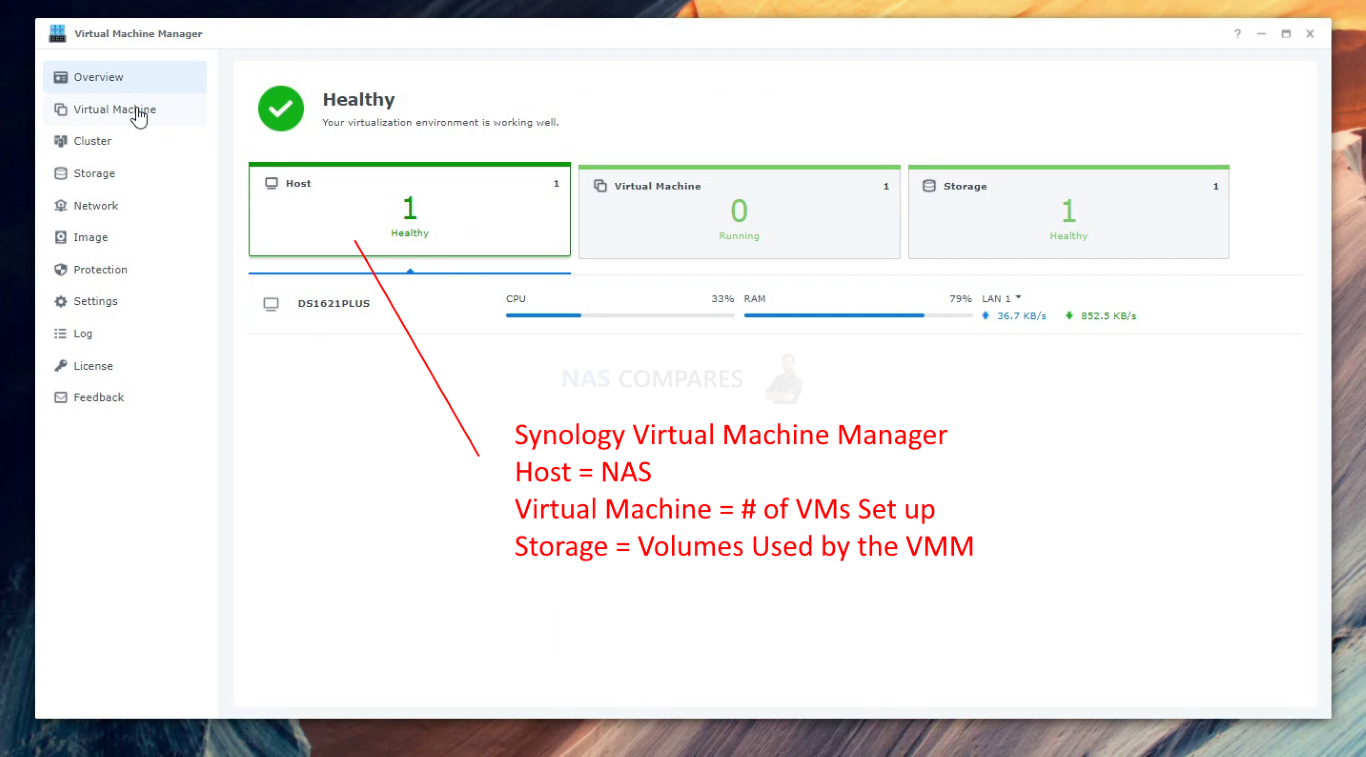
After the application is installed you need to open it from the available list of apps and before you can proceed with the tool you will be asked to quickly check that you have sufficient resources available on your NAS in CPU and memory, as well as the system asking if it can create a new virtual network switch configuration. Click ok and allow it to do this as it ensures that the windows 11 VM can access by the network and the internet after it is deployed. If successful, you will be greeted with the Synology virtual machine manager user interface with a list of options on the left-hand side of the screen and a few hints and tips displayed in the middle of the screen. Next, you will need to get a copy of Windows 11 beta which can arrive in numerous forms.
Setting Up the Windows 11 ISO Image
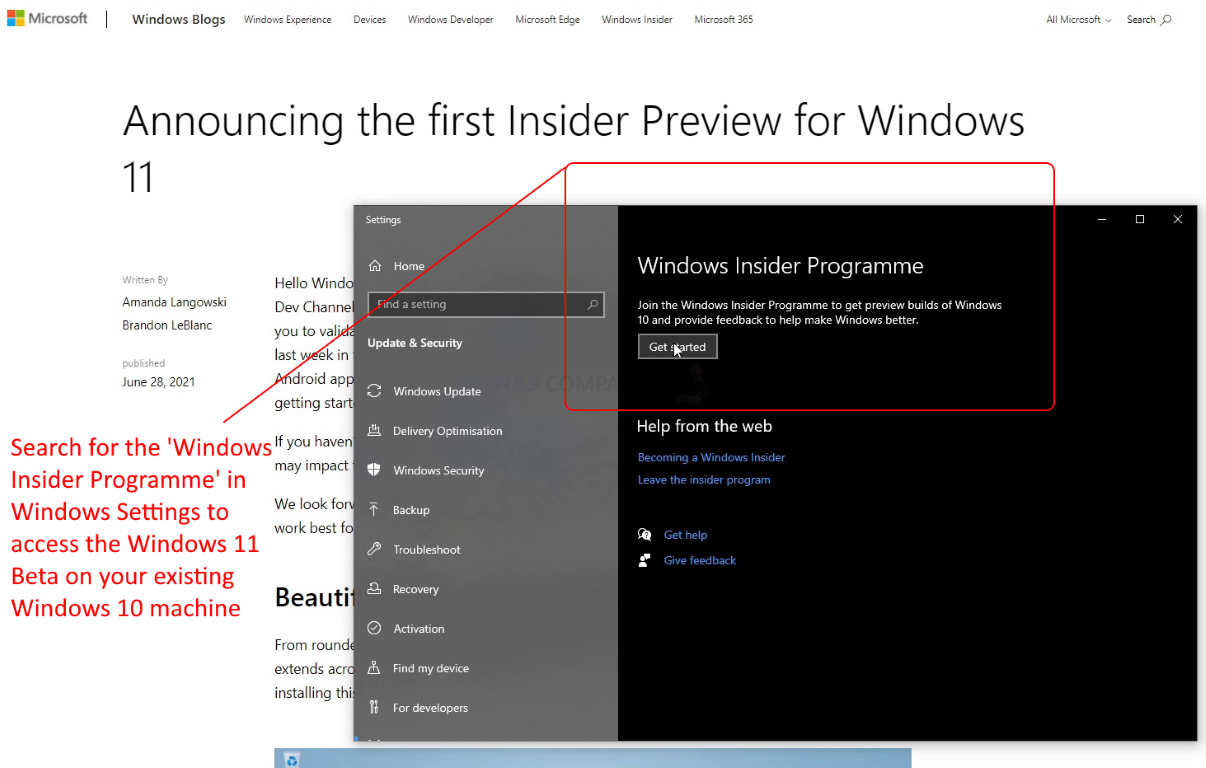
As mentioned earlier, Windows 11 is currently available from numerous sources across the internet (for example) and alongside the ability to download the digital image of the software, more commonly produced as an ISO (which can be mounted vertically or burnt to a physical DVD if you want to install Windows 11 on a physical computer instead). Alongside this, you can use your existing copy of Windows 10 to connect with the Windows beta program (shown above, by searching for ‘Windows Insider Programme‘ in the settings menu) and it will provide you with a Windows 11 licence and means with which to test Windows 11 on your existing system. There are numerous other methods online and a quick Google search will provide you with numerous download sites where you can get hold of Windows 11 beta. For this guide, I have downloaded Windows 11 beta as an ISO at 4.54GB. it downloads as a single file and this is the file that you will need to transfer over to the NAS.

Once you have downloaded your Windows 11 ISO, simply access your NAS file manager as you normally would and then drag and drop the windows 11 ISO file into a NAS directory that you have access to. Depending on your upload speed this can take from seconds to minutes, As soon as that is done, make your way back into the Synology virtual machine manager tool and continue with the installation of Windows 11 on your soon to be created brand new virtual machine.
Creating Your Synology Virtual Machine for Windows 11
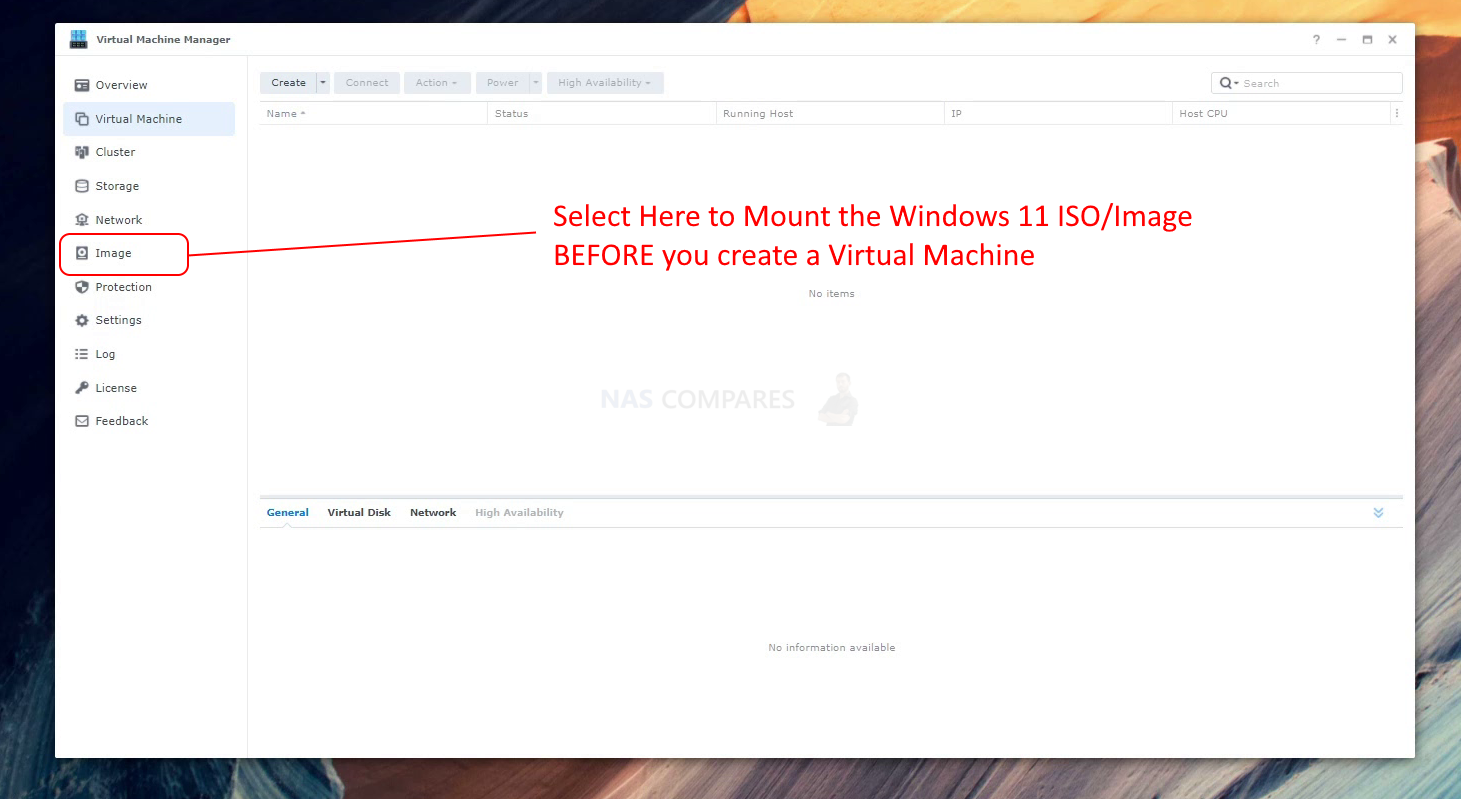
Once you have made your way back into the Synology virtual machine manager application. Select the side bar option called ‘Image‘.
At the top, you will find an option that allows you to add a new image. Select option and when prompted, select the option Synology NAS.
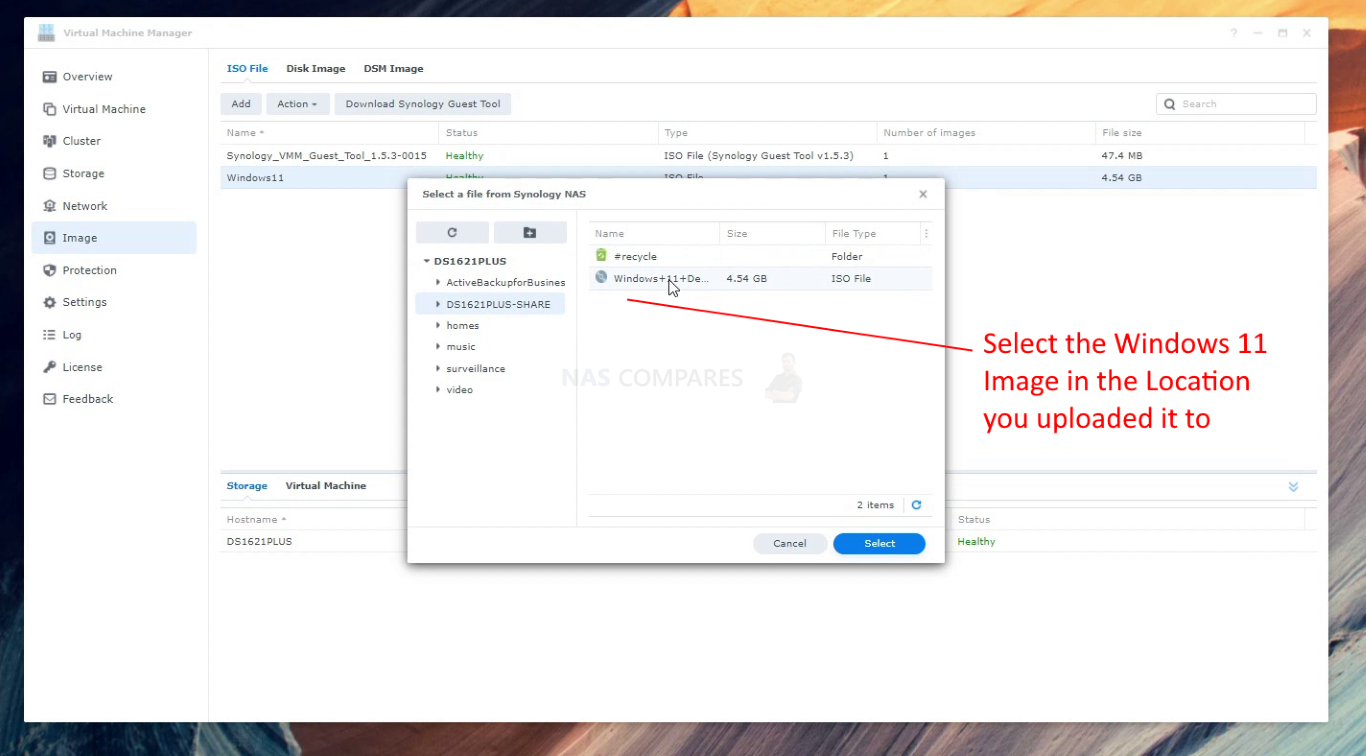
The list of available options on screen will be the ones that you have on your NAS and you just need to browse through the folders to find the one where you uploaded the windows 11 virtual machine ISO earlier. Click this ISO and then go-ahead to the next step.
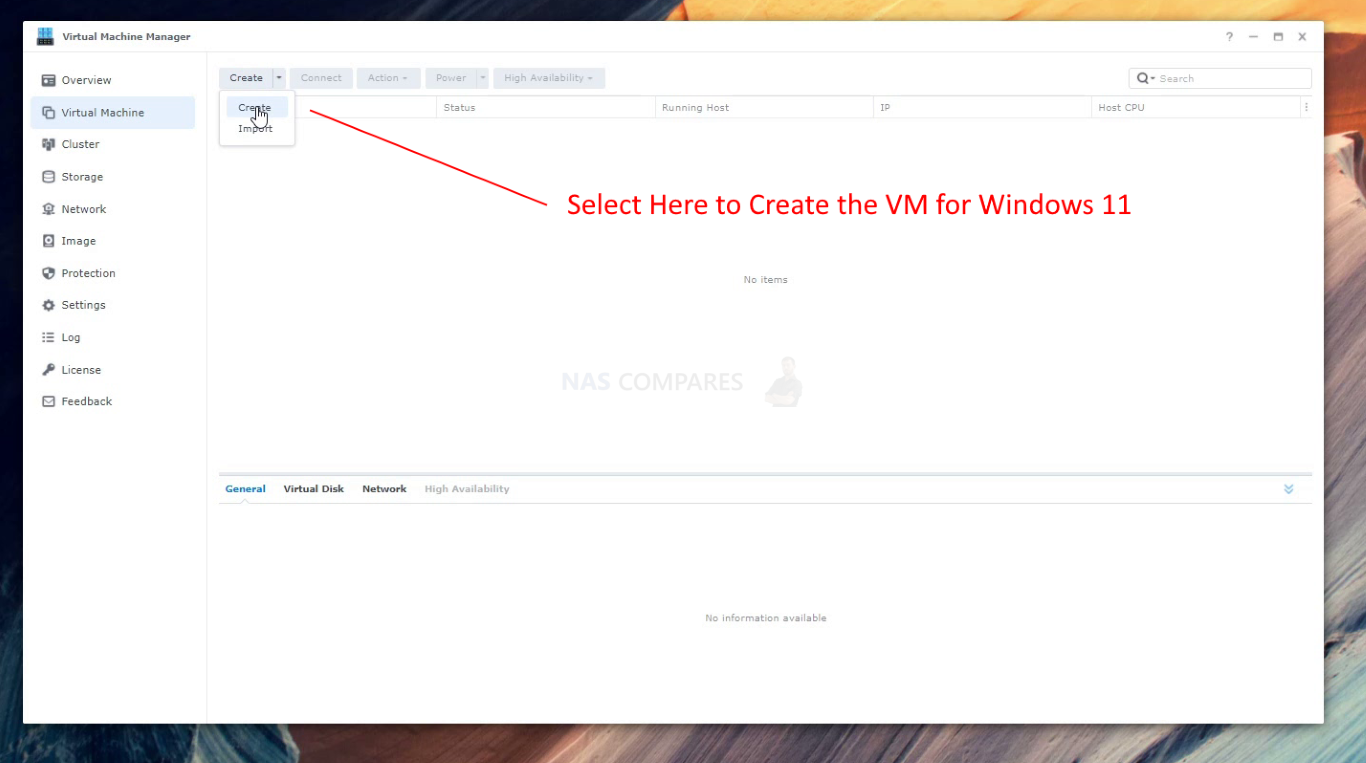
Now head up to the top of the menu at ‘virtual machine’ and click create.
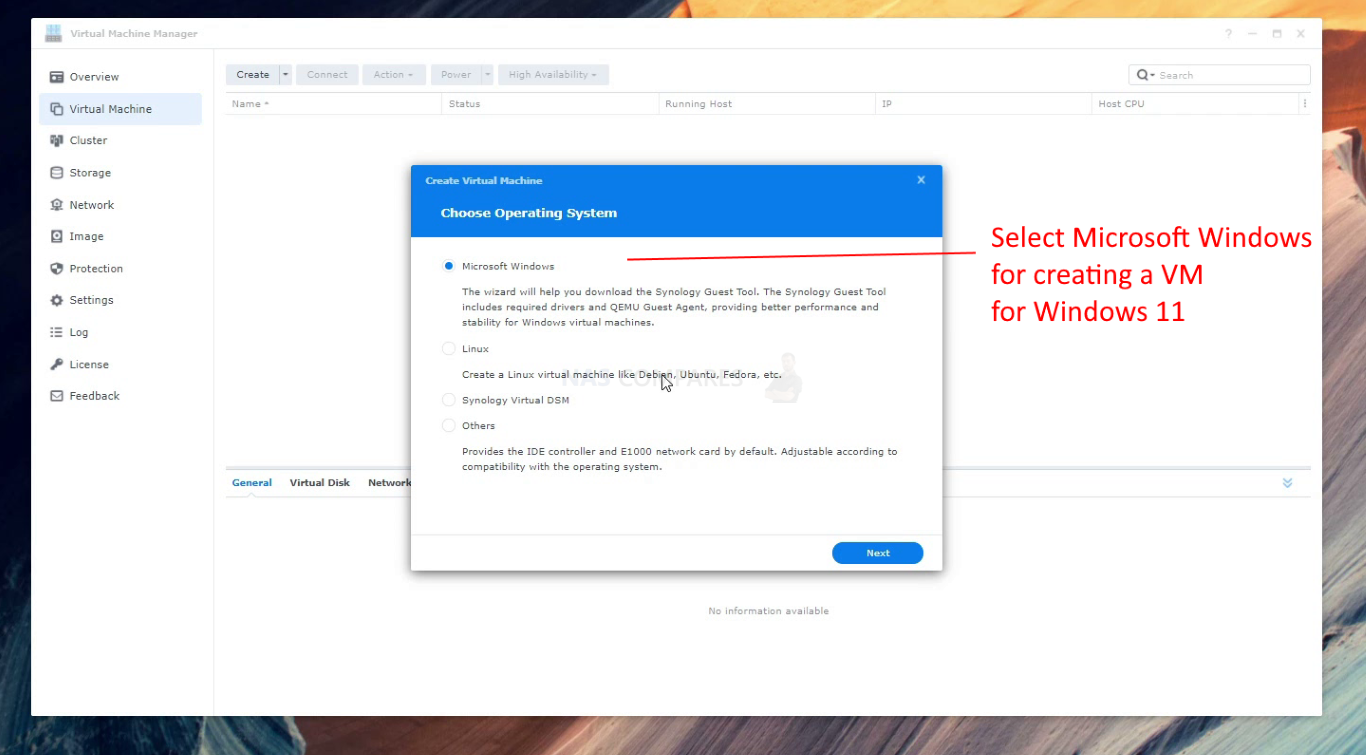
Then select the option for Microsoft Windows as the Virtual Machine Type
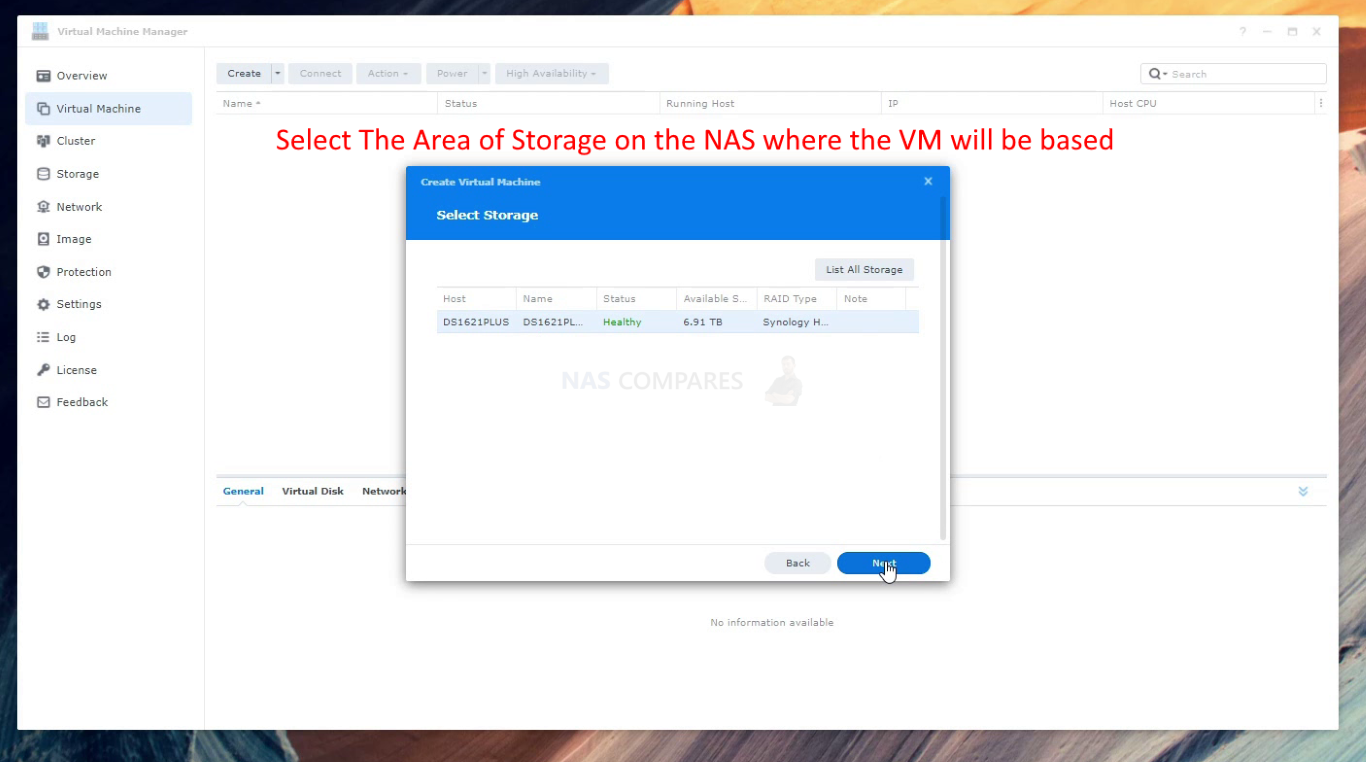
Then select the storage volume on your Synology NAS that you want the Windows 11 Virtual Machine to live/run-in
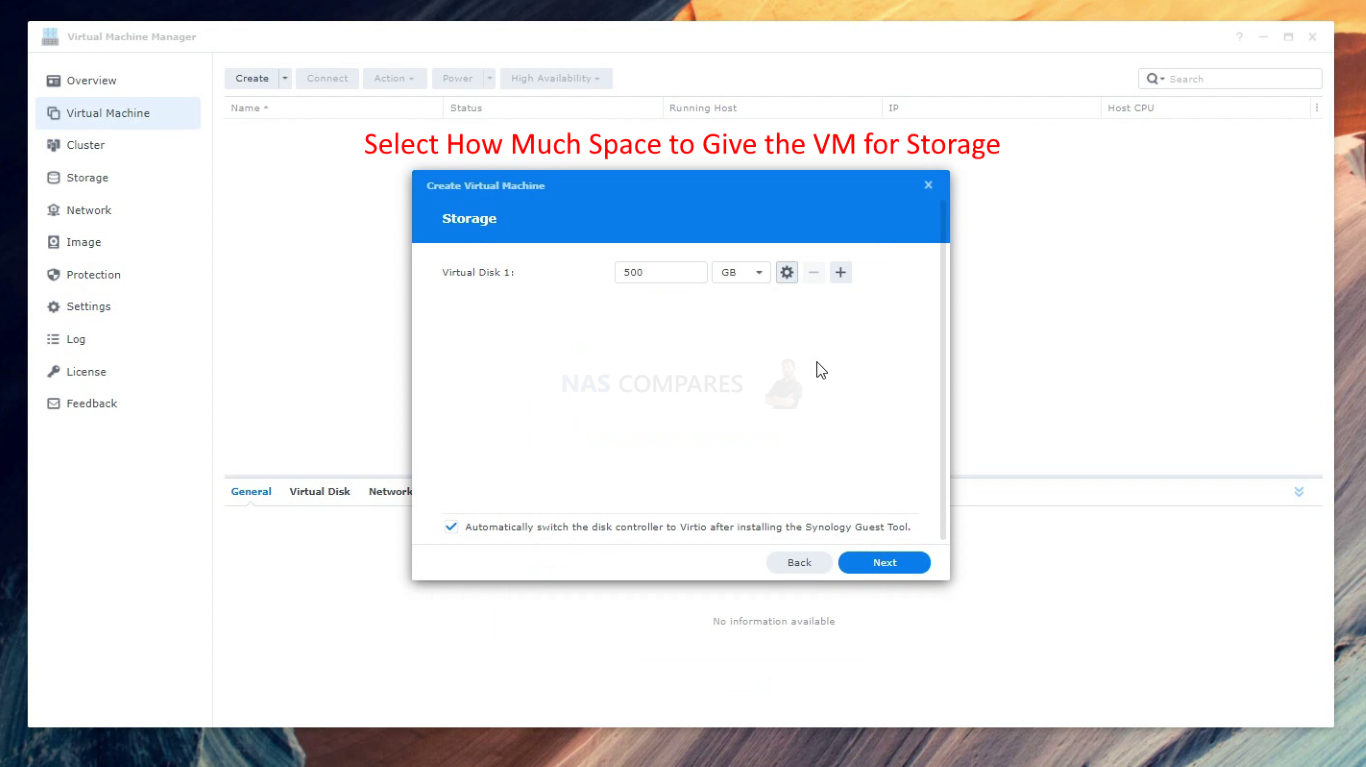
Next, You need to assign how much storage in GB/TB that you want the windows 11 Virtual Machine to use
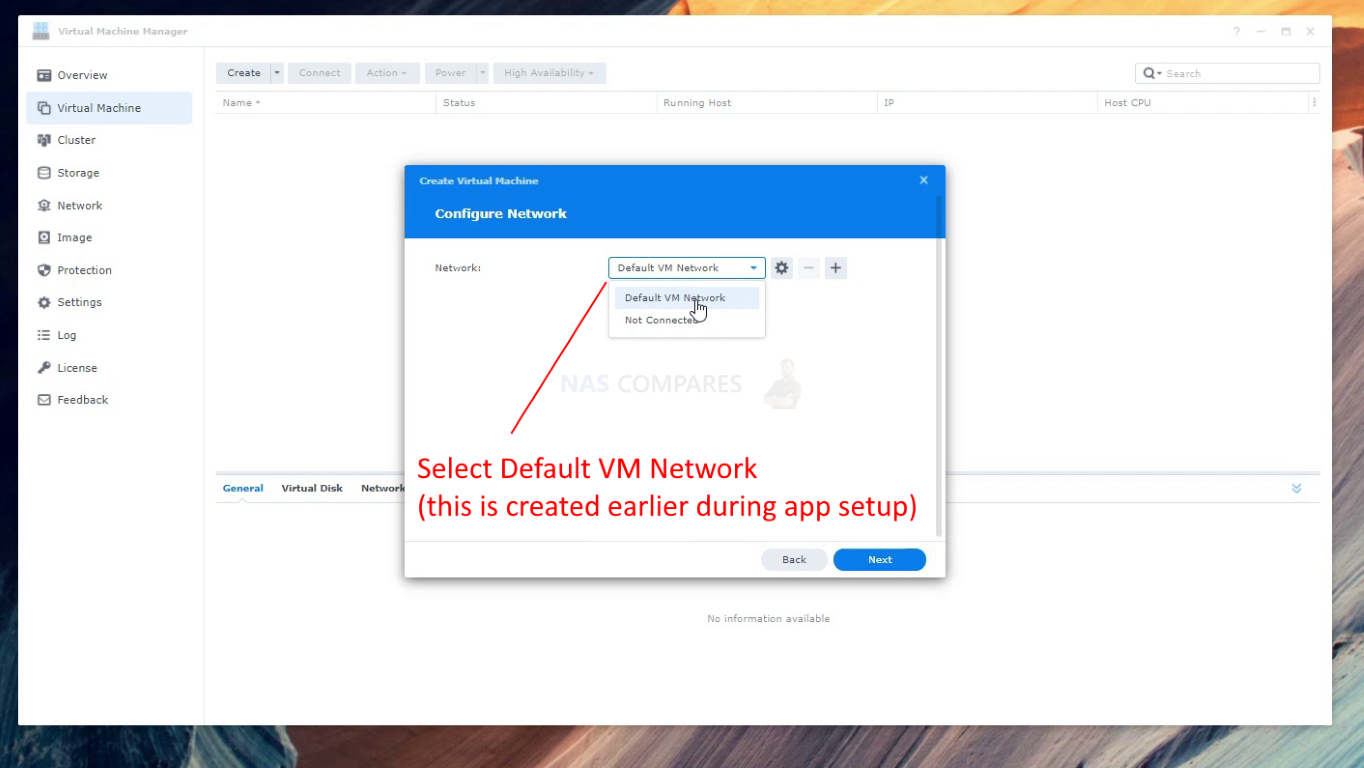
Next, you need to assign the Windows 11 Virtual machine to a network. Synology Virtual Machine Creates a new virtual network when the software is installed, so you can use this or create a new one if you choose.
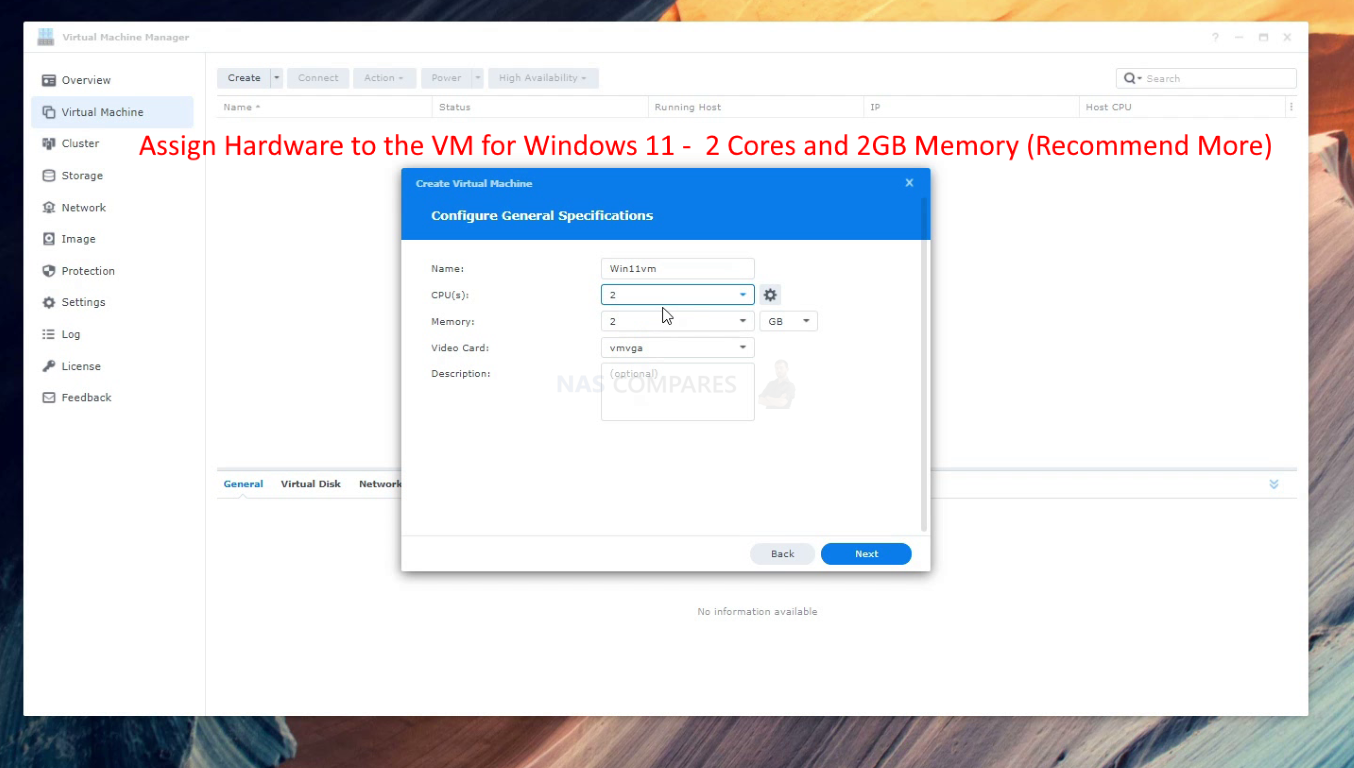
At this point, the virtual machine creation window will appear. You will need to assign CPU cores and Memory amounts to this VM. It is recommended that you dedicate at least 2 cores of your x86 64bit CPU and 2GB of memory, however, Windows 11 will run much, MUCH better if you can assign more hardware to this VM. Just remember that in order for the NAS to run smoothly (and there for the Virtual Machine Manager Hypervisor software to run well), you should leave sufficient CPU/Memory to the NAS.
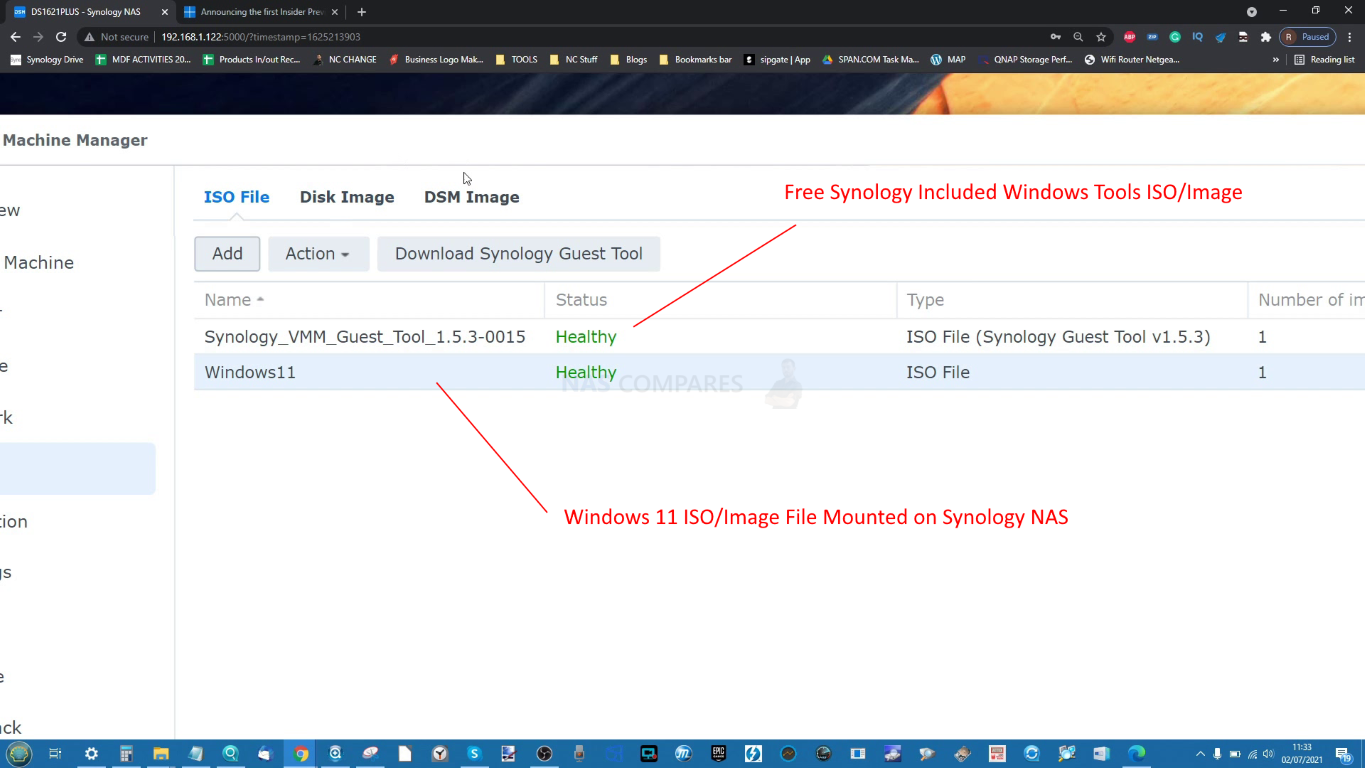
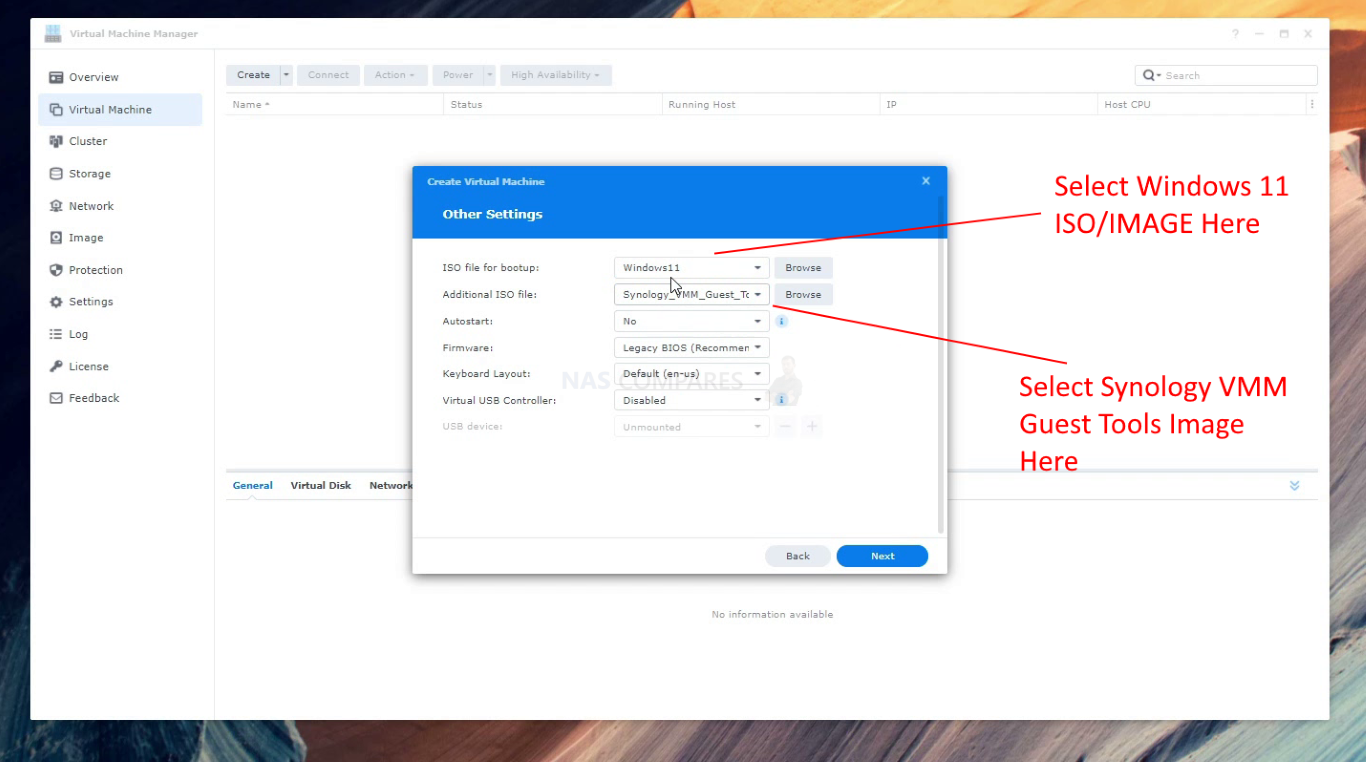
From here you will need to connect the Windows 11 ISO/image you added earlier (should appear in a drop-down) and it is recommended that you use the Synology Windows Guest Driver ISO into the 2nd mounted drive too (as shown). You can also assign USB ports to the VM to allow you to connect devices physically to the NAS and then they will be accessible/visible to the Windows 11 VM.
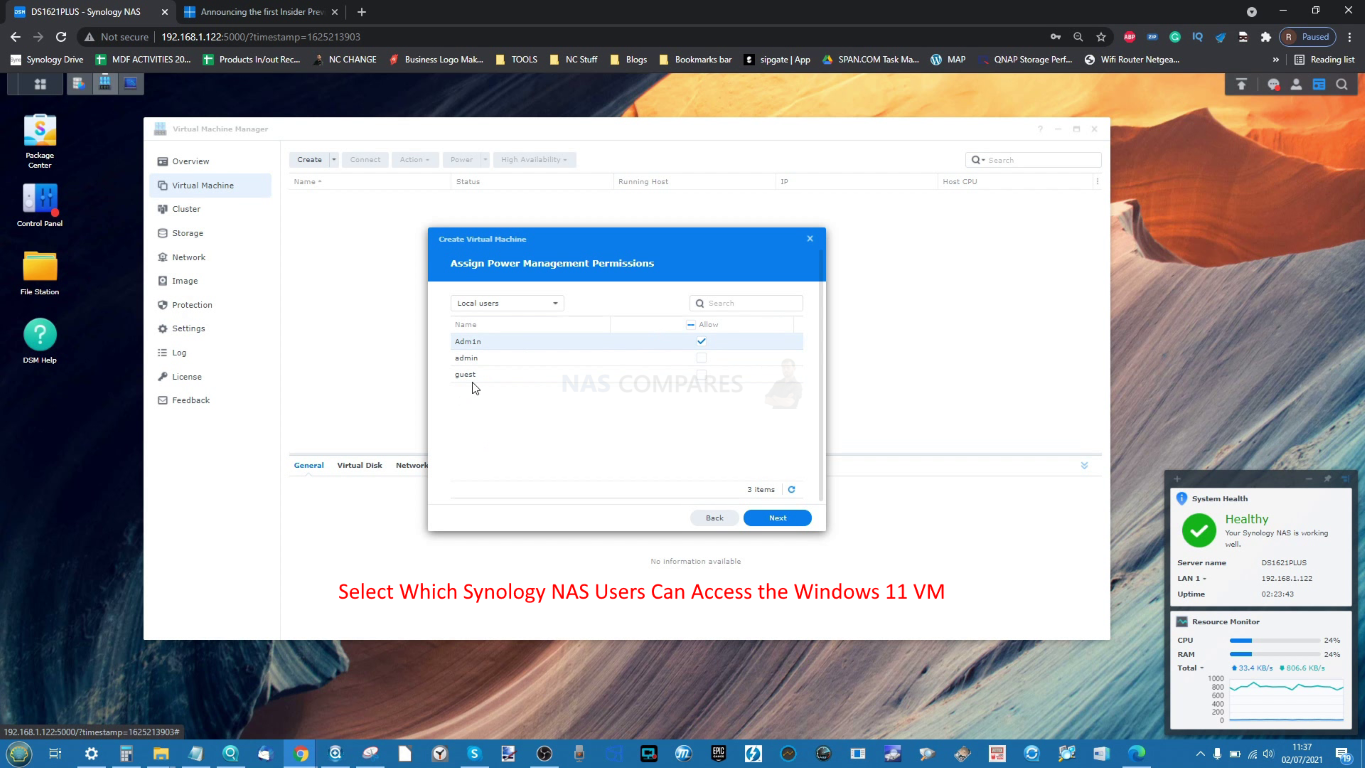
Next you will need to let the Synology NAS know which users can access the Windows 11 VM. A list of the current NAS users/groups will appear and you can put a tick next to the users whose login credentials will allow access to this VM.
Then you need to confirm that the settings are correct, then you can confirm and the Synology Virtual Machine Manager will create the VM with the Windows 11 ISO/Image mounted for the first time setup.

When the Synology Virtual Machine manager displays the VM as available/powered off, you can power it on from the options at the top and connect to it in the web browser

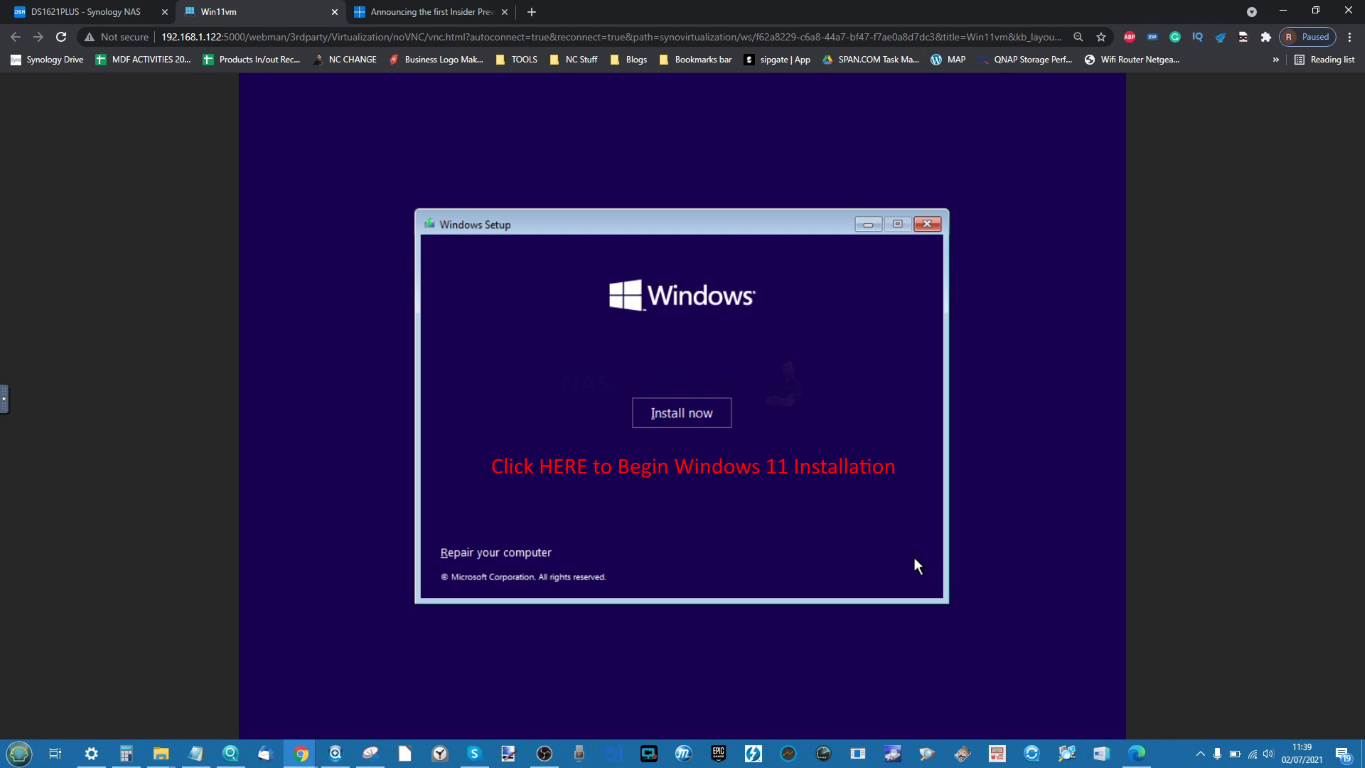
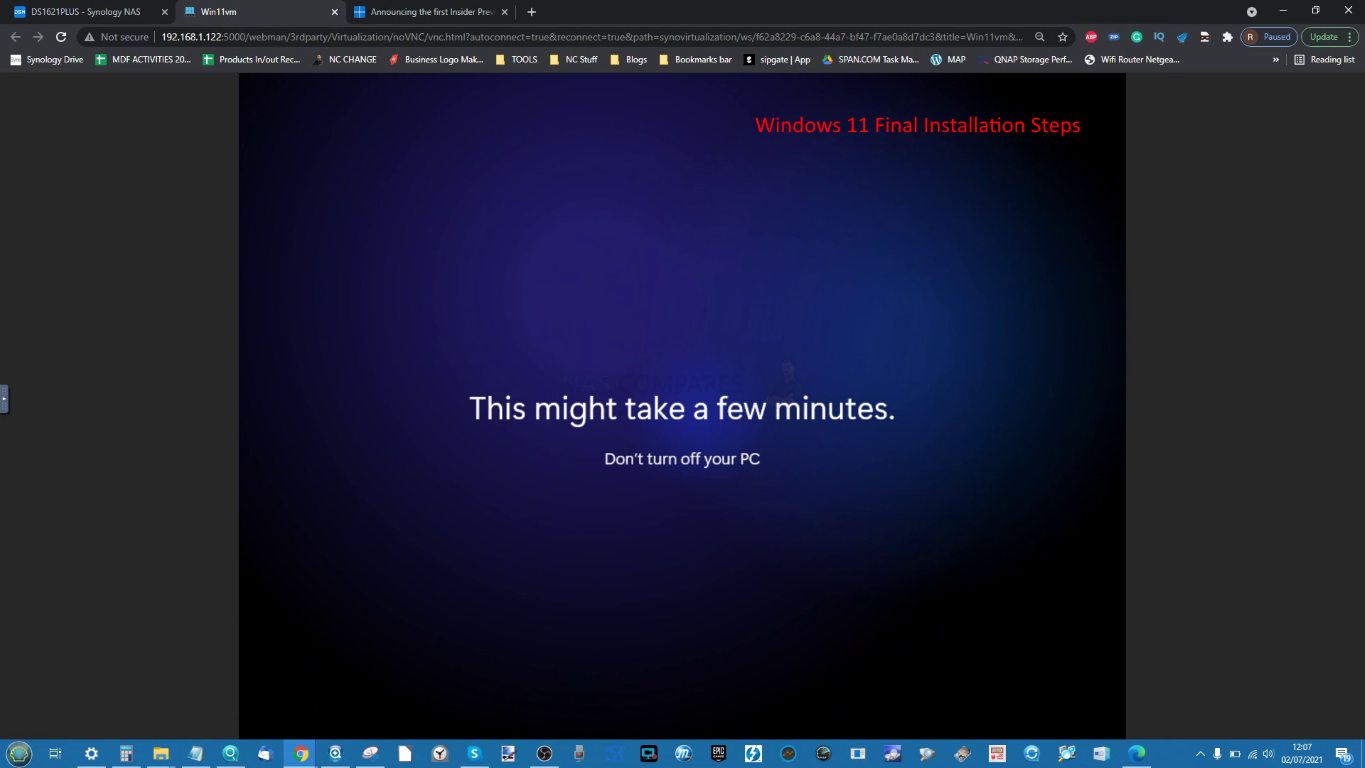
When you connect to the VM at start up, much like a physical PC, the system will read from the mounted ISO/Image (as a normal PC would boot from the DVD drive to check from media) and you will boot straight into the Windows 11 installation screen.
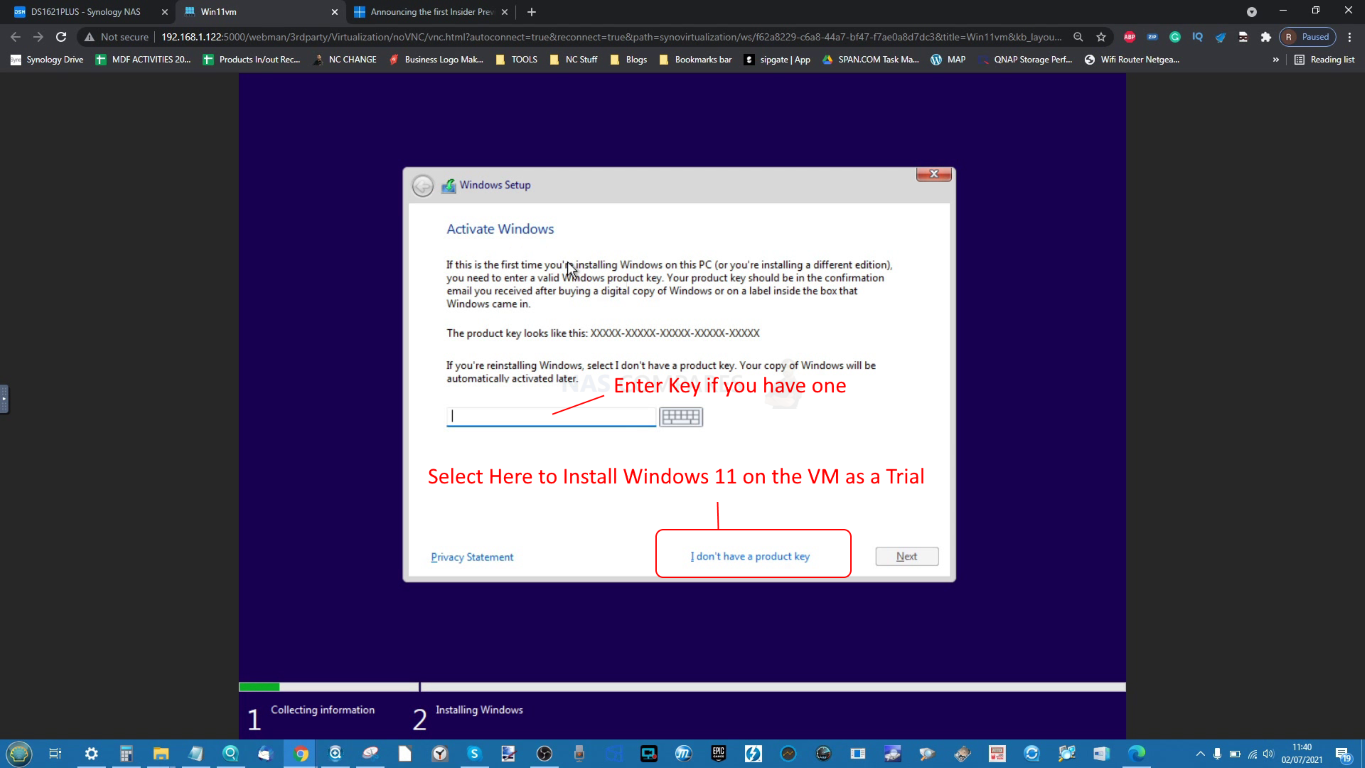
If you are using the Windows 11 ISO/Image and do not have a product key, but still want to test out the Windows 11 system, you can click the option at the bottom to install without a licence.
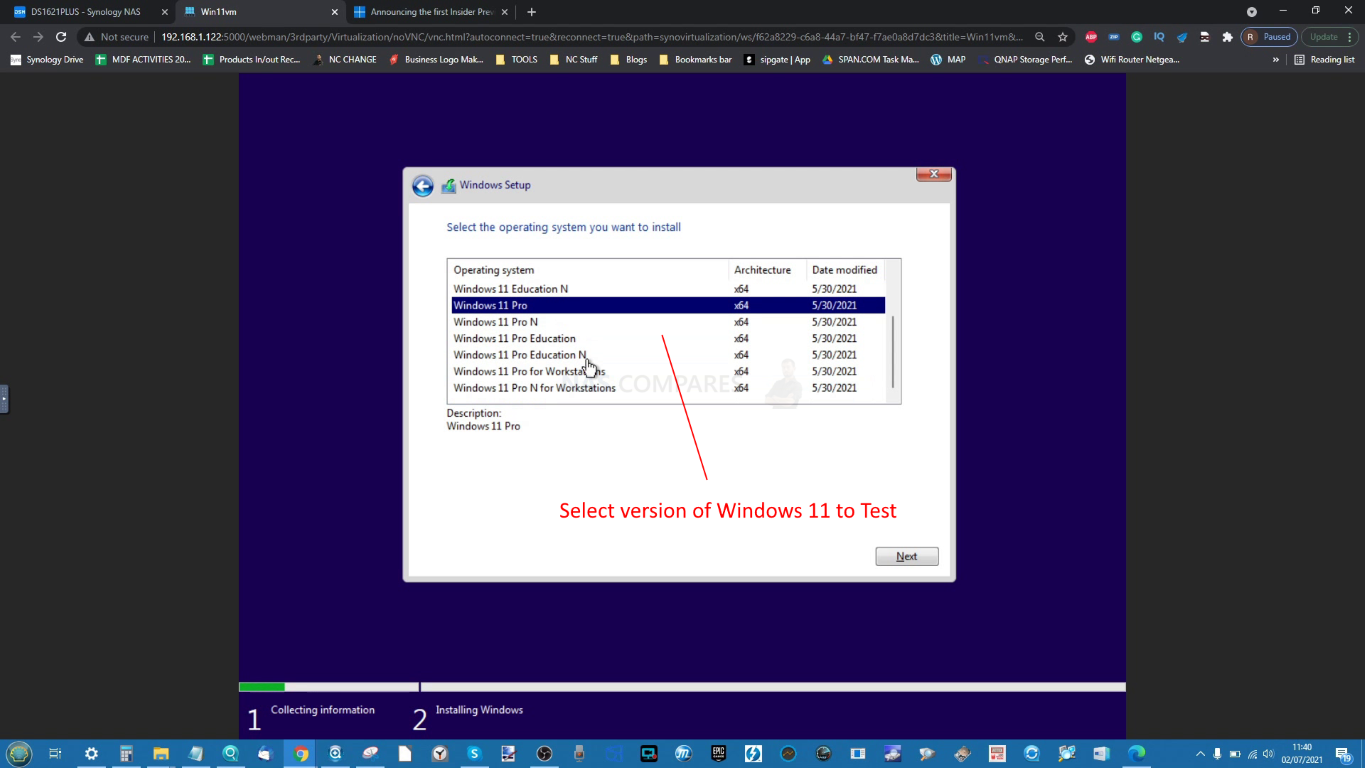
Then just select the version of windows you want to install:
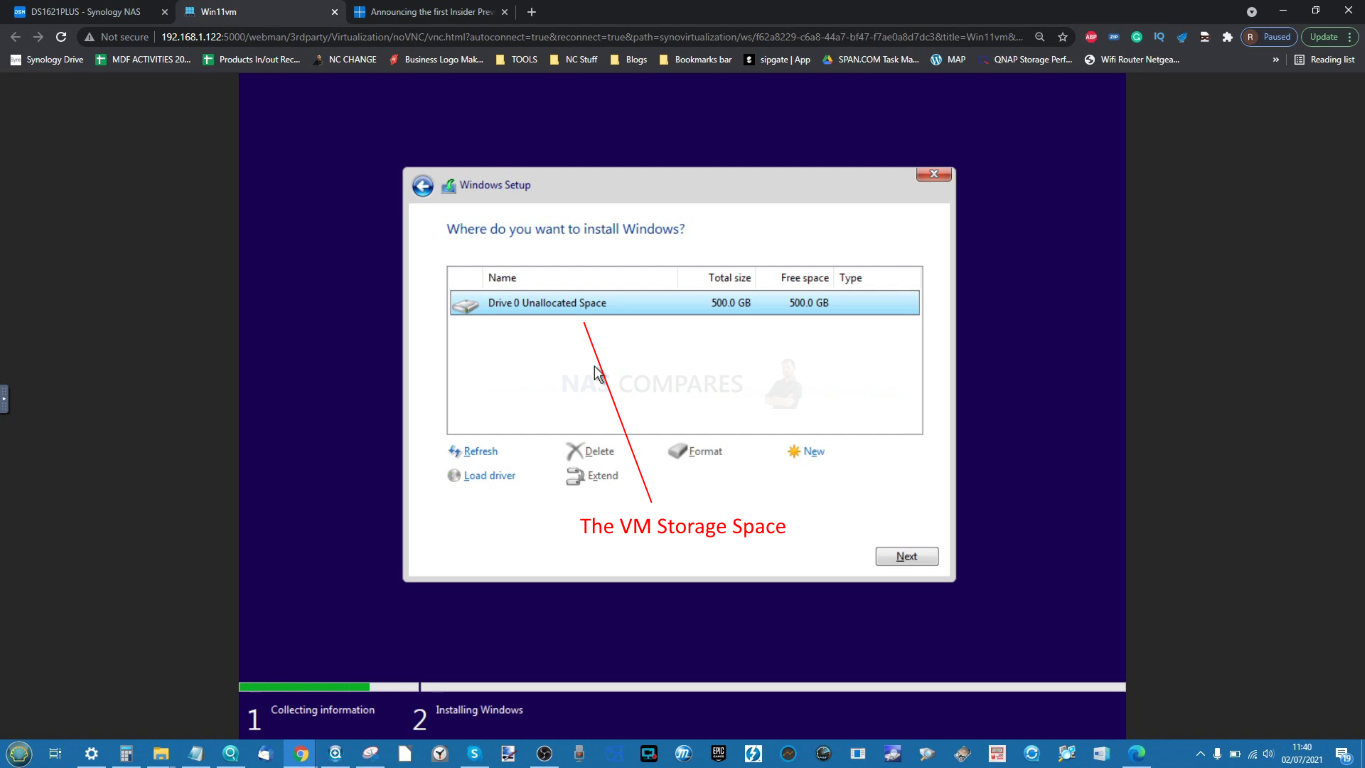
Then the area of storage you created in the VM setup on the Synology NAS will appear and you can select it to install the Windows 11 operating system on to.
From there installation will begin and it will be a relatively fast process, depending on the power of the VM resources you gave it and the speed of the storage media in your Synology NAS

After this, the VM will reboot and then go straight into the Windows 11 Setup tutorial
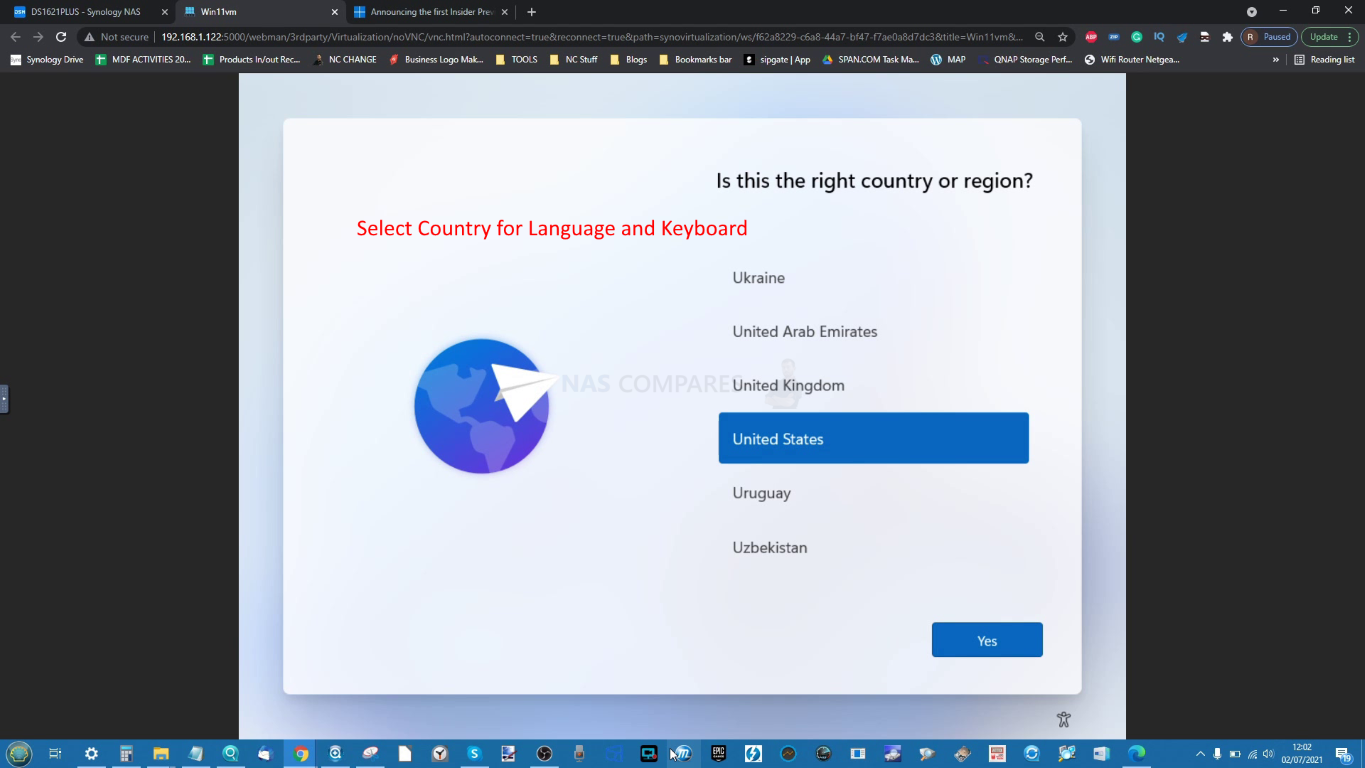
If you do not want to supply your Microsoft associated account details to this VM and Windows 11, you can do it without entering them by clicking the option to sign in another way
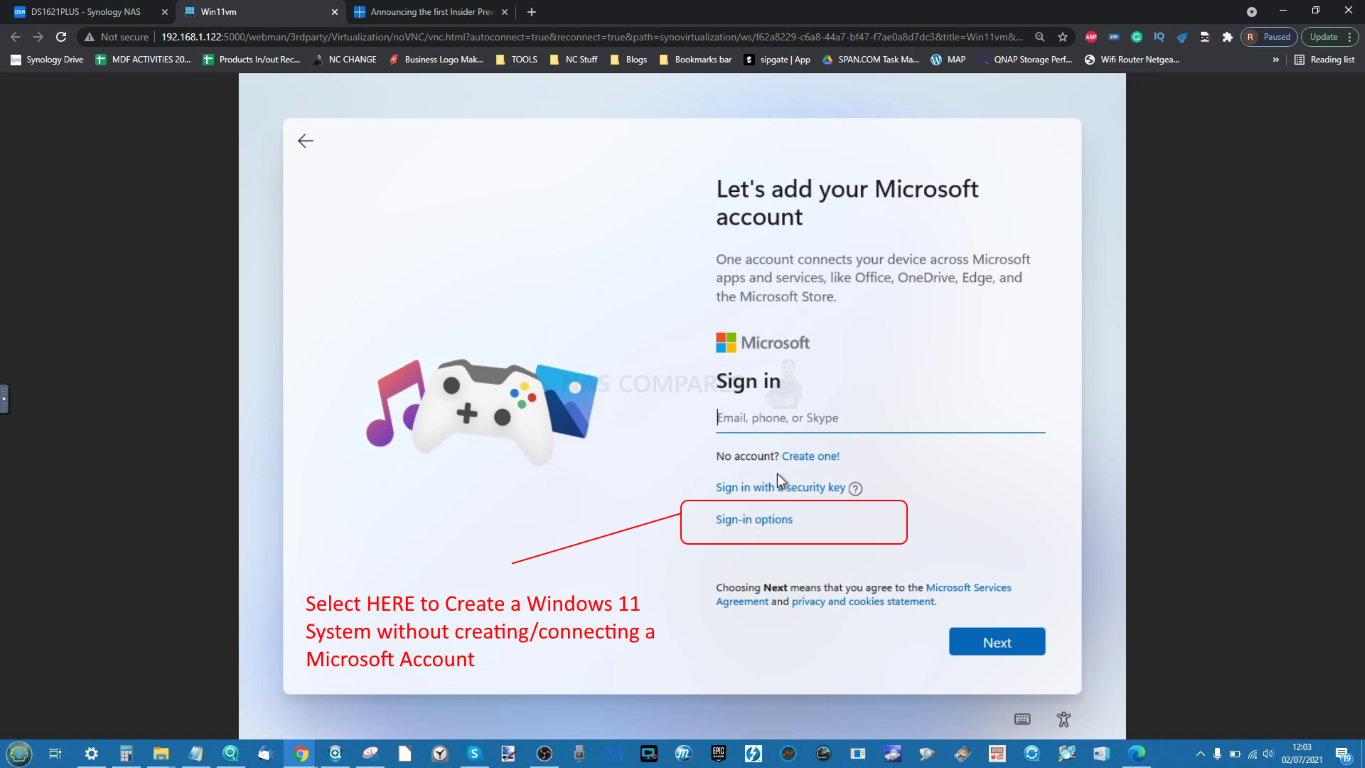
Then clicking the offline option:
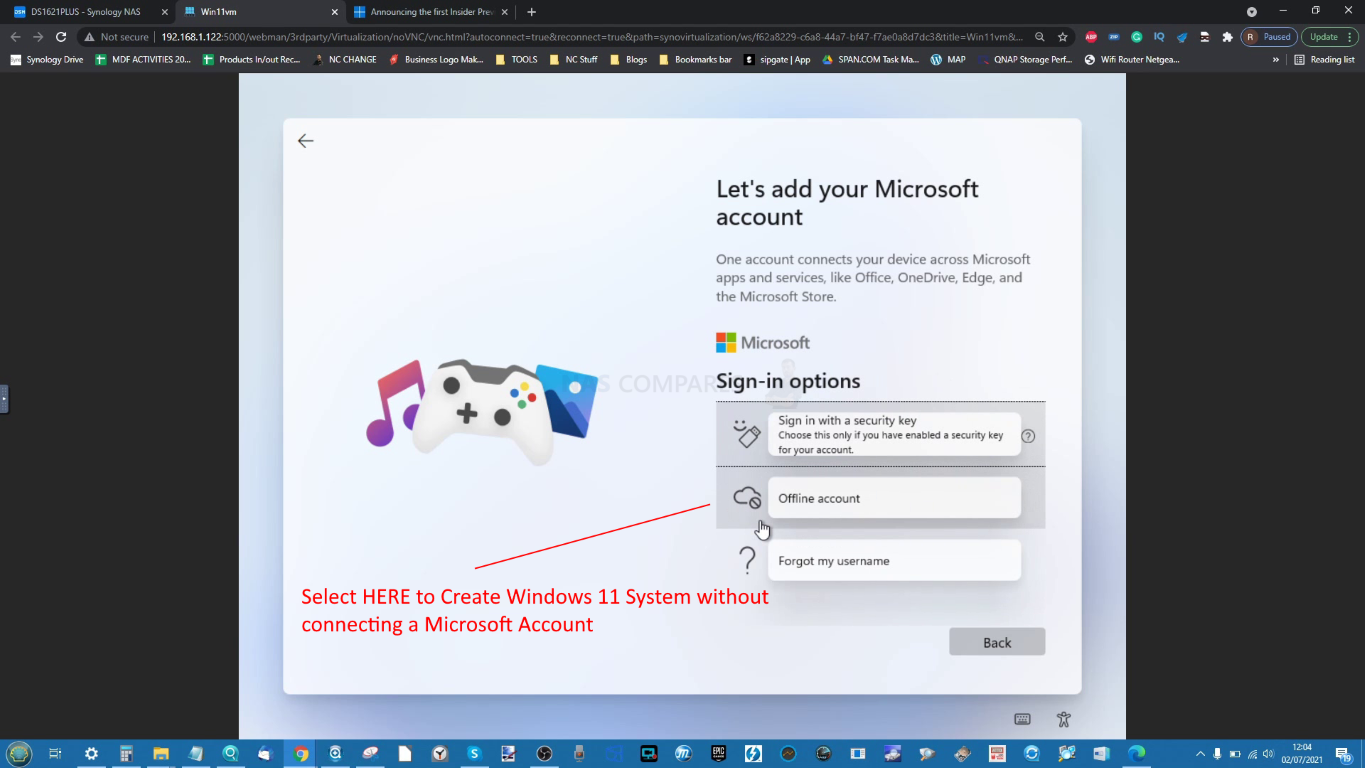
Then just entering local/offline security information. However, do remember that this will limit some features of Windows 11 that require a Microsoft account.
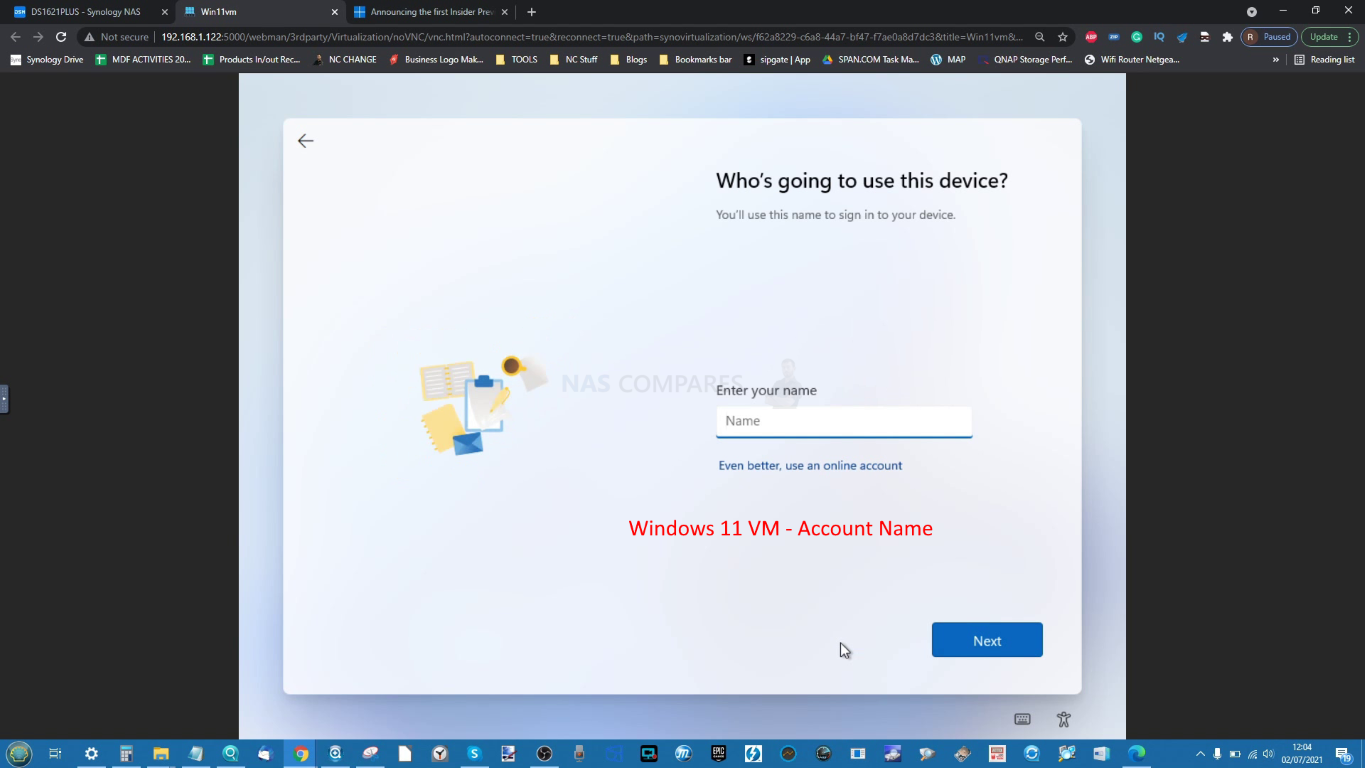
Then you can proceed with the setup and the system will apply the settings you created:
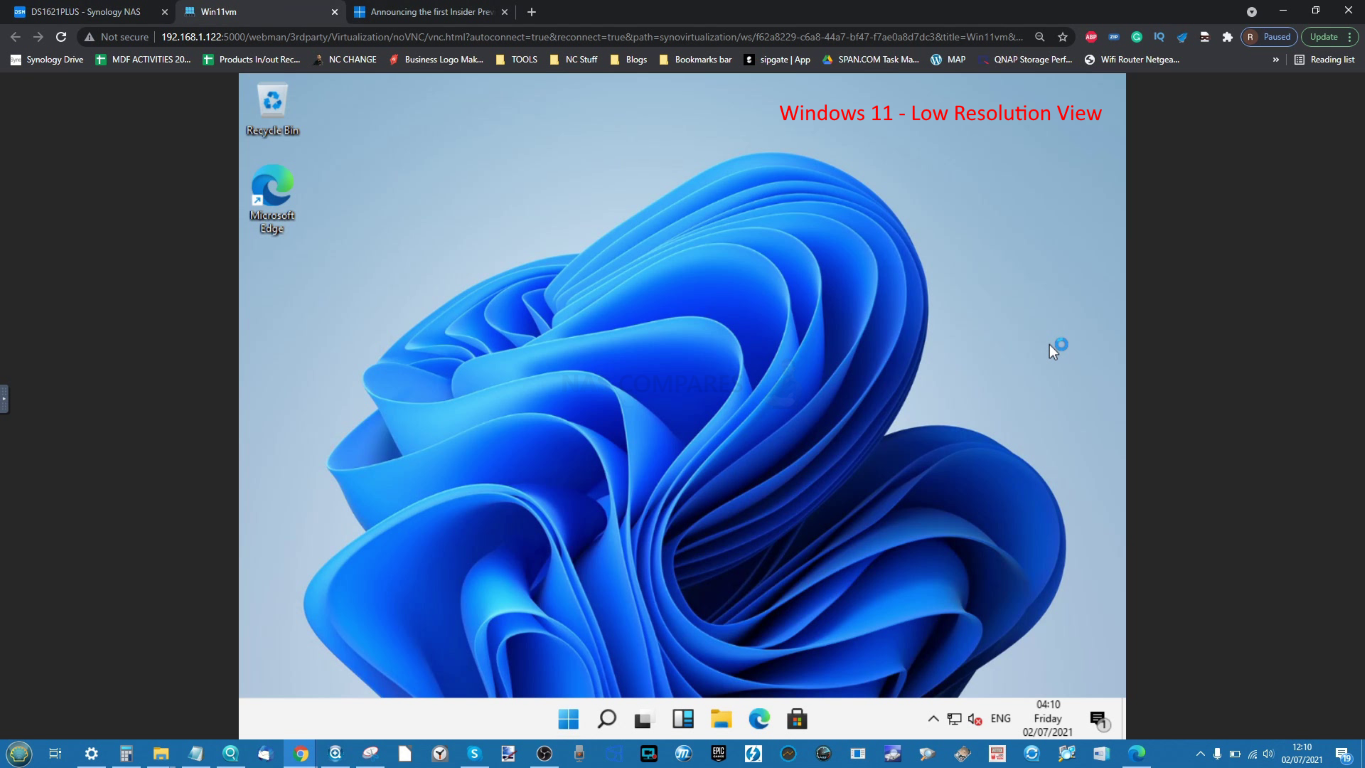
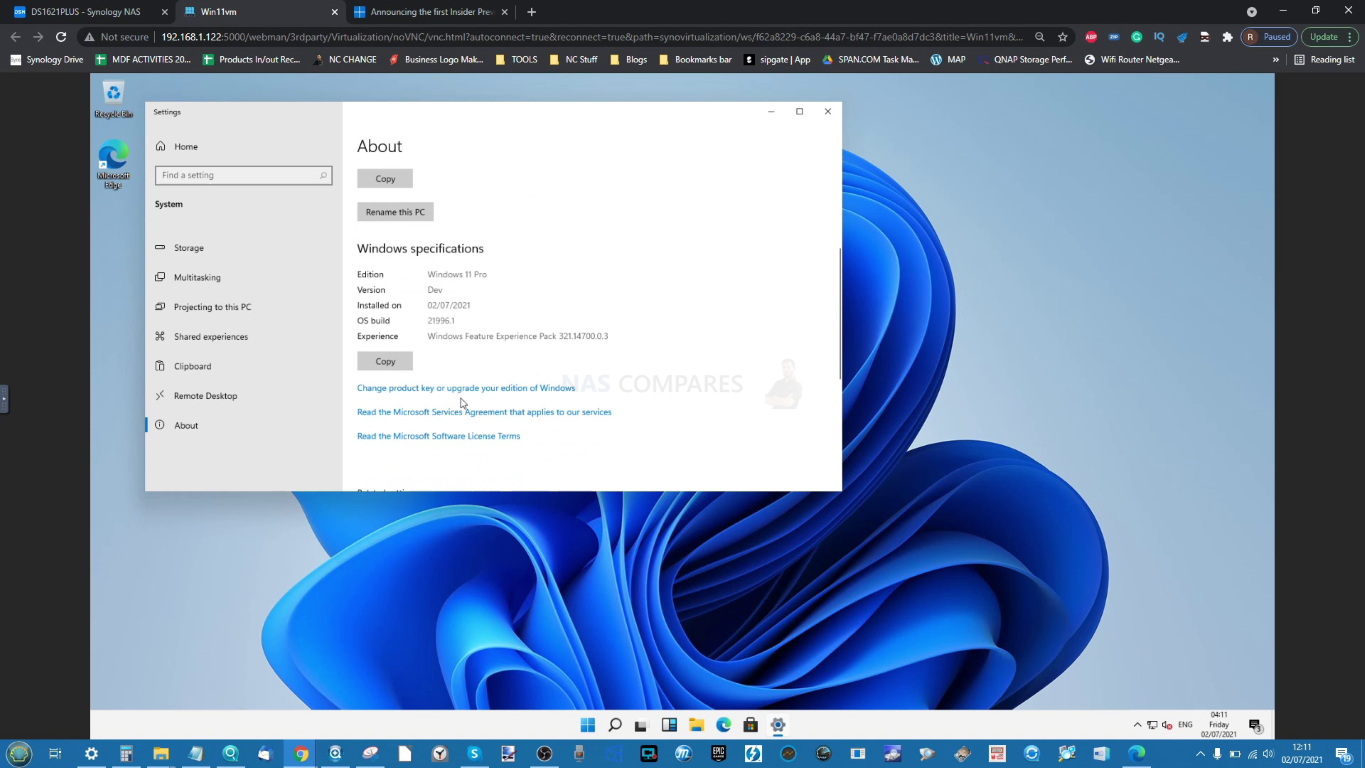
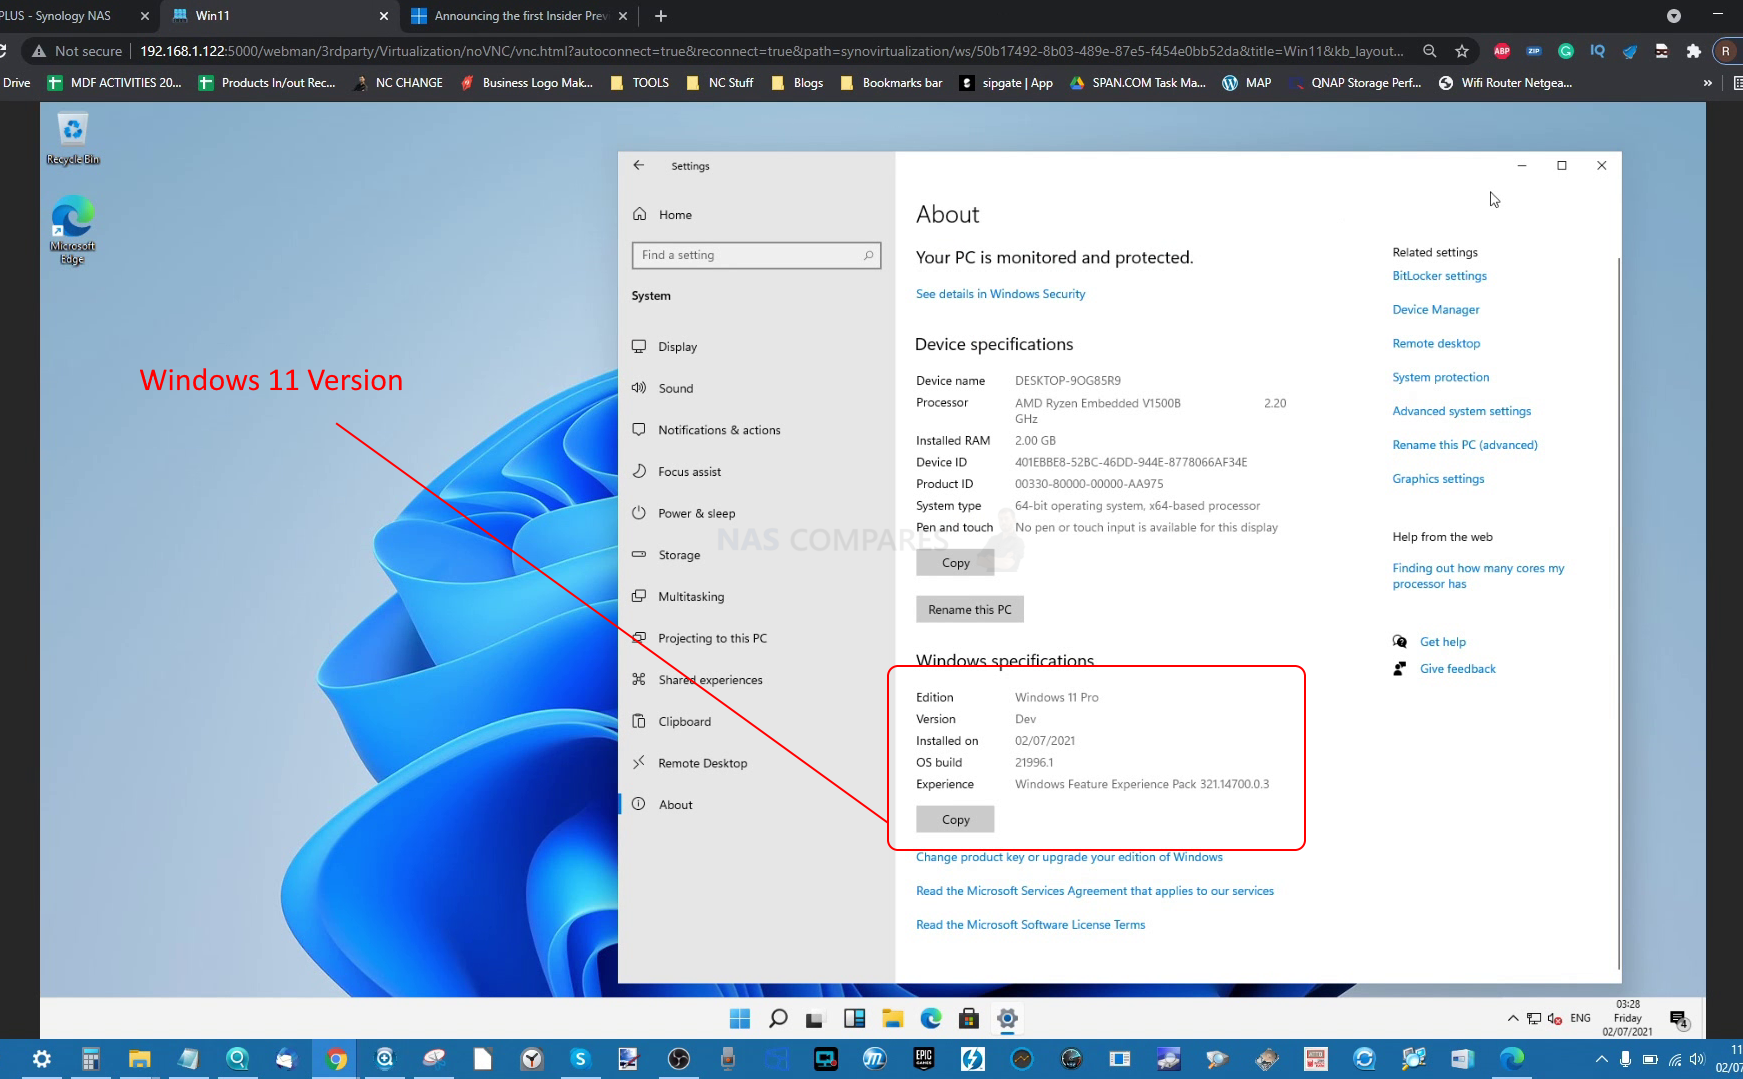
The Windows 11 desktop will then be displayed and you can go ahead and have fun with your new VM
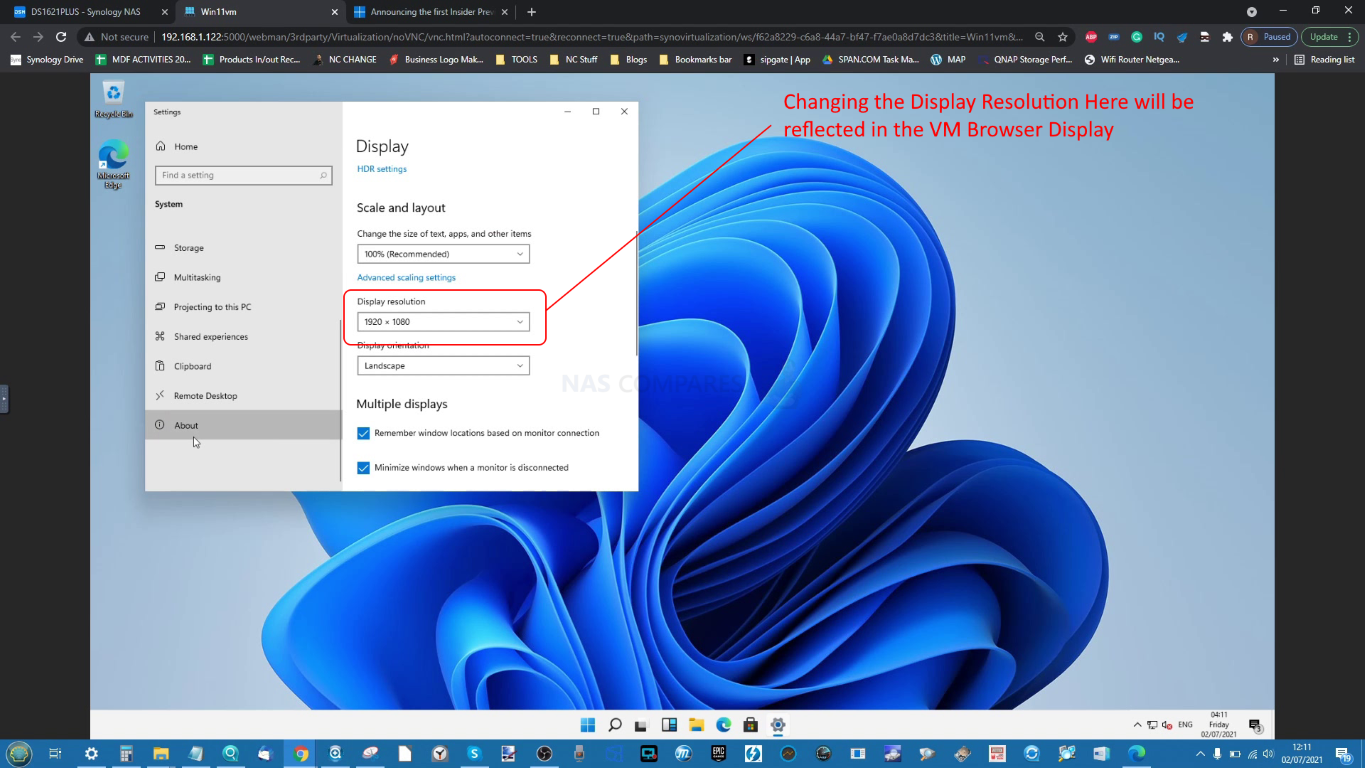
By default, Windows 11 will display via the web browser in a lower resolution (in case it cannot be displayed to users with older tech. But you can change this quickly by right-clicking and selecting display options

Then you can increase the resolution, which will make the screen bigger in your browser VM access too:
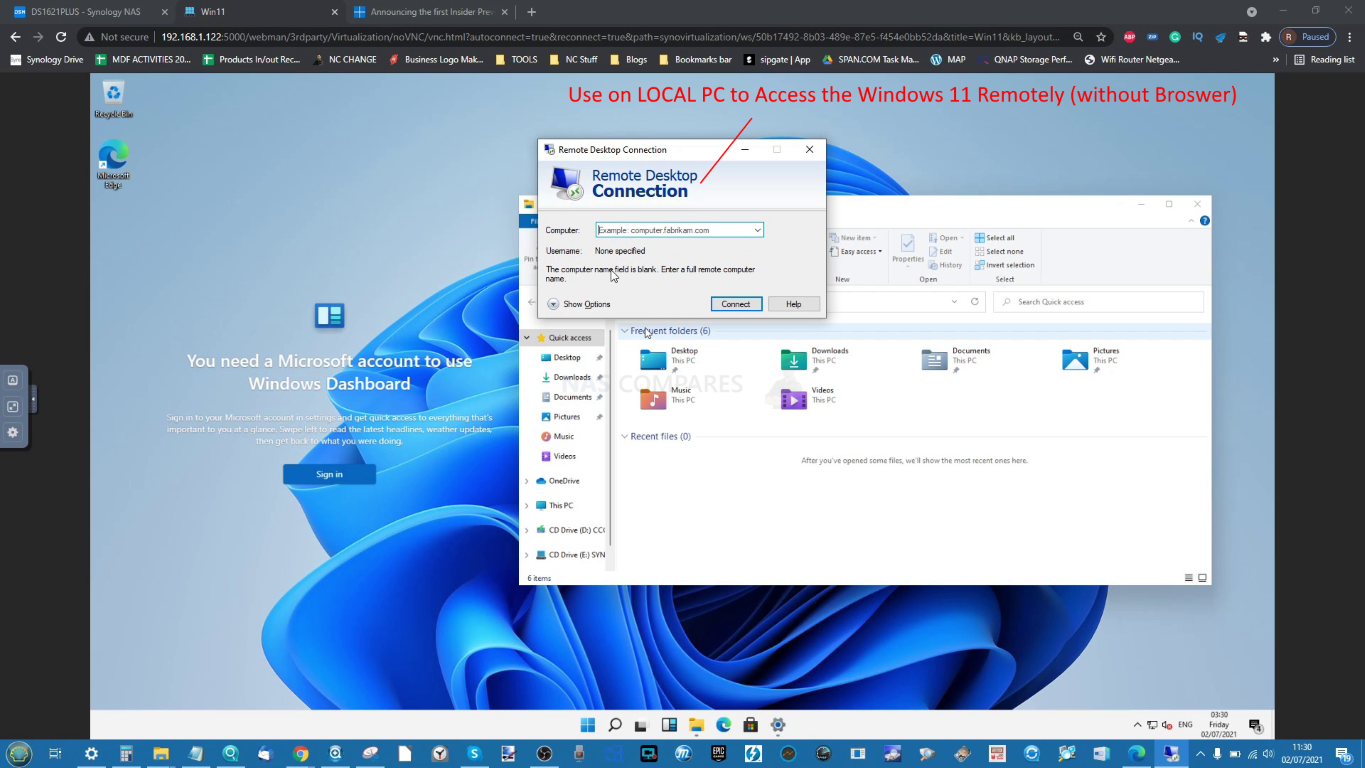
Additionally, if you want to access the VM OUTSIDE of the browser, the best way to do it is with the Remote Connection tool on a local PC:
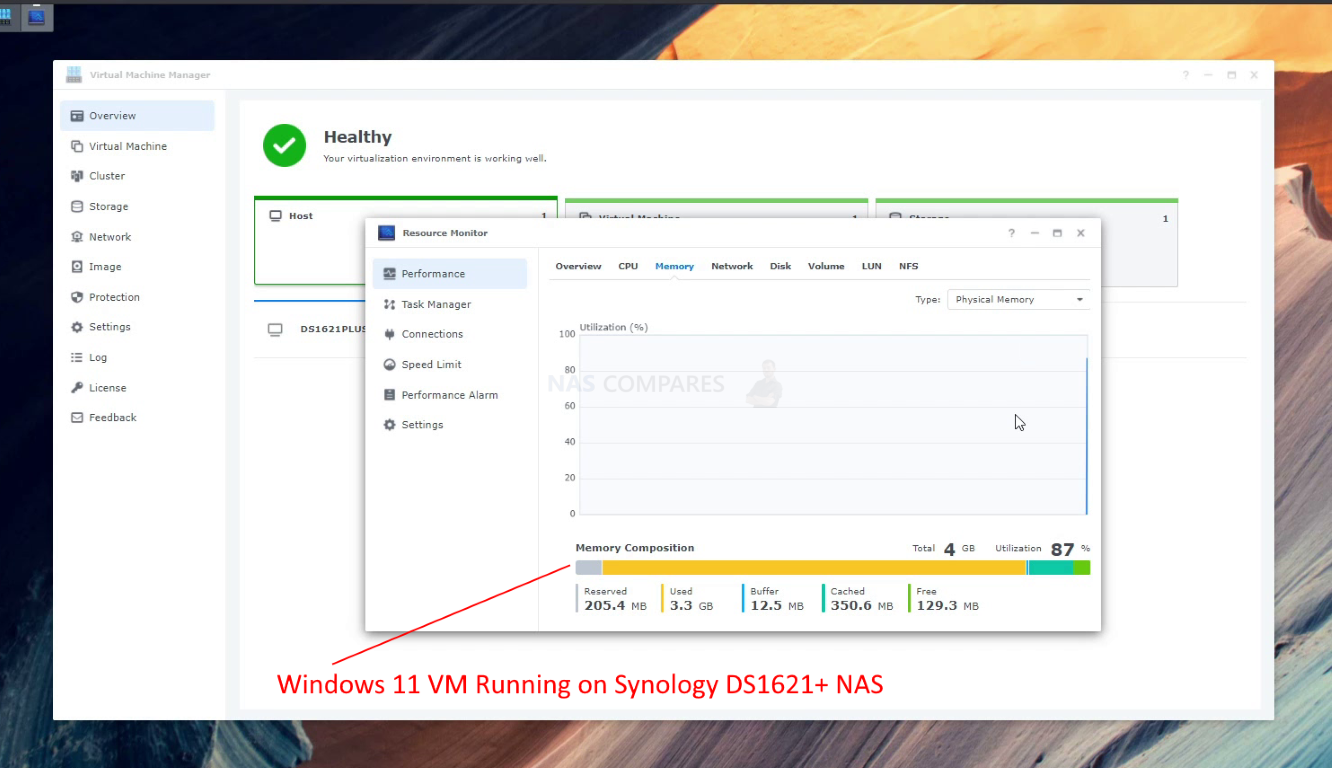
And remember to keep an eye on memory and CPU use on your Synology NAS whilst the Windows 11 Virtual Machine is running
And there you have it. You now have a windows 11 VM on your Synology NAS hypervisor software:
If you have already installed Windows on a brand new computer before, then all of the steps necessary to install Windows are very familiar to you. Even then, you may need a refresher, so use the video below for my guide on how to set up Windows 101on a NAS after the virtual machine and ISO have been created. Although this guide is for Windows 11 on a Synology NAS, the steps for setting up a VM are are remarkably similar to other brands.
And there you have it, you can now test out Windows 11 as a virtual machine on your NAS without fear of it leading to problems on your existing Windows 10 PC. It is worth remembering that this is still a beta of Microsoft’s brand new operating system and therefore you can expect there to be a few hiccups along the way. Additionally, bear in mind that the performance of the VM will also be hinged in a big way on the hardware resources of your NAS and depending on the amount of resources you assigned to the VM ,and therefore the amount of resources you left to your NAS to run in the background will dictate how well Windows 11 will run. So do bear that in mind
📧 SUBSCRIBE TO OUR NEWSLETTER 🔔
🔒 Join Inner Circle
Get an alert every time something gets added to this specific article!
This description contains links to Amazon. These links will take you to some of the products mentioned in today's content. As an Amazon Associate, I earn from qualifying purchases. Visit the NASCompares Deal Finder to find the best place to buy this device in your region, based on Service, Support and Reputation - Just Search for your NAS Drive in the Box Below
Need Advice on Data Storage from an Expert?
Finally, for free advice about your setup, just leave a message in the comments below here at NASCompares.com and we will get back to you. Need Help?
Where possible (and where appropriate) please provide as much information about your requirements, as then I can arrange the best answer and solution to your needs. Do not worry about your e-mail address being required, it will NOT be used in a mailing list and will NOT be used in any way other than to respond to your enquiry.
Need Help?
Where possible (and where appropriate) please provide as much information about your requirements, as then I can arrange the best answer and solution to your needs. Do not worry about your e-mail address being required, it will NOT be used in a mailing list and will NOT be used in any way other than to respond to your enquiry.


|
 |


Best NAS for under $499
Best NAS for Under $250 (2025)
Minisforum N5 Pro NAS - FIRST IMPRESSIONS
HexOS Q2 Update - What's Changed?
5 Exciting NAS Coming Later in 2025
Beelink ME Mini vs GMKtec G9 vs CWWK P6 NAS Comparison
Access content via Patreon or KO-FI

Is this still possible after they locked many methods
REPLY ON YOUTUBE
Why do ppl even wanna try this on synology? Oh, assign 4gb ram to win11? Why bother
REPLY ON YOUTUBE
What about the audio in this windows 11?
REPLY ON YOUTUBE
I did everything the same but I get the error: “This PC can’t run Windows 11” message and I can;’t continue
REPLY ON YOUTUBE
I’m dumb 🙂 I’m playing around with my nas to see what it can do and what I can do to and with it…what can I use win11 on my nas for?
REPLY ON YOUTUBE
I encounter this error when connecting to the wm: “guest has not initialized the display (yet)”. Anyone can help?
REPLY ON YOUTUBE
Can Tiny11 be setup as a VM on a Synology? If so, could you make a tutorial? Thanks
REPLY ON YOUTUBE
Is there a way to create Windows VM on a NVM ssd cache? Or on USB 3.0 Nvm SSD 128GB Drive?
REPLY ON YOUTUBE
windows vms are slow and dont know how to upgrade the video driver, any help
REPLY ON YOUTUBE
Sad to say it seems to no longer work as at least on my DS920+ it says it does not meet the requirements to run windows-11 I am sure the pre-retail versions did not have strict requirements which is why it worked for you,. Lucky for me I still had an old windows10 ISO and used that instead.
REPLY ON YOUTUBE
Can you prepare video on windows 11lite on Synology, the version that you show us very slos
REPLY ON YOUTUBE
Never… ever… apologize for the seagulls !!!
REPLY ON YOUTUBE
Hi there! Great video!! One question… how fast is windows 11 on sinology vmm when compared with windows 10 vmm? Thanks again.
REPLY ON YOUTUBE
Every time I try this, I am met with the message that this PC cant run Windows 11, on a DS920+, any advice?
REPLY ON YOUTUBE
It seems Windows 11 has a hardware check before you can install it. I ran into the same issue with my Synology DS1520+ (8GB RAM). I downloaded the official Microsoft Windows 11 ISO. Ran the installation process and got the same message: “This Pc cant run Windows 11”.
This tutorial below worked for me. It shows you how to add 2 things to the Windows 11 registry to bypass the Windows 11 TPM (hardware check).
Install Windows 11 RTM on a Synology NAS (Virtual Machine Manager), by Tech Me Out
https://www.youtube.com/watch?v=QIXlYIgTdbA
Like mentioned in the video disabling TPM comes with a cost: your not eligible to get any Windows 11 (security) updates anymore. So I’ve heard (not confirmed).
How to install the Audio output device ON a VM?
REPLY ON YOUTUBE
How to install the Audio output device ON a VM?
REPLY ON YOUTUBE
Sorry but I’m totally inexperienced about that.
Why should I want to install a Windows VM on my Synology NAS?
REPLY ON YOUTUBE
@NASCompares Hi bro, I didn’t see in video the TPM mandatory option for Win 11. Does this mean installation is possible without TPM module?
REPLY ON YOUTUBE
We use mostly qnap’s, but do have one or two synology’s. We have migrated some of our Windows file server data storage requirements to a few of the qnap’s due to running out of storage on the windows servers. Do you find the synology or qnap better as a file server replacement? I am integrating AD and the qnap’s seem to be handling it fine, but I must admit I’m losing sleep. It’s odd to move away from the Windows servers, but the NAS solution is just easy and I can update / reboot domain controllers and servers without affecting data access. Would love to hear your thoughts and see a video on setting them up as file servers.
REPLY ON YOUTUBE
First? And thanks this is something I need to do
REPLY ON YOUTUBE