

Perfect Setup for your Storage Space, Volumes and RAID
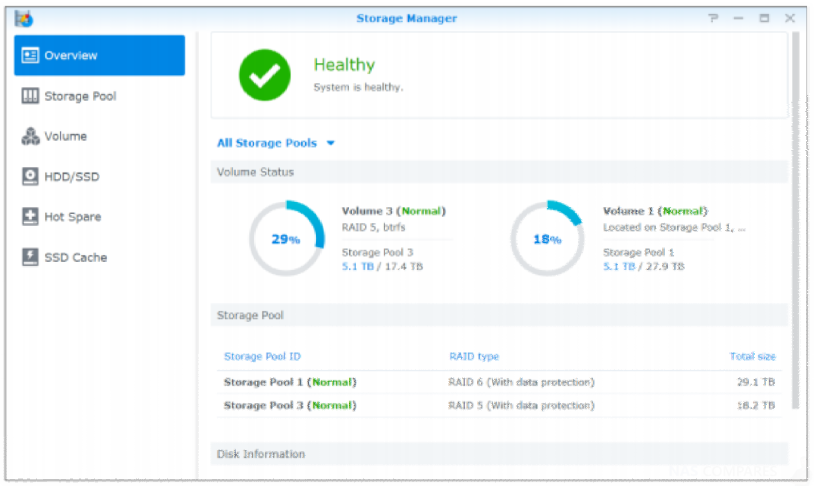
Before taking advantage of the various features of your Synology NAS, you need to set up at least one storage space. This chapter explains how Storage Manager can help you manage different types of RAID and non-RAID storage spaces such as storage pools and volumes, as well as view the status of installed drives. For more detailed instructions, please see DSM Help.
Synology NAS – Storage Pools and Volumes
A volume is the basic storage space on your Synology NAS and is constructed on a storage pool. Before creating a volume, you need to create a storage pool first.1 For Synology NAS models supporting the quick creation mode, you can create a volume and a storage pool at the same time and the Volume Creation Wizard will automatically optimize storage capacity and performance.2 For detailed instructions, please see DSM Help.
Create Storage Pools on Synology NAS
Go to Storage Manager > Storage Pool and click Create to choose either of the following storage pool types. For detailed instructions, please see DSM Help

Create Volumes on Models with Quick Creation Mode on Synology NAS
For Synology NAS models supporting the quick creation mode, you can create both a volume and a storage pool at the same time. Go to Storage Manager > Volume and click Create. Then choose either of the following methods:

Create Volumes on Other Models on Synology NAS
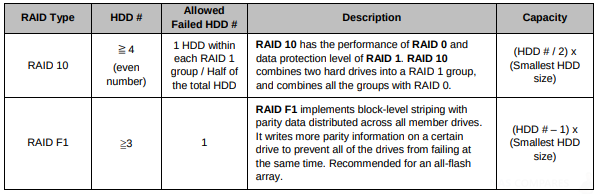
Make sure your Synology NAS has an existing storage pool with allocatable space. Go to Storage Manager > Volume and click Create. For detailed instructions, please see DSM Help. RAID Types Depending on your model and number of installed hard drives, the following RAID types can be implemented when creating custom storage pools.

Repair Storage Pools on Synology NAS
The repair function is available for RAID 1, RAID 10, RAID 5, RAID 6, RAID F1, and SHR storage pools. Depending on your RAID types, when one of the hard drives in the storage pool fails, the status of the storage pool will change to degraded. You can repair the storage pool by replacing crashed drives to keep the data on the storage pool protected. For more detailed instructions, please see DSM Help.
Change RAID Type on Synology NAS
The RAID types of existing storage pools can be changed without losing existing data, allowing you to easily and
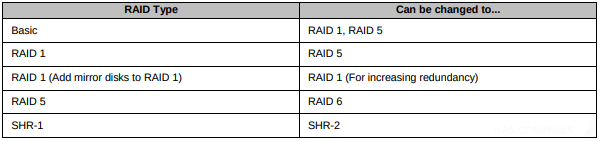
economically manage storage capacity. For example, you can create a RAID 1 volume on your Synology NAS, and later change to RAID 5 if you install more hard drives. The sections below provide basic information regarding changing RAID types. For more detailed instructions, please see DSM Help.
Supported RAID Types on Synology NAS
RAID types can be changed as follows.
Hard Drive Requirements for RAID on Synology NAS
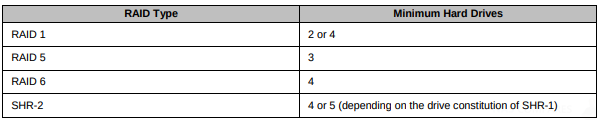
In order to change the RAID type of a storage pool, there must be a sufficient number of available hard drives installed in your Synology NAS. Please see below for the minimum number of hard drives required for each RAID type.
Expand Volumes and Storage Pools on Synology NAS
The storage capacity of volumes and storage pools can be gradually expanded by installing more or larger hard drives. This feature allows you to expand the capacity of your volume and storage pool according to your budget and with no need to worry about losing any existing data. The sections below provide basic information regarding expanding volumes and storage pools. For more detailed instructions, please see DSM Help.
Expand a Volume on a Synology NAS
For a volume created on a storage pool with multiple volume support (higher flexibility), if the underlying storage pool has enough capacity, you can expand the volume directly by changing its size. For a volume created on a storage pool without multiple volume support, you need to expand the underlying storage pool first. For more detailed instructions, please see DSM Help.
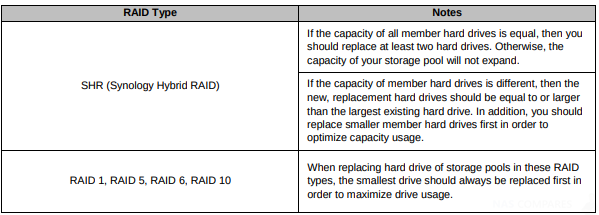
Expand a Storage Pool by Replacing Drives on Synology NAS
For SHR, RAID 1, RAID 5, RAID 6, RAID 10, and RAID F1, the storage capacity of storage pools can be expanded by replacing smaller hard drives with larger ones. When expanding storage capacity with this method, please carefully replace each hard drive one-by-one. After replacing one hard drive, the storage pool must be repaired before the next hard drive is replaced. For more detailed instructions, please see DSM Help. Please see the following table to see which hard drive should be replaced first.
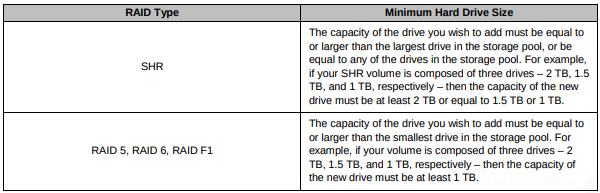
Expand a Storage Pool by Adding Drives on Synology NAS
For SHR, JBOD, RAID 5, RAID 6, and RAID F1, the storage capacity of storage pools can be expanded by adding more hard drives if there are empty hard drive bays in your Synology NAS. For more detailed instructions, please see DSM Help. Please see the following table regarding the minimum size of new hard drives.
RAID/File System Scrubbing on Synology NAS
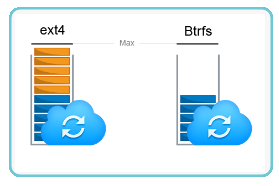
RAID/file system scrubbing is a data maintenance function that inspects storage pools and repairs any detected data inconsistencies. RAID scrubbing can be used with storage pools that implement SHR (comprised of three or more drives), RAID 5, RAID 6, or RAID F1. File system scrubbing can be used with volumes in Btrfs file system. We recommend regularly performing RAID/file system scrubbing in order to maintain data consistency and avoid losing any critical data in the event of drive failure. For detailed instructions, please see DSM Help.
SSD TRIM on Synology NAS Storage
If a volume consists entirely of SSDs (Solid State Drives), we recommend enabling SSD TRIM. This feature optimizes the read and write performance of volumes created on SSDs, increasing efficiency as well as extending the lifetime of your SSDs. Before trying to set up SSD TRIM, please see DSM Help for detailed instructions and more limitations.
Note:
– SSD TRIM is only available on certain Synology NAS models and RAID types.
– Some SSD models are not able to perform SSD TRIM on RAID 5 and RAID 6 volumes.
Manage Hard Drives on Synology NAS
The HDD/SSD tab allows you to monitor the status of the hard drives installed in your Synology NAS, providing options to manage and analyze hard drive performance and health. To see this tab, go to Storage Manager and click HDD/SSD.
Enabling Write Cache Support on Synology NAS
Enabling write cache support enhances the performance of your Synology NAS. Only certain hard drive models support this feature. To ensure data protection while using write cache support, usage of a UPS device is strongly recommended. We also suggest the system be shut down properly every time after use. Disabling write cache will reduce the chances of data loss caused by abnormal power outages, but system performance will decline.
Running S.M.A.R.T. Tests on Synology NAS
Drive S.M.A.R.T. tests examine and report the status of your hard drive, alerting you to possible drive failures. We recommend promptly changing your drive if any errors are detected. S.M.A.R.T. tests can also be scheduled to run automatically by creating tasks.
Checking Drive Info on Synology NAS
At Storage Manager > HDD/SSD > HDD/SSD, click on the down arrow next to the name of a hard drive to view the hard drive’s model name, serial number, firmware version, and total size.
SSD Cache on Synology NAS
SSD cache drives can be installed and mounted in a read-only (RAID 0) or read-write (RAID 1, RAID 5, RAID 6) configuration to boost the read/write speed of a volume. You can create a cache and view related information at Storage Manager > SSD Cache.
Manage External Drives on Synology NAS
External USB or eSATA drives can be attached to the USB or eSATA port of your Synology NAS for backup or file sharing purposes.
Go to Control Panel > External Devices to manage attached external drives or setup printers.
The External Devices tab provides options to view device information, change formats, or eject the device. The Printer tab provides options to setup USB or network printers. For more detailed instructions, please see DSM Help.
📧 SUBSCRIBE TO OUR NEWSLETTER 🔔🔒 Join Inner Circle
Get an alert every time something gets added to this specific article!
This description contains links to Amazon. These links will take you to some of the products mentioned in today's content. As an Amazon Associate, I earn from qualifying purchases. Visit the NASCompares Deal Finder to find the best place to buy this device in your region, based on Service, Support and Reputation - Just Search for your NAS Drive in the Box Below
Need Advice on Data Storage from an Expert?
Finally, for free advice about your setup, just leave a message in the comments below here at NASCompares.com and we will get back to you. Need Help?
Where possible (and where appropriate) please provide as much information about your requirements, as then I can arrange the best answer and solution to your needs. Do not worry about your e-mail address being required, it will NOT be used in a mailing list and will NOT be used in any way other than to respond to your enquiry.
Need Help?
Where possible (and where appropriate) please provide as much information about your requirements, as then I can arrange the best answer and solution to your needs. Do not worry about your e-mail address being required, it will NOT be used in a mailing list and will NOT be used in any way other than to respond to your enquiry.


|
 |


Minisforum N5 Pro NAS - Should You Buy?
UGREEN DH4300 & DH2300 NAS Revealed - Good Value?
Aoostar WTR Max NAS - Should You Buy?
Xyber Hydra N150 NAS Review - Is This COOL?
Minisforum N5 Pro vs Aoostar WTR Max - The BIG Showdown
Do MORE with Your M.2 Slots - GREAT M.2 Adapters!
Access content via Patreon or KO-FI
I have a Synology DS1817, and have it configured in SHR2 with all bays being utilized. There is 40TB worth of drives installed – giving me a storage pool of 25.44TB in this configuration. However a volume on this storage pool is limited to 16TB, as noted on Synology’s website: https://www.synology.com/en-global/knowledgebase/DSM/tutorial/Storage/Why_does_my_Synology_NAS_have_a_single_volume_size_limitation
I would love for this guide to address what the proper way to utilize the full capacity of the storage pool when it exceeds 16TB. I recently ran out of space on my first and only volume, and am wondering if the only way to create more space using the drives currently installed is to create a 2nd volume?