Synology DS1019+ NAS Guide to Safe Backups
With the release of the already hugely popular DS1019+ NAS Drive from Synology, it is worth highlighting that is one of the most proficient and powerful network storage devices for home and small business users of 2019. Despite this popularity, for many users, the Synology DS1019+ diskstation is likely to be their first real experience of a NAS drive and despite its similarity to a desktop computer, the setup and use of a Synology NAS and DSM (diskstation manager) may be a little intimidating. Fear not, as it’s actually really user-friendly and I’ve created a whole bunch of guides to help you get to grips with your new piece of hardware. This guide is to help you get the most from your new NAS drive.
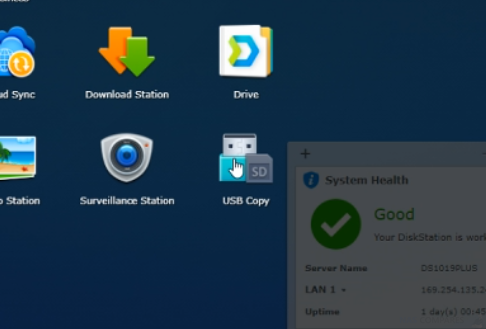
DS1019+ NAS – USB Backup
Although the DS1019+ NAS drive has a fantastic array of RAID options available to protect you from hard drive failure, it is always worth remembering that RAID is not a backup, It is a safety net! If you backup numerous devices to a NAS periodically, then delete data from your phone, laptop, PC or more to save space, this makes the files on your DS1019+ NAS drive the ONLY copies of those files! In order to truly have a backup, you need the contents of your NAS or at least the files that matter, stored on another location. Synology and DSM have addressed this concern in a number of ways and you may have noticed the multiple USB ports in your DS1019+.
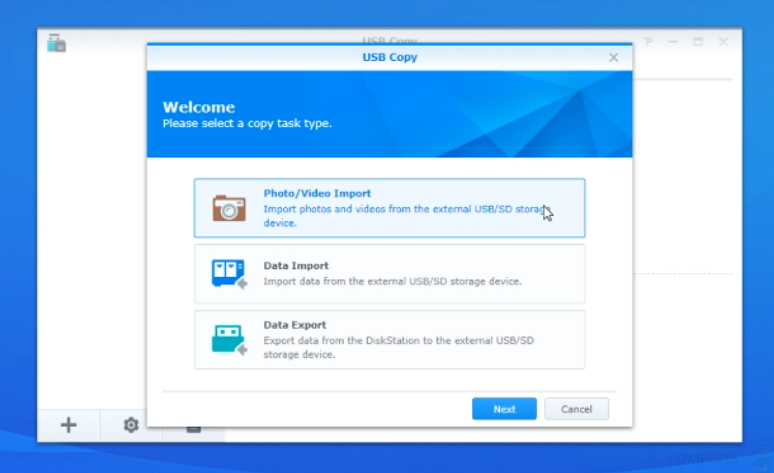
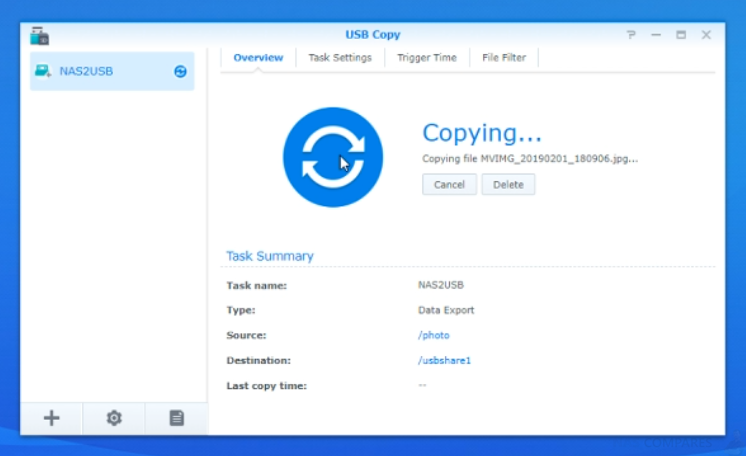
These allow you to connect USB storage and then let you backup either the entire contents of the NAS (If your external USB drive has enough capacity) or just individually selected files. Alternatively, you can back up the contents of regularly used USB storage drives to the NAS, with regular backups in individual directories, or just back up changed files (a diff backup). Most interestingly of all, this can be done manually via the DSM user interface, or automatically when a USB drive is connected.
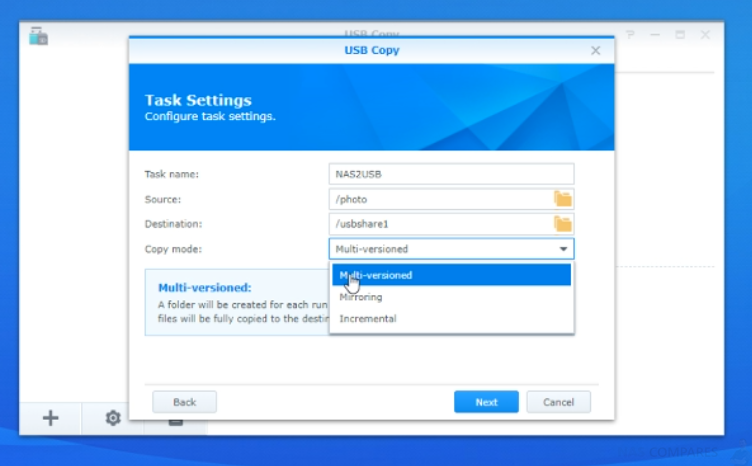
You can go to Control Panel, then External Devices to specify a shared folder for use with USBCopy or SDCopy, and then use the Copy button on the front panel of your Synology NAS to copy data from a USB device or SD card to the shared folder.
DS1019+ NAS – Cloud Migration
Another popular form of backup for the DS1019+ Synology NAS is by using 3rd party cloud services, such as DropBox, Google Drive and BackBlaze. Although a NAS is a private cloud server, it can still be connected for two way communication and migration with supported cloud servers with ‘cloud sync’. This means that you can back up the contents of your NAS (encrypted if you prefer) to a cloud provider and have an off-site backup. Alternatively, you can backup multiple cloud service accounts periodically to the DS1019+ NAS drive instead. A multi-tiered backup plan made up of a NAS, a USB drive and an off-site cloud backup is a fantastic setup if you can afford it
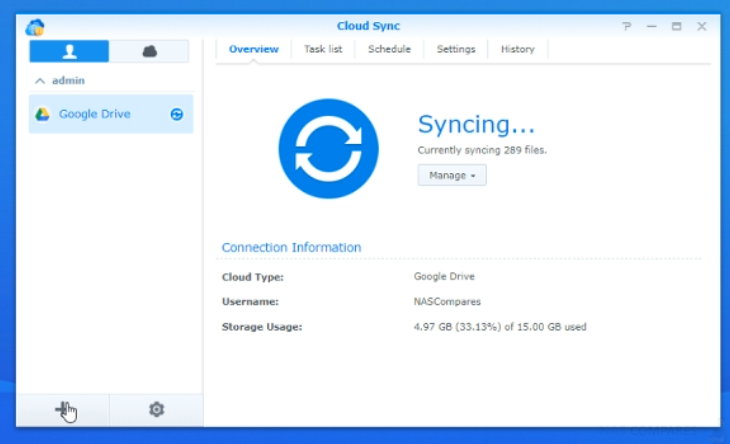
Cloud Sync enables you to seamlessly connect your local Synology NAS to public cloud services or on-premise storage through Amazon S3 API, OpenStack Swift, or WebDAV protocols. With Cloud Sync, you can enhance the collaboration when accessing between your local NAS and other remote cloud services, and can efficiently and easily back up data from or to public clouds. To sync files among your Synology NAS and public cloud services, you need to create connections on Cloud Sync to link to the service provider by using your user credentials.
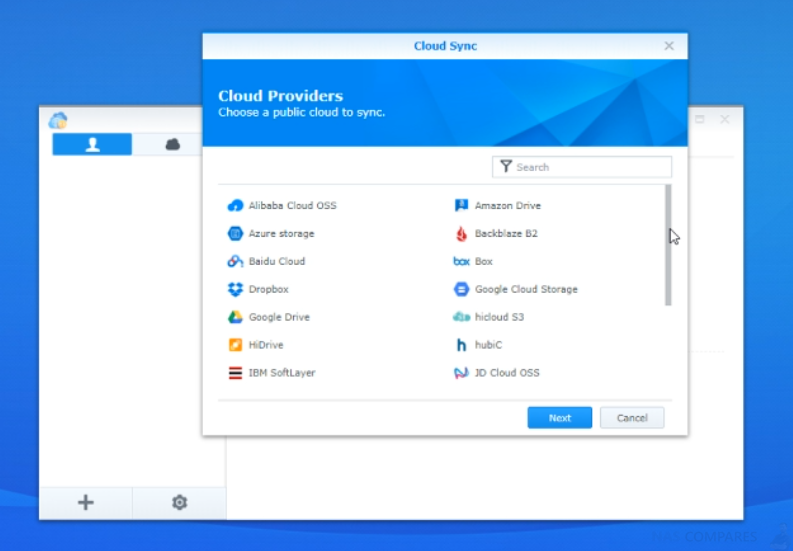
To create a new connection:
- On the Cloud Sync user interface, click on the Create icon at the bottom-left corner to start the wizard.
- Choose one of the public cloud services to sync files with and click Next., Once authentication has been successful, fill in the following fields and then click Next
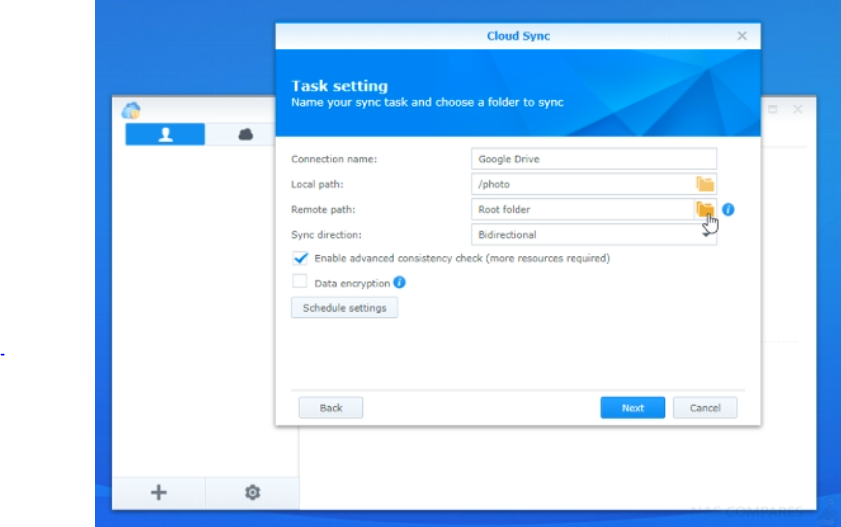
- Task name: This name will show on the connection list.
- Local path: Select a local folder. All directories and files within this folder will be synced to the remote folder.
- Remote path: Select a remote folder. All directories and files within this folder will be synced to the local folder.
- Sync direction: Select whether you want the sync to be Bidirectional,Download remote changes only, or Upload local changes only.
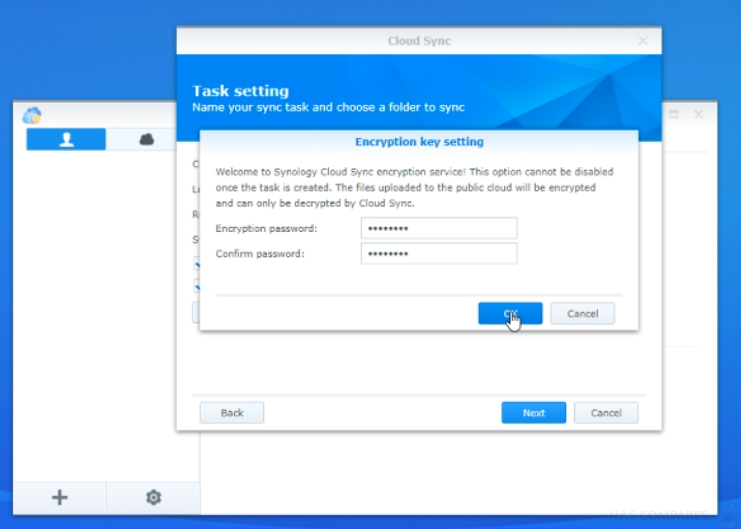
- Check the box next to Data encryption to enable client-side data encryption.
- Check the box next to Don’t remove files in the destination folder when they are removed in the source folder. if needed.
- Schedule settings: Go to this section to enable your schedule for file syncing.
- To further adjust your sync settings, click Advanced settings.
- You can prevent certain files from being synced by unchecking any folders you don’t want synced, by setting a max file size limit, or filtering out certain file names or file extensions:
- By folder: uncheck any sub-folders you don’t want synced.
- By maximum file size: If a file is bigger than your specified size, it will not be synced.
- By file name: Any file with the designated file name will not be synced.
- File extension: Any designated file extension will not be synced. Add *.[extension] to the table, e.g. *.iso.
- You can prevent certain files from being synced by unchecking any folders you don’t want synced, by setting a max file size limit, or filtering out certain file names or file extensions:
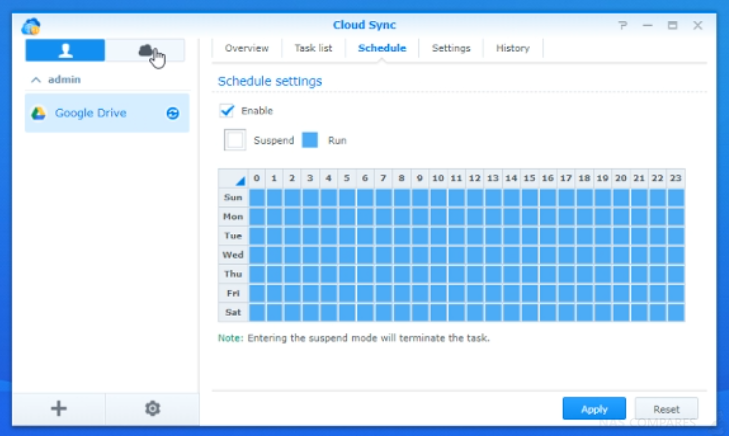
- Click Apply to save your settings.
DS1019+ NAS – Network Backups with Hyper Backup
Unexpected data loss from hard drive failures, natural disasters, and ransomware attacks pose potential threats to your paramount data on your DS1019+ NAS. To avoid data loss caused by such unfortunate situations, the 3-2-1 data protection strategy is widely adopted to maintain multiple versions of backup data, thereby providing extra protection in case the current version crashes or gets infected by ransomware.
A 3-2-1 data protection strategy means having at least three data copies, where one copy is stored locally, and the rest are stored on two different devices. For personal users, you may consider adopting this strategy to acquire enterprise-level data protection for your precious memories, such as photos, family videos, and customized albums or choose to keep at least two data copies to ensure data availability. As for business users, it is recommended to follow the 3-2-1 strategy to make sure that all your core business data and critical information are always secure.
We have already talked about how to create a USB Backup of your DS1019+ NAS available in Synology’s DSM Package Center that can help to build your own 3-2-1 data protection solution. However, there are much more enterprise appropriate solutions in the form of Hyper Backup, Snapshot Replication and Cloud Sync.
Compare the backup solutions on your DS1019+ NAS
To prevent data loss resulting from hard drive failures, natural disasters, and ransomware attacks, offsite backup solutions are highly recommended, among which backing up to clouds is the most ideal choice for users who don’t have existing equipment since cloud services help save hardware, maintenance, and electricity costs as well as depreciation expenses. In addition, users can also sort out a solution that best suits their needs as some cloud service providers offer flexible pricing plans. However, If you already have existing devices, such as USB drives, other Synology NAS, or file servers, you can still leverage the space to back up your NAS data, but do remember to locate the destination device away from your source NAS to protect against potential data loss.
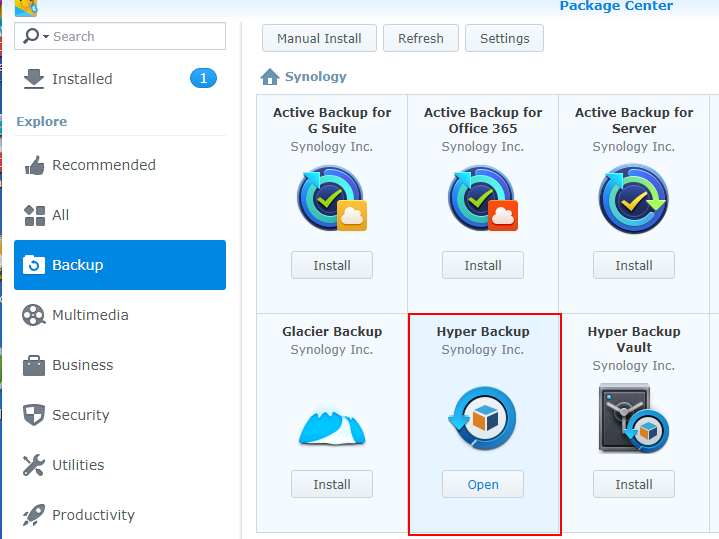
Offsite copies of your data can surely increase the level of protection, but having a local copy for fast recovery is also necessary. Therefore, your are recommended to take advantage of the features of Hyper Backup or Snapshot Replication to create a copy of your NAS data on the same Synology NAS or other devices, which should be placed close to the source data for better restore performance.
After understanding the 3-2-1 strategy and having at least two data copies, you can rest assured that your data is readily available and well protected.
Back up to the same Synology NAS to have a multi-version local copy
Having a multi-version local copy gives you the advantage of fast recovery in the event of data corruption or accidental file deletion since the data copy can be retrieved directly from your Synology NAS, but even when such measure is taken, RAID crash and hard drive failure might still cause disastrous data loss. It’s highly recommended, therefore, to create a multi-version local copy to ensure restore efficiency while also backing up to a different destination to get further data protection.
The below content of this section gives a brief introduction of Hyper Backup and Snapshot Replication. You may choose either package according to their features and your needs.
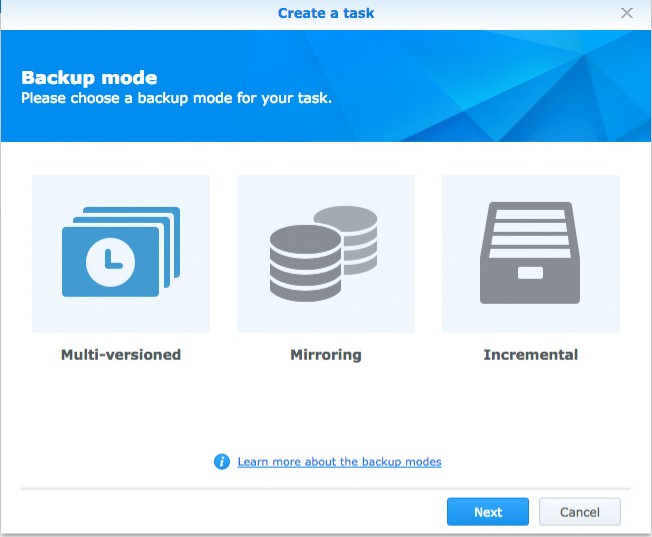
Hyper Backup allows you to back up applications and system configurations and restore them when needed to ensure data consistency. What’s more, this package also features block-level incremental backup, meaning that only files that have been changed compared to the initial versions will be backed up, while files that are simply renamed or duplicated will be deleted via cross-file deduplication to avoid unnecessary storage consumption.
If your NAS model supports the Btrfs1 file system, you may consider creating a local copy using Snapshot Replication. Conducted in merely a few seconds, the snapshot process only causes minimal impacts on system performance. Compared to Hyper Backup, Snapshot Replication is faster in backup speed/recovery time and is also applicable to shared folders and iSCSI LUN.
Below is a summary of all the backup tools introduced in this article and a comparison of their features. You may refer to the table to find out which package is the most suitable for helping you achieve your goals.
Back up to a different destination over the network
To protect against data loss caused by RAID crash or hardware damage, you may choose to create an offsite copy on a variety of destinations. The following sections provide an overview of some tools that you can employ to complete such backup tasks.
When backed up to another Synology NAS, data is transferred via Synology’s NAS protocol.
With the aforementioned Hyper Backup, which comes with built-in technology to enhance storage efficiency as well as application and configurations backup support, you can easily back up data to a remote NAS device by installing Hyper Backup Vault on the destination, a package that allows you to view the backup tasks you received and task-related logs on the receiving device. Hyper Backup supports both the EXT4 and the Btrfs file system, but the format of backup data is not readable.
Snapshot Replication provides the convenience of replicating snapshots to multiple remote Synology NAS and only replicates changed data blocks to reduce bandwidth and time consumption. For management flexibility, one replication can be extended to up to three remote sites. Again, Snapshot Replication is only applicable to models that support the Btrfs file system.
| Backup Destination
DS1019+ |
Hyper Backup
|
Snapshot Replication
|
USB Copy
|
Cloud Sync
|
|---|---|---|---|---|
| Local Shared Folders | Yes | Yes | No | No |
| External Devices (USB) | Yes | No | Yes | No |
| Another Synology NAS | Yes | Yes | No | No |
| File Servers | Yes | No | No | Only WebDAV and OpenStack data synchronization |
| Public Clouds | Yes | No | No | Yes |
| Features Summary | ||||
| Applications2 & System Configurations Backup | Yes | No | No | No |
| Backup & Restore Performance | Low | High | Medium | Medium |
| Storage Efficiency | Medium | High | Low | Low |
| Backup Frequency | Daily | 5 mins (shared folder) 15 mins (iSCSI LUN) |
Hotplug support | Sync when changed are made |
The Synology DS1019+ NAS – VERDICT
| PROS | CONS |
|
|
aaa
🔒 Join Inner Circle
Get an alert every time something gets added to this specific article!
This description contains links to Amazon. These links will take you to some of the products mentioned in today's content. As an Amazon Associate, I earn from qualifying purchases. Visit the NASCompares Deal Finder to find the best place to buy this device in your region, based on Service, Support and Reputation - Just Search for your NAS Drive in the Box Below
Need Advice on Data Storage from an Expert?
Finally, for free advice about your setup, just leave a message in the comments below here at NASCompares.com and we will get back to you. Need Help?
Where possible (and where appropriate) please provide as much information about your requirements, as then I can arrange the best answer and solution to your needs. Do not worry about your e-mail address being required, it will NOT be used in a mailing list and will NOT be used in any way other than to respond to your enquiry.

|
 |
Terramaster F4 SSD NAS - Should You Buy? (Short Review)
Minisforum N5 Pro NAS Review - Did Minisforum just WIN at NAS?
What Can You ACTUALLY DO with HDMI on Your NAS?
Best NAS for under $499
Best NAS for Under $250 (2025)
Minisforum N5 Pro NAS - FIRST IMPRESSIONS
Access content via Patreon or KO-FI




Thanks legend
REPLY ON YOUTUBE
Please can you kindly repeat the video, but where the NASes are not on the same LAN and also which port forwarding to enable. Thank you.
REPLY ON YOUTUBE
Hi.
Thanks a lot for this great video!!!
REPLY ON YOUTUBE
Hello. I always had a Qnap and now I have a Synology DS220. I stil have q second Qnap to back up to. I am testing now to see how it works. Your Video was very good thanks!. What I do see is that if I delete a movie or document on de DS220 and the BackUp goes it alseo deletes on the Qnaop. I do not want that 🙁 ans I see no way to have a setting that only moves new files from Ds220 to Qnap. Second question is, is there always a full comlte backup of is there an option to only backup new files ? Regards and hopefully you have a good tip for me. Ben
REPLY ON YOUTUBE
Very helpful, straight forward and well explained! Thanks!
REPLY ON YOUTUBE
Not an issue with mirror option.
REPLY ON YOUTUBE
Be aware that when using this method that several folders and files will be created on the QNAP by the process. I found that I could not delete them until I dug into their properties. It turned out that the were pretty much untouchable except by the admin account even if you have disabled that account. I had to change the properties and then enable my admin account temporarily to delete these folders and contents. I thought that the process created more of a mess than I was prepared to deal with so I would suggest that anyone who is thinking of doing this to do a very small test first. For me, it is easier to use FreeFileSync on my PC to do this backup. I would also consider Syncthing.
REPLY ON YOUTUBE
Best channel on YouTube regarding NAS by far.
REPLY ON YOUTUBE
@NASCompares, great vid. Do you know of a way to keep a Buffalo TS3410DN sync with a Synology TS218? Thanks!!
REPLY ON YOUTUBE
Thanks 4 the video. Exactly what I was looking 4.
But I not C where U defined the target folder on the QNAP.
In my case the files from Syno will B copied 2 the folder “Downloads”, but I prefer 2 have the backups in the “Backups” folder.
Any hints ?
REPLY ON YOUTUBE
One drive or Google drive are only for 1 user …but using a Nas on network … multiple users can work on Same files and also get notification to open in read only mode when the file is already open at some other computer
REPLY ON YOUTUBE
Good video but you totally blew off setting the port on the QNAP and didn’t come back. I’m sure in the real world scenario your backup wouldn’t work.
REPLY ON YOUTUBE
Once i completely back up the contents of the Synology NAS to the cloud, can i delete the files in the NAS already?
REPLY ON YOUTUBE