

Accessing Your NAS Remotely – Security vs Speed vs Cost!
Network Attached Storage (NAS) devices are an essential part of any home or office network. They provide a central storage location for all your digital files, making it easy to access and share them across multiple devices. However, connecting to a NAS device can be complicated, and choosing the right connectivity option can make all the difference in terms of speed and security.
Network Attached Storage (NAS) devices are used for a variety of purposes. Some of the most popular uses for NAS devices include:
- File Storage and Backup: NAS devices provide a centralized location for storing and backing up all types of files, including documents, photos, videos, and music.
- Media Streaming: NAS devices can serve as media servers, allowing users to stream music, videos, and photos to multiple devices in the home.
- Surveillance: NAS devices can be used to store and manage video footage from surveillance cameras.
- Virtualization: NAS devices can host virtual machines, allowing users to run multiple operating systems on the same hardware.
- Cloud Storage: NAS devices can be configured to serve as a personal cloud, allowing users to access their data from anywhere with an internet connection.
- Downloading and Managing Torrents: NAS devices can be used to manage torrent downloads and automate the process of downloading, organizing and seeding files.
- Web and Mail Hosting: NAS devices can be used to host websites and mail servers, providing a cost-effective and low-maintenance solution for small businesses and individuals.
When deciding on the method for remotely accessing a Network Attached Storage (NAS) device, several factors should be considered. Here are some steps to help you make a decision:
- Determine your needs: The first step is to determine what you need to access on the NAS device. Will you be accessing the administration panel, multimedia files, or other data? Knowing your needs will help you determine what method is best suited for your needs.
- Consider security: Security is a critical factor when accessing NAS devices remotely. Consider the level of security you need and choose a method that provides the appropriate level of security for your needs.
- Check compatibility: Some methods may not be compatible with your NAS device, so it’s important to check compatibility before choosing a method.
- Evaluate ease of use: Consider the ease of use of the method you are considering. Some methods may be more user-friendly than others, and may be more suitable for users who are less tech-savvy.
- Cost: The cost of the method you choose may be a factor in your decision-making process. Some methods may be more affordable than others, while some may offer more features for a higher cost.
- Performance: Consider the performance of the method you are considering. Some methods may provide faster access times and better performance than others, while some may have more latency or other performance issues.
- Technical Support: Consider the level of technical support available for the method you are considering. Some methods may have more robust support than others, which may be important if you need help setting up or using the method.
- User Reviews: Consider user reviews and feedback from other users who have used the method you are considering. User reviews can provide valuable insight into the strengths and weaknesses of a particular method.
By considering these factors, you can make an informed decision about the best method for accessing your NAS device remotely for different purposes and applications.
Different connectivity options for NAS
-
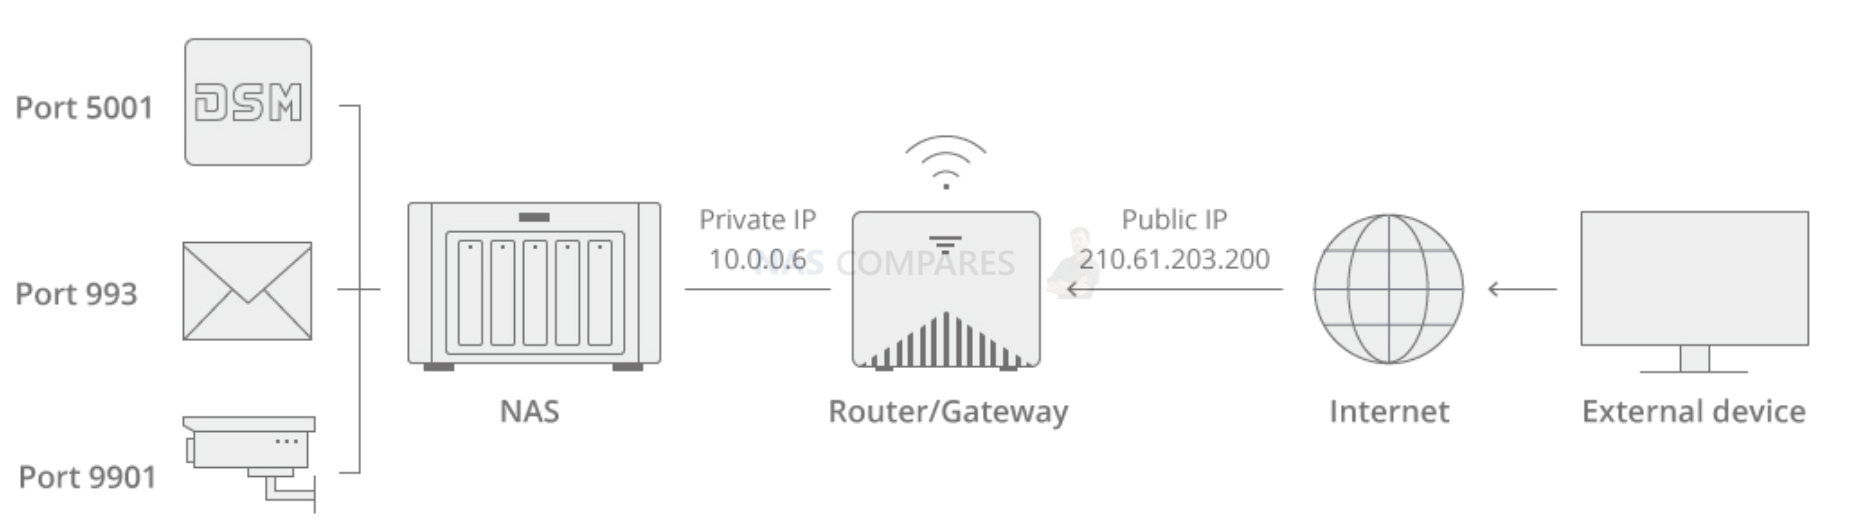
Port forwarding
Port forwarding is a common method of connecting to a NAS device. It is a complicated setup that requires manually opening each port for each service. The advantage of this method is that it is fast, with speed depending on the network quality in the region. However, it is not secure as it leaves the NAS device open to attack from anyone on the internet.
Port Forwarding can be a simple and effective way to remotely access a NAS device, but it may not be suitable for all users. Port Forwarding can be complex to set up, and may require a high level of technical knowledge to configure. Additionally, Port Forwarding can be a security risk, as it can expose the NAS device to potential attacks from the internet. It’s important to weigh the benefits and risks of using Port Forwarding before deciding to use it.
Here is a general guide to set up Port Forwarding for a Network Attached Storage (NAS) device:
- Determine your internal IP address: Before you can set up Port Forwarding, you need to determine the internal IP address of your NAS device. You can typically find this information in the administration panel of your router or by using a network scanner tool.
- Access your router’s administration panel: To set up Port Forwarding, you need to access the administration panel of your router. This is typically done by entering the IP address of the router into a web browser.
- Find the Port Forwarding section: Once you have access to the administration panel, navigate to the Port Forwarding section. This section may also be called “NAT” or “Virtual Servers”.
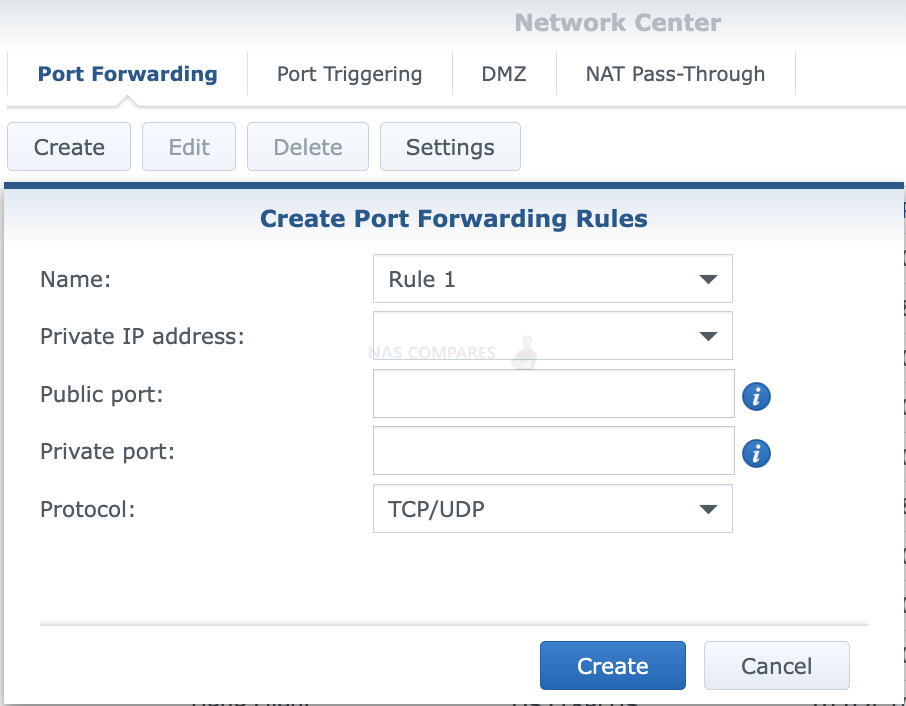
- Add a new Port Forwarding rule: To set up Port Forwarding, you need to add a new rule to your router. The specific steps for adding a rule may vary depending on your router, but you will typically need to enter the following information:
- Protocol: Select the type of protocol to use for the Port Forwarding rule. The most common options are TCP, UDP, or both.
- External port range: Enter the range of external ports that will be forwarded to the internal device.
- Internal IP address: Enter the internal IP address of the NAS device.
- Internal port range: Enter the range of internal ports that will be forwarded.
- Save the rule: After entering all of the required information, save the rule to apply the Port Forwarding.
- Test the Port Forwarding: After setting up the Port Forwarding rule, you should test the connection to ensure that it is working as expected. You can typically do this by accessing the service you set up Port Forwarding for from a remote location.
- Verify the connection: Verify the connection by checking the logs or the status page of your router. You should see the Port Forwarding rule listed and the connection status should indicate that the rule is active.
Note: This is a general guide and the specific steps to set up Port Forwarding may vary depending on your router and the specific requirements of your NAS device. If you have any issues with Port Forwarding, consult the documentation for your router and NAS device, or seek assistance from a technical support representative.
-
Quick connect / myQNAPcloud
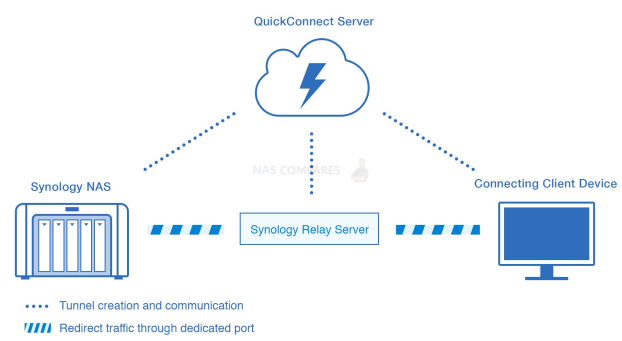
Quick connect and myQNAPcloud are proxy-based connectivity options that allow you to connect to your NAS device remotely. They are easy to set up, but have the disadvantage of not allowing access to third-party apps like Plex. They are semi-secure, but everyone who knows your cloudID can try to hack into your device. The speed of this option depends on the proxy server limit, with Synology being limited to 1 MB/s.
Here is a guide to set up Quick Connect / myQNAPcloud for a Network Attached Storage (NAS) device:
- Log in to the NAS device: Start by logging in to the administration panel of your NAS device. This can typically be done by entering the IP address of the device into a web browser.
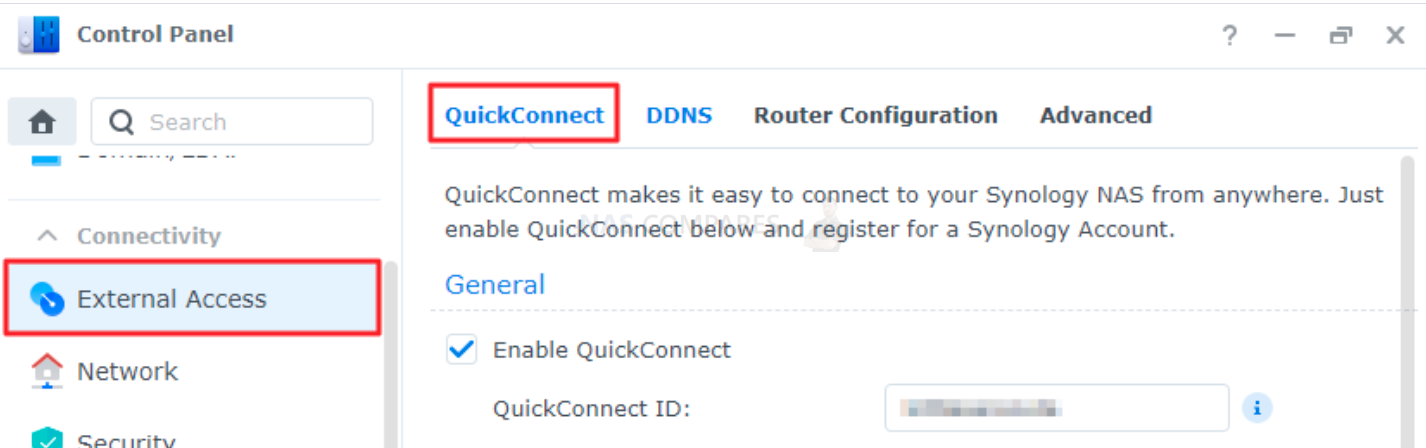
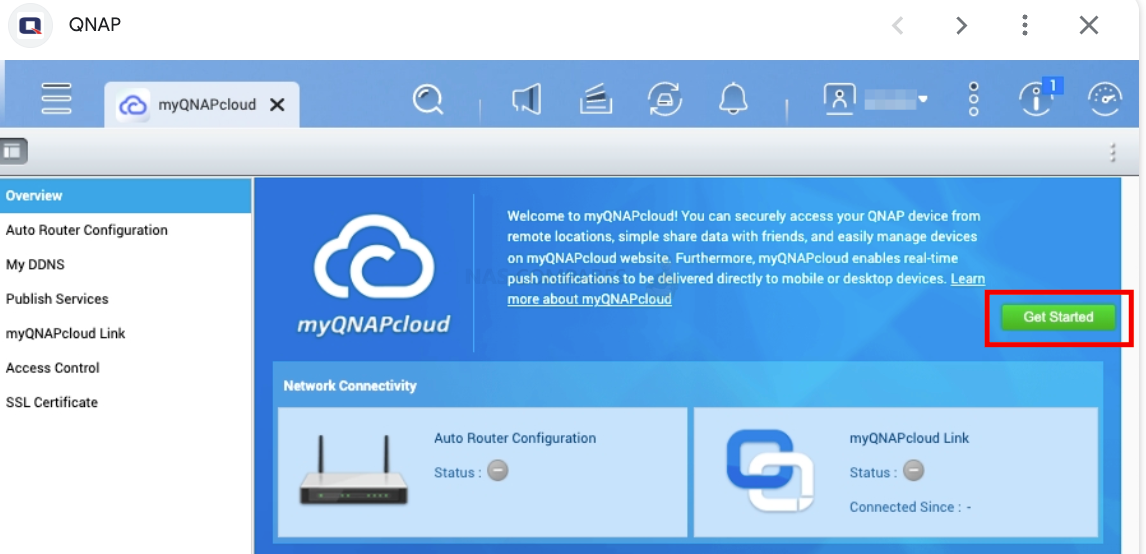
- Access the Quick Connect / myQNAPcloud settings: Navigate to the Quick Connect / myQNAPcloud settings in the administration panel. This section is typically found under “External Access” or “Cloud Services”.
- Enable Quick Connect / myQNAPcloud: To use Quick Connect / myQNAPcloud, you need to enable the feature in the settings. Follow the on-screen instructions to enable the feature and create a Quick Connect / myQNAPcloud account if you do not already have one.
- Set up port forwarding: Quick Connect / myQNAPcloud uses port forwarding to allow remote access to your NAS device. You will need to set up port forwarding on your router to ensure that the feature works correctly.
- Register your device: Once Quick Connect / myQNAPcloud is enabled, register your device by entering the required information. This will typically include the device name, IP address, and port information.
- Verify the connection: Verify the connection by checking the logs or the status page of your NAS device. You should see the Quick Connect / myQNAPcloud connection listed and the status should indicate that the connection is active.
- Access the NAS device remotely: Once the Quick Connect / myQNAPcloud connection is established, you can access your NAS device from a remote location. Simply enter the Quick Connect / myQNAPcloud address into a web browser to access the device.
Note: The specific steps to set up Quick Connect / myQNAPcloud may vary depending on your NAS device. If you have any issues with the setup process, consult the documentation for your device or seek assistance from a technical support representative.
-
Tailscale
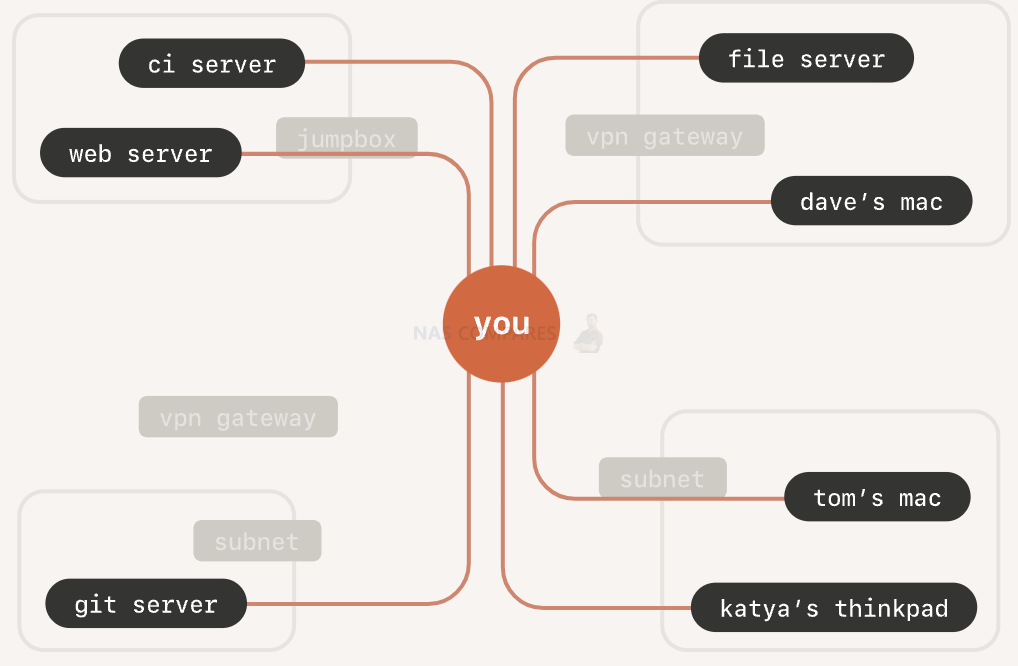
Tailscale is a point-to-point connectivity option that is easy to set up with a two-click process. It is secure, as no one knows about your NAS device’s existence. However, if someone gains access to your Tailscale admin panel, they can see a list of connected devices and potentially access them. The speed of this option depends on the network quality in the region.
Here is a guide to set up Tailscale on a Network Attached Storage (NAS) device and a personal computer:
- Install Tailscale: To use Tailscale, you will need to install the software on both your NAS device and personal computer. You can download the software from the Tailscale website and follow the on-screen instructions to install it.
- Create a Tailscale account: Before you can set up Tailscale, you will need to create a Tailscale account. This can be done from the Tailscale website or from within the Tailscale software.
- Configure the NAS device: After installing Tailscale on your NAS device, launch the software and sign in to your Tailscale account. Follow the on-screen instructions to configure the device for Tailscale.
- Configure the personal computer: Repeat the steps above to install Tailscale on your personal computer and sign in to your Tailscale account. Follow the on-screen instructions to configure the device for Tailscale.
- Verify the connection: Once both the NAS device and personal computer are configured for Tailscale, verify the connection by checking the status of the connection in the Tailscale software. You should see both devices listed and the connection status should indicate that the devices are connected.
- Connect to the NAS device: To connect to the NAS device from your personal computer, you will need to use the Tailscale address for the device. This address can typically be found in the Tailscale software or by contacting the technical support representative for Tailscale.
Note: The specific steps to set up Tailscale may vary depending on your NAS device and personal computer. If you have any issues with the setup process, consult the documentation for your devices or seek assistance from a technical support representative.
-
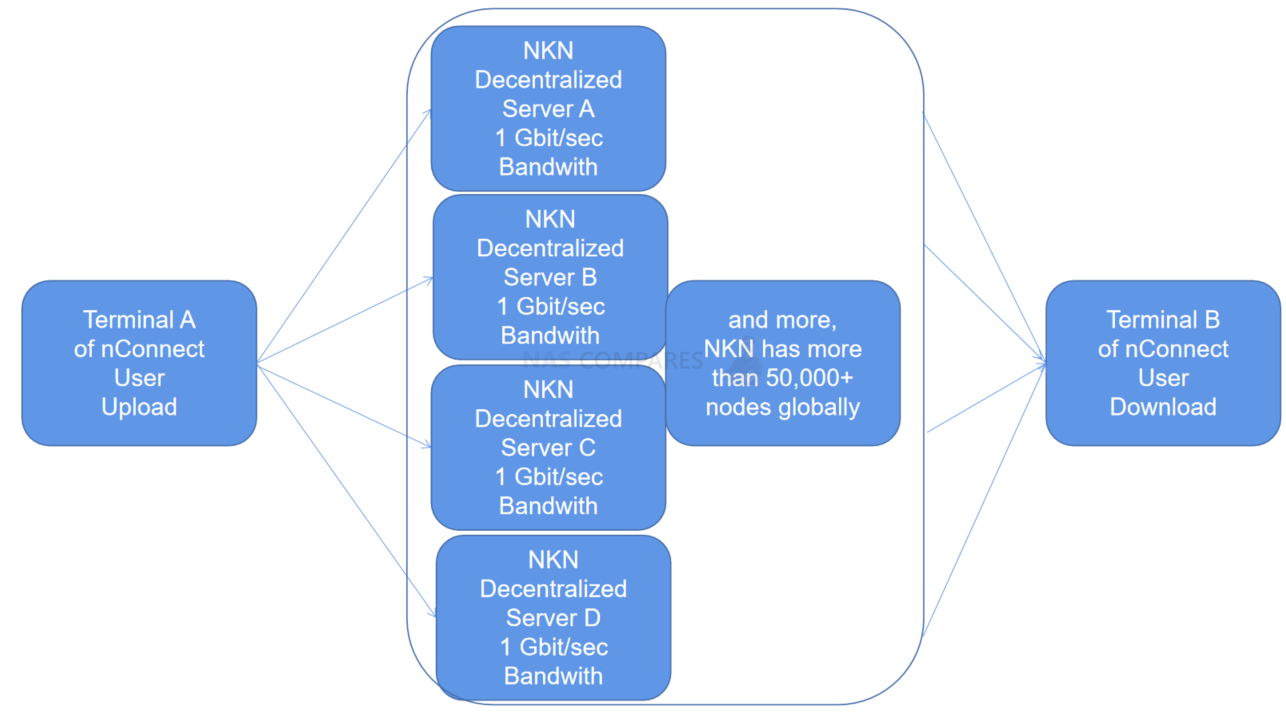
nConnect
nConnect is a blockchain/torrent-style connectivity option that is easy to set up with a scan code installation process. It is very secure as no one knows about your devices or networks. Additionally, data is sent over multiple channels, making it the fastest option.
Here is how to install nConnect
How to access your NAS remotely? A Comparison of NKN nConnect and Tailscale
-
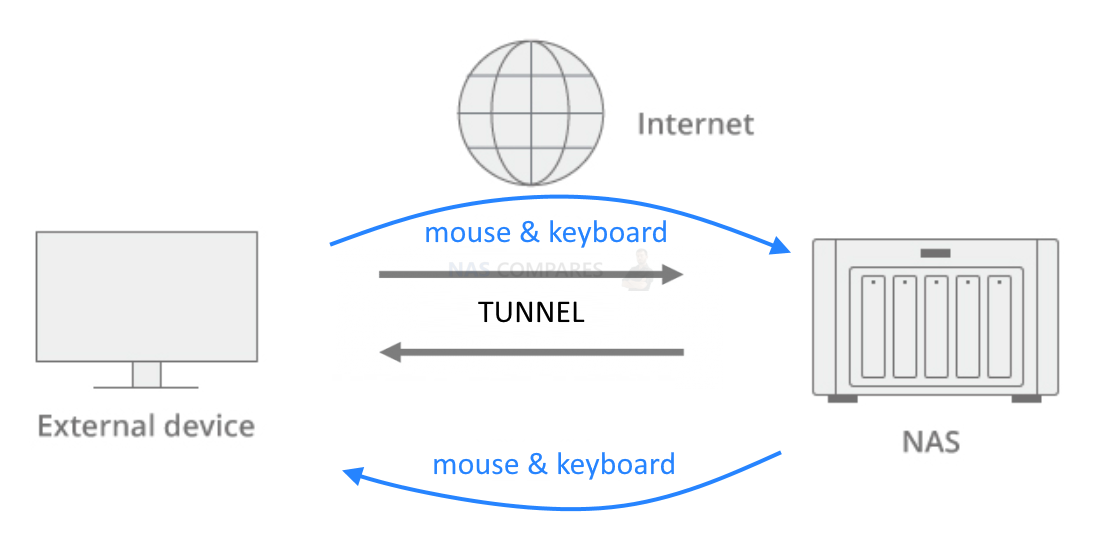
Team viewer
Team viewer is a remote control connectivity option that allows you to access and control your NAS device from anywhere. However, it does not support drive mapping, Time Machine, or Plex access. It is secure, but if someone gains access to the Teamviewer admin panel, they can potentially access other devices. The speed of this option is slow due to the constant remote desktop view data exchange.
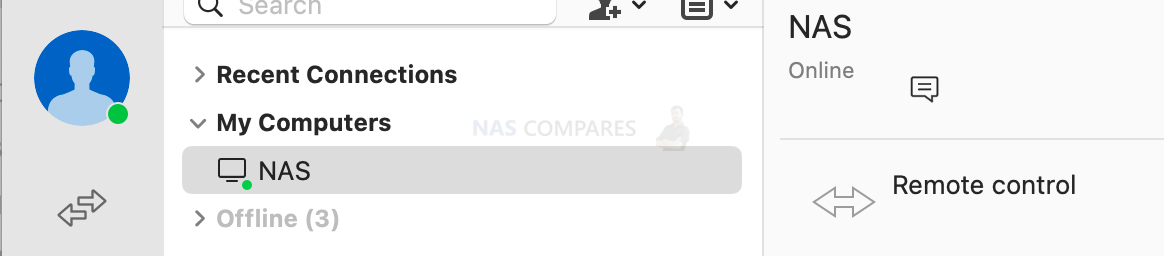
Here is a guide to set up TeamViewer on a Network Attached Storage (NAS) device and a personal computer:
- Install TeamViewer: To use TeamViewer, you will need to install the software on both your NAS device and personal computer. You can download the software from the TeamViewer website and follow the on-screen instructions to install it.
- Create a TeamViewer account: Before you can set up TeamViewer, you will need to create a TeamViewer account. This can be done from the TeamViewer website or from within the TeamViewer software.
- Configure the NAS device: After installing TeamViewer on your NAS device, launch the software and sign in to your TeamViewer account. Follow the on-screen instructions to configure the device for TeamViewer.
- Configure the personal computer: Repeat the steps above to install TeamViewer on your personal computer and sign in to your TeamViewer account. Follow the on-screen instructions to configure the device for TeamViewer.
- Verify the connection: Once both the NAS device and personal computer are configured for TeamViewer, verify the connection by checking the status of the connection in the TeamViewer software. You should see both devices listed and the connection status should indicate that the devices are connected.
- Connect to the NAS device: To connect to the NAS device from your personal computer, you will need to use the TeamViewer address for the device. This address can typically be found in the TeamViewer software or by contacting the technical support representative for TeamViewer.
-
Synology VPN server/ open VPN
Synology VPN server/open VPN is a point-to-point connectivity option that requires a complicated setup process and still requires opening ports. While it is secure, with only one port open, it can still be compromised if not updated. The speed of this option depends on the network quality in the region.
What is the best way to connect remotely based on APP you use
| DSM or QTS Admin panel | tailscale | NKN | Team viewer |
| Phone Audio Station | Quick connect | ||
| Synology Chat Server | Quick connect | ||
| Synology Mail Server | port forwarding | ||
| SMB Service | NKN | tailscale | |
| Surveillance Station | Quick connect (1MB/s) | port forwarding | |
| Synology Drive Server | Quick connect (1MB/s) | port forwarding | |
| Phone / TV Synology Photos | Quick connect | ||
| Phone/ TV Video Station | Quick connect (1MB/s) | port forwarding | |
| Web Station | port forwarding | ||
| Plex Media Server | Plex relay server (1-2MB/s) | port forwarding | |
| Synology MailPlus Server | port forwarding | ||
| Virtual Machine Manager | Quick connect | ||
| RSYNC | tailscale | NKN |
Comparison of the different connectivity options
When comparing the different connectivity options, it is important to consider security, speed, and ease of setup and configuration.
In terms of security, nConnect is the most secure, followed by Tailscale, Team viewer, Synology VPN server/ open VPN, Quick connect / myQNAPcloud, and Port forwarding.
In terms of speed, nConnect is the fastest, followed by Tailscale, Synology VPN server/ open VPN, Port forwarding, Quick connect / myQNAPcloud, and Team viewer.
When it comes to ease of setup and configuration, Tailscale is the easiest, followed by nConnect, Quick connect / myQNAPcloud, Synology VPN server/ open VPN, Port forwarding, and Team viewer.
|
Technology |
Configuration |
Security |
Speed |
Remarks |
|
Port forwarding |
Complicated setup, need to open each port manually for each service |
Not secure (public, everyone on internet can try to hack it) |
Fast (depends on network quality in that region) |
Access to open ports only |
|
Quick connect / myQNAPcloud |
Easy Proxy |
Semi secure (everyone that knows your cloudID can try and hack it) |
Slow (depends on proxy server limit (Synology = 1MB/s)) |
Only access first party apps. No access to 3rd like Plex. No SMB etc |
|
Tailscale |
Easy two-click setup |
Secure (no one knows about your NAS existence, but if someone gains access to Tailscale admin panel, they can see a device list and get into connected devices) |
Fast (depends on network quality in that region) |
Access everything |
|
nConnect |
Easy Install-scan code setup (blockchain/torrent style) |
Very secure (no one knows about your devices and networks) |
Fastest (data sent over multiple channels) |
Access everything |
|
Team viewer |
Easy Remote controlling |
Secure (but someone gaining access to Teamviewer admin panel could access other devices) |
Slow (constant remote desktop view data exchange) |
No drive mapping, Time Machine. PC/ Mobile – not TV |
|
Synology VPN server/ open VPN |
Complicated setup, still require opening ports |
Secure (NAS is still public but with only one port open, could be compromised if not updated) |
Fast (depends on network quality in that region) |
Access everything |
Conclusion
In conclusion, remote access to your NAS offers several benefits such as being able to access your files and data from anywhere in the world. However, it is important to consider the security and speed implications of the different remote access methods. The five methods discussed in this article, Port Forwarding, Quick Connect, Tailscale, nConnect, Team Viewer, and Synology VPN, each offer their own set of pros and cons.
Port forwarding is fast but not secure as it requires manual port opening for each service and is public, making it vulnerable to hacking attempts. Quick Connect and myQNAPcloud are semi-secure and slow as the speed depends on the proxy server limit. Tailscale is fast, secure, and easy to set up, but access to the Tailscale admin panel can be a potential security concern. nConnect is the most secure with multiple channels for data transmission but may not be accessible to third-party apps. Team Viewer is secure but slow due to constant remote desktop data exchange and limits access to drive mapping and Time Machine. Synology VPN is fast, secure, but requires a complicated setup and needs to be regularly updated to maintain security.
In choosing the right remote access method for your NAS, it is important to consider your specific needs, priorities, and risk tolerance. Whichever method you choose, make sure to regularly update your security measures and keep your device software up to date to ensure the protection of your data.
| Where to Buy a Product | |||
 |
    
|

|
VISIT RETAILER ➤ |
 |
|
|
VISIT RETAILER ➤ |
 |
|
|
VISIT RETAILER ➤ |
|
|
|
|
VISIT RETAILER ➤ |
We use affiliate links on the blog allowing NAScompares information and advice service to be free of charge to you. Anything you purchase on the day you click on our links will generate a small commission which is used to run the website. Here is a link for Amazon and B&H. You can also get me a ☕ Ko-fi or old school Paypal. Thanks! To find out more about how to support this advice service check HERE If you need to fix or configure a NAS, check Fiver Have you thought about helping others with your knowledge? Find Instructions Here
📧 SUBSCRIBE TO OUR NEWSLETTER 🔔
🔒 Join Inner Circle
Get an alert every time something gets added to this specific article!
This description contains links to Amazon. These links will take you to some of the products mentioned in today's content. As an Amazon Associate, I earn from qualifying purchases. Visit the NASCompares Deal Finder to find the best place to buy this device in your region, based on Service, Support and Reputation - Just Search for your NAS Drive in the Box Below
Need Advice on Data Storage from an Expert?
Finally, for free advice about your setup, just leave a message in the comments below here at NASCompares.com and we will get back to you. Need Help?
Where possible (and where appropriate) please provide as much information about your requirements, as then I can arrange the best answer and solution to your needs. Do not worry about your e-mail address being required, it will NOT be used in a mailing list and will NOT be used in any way other than to respond to your enquiry.
Need Help?
Where possible (and where appropriate) please provide as much information about your requirements, as then I can arrange the best answer and solution to your needs. Do not worry about your e-mail address being required, it will NOT be used in a mailing list and will NOT be used in any way other than to respond to your enquiry.


|
 |


ZimaOS is the BEST Beginner NAS OS - Watch Your Back UnRAID and TrueNAS !!!
30TB Hard Drives are TOO BIG ! (and here is why)
COMPLETE UGREEN NAS Setup Guide - 2025 EVERYTHING VERSION
$110 USB4 to 2x10Gb Adapter Review - What the WHAT?
UGREEN NAS Now has iSCSI, 2FA and Jellyfin (and more) - FINALLY!
Seagate 30TB Ironwolf and EXOS Hard Drive Review
Access content via Patreon or KO-FI
I can’t install tailscale on my synology nas. I’ve tried and tried.
REPLY ON YOUTUBE
i still cant get my nas to mount under the devices section. ive logged out of everything and used the installed app on my nas to redirect to log back in. but still the nas wont show up
REPLY ON YOUTUBE
Thanks to your video I’ve successfully set up Tailscale on my Synology NAS but can’t work out how to configure the existing PLEX on my Synology so I can access my music via a mobile (which also has Tailscale installed)? What’s are the final steps to do this?
REPLY ON YOUTUBE
Fantastic video. Thank you very much.
REPLY ON YOUTUBE
So apart from this I should still use Synology vpn?
REPLY ON YOUTUBE
What about the firewall? Should we just allow tailscale from the ip-range they give, or also other services we might need to use (photos for example)?
REPLY ON YOUTUBE
He didn’t mention but you also need to install Tailscale on your other devices and have the service running in order to connect to the Tailscale ip of your NAS
REPLY ON YOUTUBE
I’ve looked EVERYWHERE on the internet for a guide to installing tailscale on TOS4. Any idea how to do this? The video and the website you’ve suggested are for TOS5.
REPLY ON YOUTUBE
Great video with lots of good info. I have had my TS-853 Pro for 9 years now and I have not had any malware. I keep it off of the internet and always keep updates applied.
REPLY ON YOUTUBE
This video needs an update and to go a bit more in depth
REPLY ON YOUTUBE
Lots of things to check. I have noticed in the new version of 5.1.5 QTS. The login options include 2 step verification (password and OTP/authenticator) or passwordless (1 step) – last option is username and authenticator. I am thinking the 2 steps seems safer.
REPLY ON YOUTUBE
so better not use ?
REPLY ON YOUTUBE
i was going to buy a nas— im not now
REPLY ON YOUTUBE
Great video- subscribed! What I really need now is to figure out how to make a Tailscale certificate and make reverse proxies for my Docker services (Vaultwarden, Jellyfin, Audiobookshelf, etc)). Or whichever is the best way to access them via Tailscale if that isn’t it.
REPLY ON YOUTUBE
very important
REPLY ON YOUTUBE
Good video. How do you add Tailscale to your NAS certificate to secure the connection? : )
REPLY ON YOUTUBE
Thanks for the video. I have Tailscale setup and running, I can access my NAS outside of my network using the Tailscale’s IP for my NAS, How do I access it using Let’s Encrypt Certificate? The certificate name only work within my local network.
REPLY ON YOUTUBE
Is there a way to limit a device to a single folder on the Nas, rather than full access?
REPLY ON YOUTUBE
Every time I go looking for info online regarding using my NAS it’s always NASCompares that I end up at as a destination. Haha. Keep up the good work!
REPLY ON YOUTUBE
I started using Tailscale last night , and I’ve found that the speed is a bit slow to watch media .
I can download documents and photos with not problem but when it comes to videos , it’s soo slow compare when connected to the local network .
Is that Normal? Is there anything I could do to improve the speed ?
Thanks heaps
REPLY ON YOUTUBE
Will this still allow me to access my smb mount in MacOS finder to reach files I want to access/edit that are stored on the NAS?
REPLY ON YOUTUBE
Hi. Could you help – why my devices cant see each other if they are connected to different networks? Only on the same network they can see each other.
REPLY ON YOUTUBE
Sadly cant open the download page on any device. WiFi, LAN or Mobile.
Does anyone know if there is another place with the TOS 4 TPK?
REPLY ON YOUTUBE
Failed at the install stage. “The package is not good” or some such message, so I never get to the “confirm” step and proceed to install. Pity.
REPLY ON YOUTUBE
Is there a use case for Tailscale if NAS is behind CGNAT? Just went fullfibre with Befibre and now Plex remote access port forwarding is screwed unless i pay for a static ip fix
REPLY ON YOUTUBE
when i enter the ip , just nothing loading
REPLY ON YOUTUBE
Please make an updated version of this video
REPLY ON YOUTUBE
You mention security at the end – where can I find instructions for adding such security – e.g. you mentioned Lets Encrypt?
REPLY ON YOUTUBE
how can I map the NAS in the file explorer? I can’t see it when the devices are discovered.
REPLY ON YOUTUBE
does it need to be the same google account to access the NAS? or can other person using other google account access my NAS as long as they know my NAS’ IP?
REPLY ON YOUTUBE
I installed and configured it on my NAS, iPhone nad Laptop.
I can access my NAS on iPhone using Tailscale IP or hostname in public network. No issue al all.
But I am not able to use it for Synology Photos or any other app. It just gives security warning and donesn’t work.
REPLY ON YOUTUBE
From your other videos I had the idea that a NAS could be a substitute for Google Photos and Drive. But yesterday I found a Reddit post with all the security warnings and saying that your NAS shouldn’t be exposed to the internet. My idea was to share storage space and photos with family in different countries. And now, I find that this is a big risk not only for the NAS but for all the devices on your network. I feel frustrated and disappointed. If all this is not possible, a NAS is not for me; I prefer Google in that case. Your videos are great but I got the wrong impression from them and I think you should emphasise the problems of exposing the NAS much more. Sorry if I got the wrong ideas and I would love you to correct me and tell me that I am wrong so I can have a bit hope. Thanks for your videos
REPLY ON YOUTUBE
Hola, es posible un manejo para ARM de terramadter así sea Docker?
REPLY ON YOUTUBE
Are you serious really?? What did you talk all those time? None sense really and explanation was really worse on here seen!!!!
REPLY ON YOUTUBE
I only have a QNAP TS-231P3, so there is no native support for Tailscale.
However, I was able to set up a Tailscale VPN thanks to an extra help from another Youtube video about how to setup Tailscale via docker containers (for QNAP there’s “ContainerStation”)
I’m loving Tailscale so far!! It’s so easy!!
REPLY ON YOUTUBE
If you limit the access to the port-forwarded portas to your mobile devices public IP address alone, why would it be risky to open ports this way, blocking all other IP addresses??
REPLY ON YOUTUBE
This was a bit of a skimmy.
Overviews are one thing, but you did say you would show how to set this up securely. That wasn’t delivered here.
REPLY ON YOUTUBE
great guide! do you know how we can use Tailscale in conjunction with hyperbackup/vault to do secure connections to other Synology NAS’s?
REPLY ON YOUTUBE
The more secure you make things, the harder it will be to manage and jump through to get what your after. You could use 2FA, and encrypt volumes, for single person or two, all of that really is not required.. as long as you have good passwords for each user., and just gets in the way anyway.
encrypted volumes also slow down you NAS as well, but depends on the CPU/RAM your NAS has. eg TS-451 would better than TS-251
I would prefer user-based folder access for security than 2FA just because 2FA and volume encryption works as a “whole” where as user password and permissions are “per-user”
Much more simple to manage. Many people may disagree, but its my NAS so… ???? Just make sure you use strong passwords and that’s it.. Also, its bad practice to keep changing passwords every 180 days,,
Companies used to do this in the past ,thinking it was more secure changing regularly, but all it REALLY did was ****** off employees.
Sorry, i manage my own security
REPLY ON YOUTUBE
can we remote ssh with it ?
REPLY ON YOUTUBE
how would synology photos, video or music etc services work if used with openvpn?
REPLY ON YOUTUBE
Thanks for the video I was starting to research solutiosn for my upcoming starlink connection. I have synology NAS which I am currently running open vpn and doing some port forwarding to my Virtual machines hosted on Synology NAS. The virtual machines are server 2003 and also investigating using XP 32 bit due to an old 32bit program I need to run. The issue with this is trying to get Tailscale installed on these machines. Is there a solution that you can think of that I can run on NAS that will give access to all my internal network when connected
REPLY ON YOUTUBE
not gonna lie I wasn’t thinking 20 minutes later all i’d hear is change password and scan for malware, that hardly keeps the NAS secure, if I had a good password to begin with my security isn’t increased by changing it constantly. and doing a malware scan isn’t keeping me secure, stopping malware get on my system would be. and being notified of the lack of security is moot and not keeping me secure. password, update and scan malware. that takes 20 seconds. I thought you were going to show us how to disable certain ports, etc.
REPLY ON YOUTUBE
I followed the instructions but get a bad gateway when opening the app. Any suggestions?
REPLY ON YOUTUBE
I have Tailscale app on my phone running.
Somehow my Synology-one-drive and Synology-photo-app does not work when I am outside the network.
I can open browser and login to my Synology web interface.
Anything I am missing?
I tried to put correct addresses in both apps as per tailscale.
REPLY ON YOUTUBE
Tailscale could be good but it doesn’t always work. I have a Synology NAS in the US where it works and another in France where it doesn’t, both with the same standard Tailscale settings. There are reports that indeed the standard settings don’t always work and require to SSH commands I don’t understand into the NAS. For that reason I dropped it. VPN through the router is the fastest and most reliable way to connect, otherwise Quick Connect works well too. I looked at Cloudflare as another option, it’s way too complicated to setup, for super nerds only.
I’m on a F4-210 which is has an ARM processor meaning no available TOS5 update. Any ideas on getting this install on TOS4?
REPLY ON YOUTUBE
How does Tailscale compare with Cloudflare Zero Trust Tunnel and/or Twingate??
REPLY ON YOUTUBE
Any chance of a guide on connecting to the now unsupported remote connection for Netgear NAS drives. I am sure you are aware, ReadyCLOUD ends in April of this year (I’m livid). Or maybe do you know of a guide that would help me configure this. Ta.
REPLY ON YOUTUBE
I got a big problem . I mounted a WebDAV remote drive cache in my QNAP. My Plex canot see my cached files . I can’t figure out how to program that.
REPLY ON YOUTUBE
Is better a wireguard VPN on router or this on nas ?
REPLY ON YOUTUBE
Thankyou. I will have to give it a try
REPLY ON YOUTUBE
Cool
REPLY ON YOUTUBE
I would love seeing video for TailScale on QNAP
REPLY ON YOUTUBE
Is the connection slow for you when using as a exit node. Mine is slow
REPLY ON YOUTUBE
Thanks for the video!
I hope you’ll tell us about some cool Tailscale stuff like MagicDNS, certificates for https and so on
REPLY ON YOUTUBE
Does Tailscale run on all Synology NAses or just the higher end models with the x86 CPU?
REPLY ON YOUTUBE
Within a few years, opening a port and port-forwarding for any outside access to your internal network is synonymous with using fax machines and having your password “password”.
REPLY ON YOUTUBE
Is this possible on a Qnap aswell?
REPLY ON YOUTUBE
Surprisingly straight forward ????
REPLY ON YOUTUBE
I’m using TailScale for a while now, but what i have discovered is that especially on my Android device, many other apps (including the web browser) are not working when i’m connected to the Tailnet. Would be great to find an option to just enable it for certain use cases or apps.
REPLY ON YOUTUBE
for those who want to use thier synology NAS not just for themselve but to make the world a better place:
Snowflake
This tool makes your hardware into a TOR-Entry node…which helps other people around the world.
Docker container is available…so it can be run on a synology NAS as such.
REPLY ON YOUTUBE
How I do stretch vm window to full screen on a nas to tv ???? when using remote pc like LG and Samsung tvs.. and what is the ultimate nas ??
REPLY ON YOUTUBE
great, but if you like to share pictures with non users, I think then this isn’t gonna work. So you will have to sacrify something
REPLY ON YOUTUBE
How is this better than using quickconnect?
REPLY ON YOUTUBE
Thanks again for yet another great video. I have been using Tailscale for several months now. Yes it was easy to setup, but I would have mentioned their recommendation to add a single line to your NAS Task Scheduler to ensure connection on reboot. That said, my use case was to connect two Synology’s, one onsite and the other offsite to use Hyper Backup supporting my 321 backup strategy. Worked great for about 7 backups, then disconnected and I was never able to reconnect or login through Hyper Backup to Hyper Vault. ????
Tried asking everywhere, Synology and Tailscale subReddits, Synology and Tailscale themselves. No one has a solution recommendation. Would be great to see if you could get it working and share another video.
REPLY ON YOUTUBE
The only ports I have opened up are 80 and 443, and those are forward to the LSIO swag container, which autoredirects http to https (I only have 80 opened up because I can’t be arsed to type https:// before my URLs if I don’t), and takes care of reverse proxying requests from all my subdomains to the appropriate Docker containers. I am not sure how secure this is compared to say a Cloudflare tunnel, but I have not had any issues thus far.
Either way, I think I’d need the reverse proxy setup even with a Cloudflare tunnel, because I have my network configured so that requests to my domain don’t go out over the internet from inside my network, so I’d need the reverse proxy to handle the local side and I could set up Cloudflare tunnels to handle the remote side without having to open any ports.
REPLY ON YOUTUBE
I just set this up! It works great but I was having trouble with ssl certificates while using the synology photos mobile app
REPLY ON YOUTUBE
Could this work for Hyper Backup?
REPLY ON YOUTUBE
Could I request some content? The title would be “break your cloud provider reliance”.
Overall the review/video would provide a guide to using local NAS resources to replace Google/Amazon/Apple/MS cloud services for:
1. Automatic mobile device photograph/video backup #most important I believe
2. Document sharing/editing
3. Sharing of content via common social media, messaging platforms
What with costs of these services constantly increasing, and the helpless feeling of being tied, powerless to their control. How easy is it to use Synology/QNap s/w to truly replicate that ‘memories happily backed-up’ feeling.
REPLY ON YOUTUBE
Great video. I am trying to figure out how to use Tailscale to allow 2 Synology NASs on 2 different external networks to each other. My goal is to map remote drives between the two so that I can drop a file in a directory on one NAS into a folder on that device and have it copy to the other…but not “sync.” In other words, I want that file to automatically copy to a folder on the other NAS and then be able to delete it from the origin NAS and have it remain on the destination.
REPLY ON YOUTUBE
I was troubleshooting a port forwarding issue with my NAS until 1 AM yesterday lmao
REPLY ON YOUTUBE
Cloudflare zero trust tunnels, also good for remote access.
REPLY ON YOUTUBE
If I understand it correctly you don’t need to create an quickconnect ID. But how would you connect the Synology photo&file apps on your mobile then? Or do you still create that ID and still keep the ports closed?
REPLY ON YOUTUBE
One of the best ways to connect remotely to a NAS.
REPLY ON YOUTUBE
How does this compare with Twingate?
REPLY ON YOUTUBE
Bro zerotier is better it works with wol and adding routes is so easy… ????
REPLY ON YOUTUBE
How the hell did you know I was looking to research this today???
REPLY ON YOUTUBE
@NasCompares
If blog/how-tailscale-works not lies, Tailscale node connections are end-to-end encrypted (a concept called “zero trust networking”).
REPLY ON YOUTUBE
I’m using cloudflare to access my synology, what do you think about cloudflare?
REPLY ON YOUTUBE
I went the VPN route by buying The Vilfo VPN router which has a separate built-in VPN server for accessing the network without opening the remote way. Before this, I was hit over 10,000 times from 2014 to November 2022 to the point that the file for autoblock was full. After using built-in VPN server I haven’t been hit once since November 2022 ????
REPLY ON YOUTUBE
Nice one! Been using it on my Asustor NAS a while. Great piece of software! No port forward means less chance of being hacked.
REPLY ON YOUTUBE
Great i was looking for a guide like this, can this be used for a qnap to Synology file sync?
REPLY ON YOUTUBE
Very BASIC security settings but the best security for QNAP is to keep all services OFFLINE completely so I absolutely NEVER use QNAP Cloud!
As of January 2023 QNAP still has major online security issues so I will not trust QNAP online servers, nor cloud services and especially not email notifications handled by QNAP.
For email notifications to be sent…QNAP needs QNAP email servers. Today QNAP products are still vectors for ransomware so please Do NOT connect to QNAP servers!
Novice QNAP users should be offline ONLY, therefore should not be using notifications nor QNAP Cloud.
REPLY ON YOUTUBE
Is myqnapcloud the only thing that “connects us to the internet.”
So my question is as long as I disconnect from myqnapcloud then a large majority of my risk goes away?
REPLY ON YOUTUBE
Can you do a video with the best firewall configuration for a multimedia qnap server like the tvs h674 without using the upnp method?…. thanks again.
REPLY ON YOUTUBE
I was hit by deadbolt ransomeware some weeks ago. Finally I got the key and my files have been fully decrypted. Thank you…
REPLY ON YOUTUBE
Have you done a video on how to set up let’s encrypt SSL for secure remote access to a NAS?
I’m just a simple Plex user and moved awhile ago, that whole time my Nas was unplugged and unused for 2 years and I recently plugged it back in after setting up a media room. My NAS wouldn’t update firmware so I updated it manually with a flashdrive and I needed to make a whole new mycloud account for some reason. It’s been a pain getting it all set up but it’s currently in sleep mode. Am I still safe?
I did manage to set up 2FA on admin and basic user account and I’ll see about setting up the X failed password revoking privileges
REPLY ON YOUTUBE
You didn’t mention running a VPN. 🙁 That saves so much complexity.
REPLY ON YOUTUBE
Worker with a reliable hacker is what I think is all over the world and I recommend a hacker parfait who works with good heart and sincerity Dee_hack11 is in Seoul☝️☝️☝️.
REPLY ON YOUTUBE
If i don’t have QNAP Cloud installed, does that mean that i am not connected to the internet?
Is sending email notification not a good idea, considering i don’t want to link my NAS to the internet?
REPLY ON YOUTUBE
After trying for some time, I had to contact *SCOTTS_HACK* to help me get the deadbolt off my Nas. I’m free now.
REPLY ON YOUTUBE
After trying for some time, I had to contact *SCOTTS_HACK* to help me get the deadbolt off my Nas. I’m free now.
REPLY ON YOUTUBE
*I was hit, so unplugged, shutdown, external USB backs fine. Plex user, was watching at the time no issues, went to update saver denied, then found the splash screen, no on reboot, water gapped on an independent switch no WiFi etc, it instantly goes to initialization. So save to assume the service themselves have been affected. Did safe shutdown. After some time I turn on everything then I found out I’ve been truly hit by deadbolt. I did as many research as I could and I found out that scott can actually decrypt the encrypted files So I paid some money not upto what deadbolt team are asking, then he decrypted my files*
REPLY ON YOUTUBE
Good day all, for DEADBOLT RANSOMWARE REMOVAL, consult *SCOTTS_HACK* Thank you.
REPLY ON YOUTUBE
Good day all, for DEADBOLT RANSOMWARE REMOVAL, consult *SCOTTS_HACK* Thank you.
REPLY ON YOUTUBE
.You can message *SCOTTS_HACK*
REPLY ON YOUTUBE
.You can message *SCOTTS_HACK*
REPLY ON YOUTUBE
Forgive that this may be a stupid question. But – if you have a QNAP NAS plugged in to your computer – and your computer is connected to the internet – does that mean your NAS is connected to the internet also? Or – is the hacking security risk purely for if you choose to directly connect the NAS to the internet (and therefore if you don’t, you risk free)?
REPLY ON YOUTUBE
will adding 2step verification change the way using share links work (ie: sending a share link to a shared folder on my nas to friends via email)?
REPLY ON YOUTUBE
Hi, Thanks for the great video!
Would you be able.to elaborate on sharing the file process to an external temporary user, please?
REPLY ON YOUTUBE
I miss the most important step, formatting and throwing away the QNAP.
REPLY ON YOUTUBE
Found the presentation very irritating. Why keep wizzing the cursor around the screen. Why not use a large black cursor. Don’t do everything so quickly.
REPLY ON YOUTUBE
I have an older TS-469 Pro running 4.3.4, so I guess my NAS is somewhat obsolete in terms of available applications such as Security Counselor
REPLY ON YOUTUBE
I don’t have the QuFirewall and the SSecurity Counselor available sadly, at least it just doesn’t want to install. Probably because my NAS is way too old, running QTS 4.2.6
REPLY ON YOUTUBE
WOW. Nice find here!! Great video.
REPLY ON YOUTUBE
Thank you. Wish I’d seen your recommendations BEFORE the Qlocker attack.
REPLY ON YOUTUBE
hello sir your videos is so helpfull for me but i am confuse with how to configure alnet ssystem software with qnap nas storage i have configure qnap nas storage raid 6 with 4tb *12 hdd 1 hdd in spare but i am able to see live video but not able save nas storage so can you help me how to add path in qnap nas storage for save recording. Thanks,Jerry Upadhyay
REPLY ON YOUTUBE
If Norton or Bitdefender is installed as your main antivirus, will they be able to work on Qnap NAS? Instead of MacAfee, which for instance I don’t like.
REPLY ON YOUTUBE
Dude. Just a side note after watching 150+ videos. I have NEVER heard “noise in the background” so please stop apologizing for it. Not. Once. Ever.
REPLY ON YOUTUBE
I wish I saw this video before ???? apparently Qnap got hit with a massive ransomware attack this year and I had no idea. My files are all encrypted by some hacker asking for Bitcoin in exchange for passwords ????
REPLY ON YOUTUBE
Changing the default port does not enhance security. Security by obscurity. Port scanners can detect open ports it might fool some scripts.
Most people who serious about securing administrative interfaces dont expose them directly to the internet period.
Thats terrible terrible terrible security pratice.
A seperate vpn server with a dedicated vlan for admin is what you should be using to secure the admin interface and remotely managing the nas.
Example
Setup vlan 100 for management
Setup vlan 201 for cifs
Setup vlan 202 for iscsi
Setup vlan 300 for public network (internet)
Setup vpn server in dmz with one arm into the public network (300) another arm into vlan 100.
Setup logging and auditing.
Ensure 2fa exists for vpn service.
The qnap should have ports trunked with vlan 100,201,202 or dedicated ports.
Assign the services ip addresses in each of the ranges.
I never ever bother changing port numbers it simply offers very little security and may just elude some scripts scanning on certain ports
REPLY ON YOUTUBE