

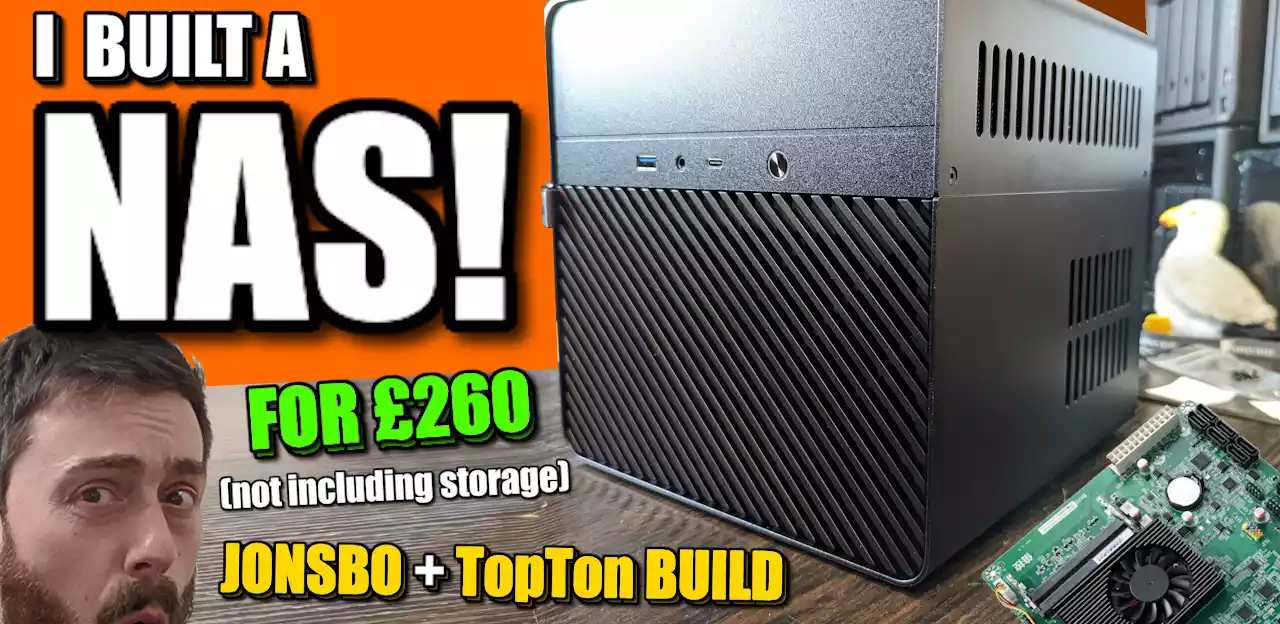
Jonsbo N2 Build with TopTon NAS Board Walkthrough
It’s almost comical now how easy it is to build your very own NAS server from scratch. Building your own server expands the boundaries of your tech understanding. A lot of this ease is attributed to the modular approach to PC and server building that has emerged in recent years. This is especially true for network-attached storage (NAS) devices. The increased availability of pre-configured server motherboards from brands like TopTon and the wider availability of server-ready cases make building your own low-cost, open-source alternative to big brands like Synology and QNAP increasingly easy. Today, I want to guide you through building the Jonsbo N2 NAS build using a cost-effective pre-built TopTon NAS board. This guide will help you finish in just over an hour and will enable you to use popular NAS software such as UnRAID and TrueNAS. Let’s begin.
Note – FULL Video Tutorial HERE on the YouTube Channel
In a Rush? Here are the full details on the Recommended Jonsbo N2 NAS Builds for $250, $500, $750 and $1000 – HERE on the blog (with parts) and HERE on YouTube:
| Jonsbo N2 + TopTon Intel n5105 Celeron / Pentium n6005 Build (+$35)
£264.64 (128GB M.2 NVMe + 4GB RAM + 400W PSU) (Optional/Swap) If you want to save some money:
£247.47 (no M.2 NVMe and Cheap PSU) Note, you need an SSD for TrueNAS OS (USB for UnRAID) |
| Jonsbo N2 + Intel Core i5 12th Gen + 16GB RAM + 10GbE Build
Total 390.44 (i5 CPU + 16GB RAM + 2x10GbE + 400W PSU + Case + Cables) |
| Jonsbo N2 + Gen4/5 MoBo + Intel Core i5 12th Gen with Int Gfx + 32GB RAM + 10GbE Build
Total £586.63 (Amazon) + £123.51 (Aliexpress) |
What You Need for the Jonsbo N2 NAS Build
Although this guide is designed for the Jonsbo N2 NAS, the range of TopTon NAS motherboard combos is diverse. Some elements of this guide might differ based on the TopTon motherboard you choose. Generally, you’ll need the following items:
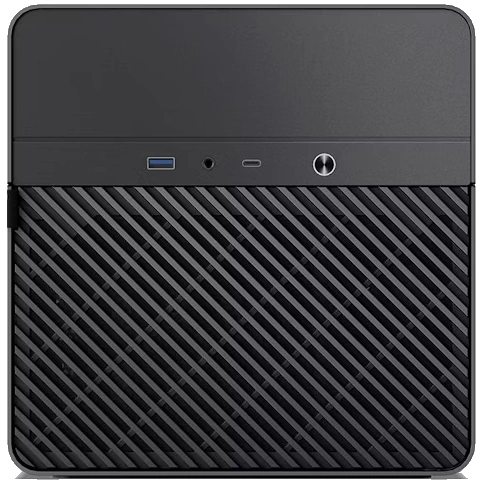
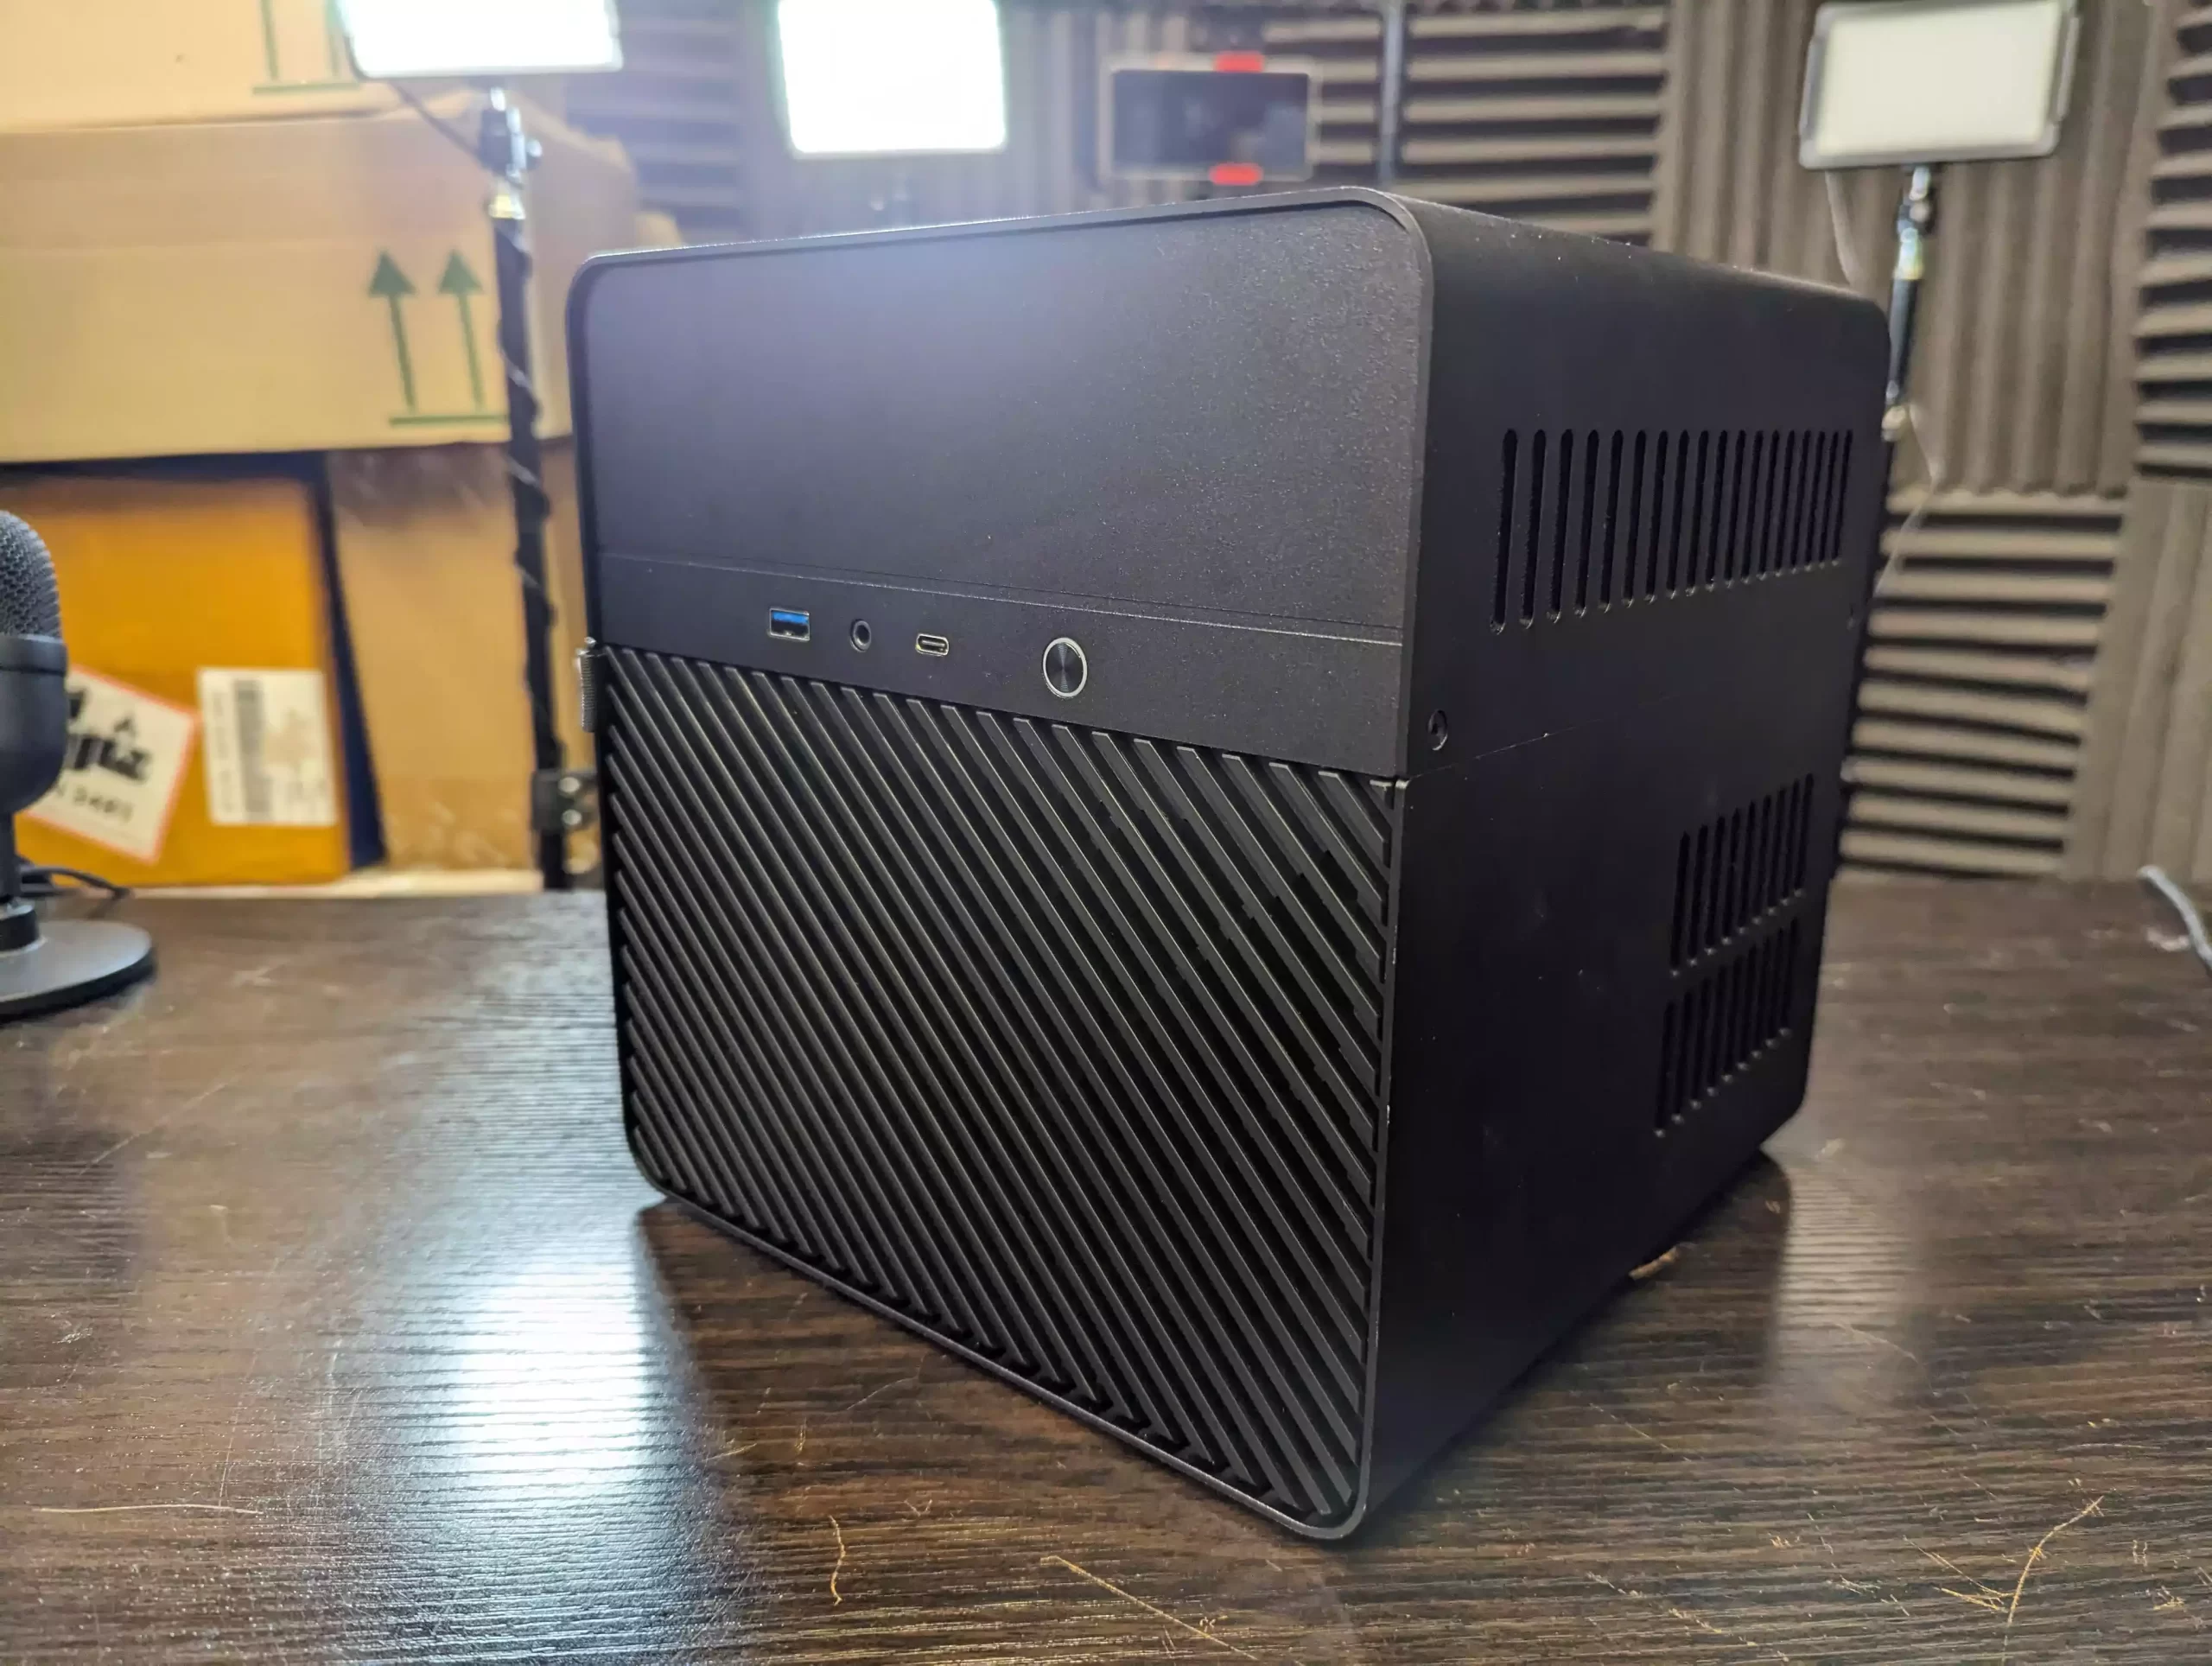
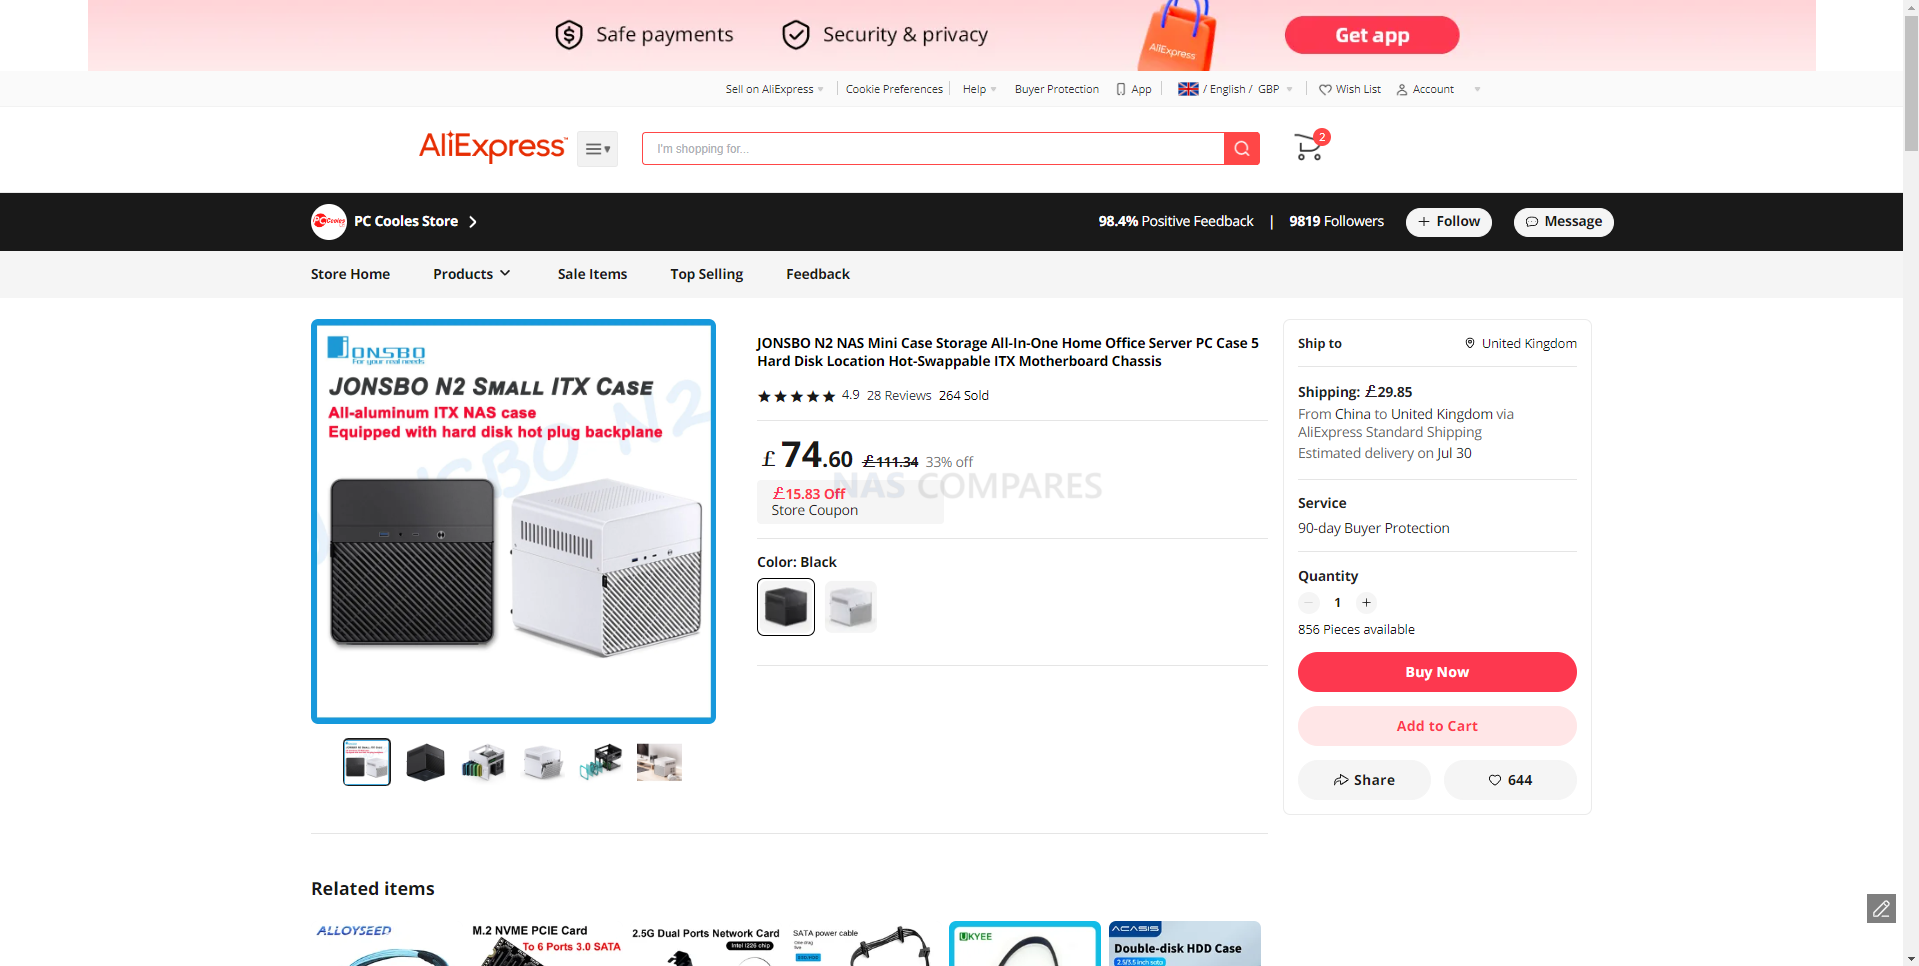
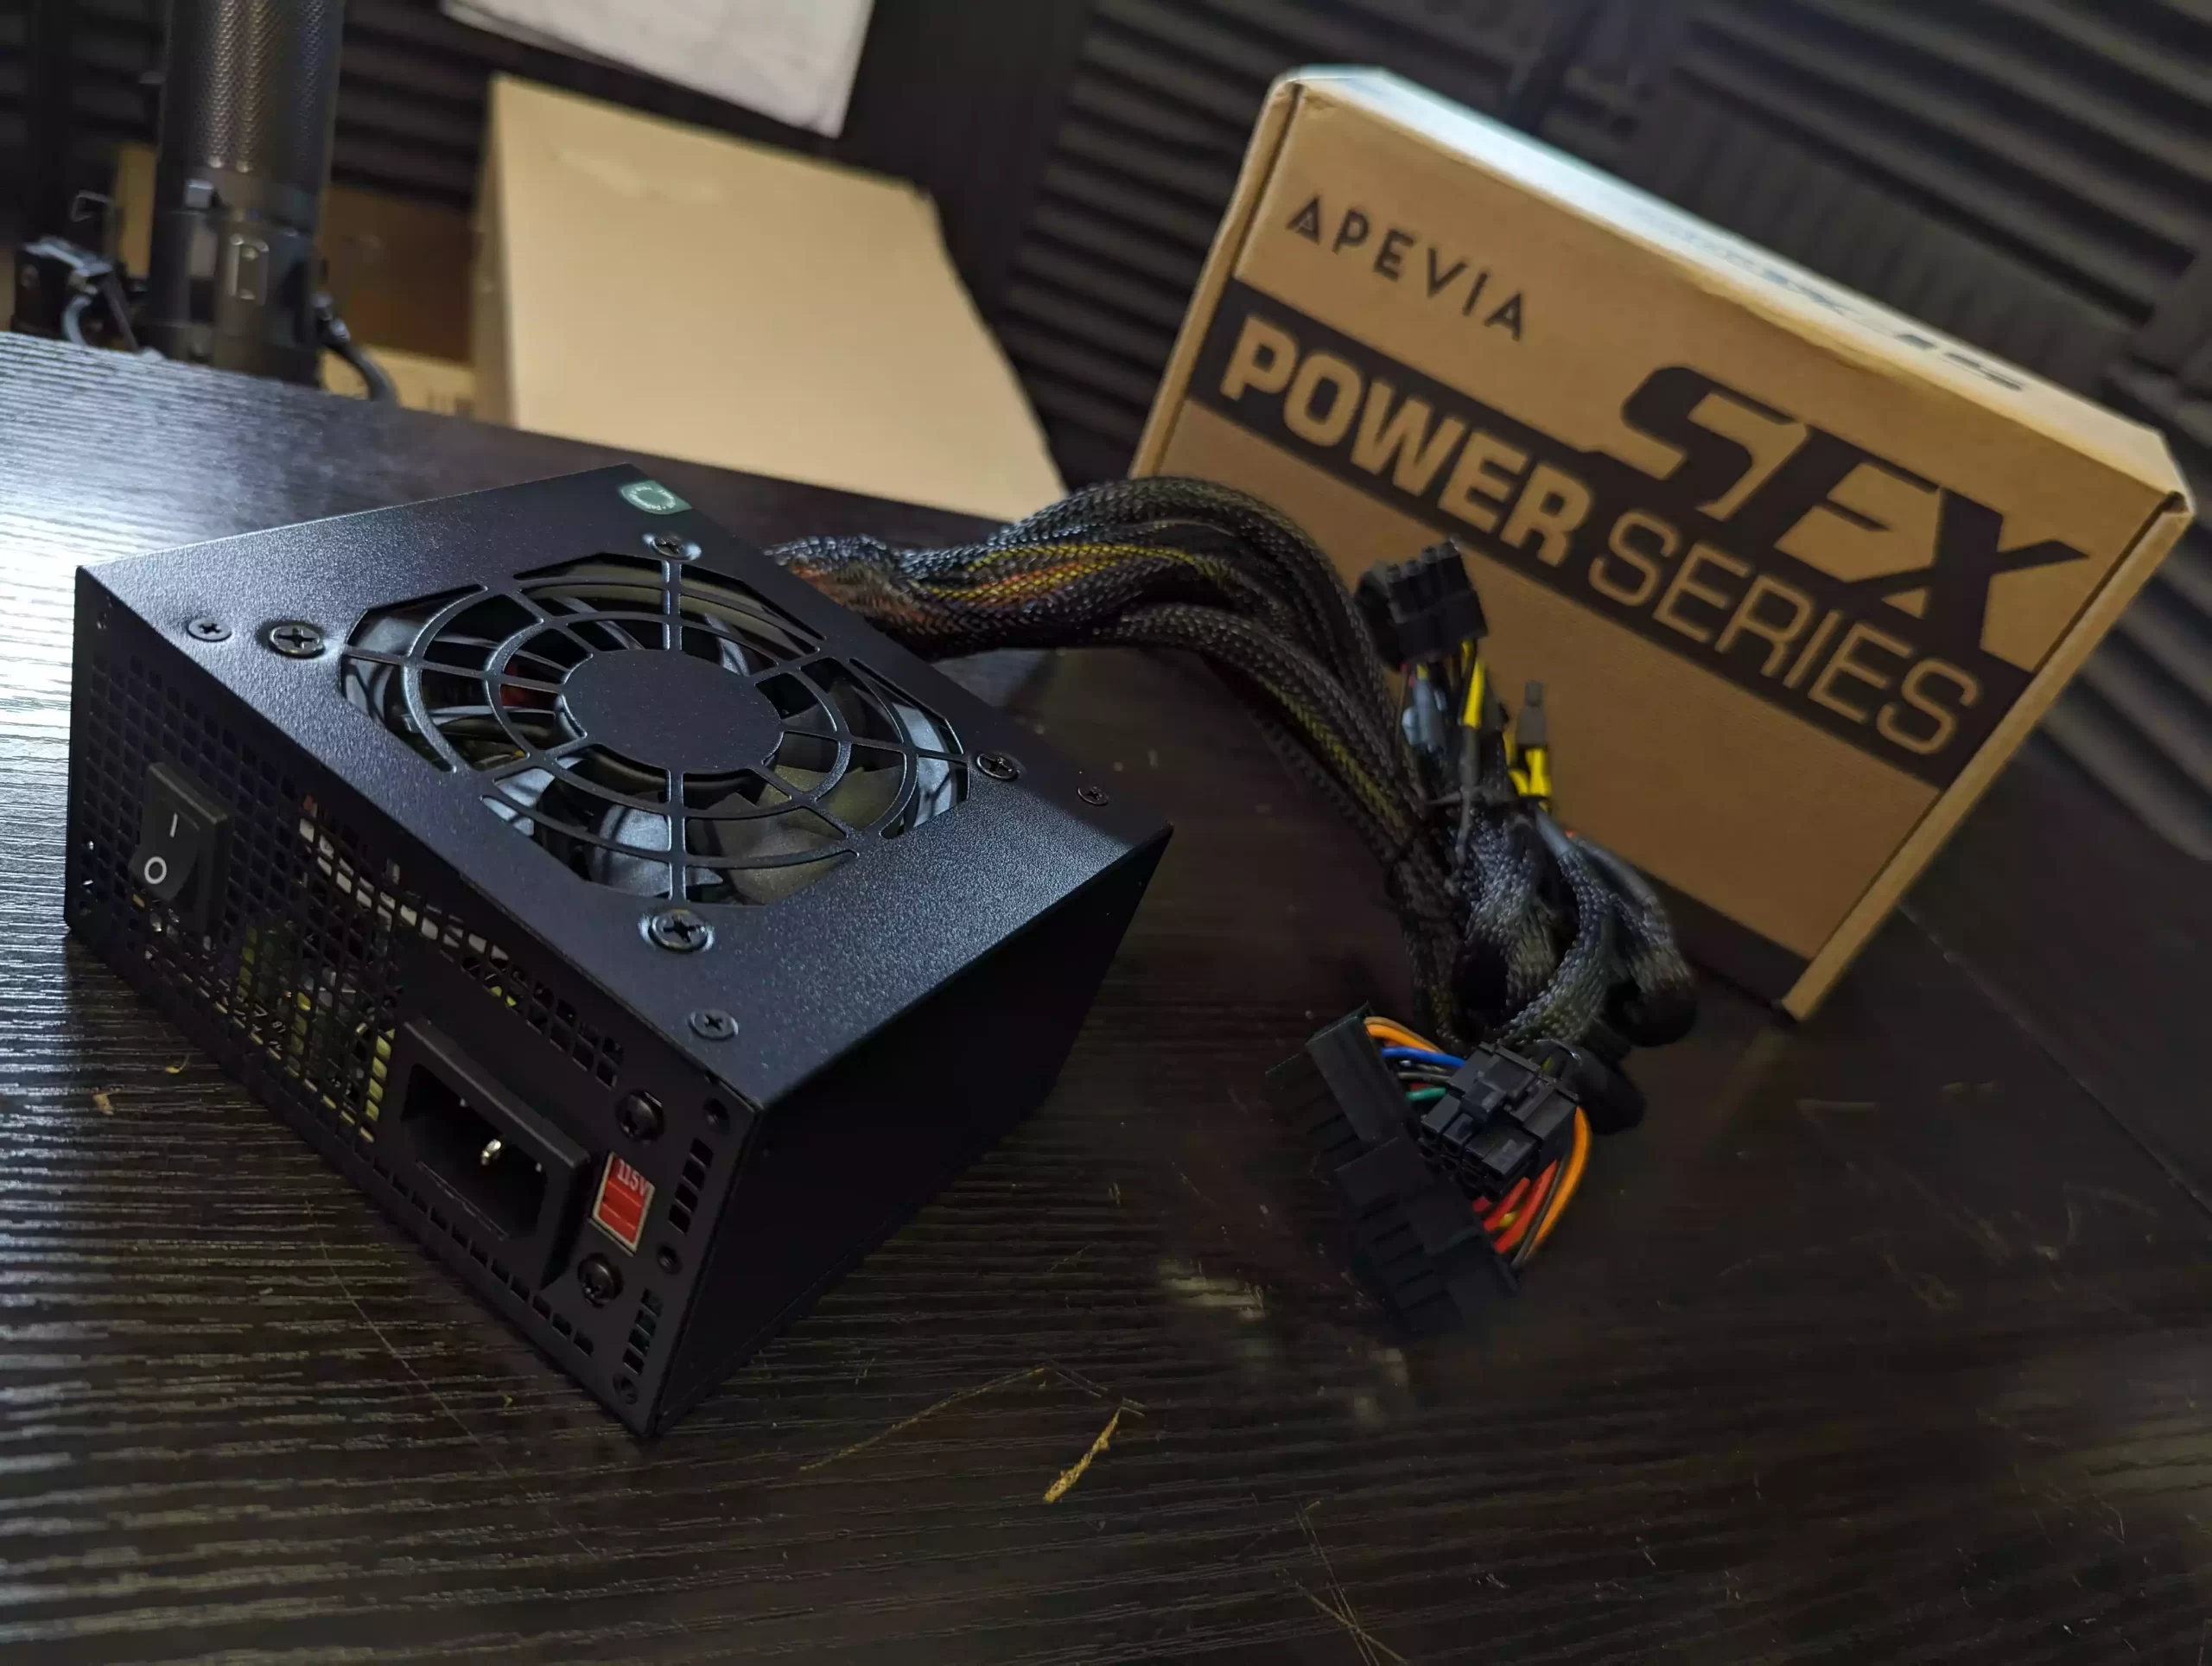
- Jonsbo N2 NAS case – HERE
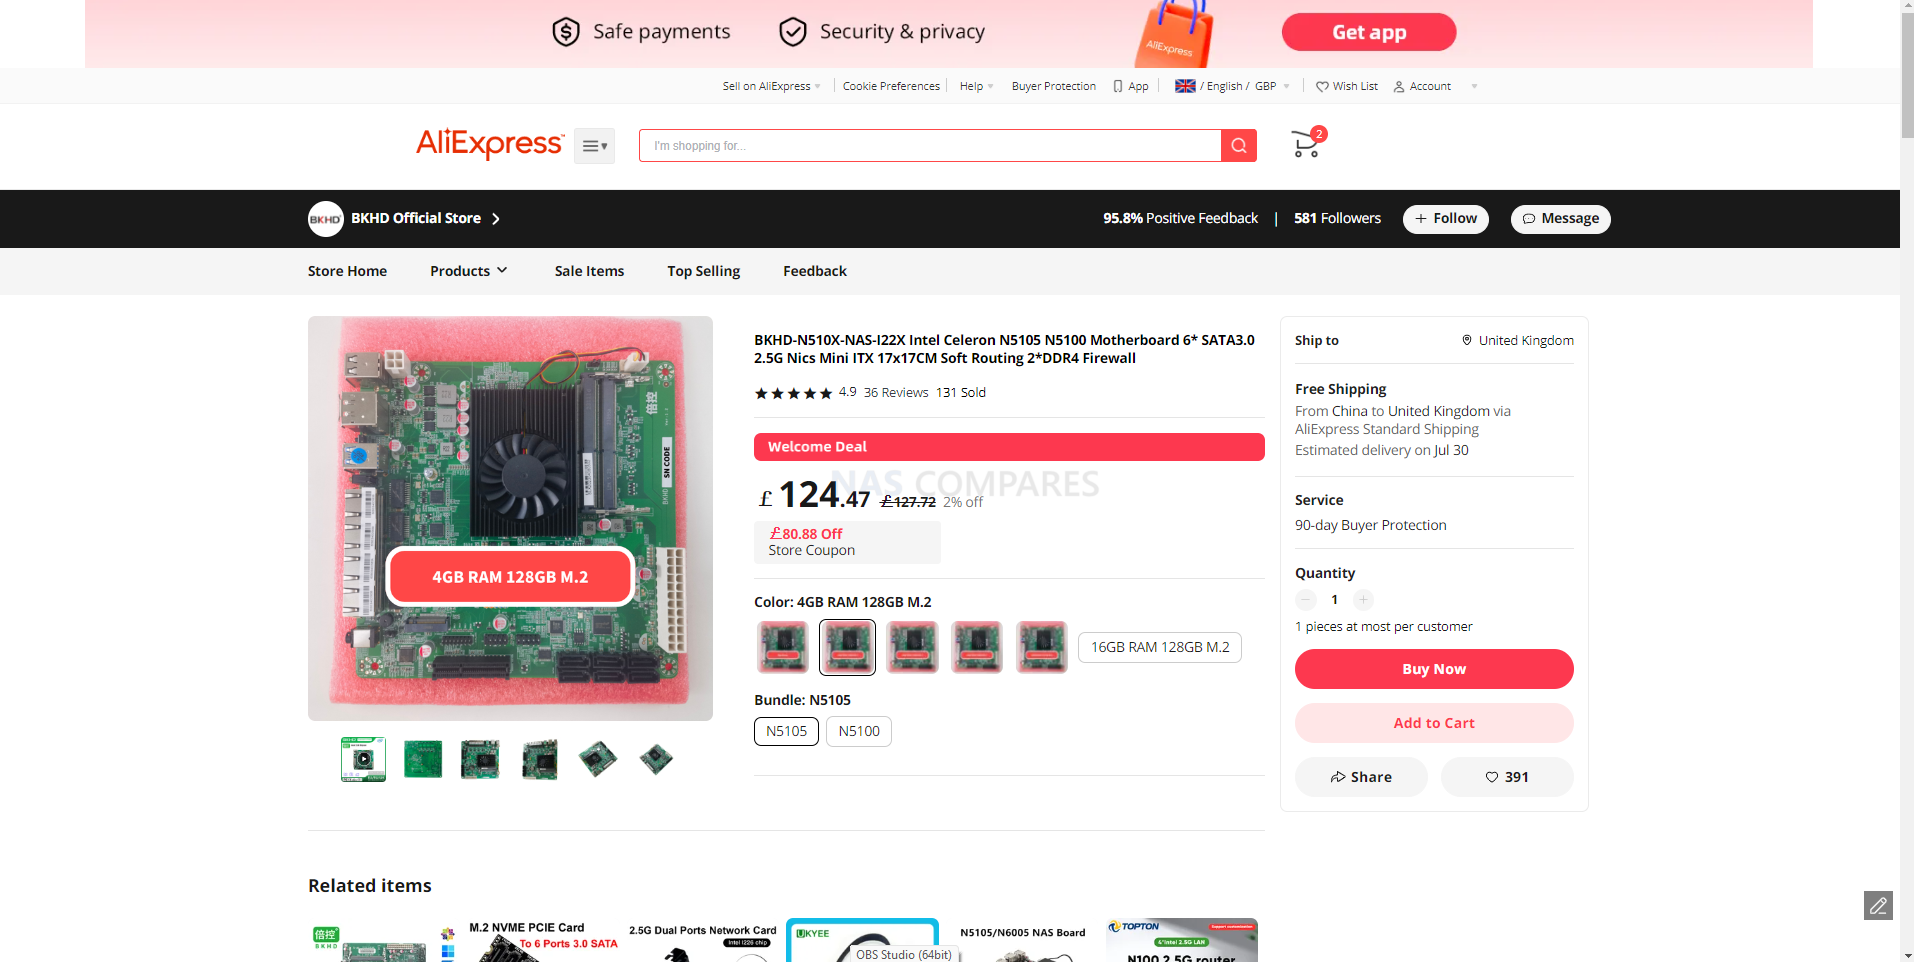
- TopTon NAS motherboard (either with memory and SSD included or purchased separately)- Amazon HERE
- Storage media (HDDs and SSDs)
- A USB drive (if you’re using UnRAID to run from or TrueNAS to install from) – HERE
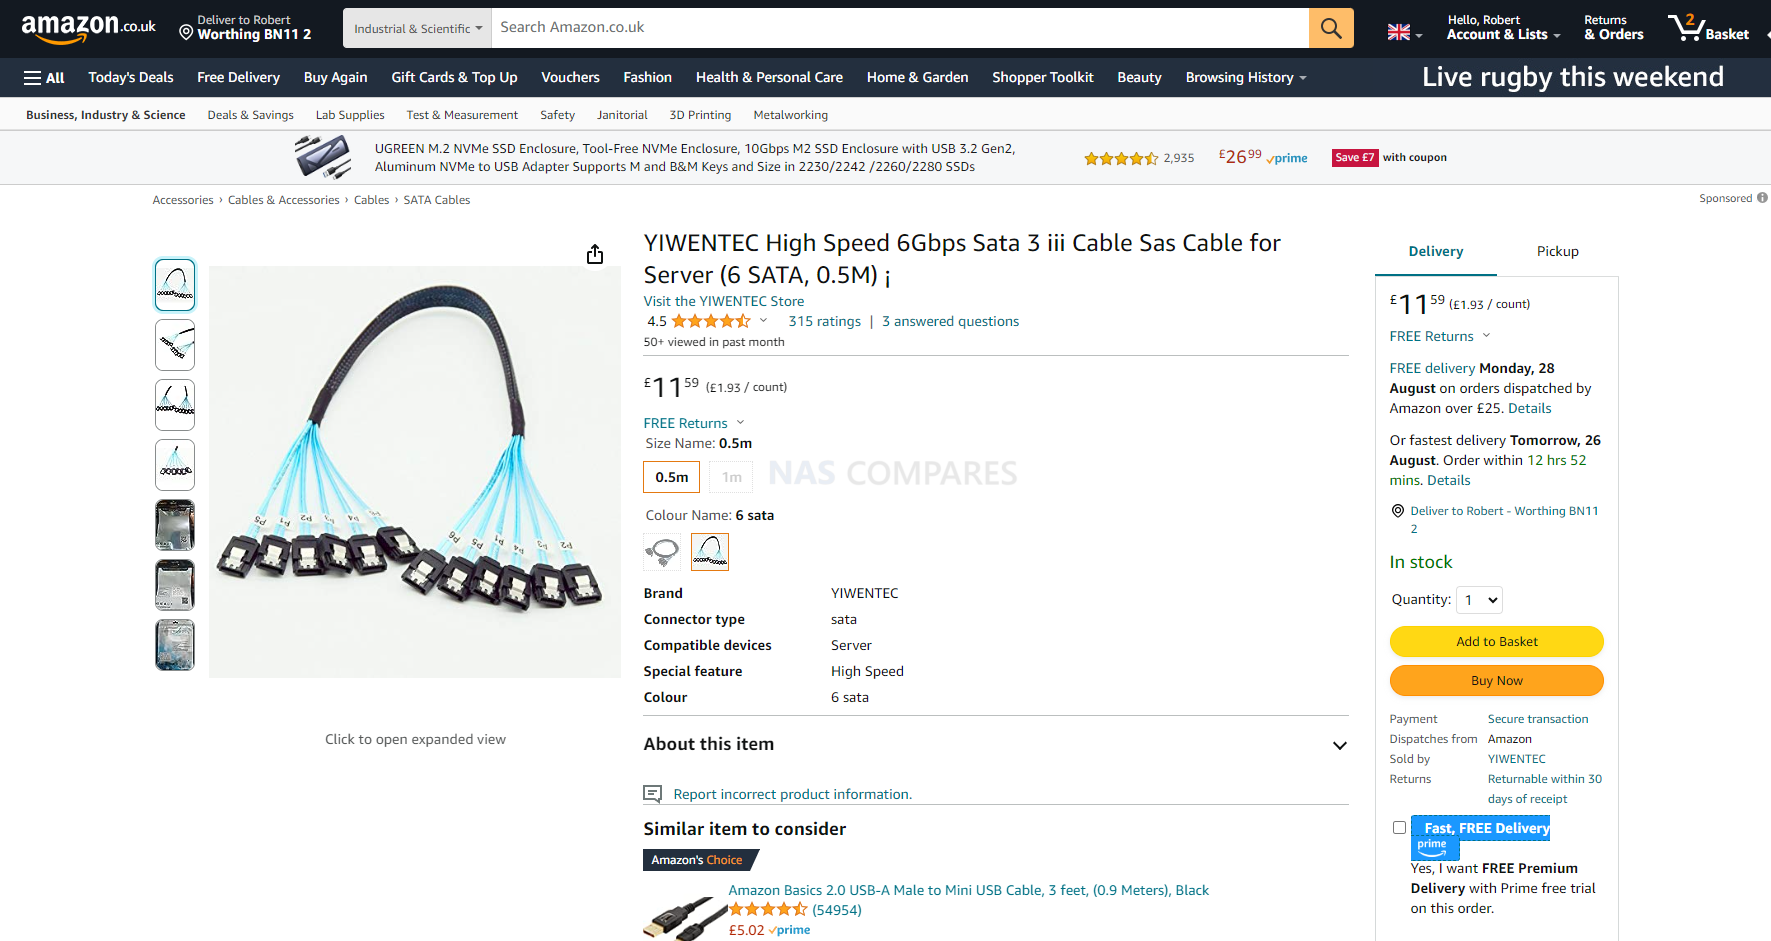
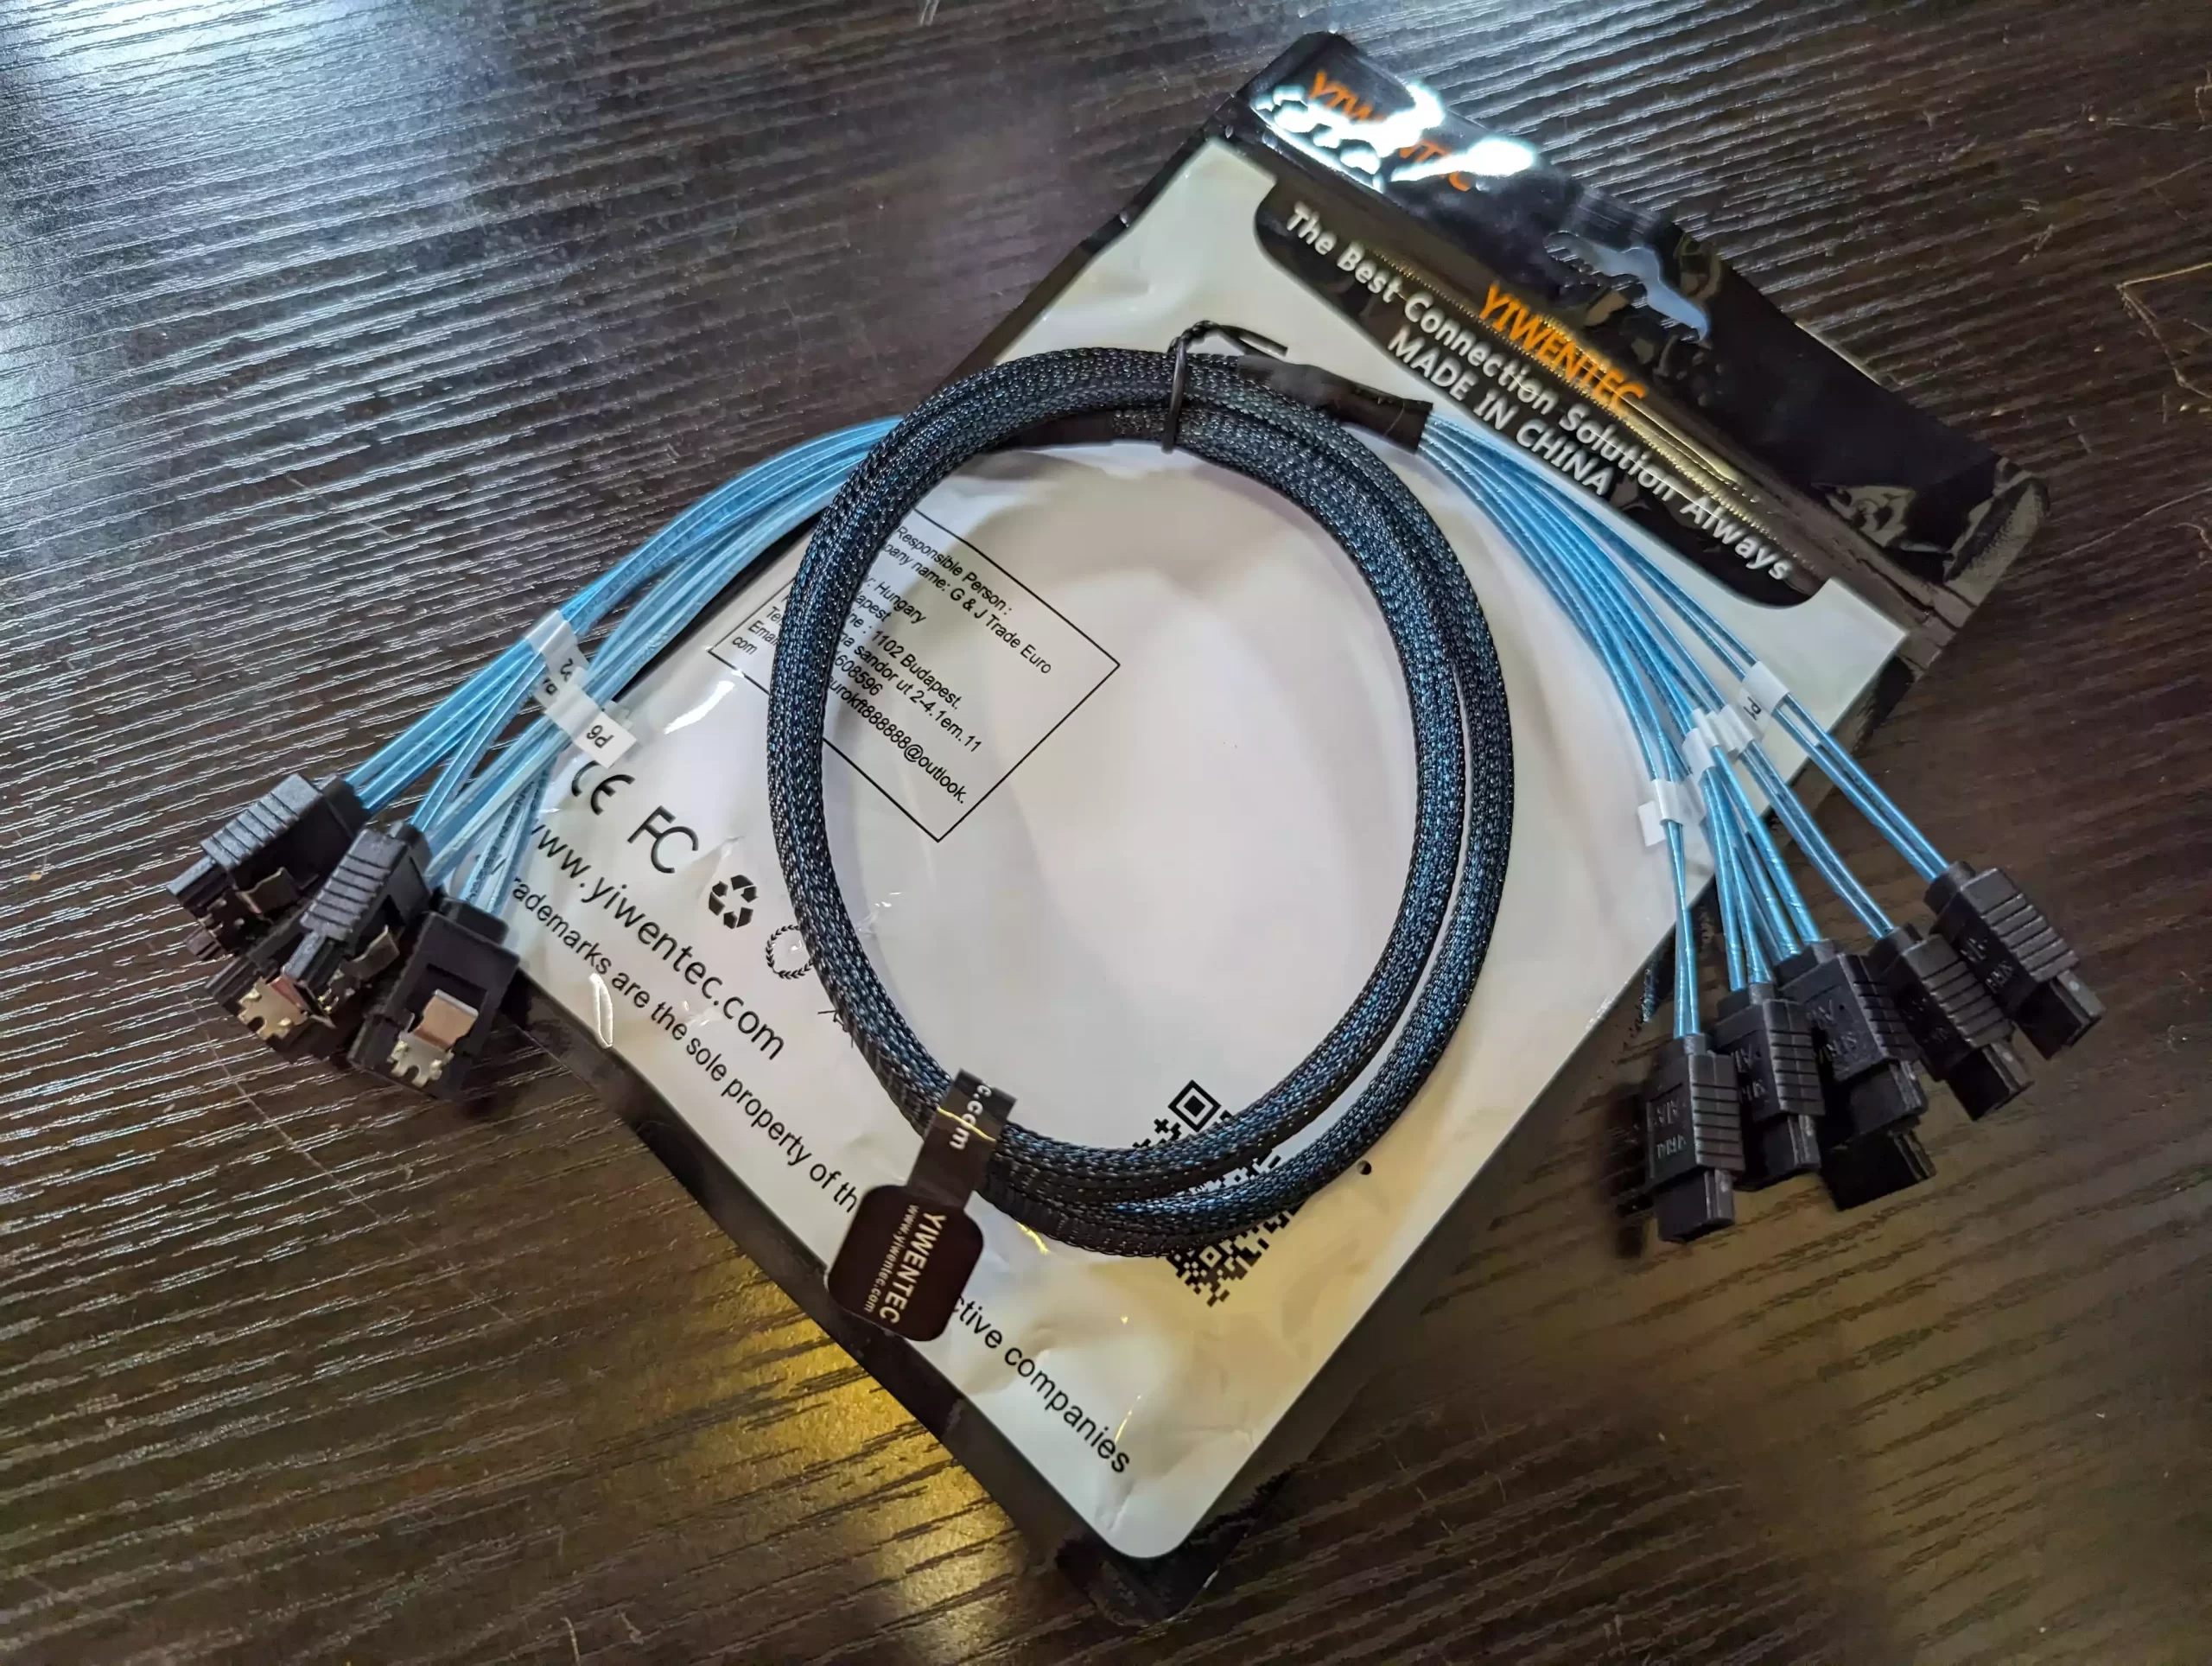
- A 6x SATA multi-lane cable – HERE
- A minimum of 250-watt SFX PSU – HERE


- Philips cross-head screwdriver
- USB keyboard, mouse, and HDMI monitor/capture card
- Optional – Download Advanced IP Scanner HERE, as it is a really useful tool for analyzing your network and finding your new TrueNAS Core NAS for remote access
- Optional – A Disk Image to USB conversion too. I recommend ‘Rufus’, currently in ver 3.19 and can be run in a portable .exe form that doesn’t require installation – DOWNLOAD
- Optional – Download the latest stable release of TrueNAS Core here as a system image (you will be converting this to USB later on) – DOWNLOAD
- Optional – Download the latest stable release of UnRAID here as a system image (you will be converting this to USB later on) – DOWNLOAD
That’s about it! The only other things you’ll need are time and patience. Avoid rushing the build as you’re working with internal components in a relatively confined space.
Start of the Jonsbo N2 NAS Build Guide
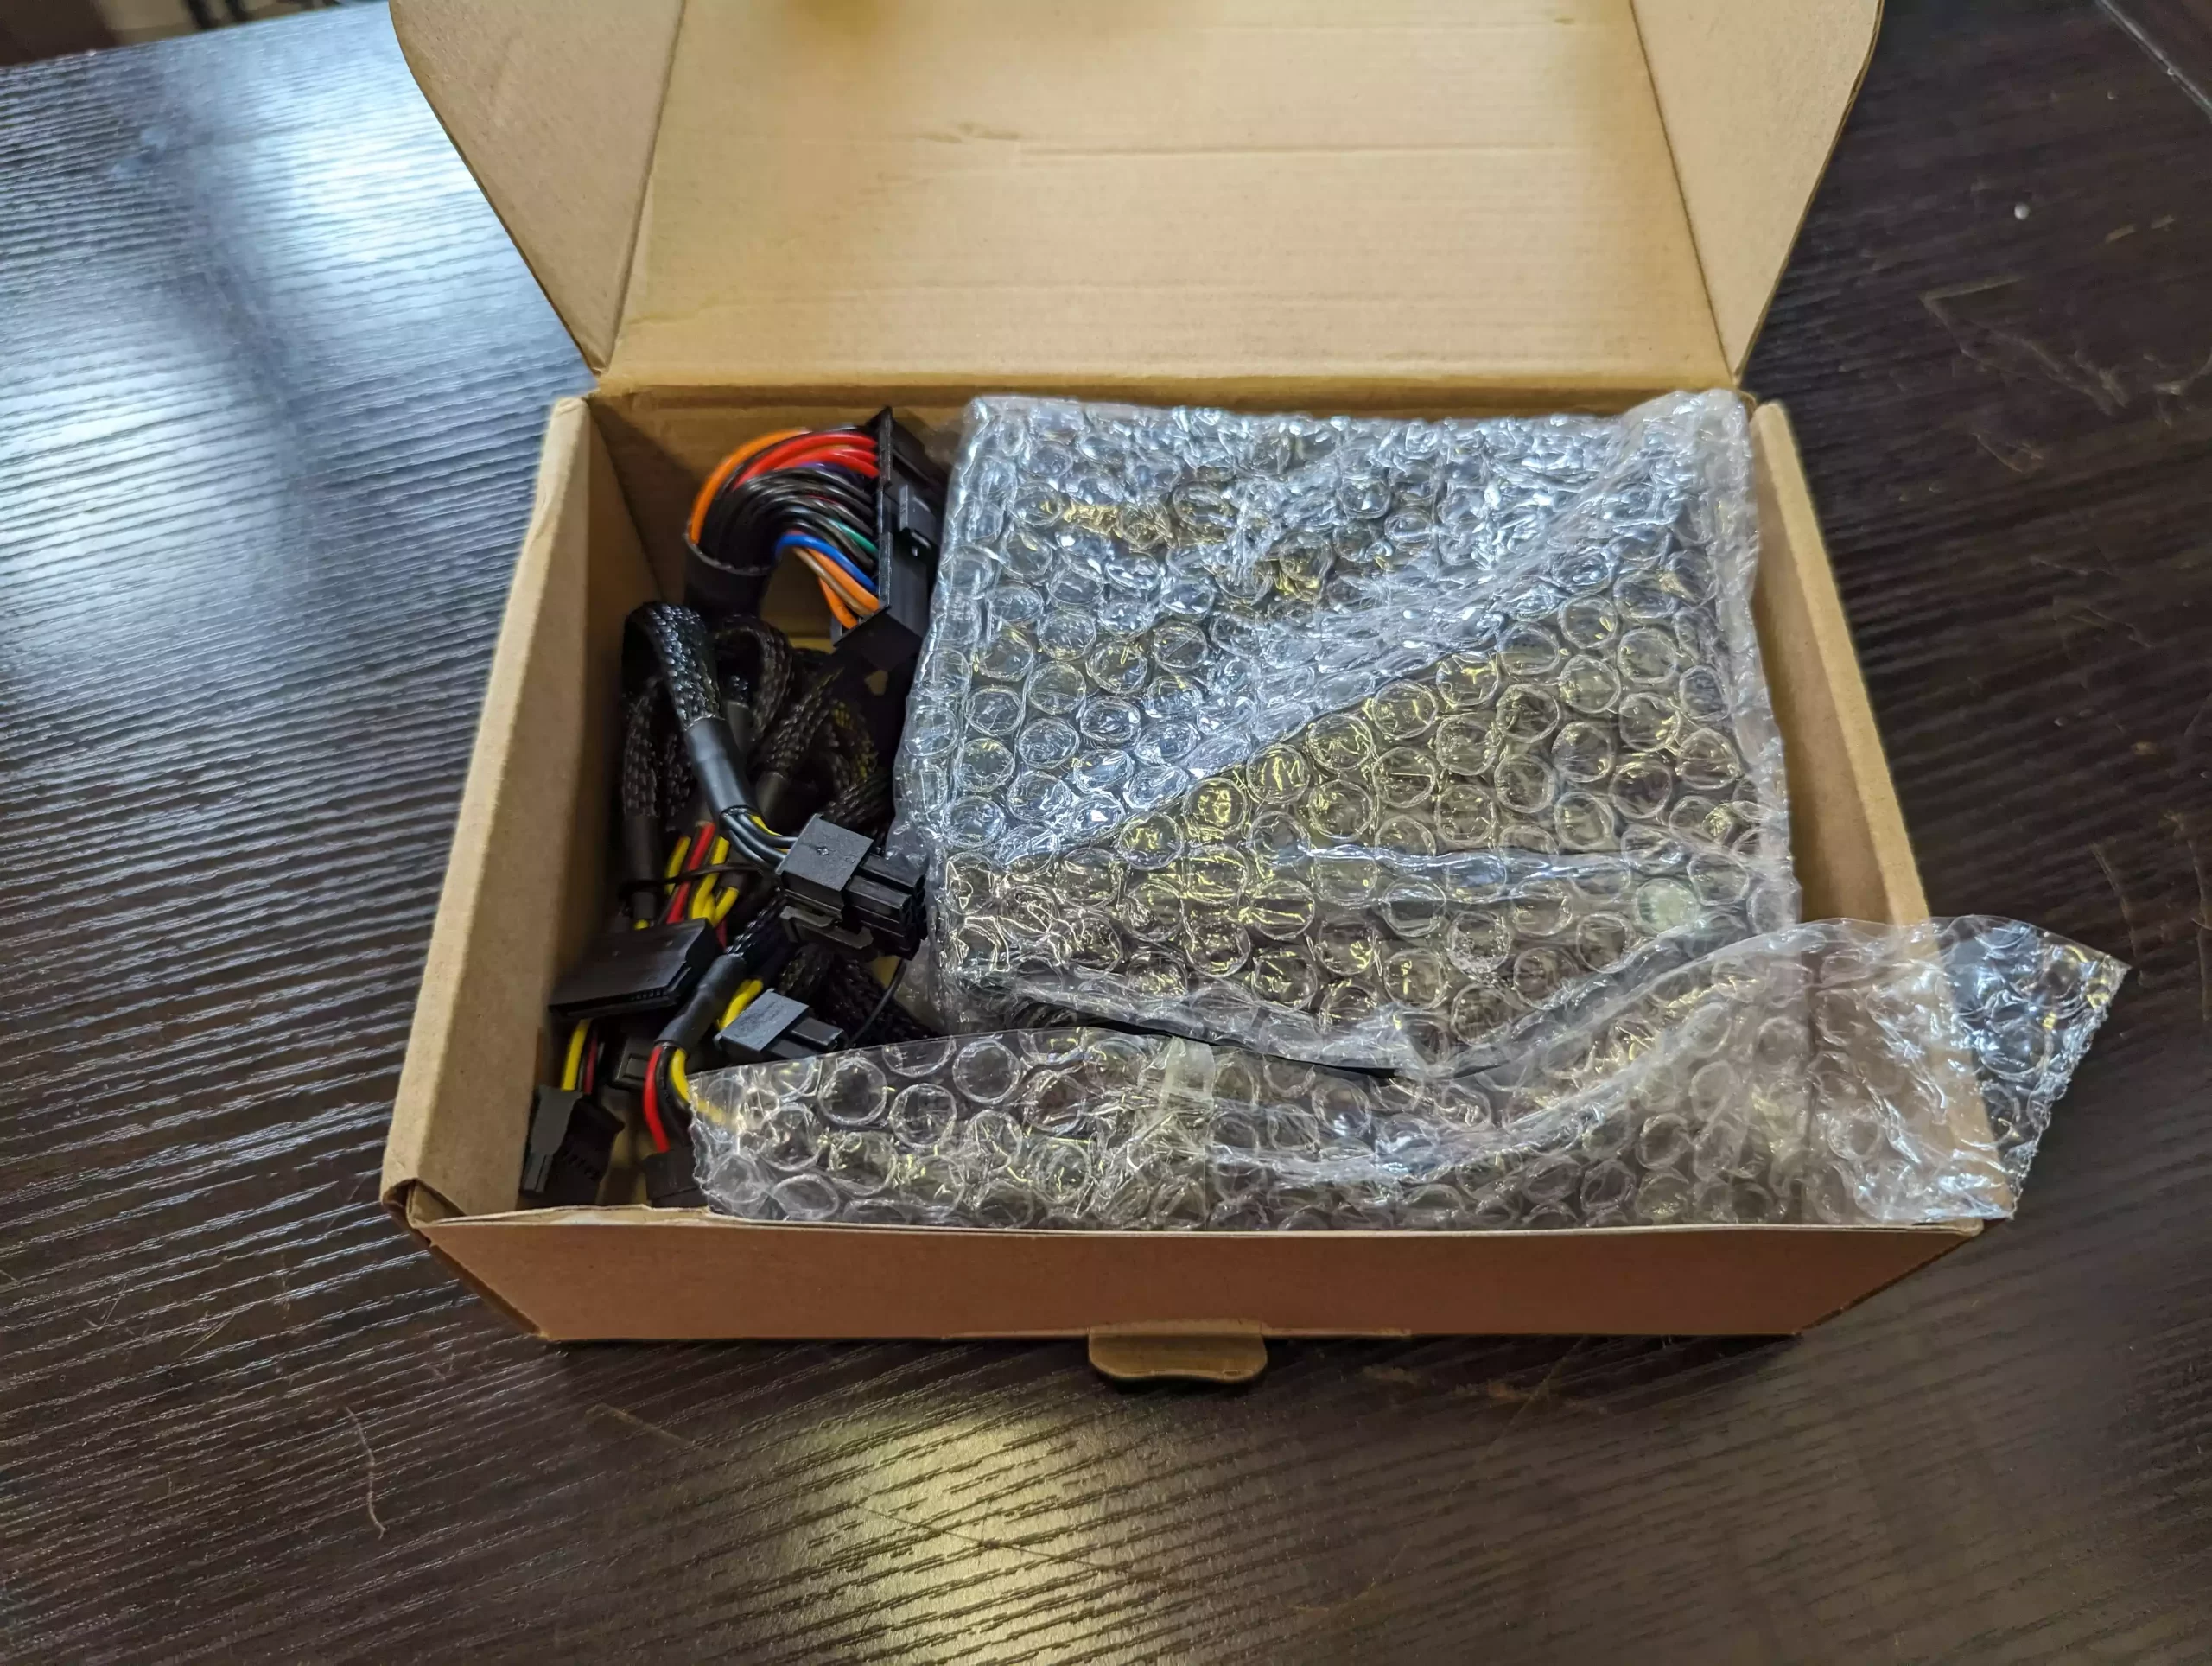
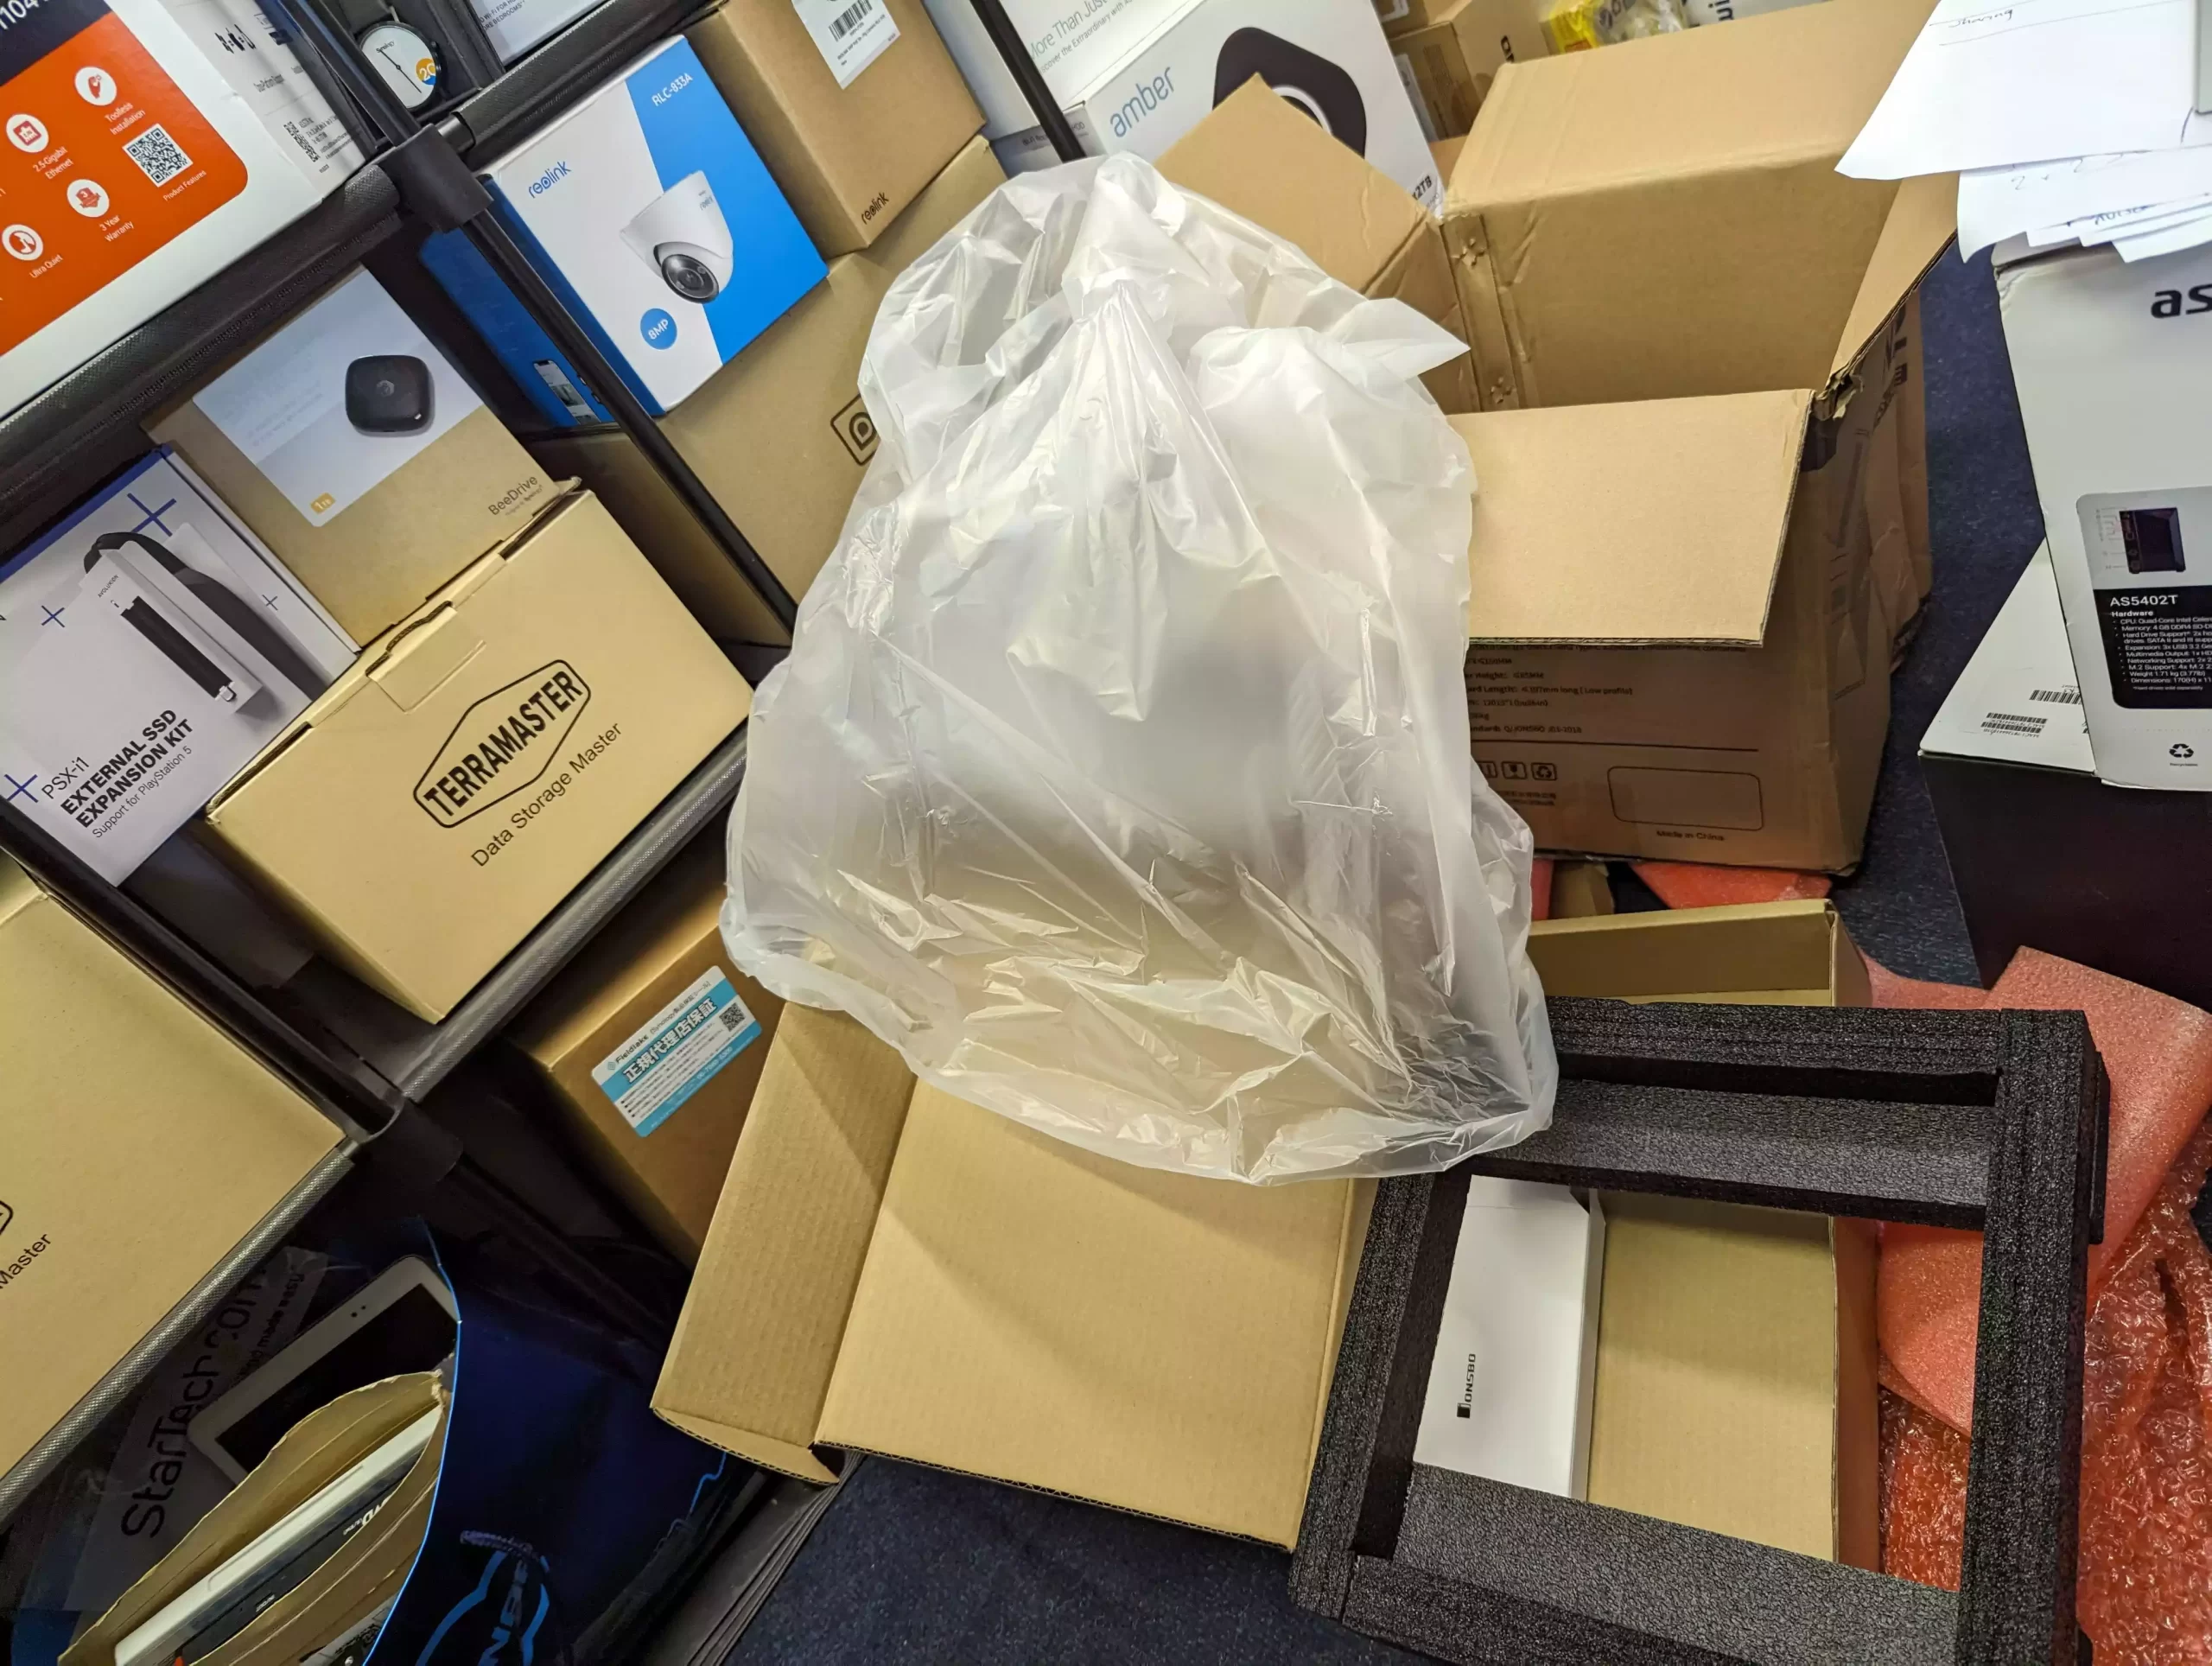
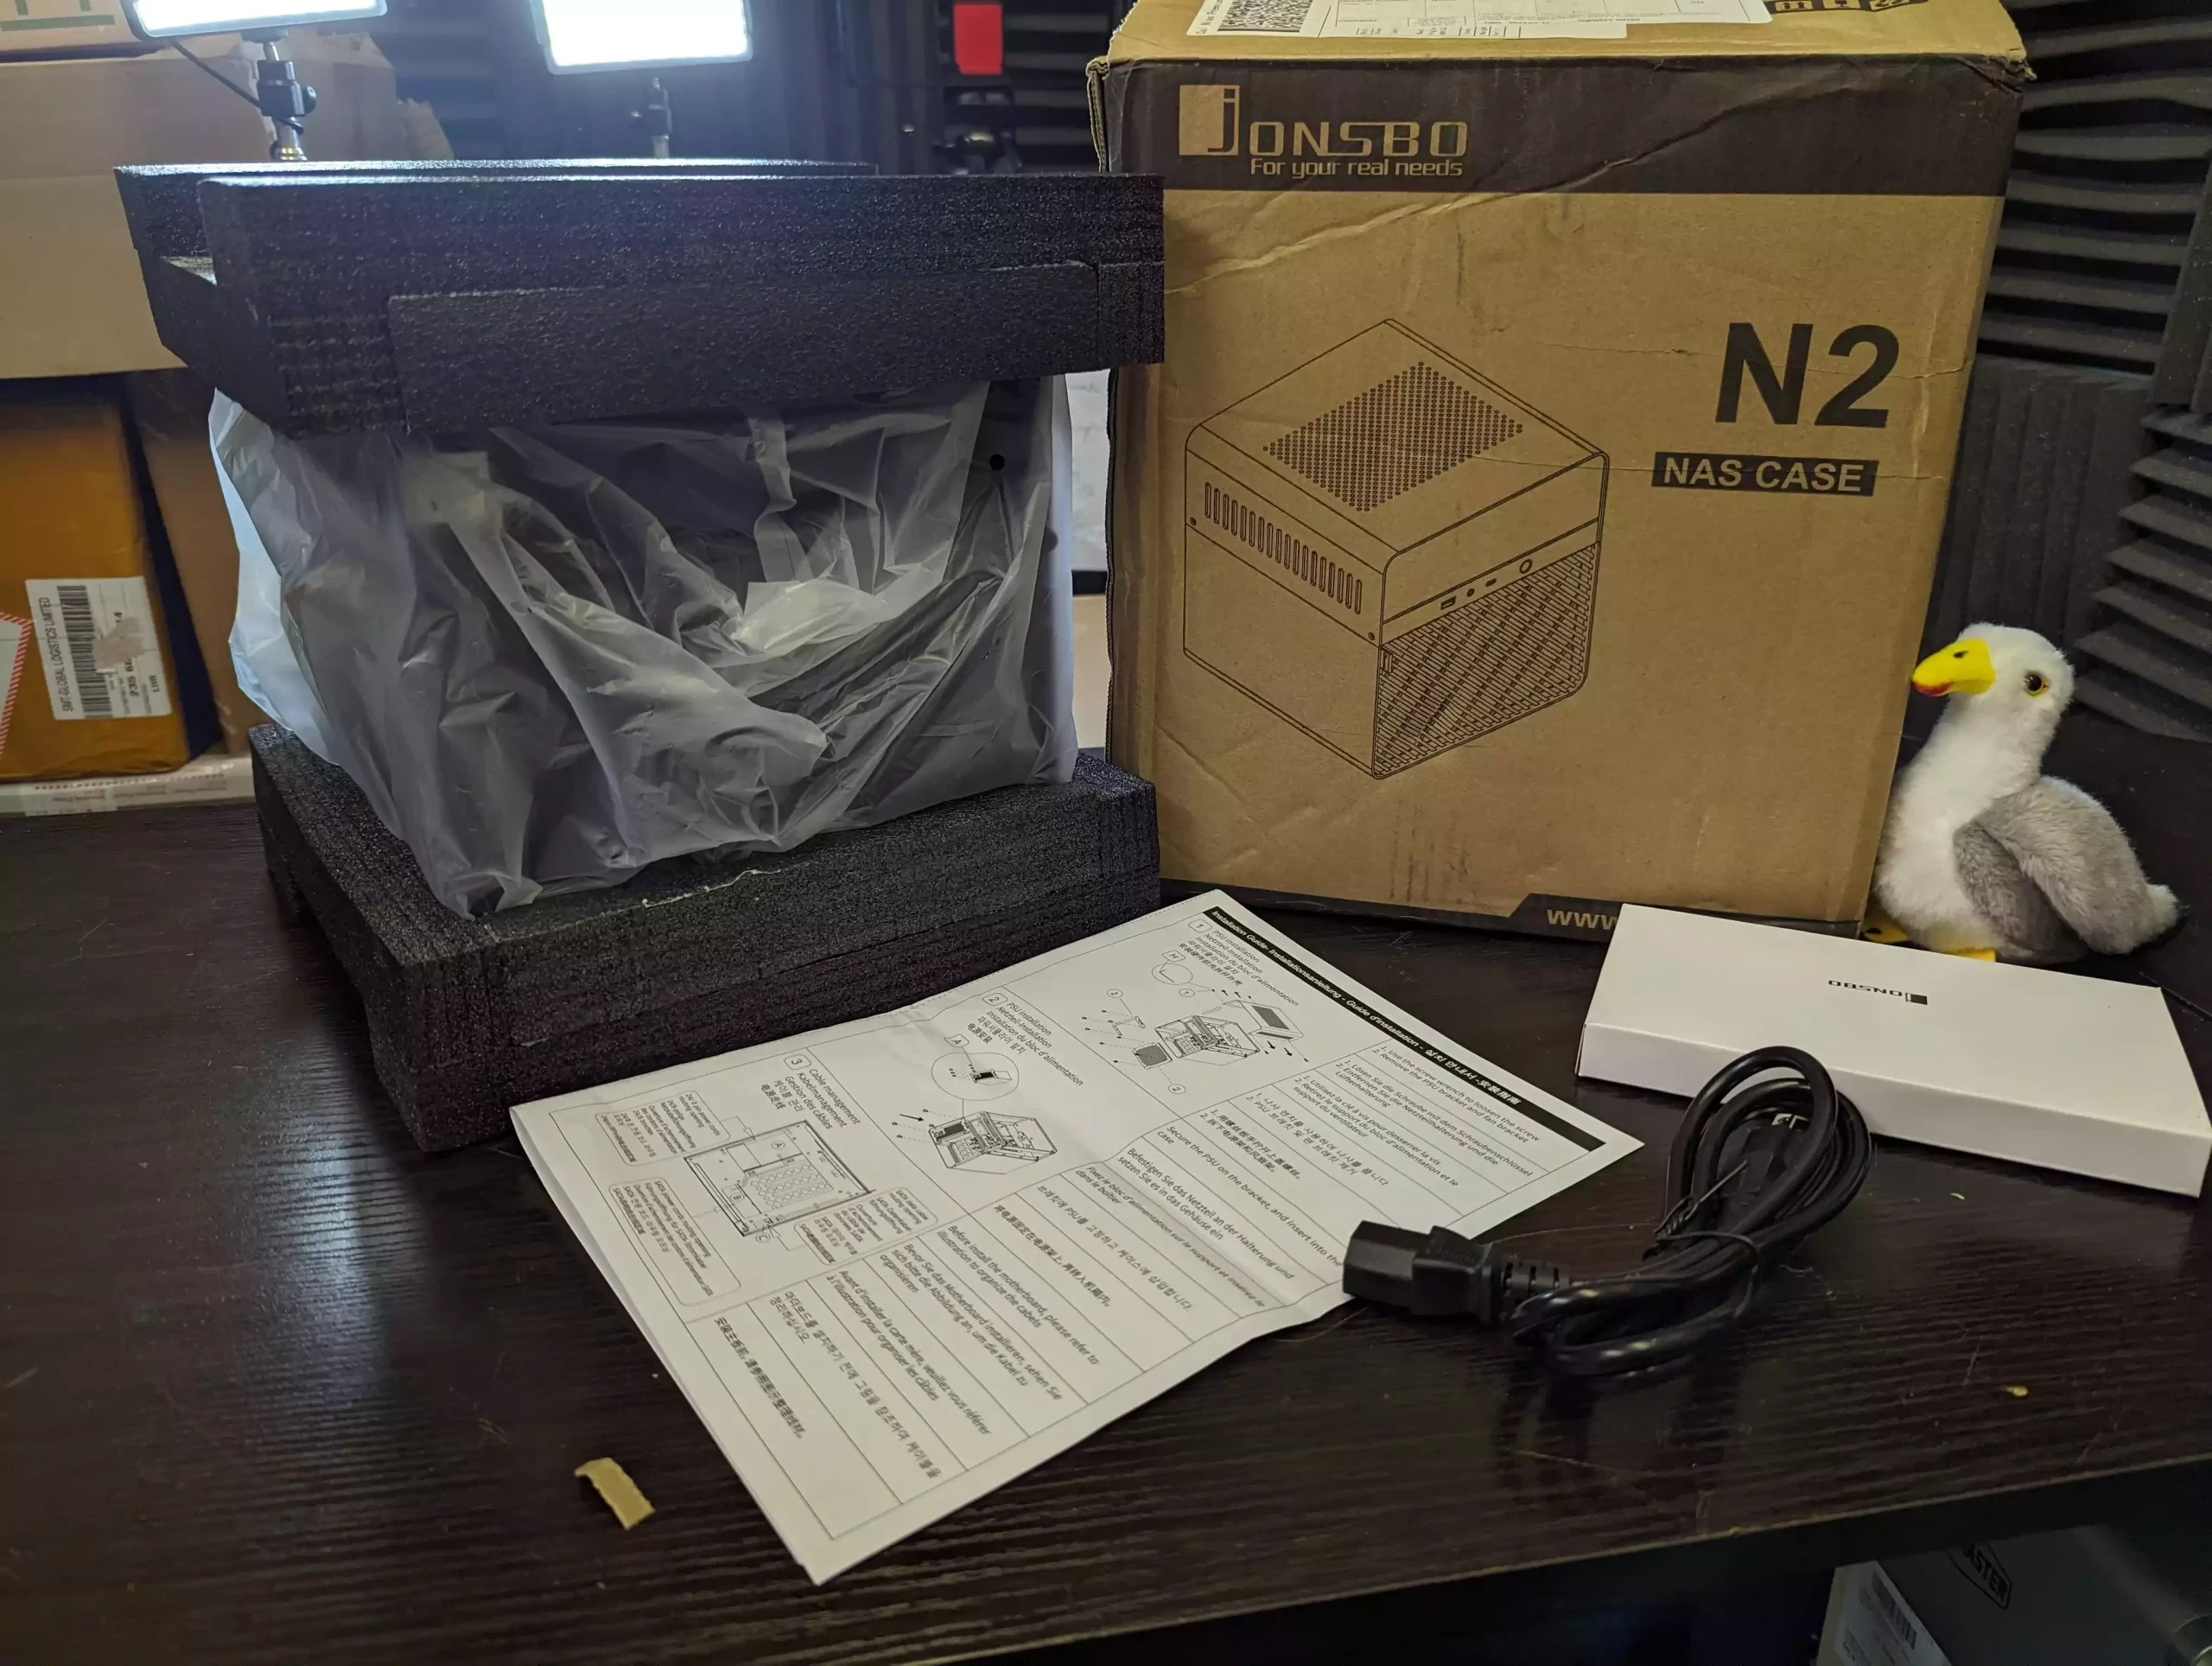
Unpack all components for this build and clear away any unnecessary materials.

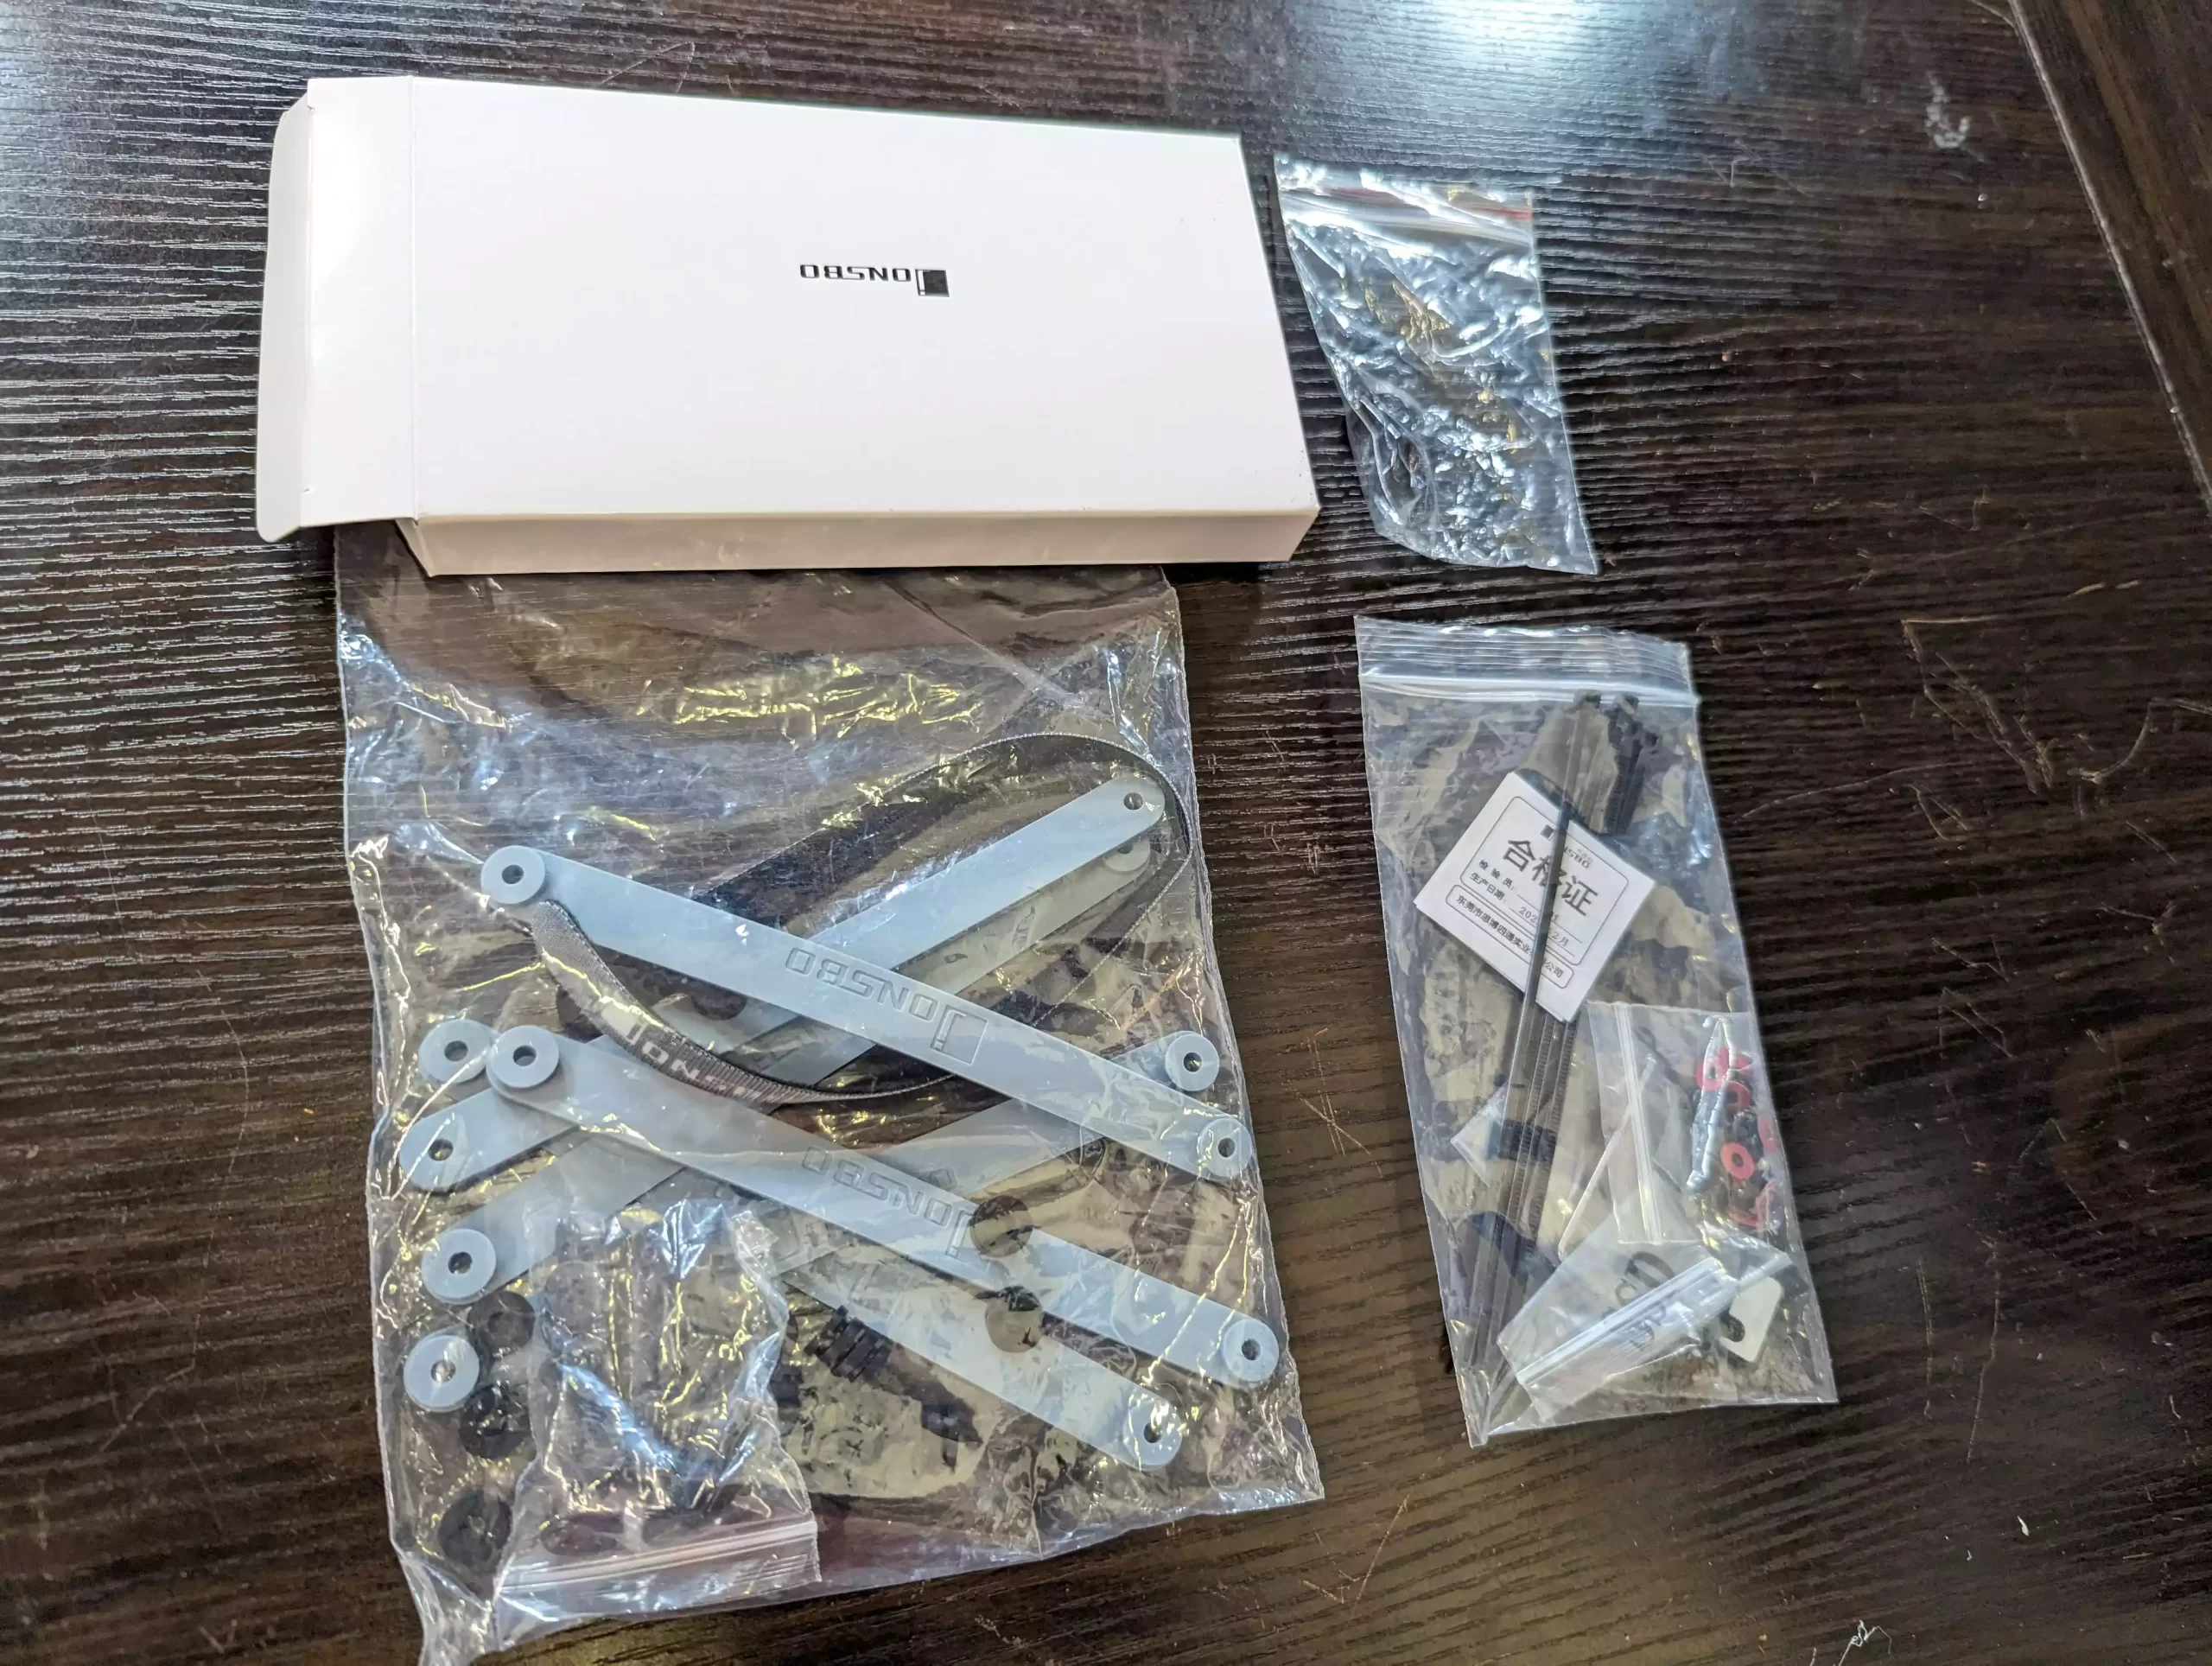
Place the Jonsbo N2 NAS case on a table. Use the included small Allen key to remove the top lid from all four corners.
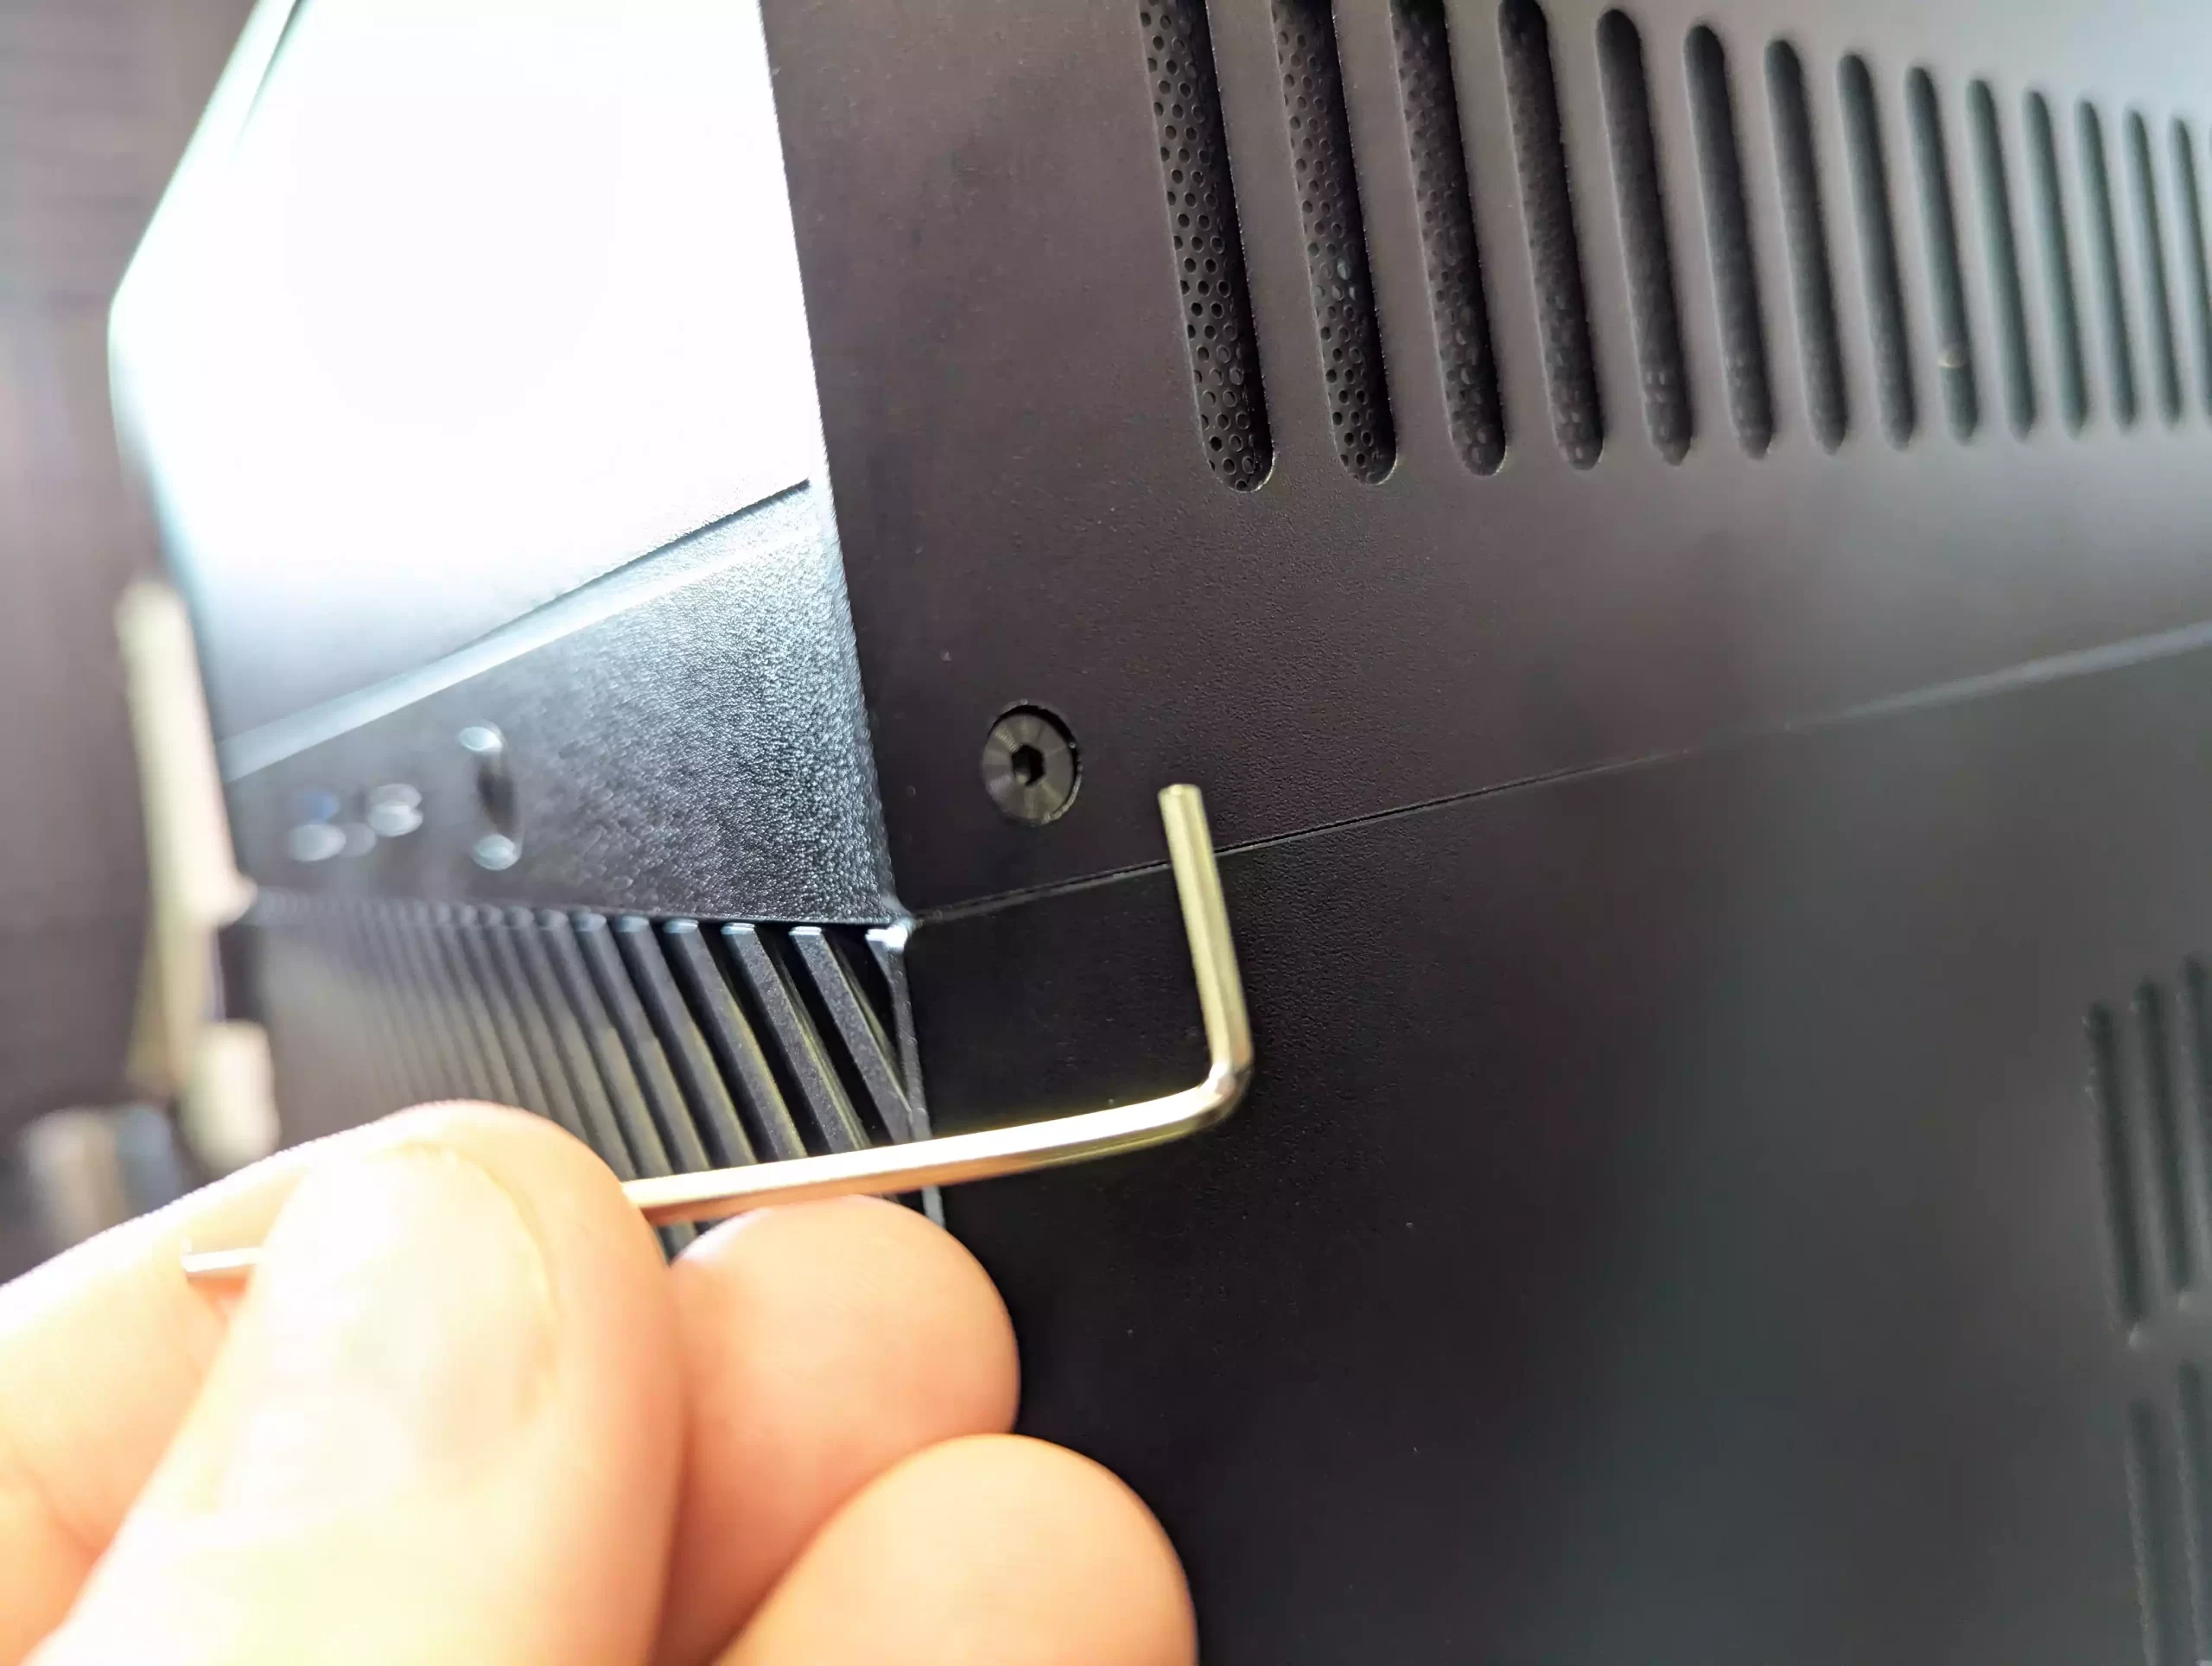
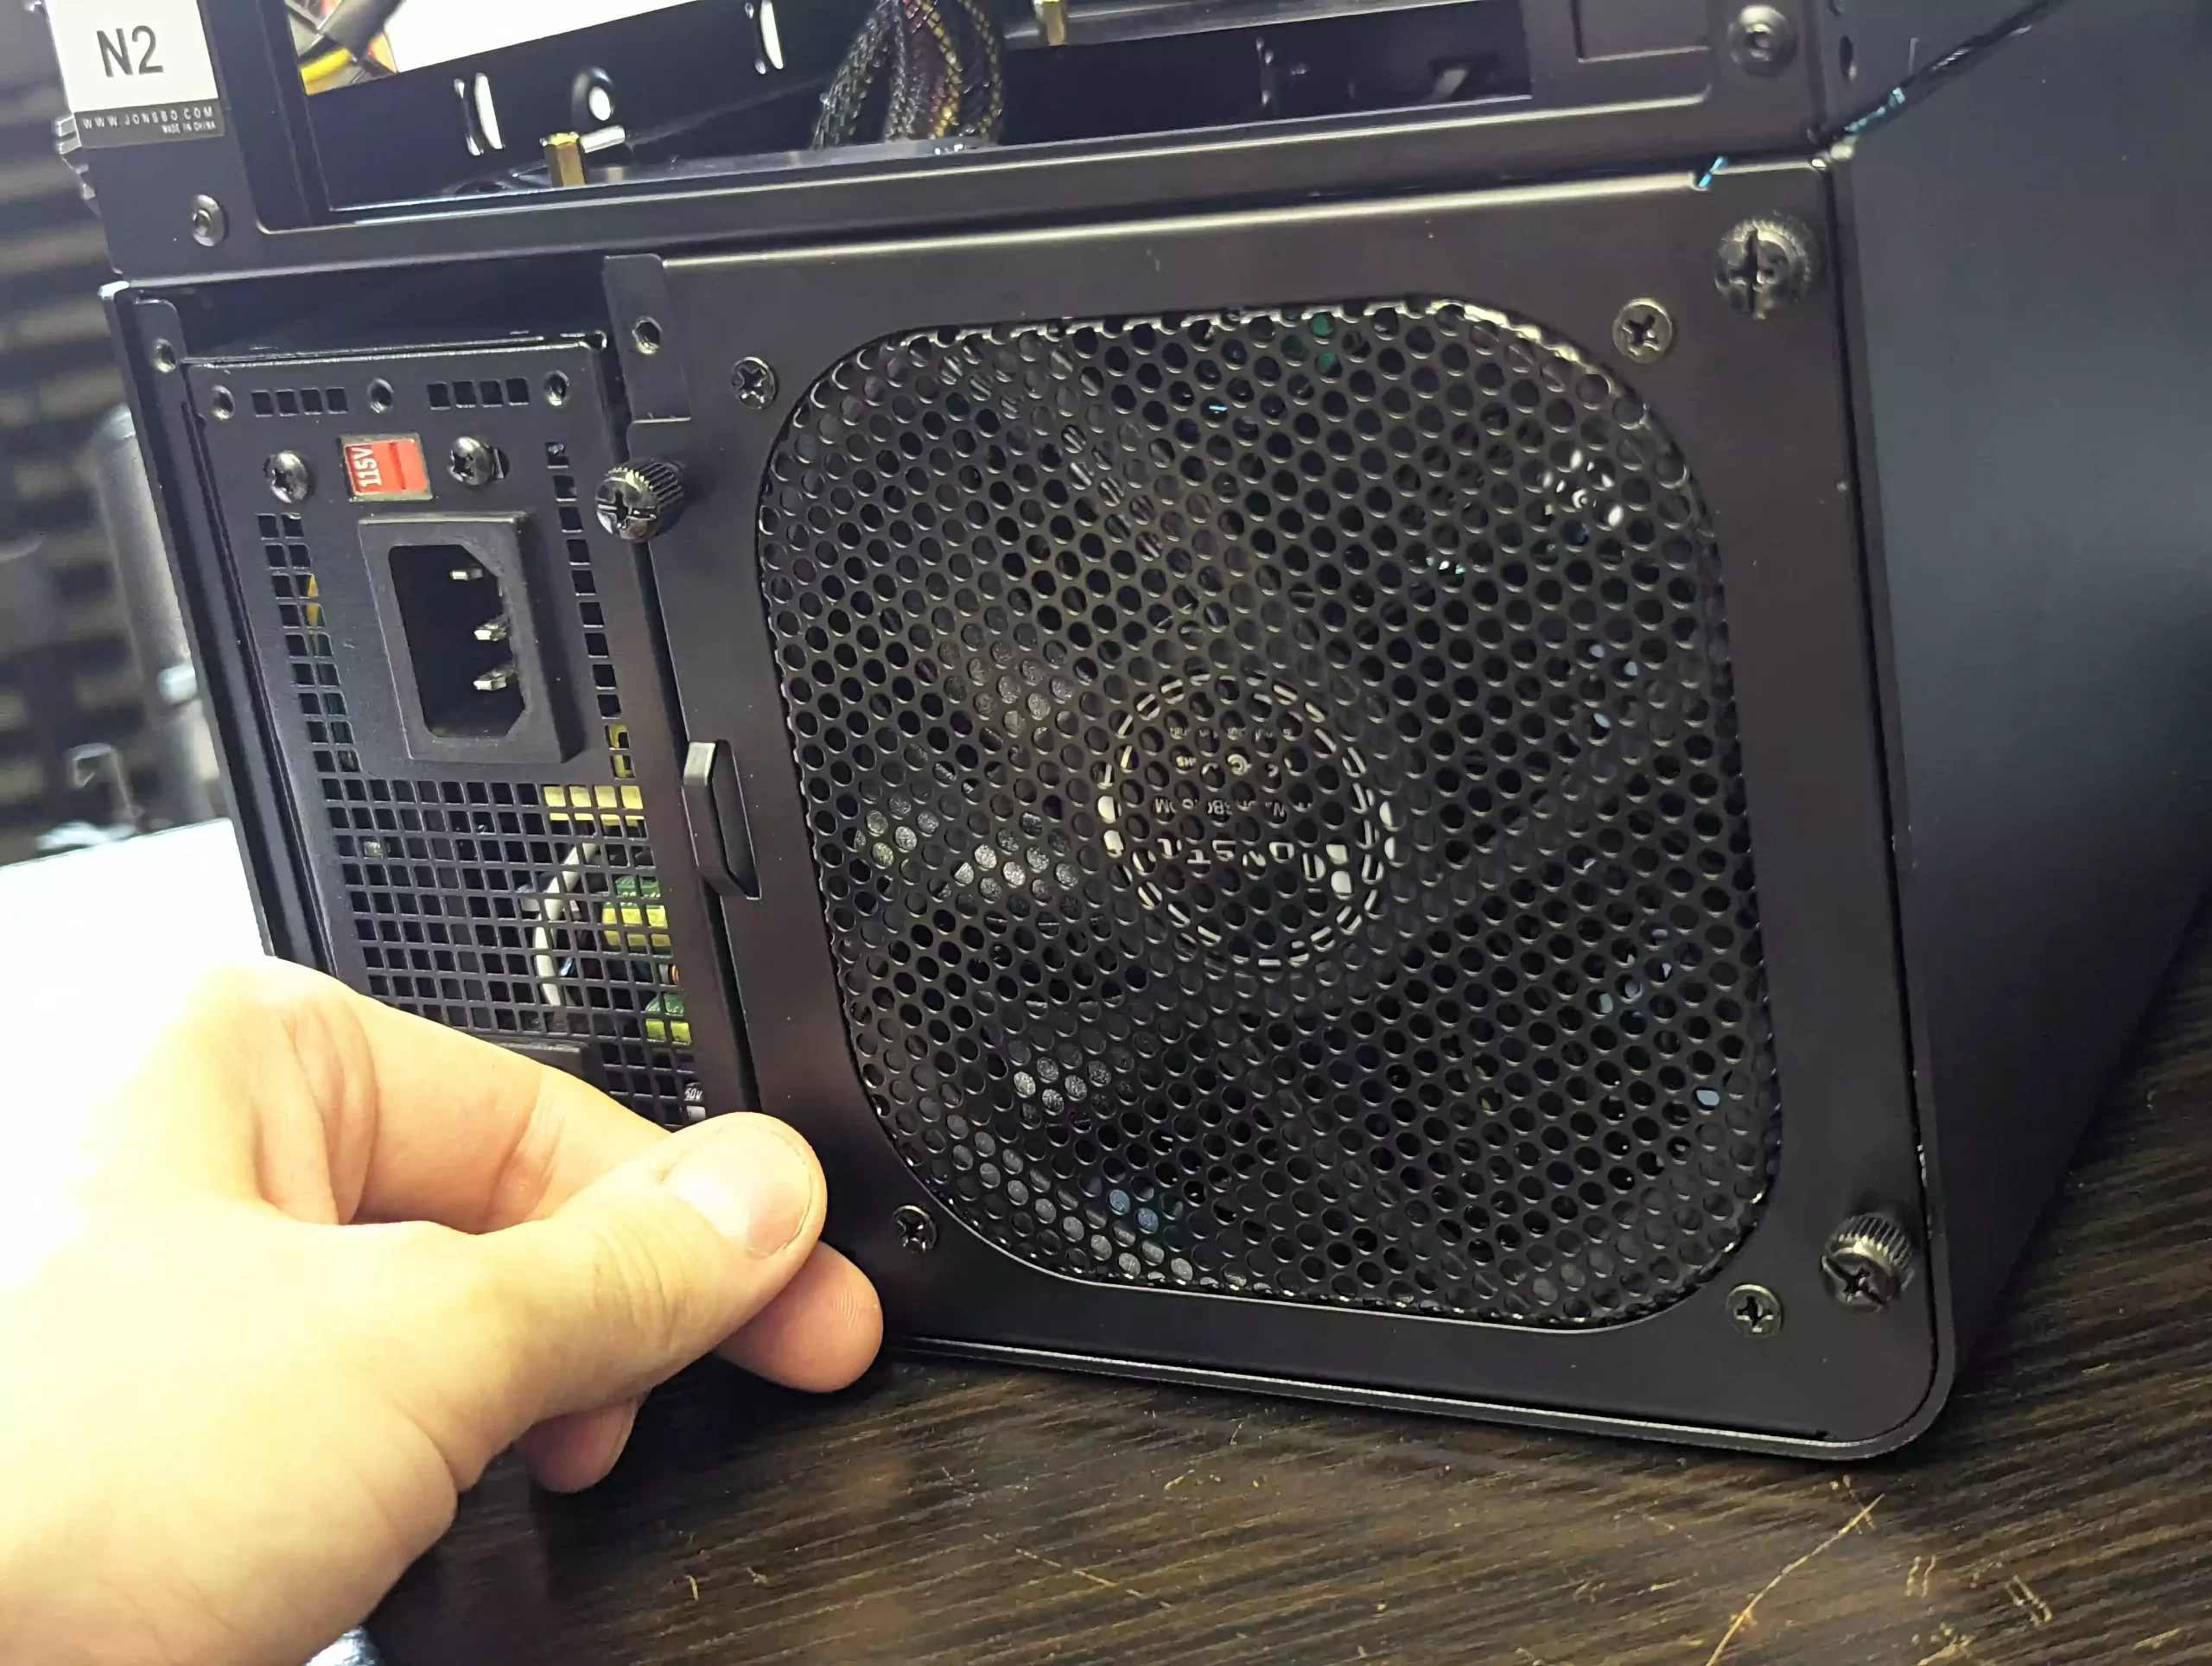
Go to the back of the Jonsbo N2 case and take out the four thumb screws around the fan.

Detach the fan using the small fan connector linked to the internal starter board.
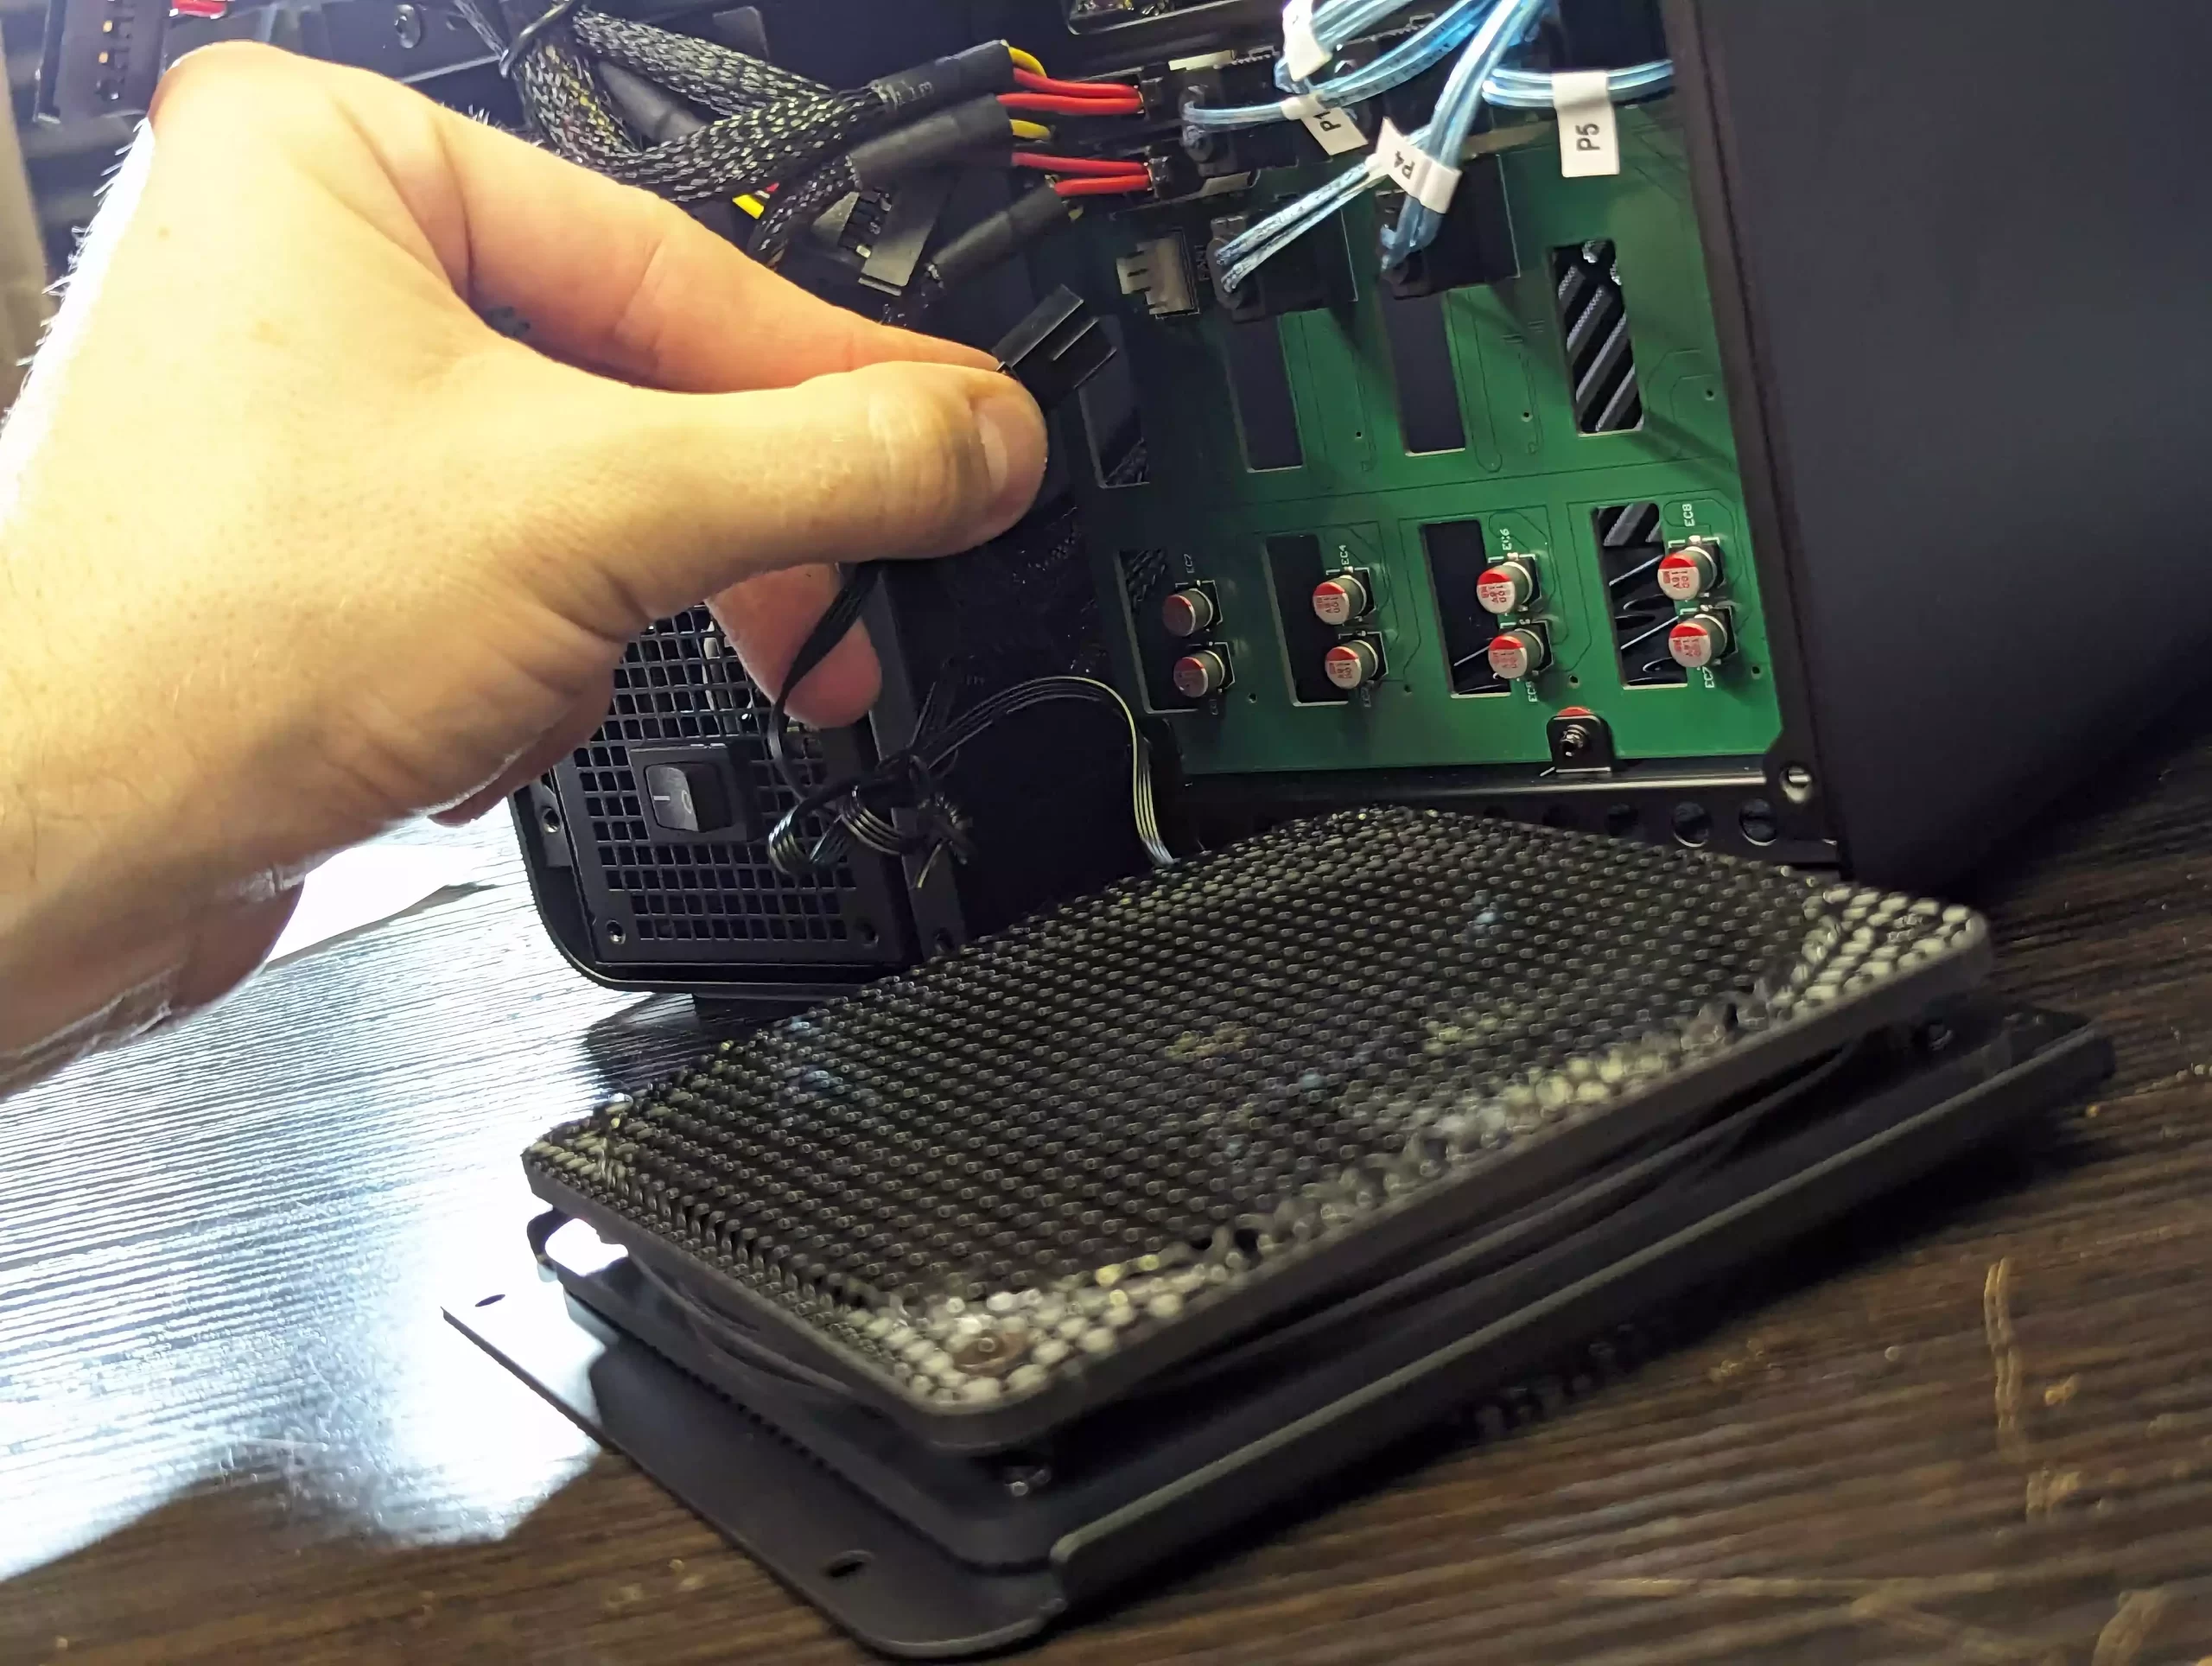
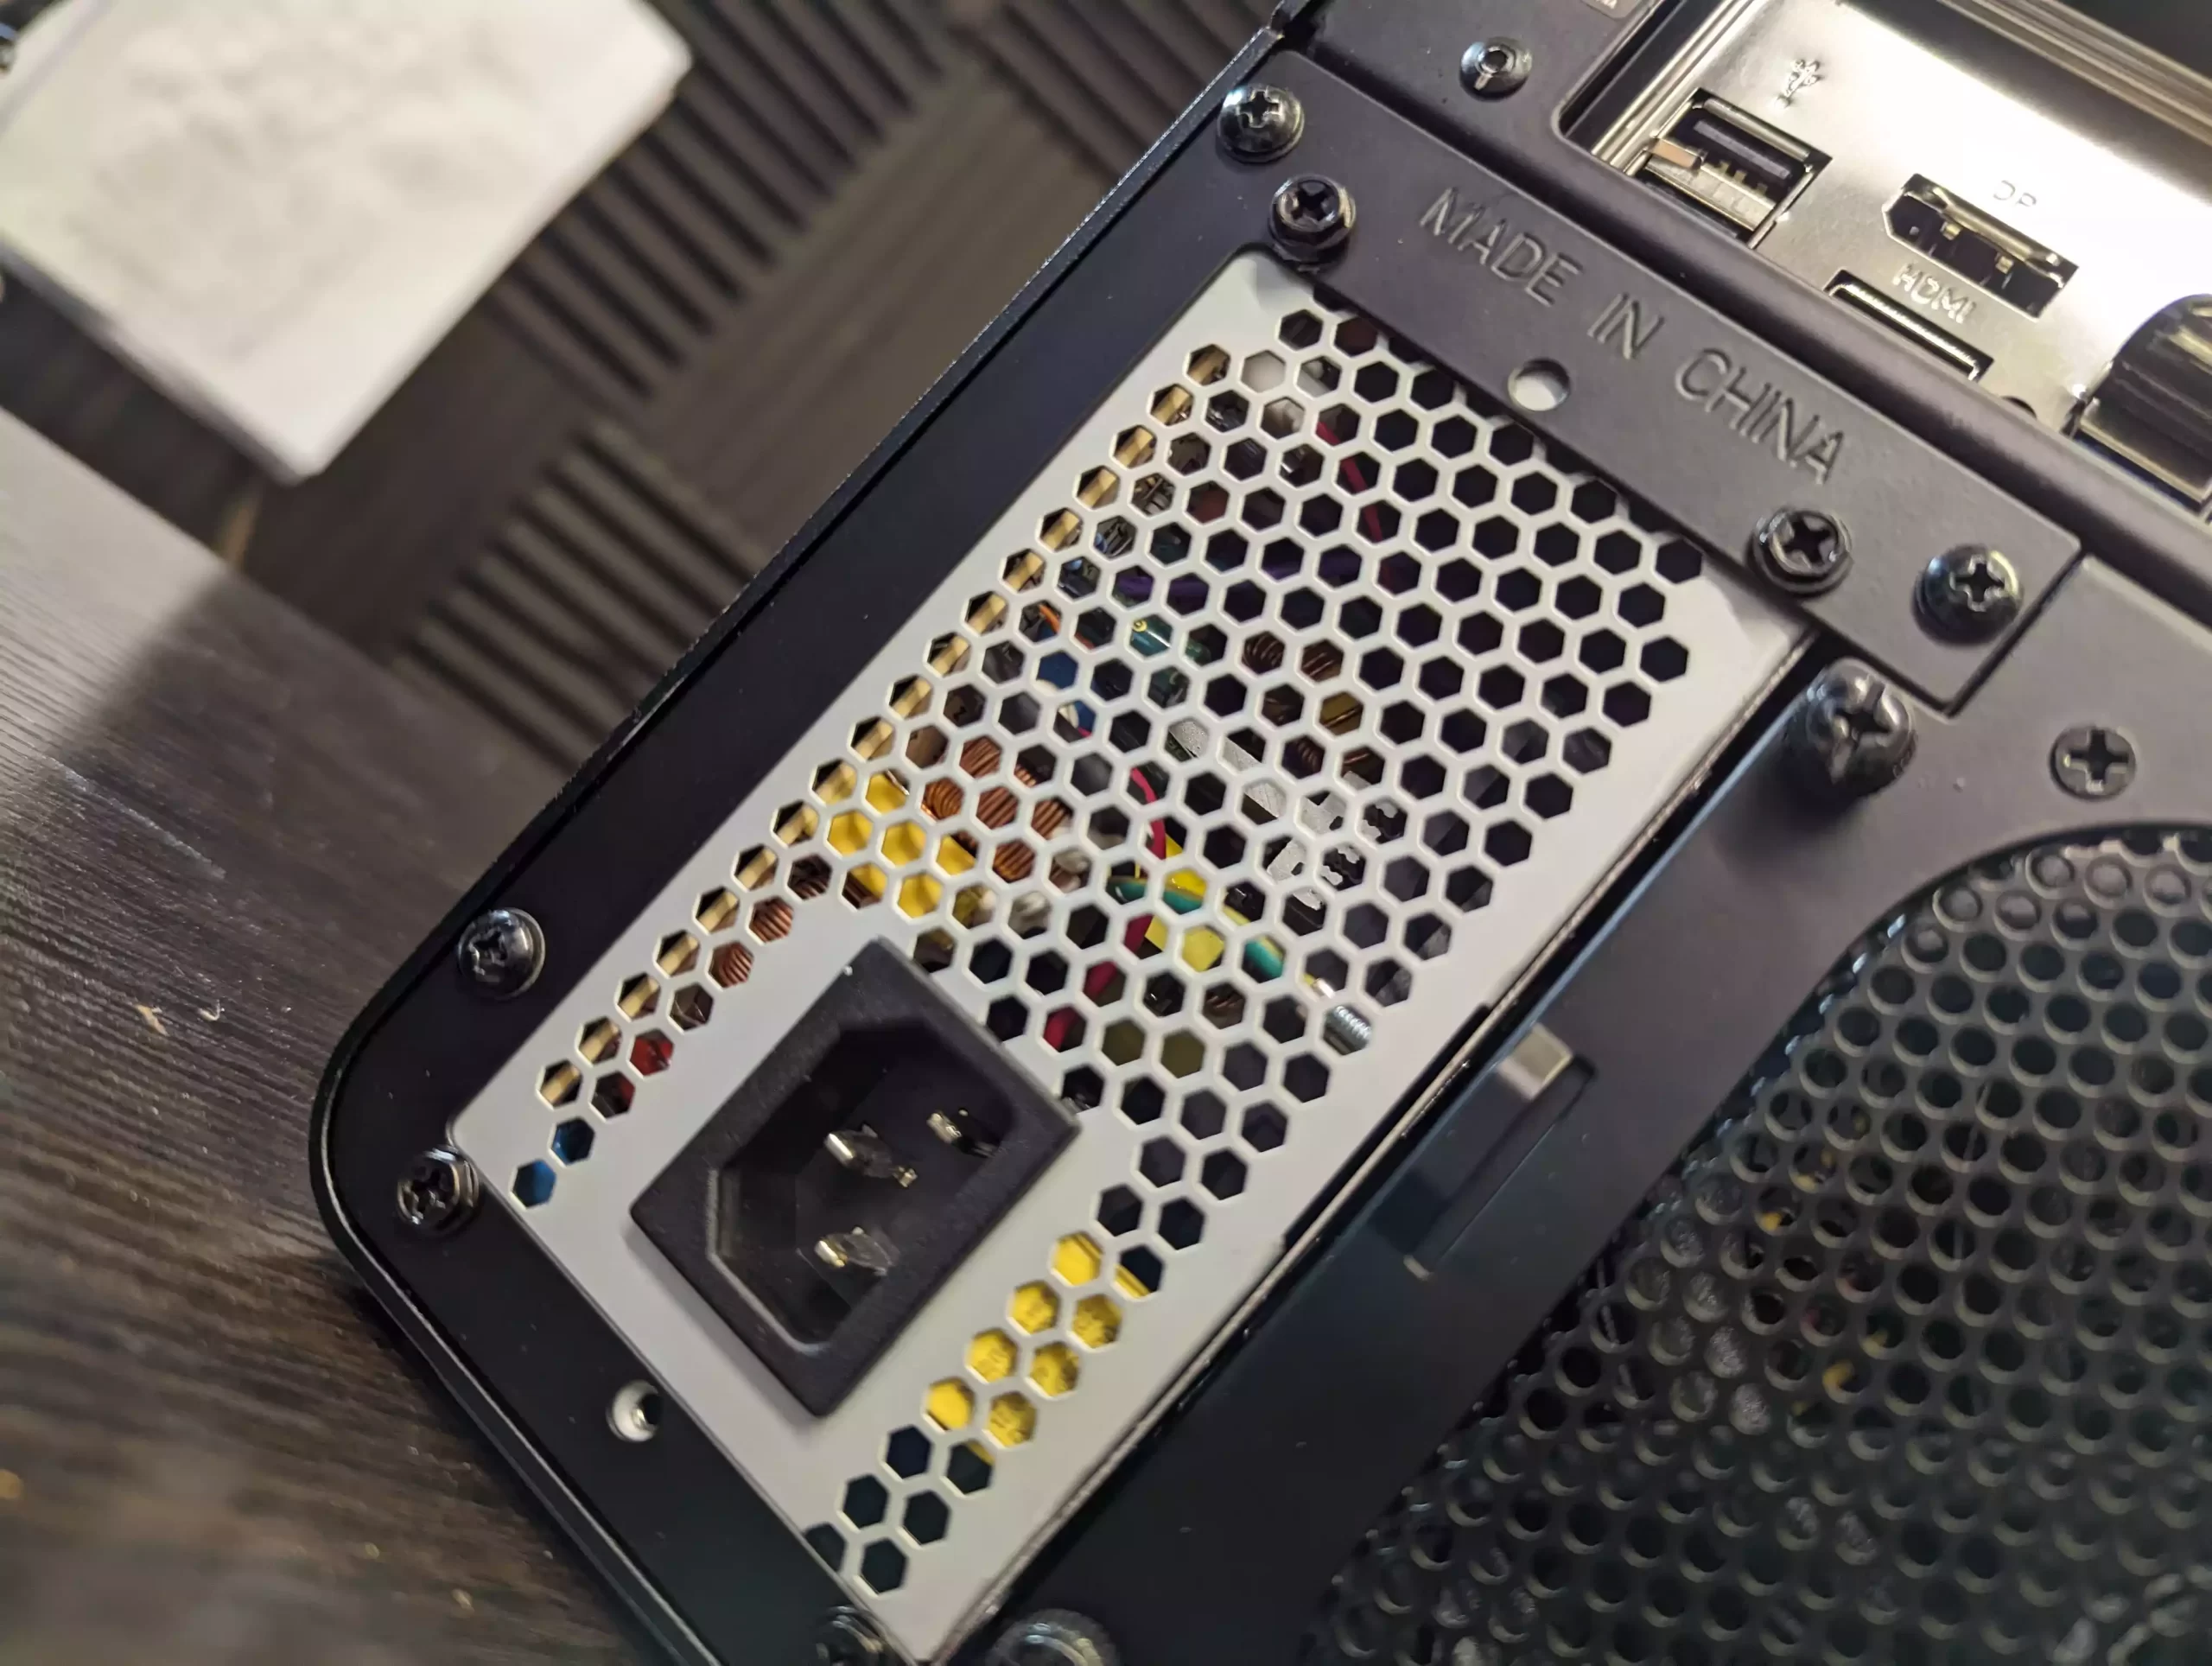
Next, remove the screws securing the plate around the PSU compartment.
Grab the PSU and divide the power connectors into two sets: one set with individual SATA and molex connectors and another set with the thicker connectors.
Feed the SATA and molex cables into the PSU compartment and immediately into the right cavity leading to the SATA backplane where drives connect.
Thread the larger power supply connectors into the back of the PSU compartment, lifting them out through the case’s top.
Now, link the two molex PSU power connectors to the white molex connectors on the backplane behind the primary storage bays.
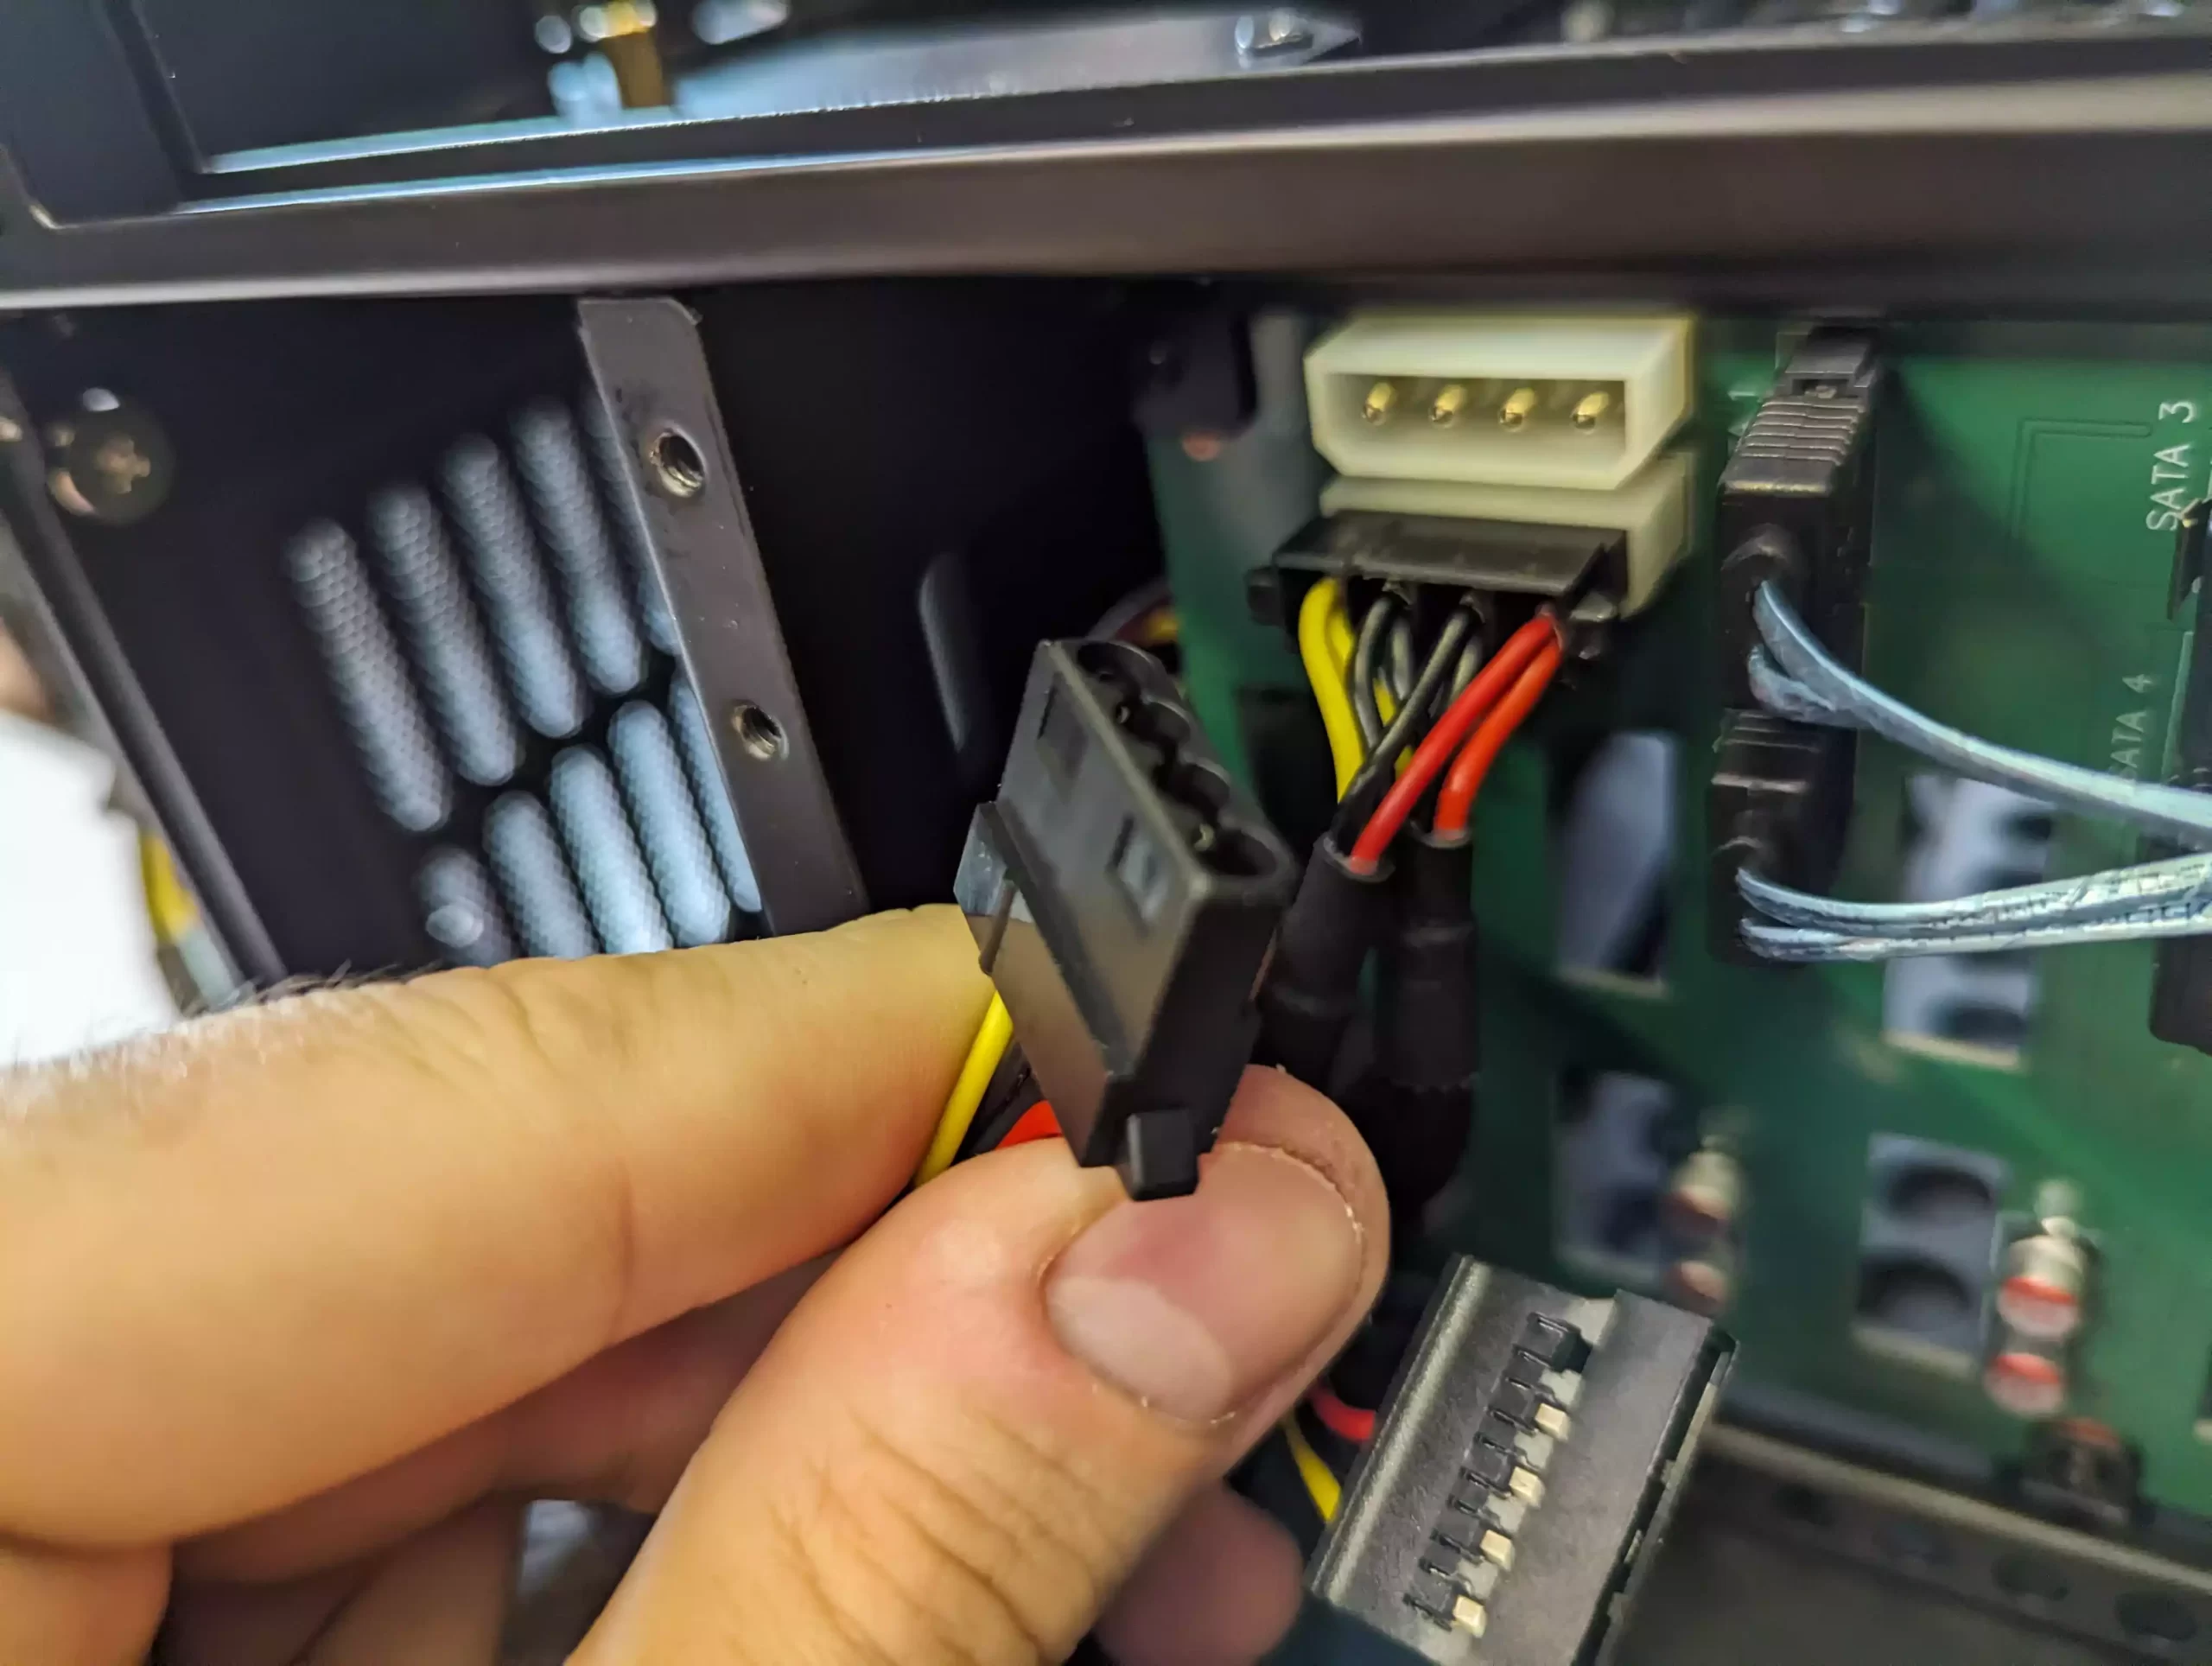
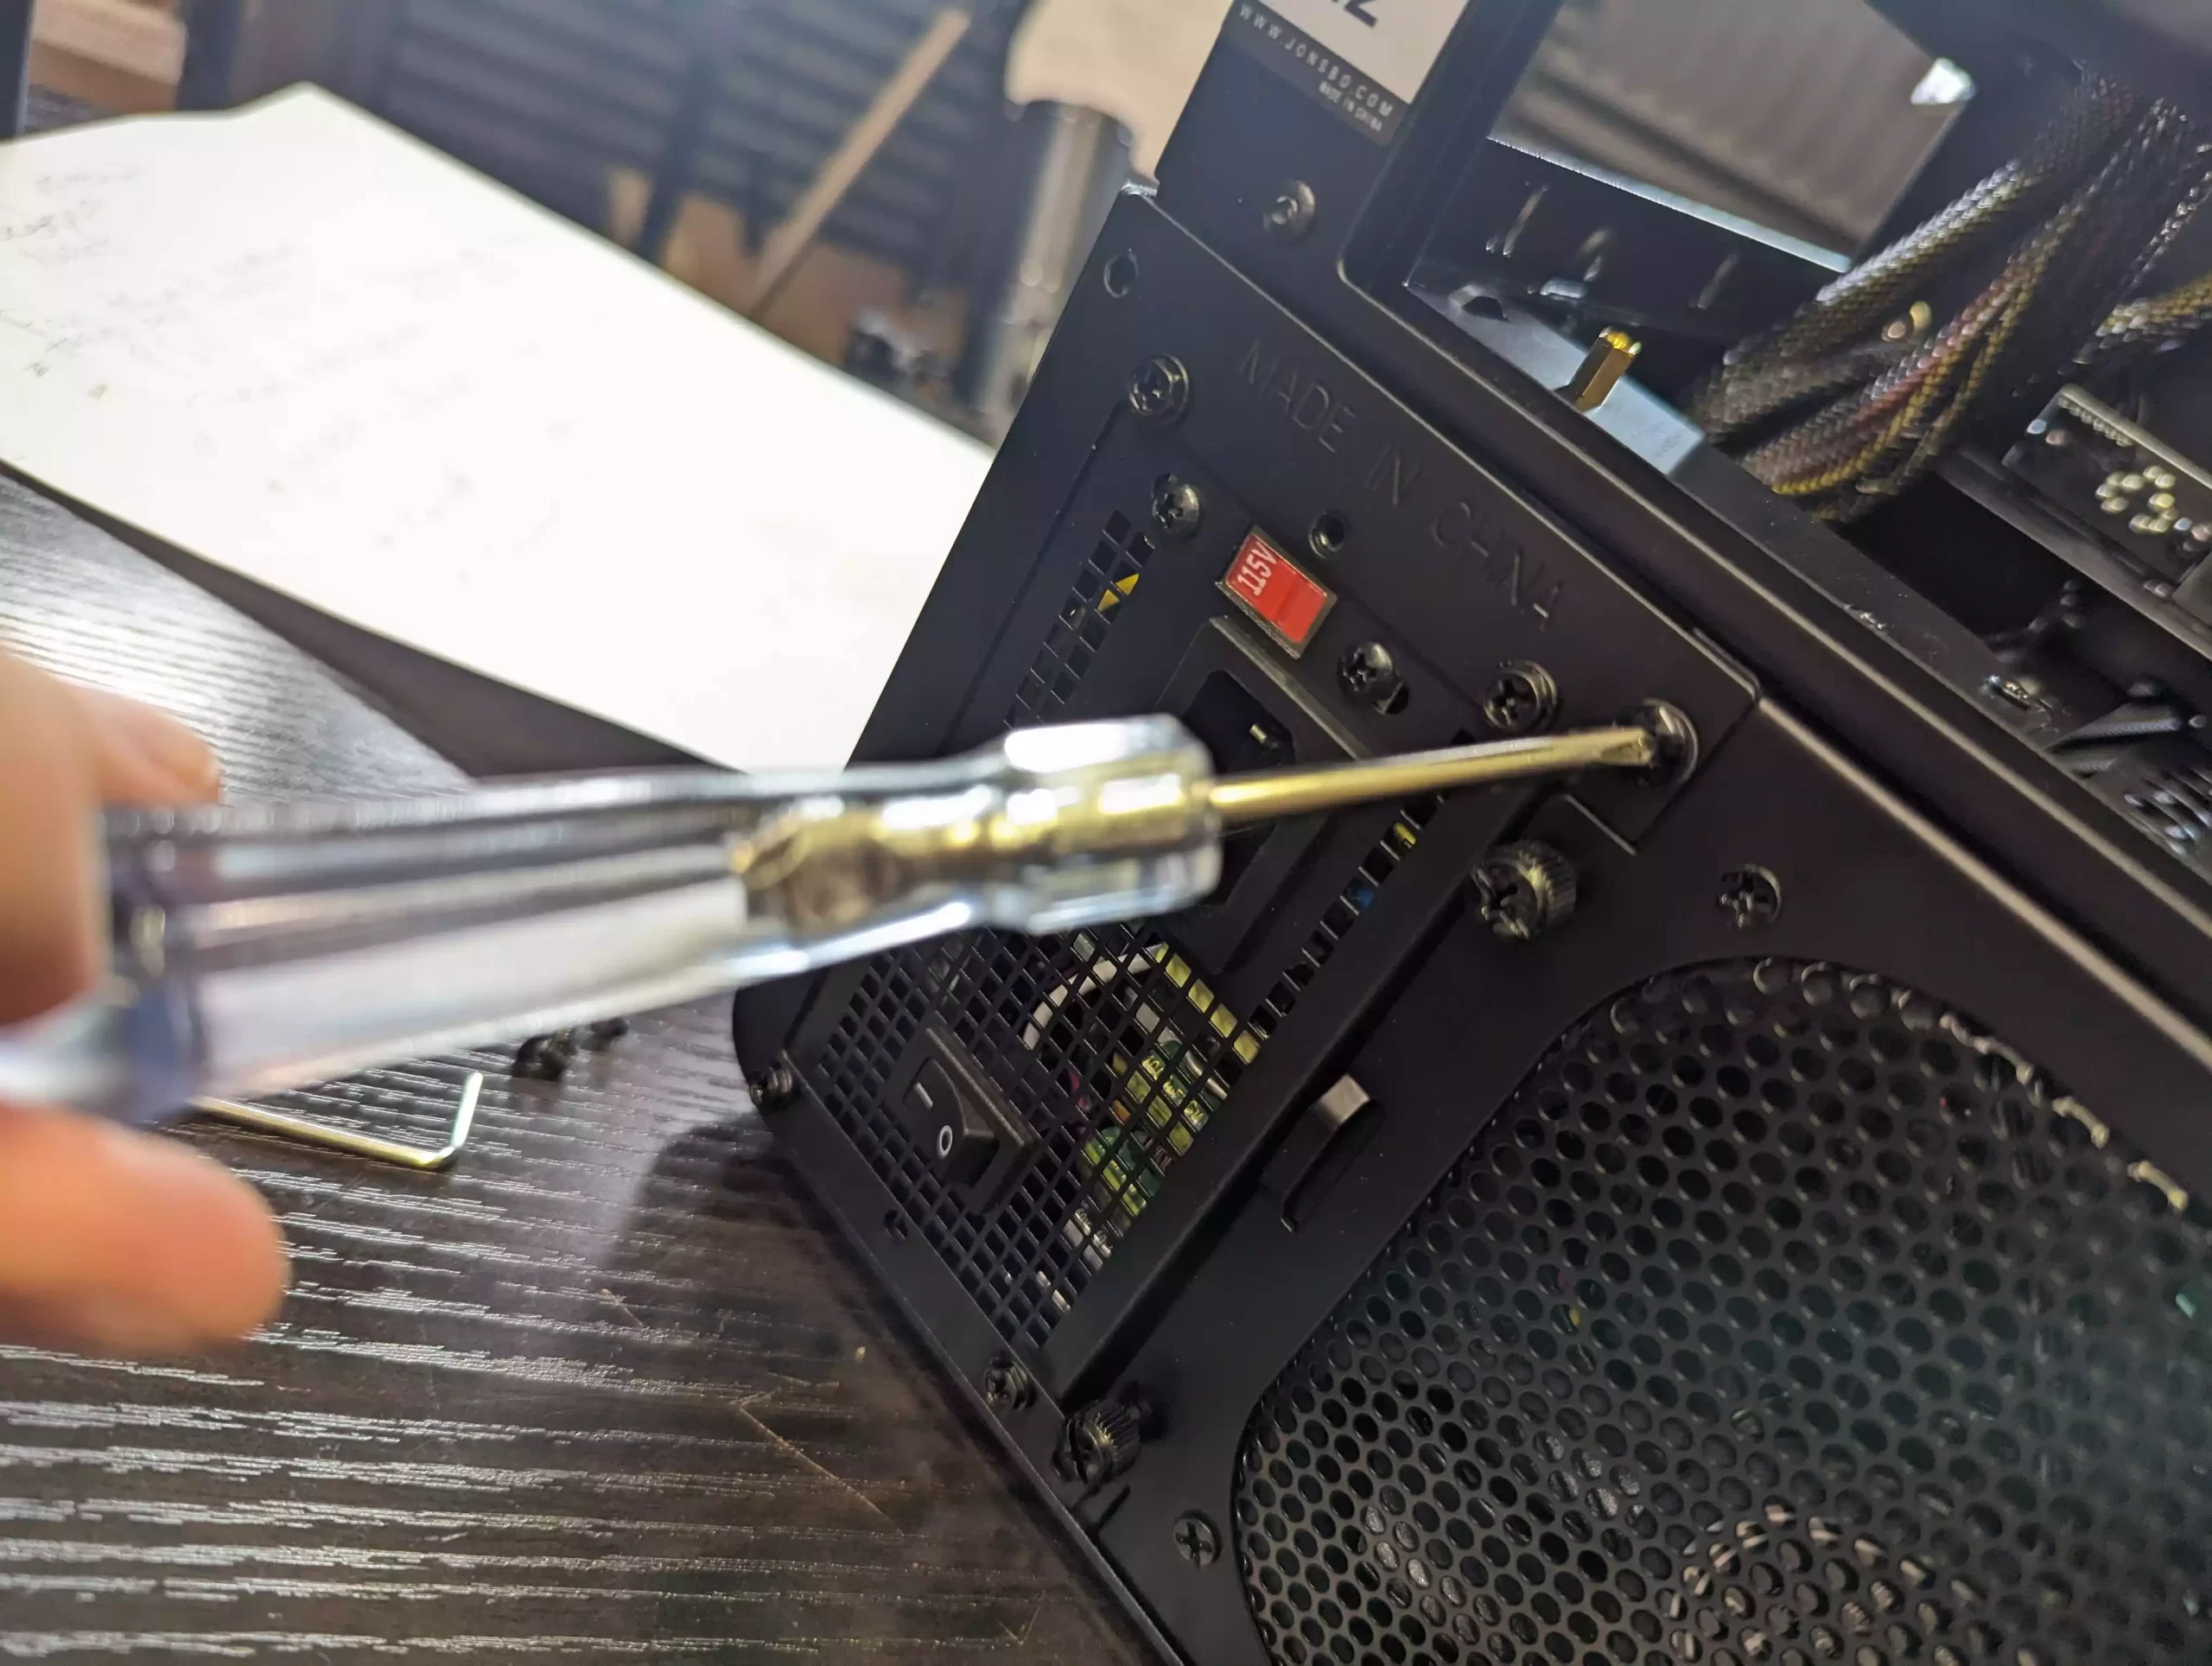
Affix the previously removed black plate from the Jonsbo case to the back of the PSU and Insert the PSU into its compartment in the Jonsbo case. Ensure the molex connectors remain in place and that the larger power cables are still outside the case.
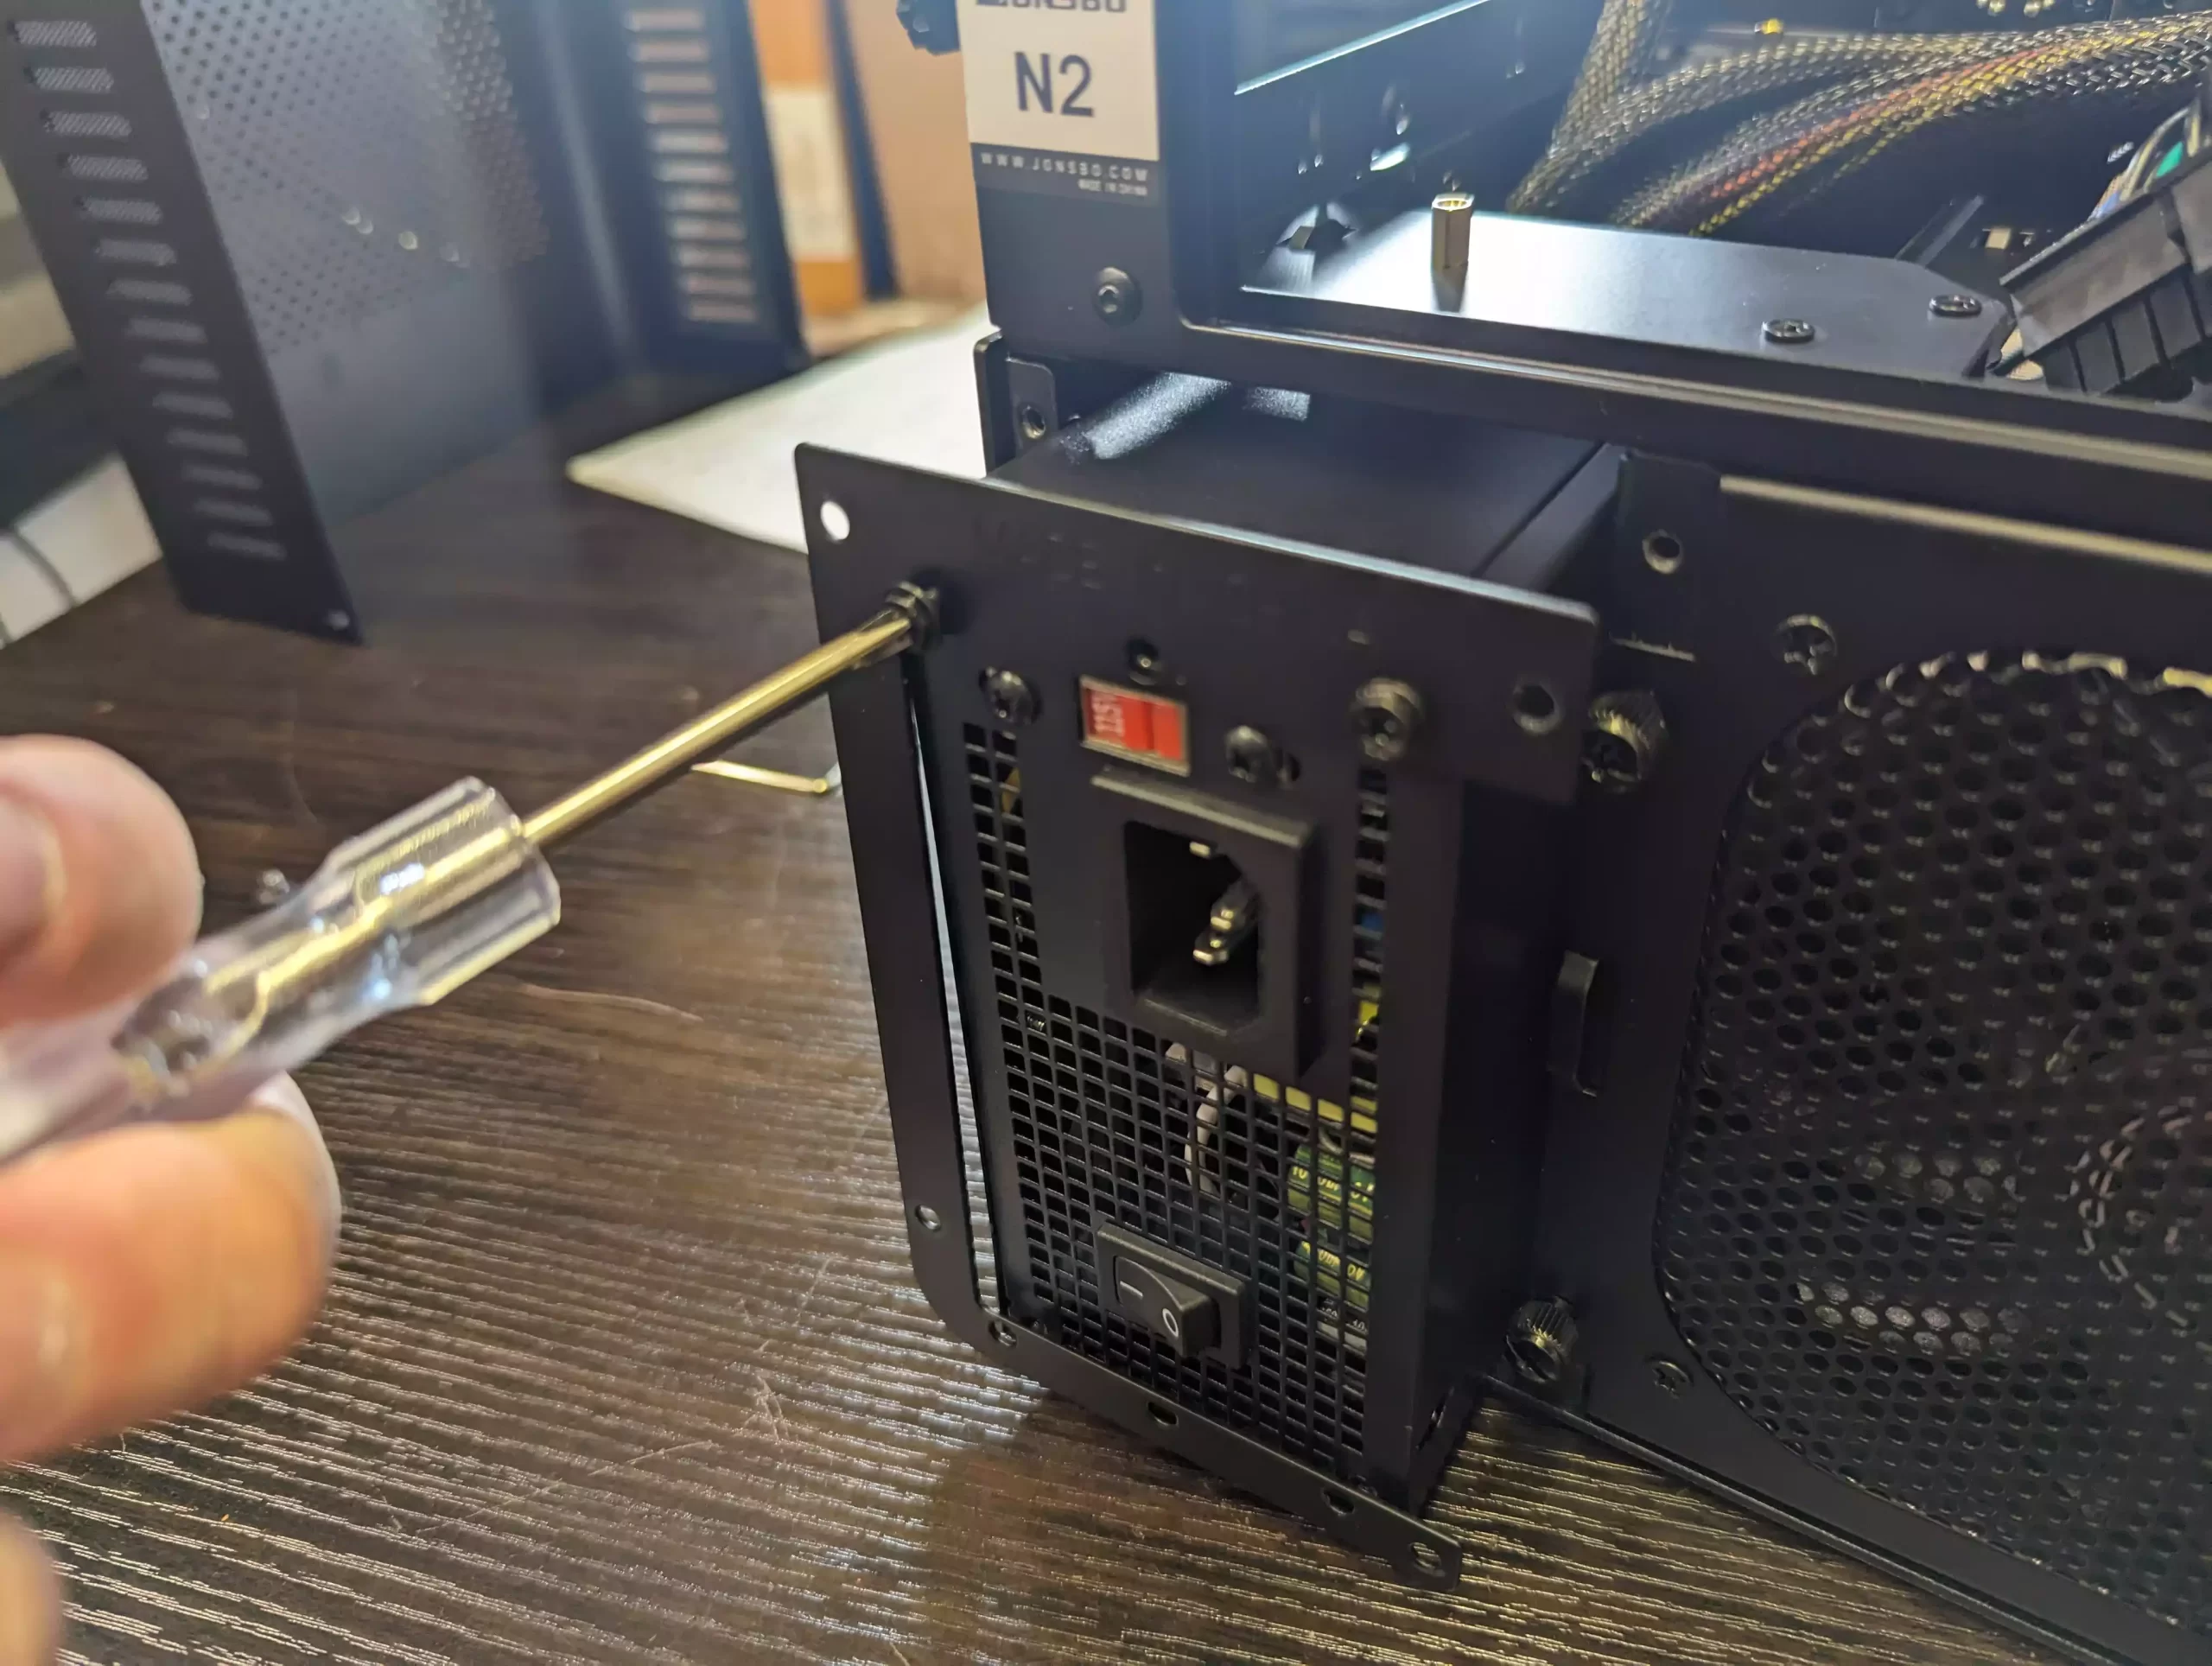
Fix the plate to the back of the Jonsbo case to secure the PSU.
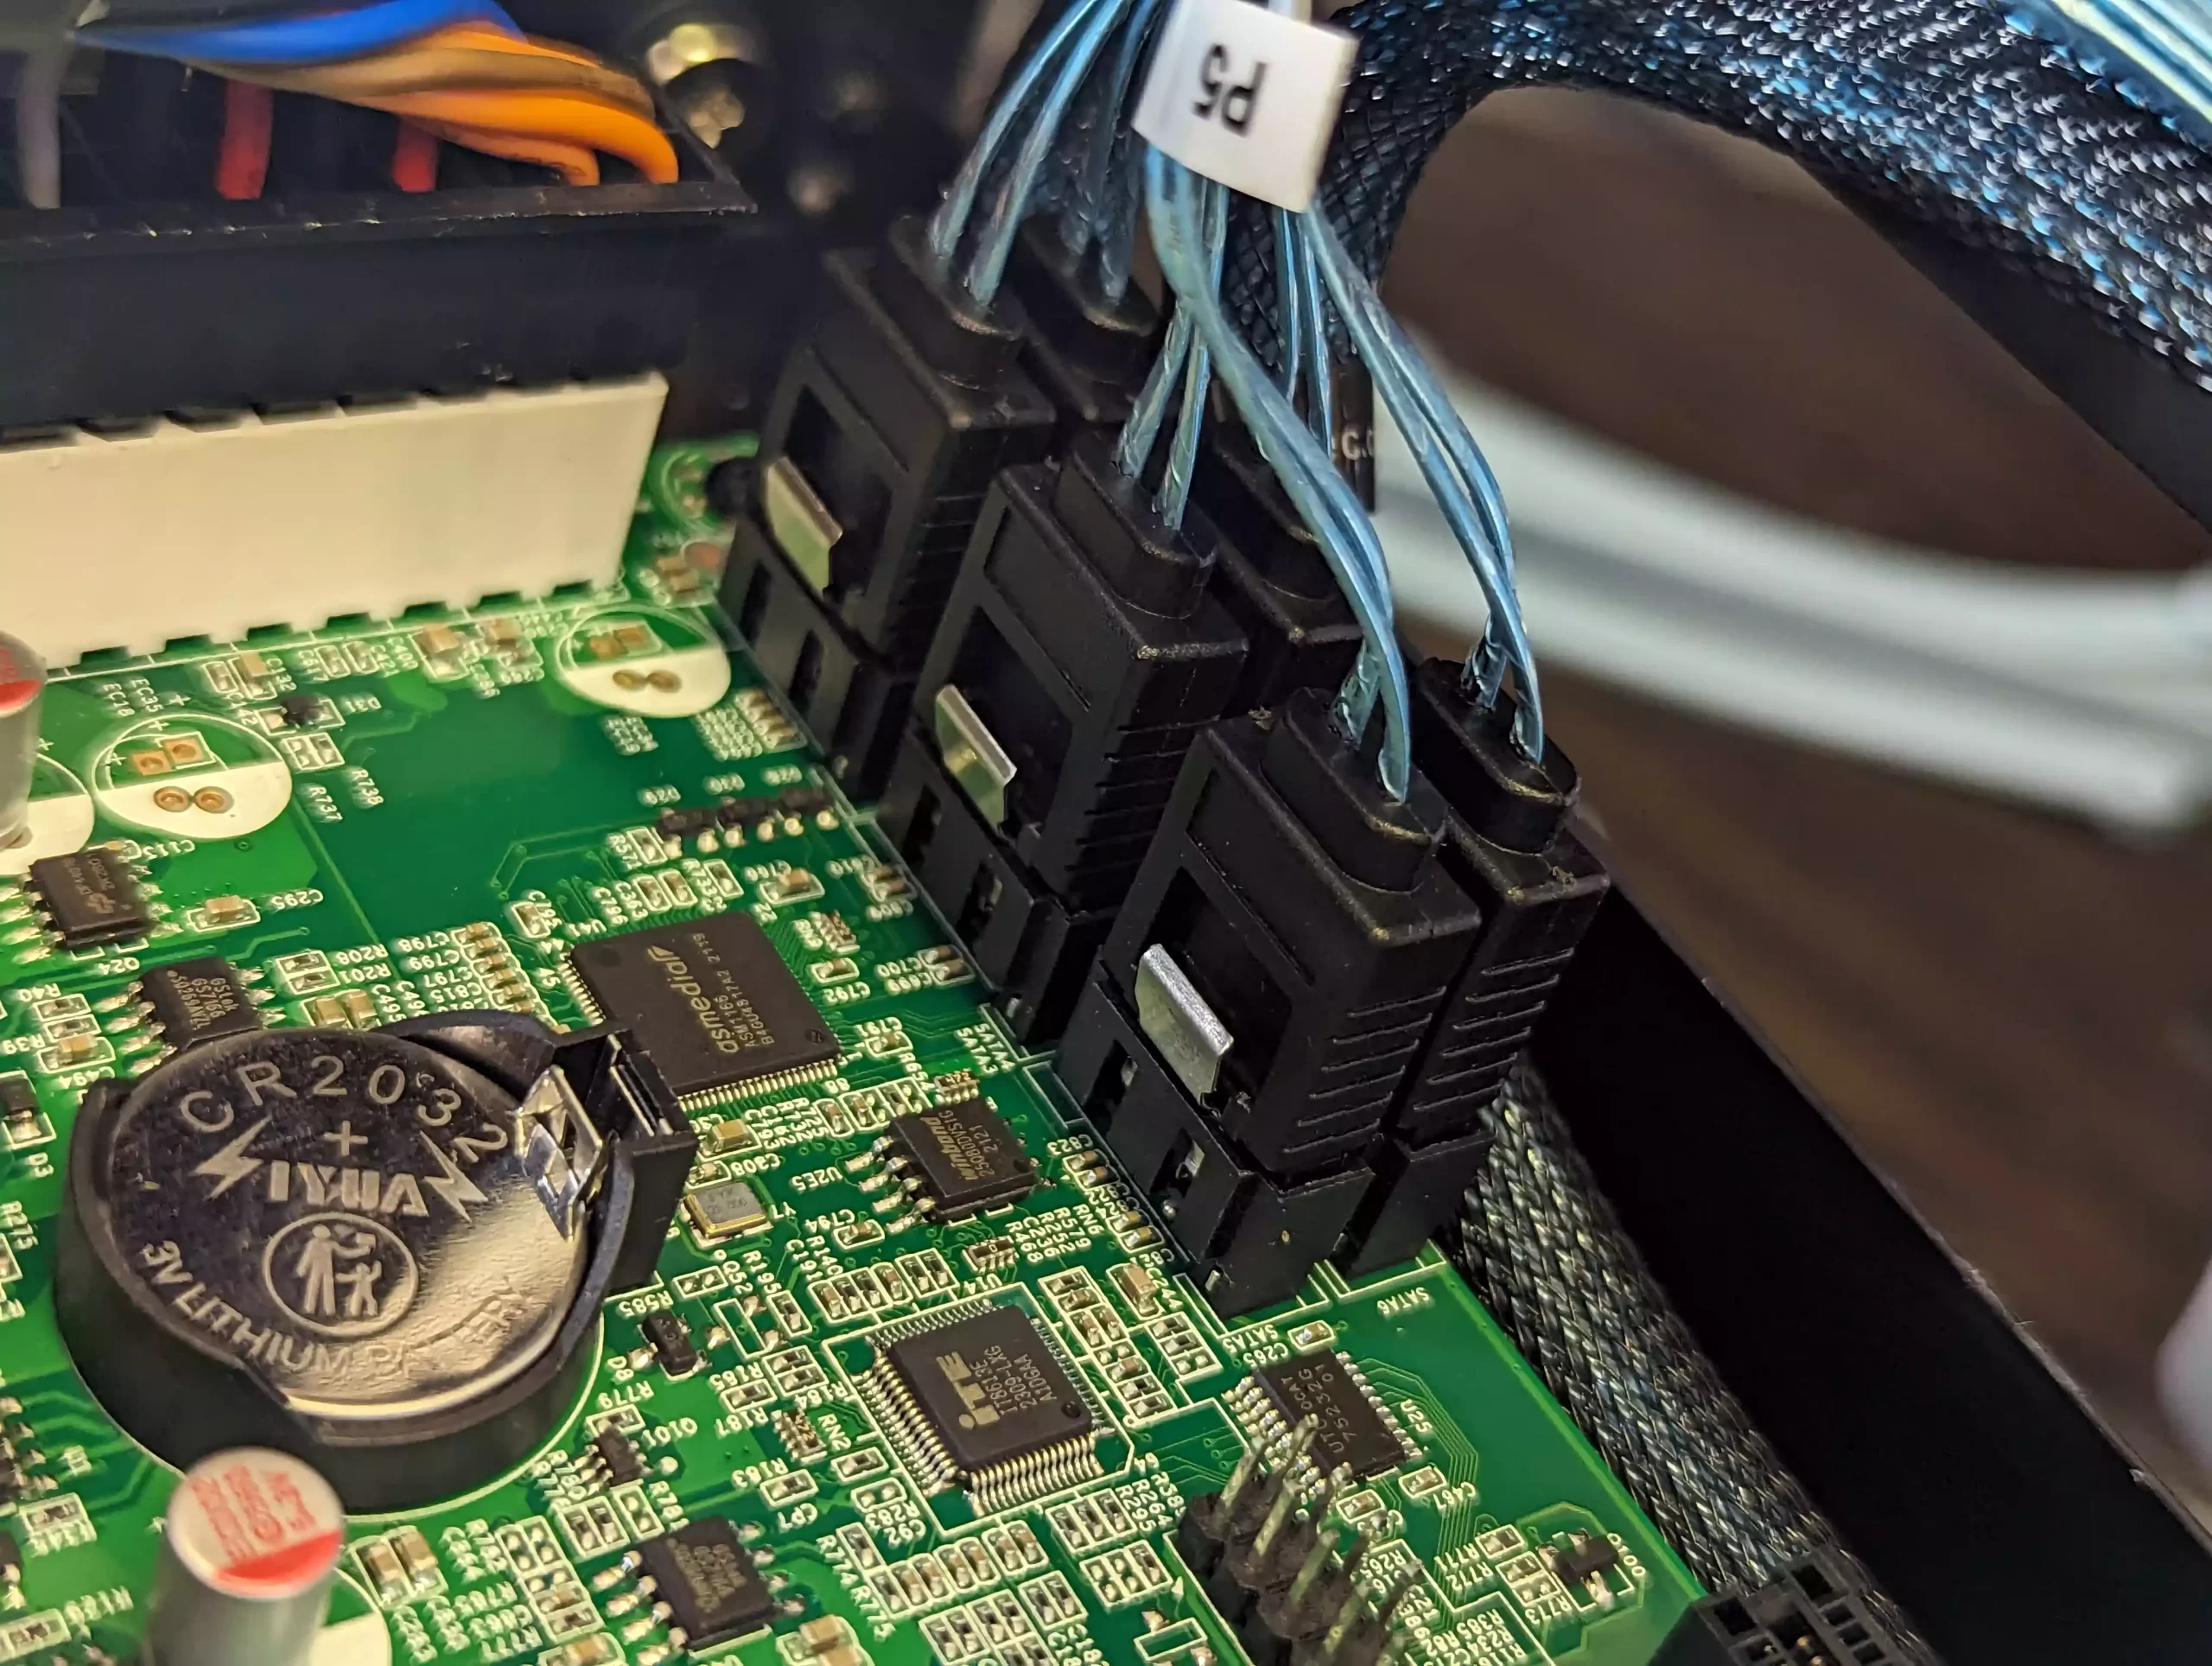
Connect the multi-lane SATA cable, carefully aligning each numbered cable with the corresponding SATA port on the backplane (next to the molex power ports).
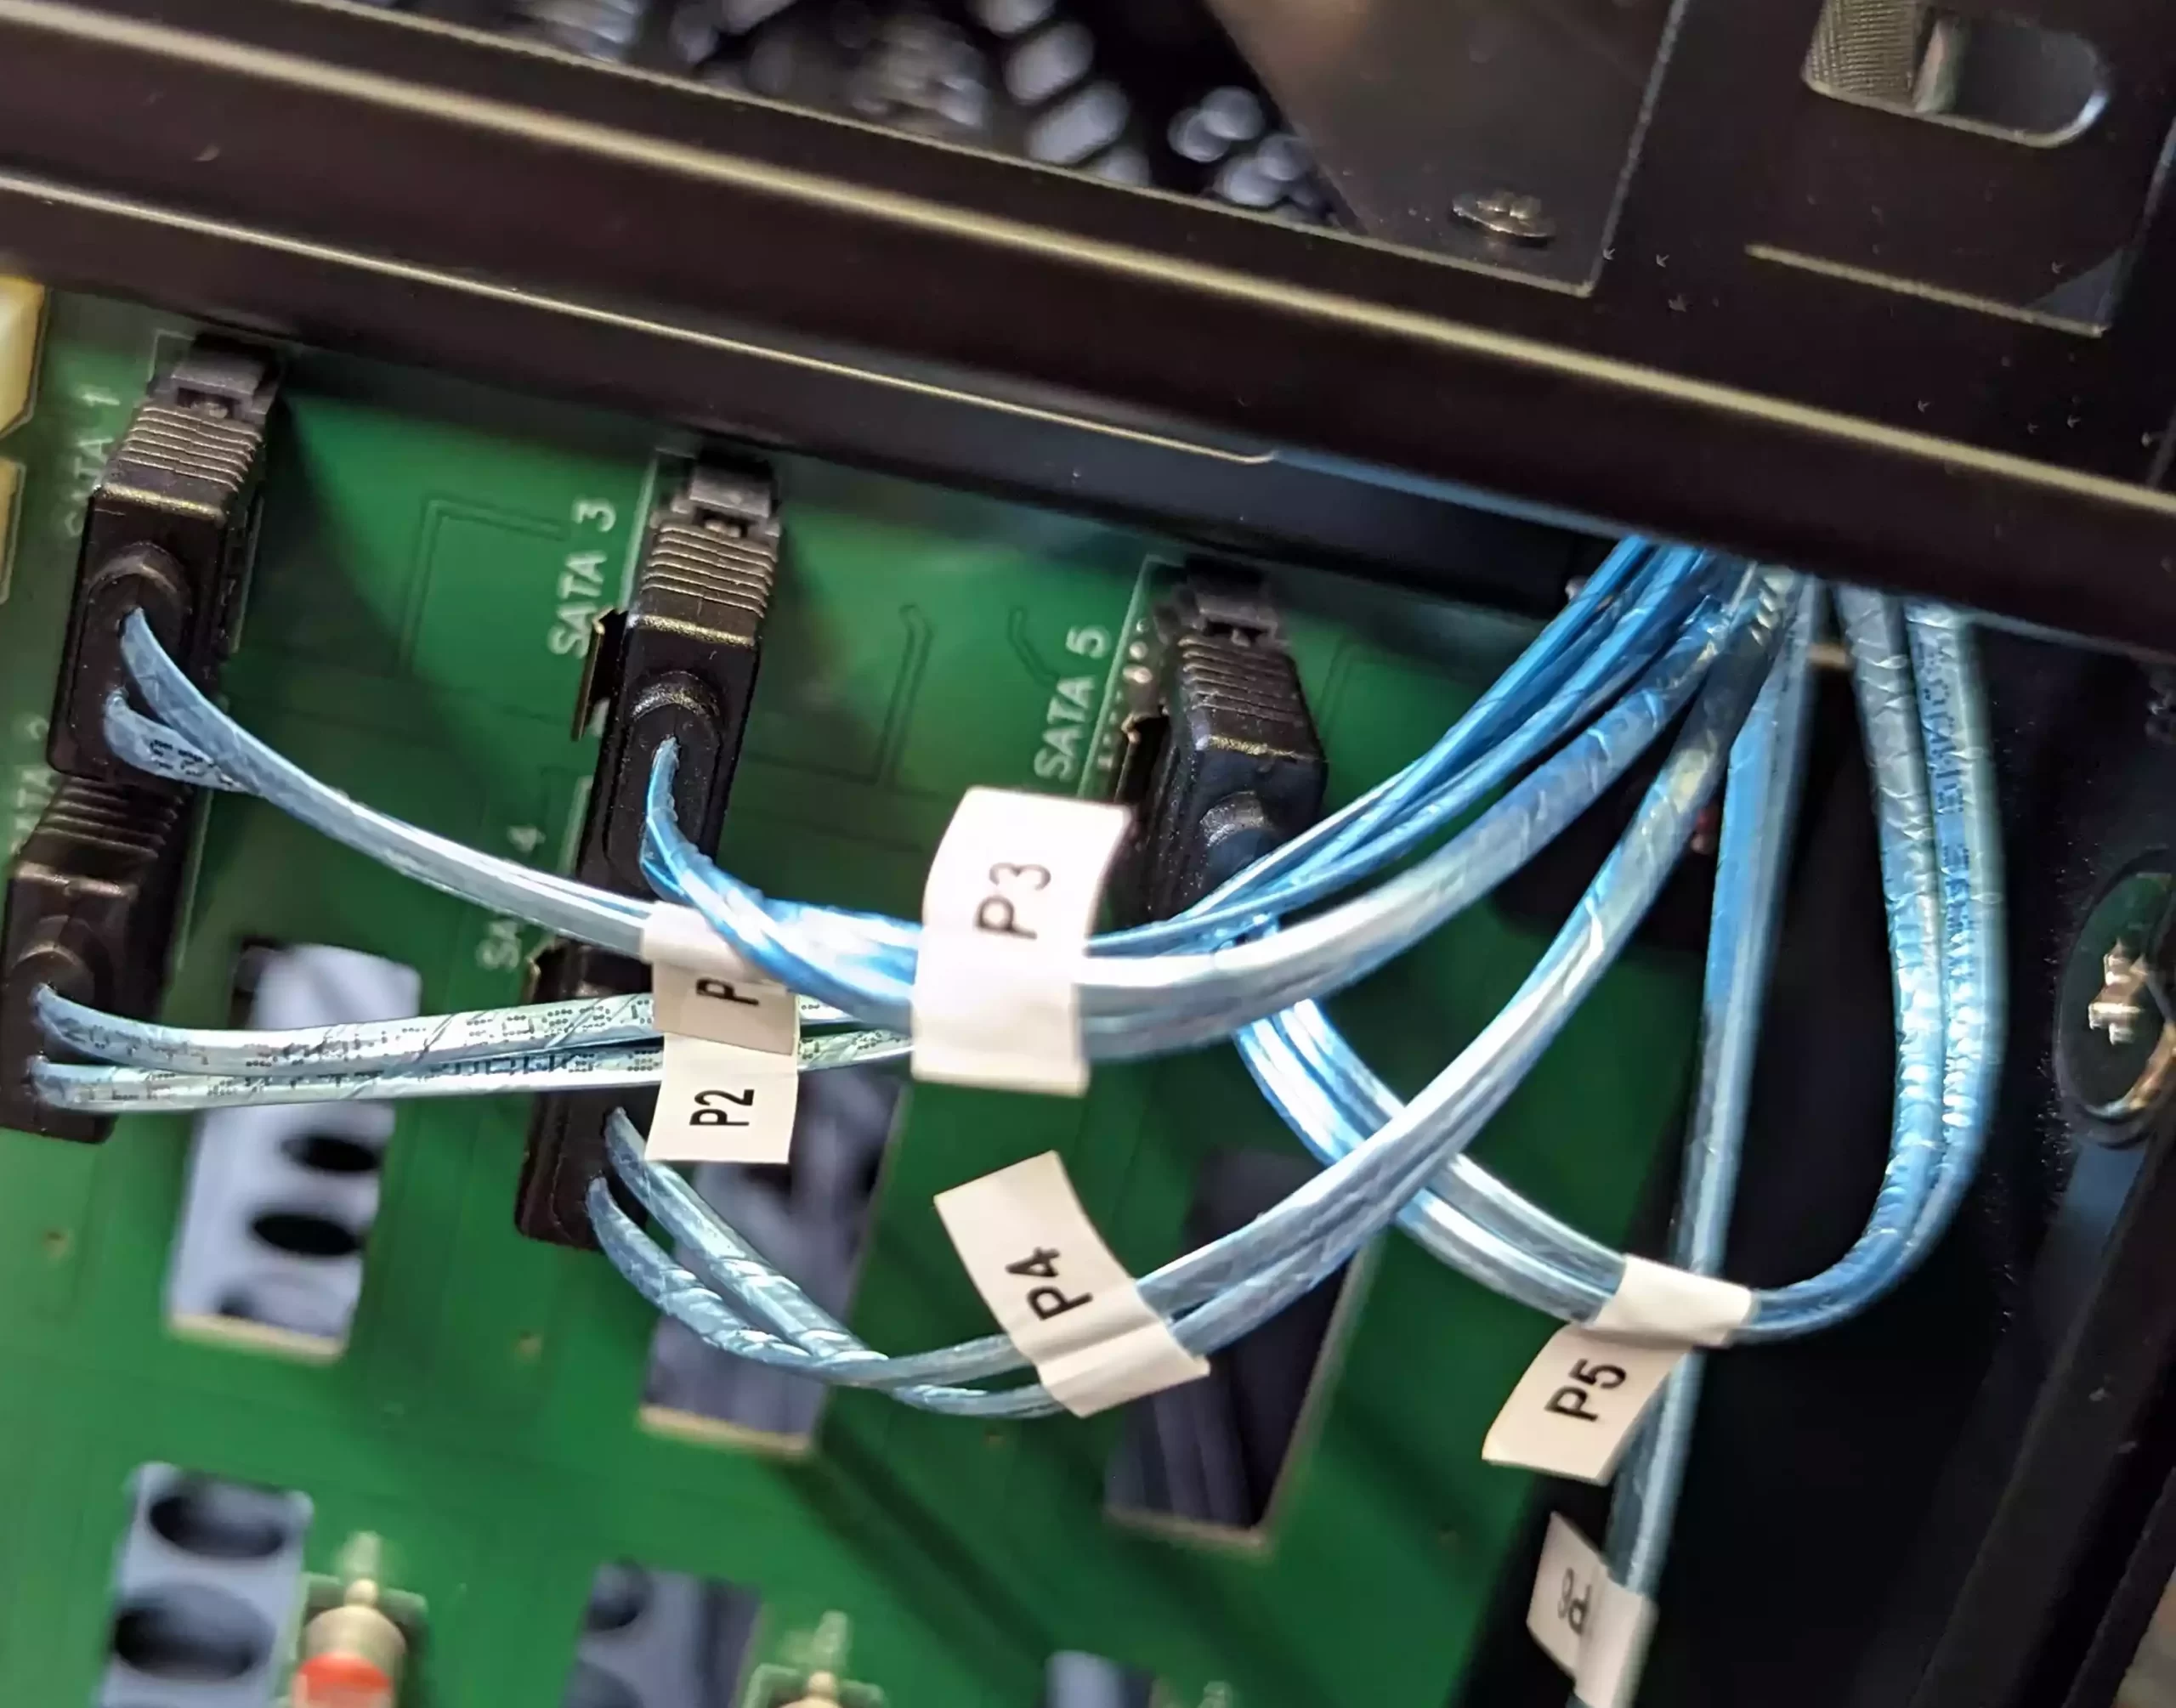
Guide the SATA cable through the cavity above and out of the top of the Jonsbo case. Ensure cables are attached to the right drive numbers and threaded correctly.
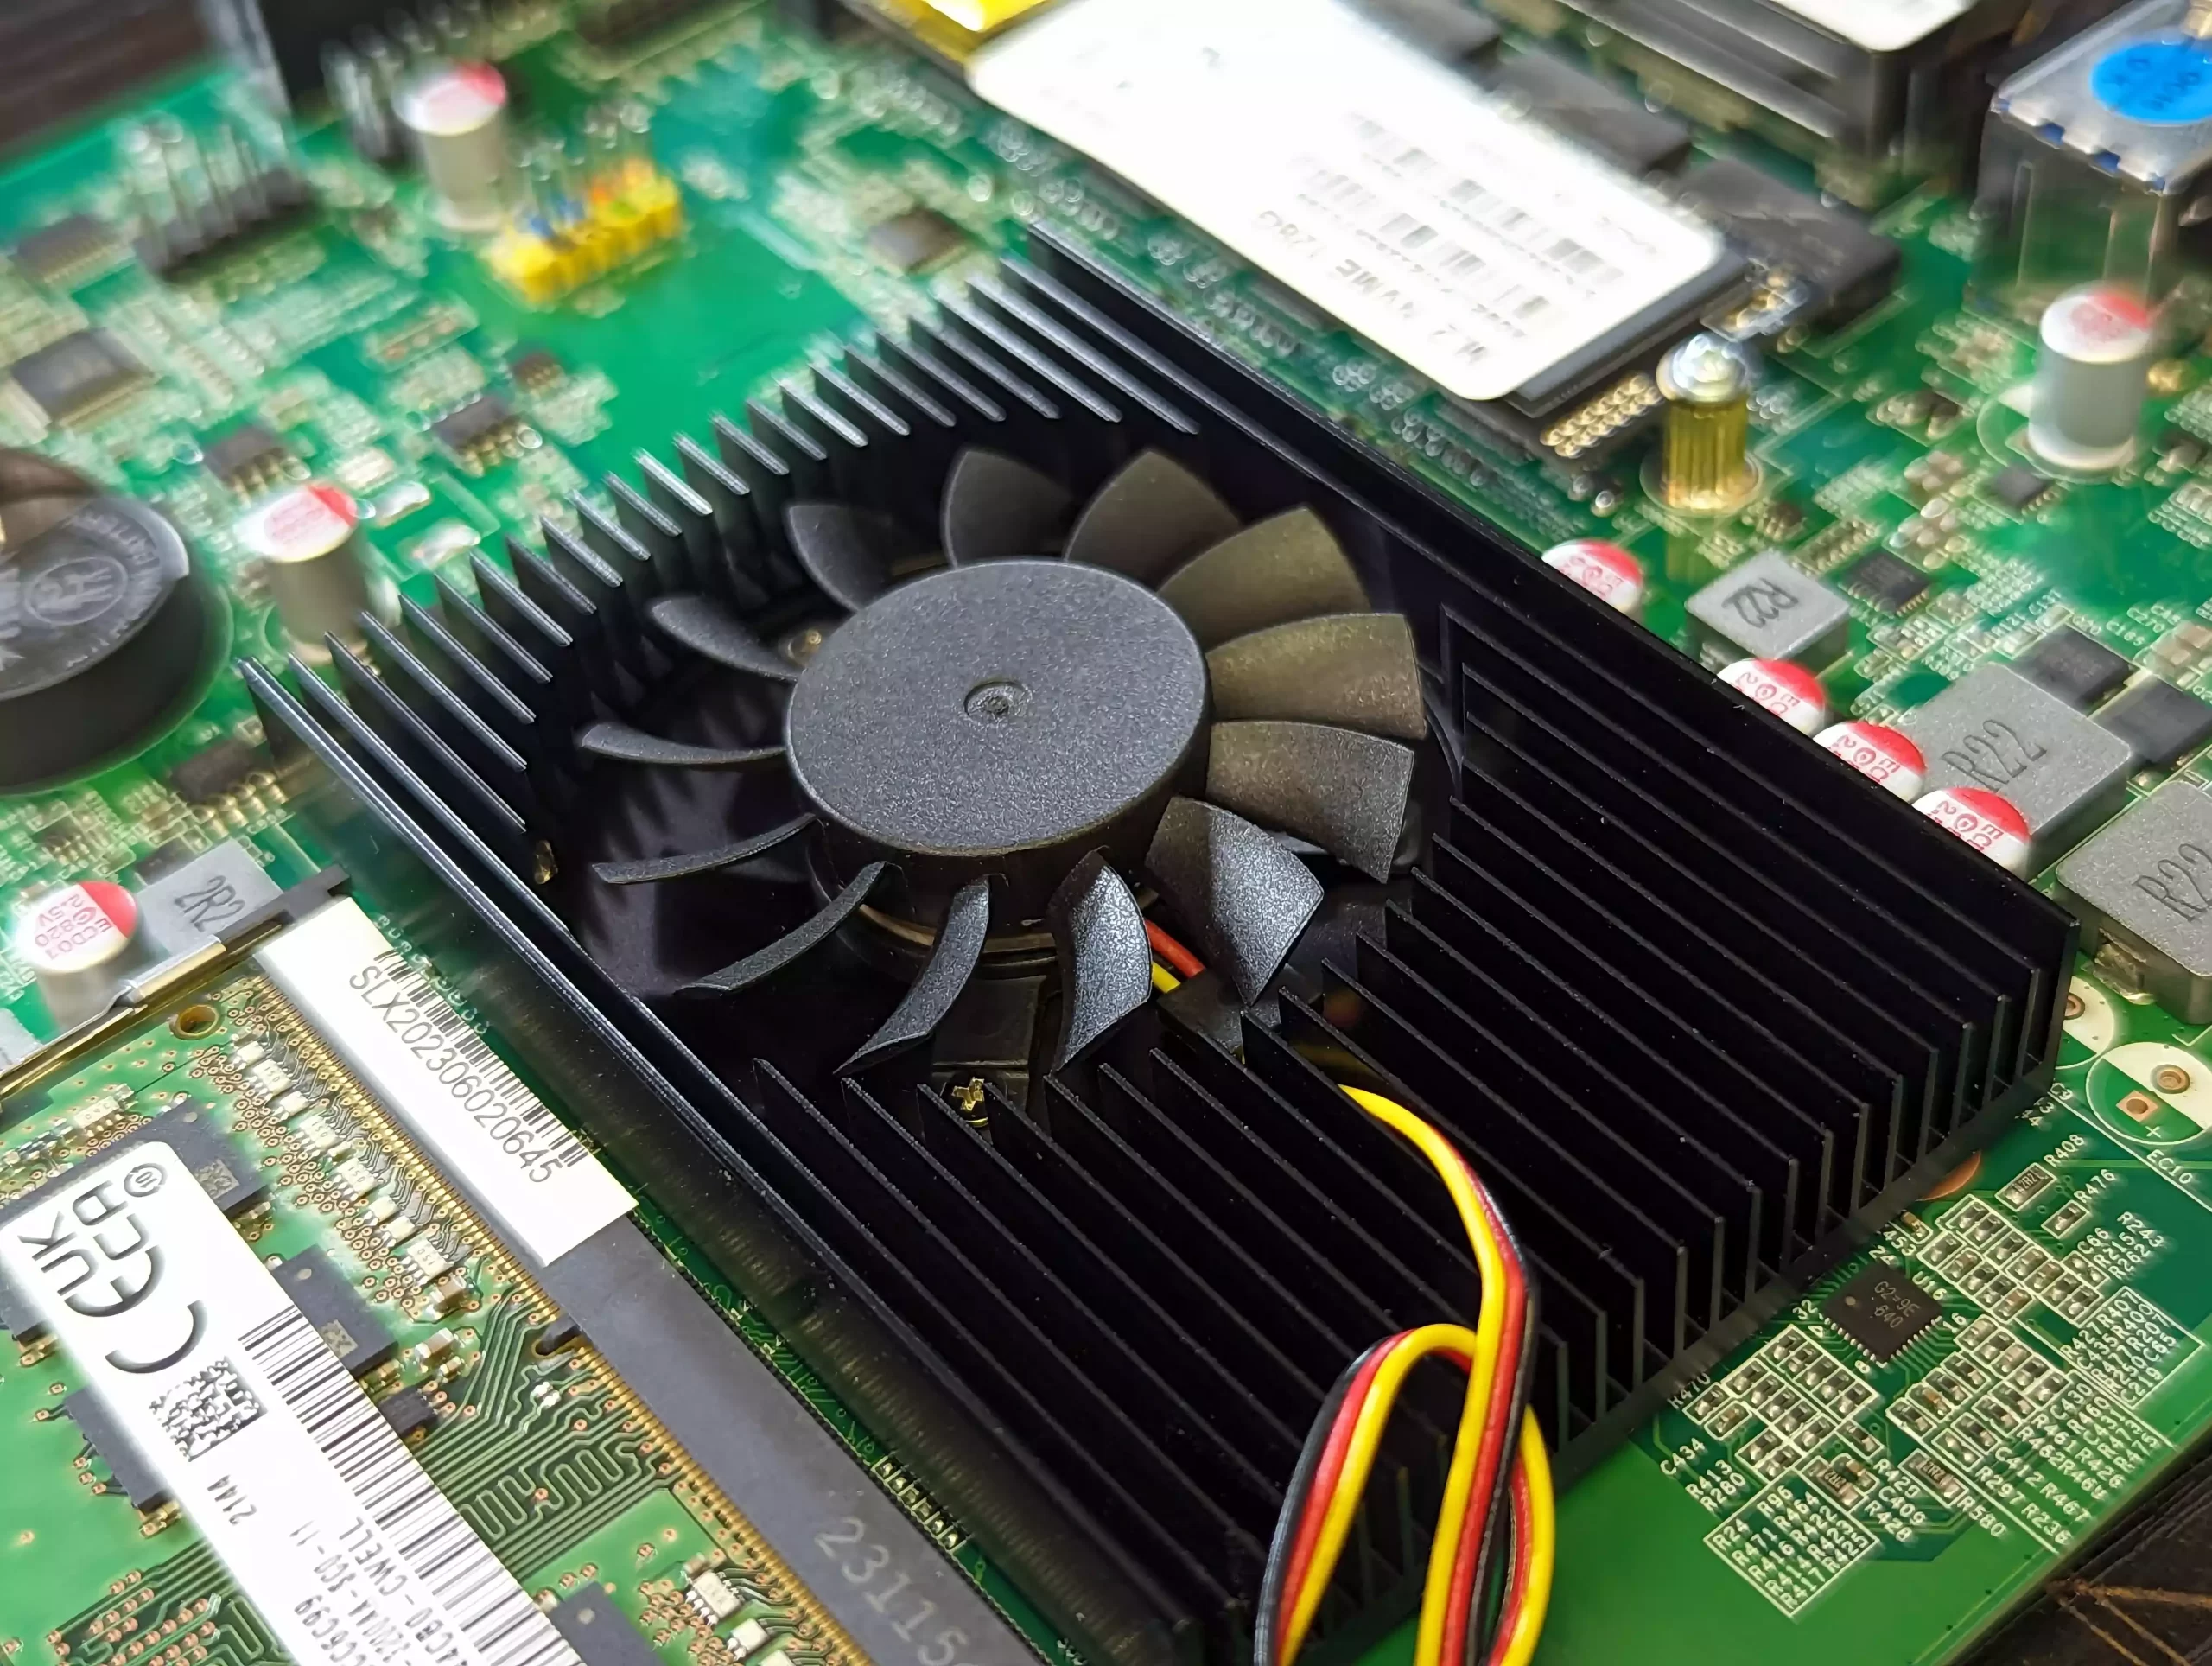
Reattach the fan to the rear of the case using its white four-pin connector and secure with the thumb screws.


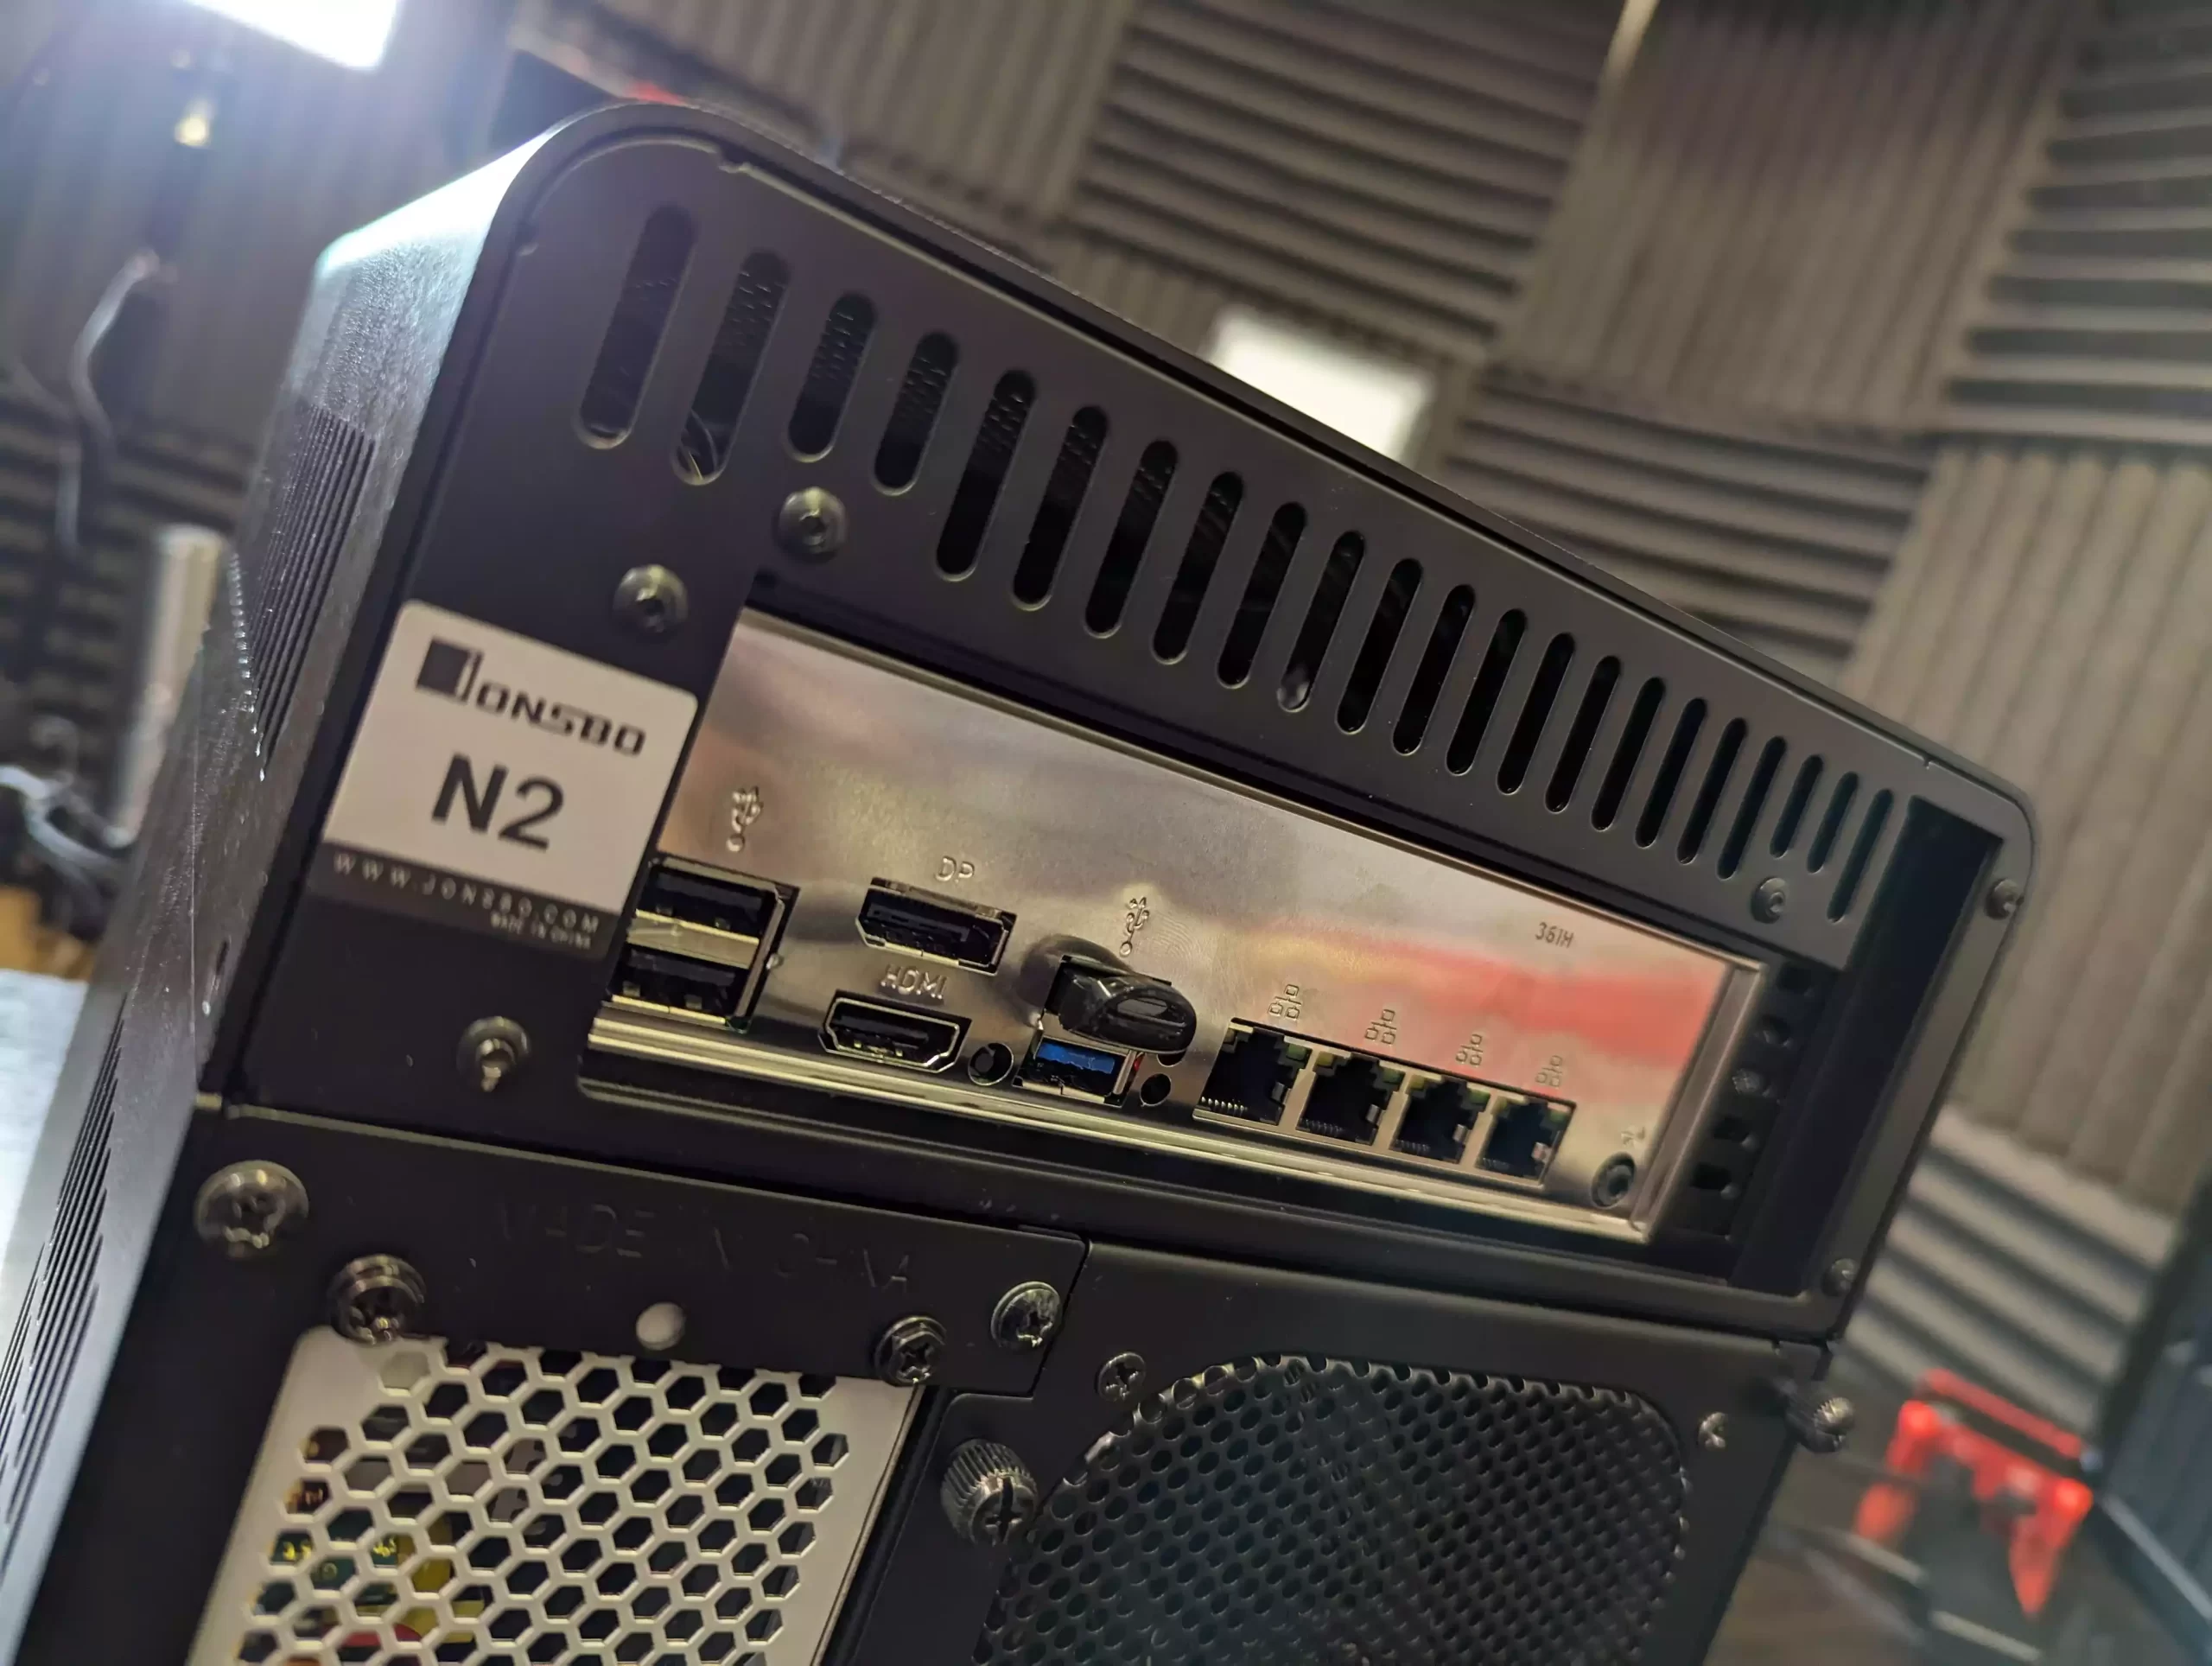
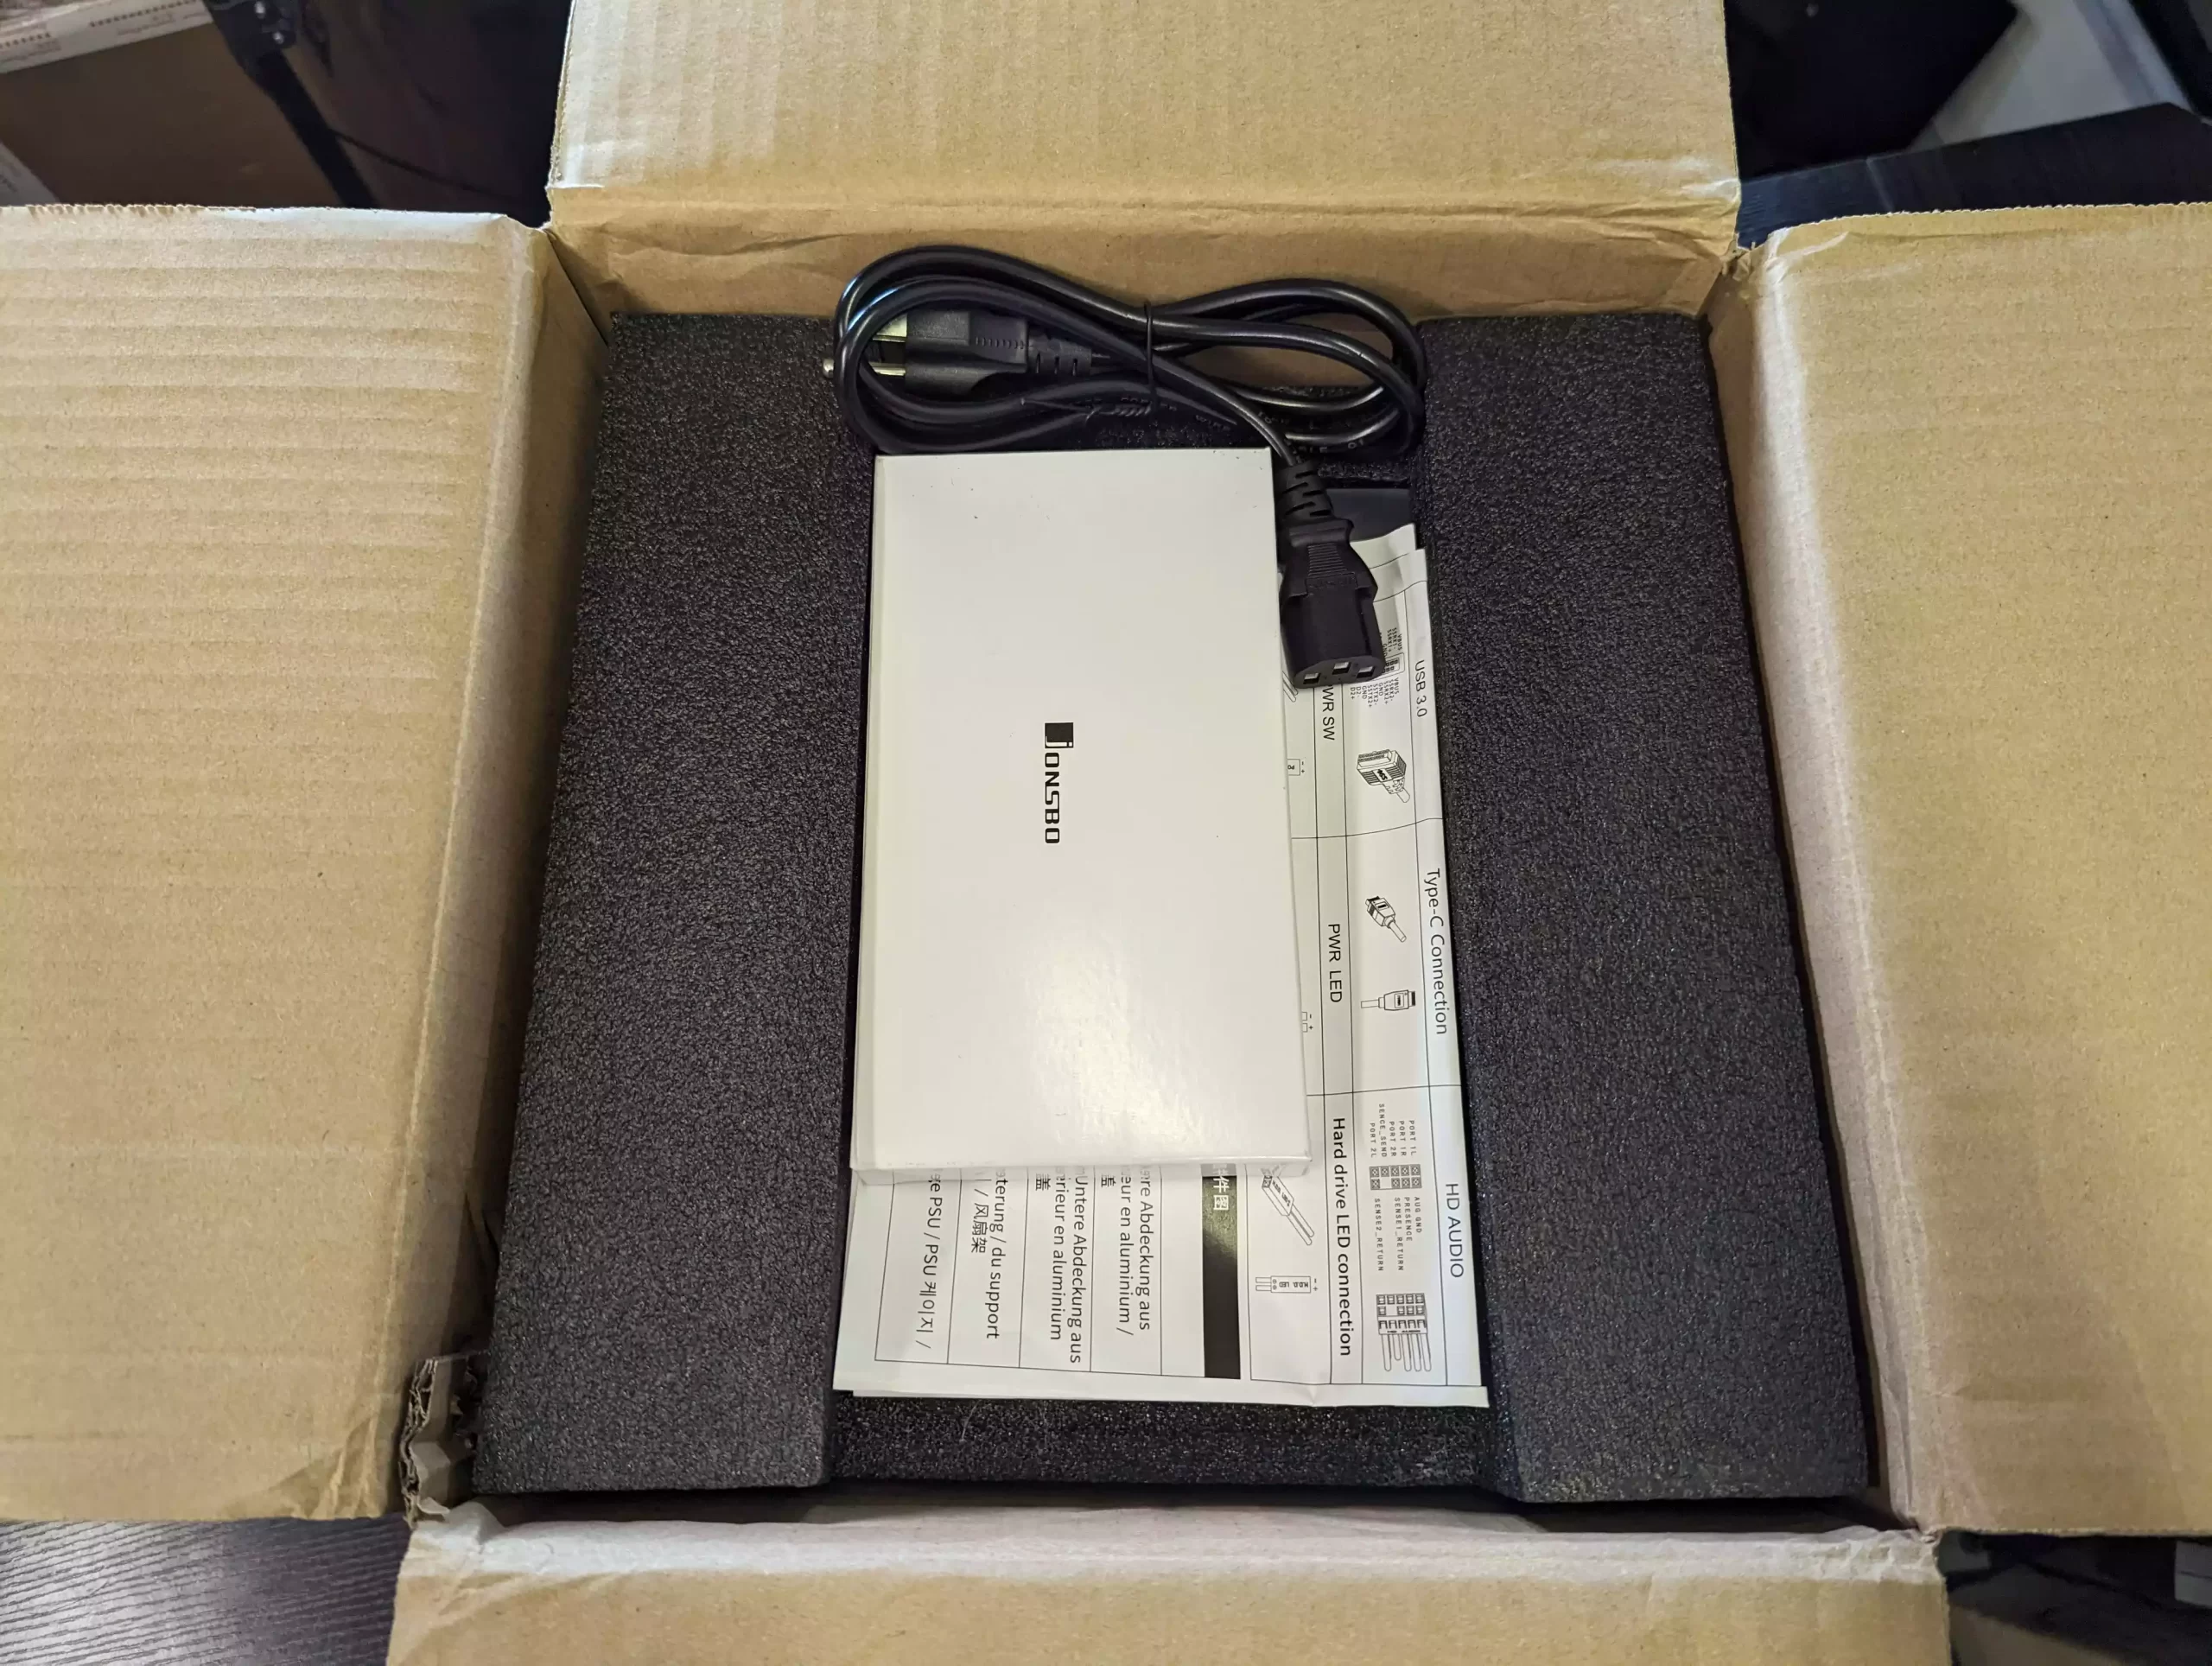
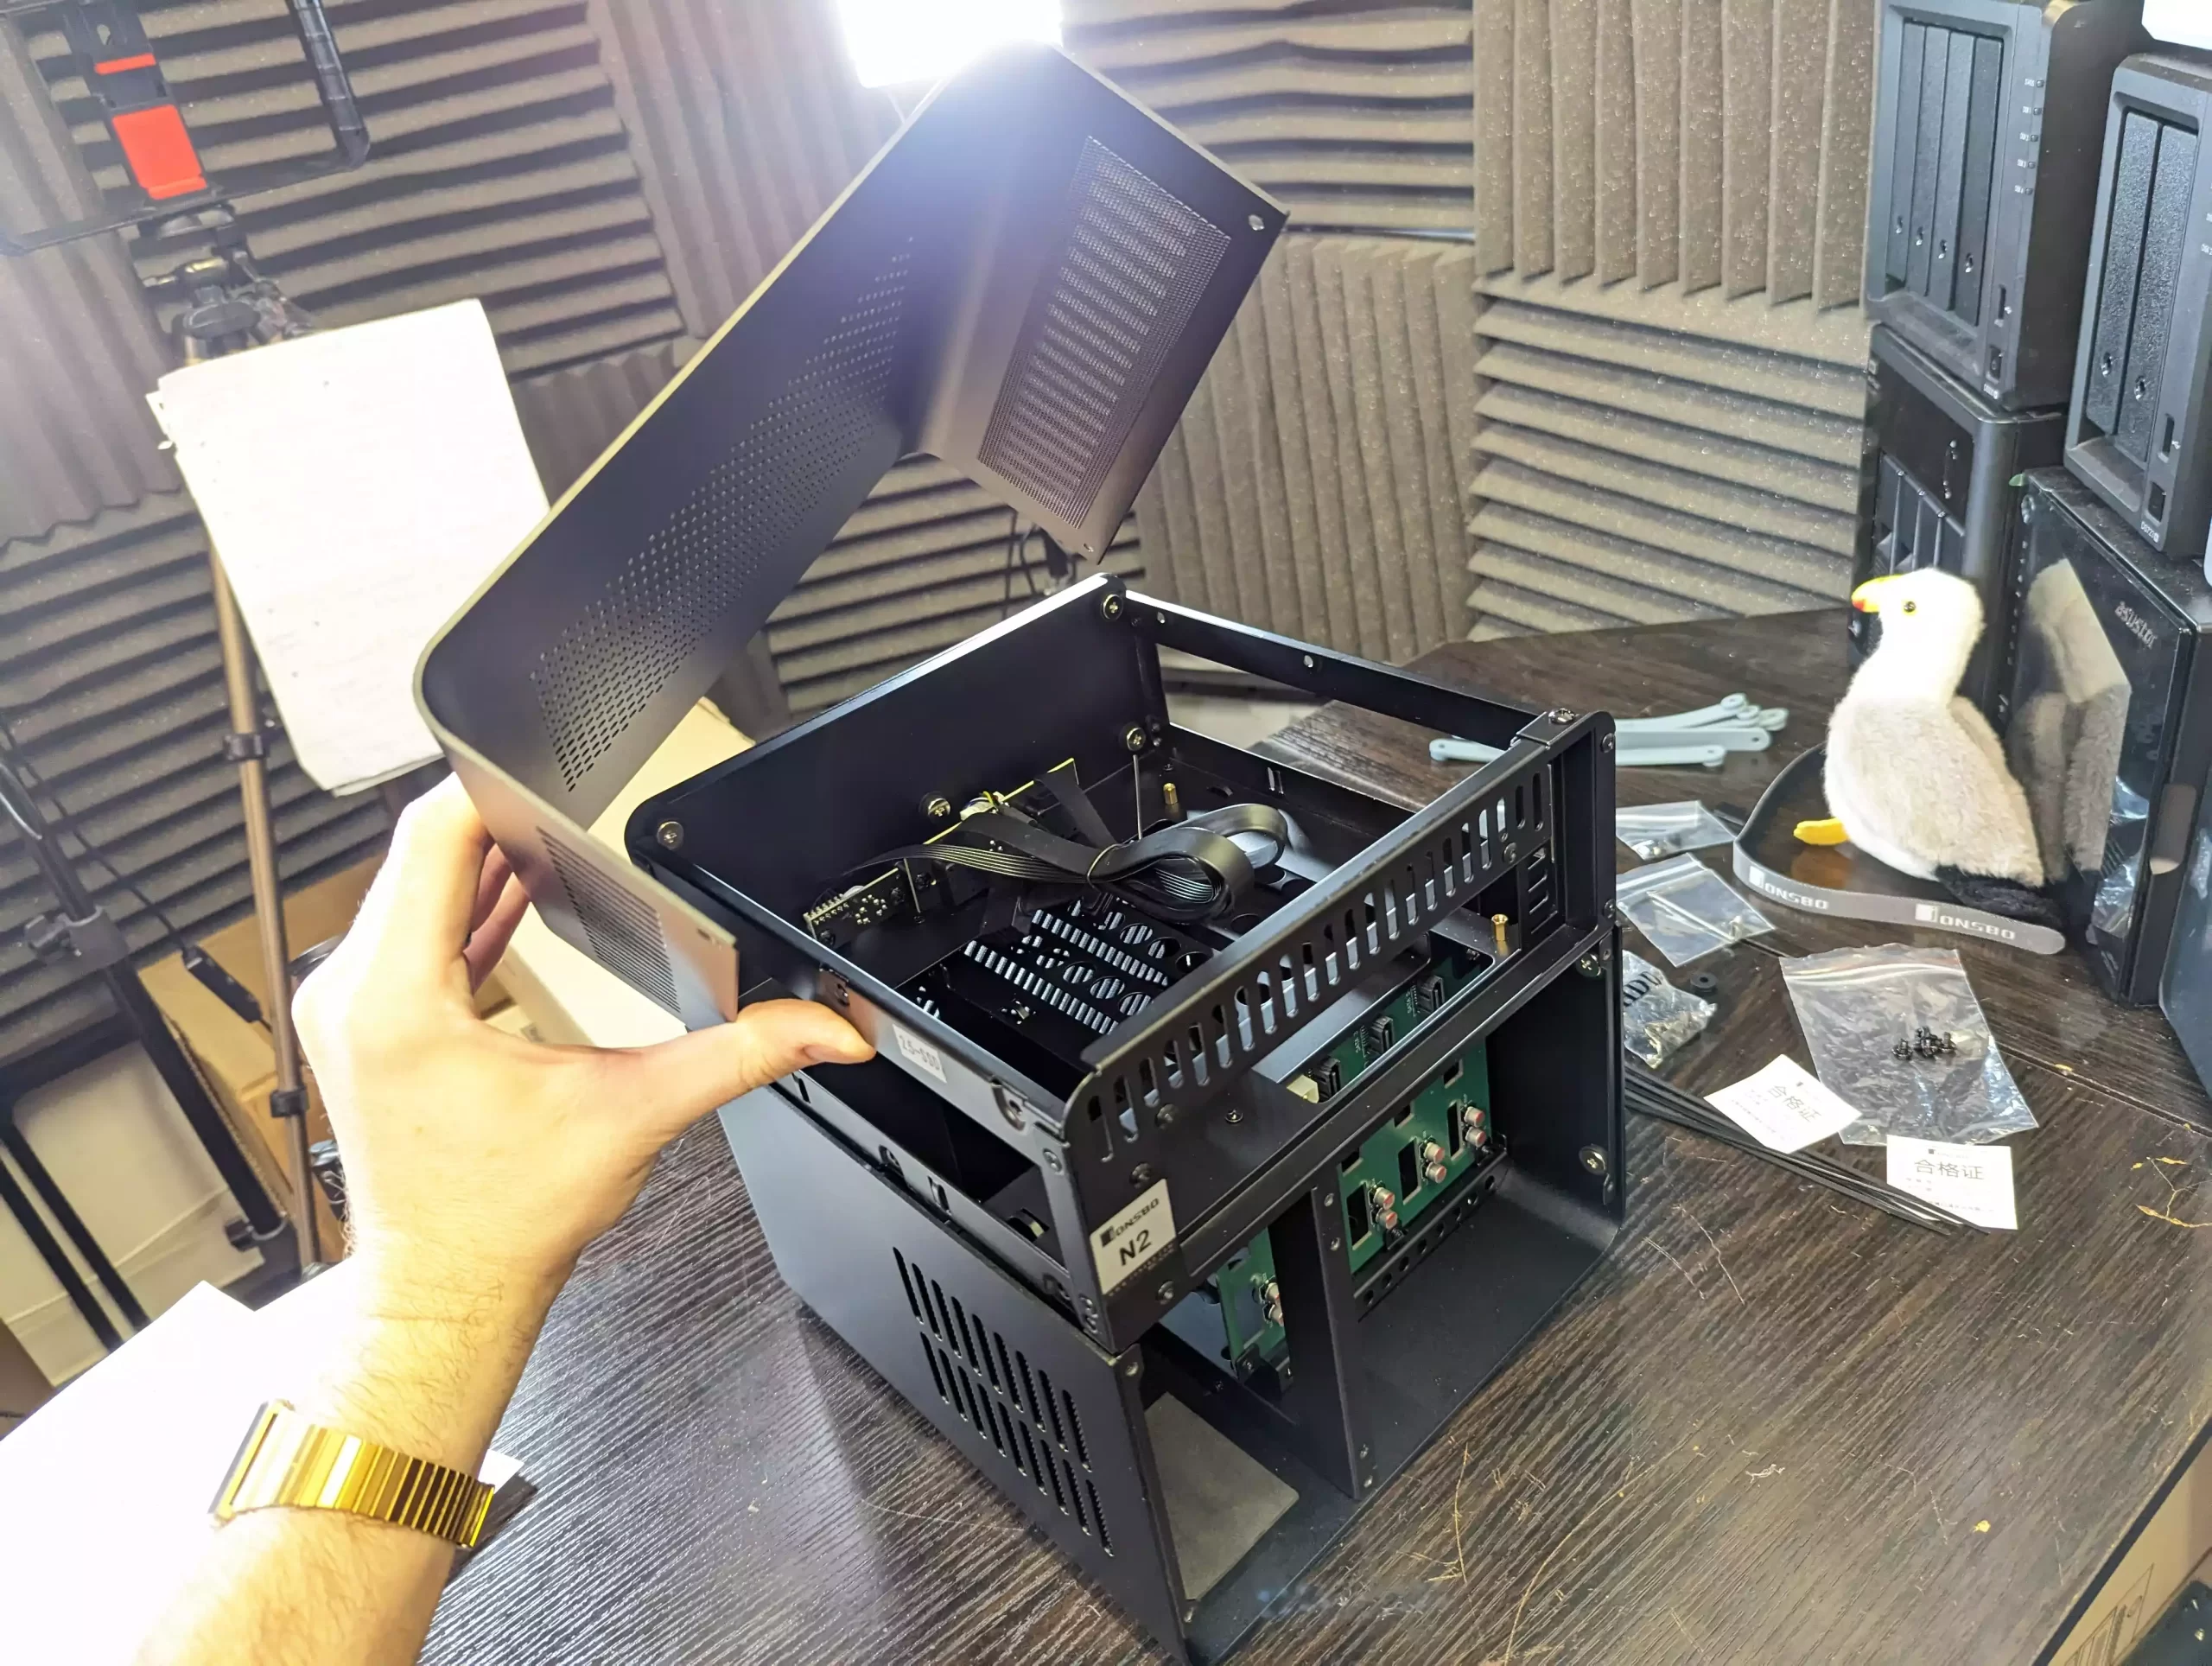
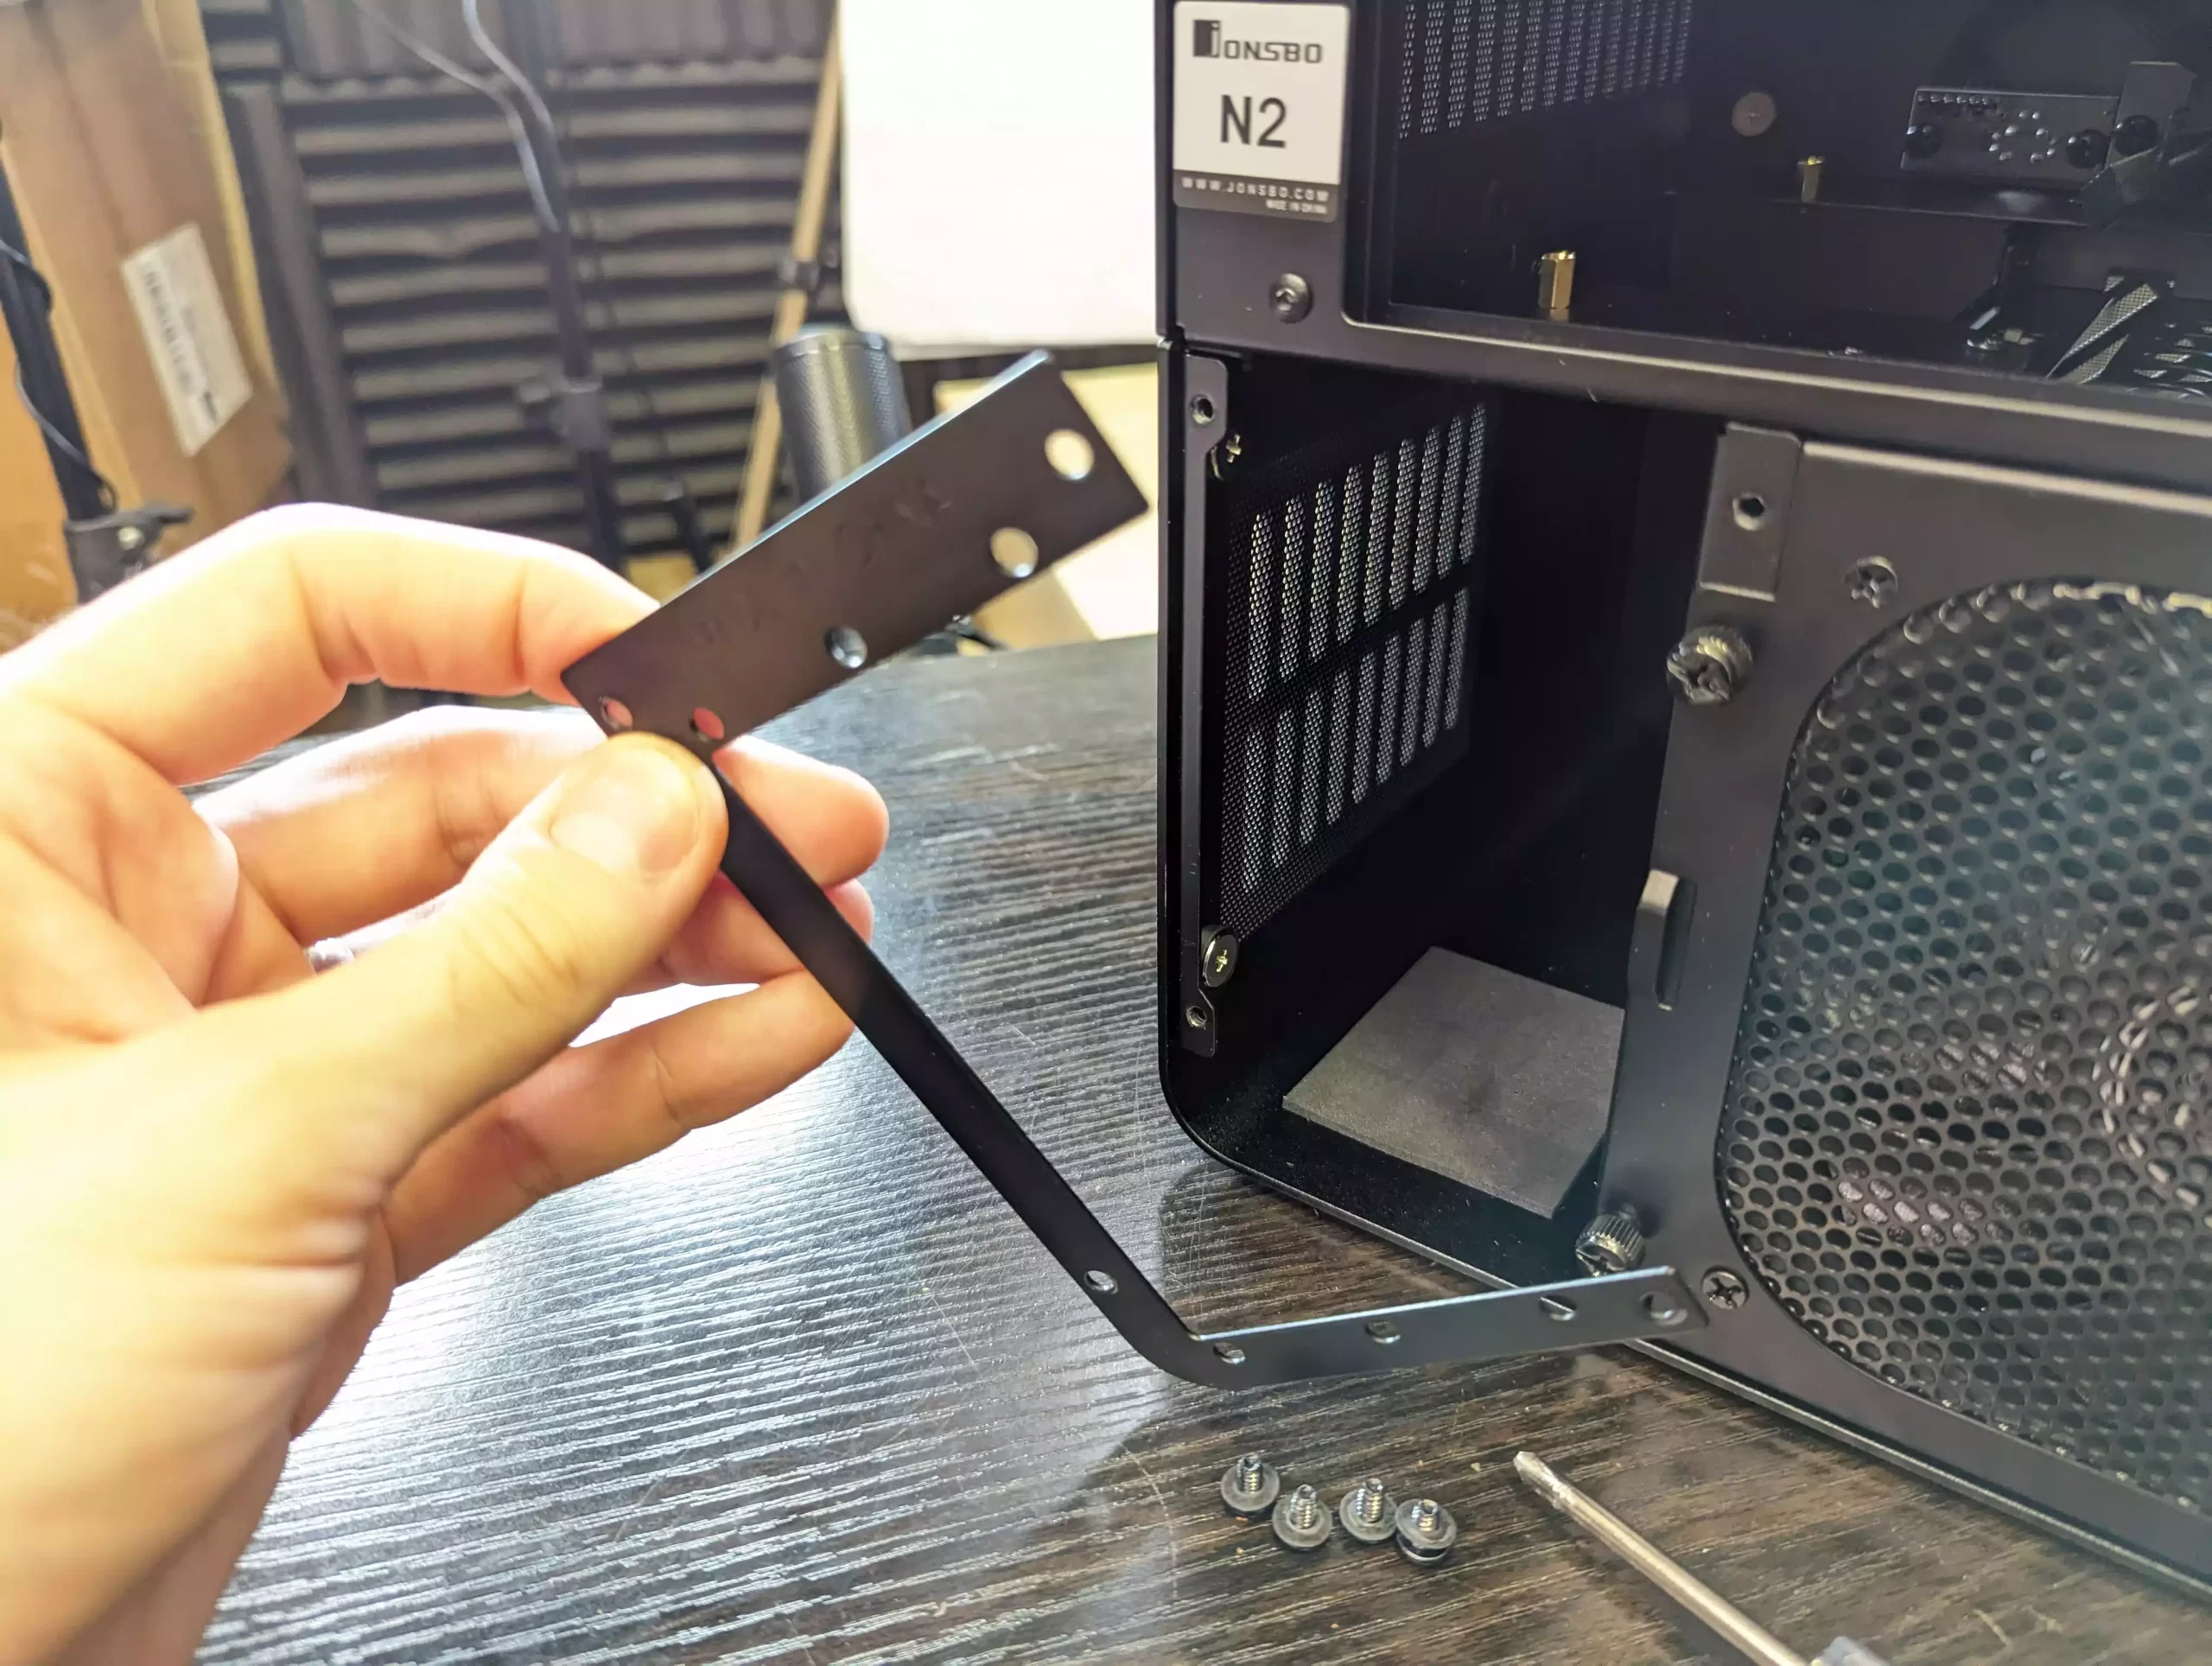
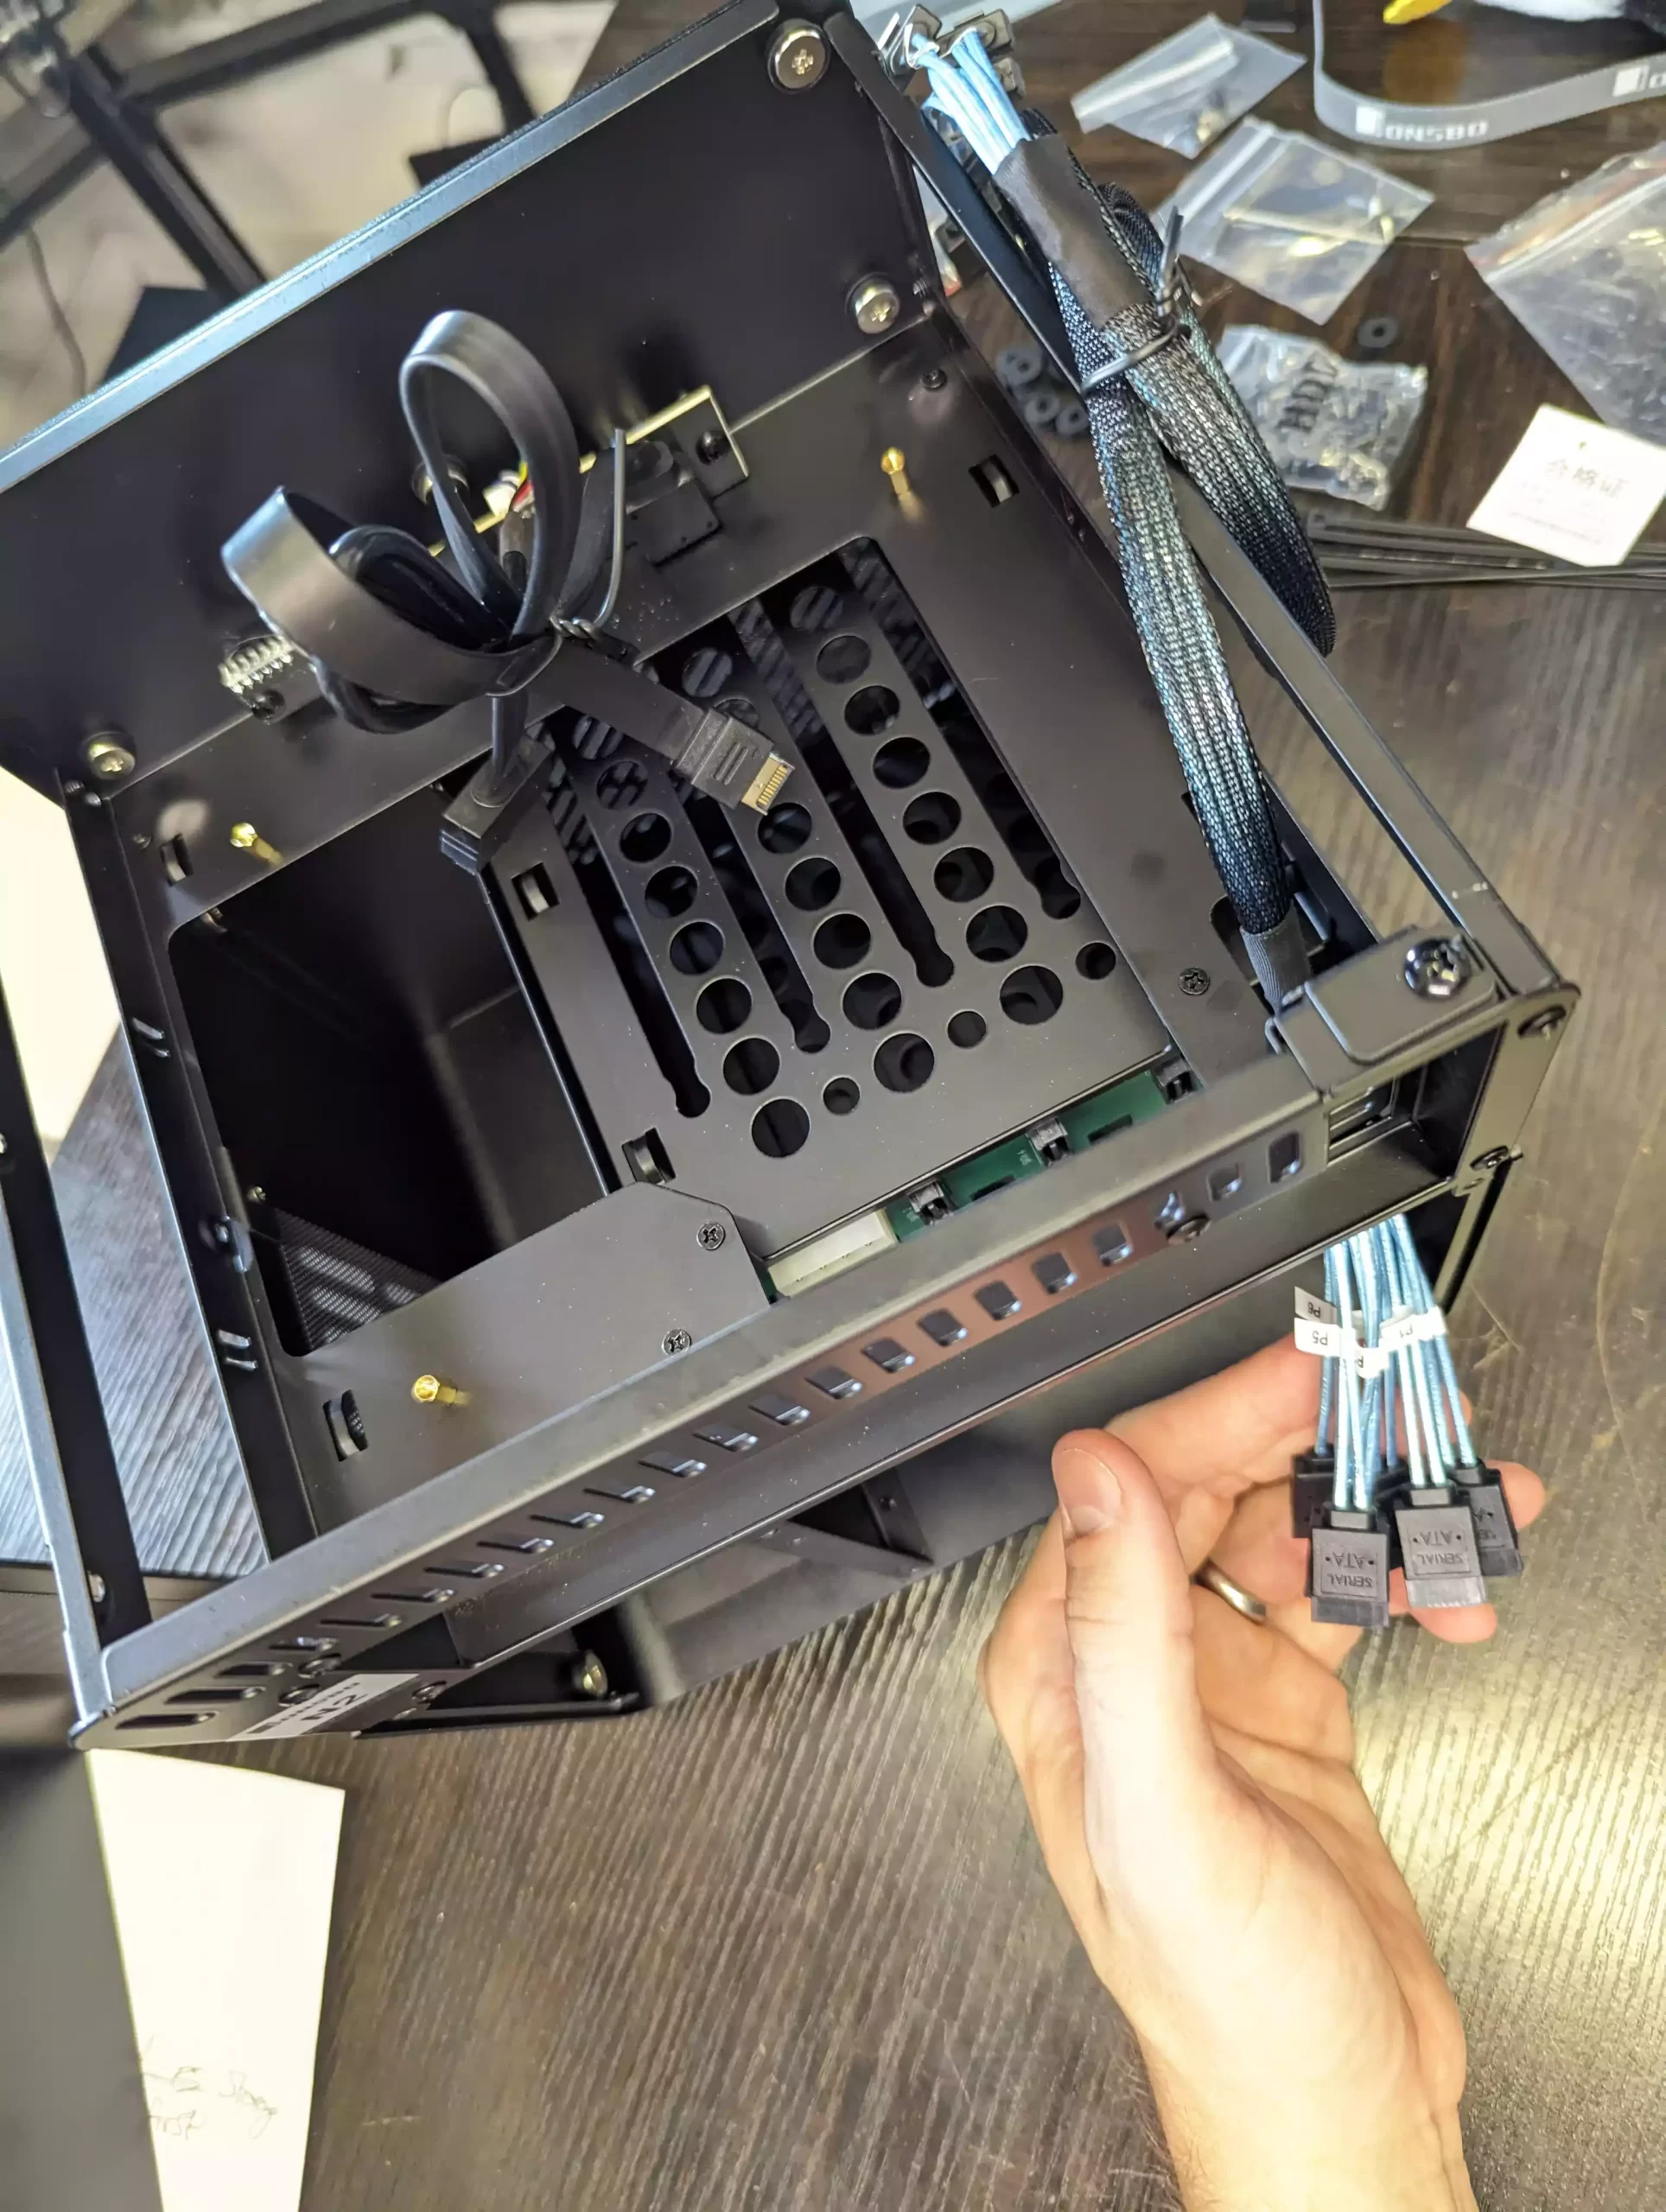
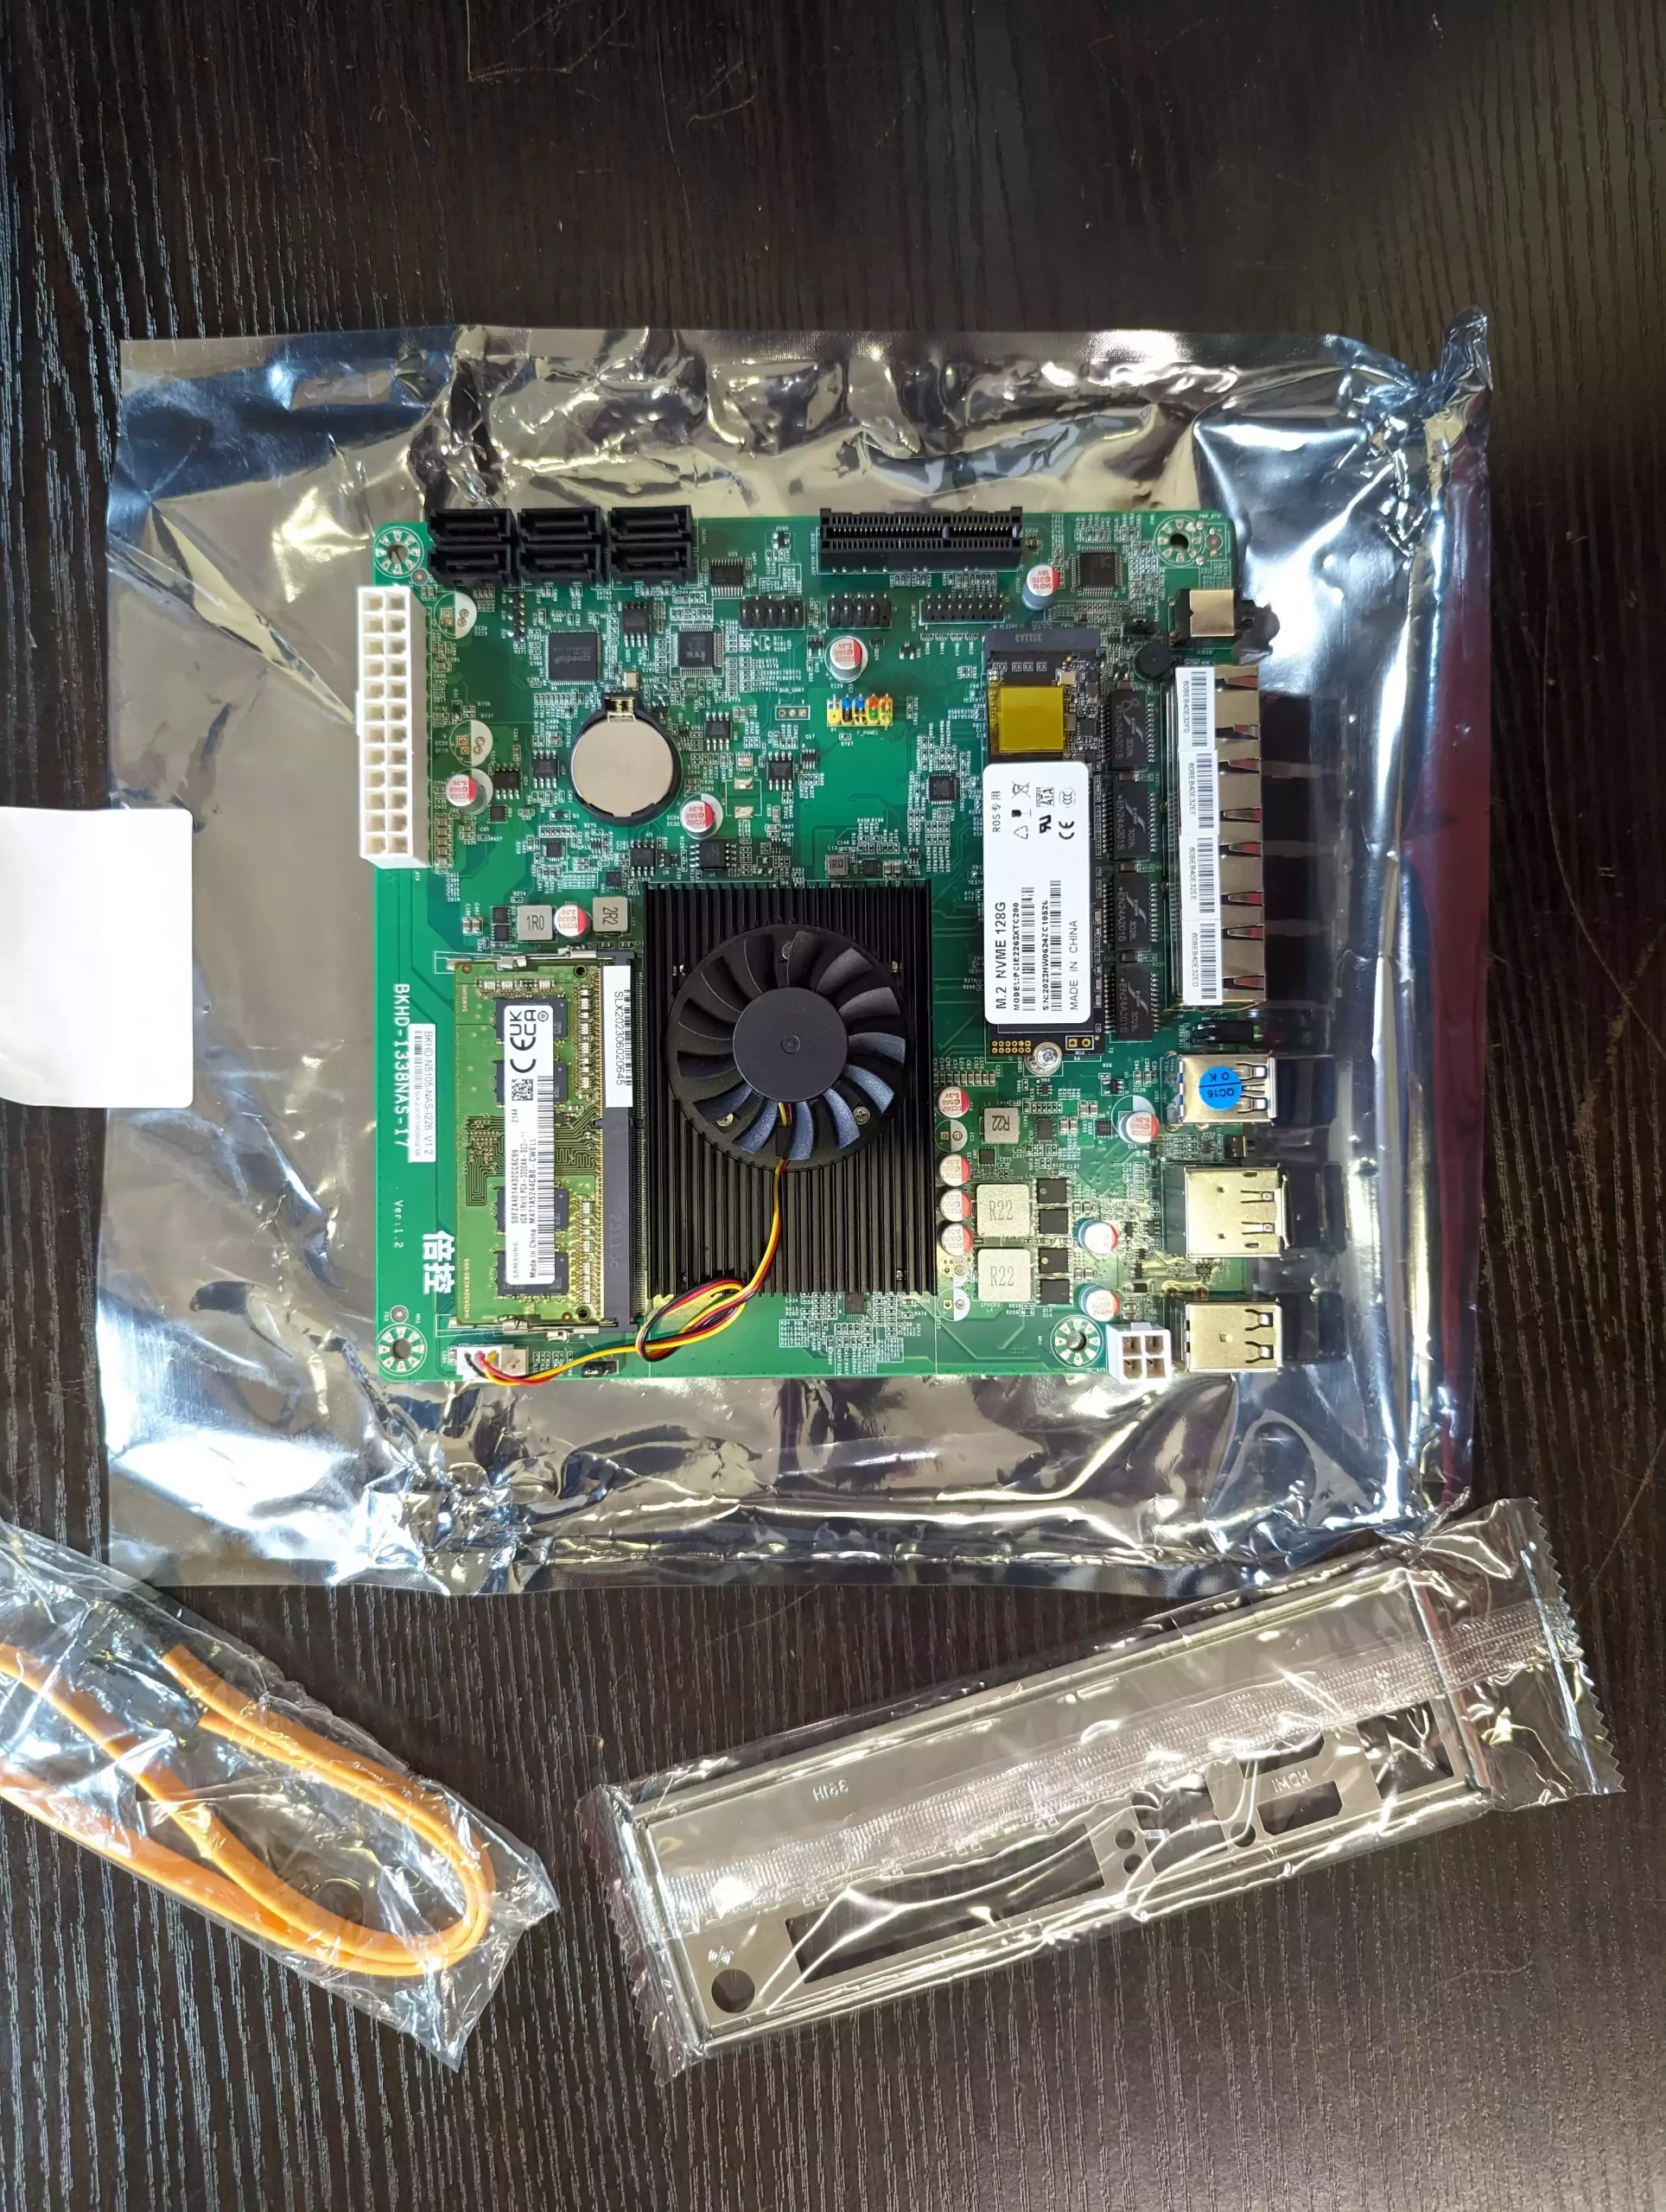
Unbox the TopTon NAS board, starting with the metal backplane.
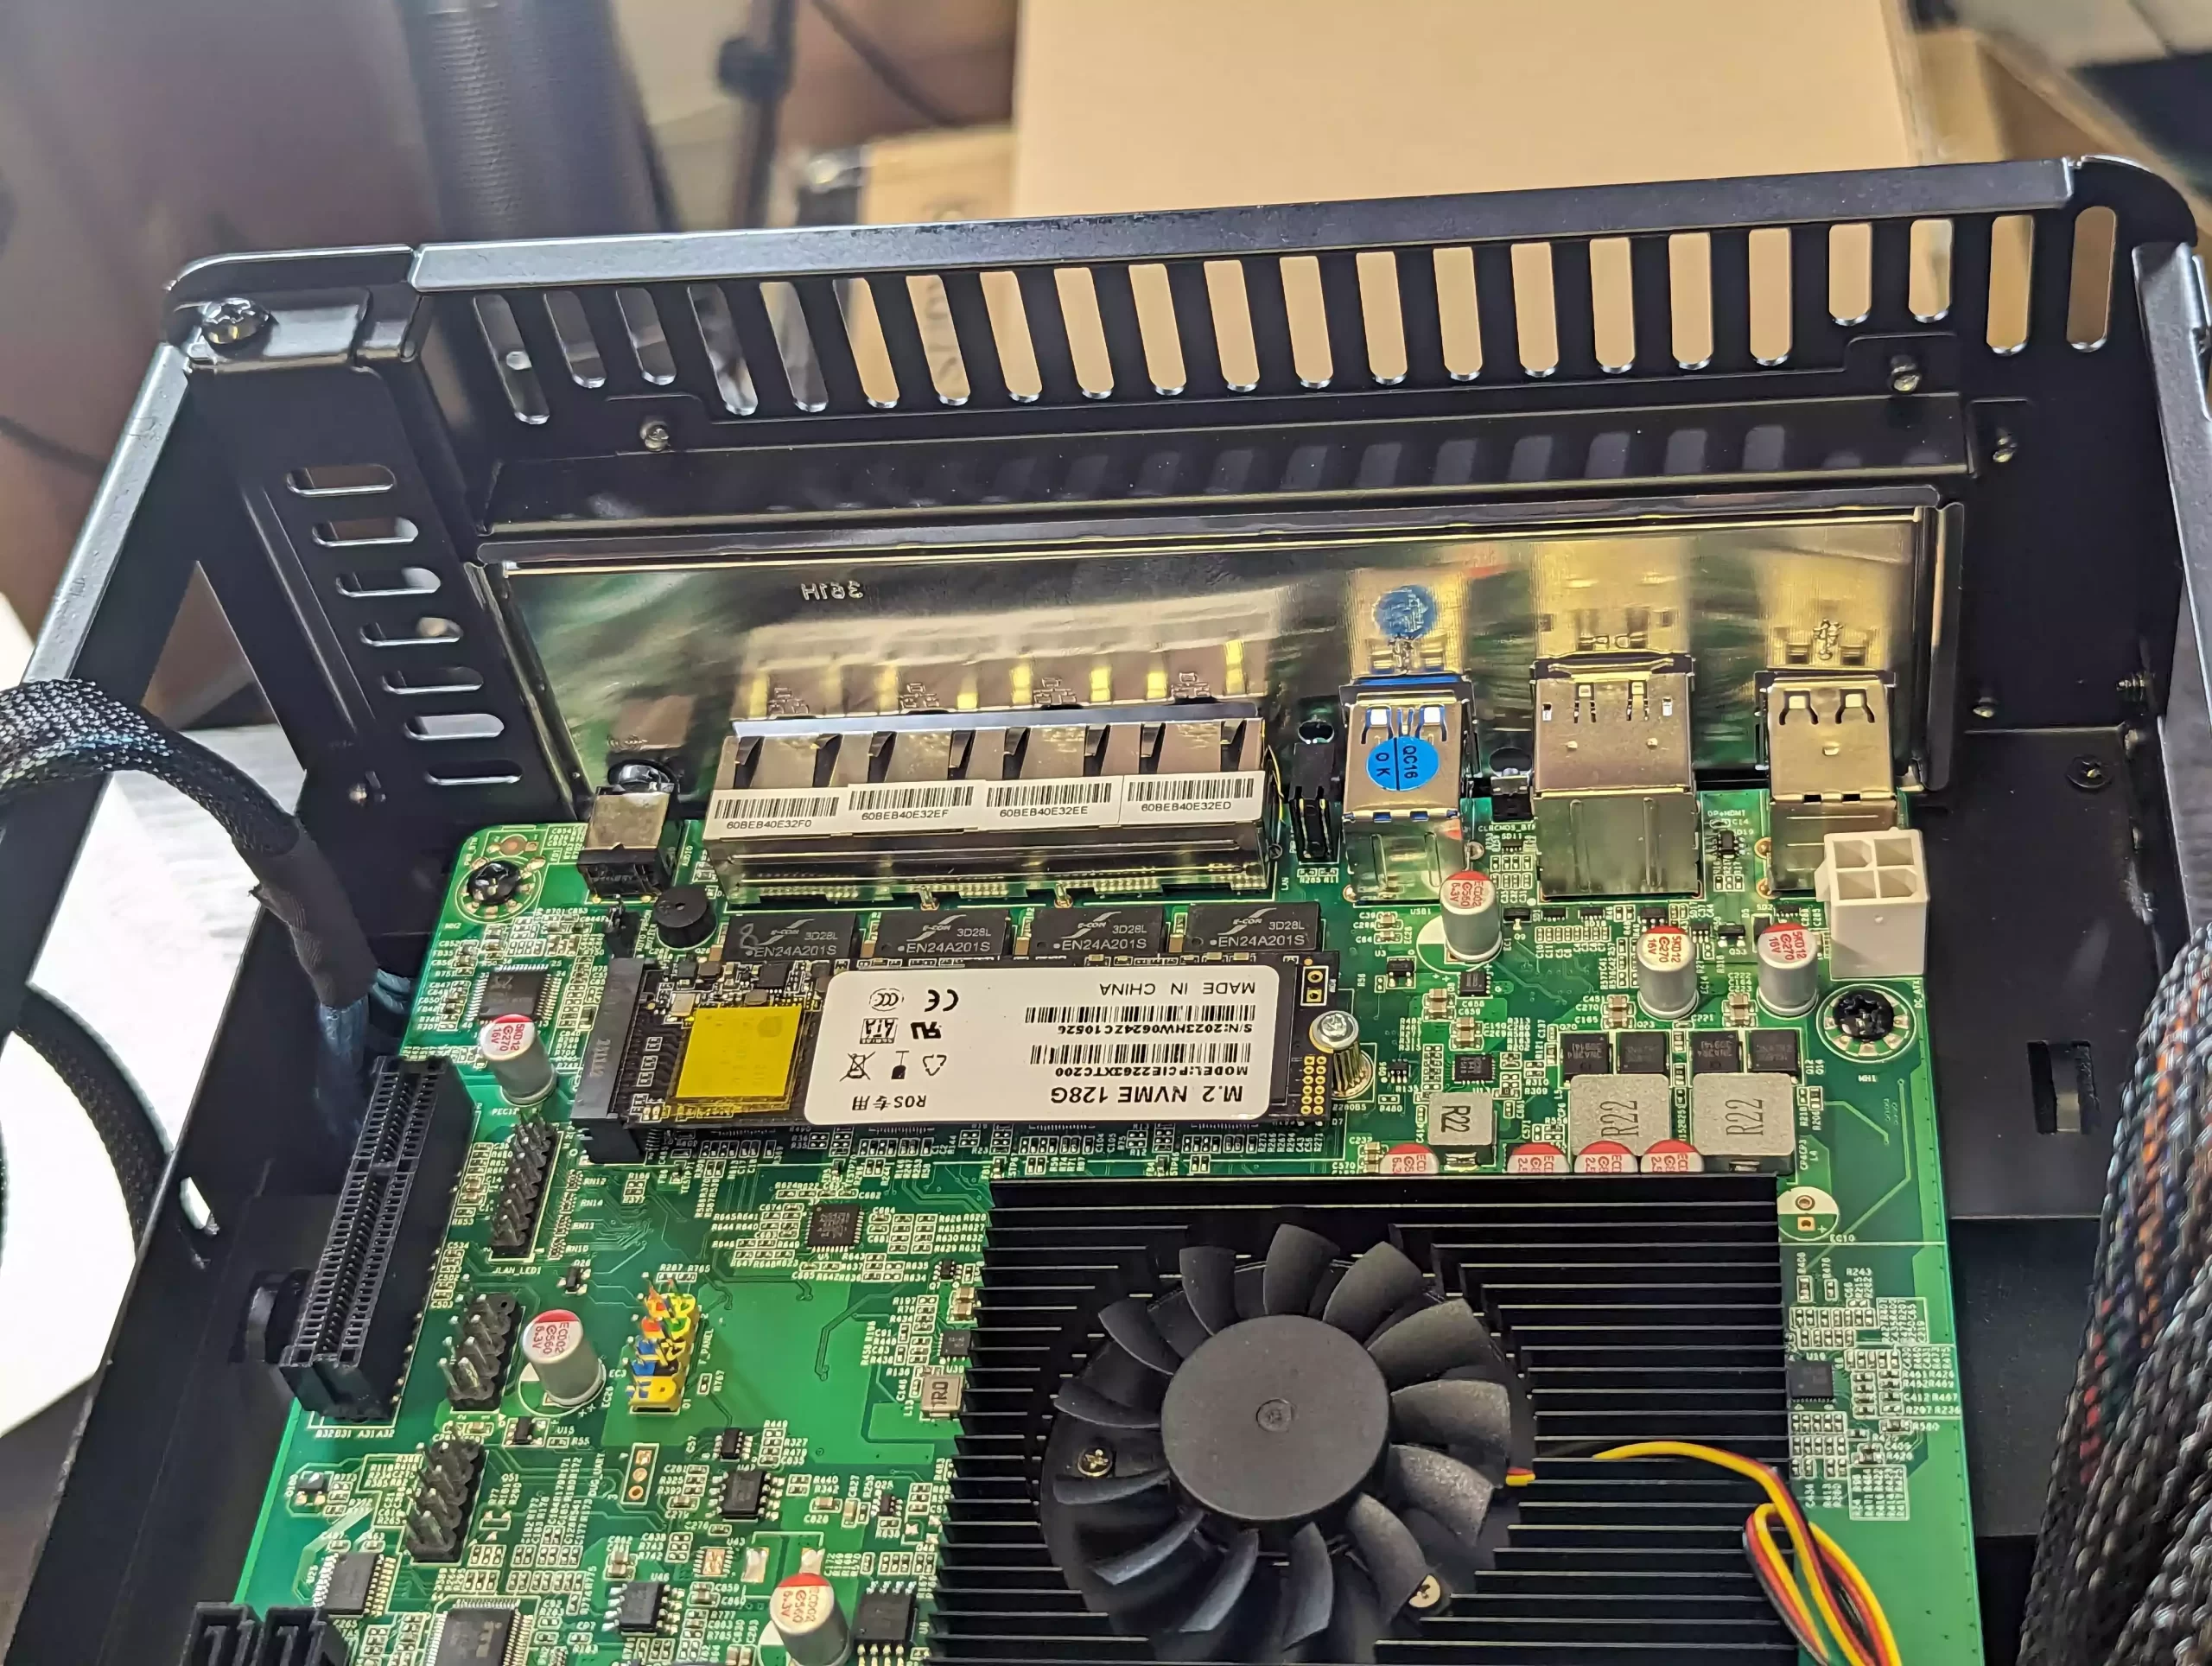
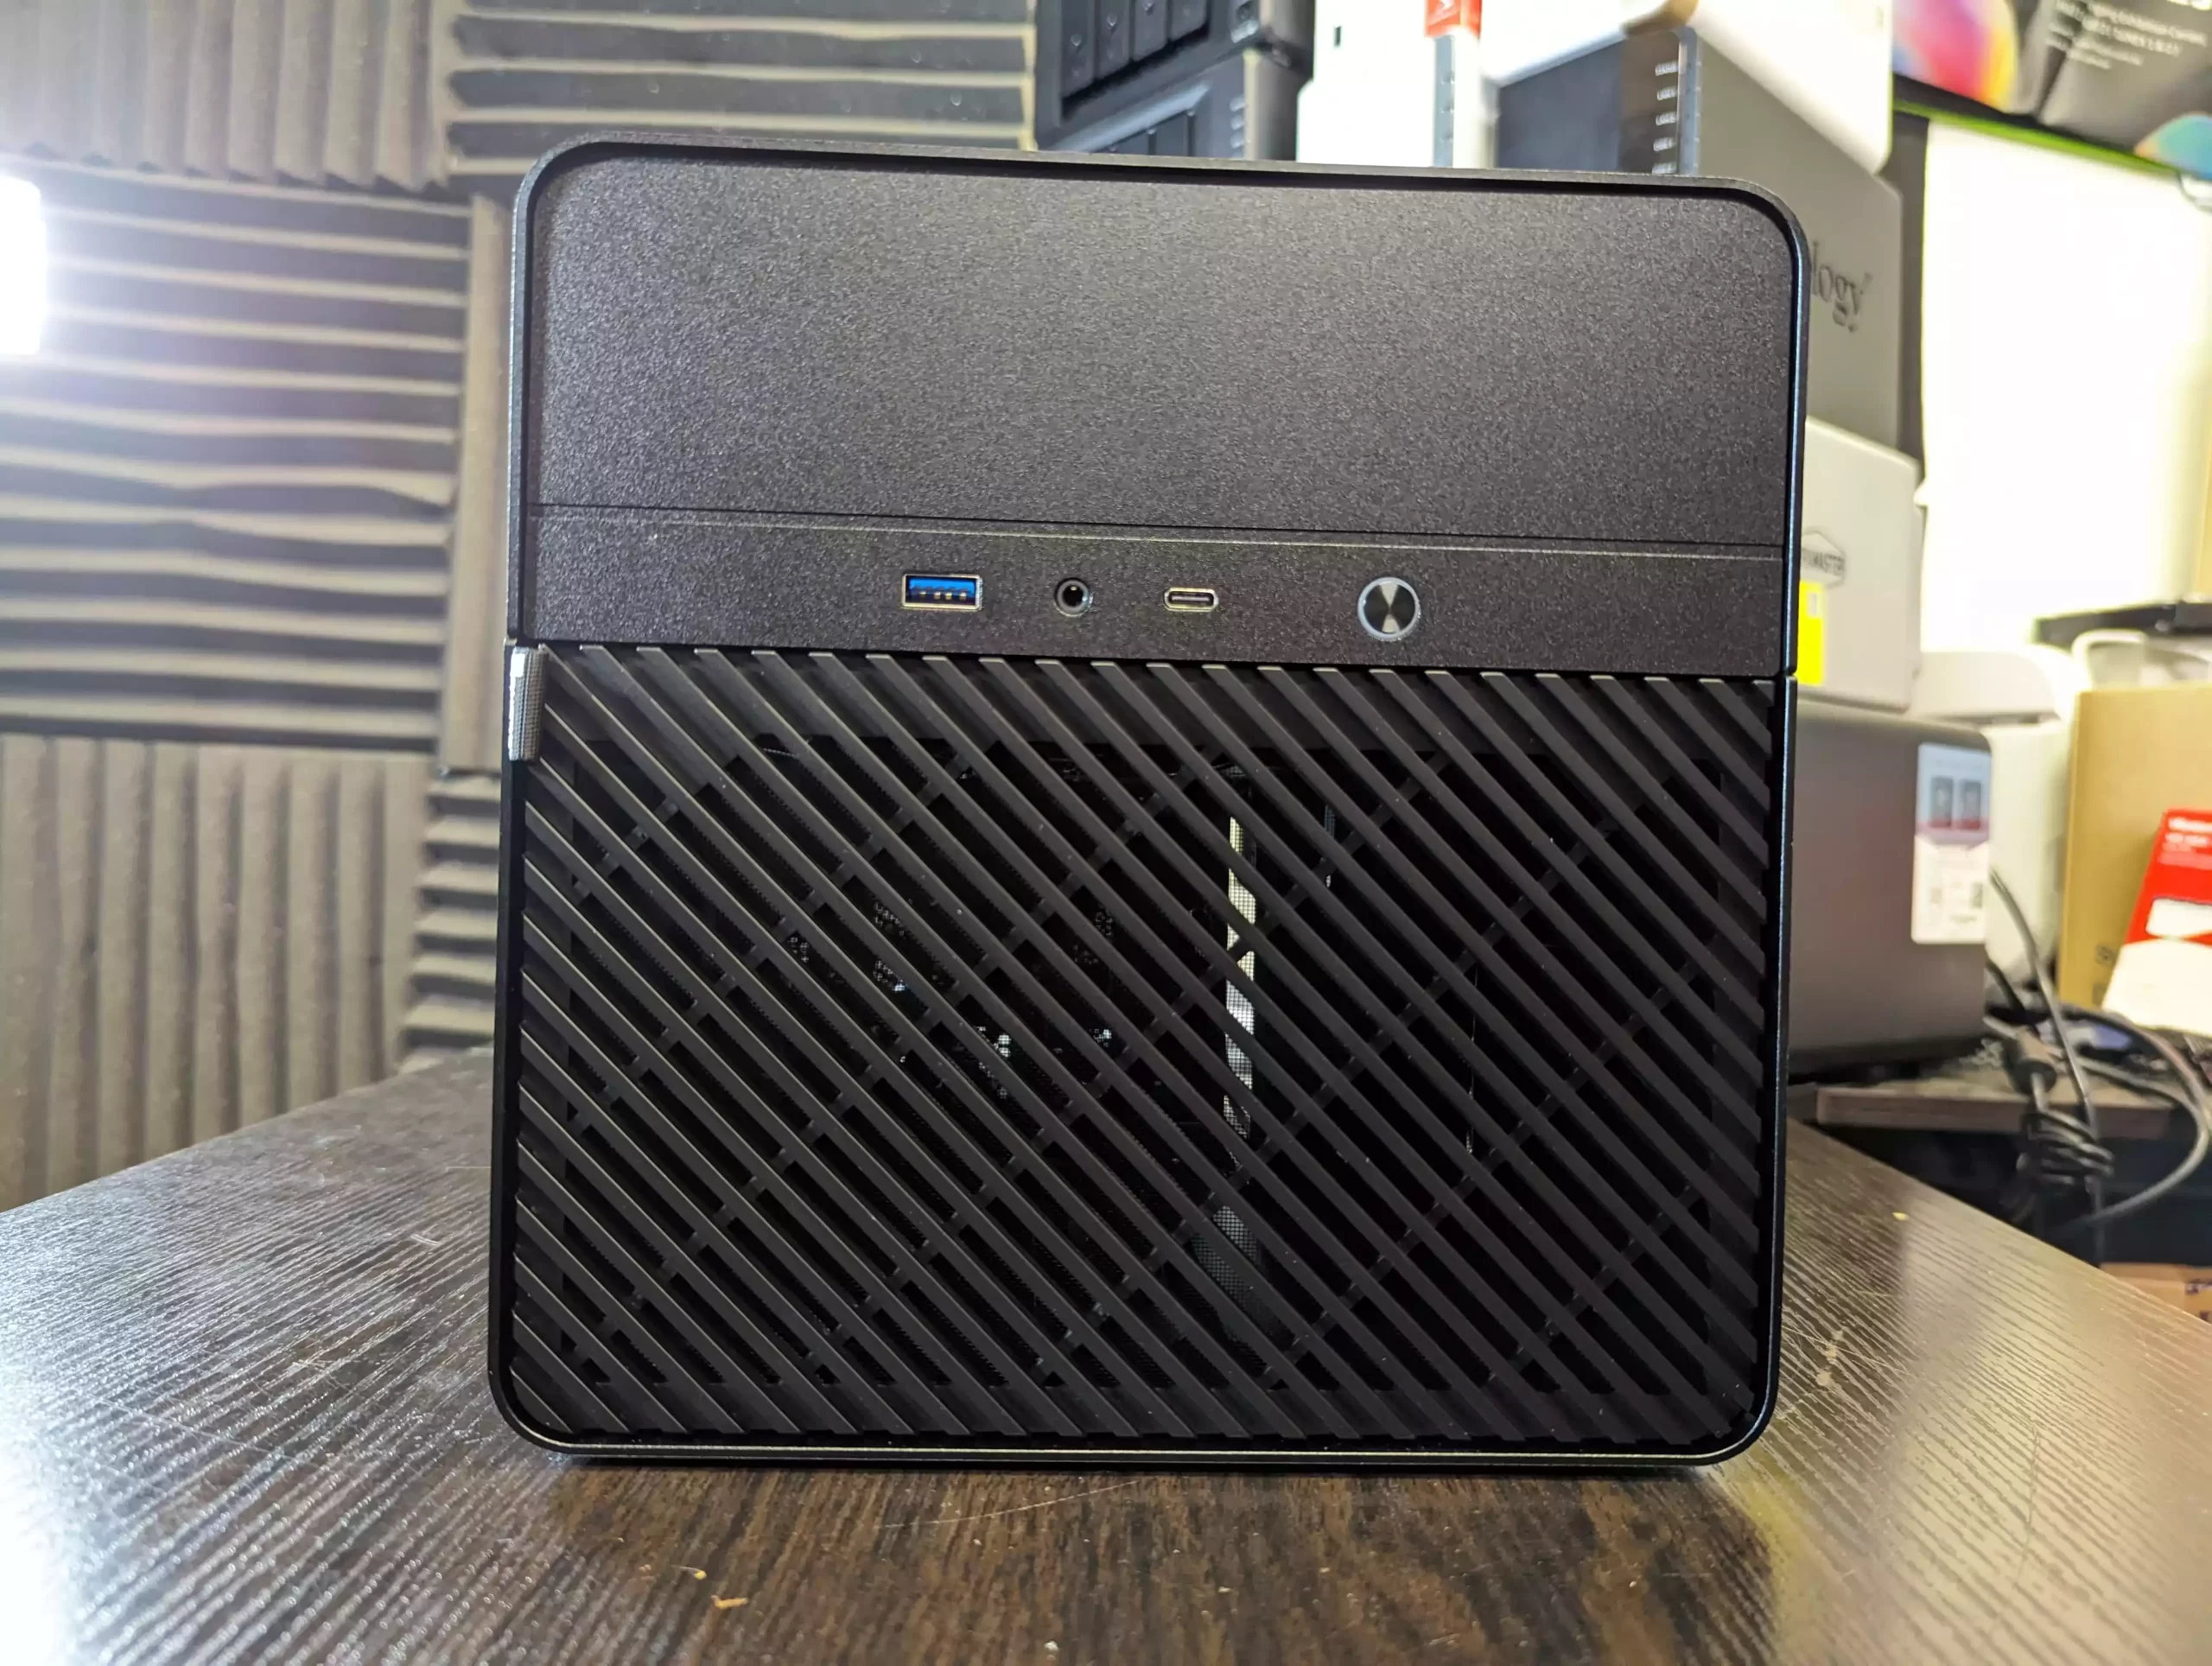
Mount the metal backplane in the available rectangular cavity of the Jonsbo case, ensuring readable text faces the right way. The network/ethernet port should be on the right when viewed from the case’s rear.
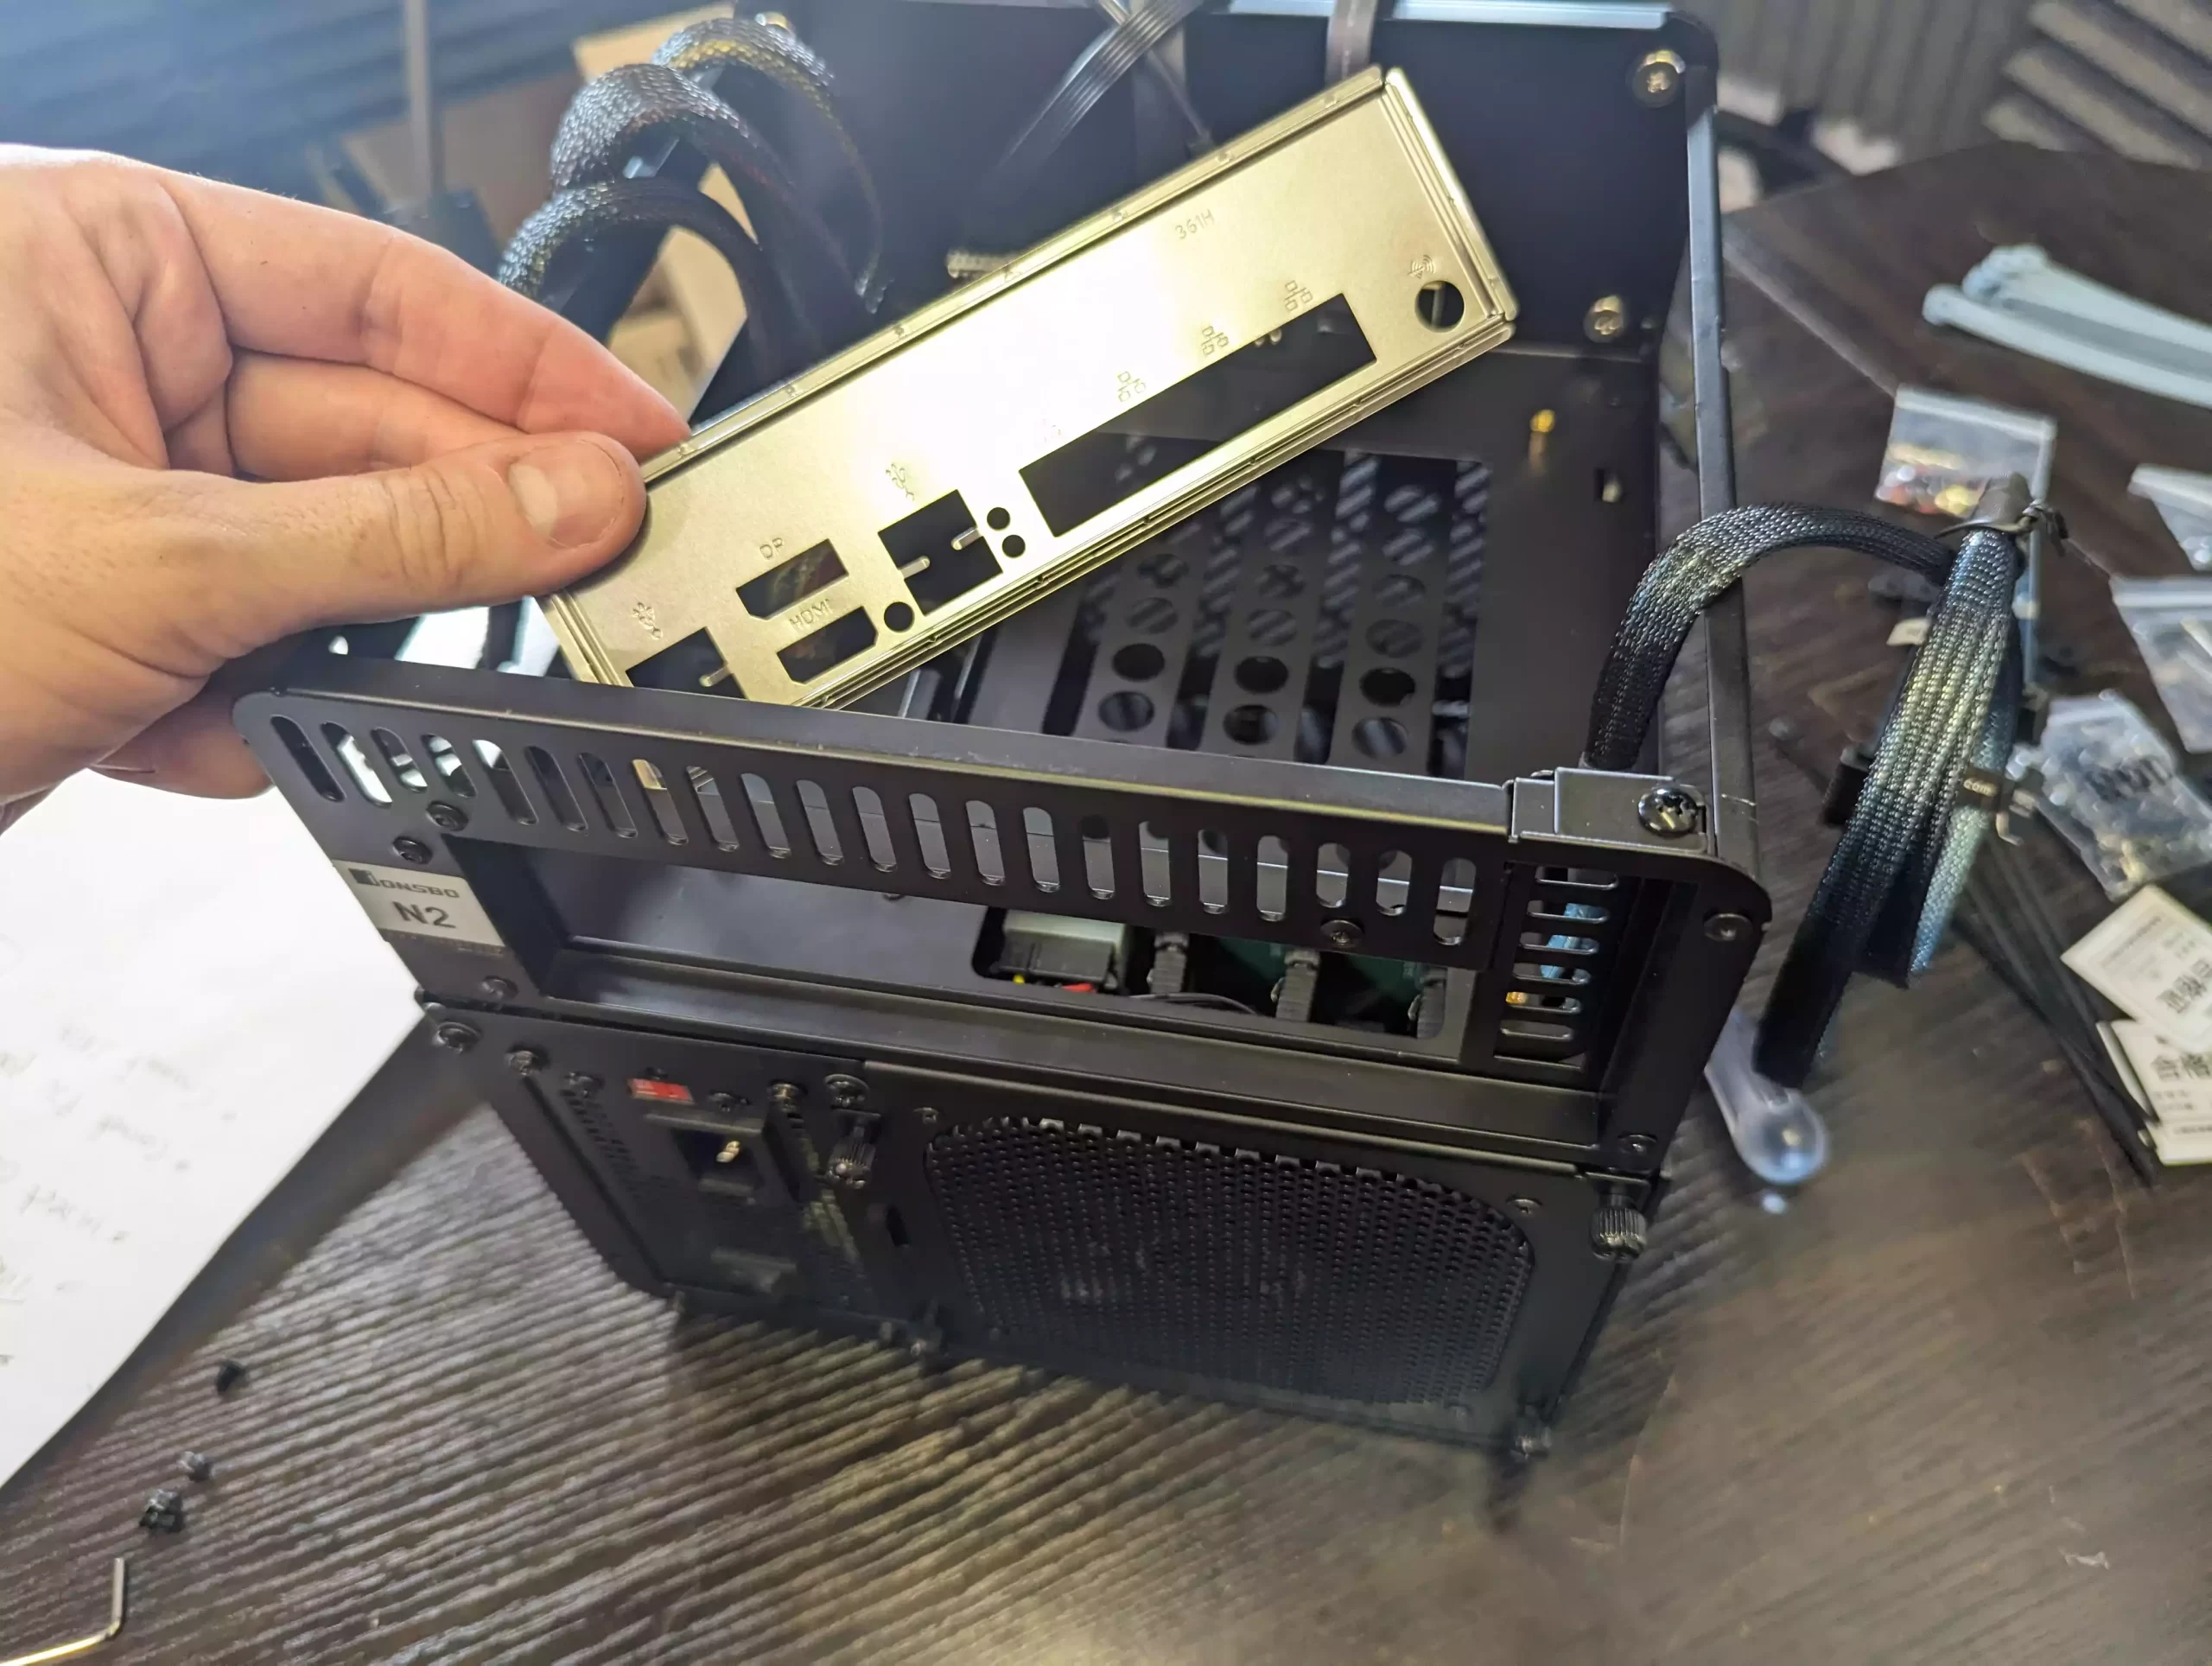
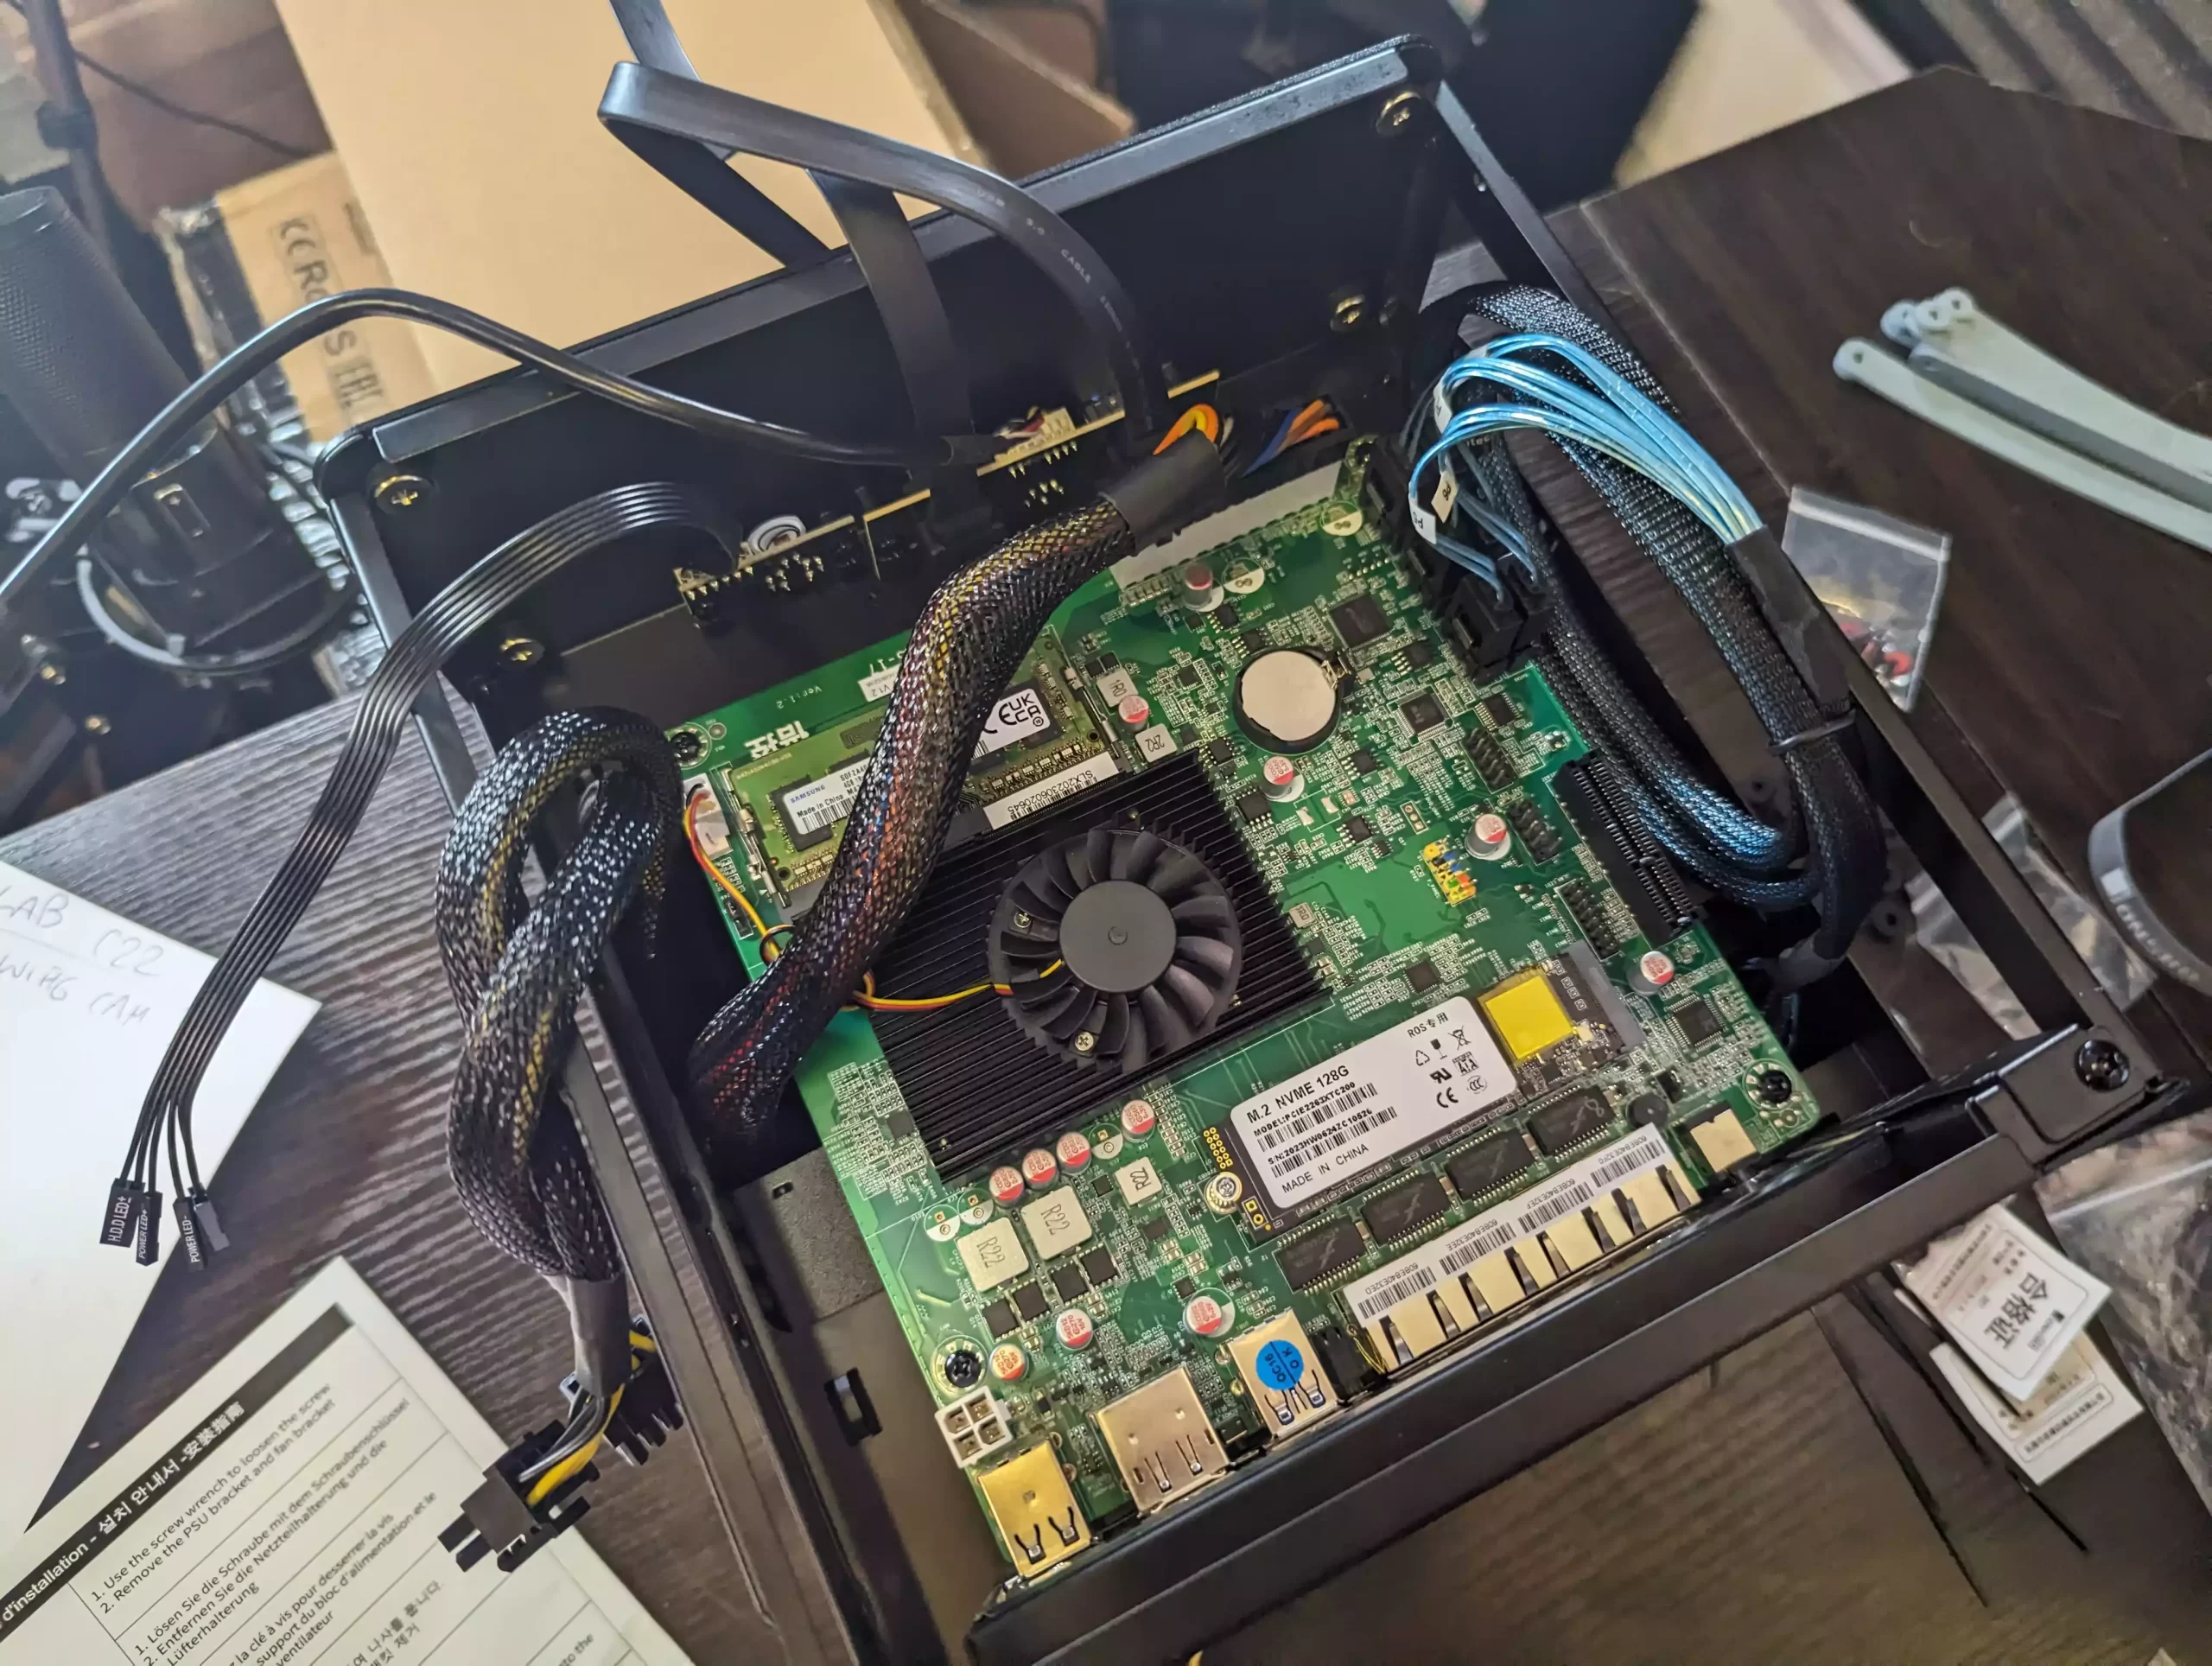
Carefully place the TopTon motherboard inside the top of the Jonsbo case, aligning connectors with the gaps in the backplane. If done right, the motherboard’s corner screws will align with the N2 case screw holes.
With all cables hanging outside, fasten the four corners of the TopTon motherboard to the Jonsbo N2 case.
Right now, it should look like this (ignore the disconnected white 4 pin PSU connector, needed to disconnect briefly to take this photo):
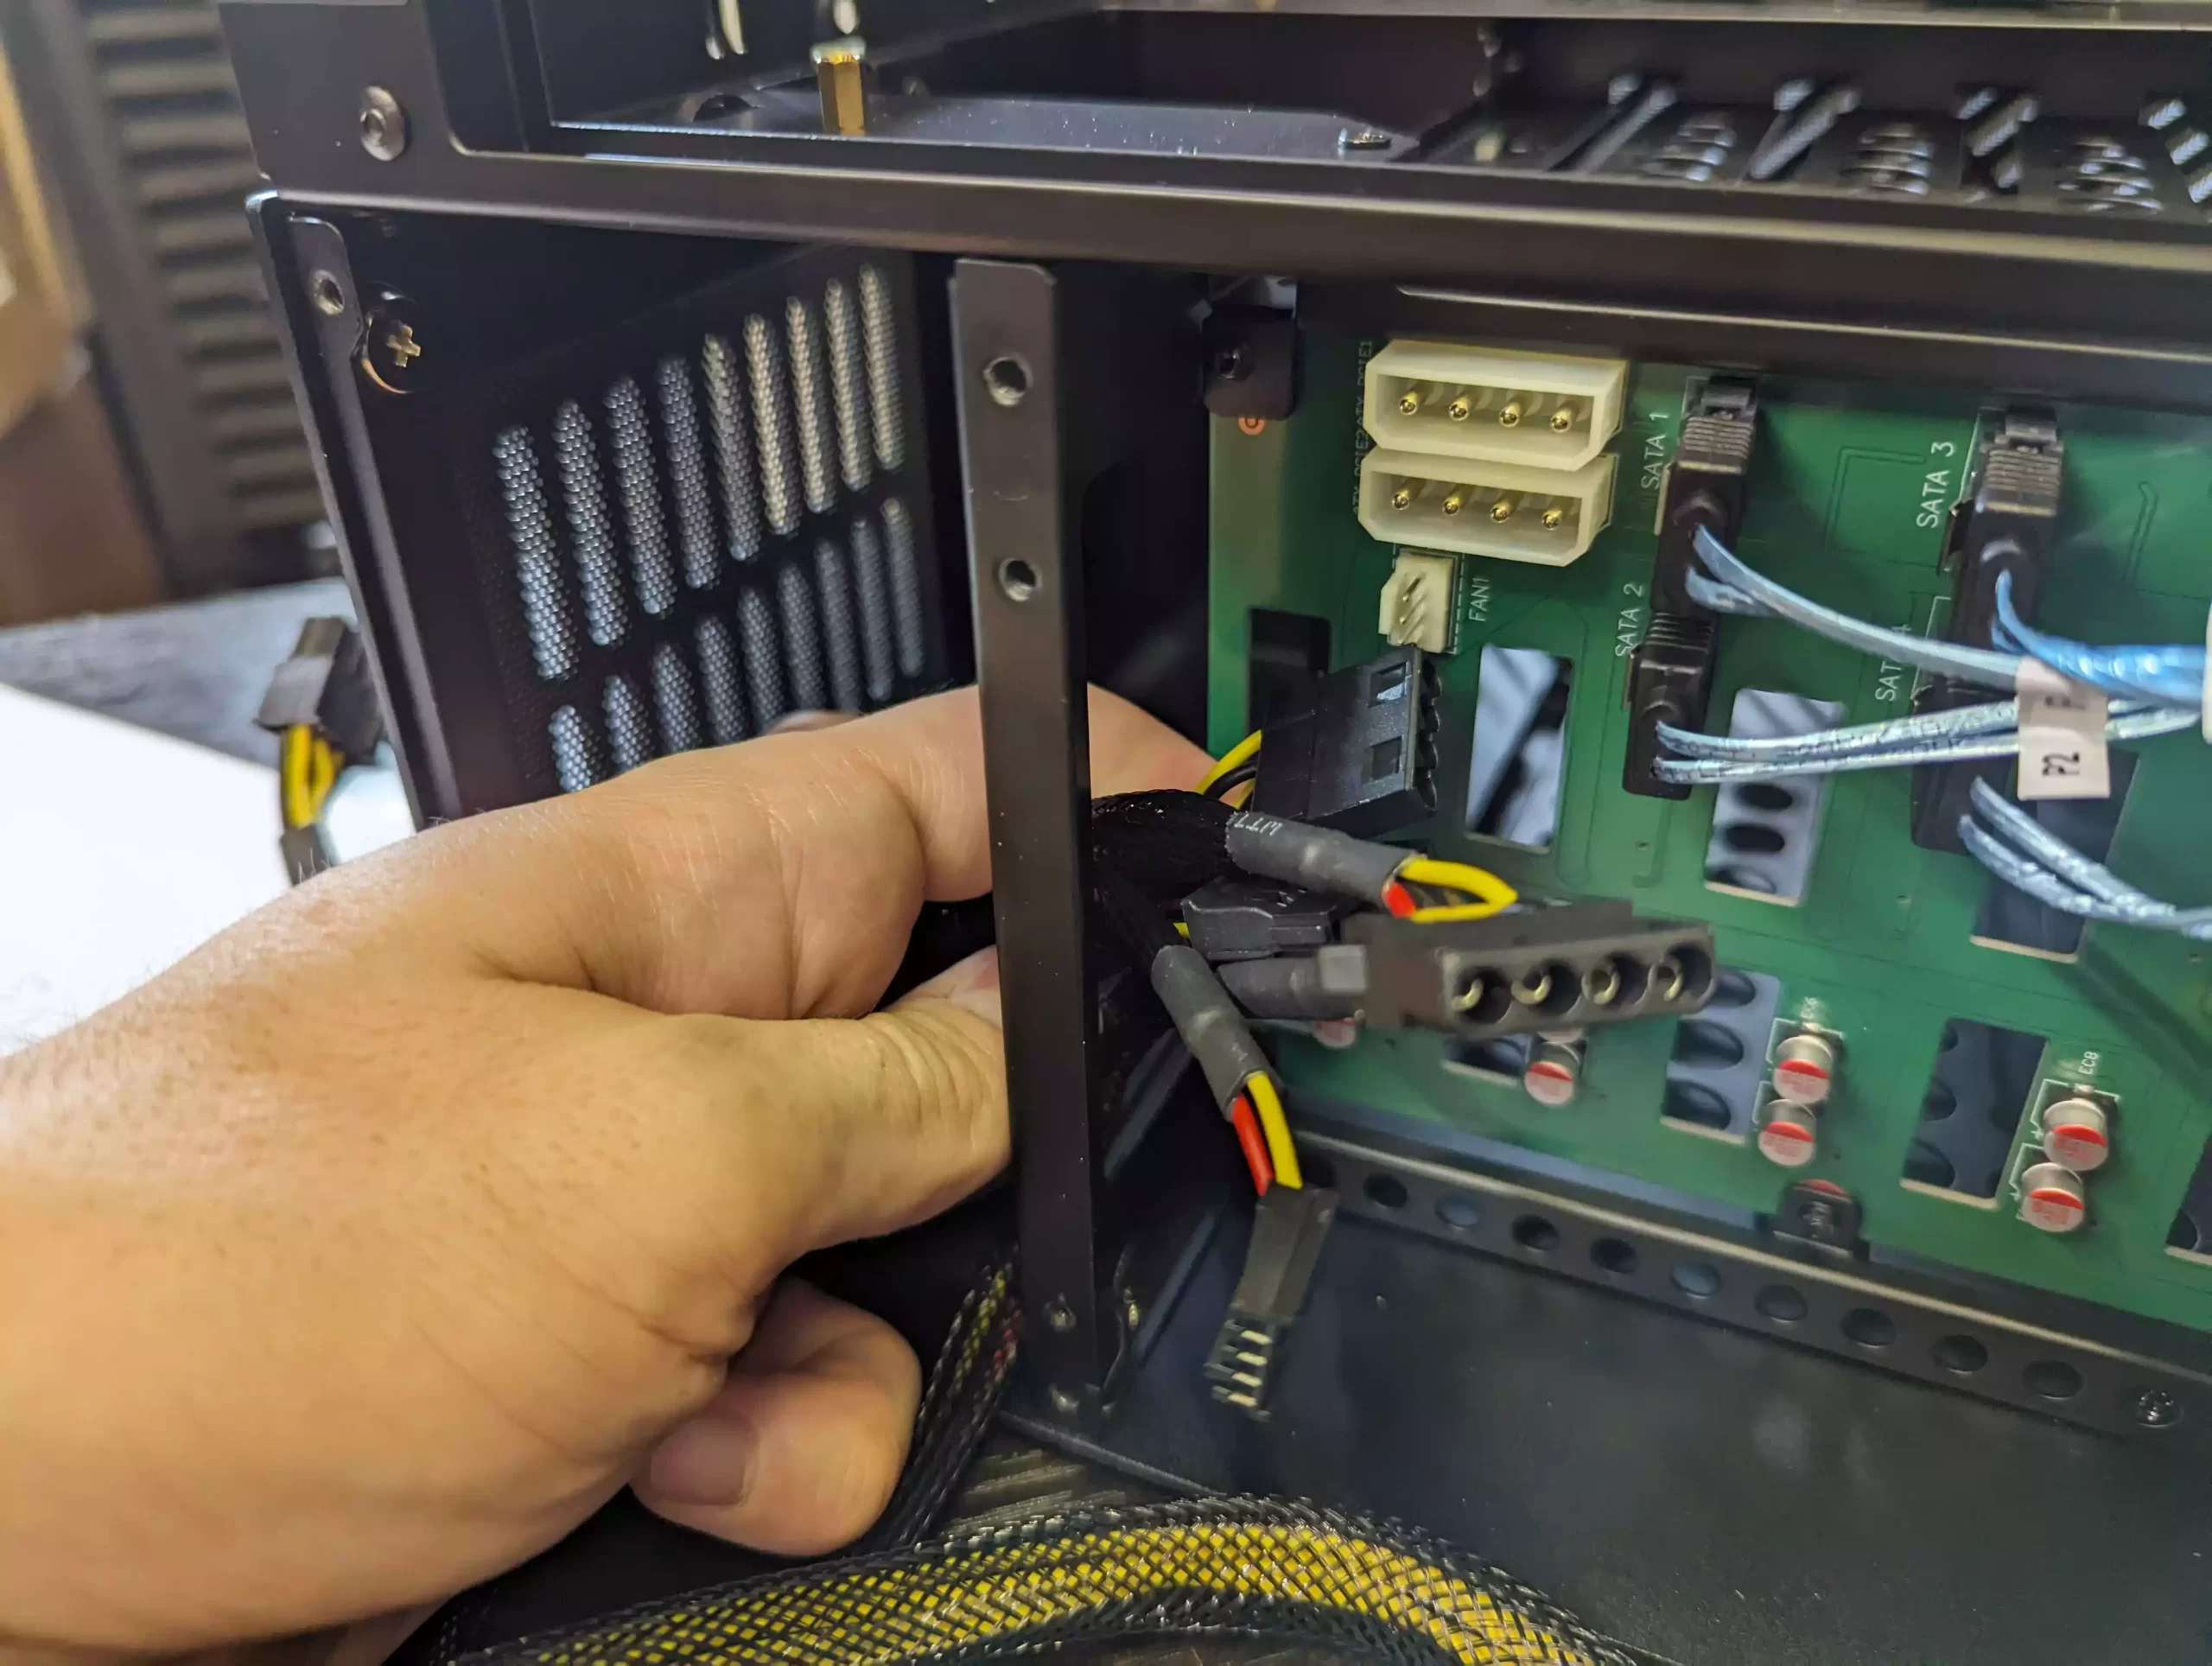
Connect each SATA connector from the multi-lane cable to its corresponding numbered SATA slot on the motherboard’s top right.
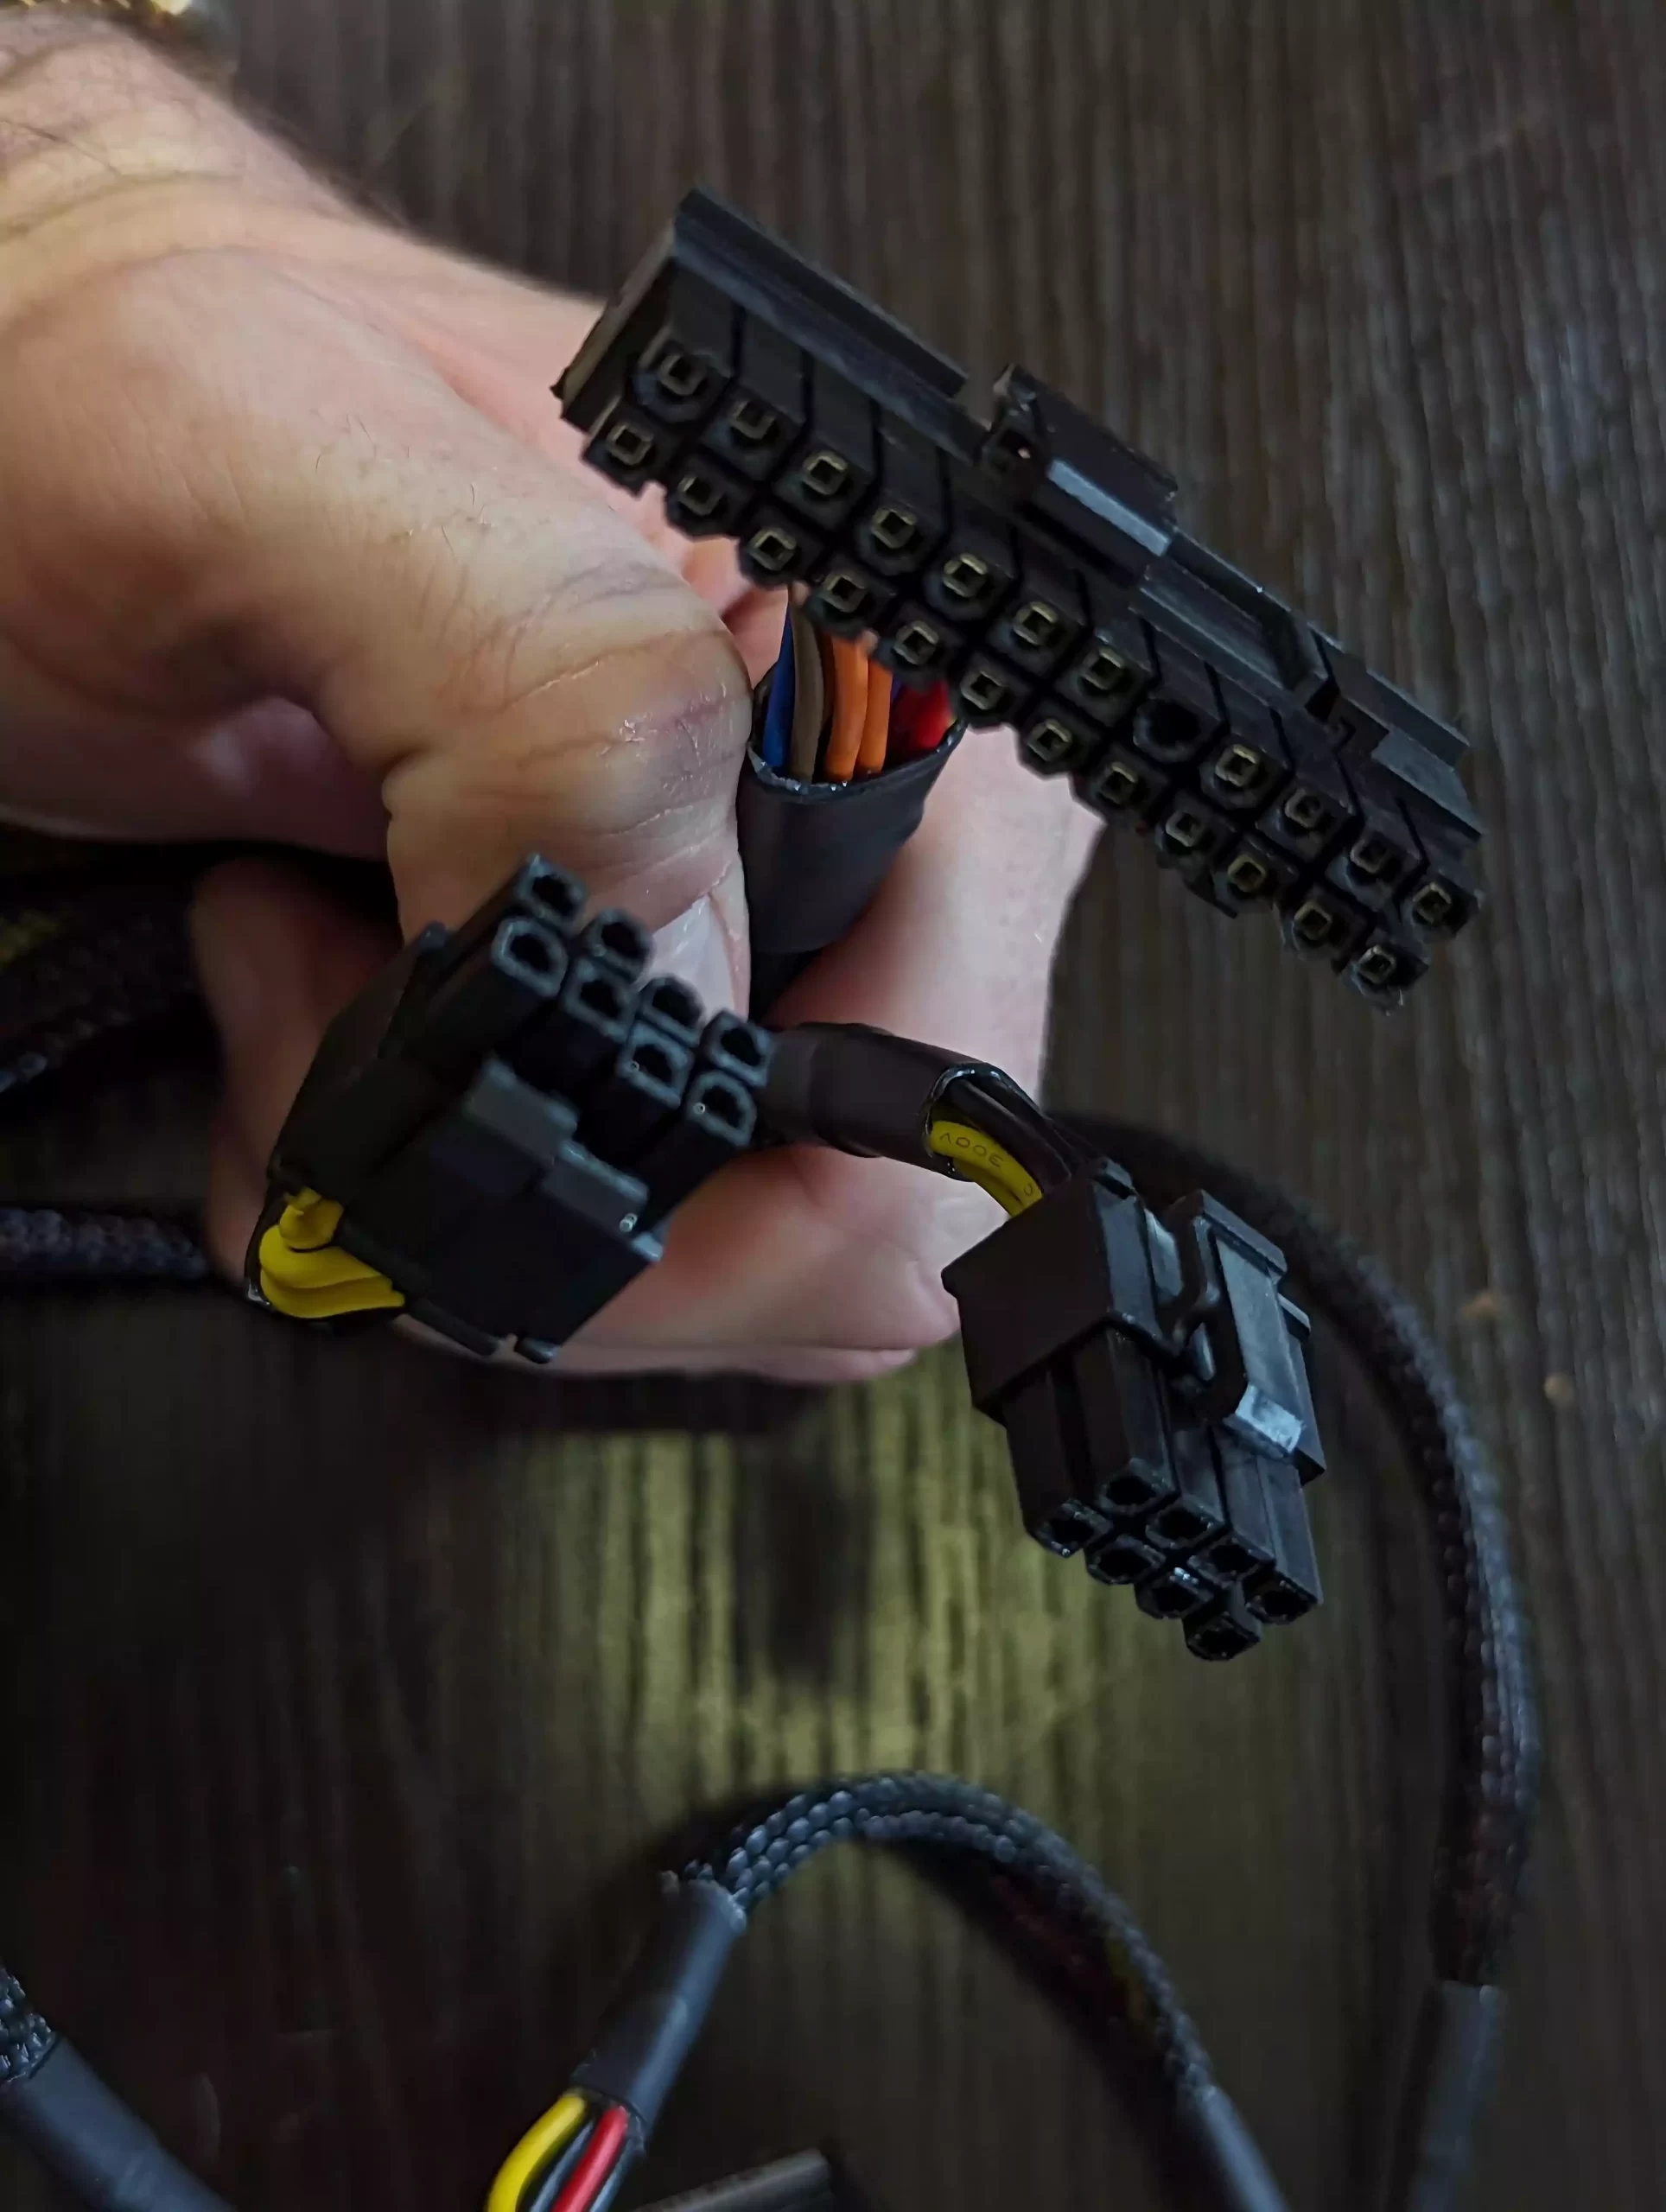
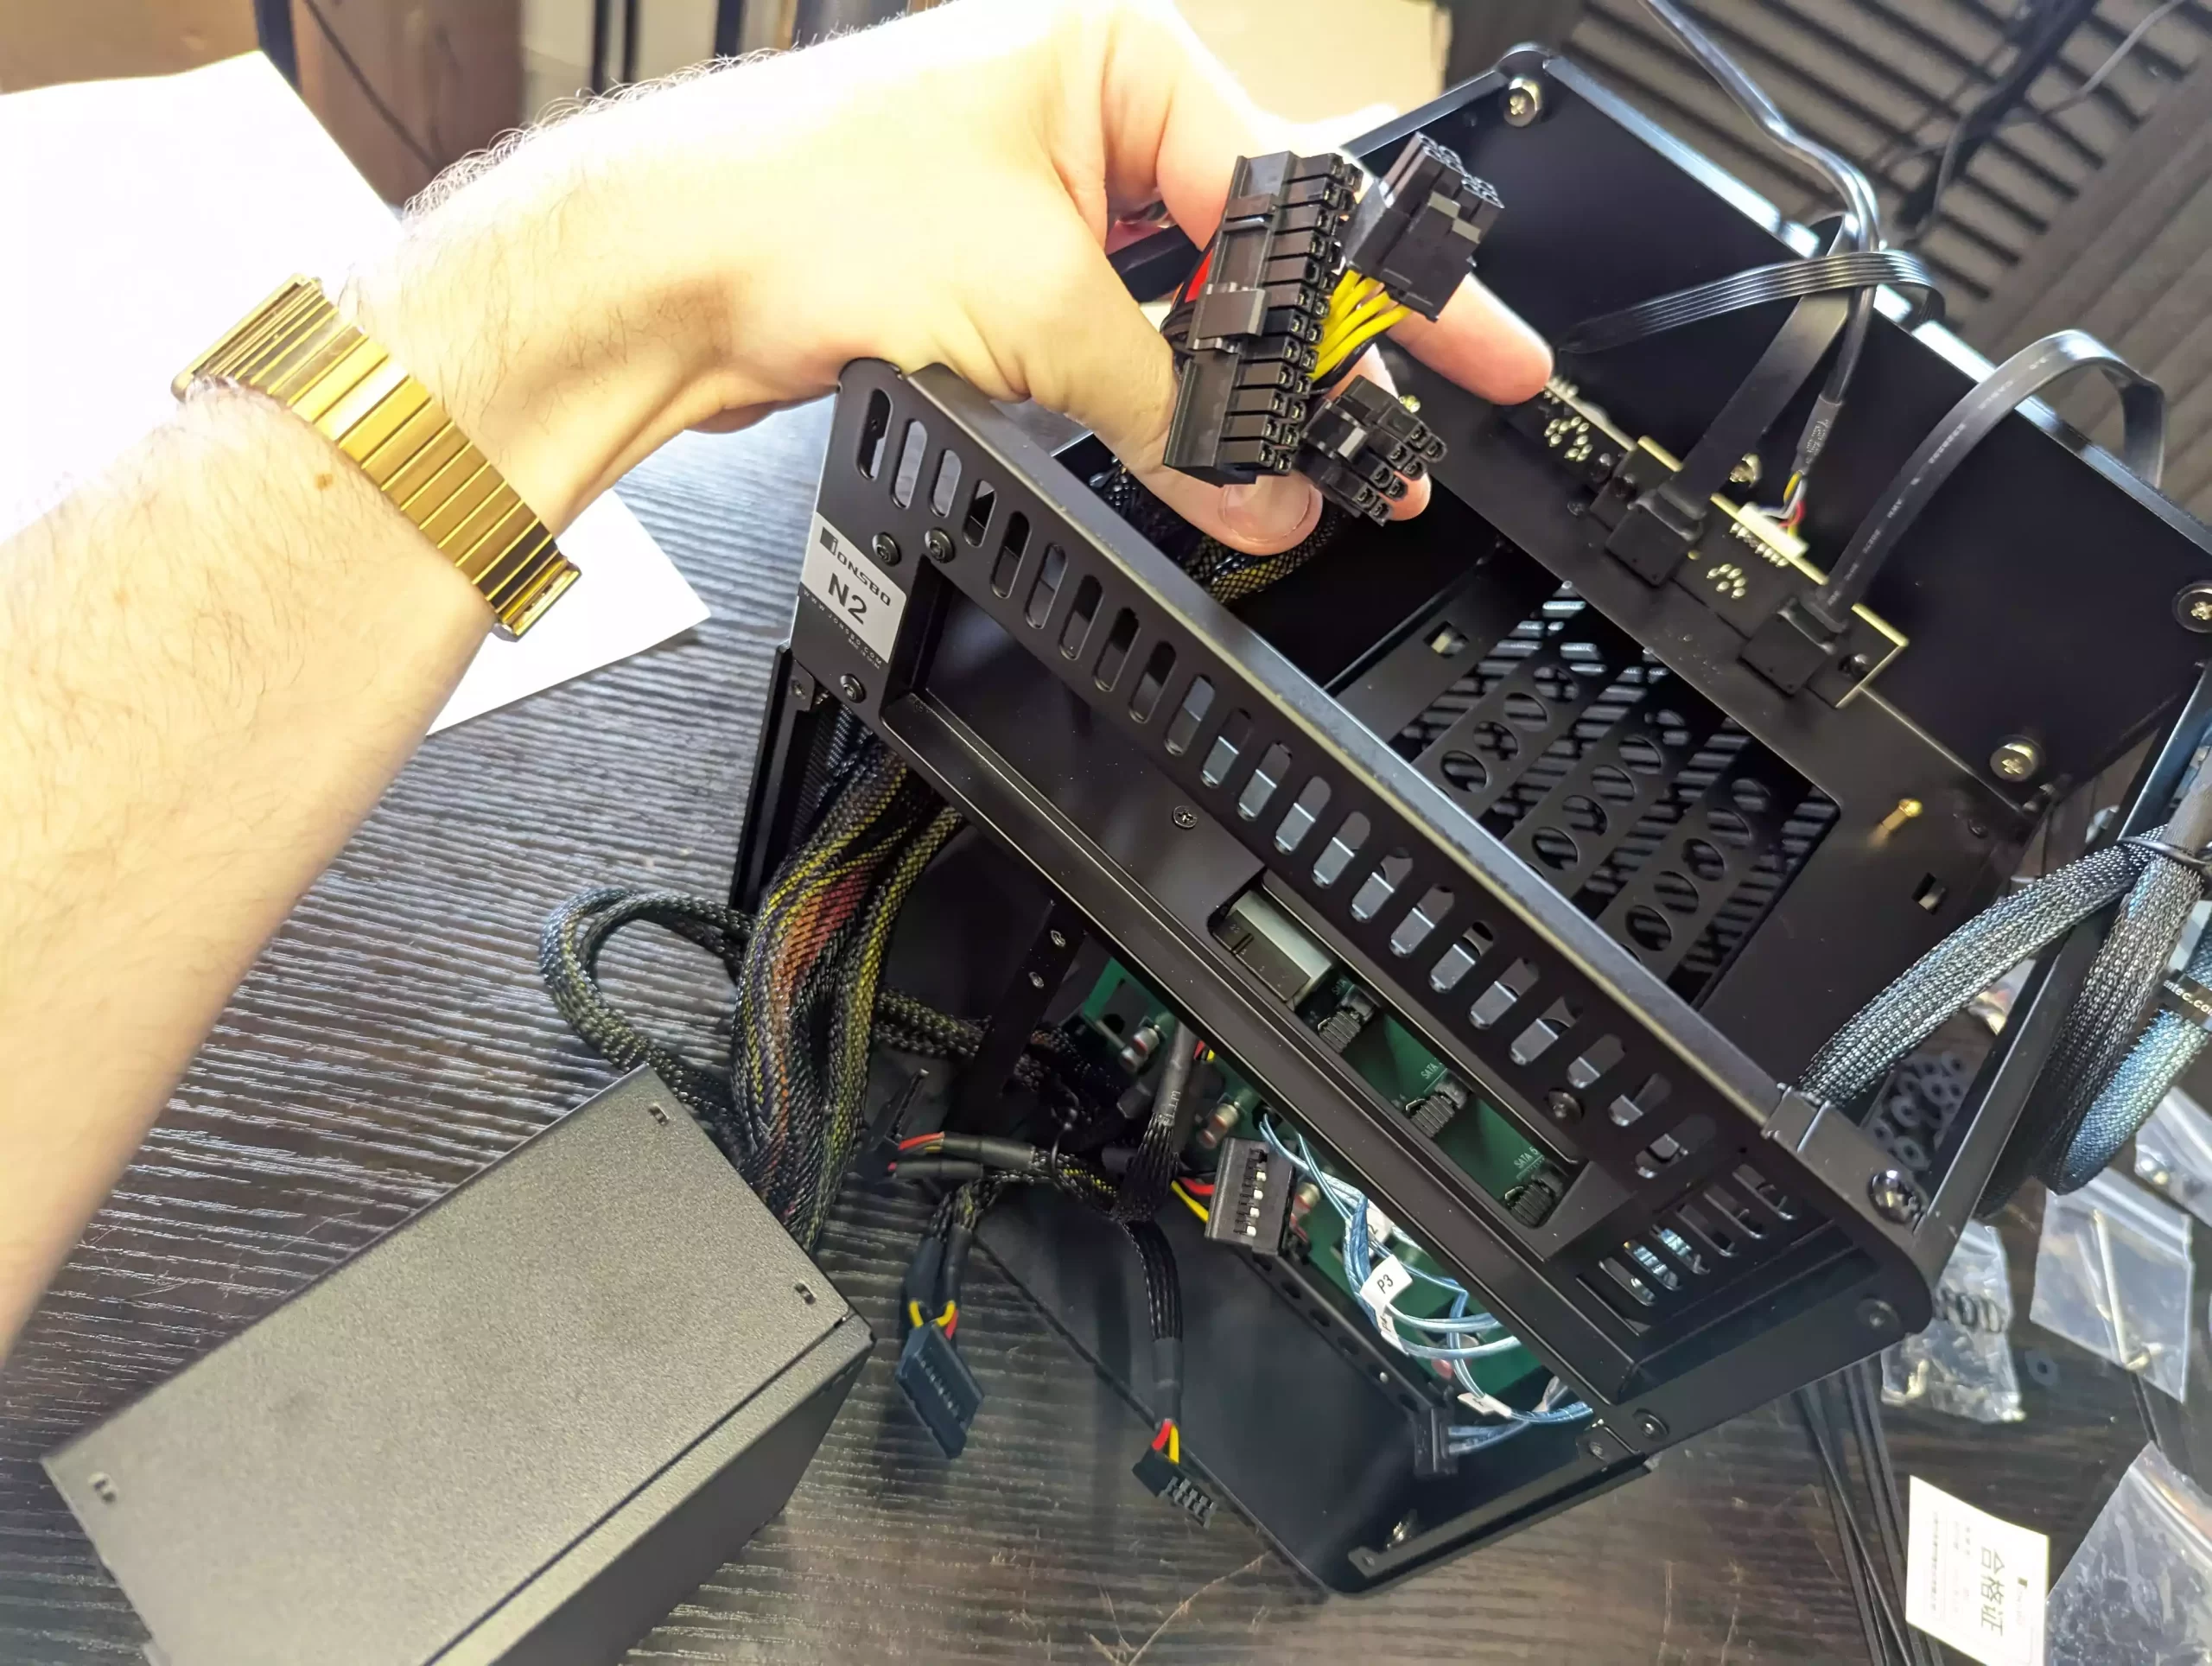
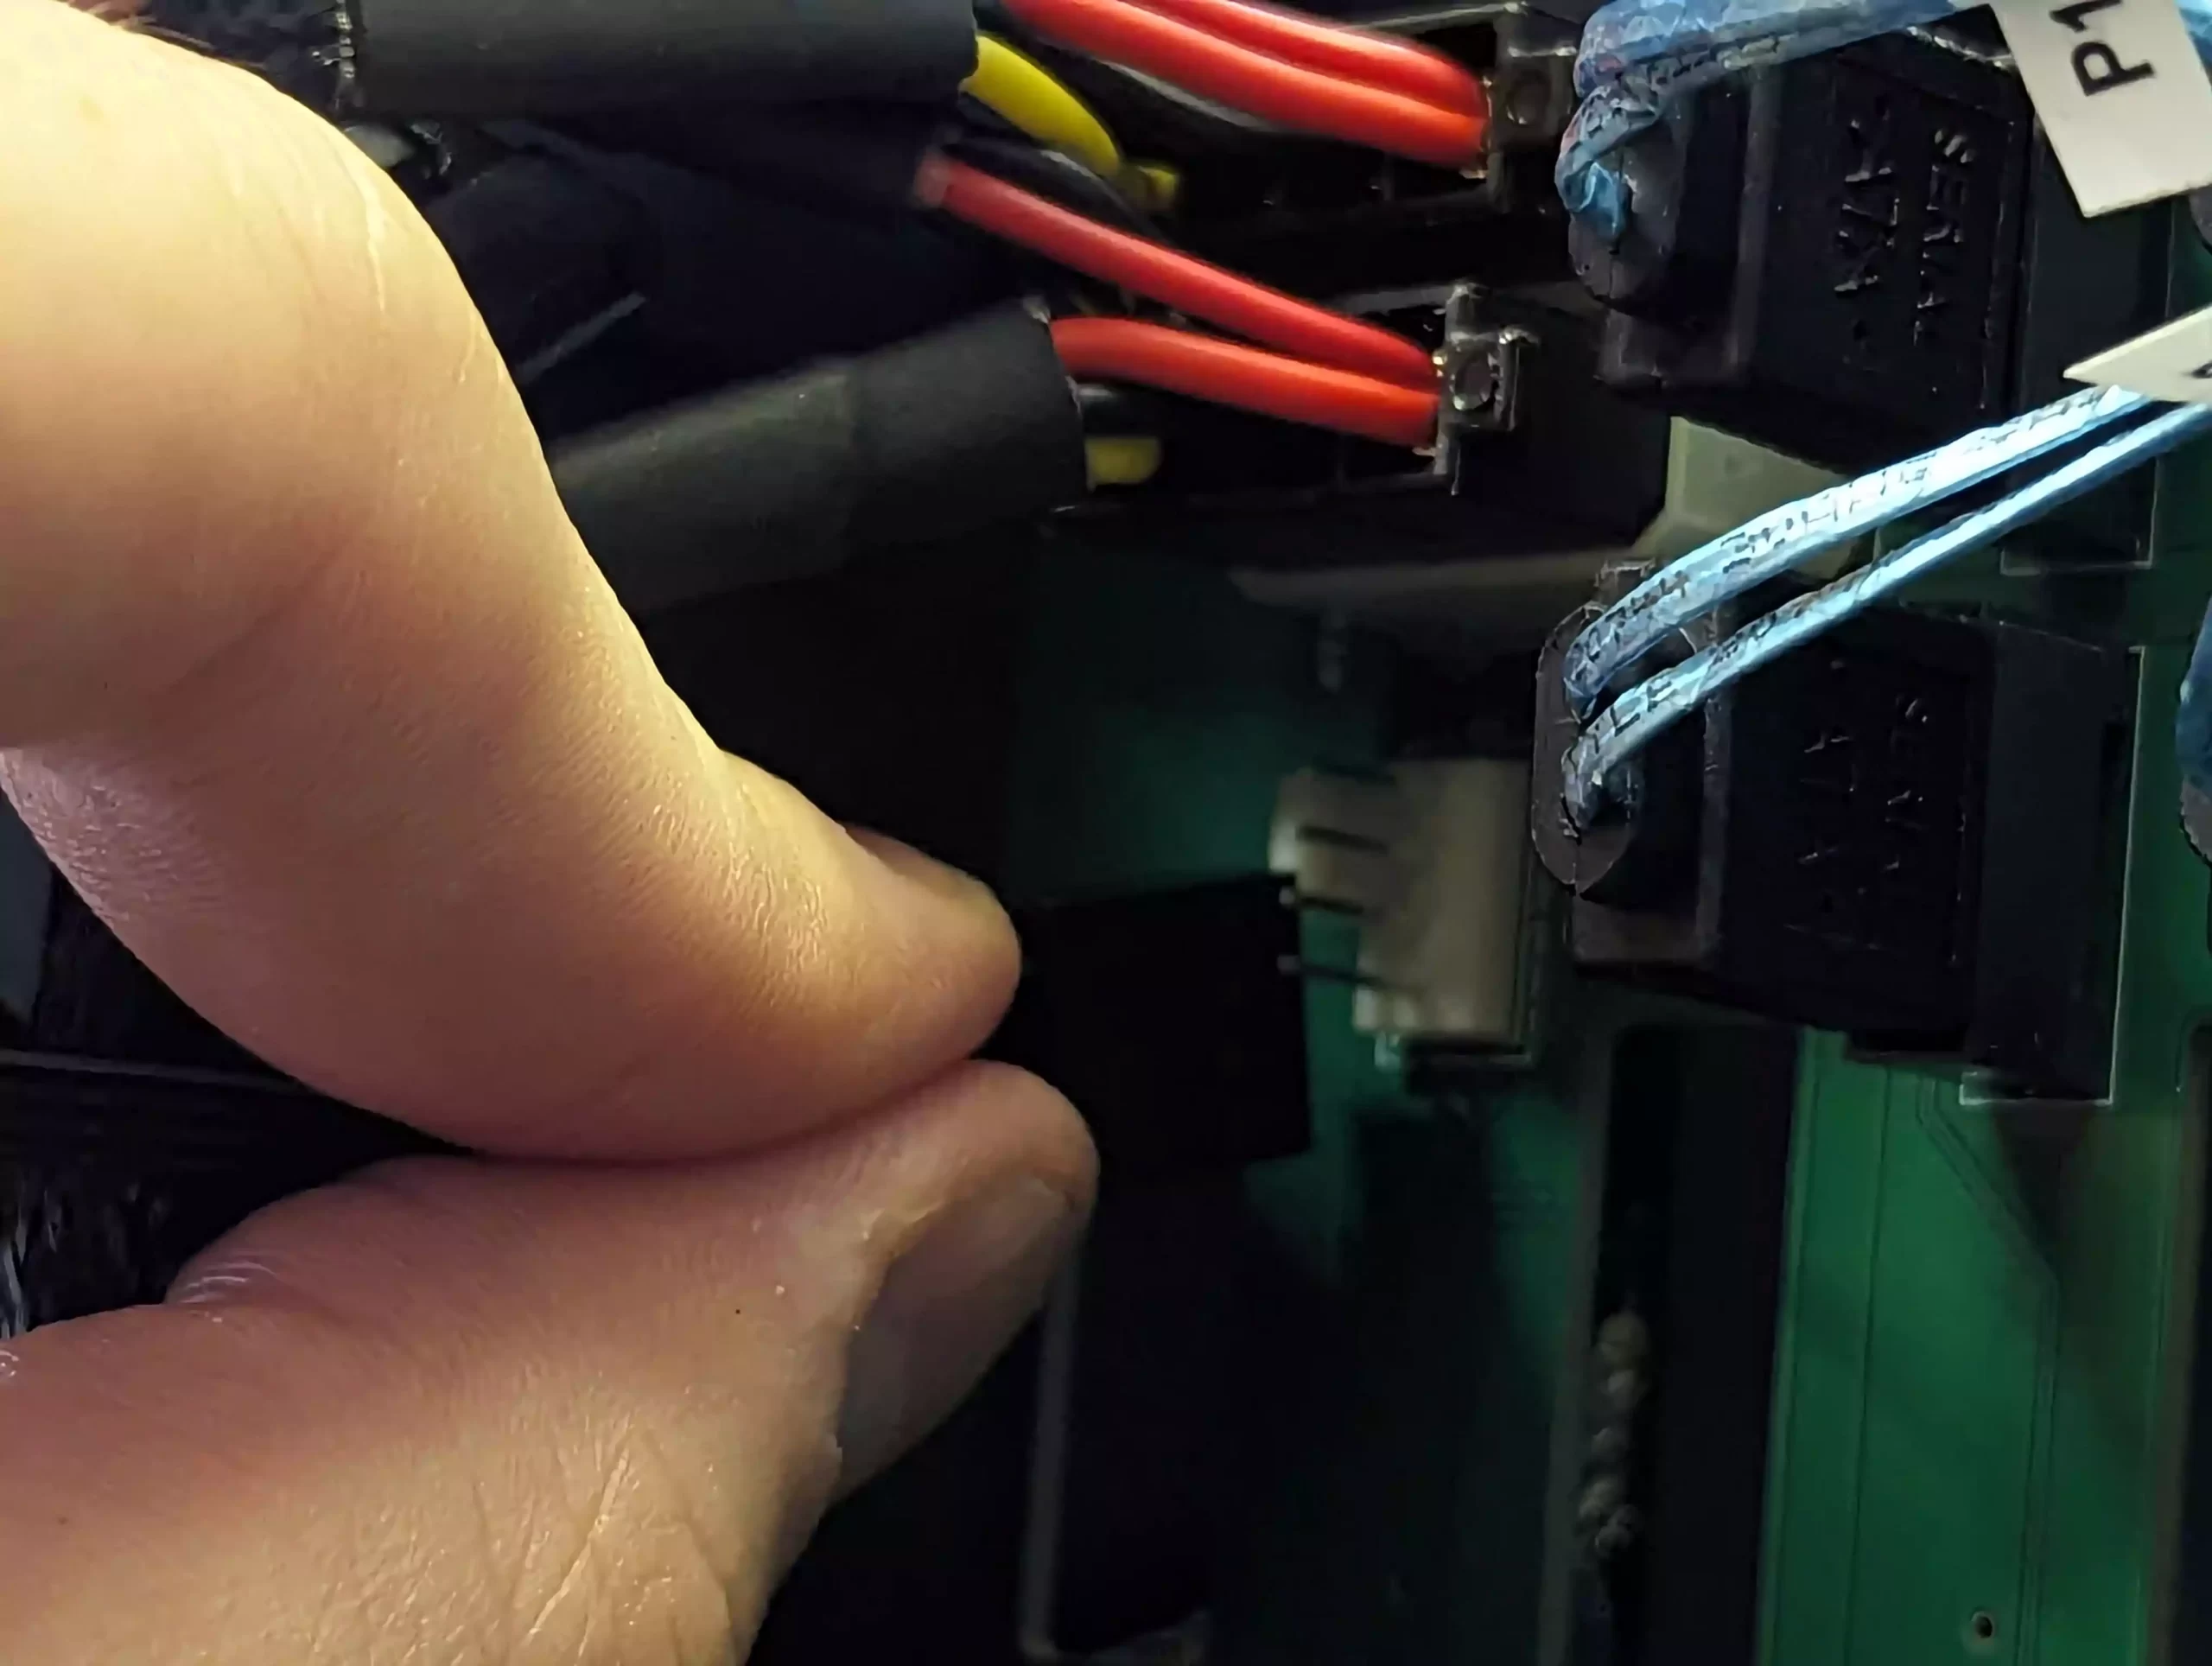
Plug the 20-pin PSU cable into the motherboard’s corresponding slot.
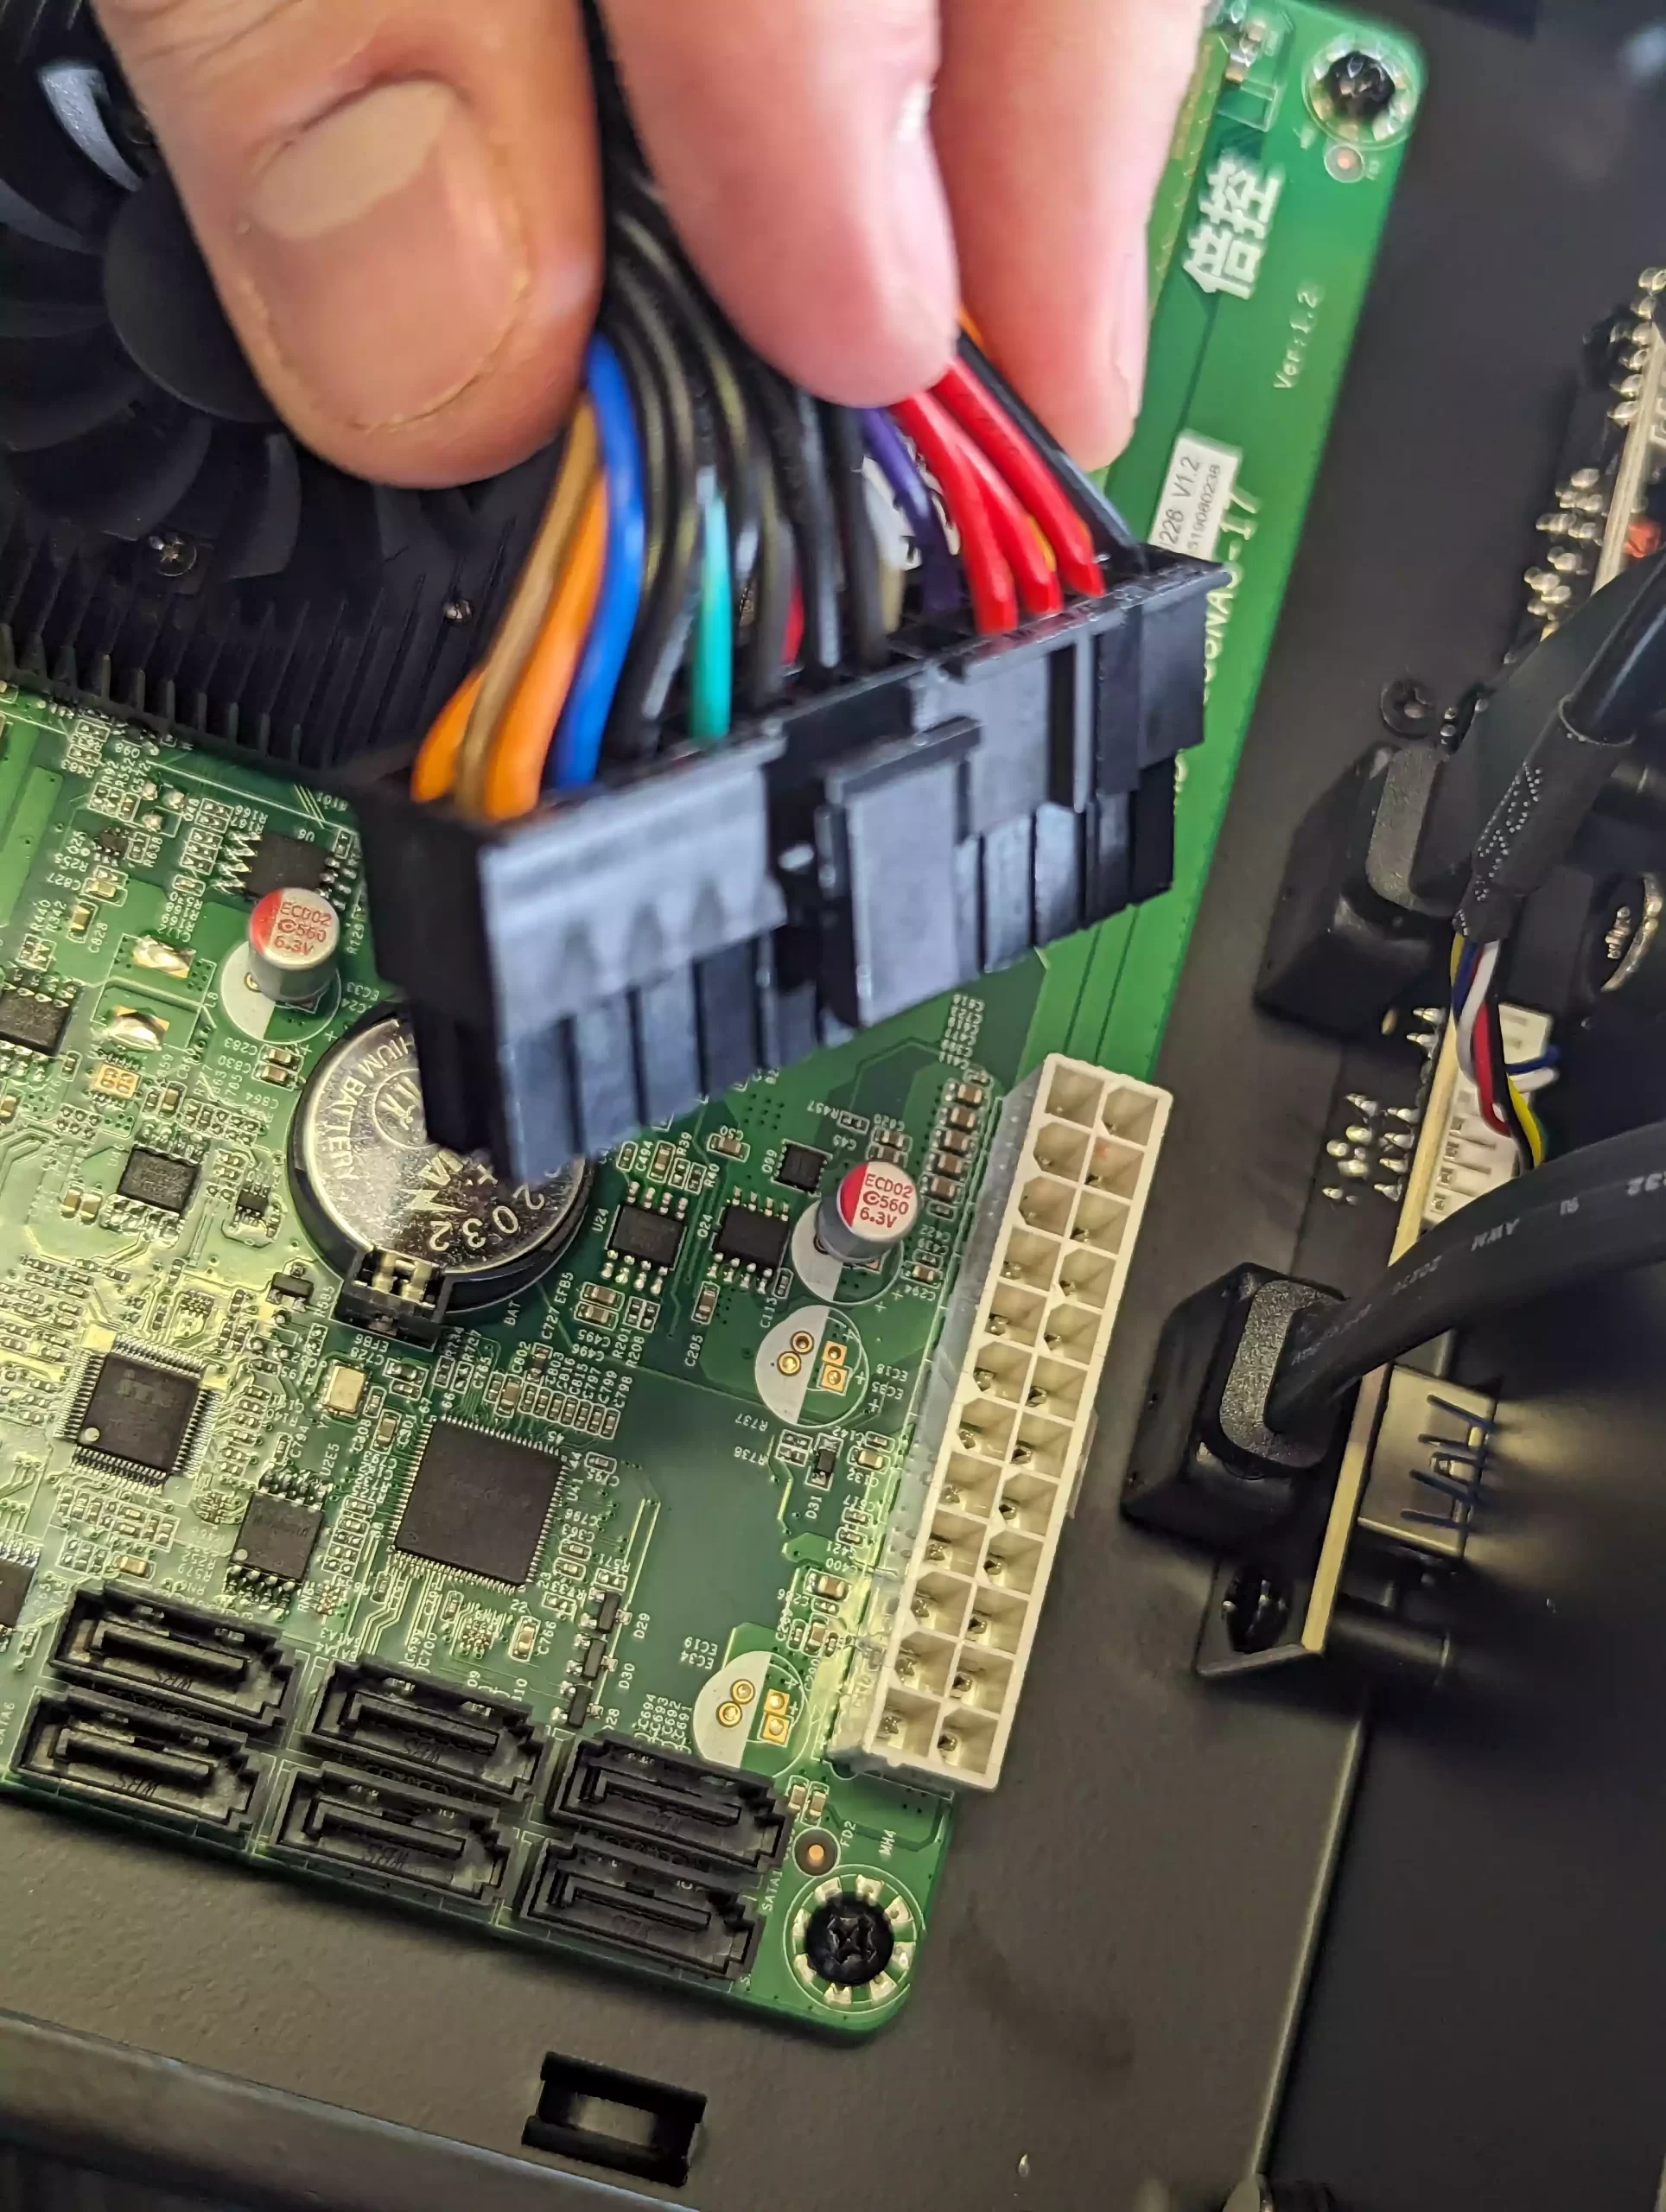
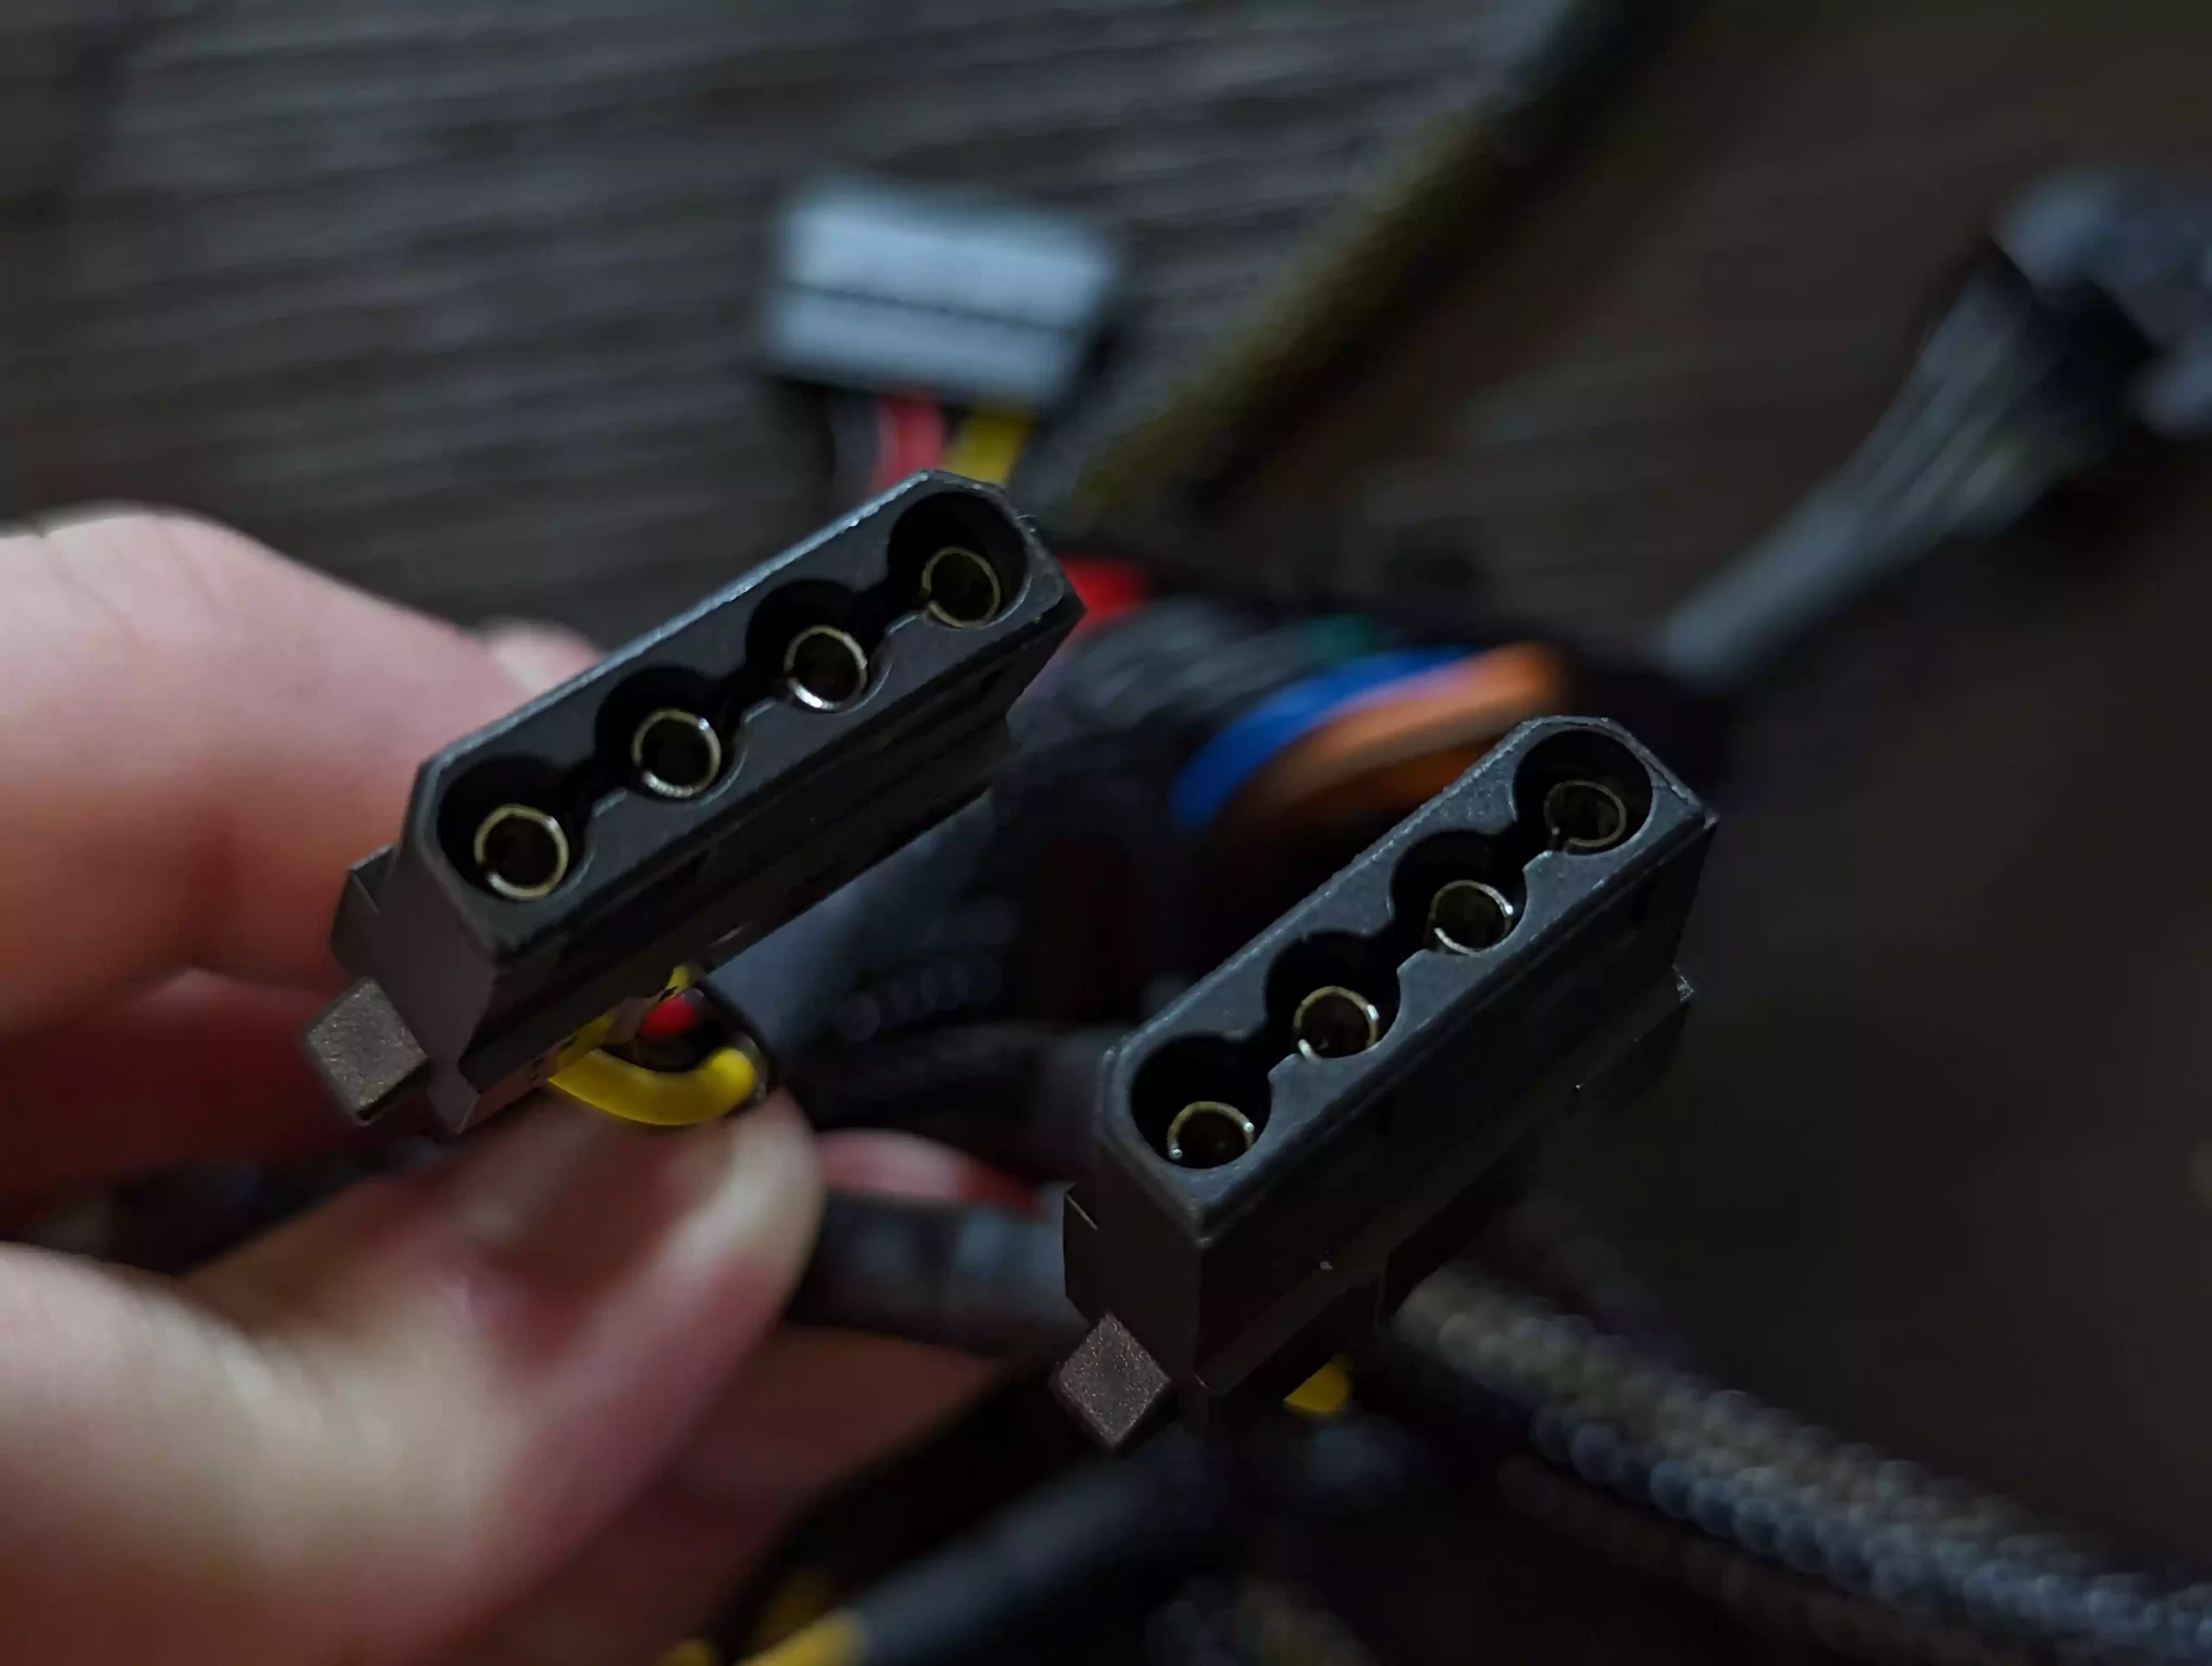
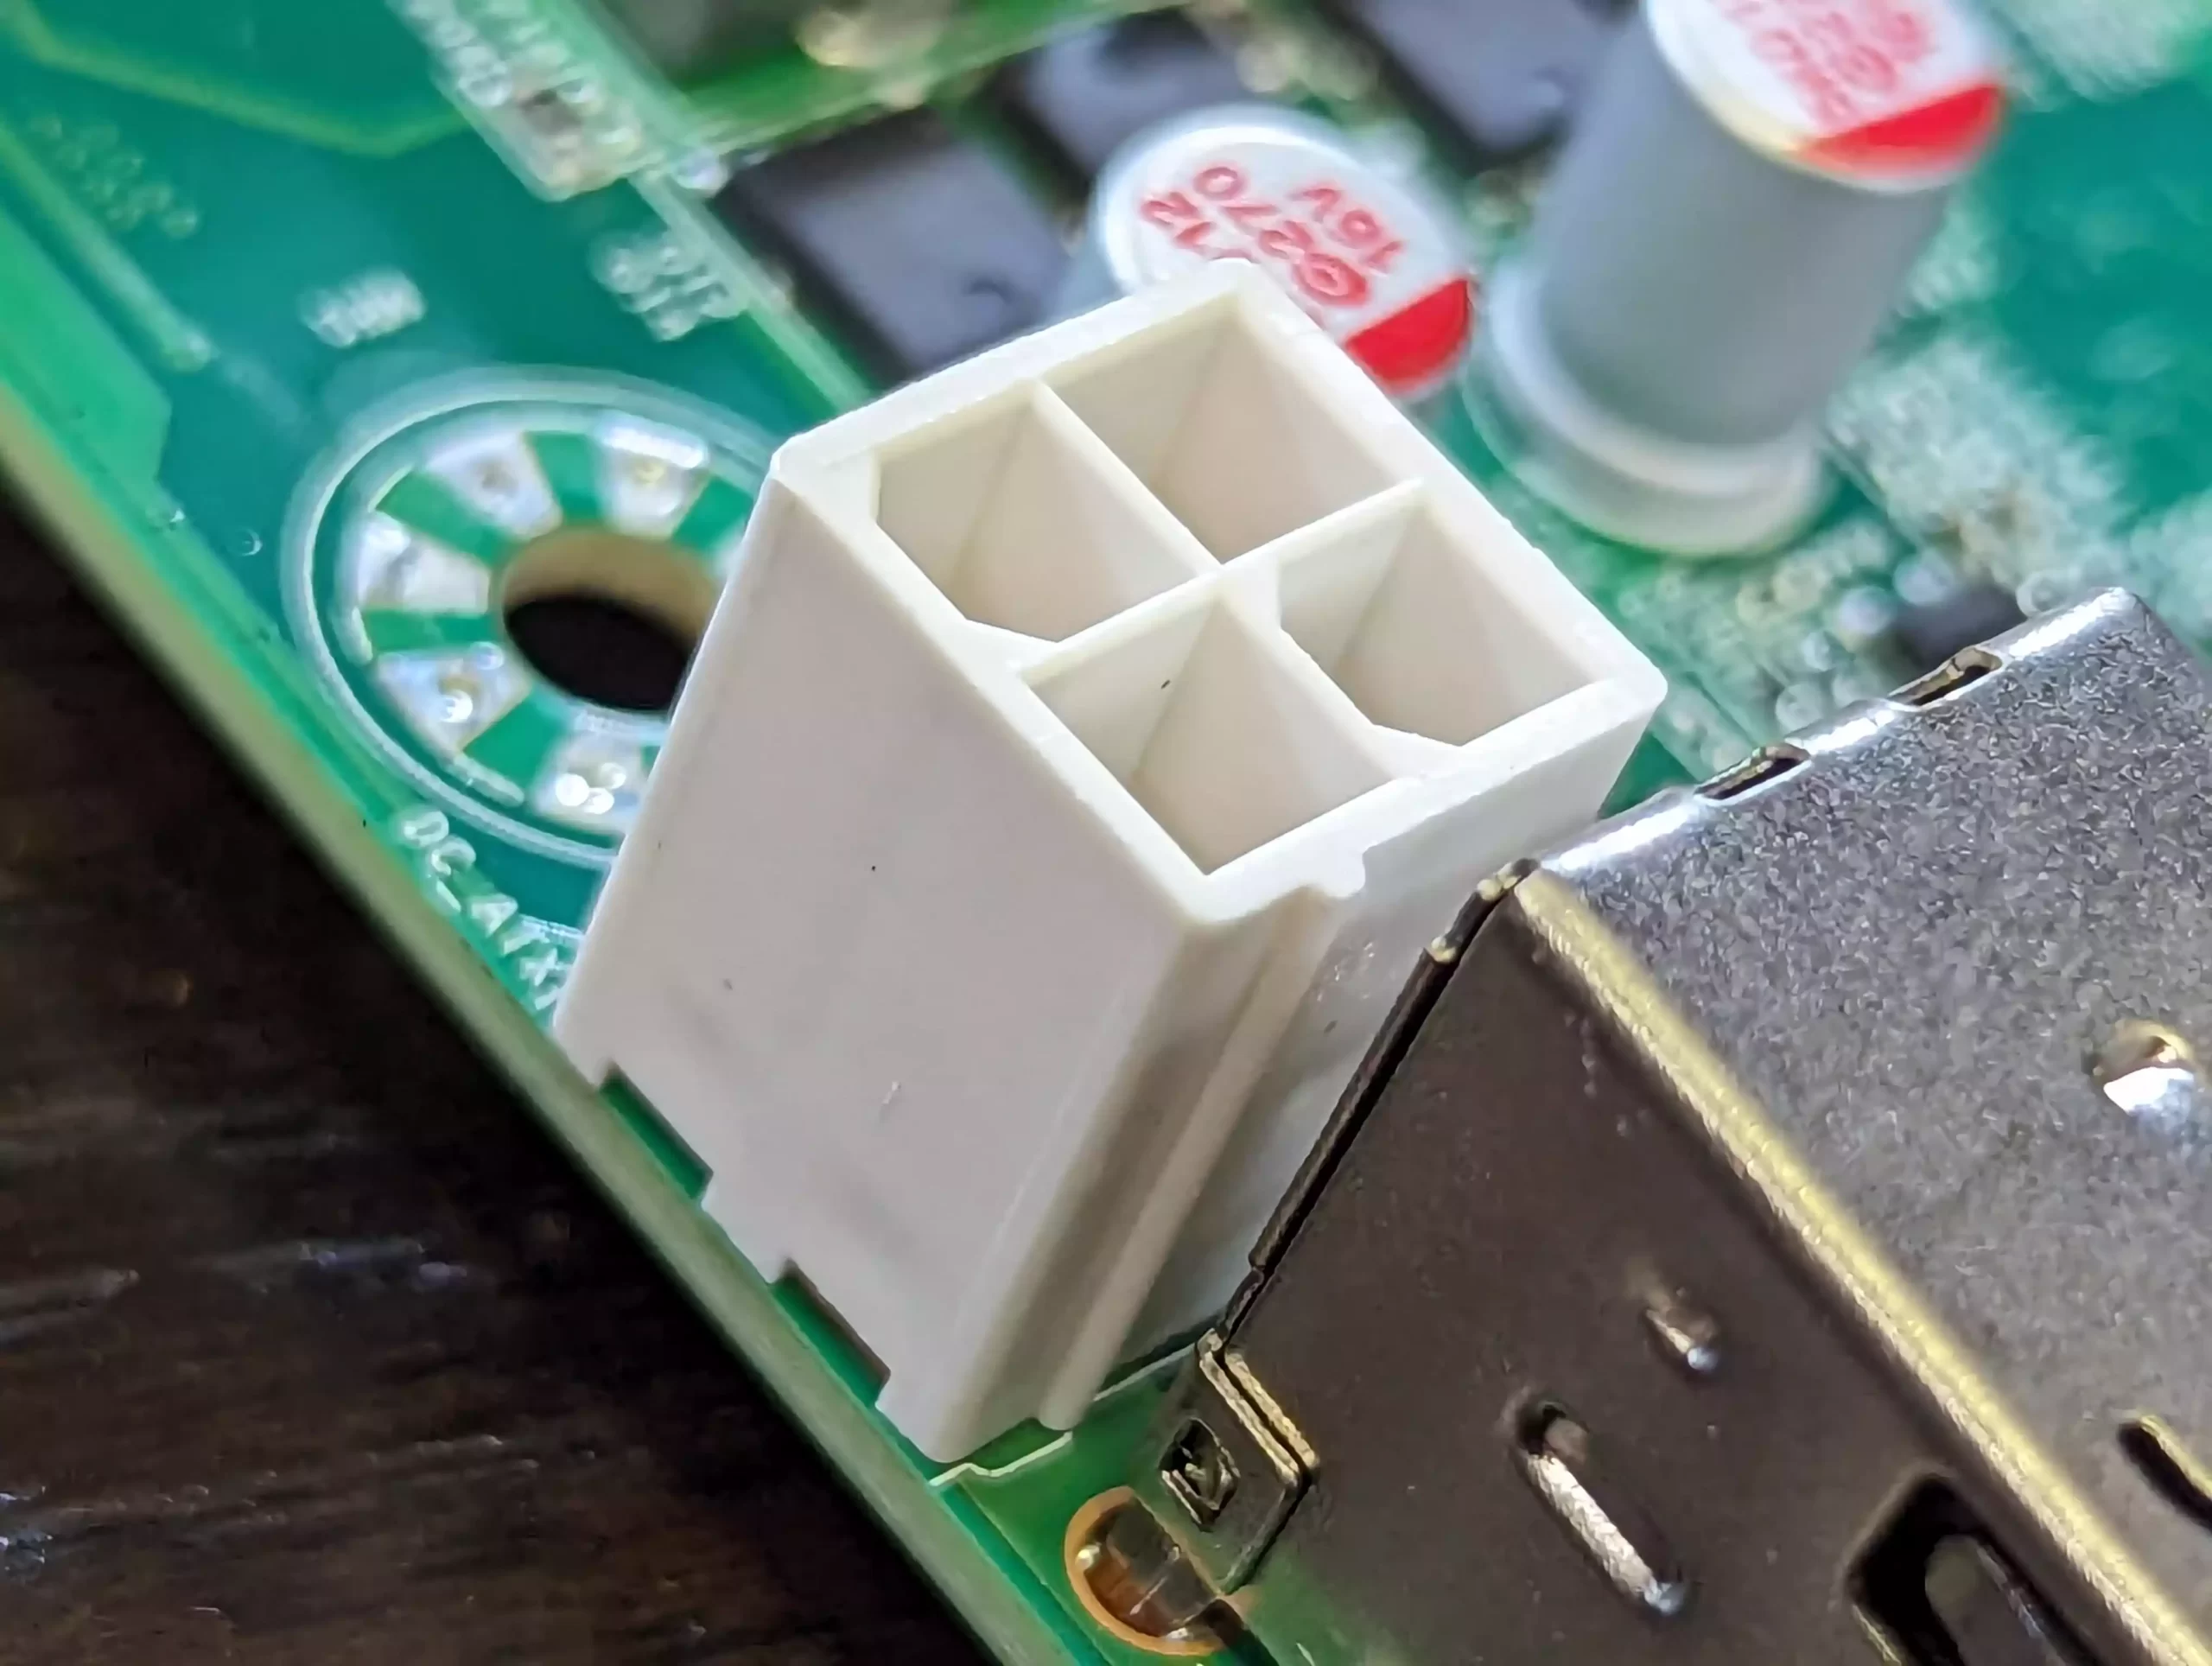
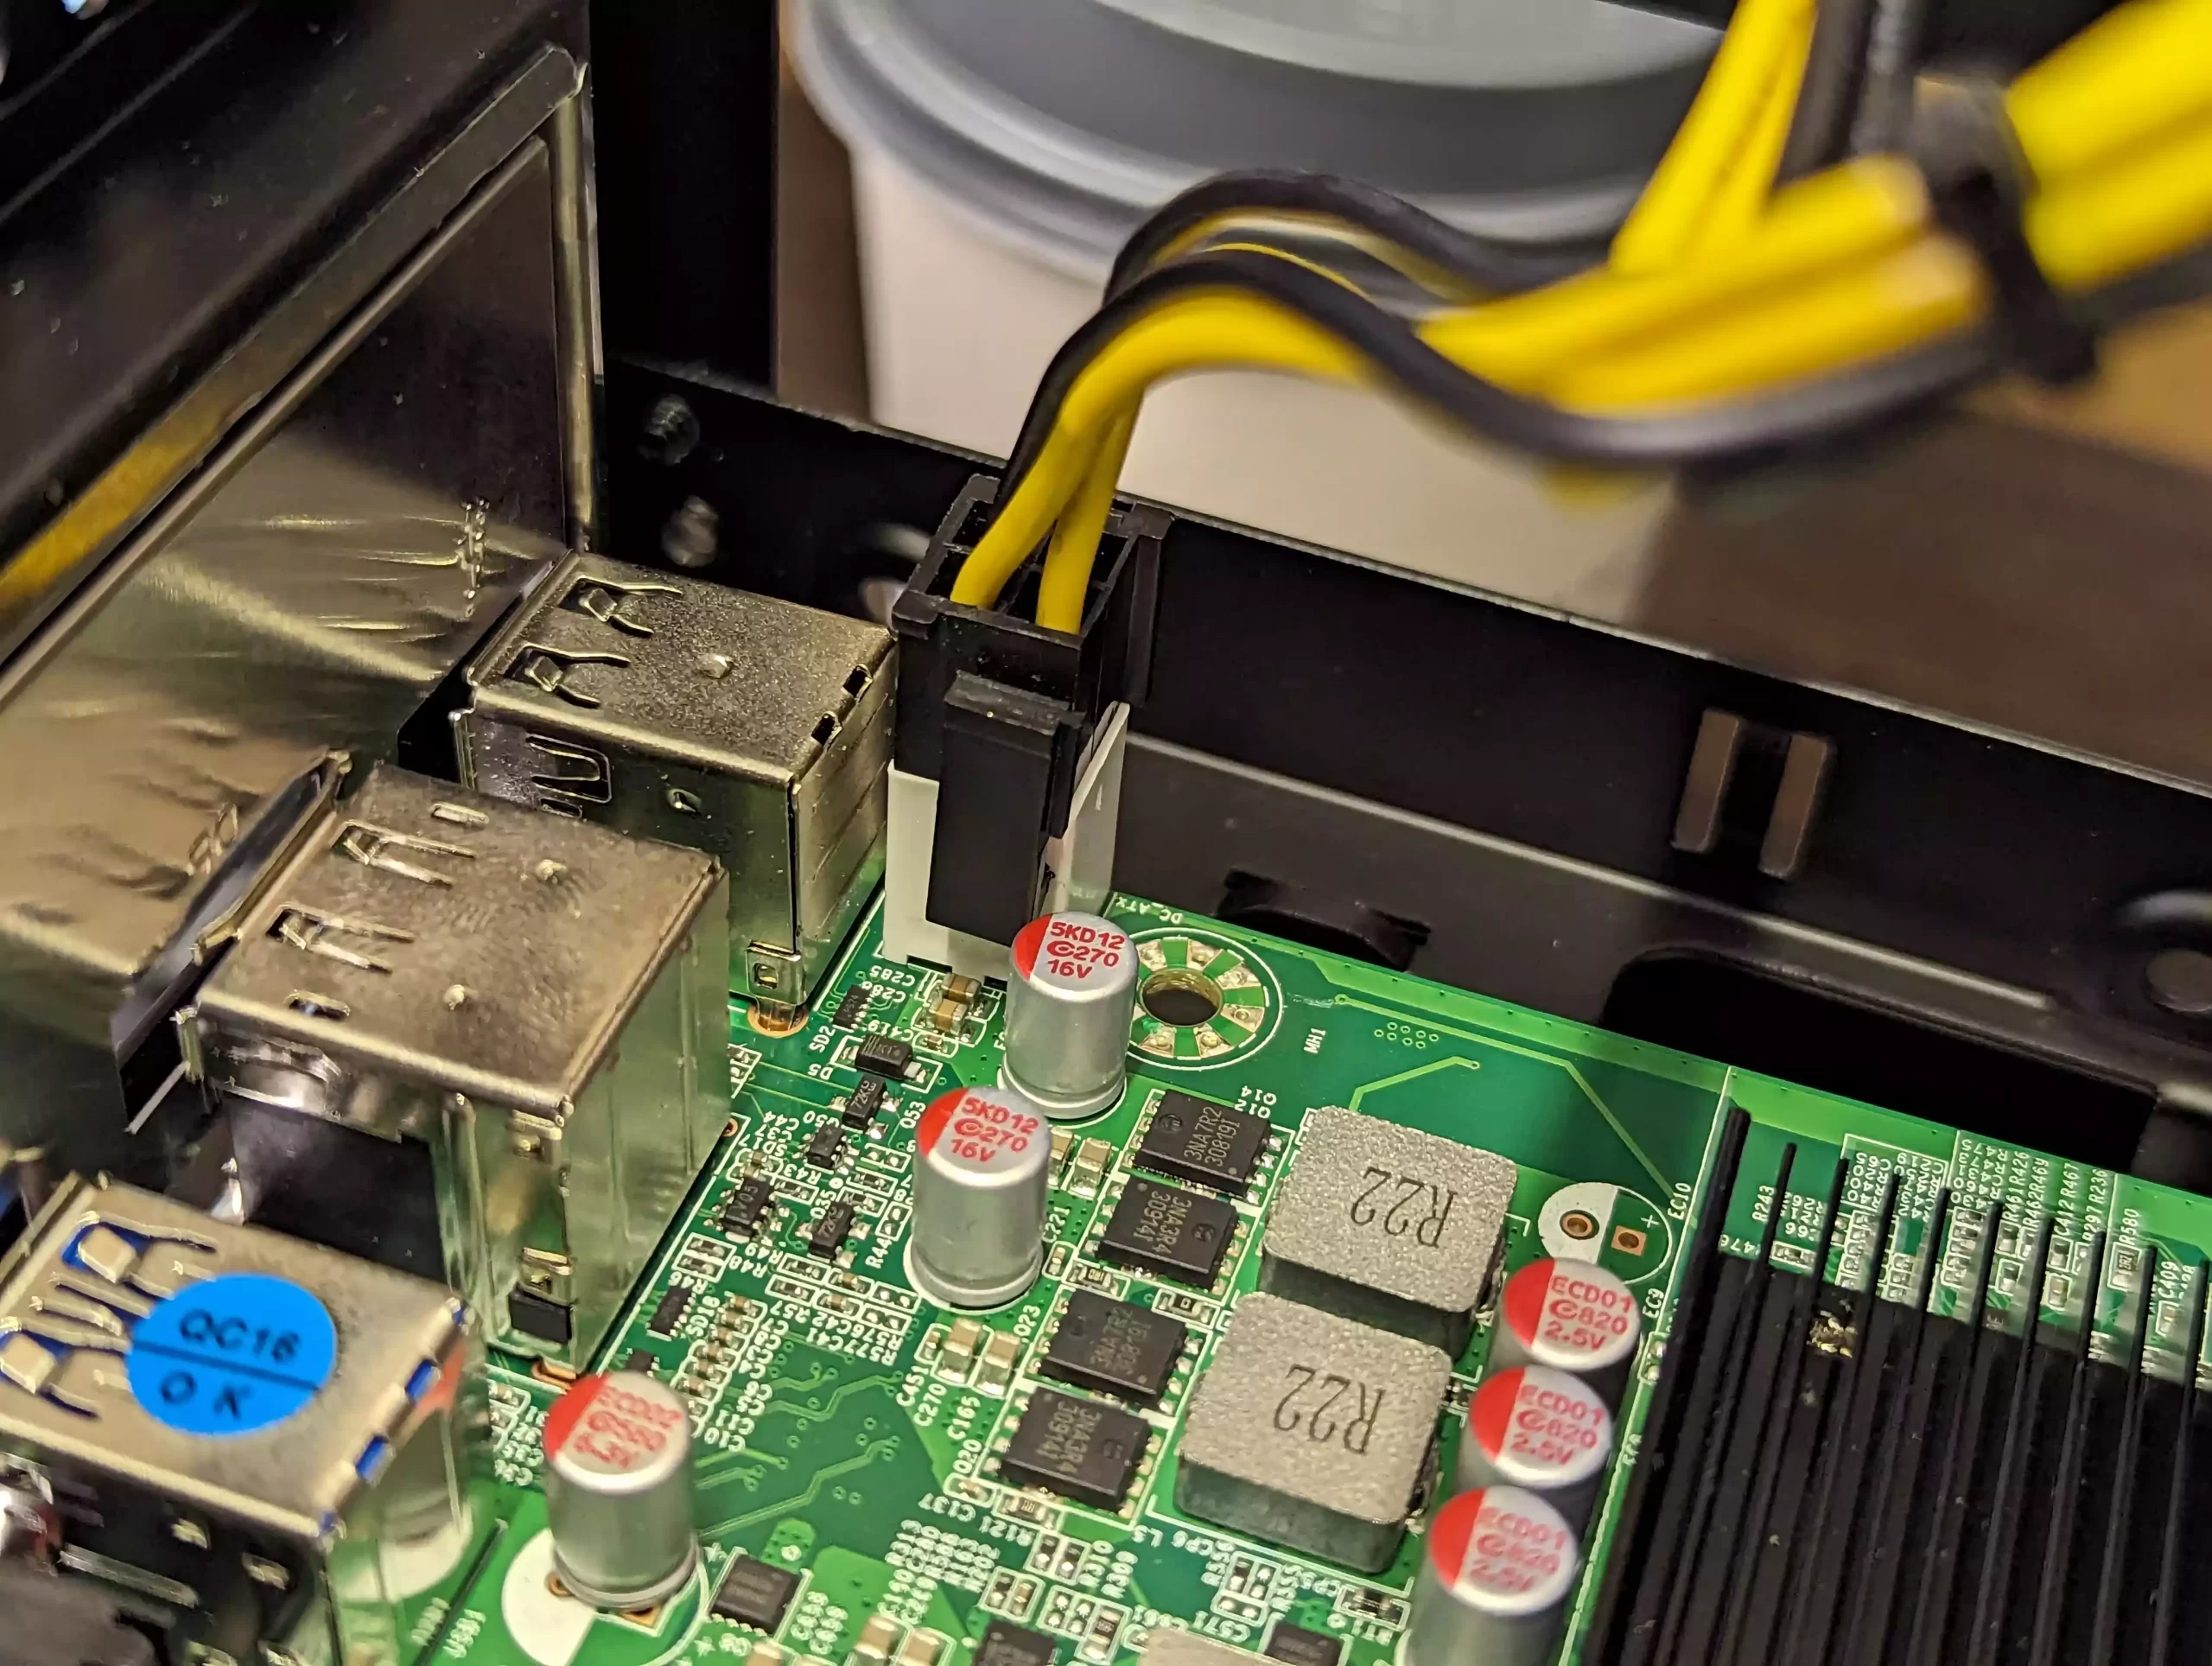
Connect the PSU’s four-pin port to the motherboard’s power port. If your PSU has a combined eight-pin plug, it might split into two four-pin groups. Ensure you select the right connectors and slots for this.
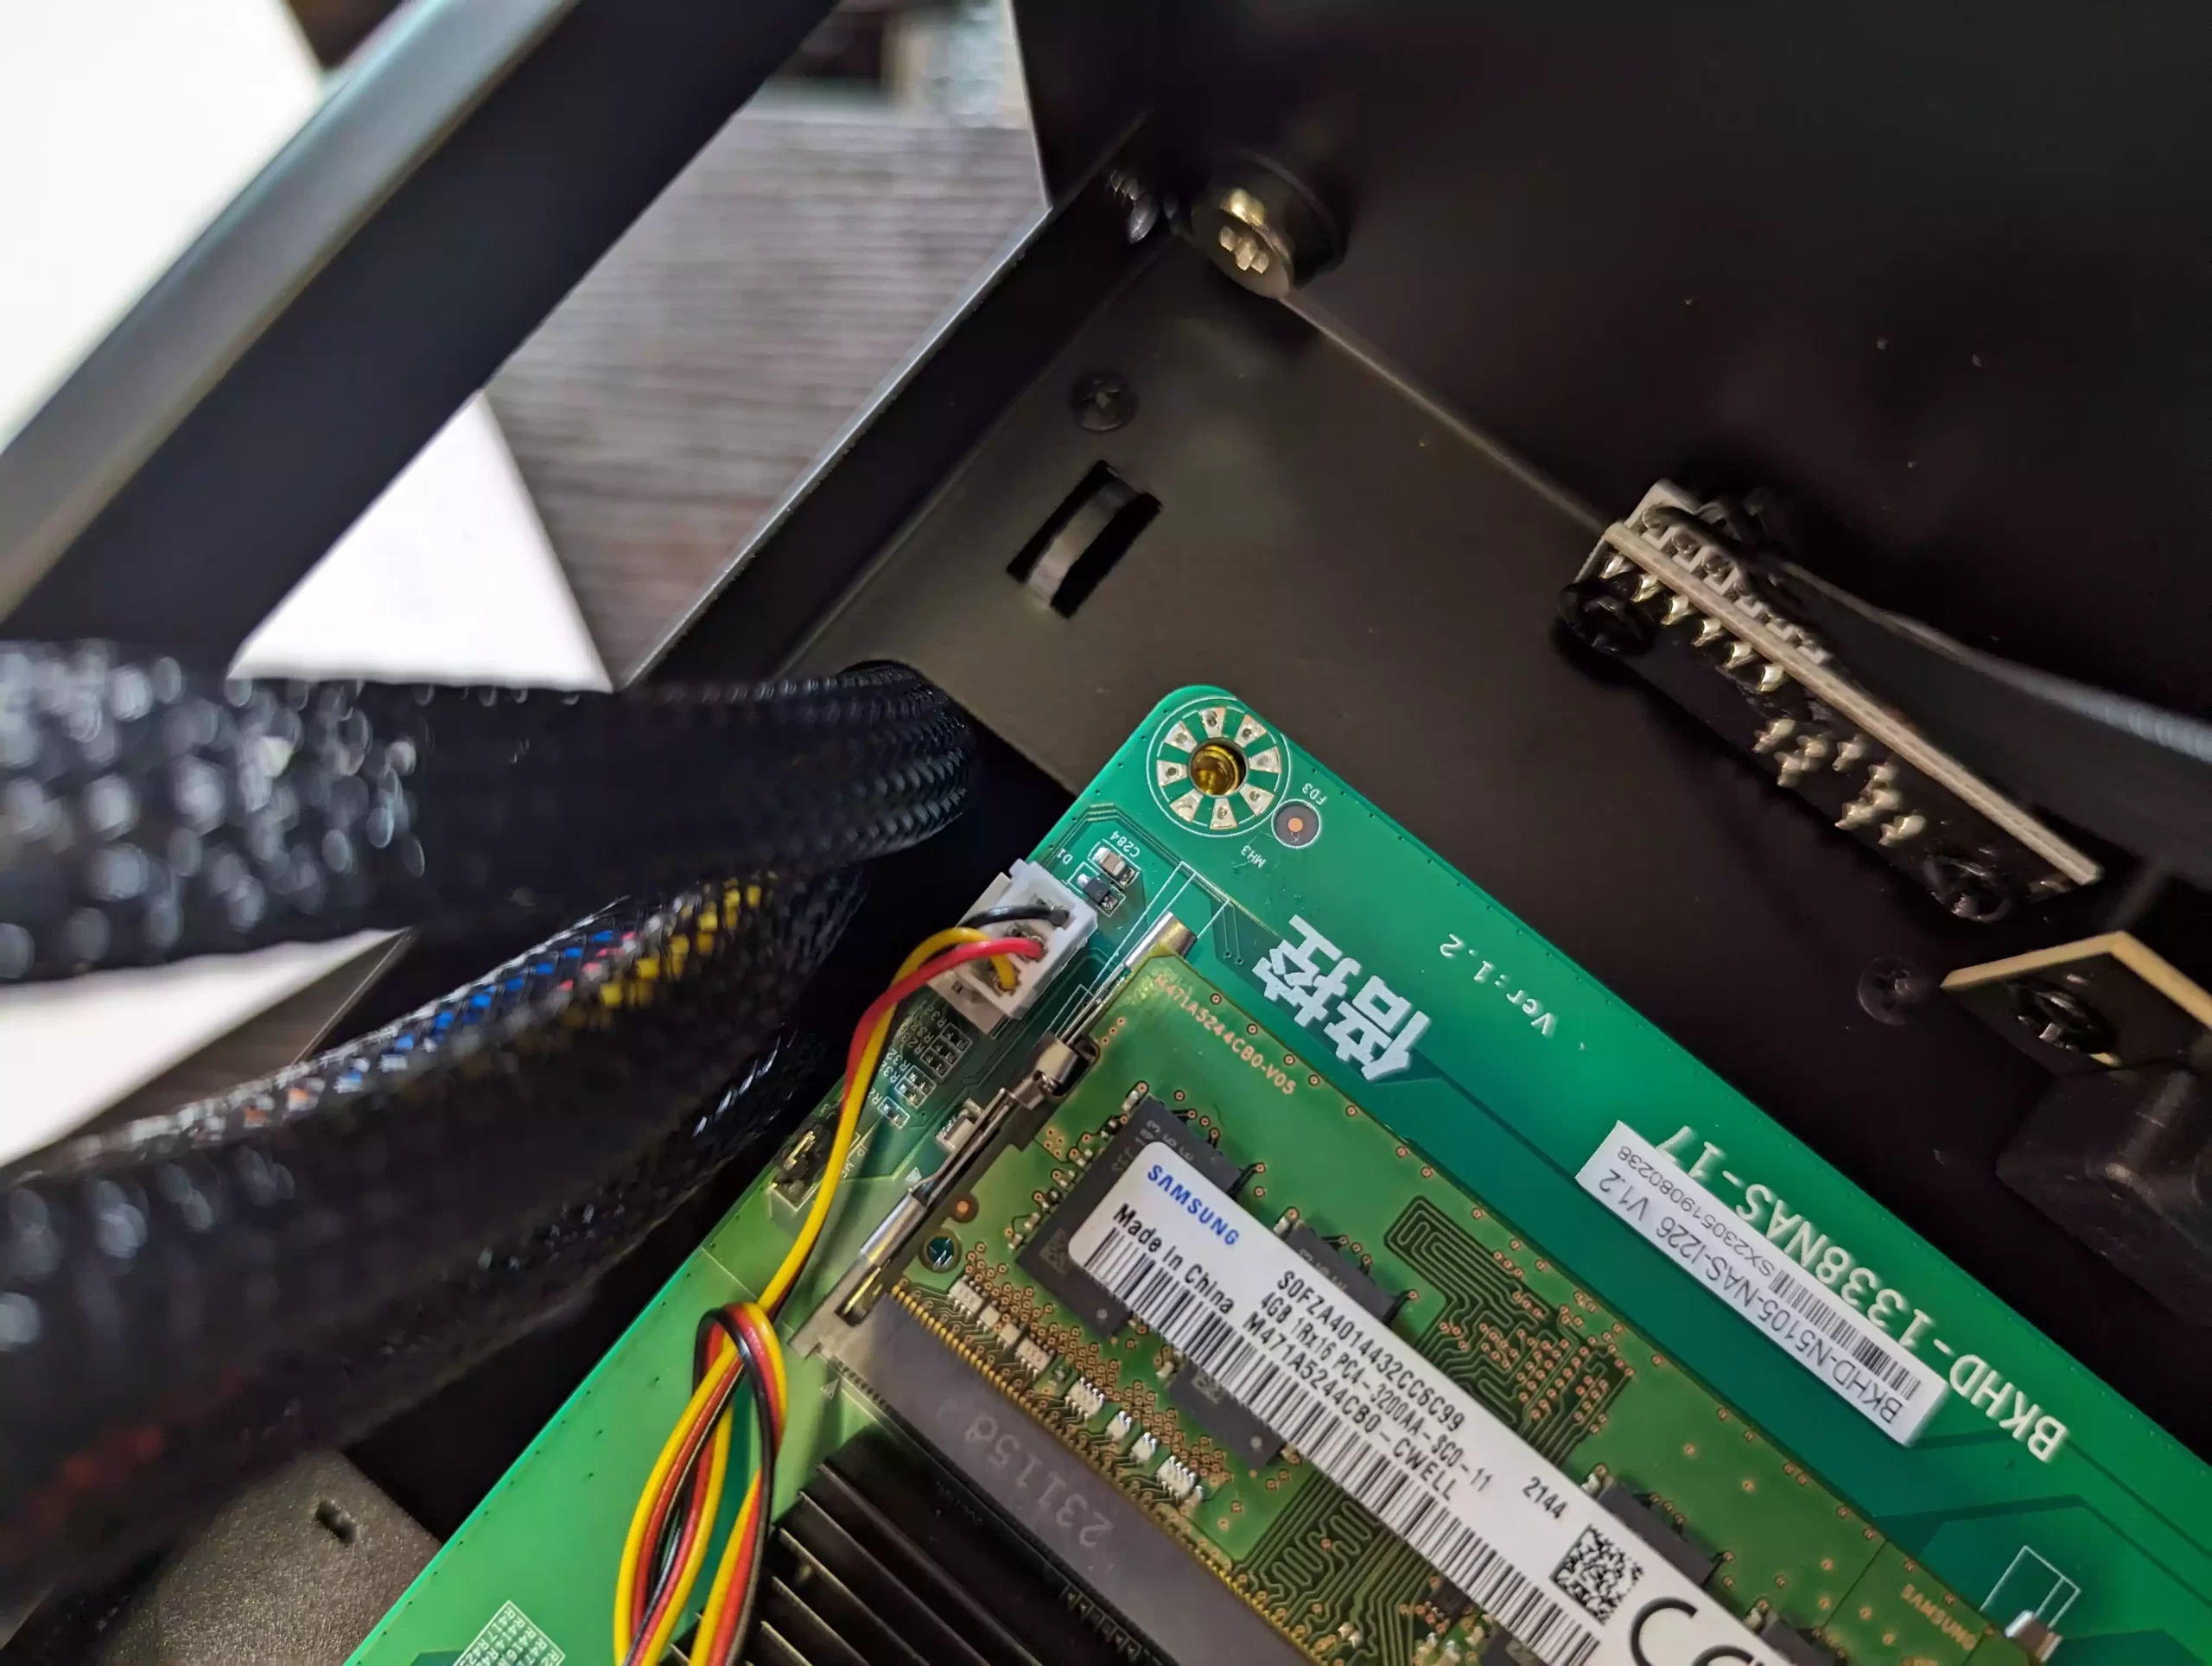
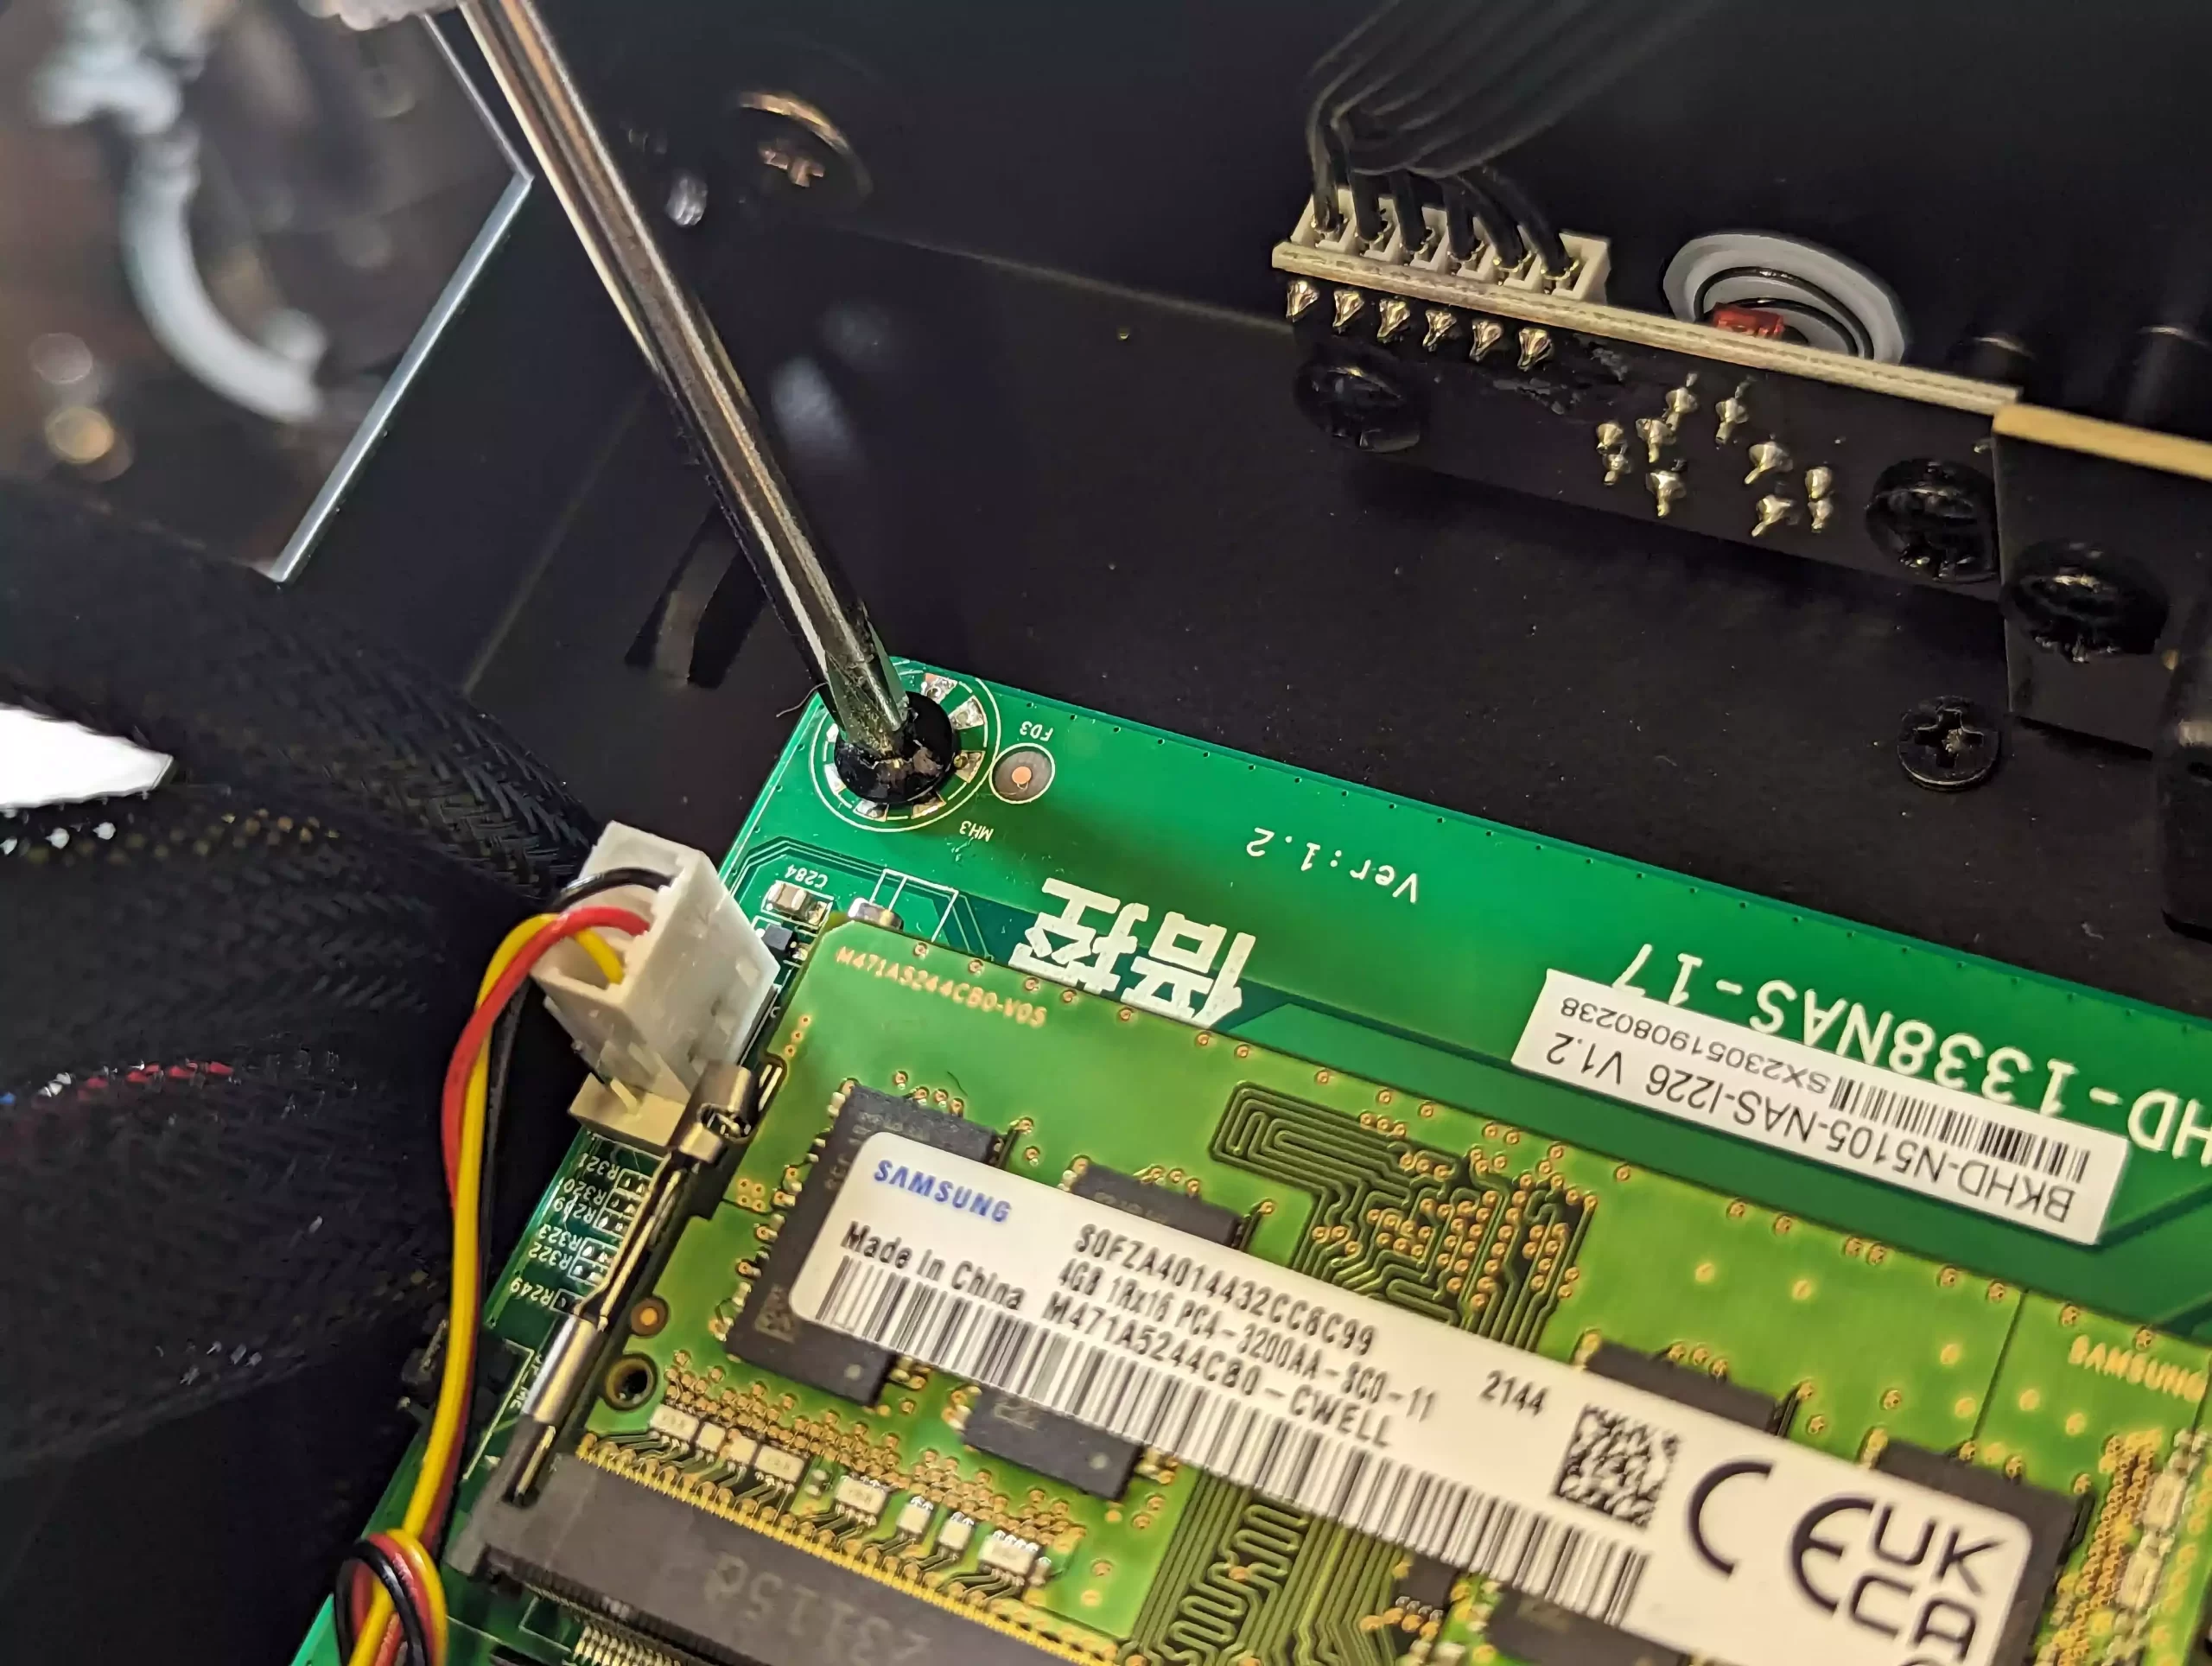
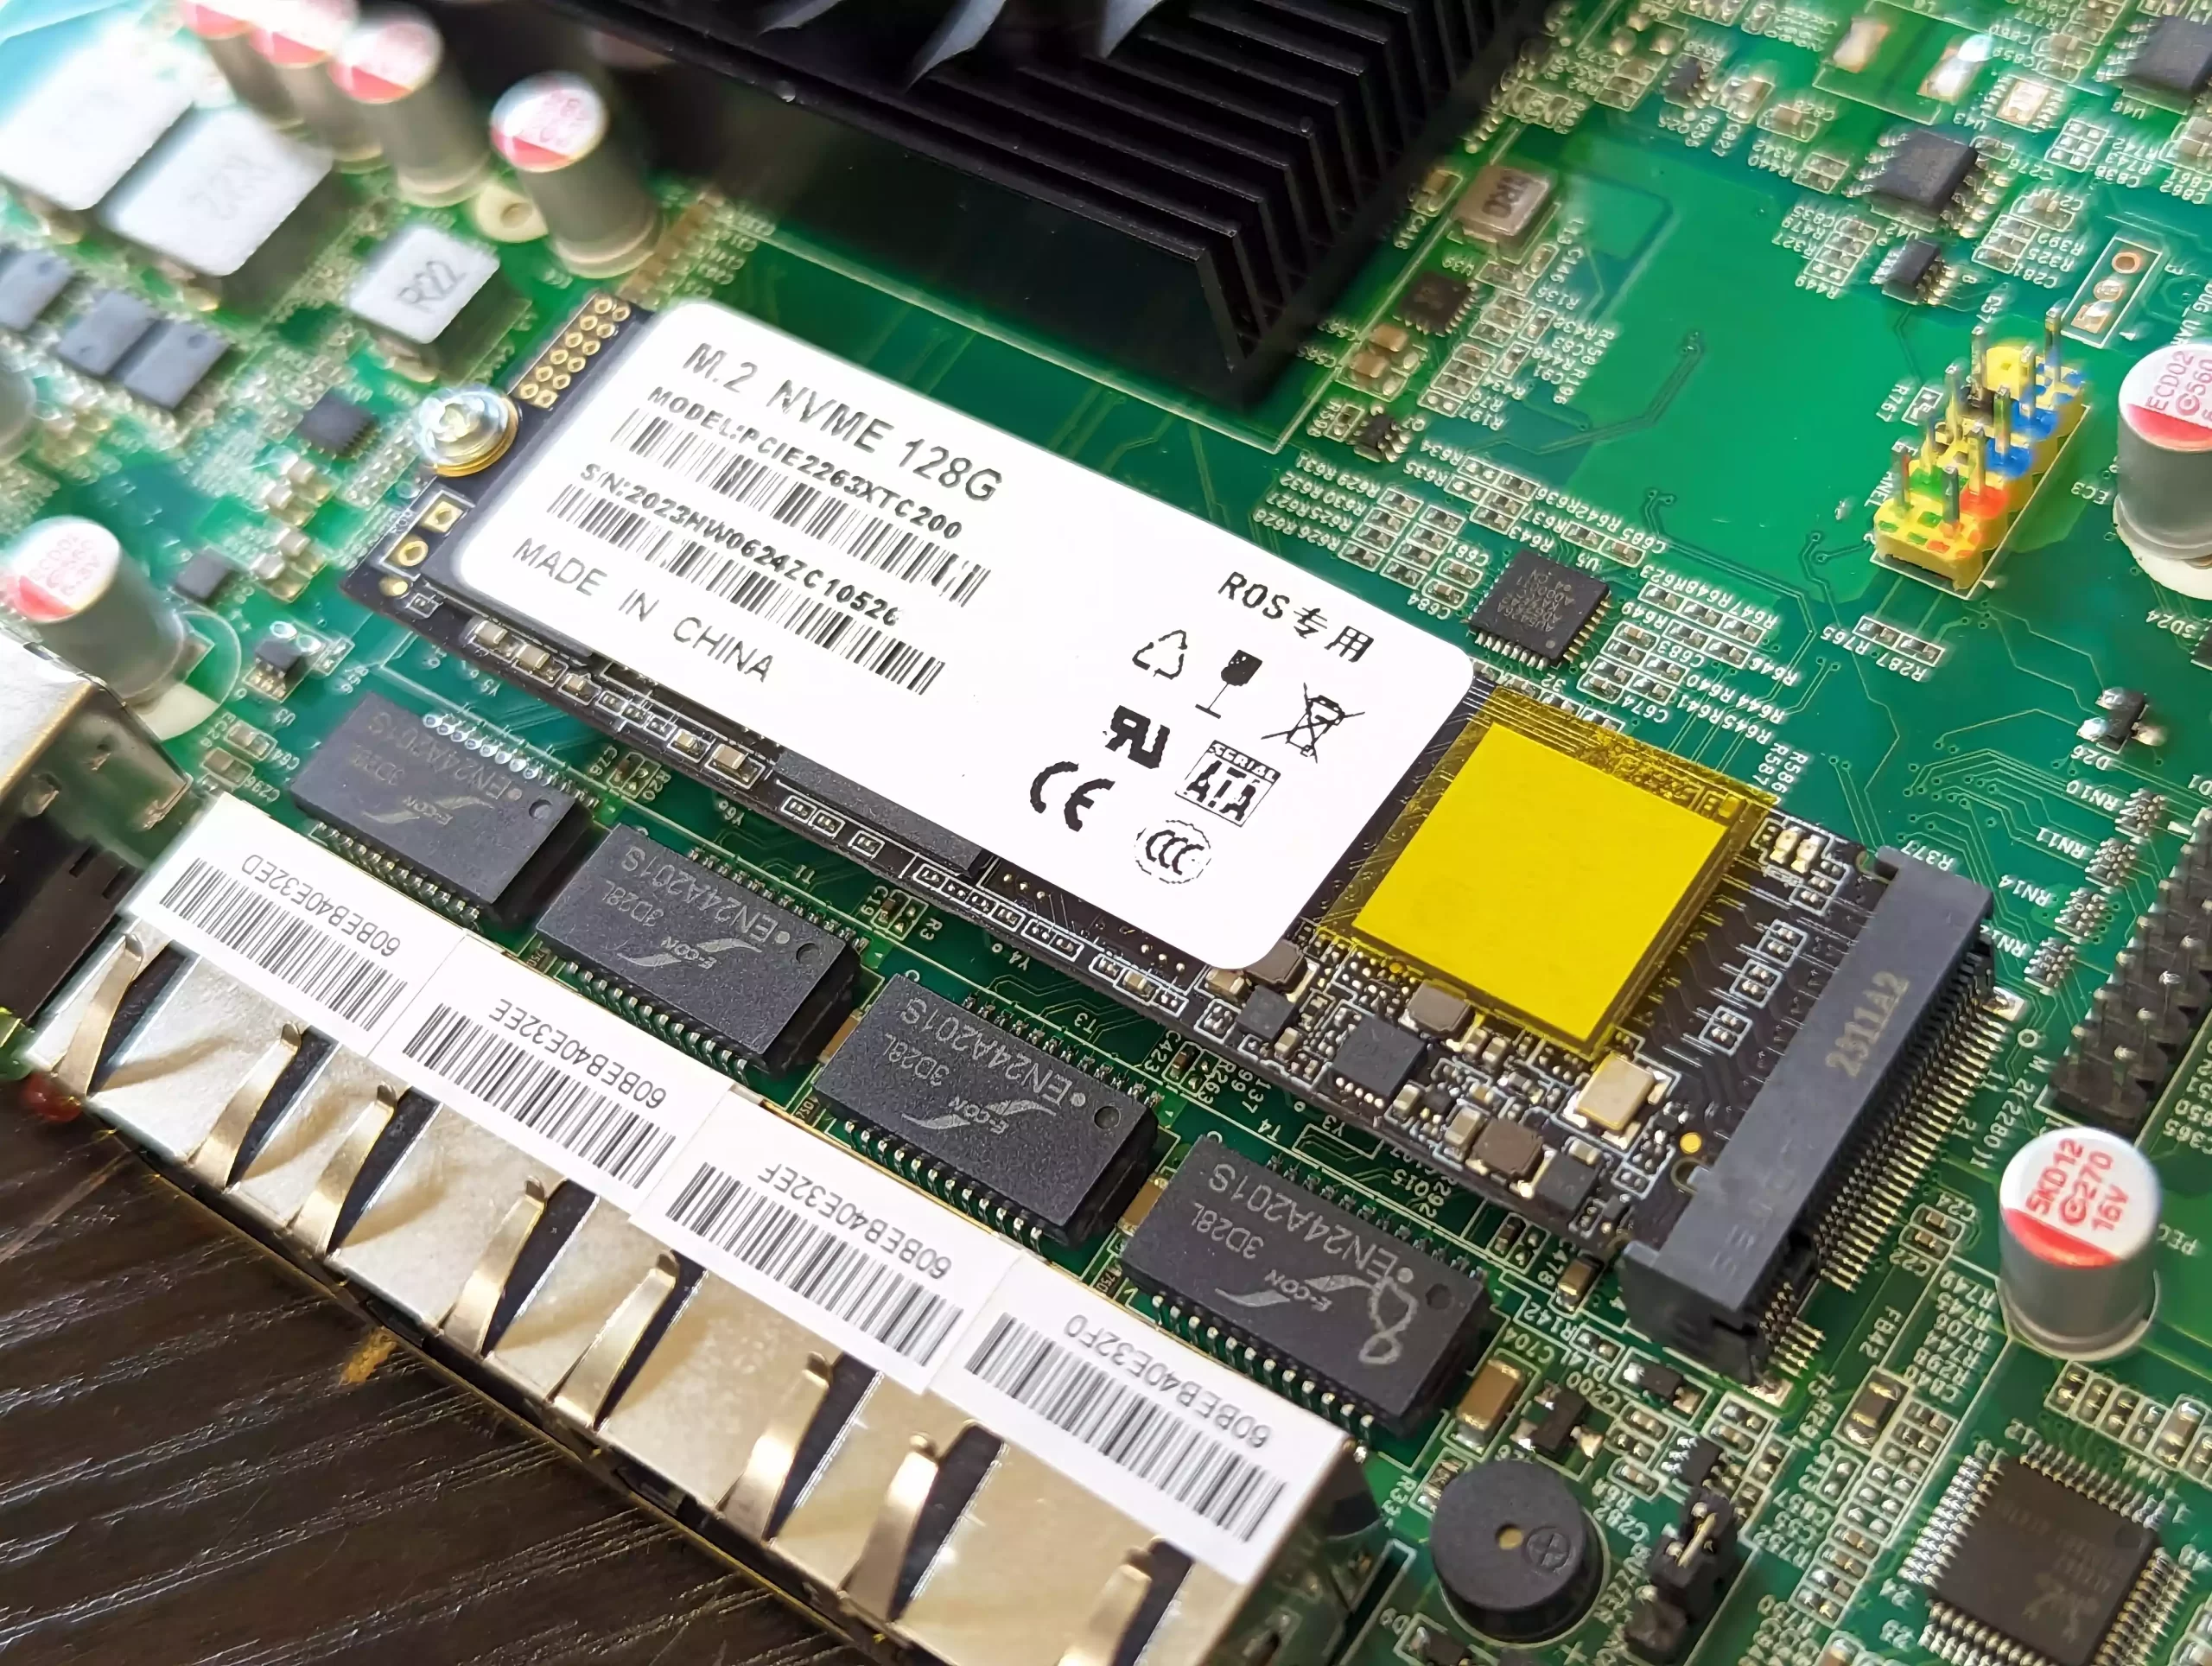
If you bought memory separately, install it in the available slot now.
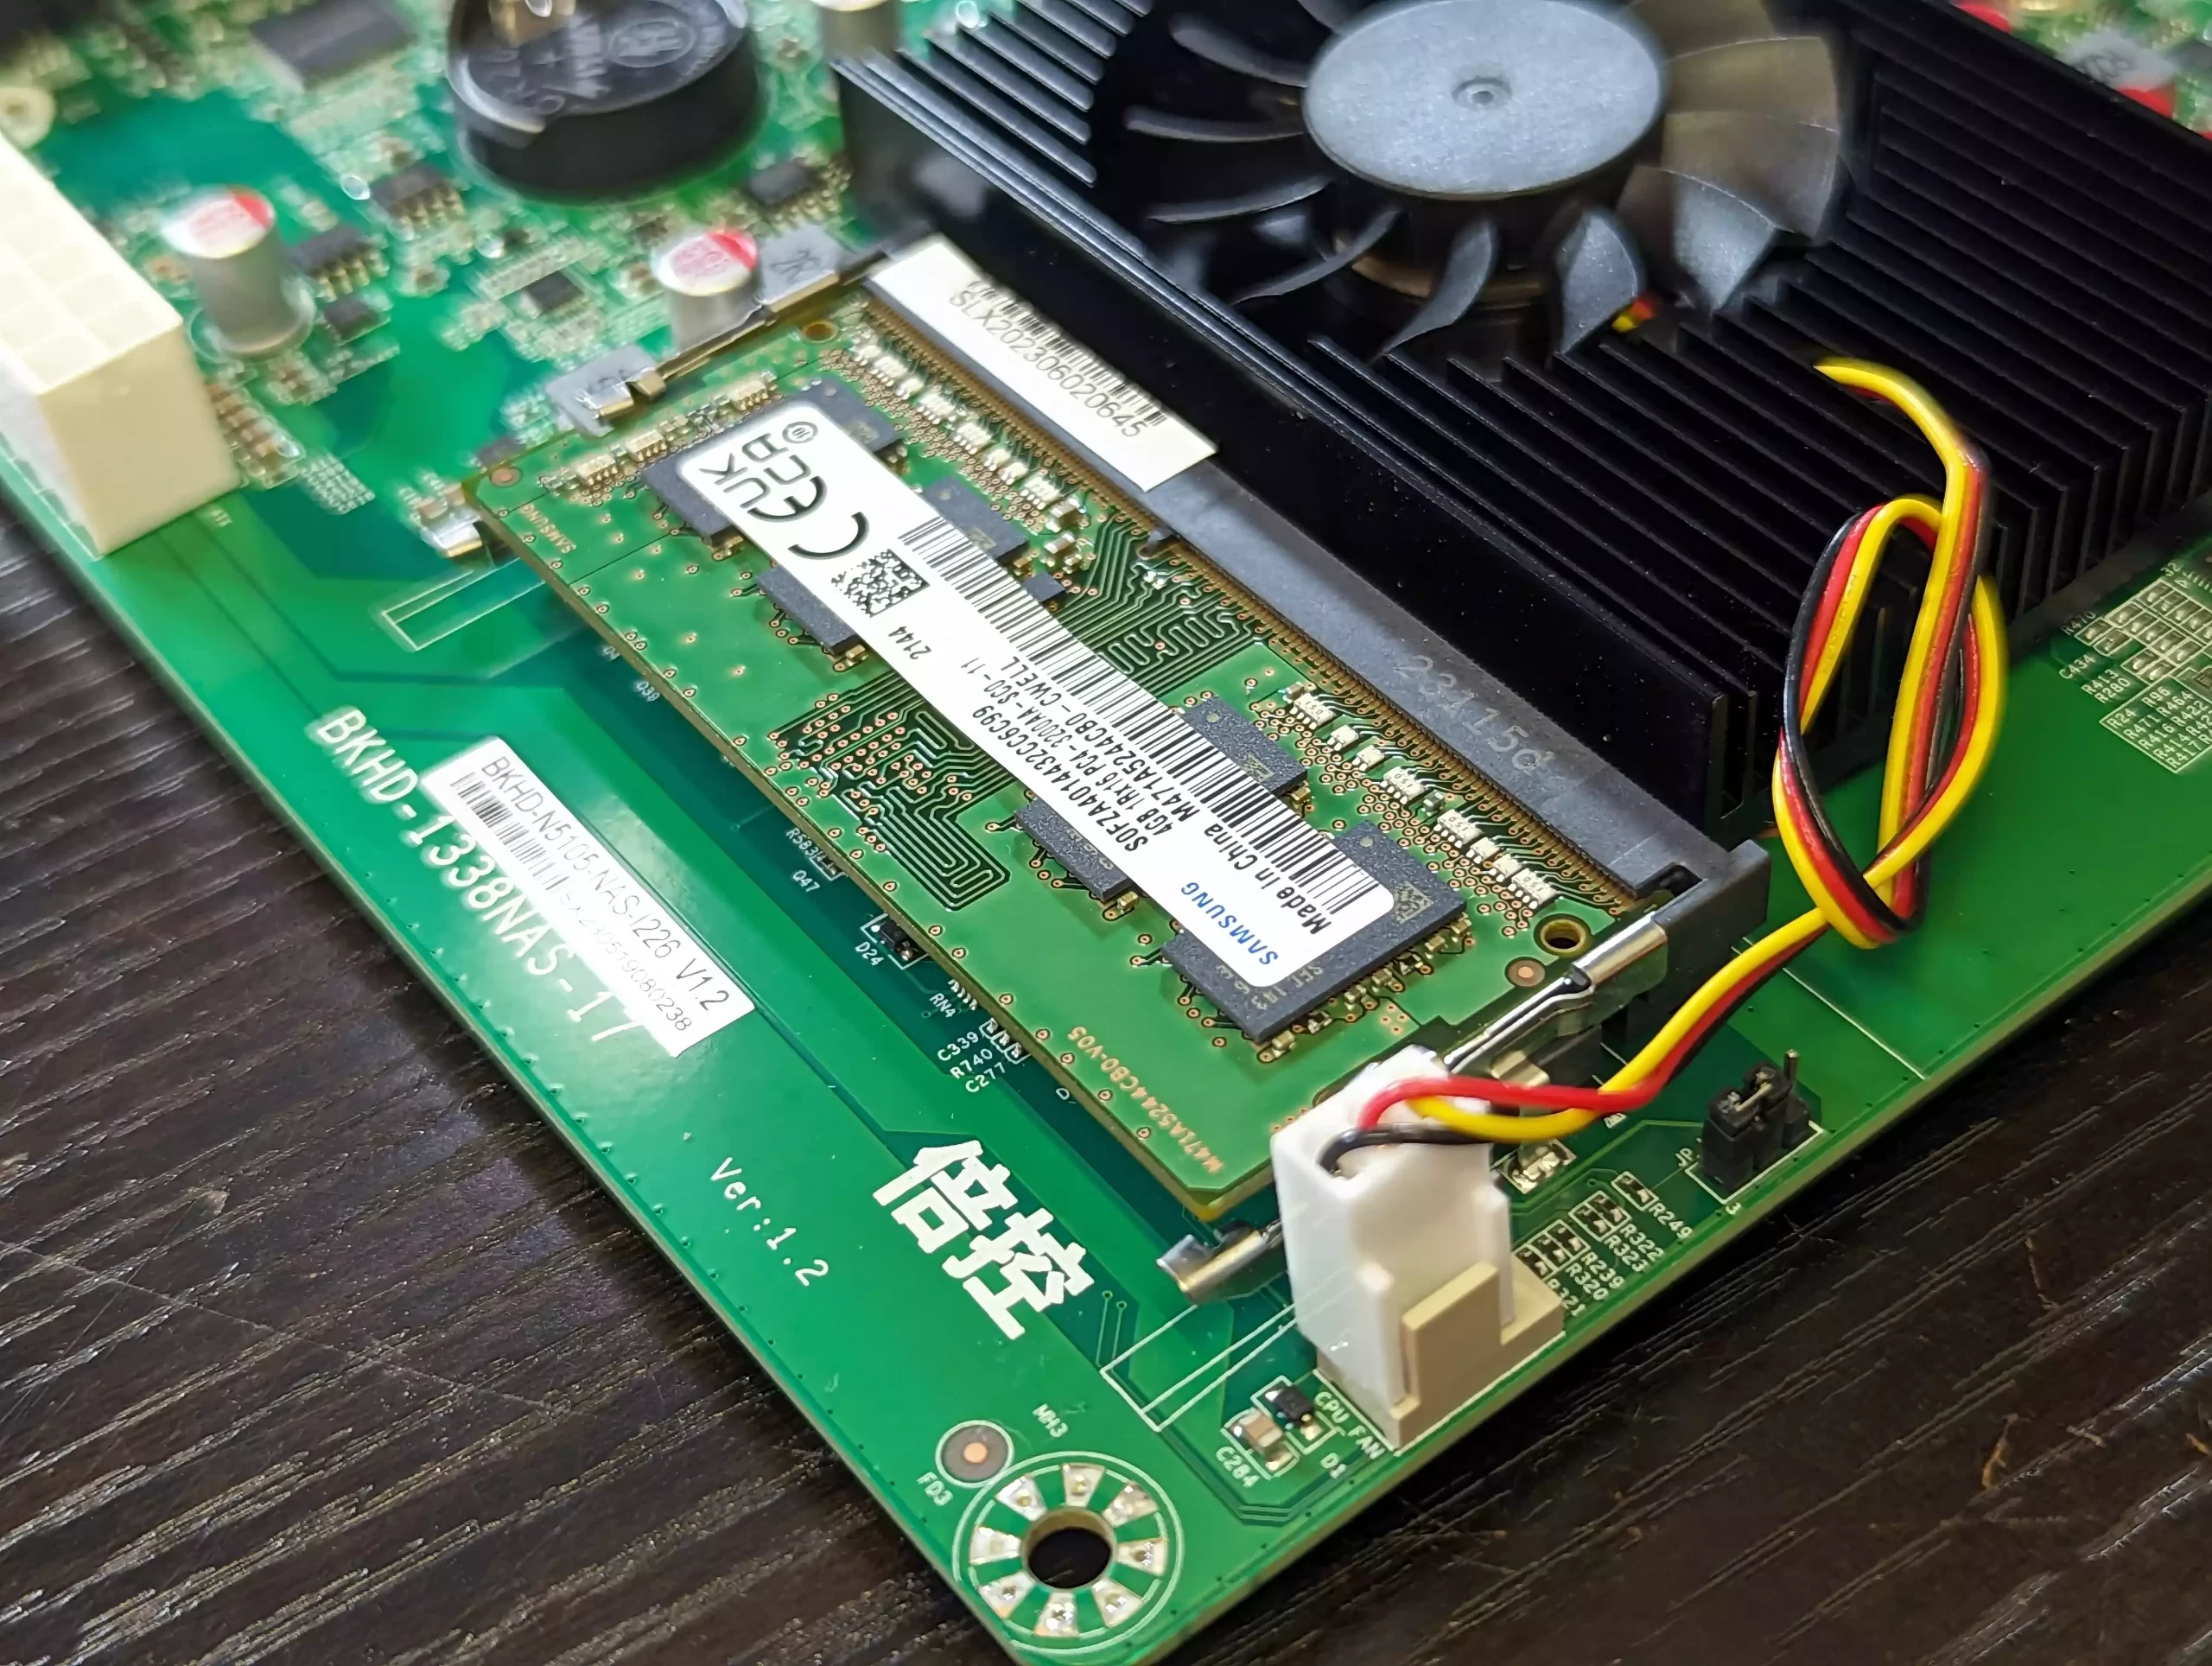
The same goes for if you have purchased a CPU fan separately + connect with the CPU fan power plug (white, next to the CPU socket)
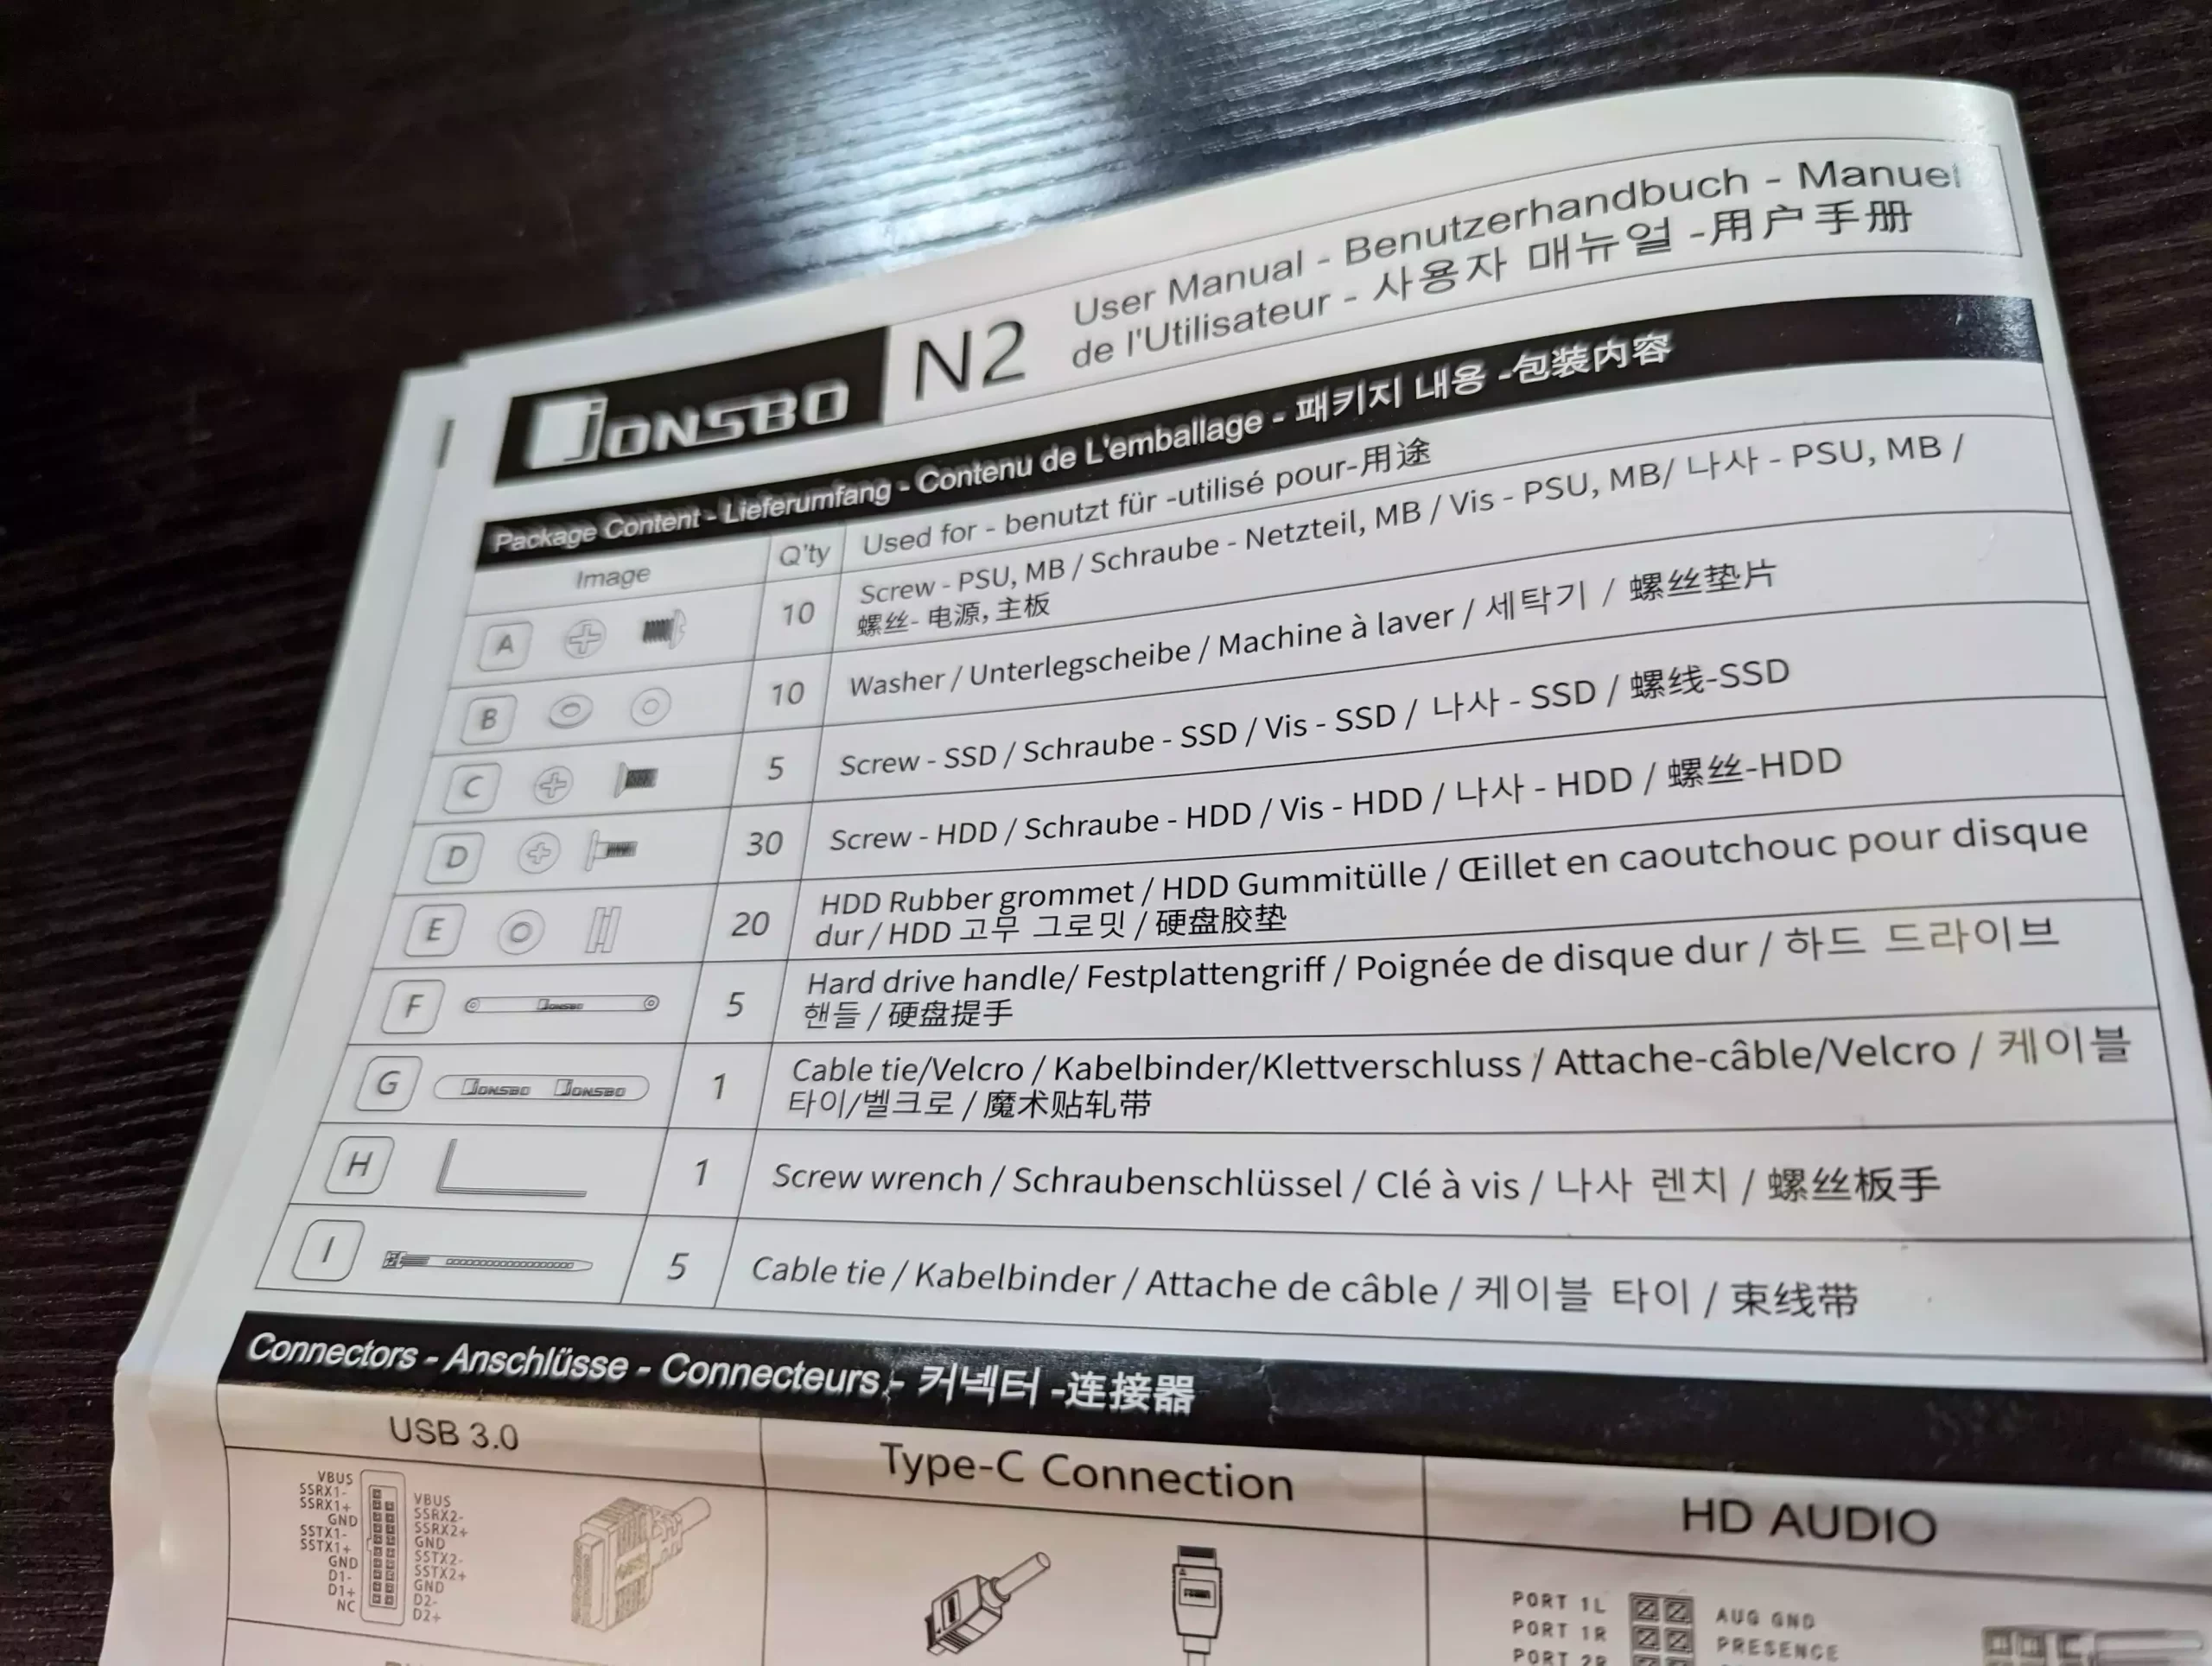
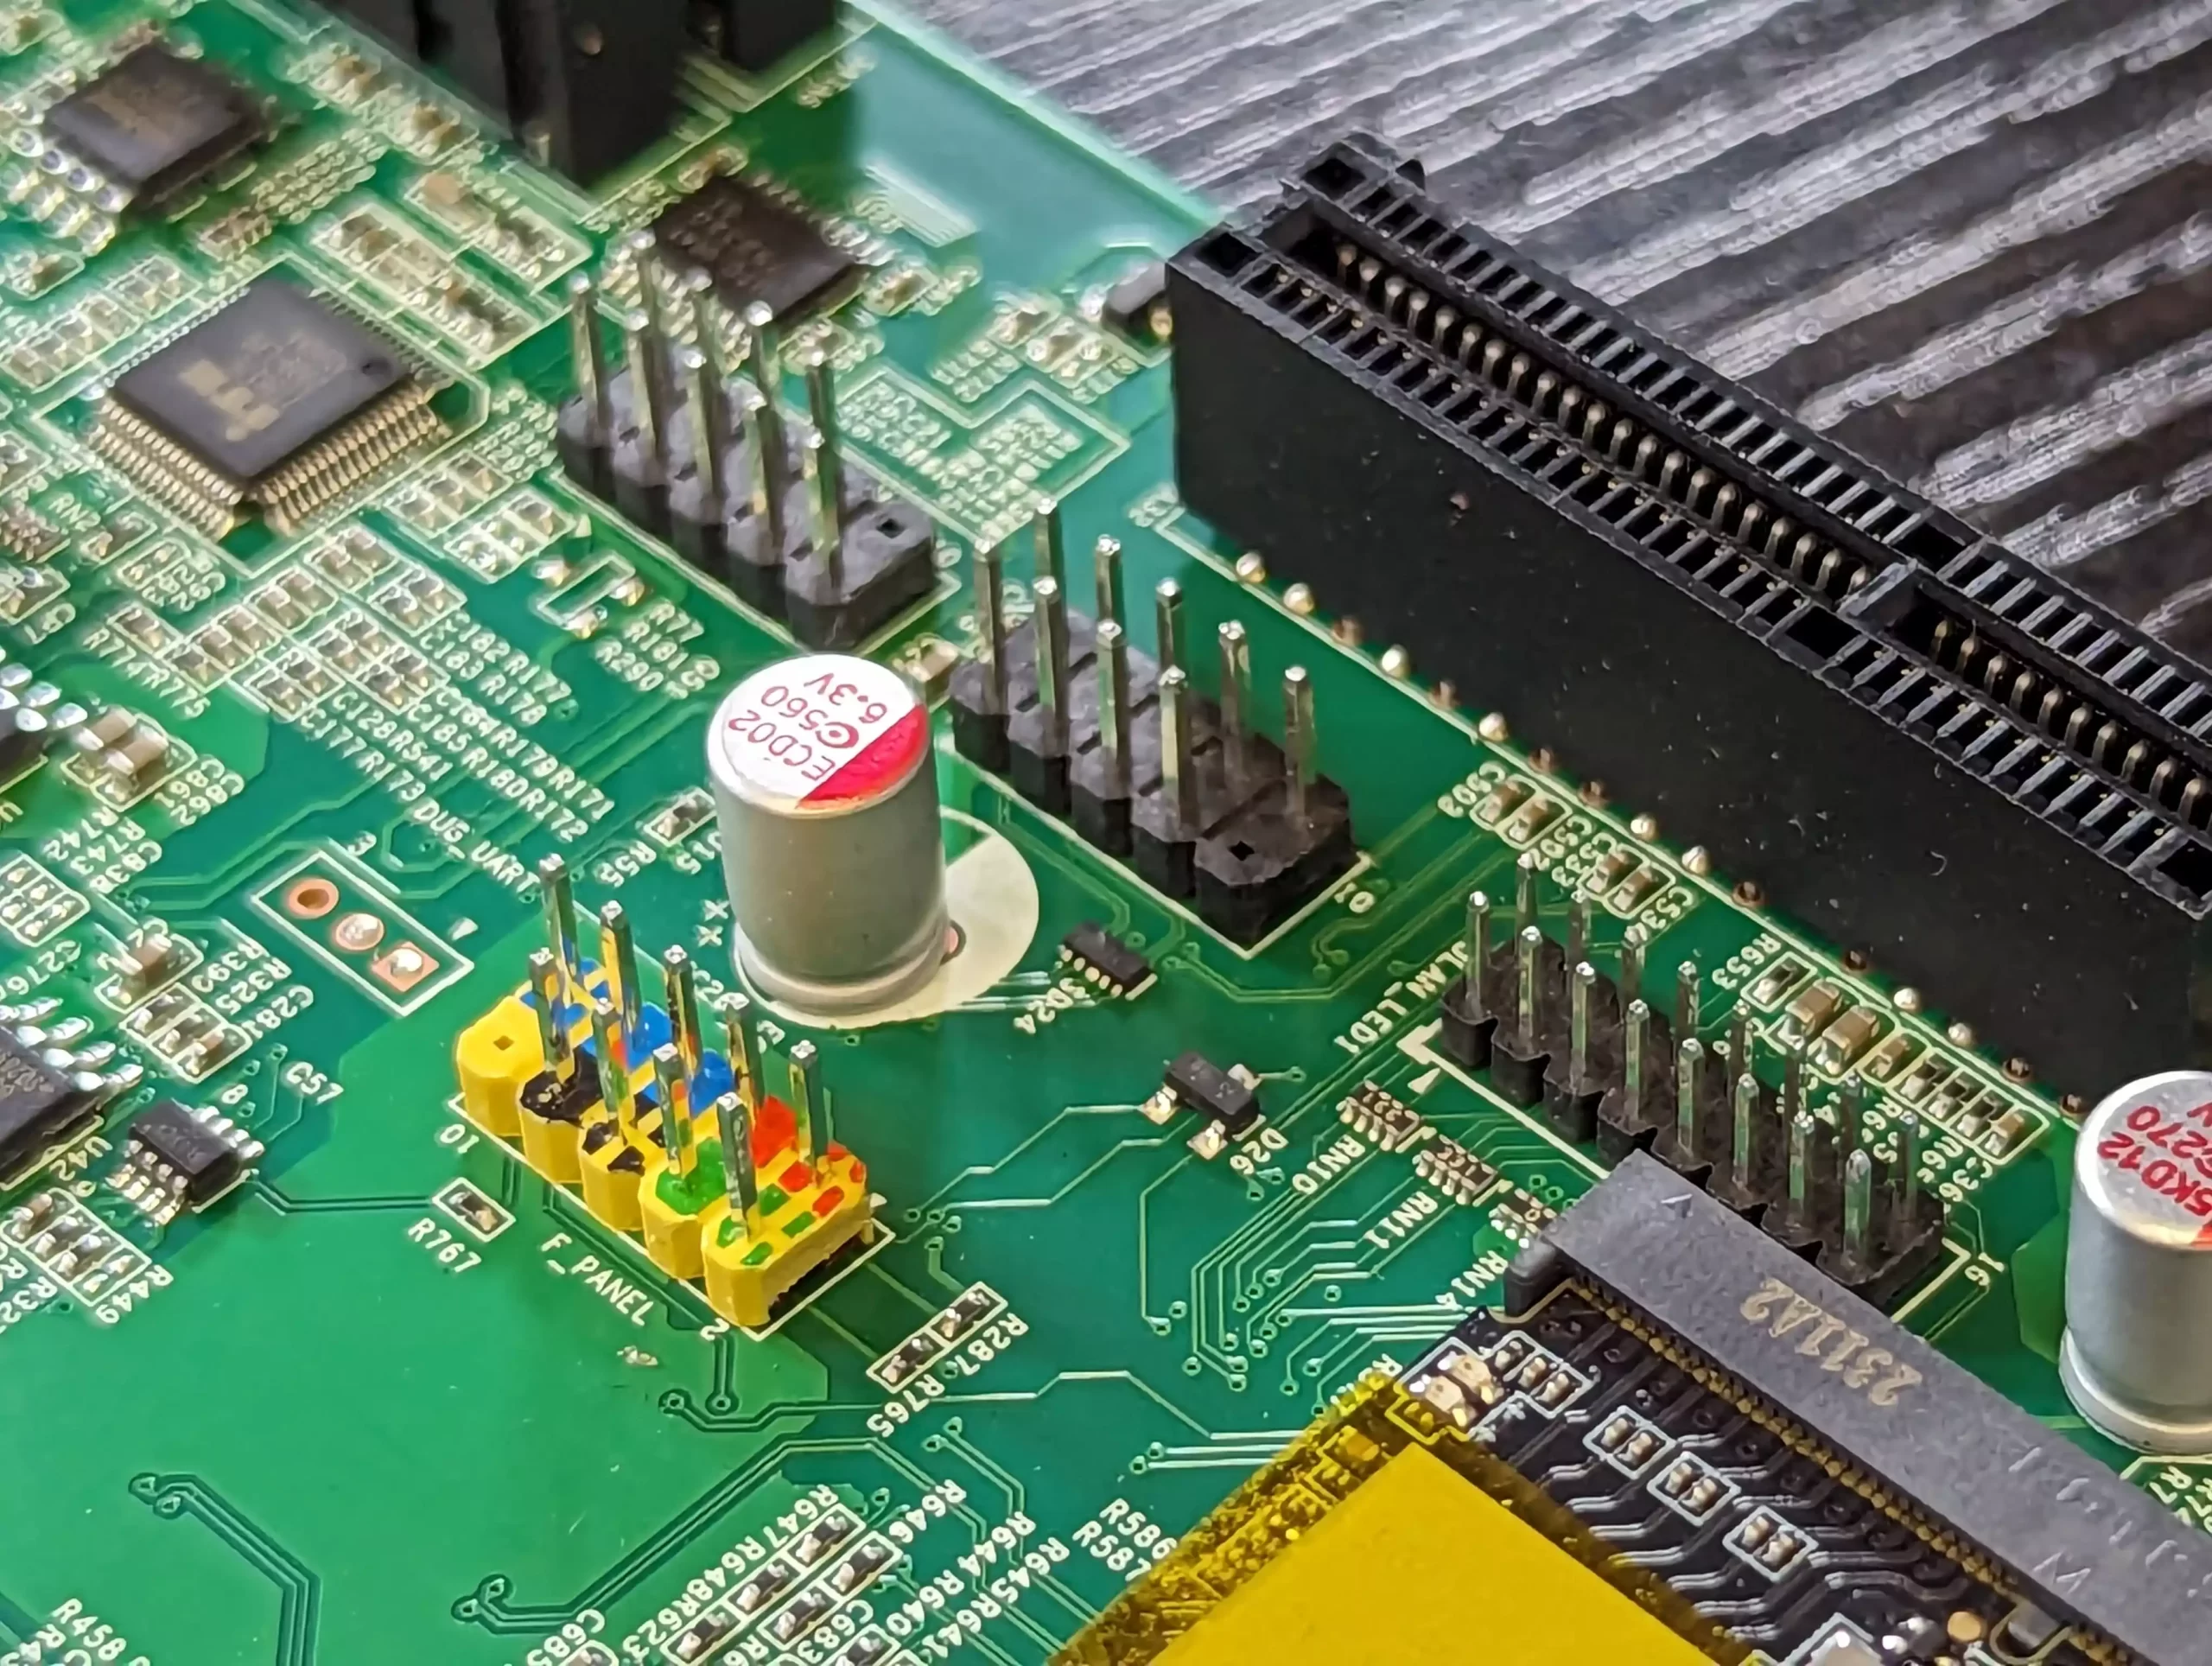
Some TopTon motherboards have varying front panel, USB pins, and LED pins.
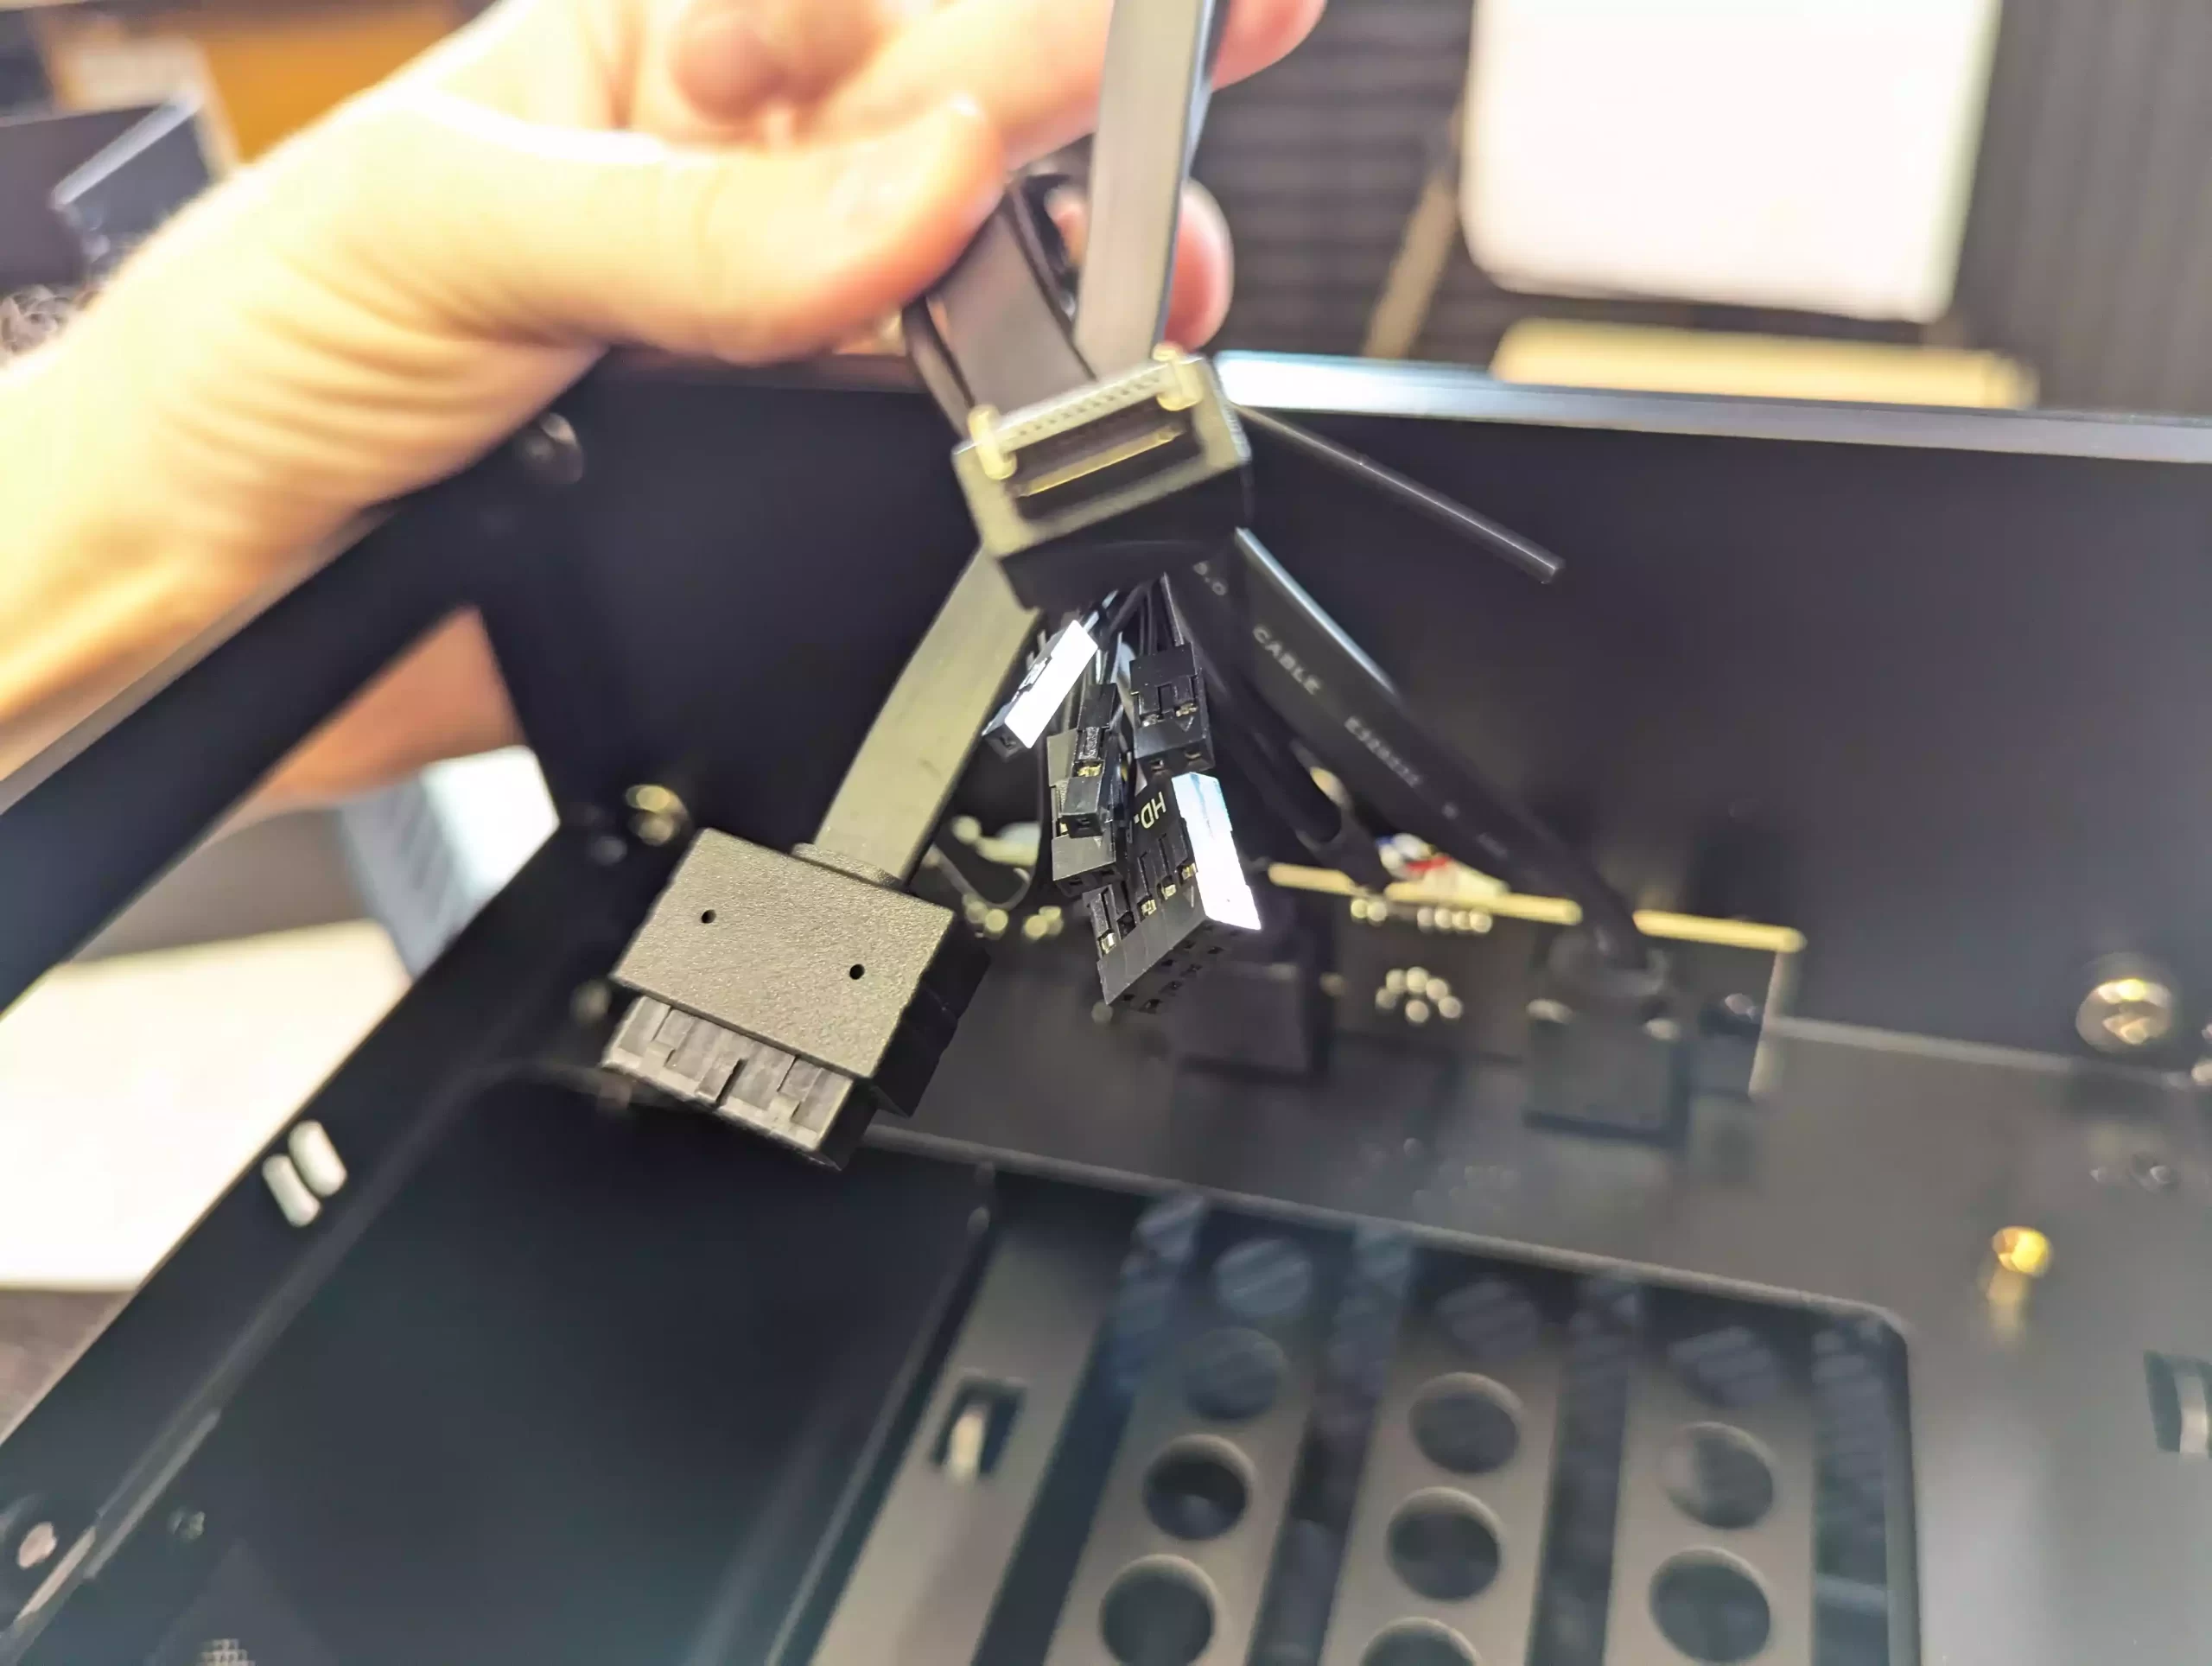
If yours doesn’t have the right USB pins for both USB type-A and type-C front panels, you’ll need specific adapters to connect them.
For front panel LEDs and the power button, consult your motherboard manual to identify the right pins.
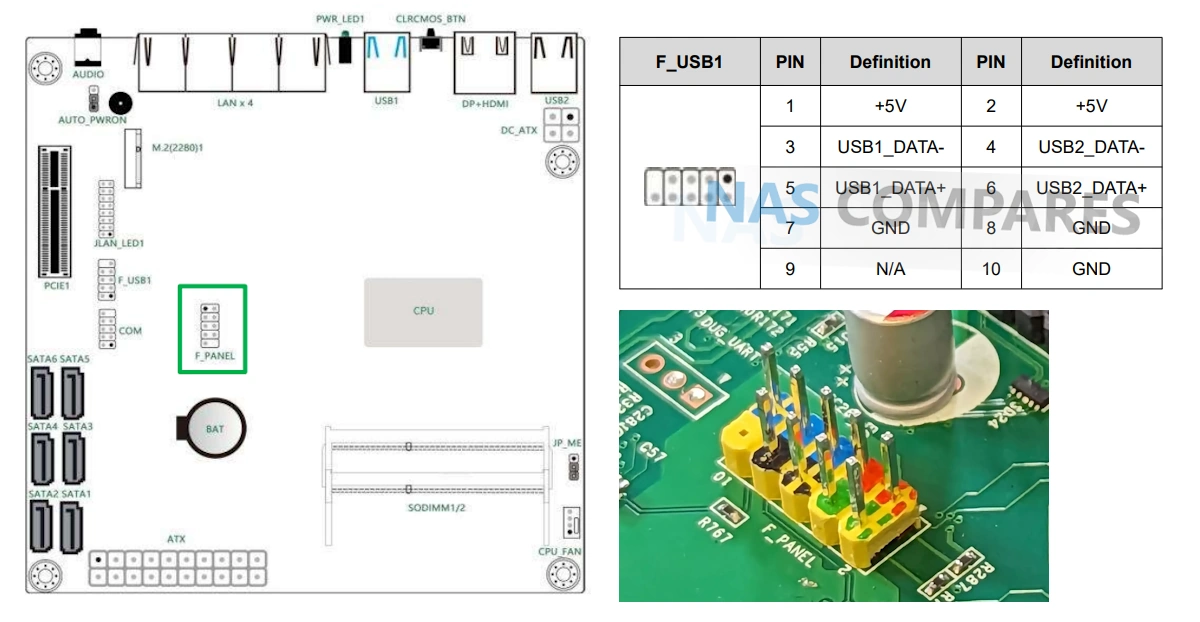
Note that the Jonsbo case doesn’t have a reset button, so you won’t find a corresponding pin.
Before sealing the Jonsbo case, briefly test the PSU’s power delivery via the main port. Ensure the power button illuminates when pressed. When you plug in the PSU with a mains cable, a brief crackling sound indicates live power, and the PSU is responsive. If power flows and the power button is on, the CPU fan and/or rear fan should activate.
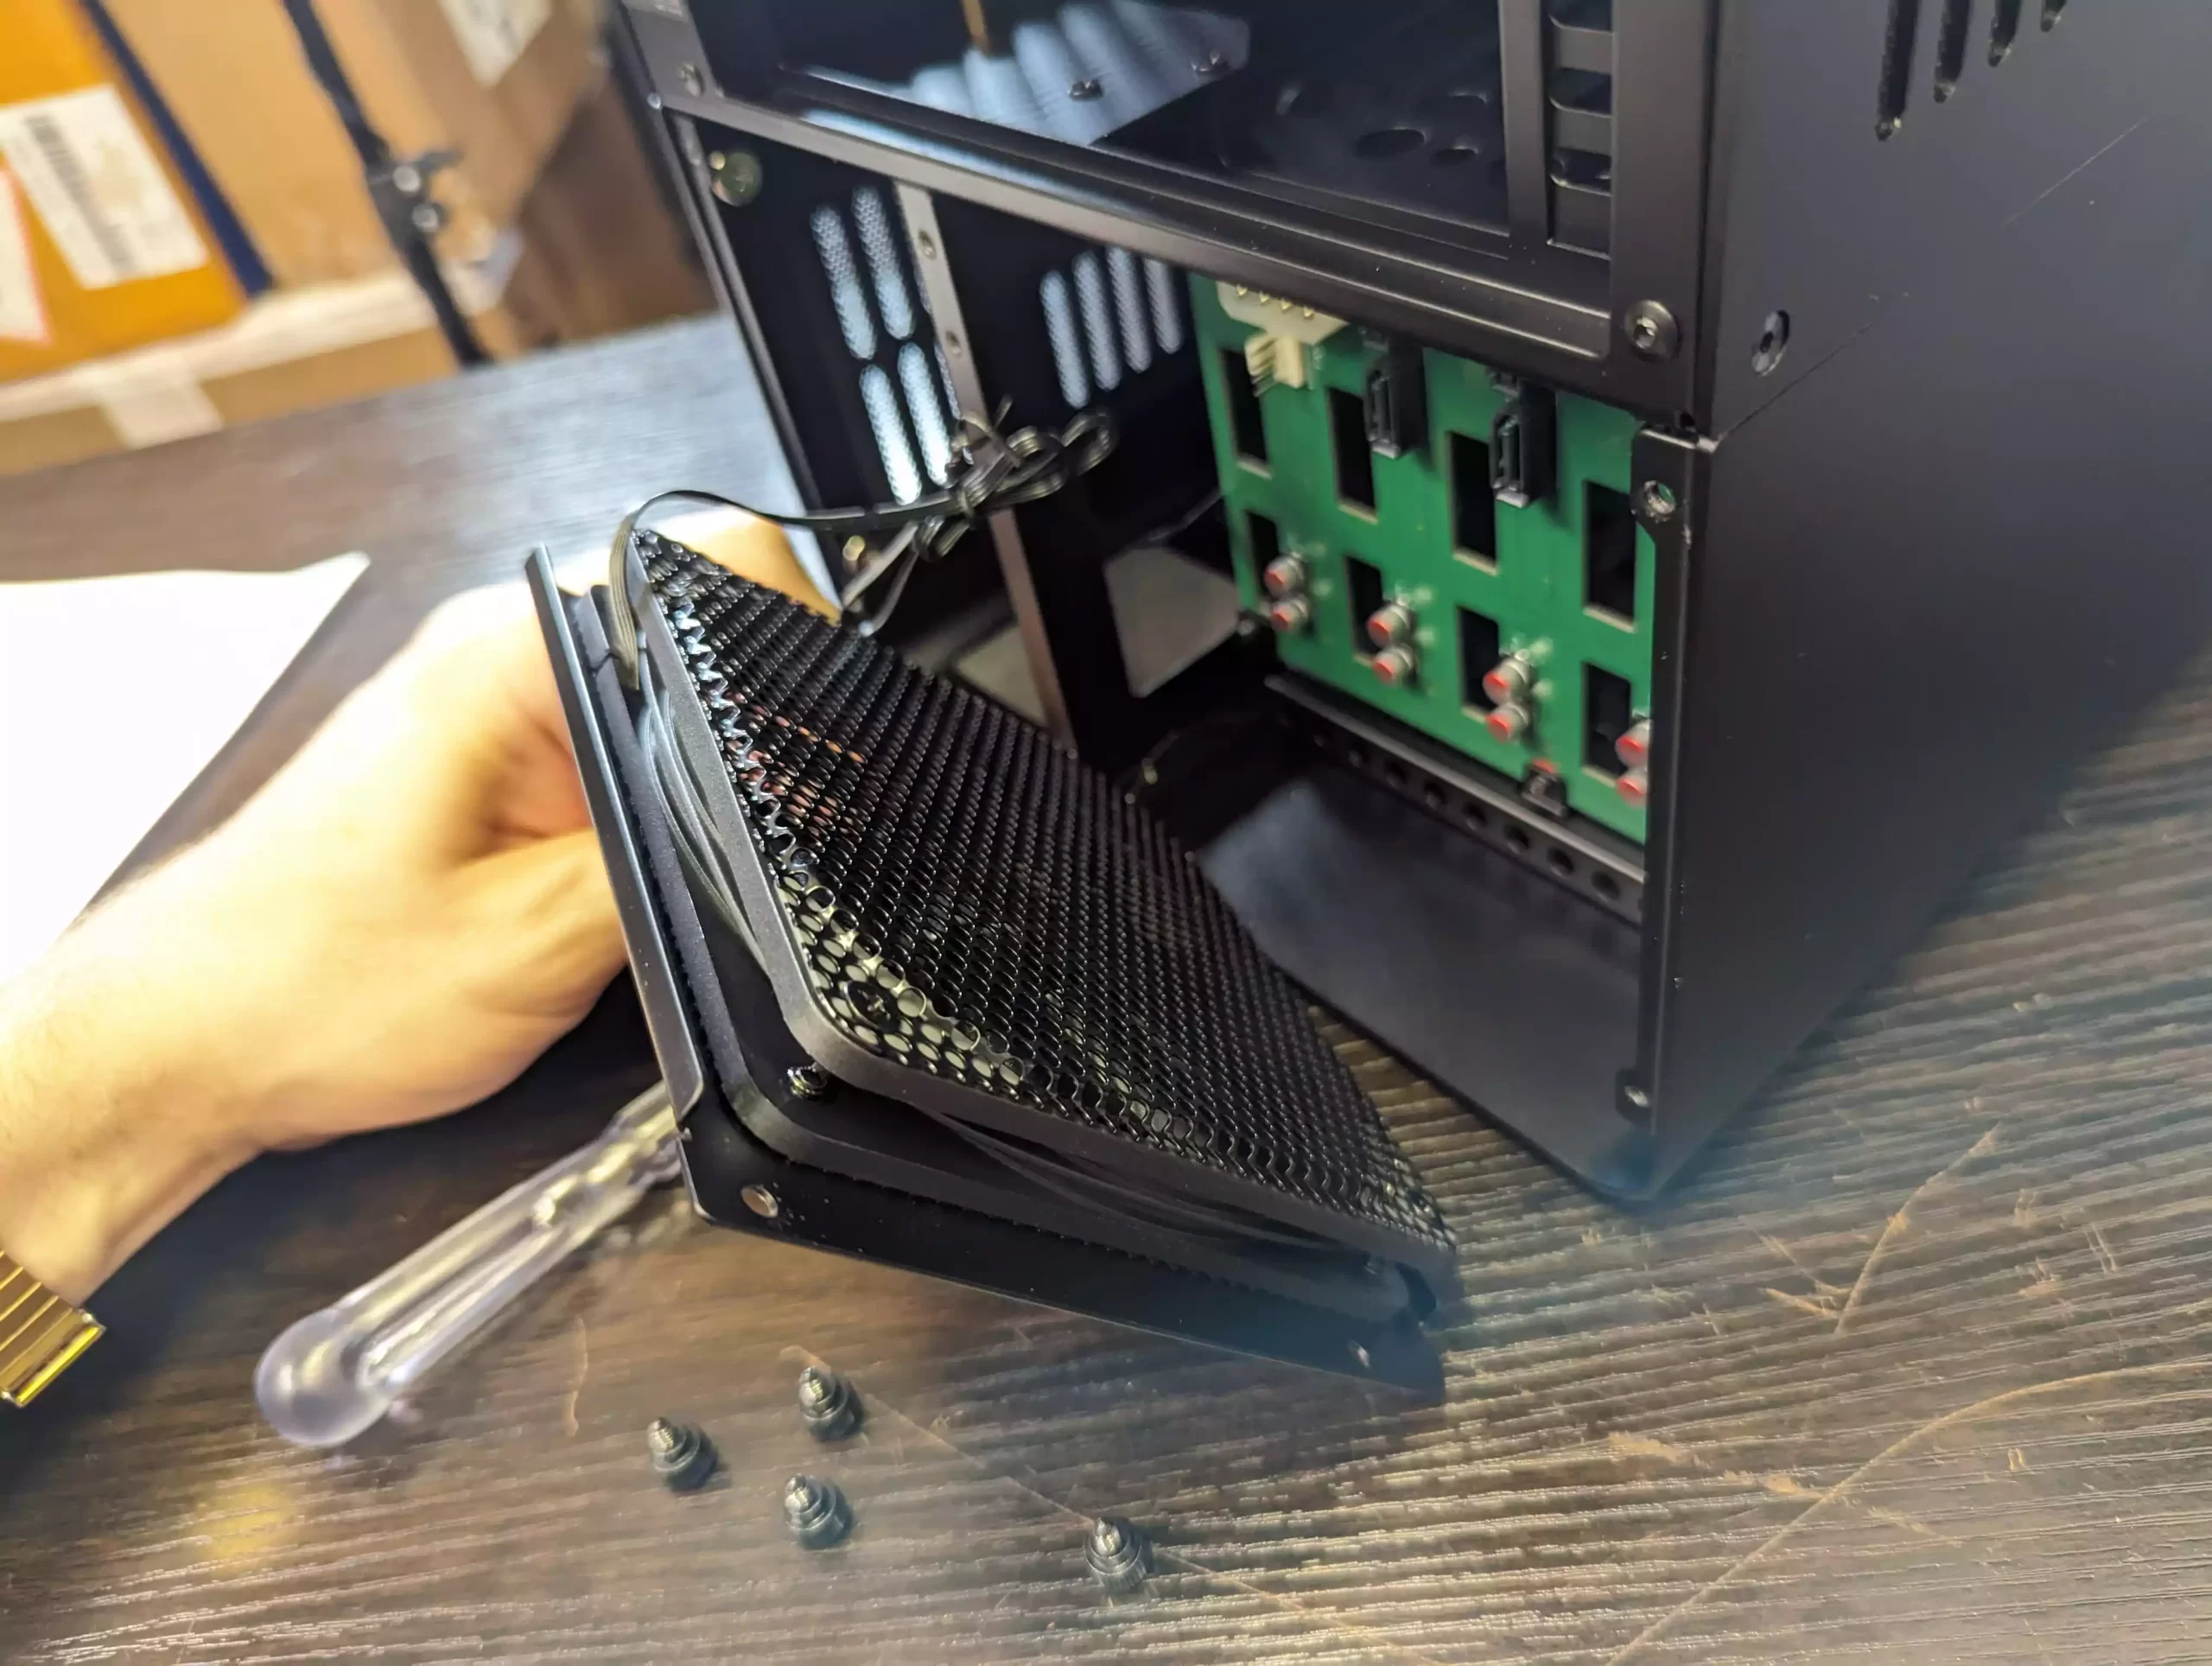
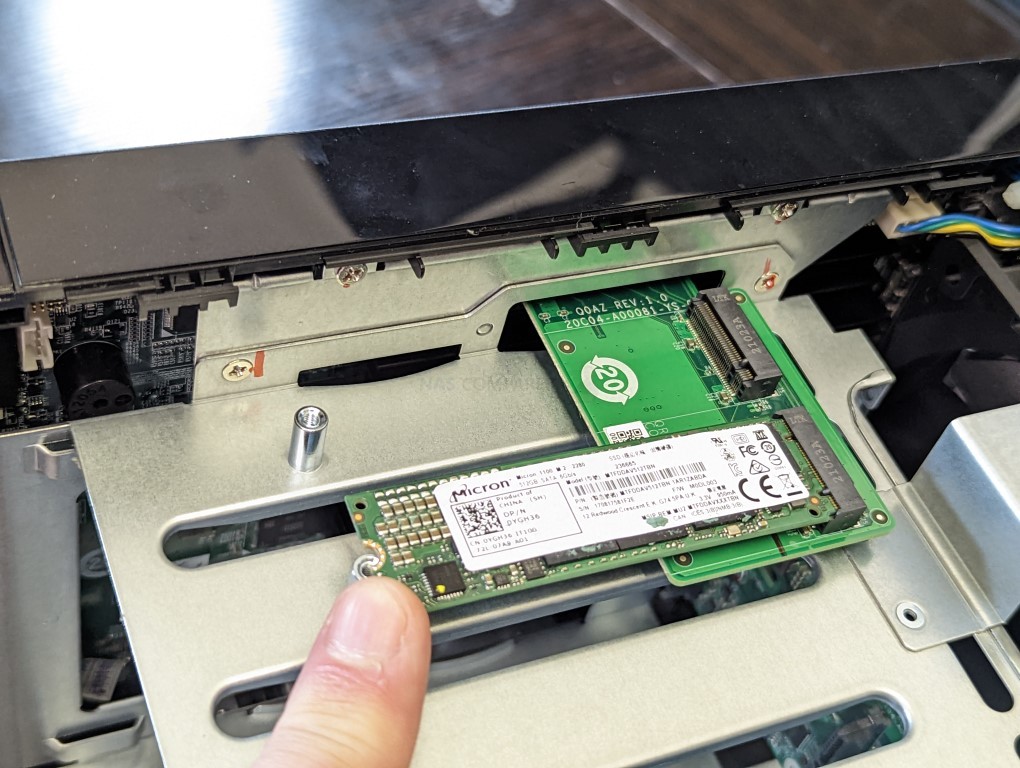
If you’re installing an M.2 NVME SSD, do so now. Afterwards, seal the top of the case using the four screws and Allen key.
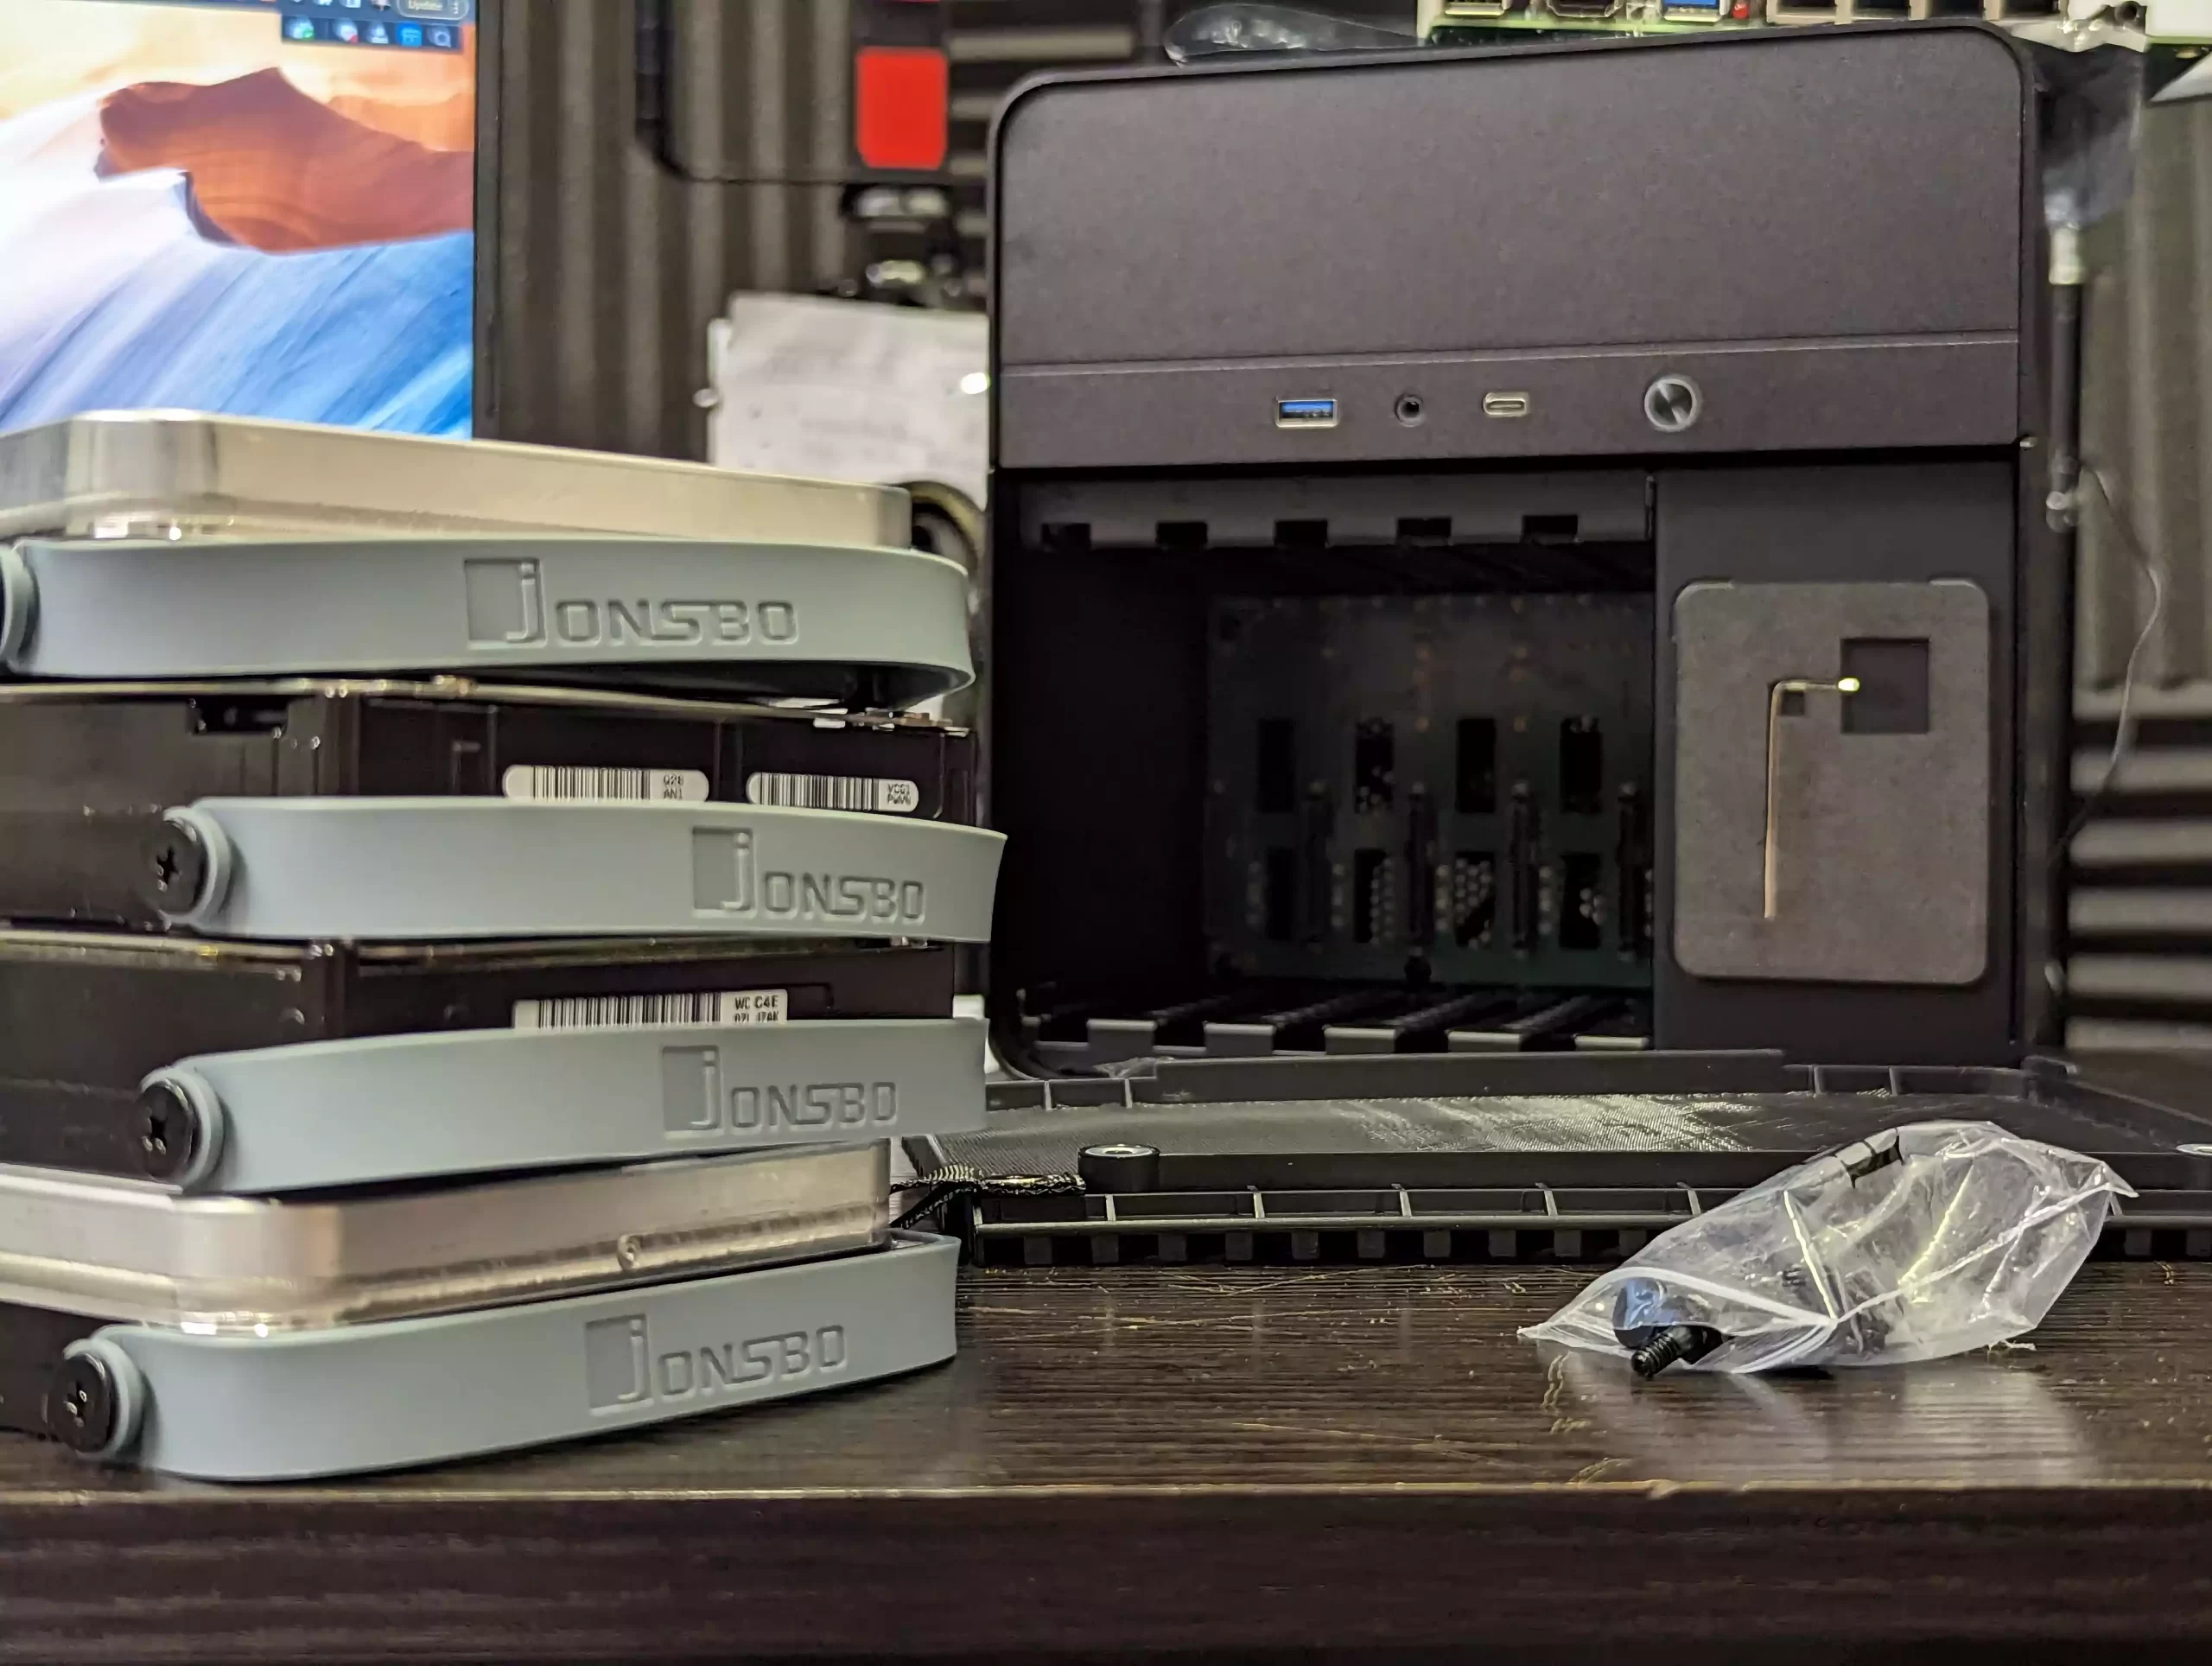
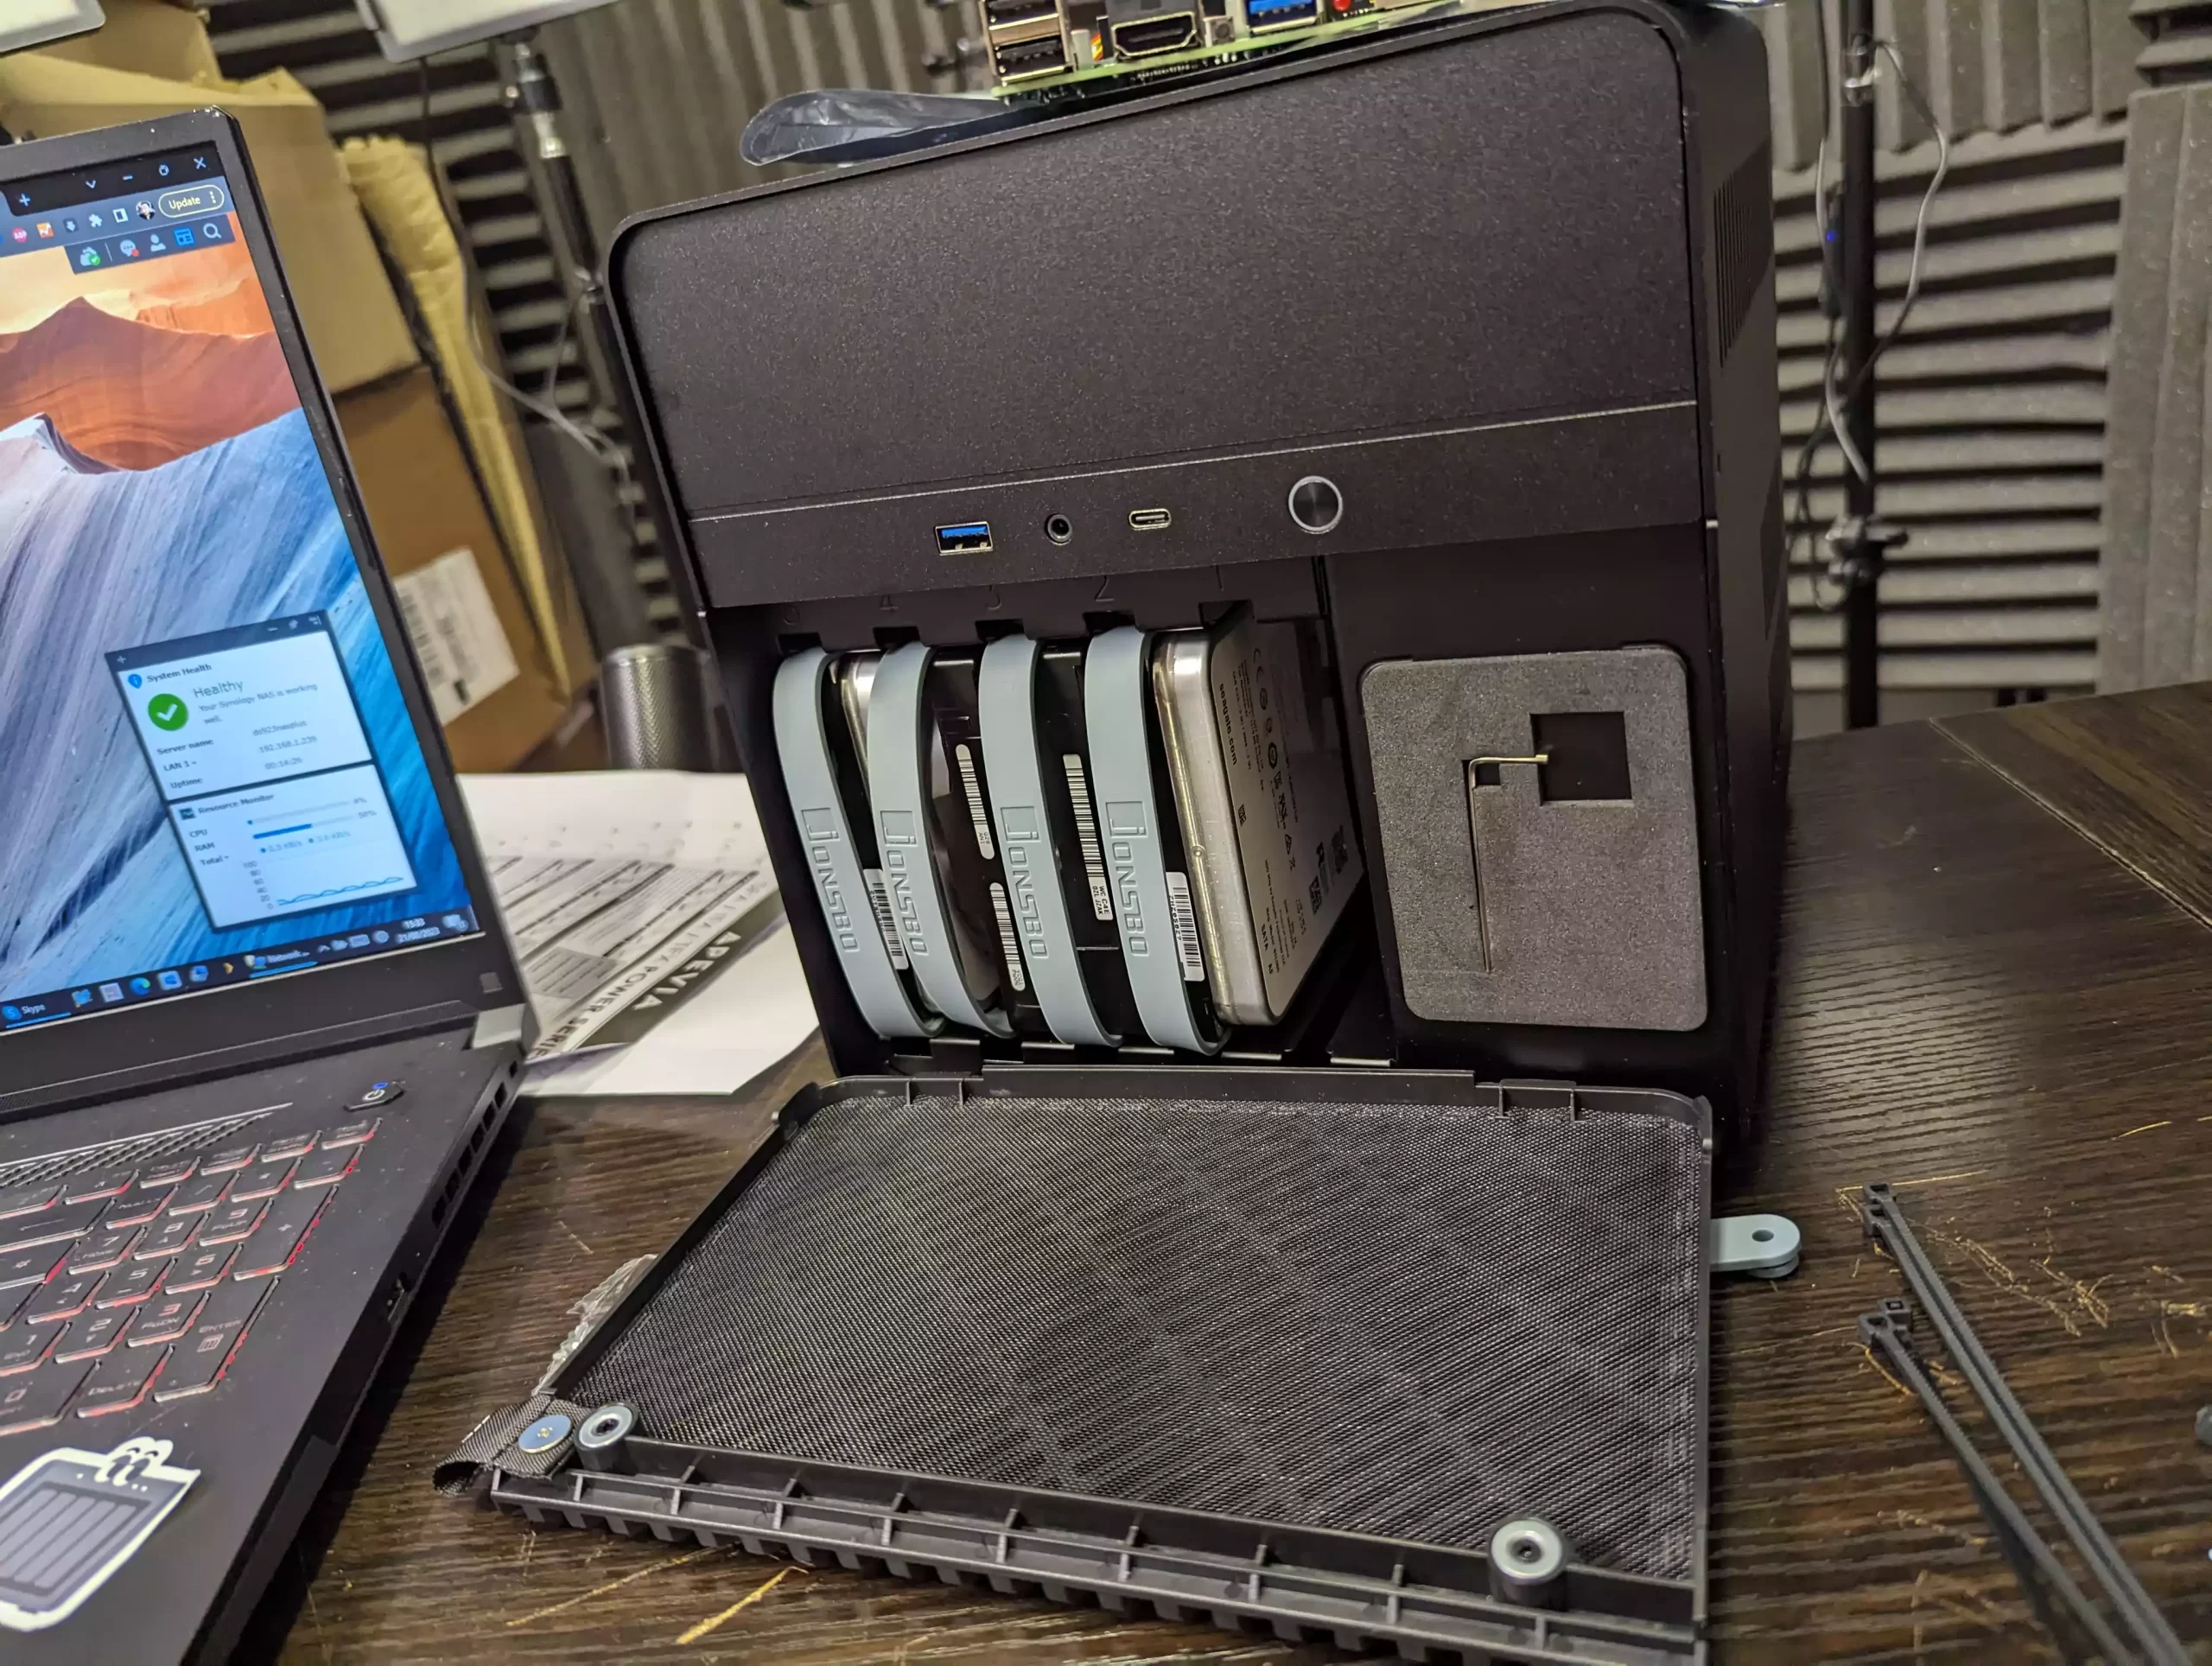
Prepare your storage media for installation. Unlike many cases, the Jonsbo N2 doesn’t have individual hard drive trays. Instead, it uses a combination of screwed guide plugs and silicone handles.
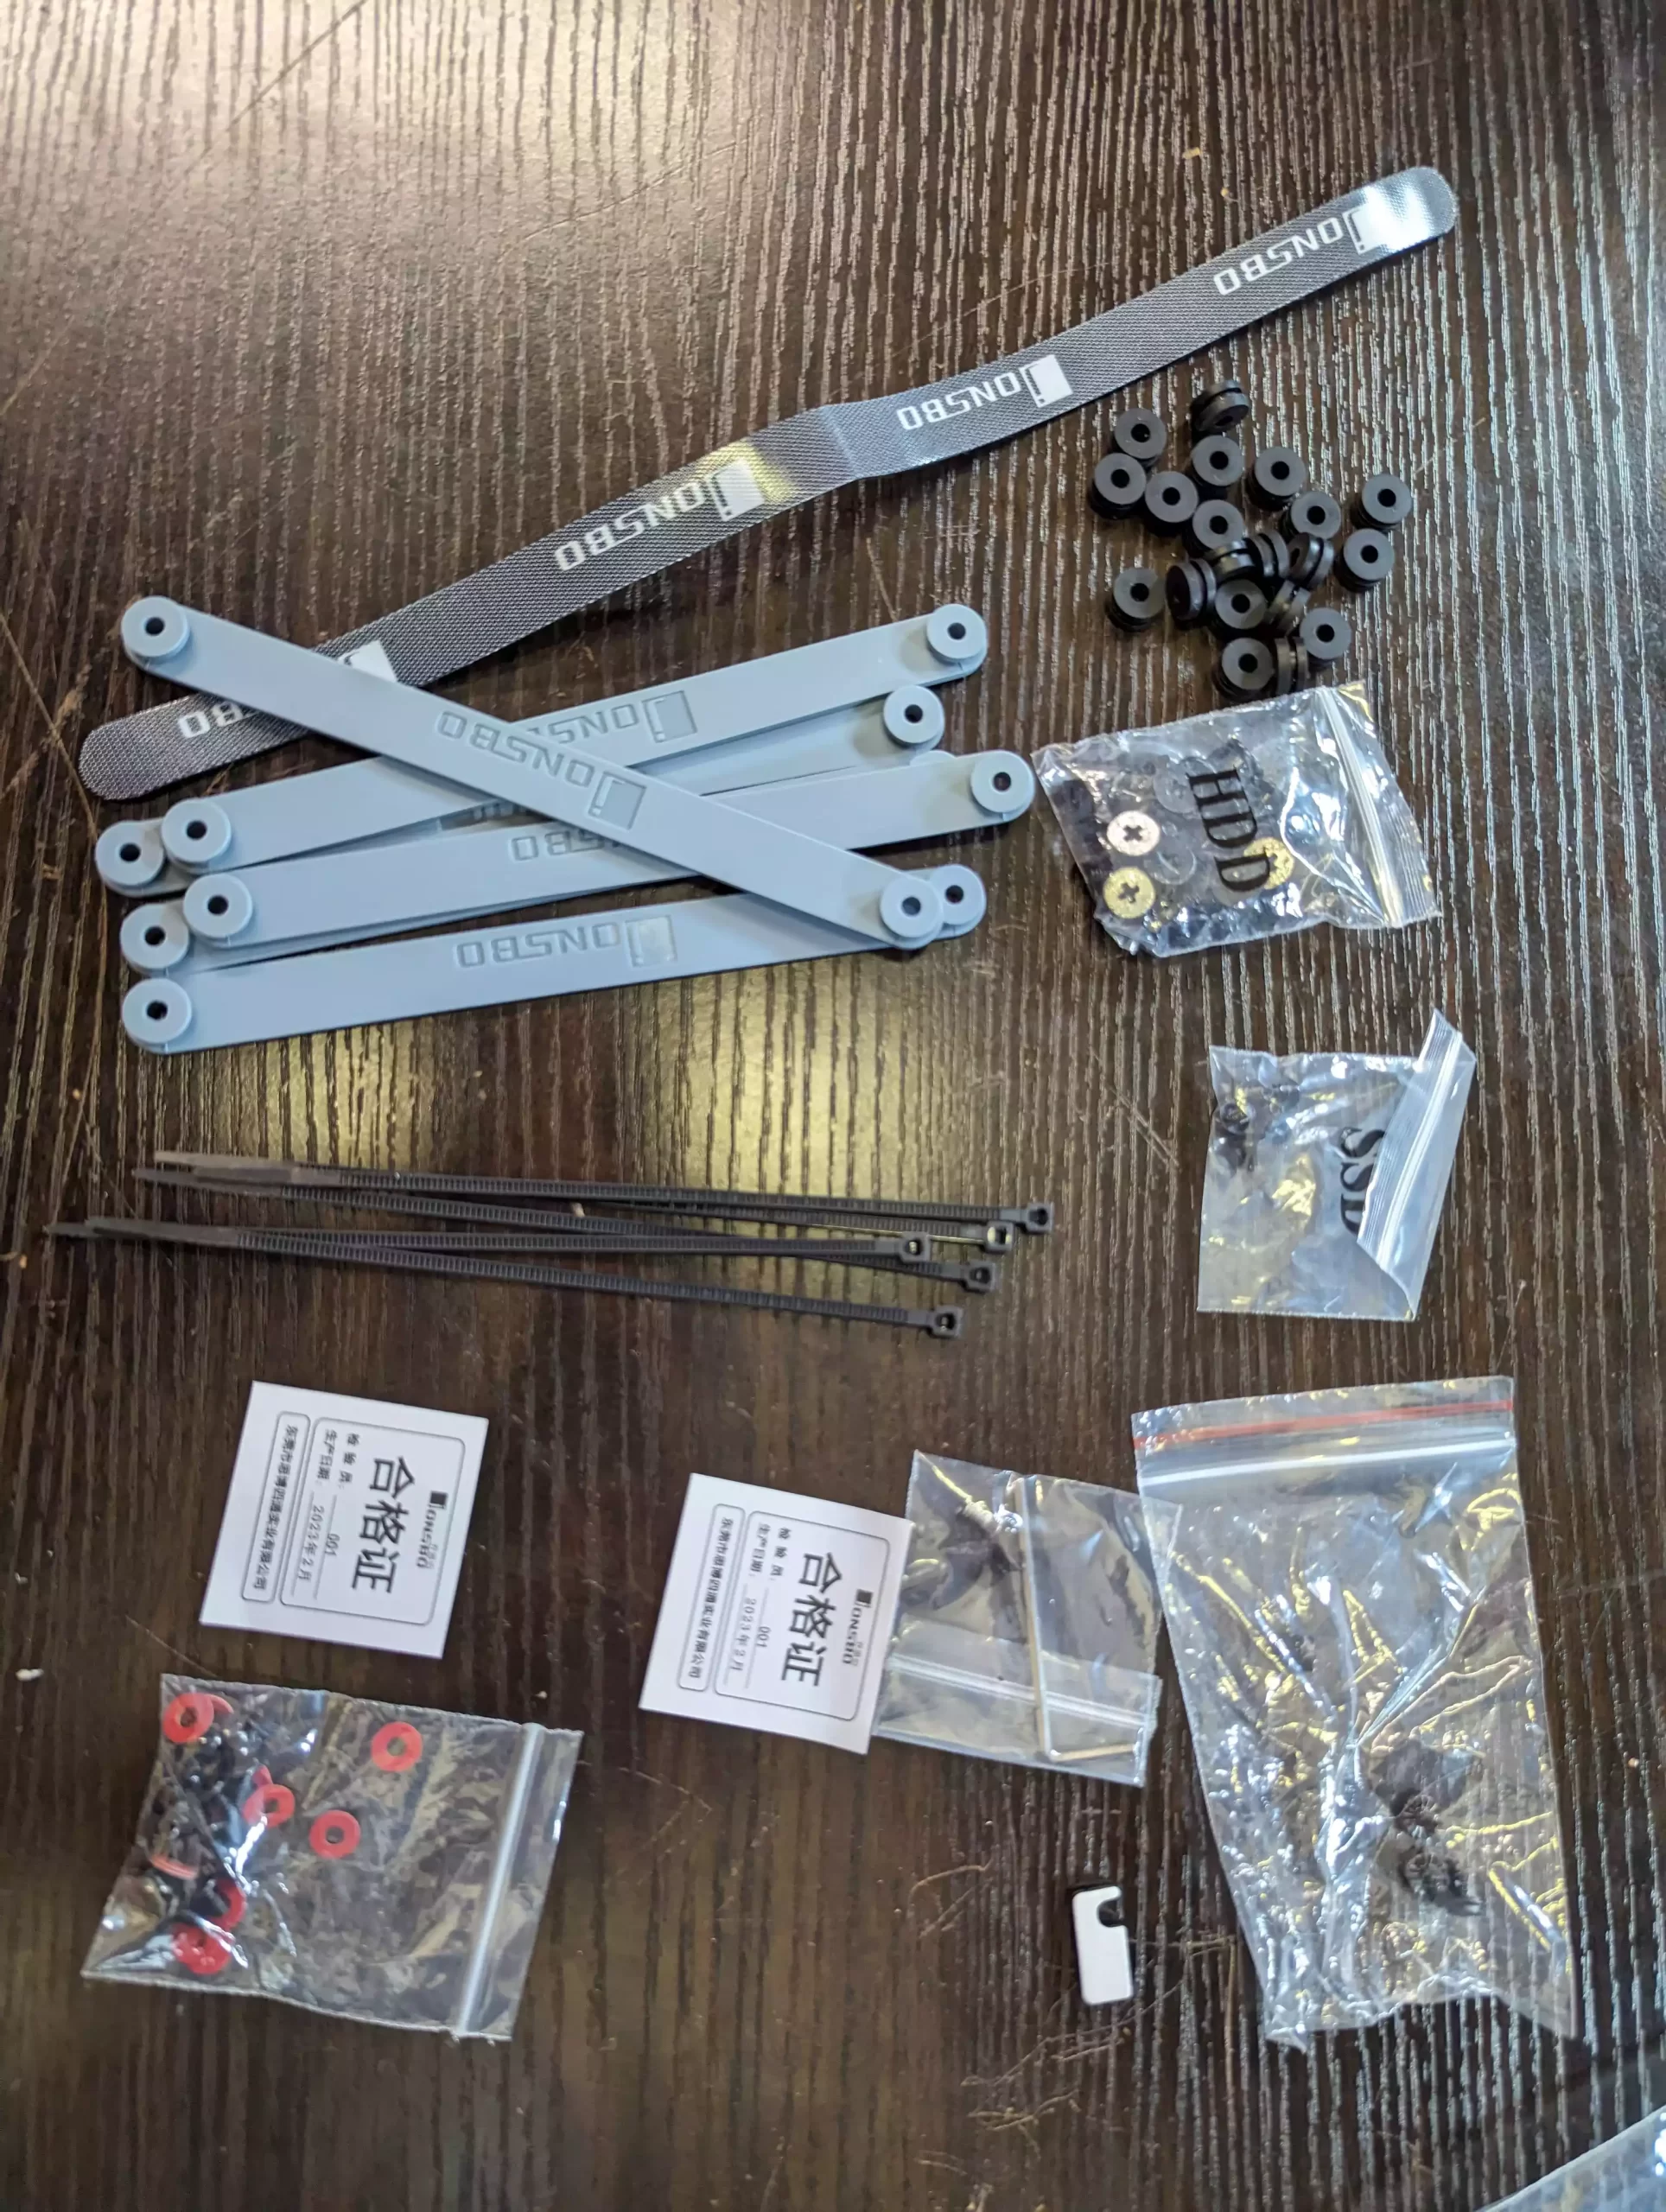
Attach the handles by screwing them into each hard drive’s base. Traditionally, the drive face is opposite the SATA connector.
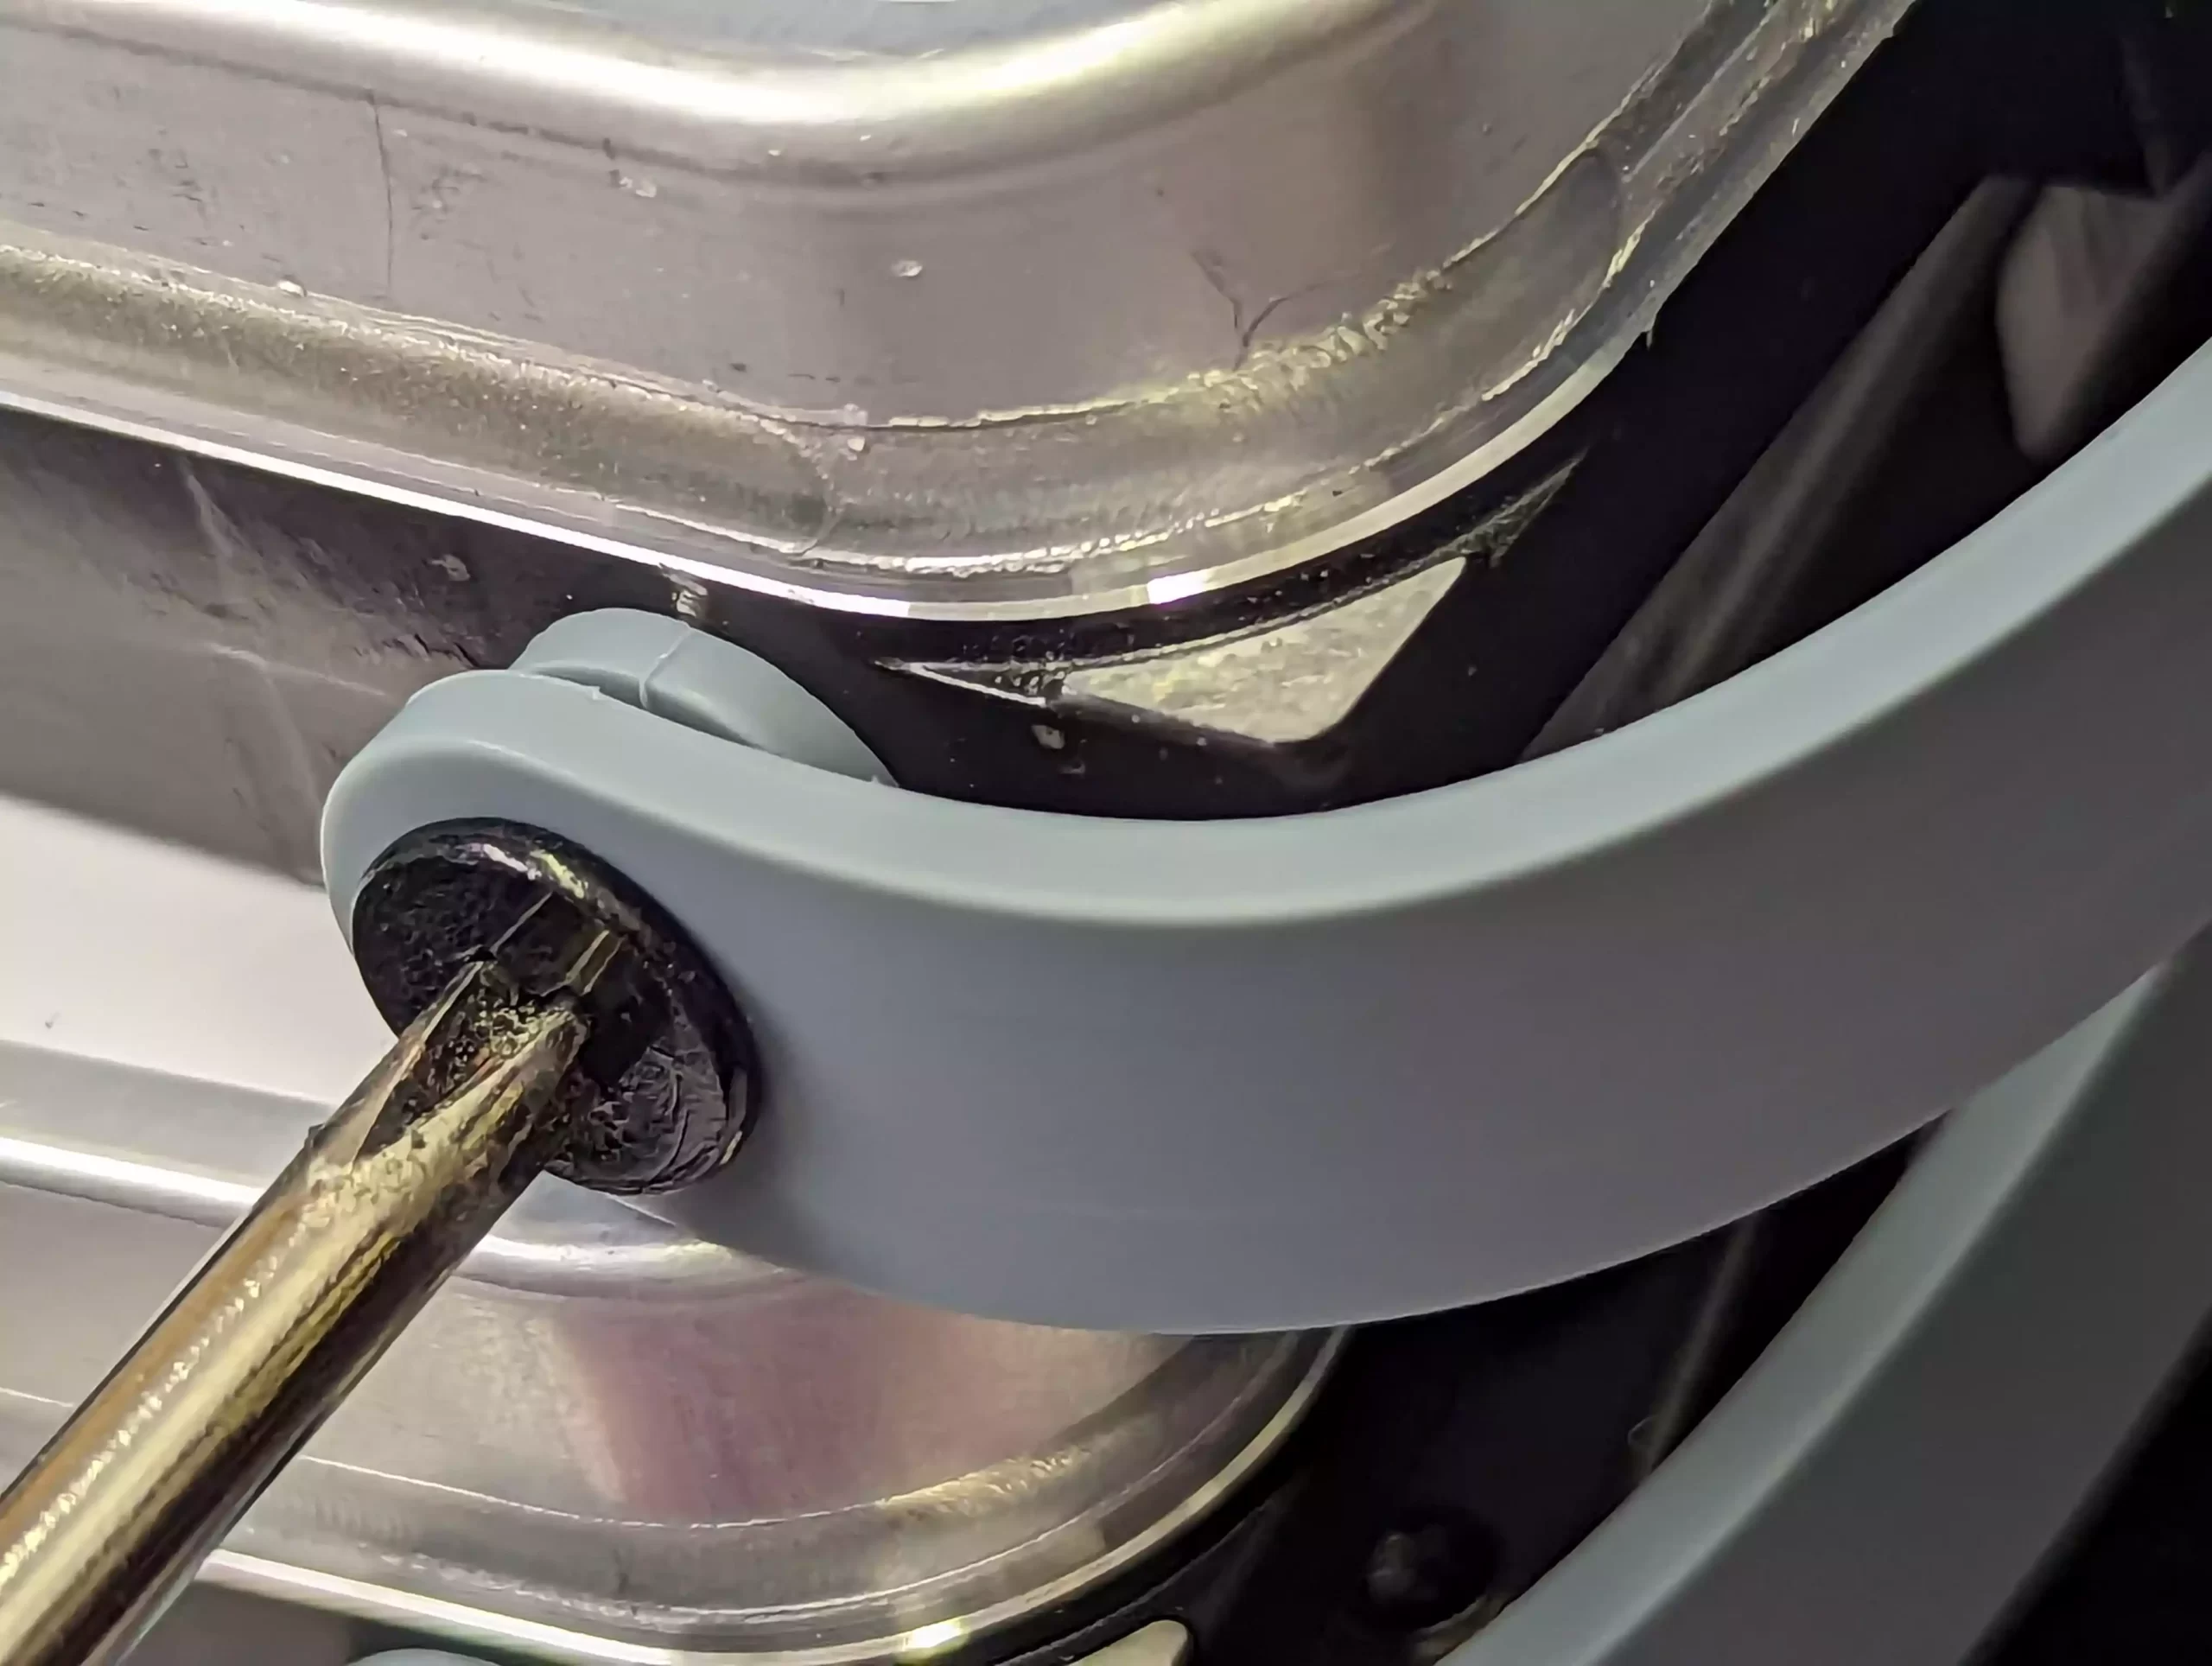
Insert four rubber thumb screws into each drive’s available screw holes. Screw each plug just enough to close its small gap. Over-tightening can misalign the drive inside the chassis.
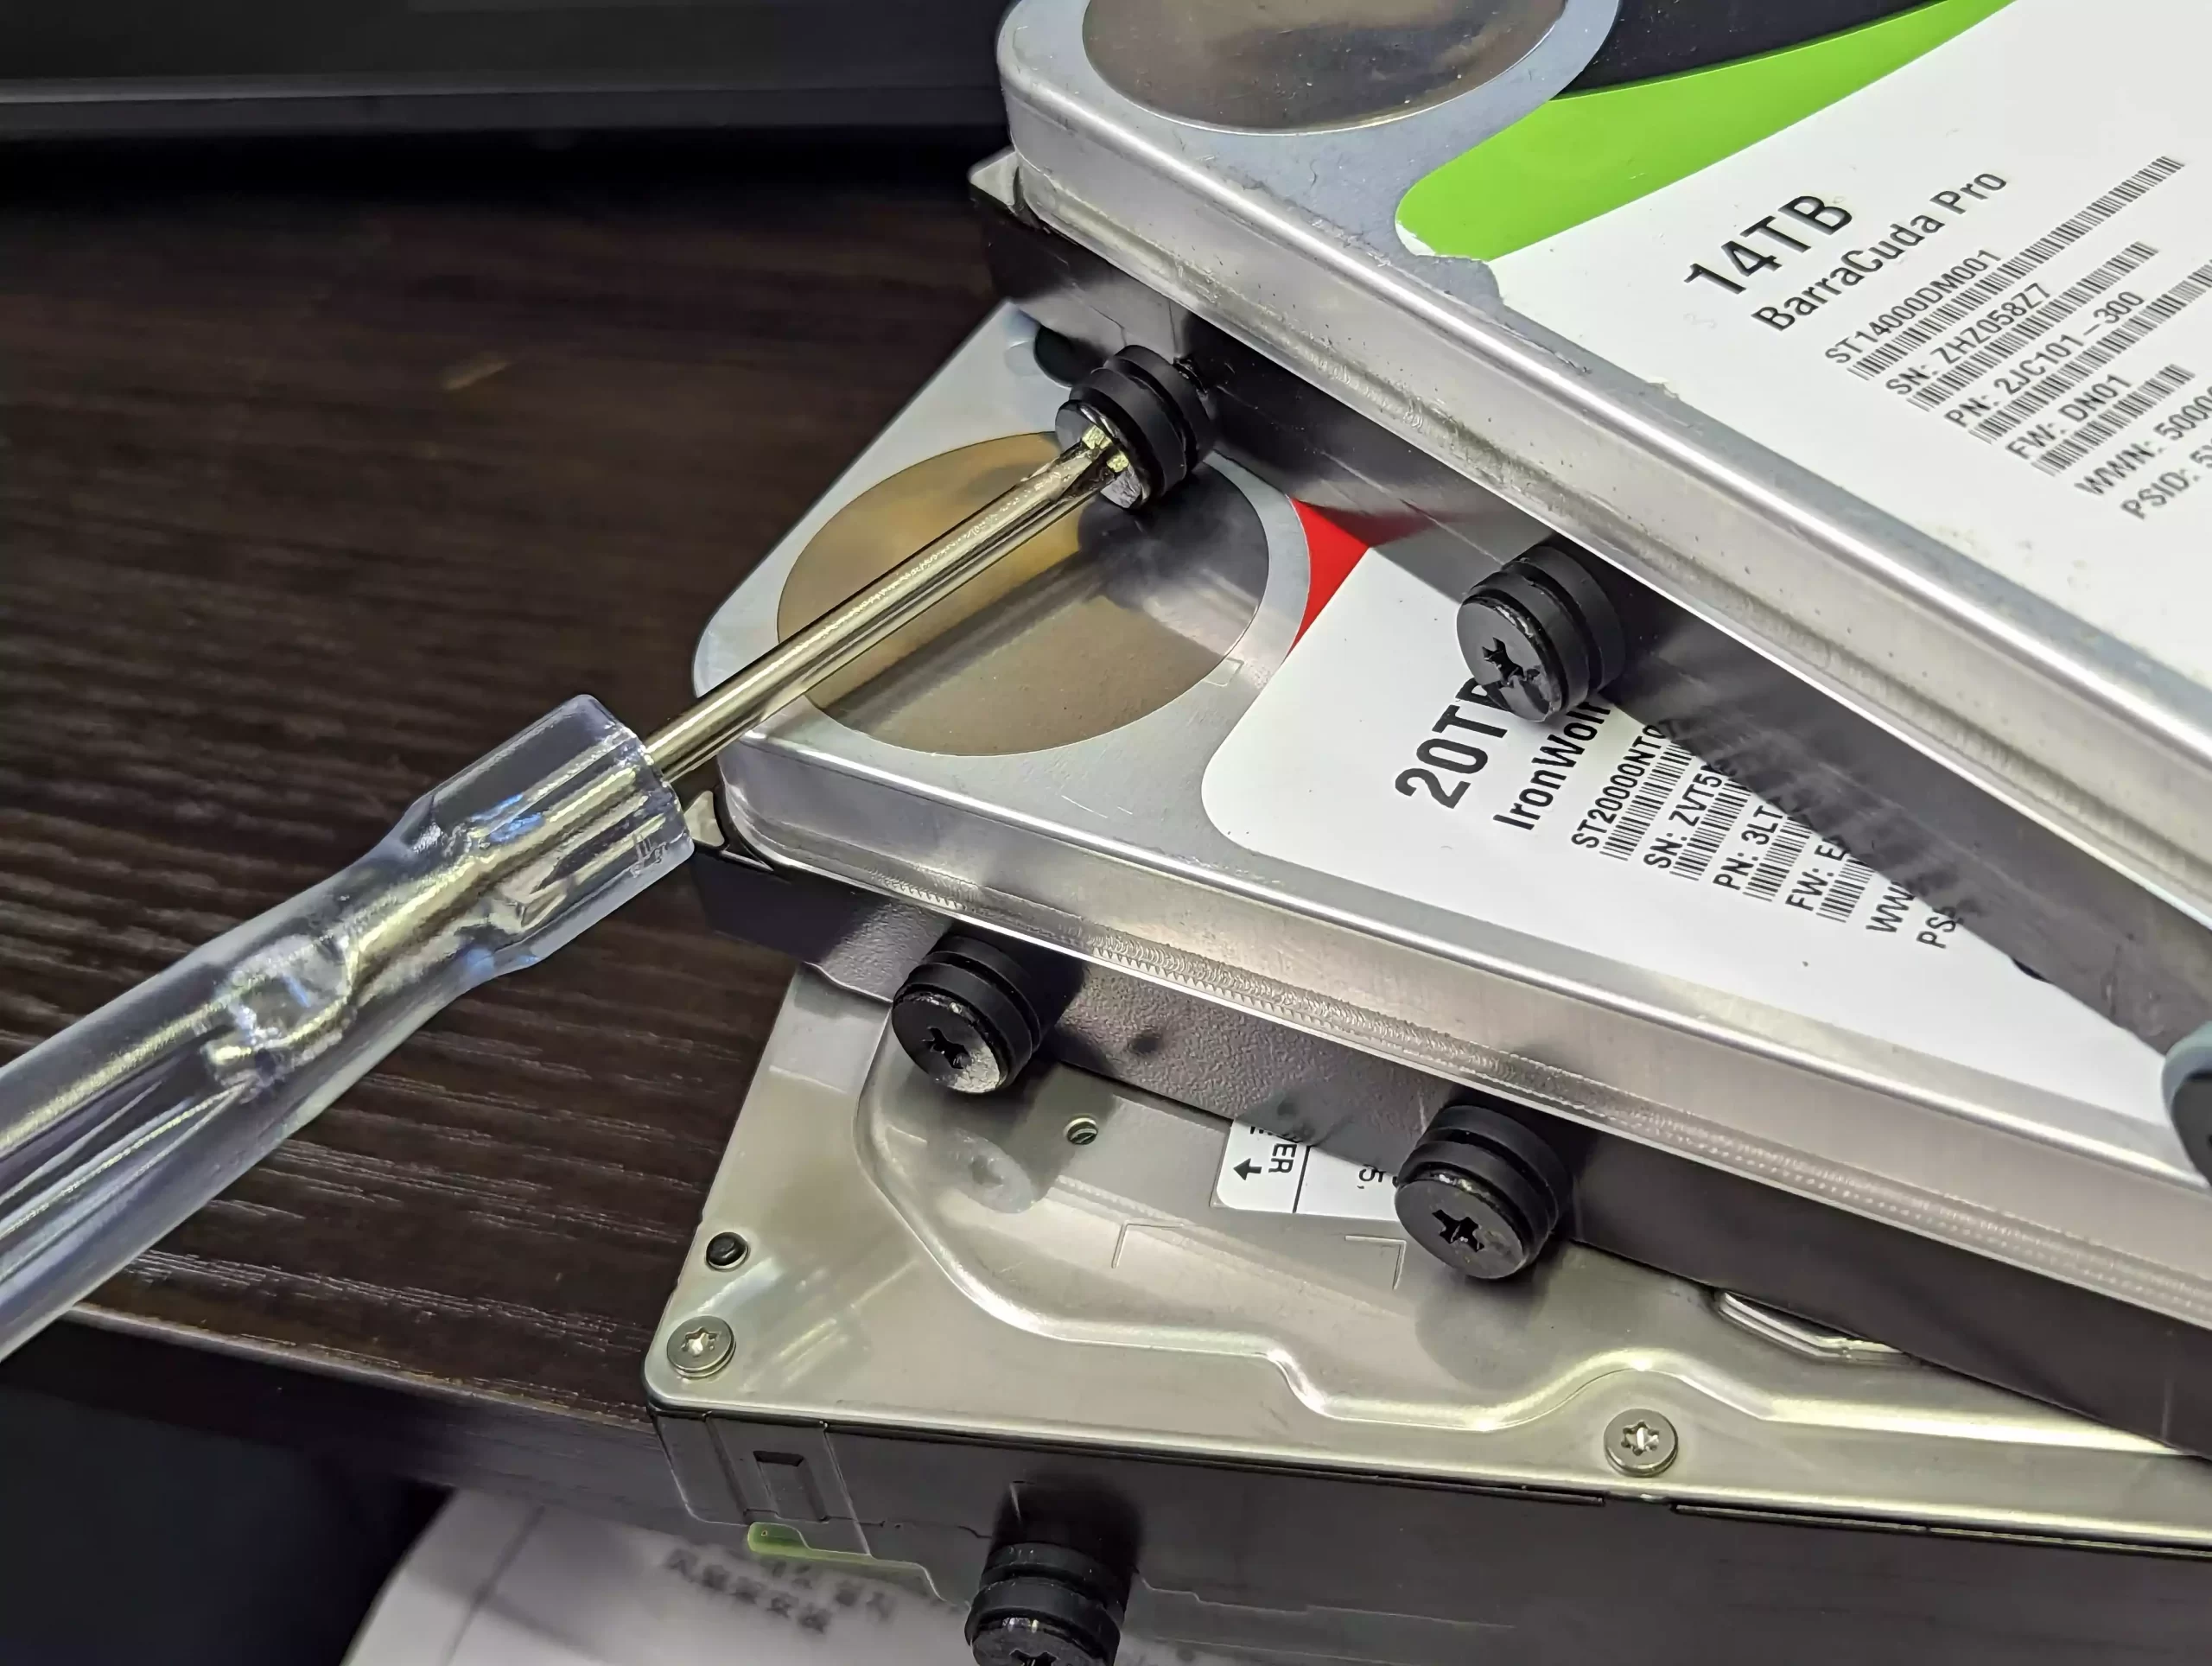
Repeat for each drive you’re installing.
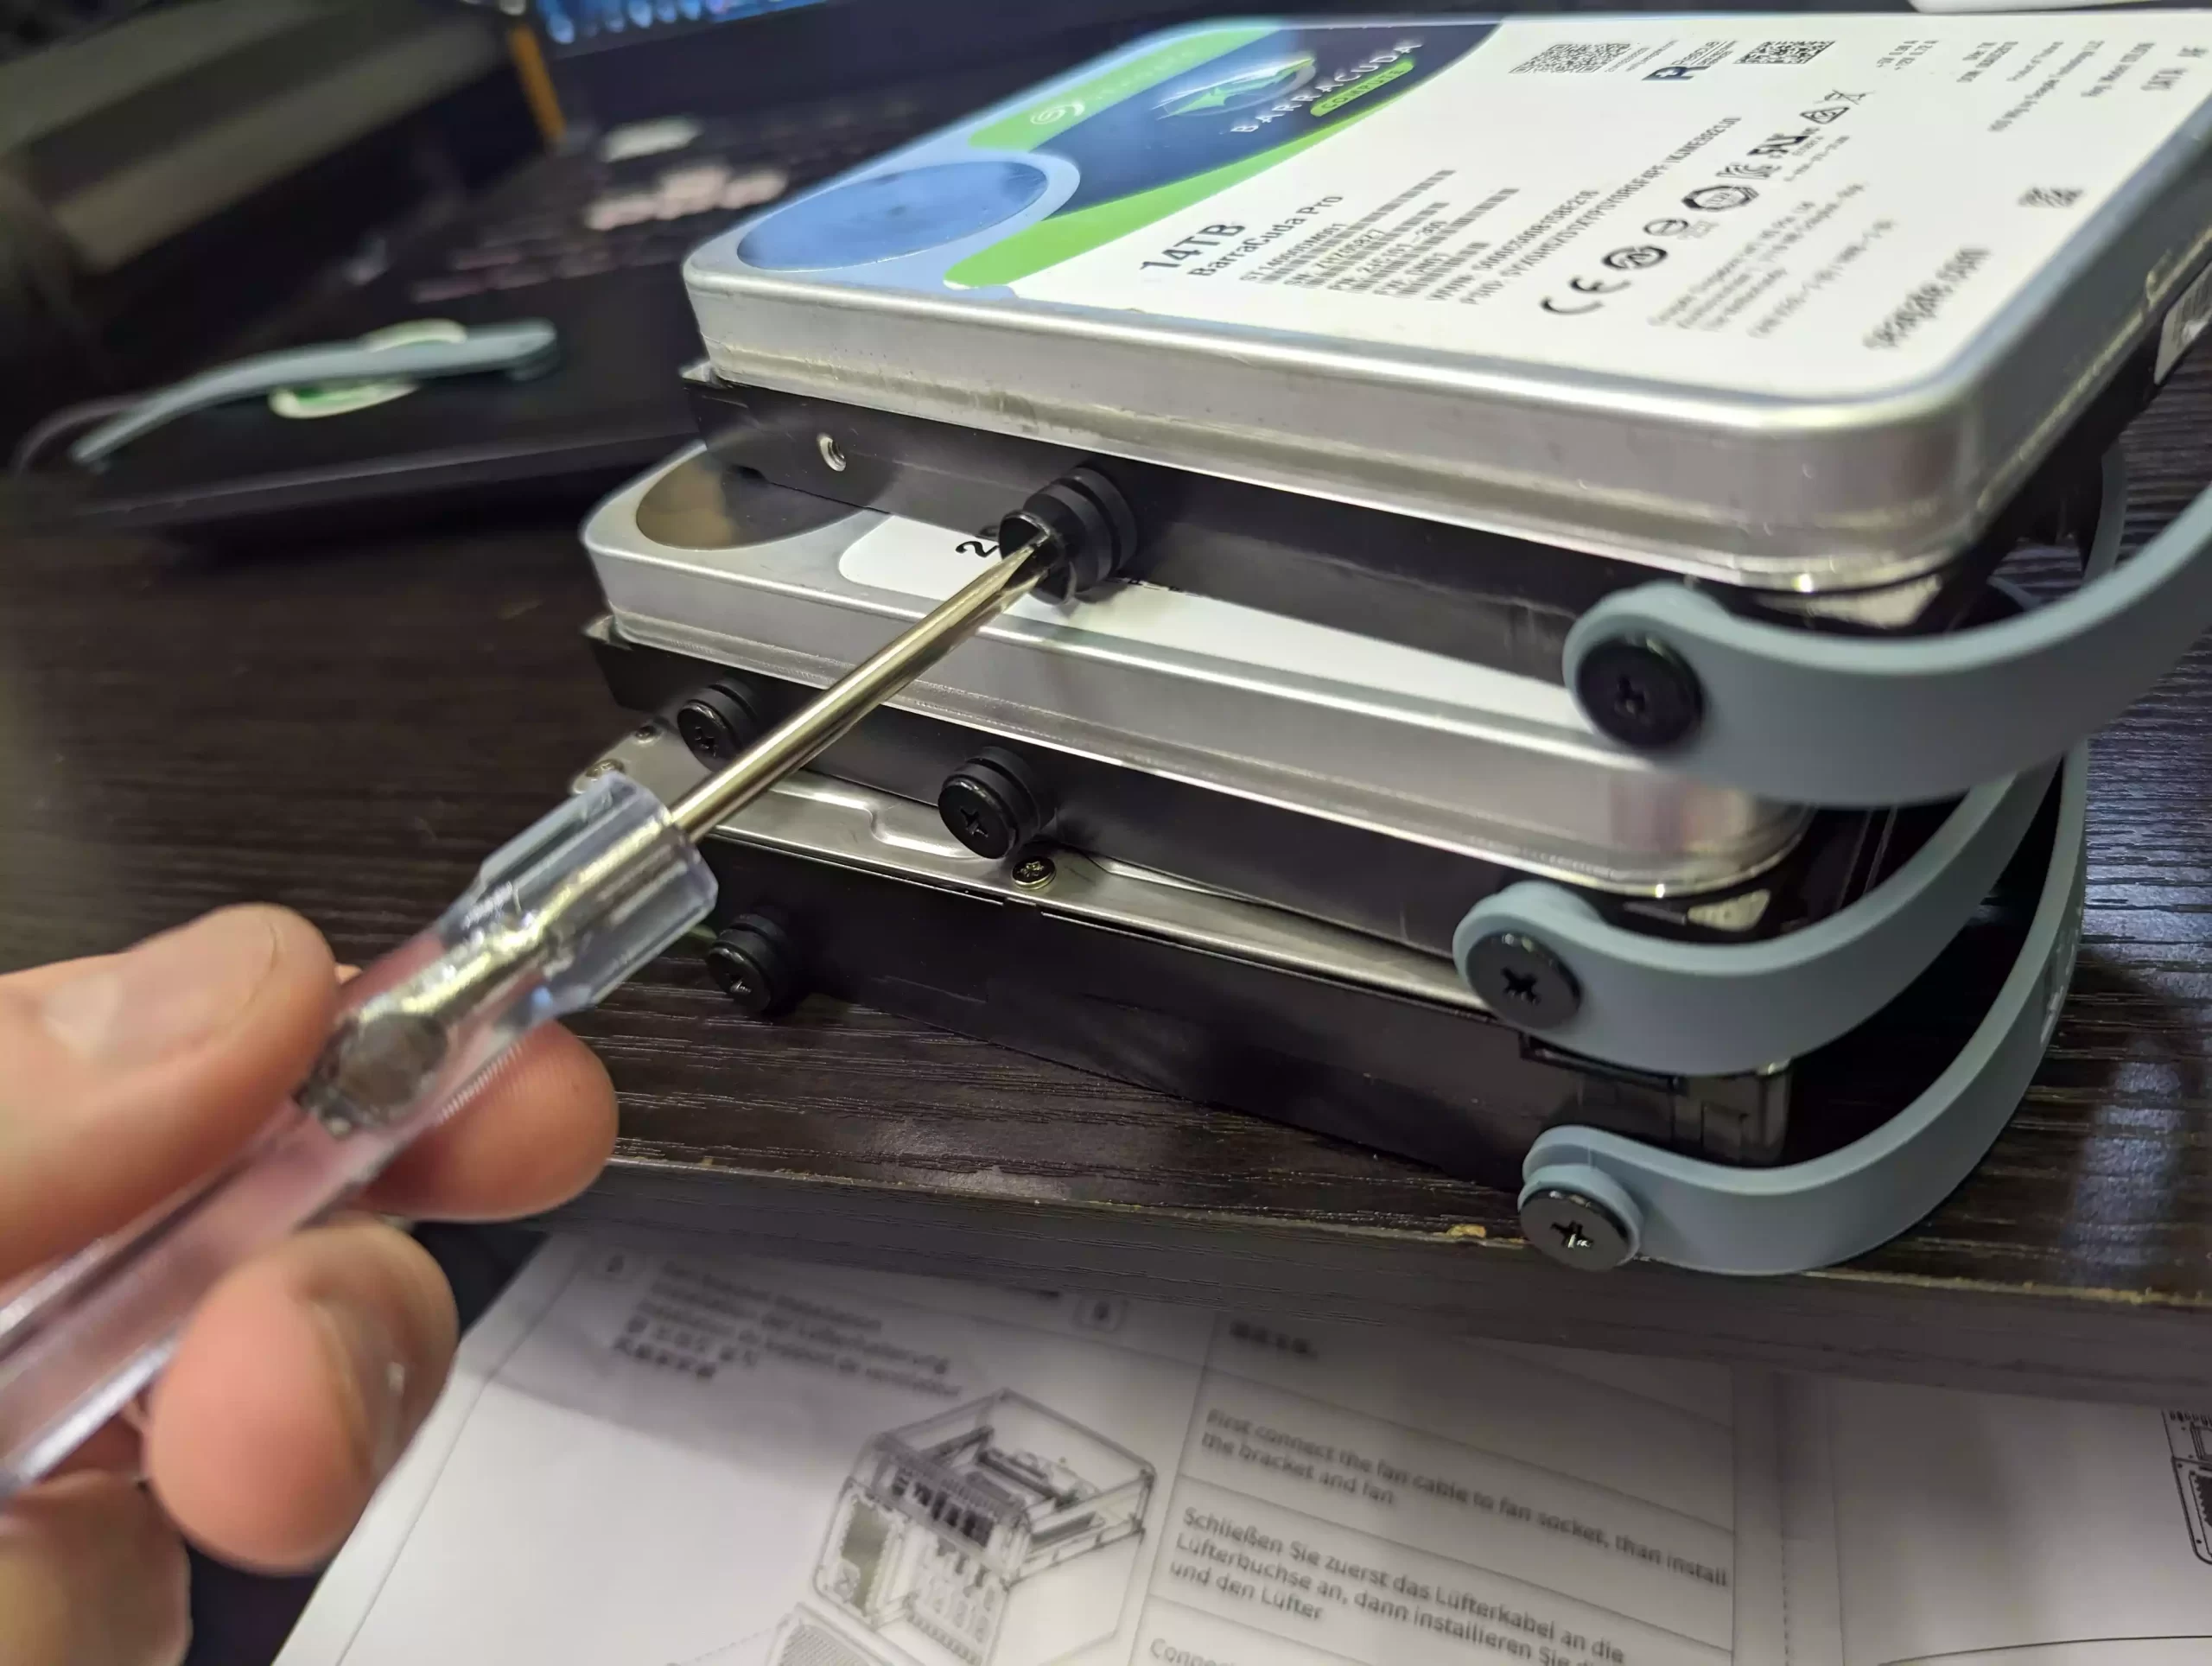
Guide each drive into the Jonsbo’s slot, ensuring the SATA connector is at the bottom. This positioning ensures the drive’s SATA connector meets the NAS board’s connector.
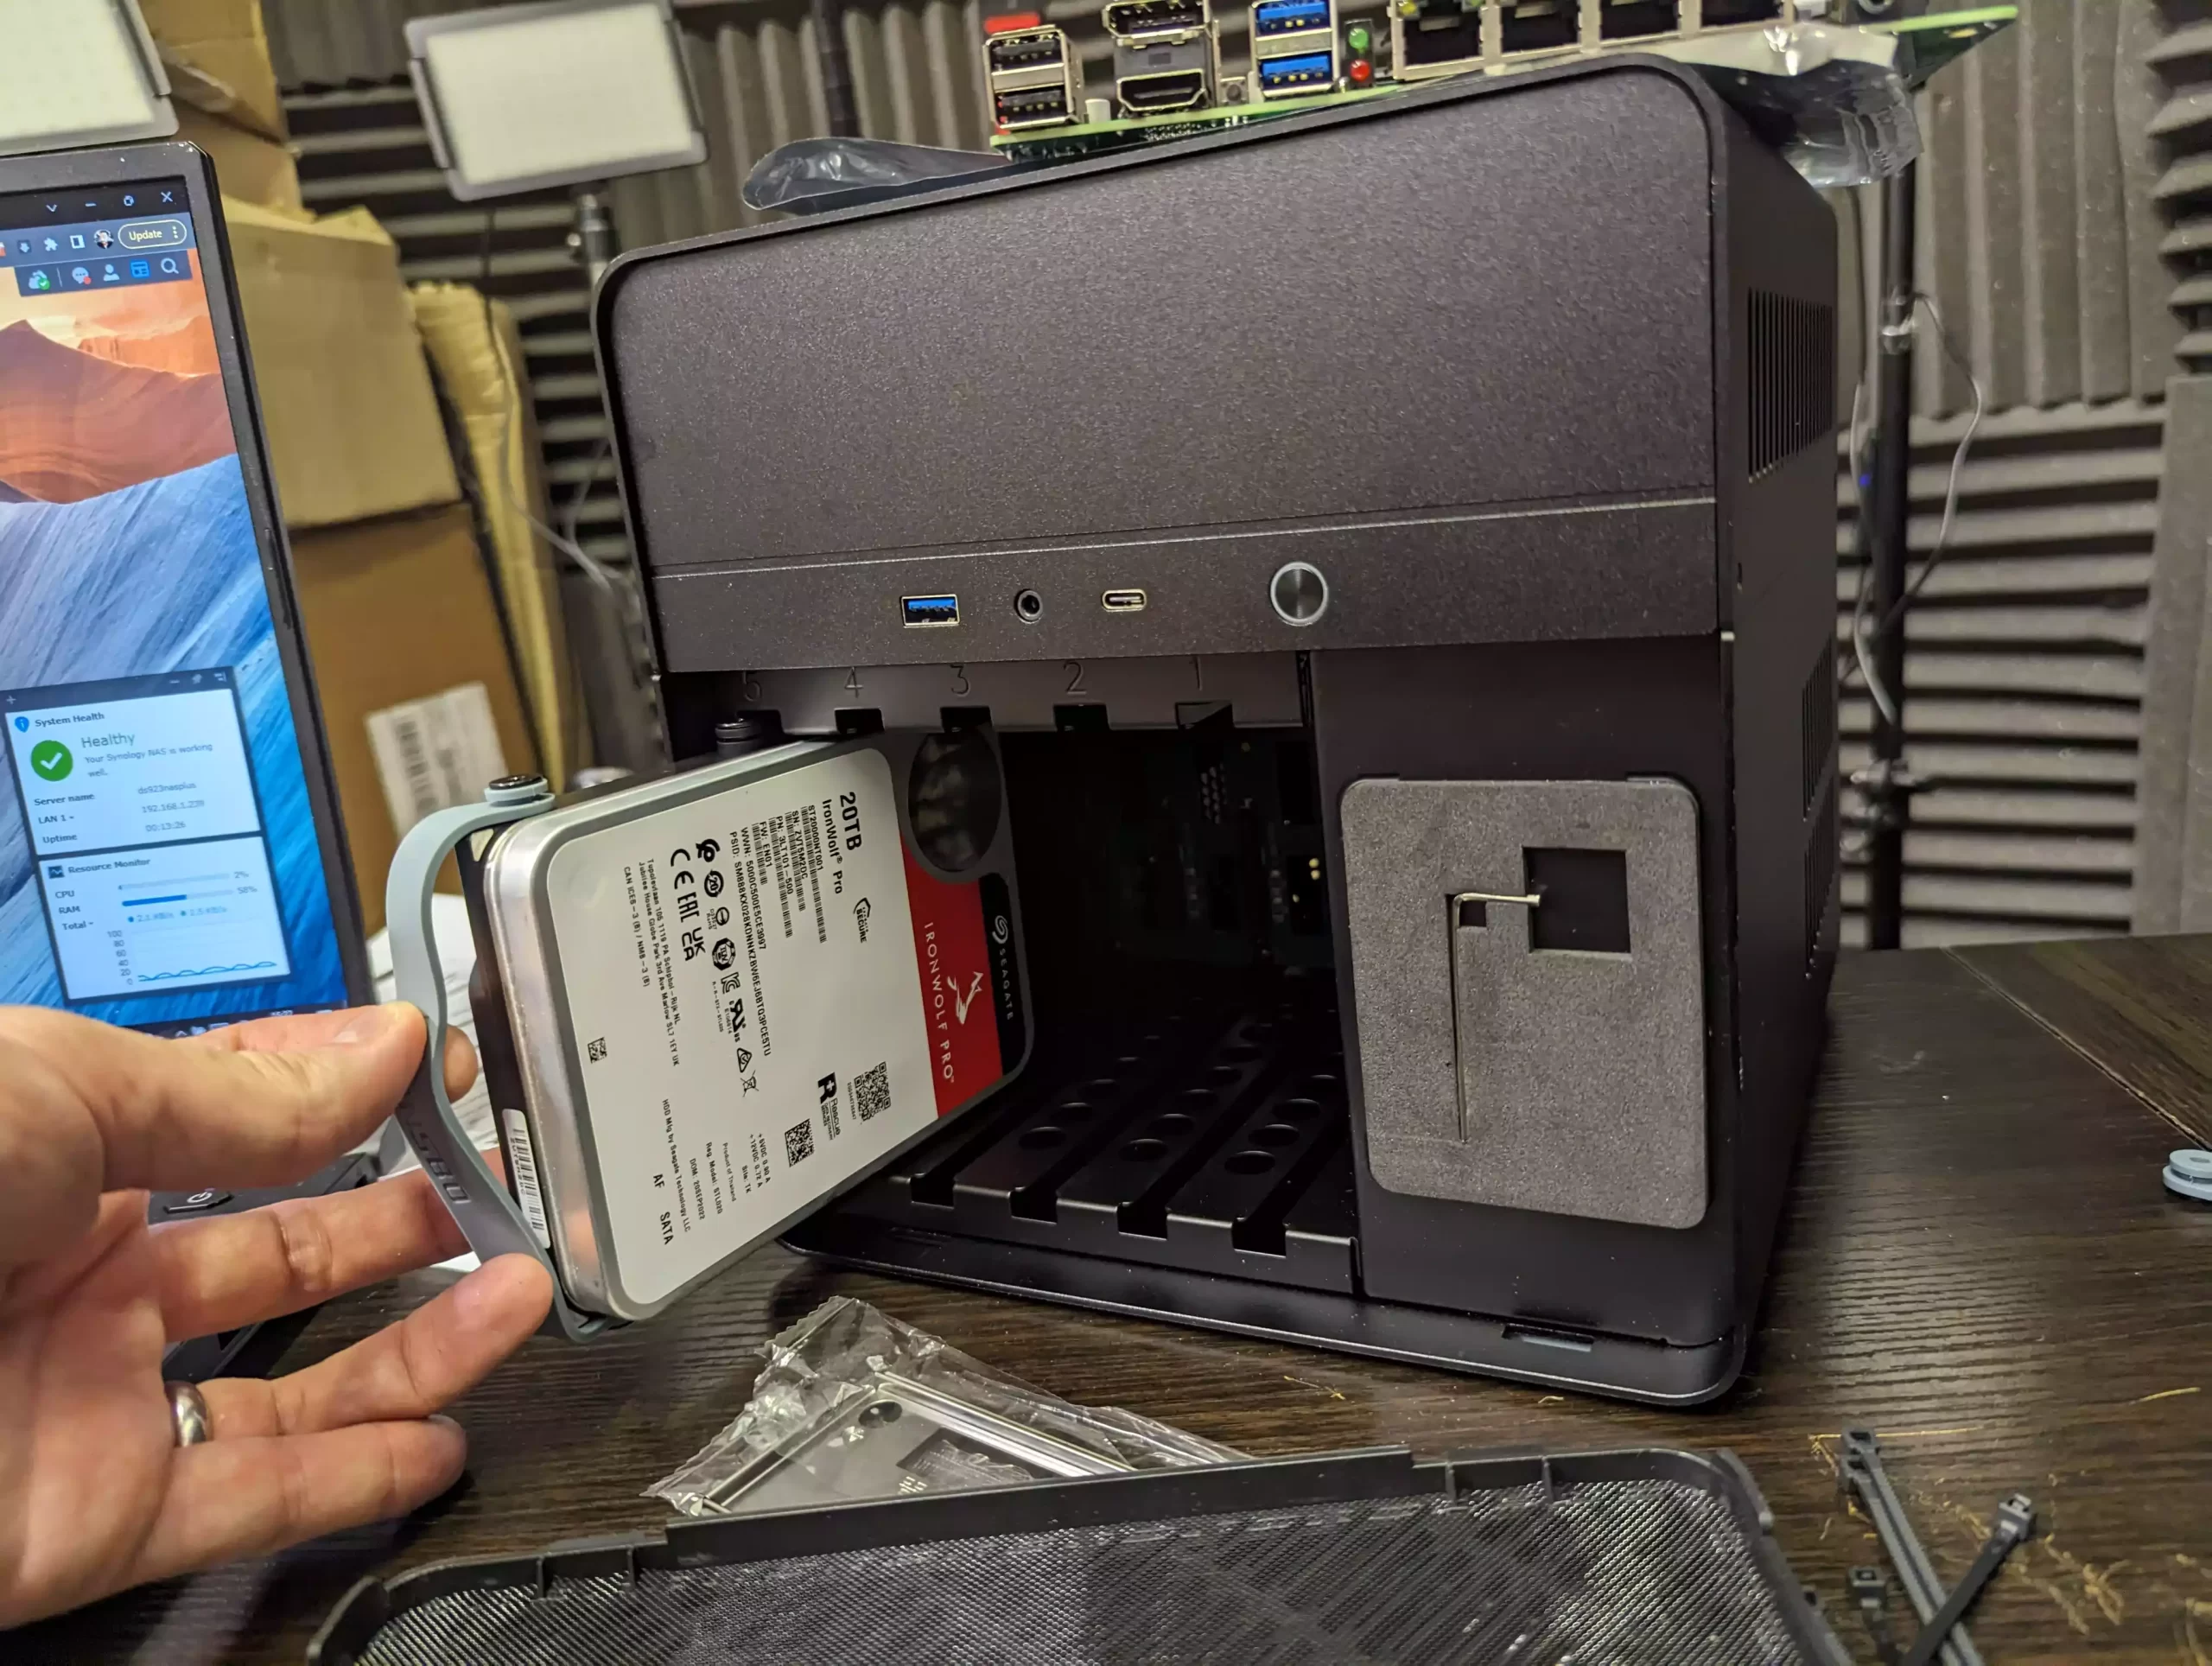
Reattach the front panel. If it doesn’t align with the rest of the N2 chassis, the drives might not be fully connected.
Your system is now boot-ready. From here, you must decide on the NAS server software for your Jonsbo N2.
UnRAID Installation on the Jonsbo N2 NAS Build Setup Walkthrough (Optional)
If you’ve chosen UnRAID as your desired software for the Jonsbo N2 NAS, the following steps will help you get started:
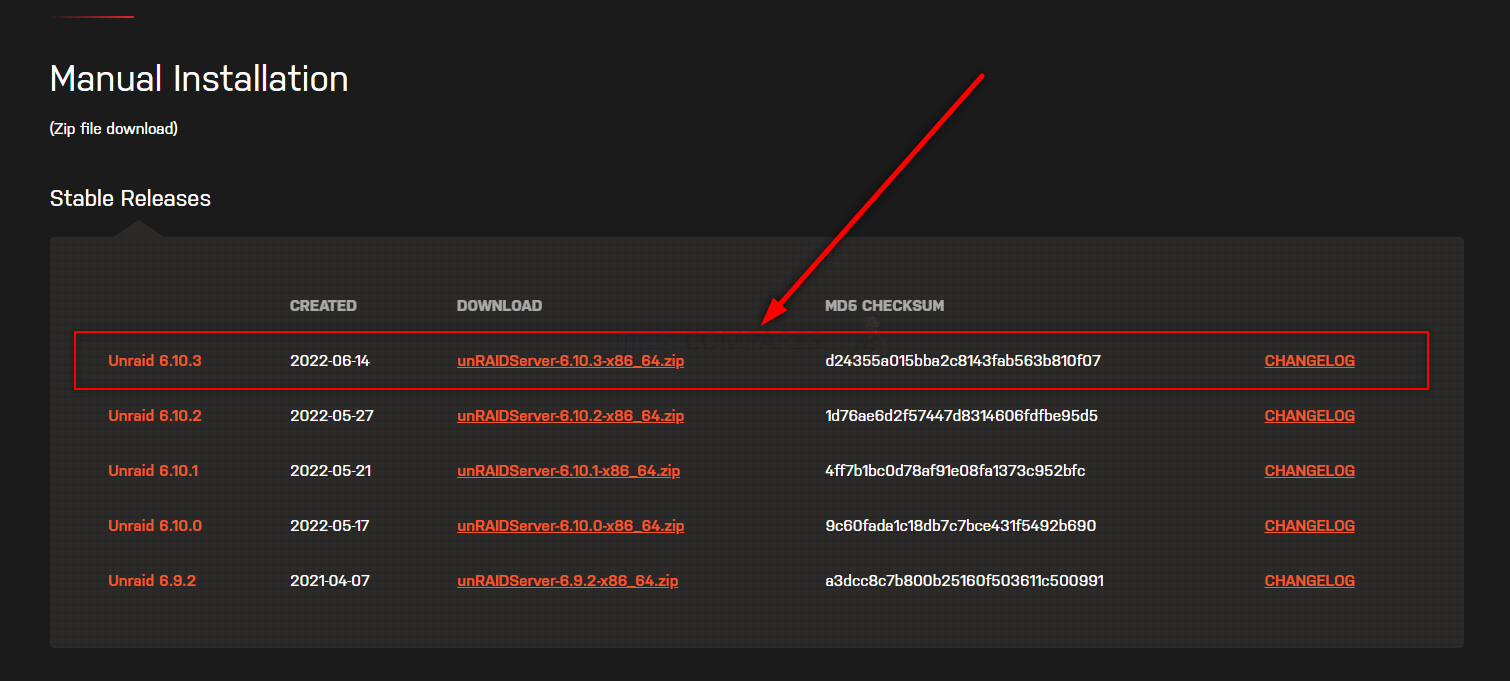
UnRAID on a Jonsbo N2 NAS – Step 1, Get the Latest Stable Release of UnRAID
Head to the UnRAID website HERE and download the latest stable release of the software to your local PC, Linux or Mac system. Make sure to remember where you downloaded it. You CAN recommend the USB creator tool and that can allow you to create a system image of the UnRAID loader, but some users have highlighted that compatibility issues with some USB sticks and capacities have been highlighted. So, that is why I recommend scrolling down and downloaded the latest stable release of UnRAID to your local PC/Mac system.
UnRAID on a Jonsbo N2 NAS – Step 2, Preparing the USB
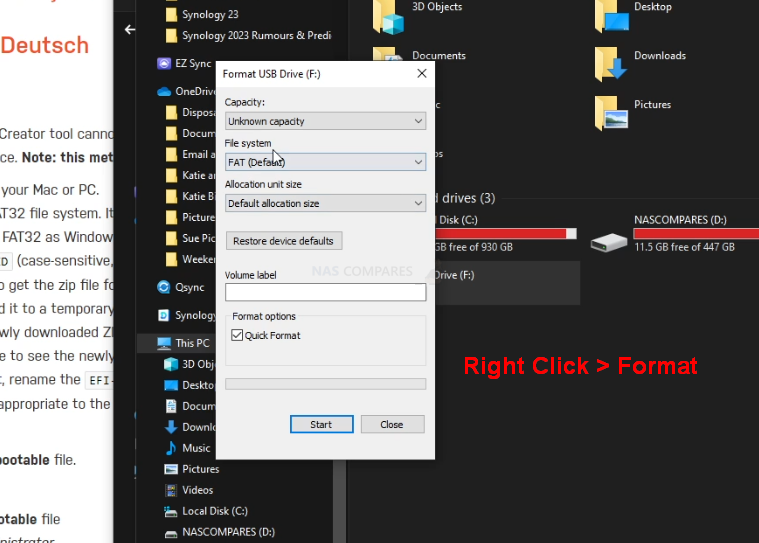
Connect the small form factor USB Drive to your system (again, this is the one I used from Sandisk) and after a few seconds, it should appear as an available USB Drive. The drive MAY need formatting (you will be prompted to do so), if that is the case, then you can format it via the system prompts and by default, it will format it to FAT32 (as long as your USB is less than 32GB). If you are not presented with a system prompt to format your USB, then you can head into My PC, or My Computer via a windows computer and right-click the drive, select ‘format’ and format it that way. IMPORTANT – Make sure in the ‘volume label’ or Drive Label field, you call the drive UNRAID (all in caps and no spacing)
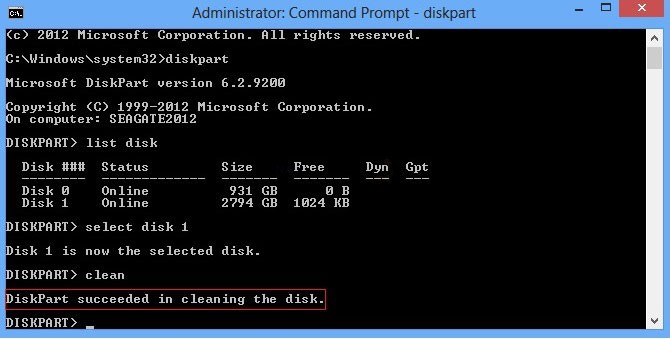
If you have used the USB for other things previously, there is a chance that the drive has existing partitions in place. For that, the quickest way to completely remove any partitions is to open up the bottom-left windows system menu as normal, and then just type diskpart and open the command-line GUI tool. From there, use the command list disk to show the available drives that are connected, you will see your USB (normally disk 1 or 2, but can differ depending on your system layout and can be spotted by the storage amount). From there, type select disk # (where # is the drive number that your USB is shown as) and then type clean, which will then remove any index structure for the drive (i.e the partitions and existing format) and then you can go back to the My Computer/My PC page and format the drive to FAT 32 as normal.
UnRAID on a Jonsbo N2 NAS – Step 4, Creating a USB Loader Image of UnRAID
Now that your USB has been prepared for the UnRAID USB setup, the next thing you need to do is move the appropriate installation files over to it. Find the .zip UnRAID Server installation you downloaded earlier on your PC/Mac system.
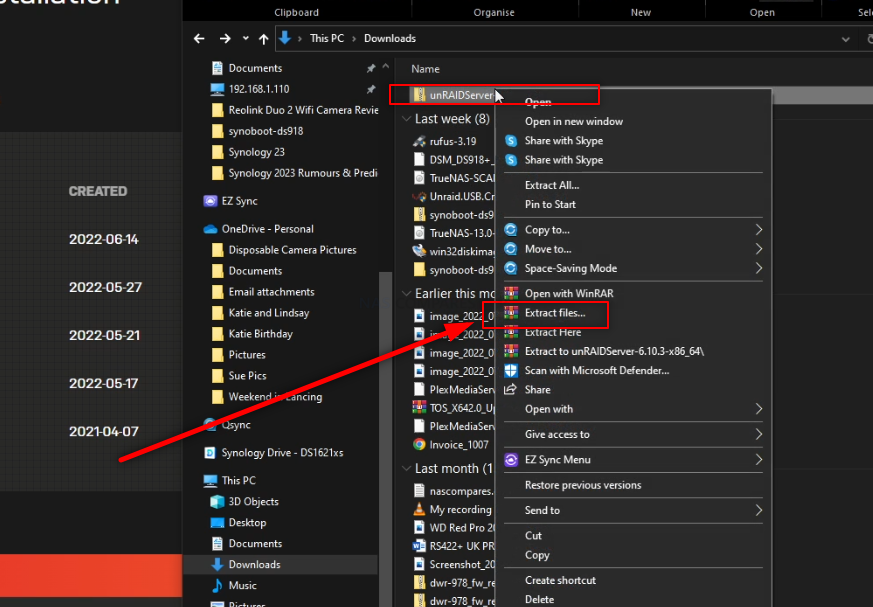
Then use the 1st party extractor tool or 3rd party tools such as WinRAR, then extract the contents of the downloaded .zip to the UNRAID USB drive (DO NOT CREATE ANY ADDITIONAL FOLDER STRUCTURE)!
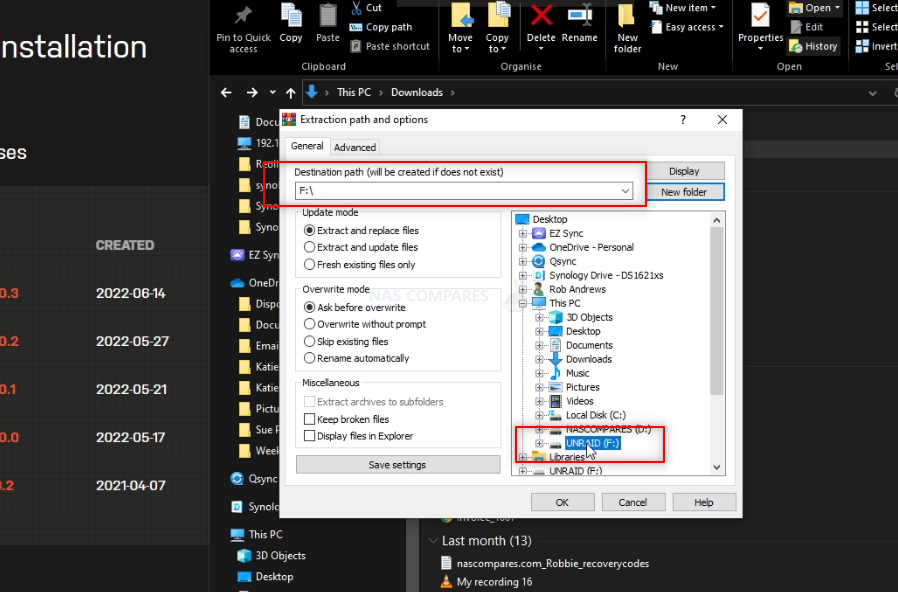
REMEMBER! This will completely format your USB drive and any files that are on that USB will be destroyed. The process upto this point will have turned the USB into a pure boot image tool – the USB will not be usable for traditional storage again unless you completely format it again.
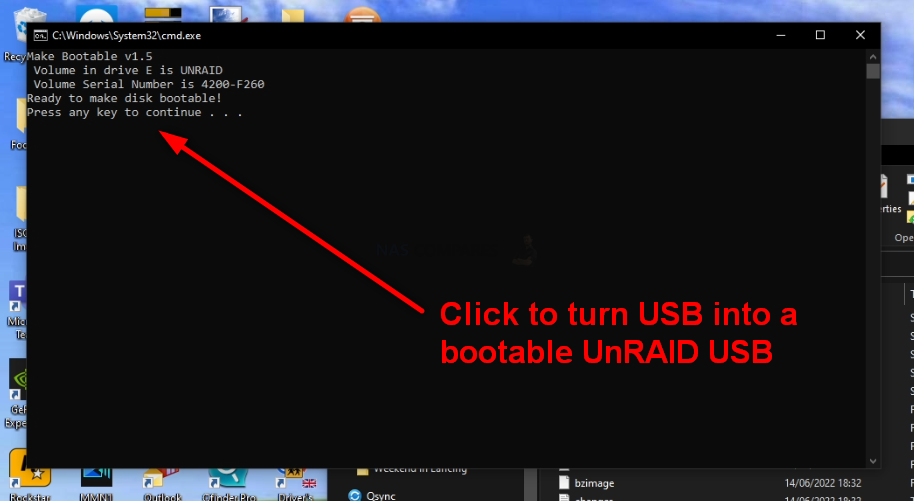
Now that you have the files extracted onto the UNRAID USB drive, you need to go into the folder structure and right-click the .bat file ‘make_bootable’, then select ‘run as Administrator’. This will open a new cmd window.
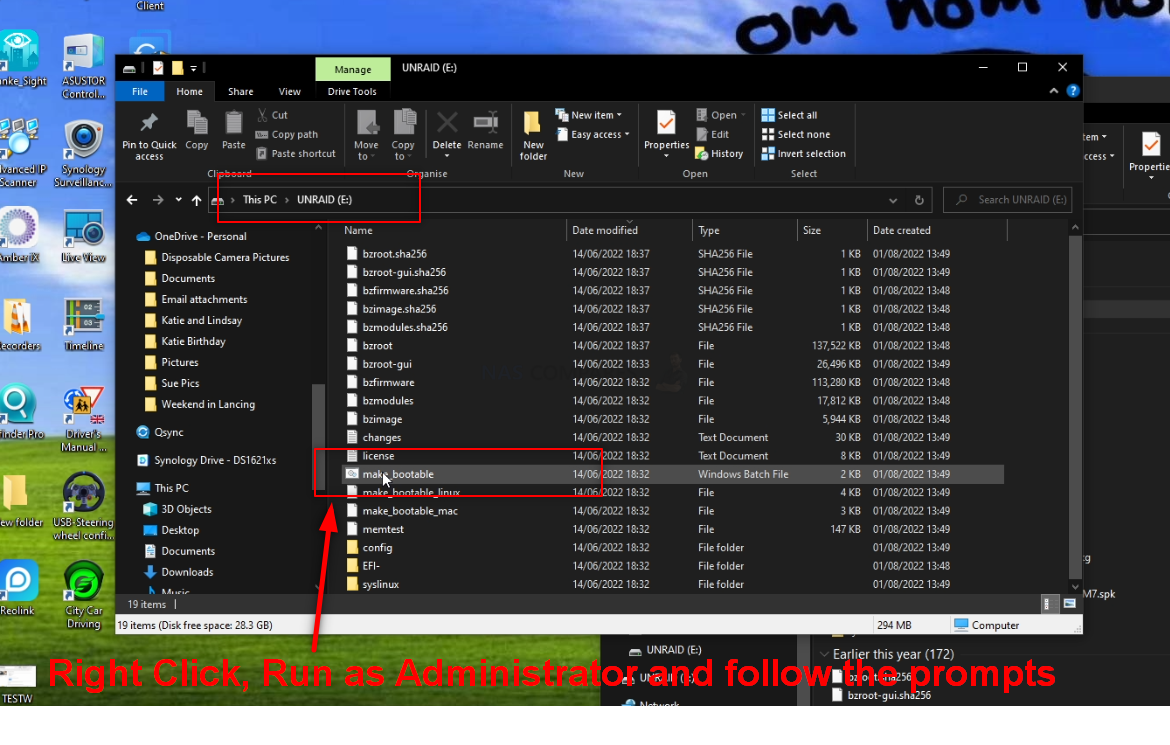
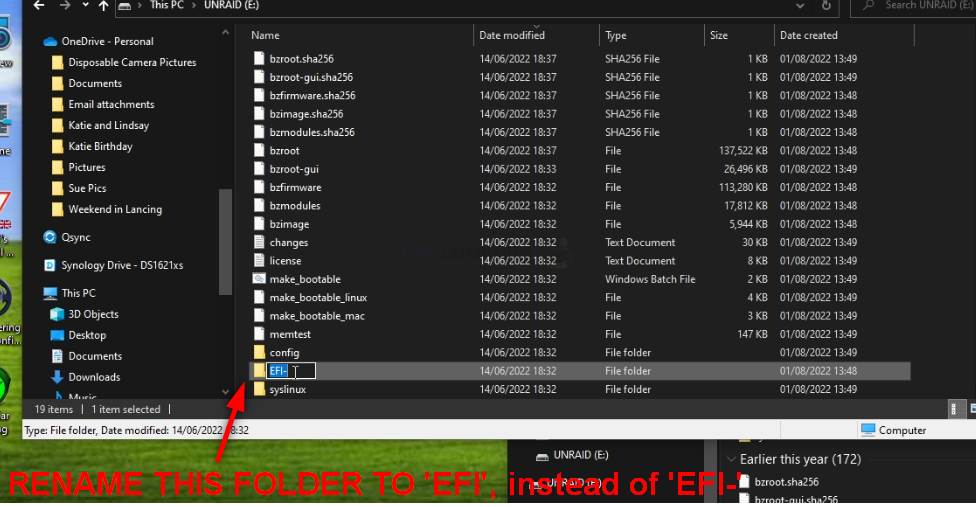
In this new CMD window, you simply need to press any button and the bootable batch file will do it’s thing in less than a second. Press any button again to exit the CMD window. Next, we need to amend a folder to ensure the drive is picked up as a bootable drive in the Jonsbo N2 mobo.
File the folder labelled ‘EFI-‘ and then rename it ‘EFI’. That’s all, there is nothing else left to change.
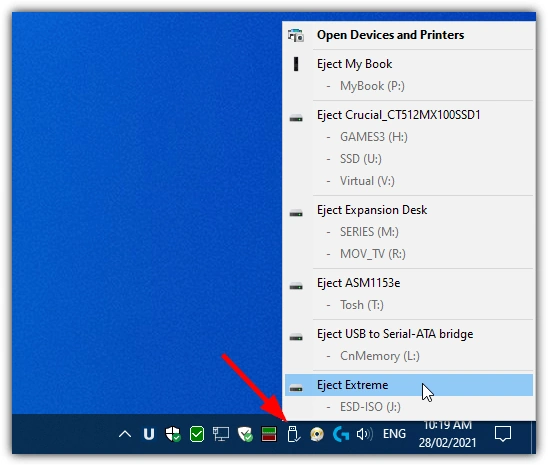
You can now safely remove the USB using the contextual system options on Windows/Mac systems and then prepare to install the USB inside the Jonsbo N2 NAS.
UnRAID on a Jonsbo N2 NAS – Step 7, Connecting the USB, Keyboard and HDMI Monitor
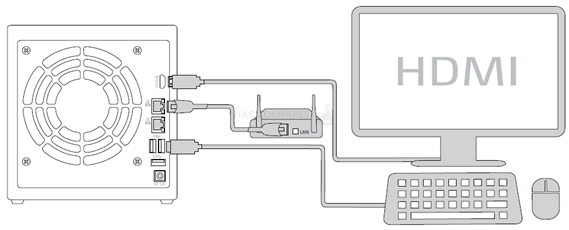
Next, we need to connect the external means to install UnRAID on the Jonsbo N2 NAS. Unlike when you set up your Jonsbo N2 NAS for the first time, UnRAID cannot typically be installed via the network. UnRAID requires you to use a KVM (keyboard, Video Mouse – though you won’t need a mouse!) and go through the installation using a low-res graphical user interface. Now you will ONLY need this setup/items for the installation and initialization of your UnRAID server and after that, you will be able to use the server over the network/internet as normal. You are going to need a basic USB Keyboard (not a Bluetooth or wireless one, as these may need drivers to run and you cannot install drivers at this point) and an HDMI Monitor/TV. You CAN use a mouse, but it is not hugely necessary and 99% of the choices in the setup of UnRAID can/will be via keyboard input. Also, I would also recommend connecting the NAS to the network during setup as this will allow the system to assume certain network values during setup that will save a tonne of time later. Once that is all connected, do NOT turn the NAS on yet – there is one small and slightly time-sensitive thing to do.
UnRAID on a Jonsbo N2 NAS – Step 8, Accessing the BIOS Menu of your Jonsbo N2 Motherboard
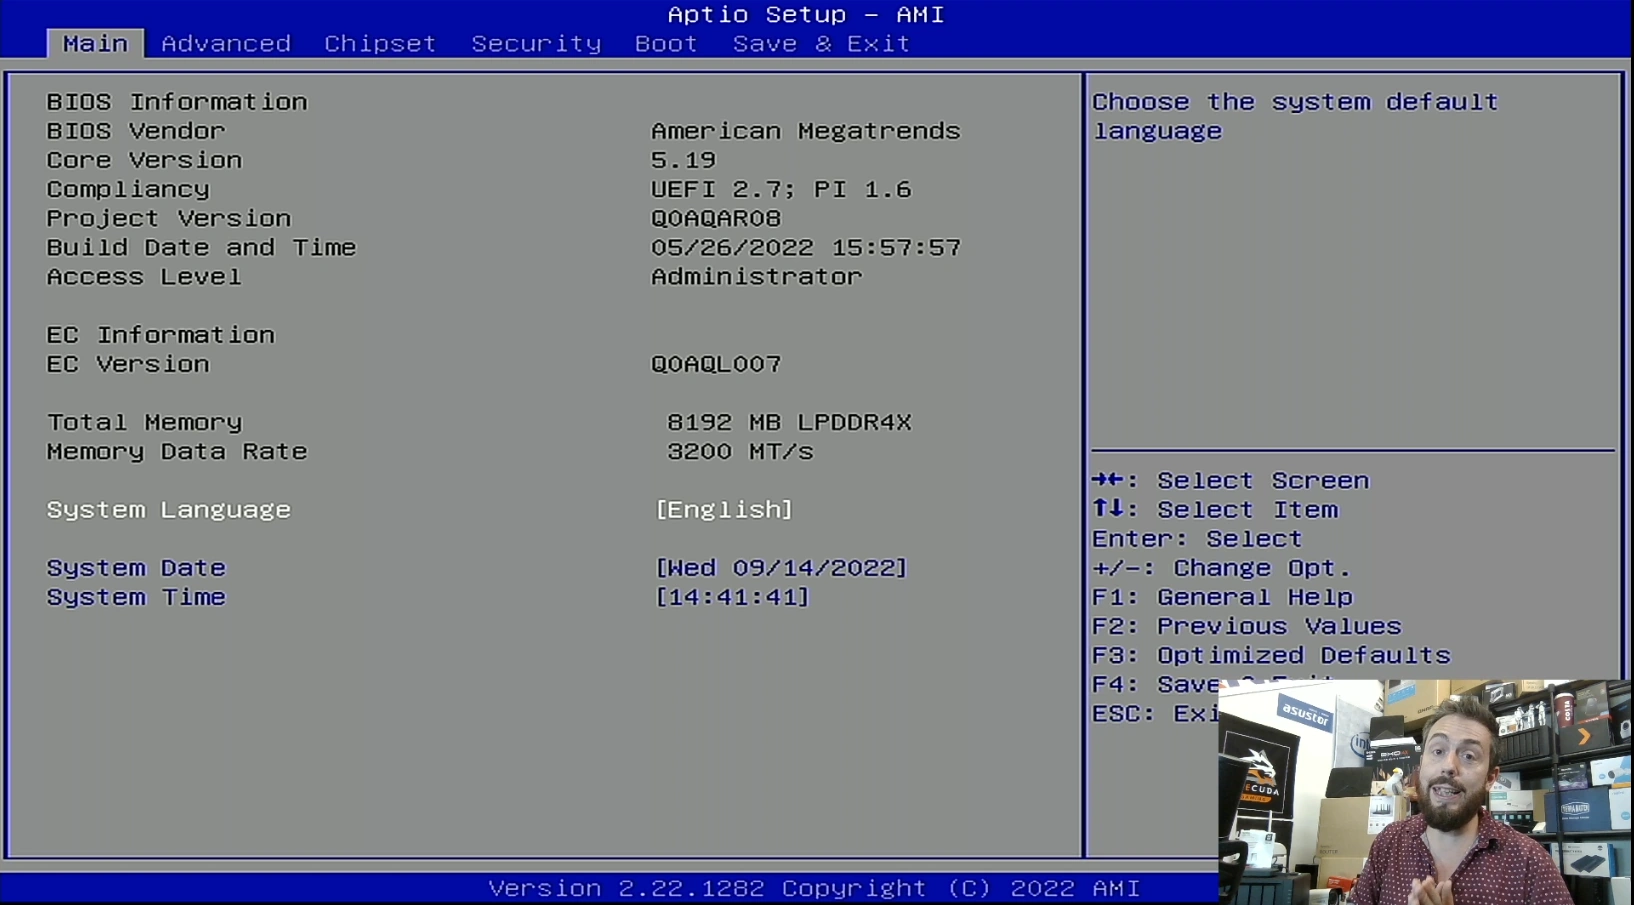
Now that your Jonsbo N2 NAS is all connected and you are ready at your keyboard/Monitor, turn the NAS on and wait till you hear a beep (should take between 5-15secs depending on the Jonsbo N2 NAS). As soon as your hear that noise (and likely see a flashing character or underscore on the monitor screen), you need to continuously hit the ESC / F12 / F2 and/or DEL keys (not at the same time, just back and forth). One of these will result in the system displaying the blue BIOS menu (it changes between motherboards and Jonsbo N2 uses a mixture of mobos in their Intel and AMD-powered systems). You need to be quick, as you only have about 3 seconds to do this before the Jonsbo N2 will automatically boot from the small internal 4GB/5GB flash OS module that boots into Jonsbo N2 .
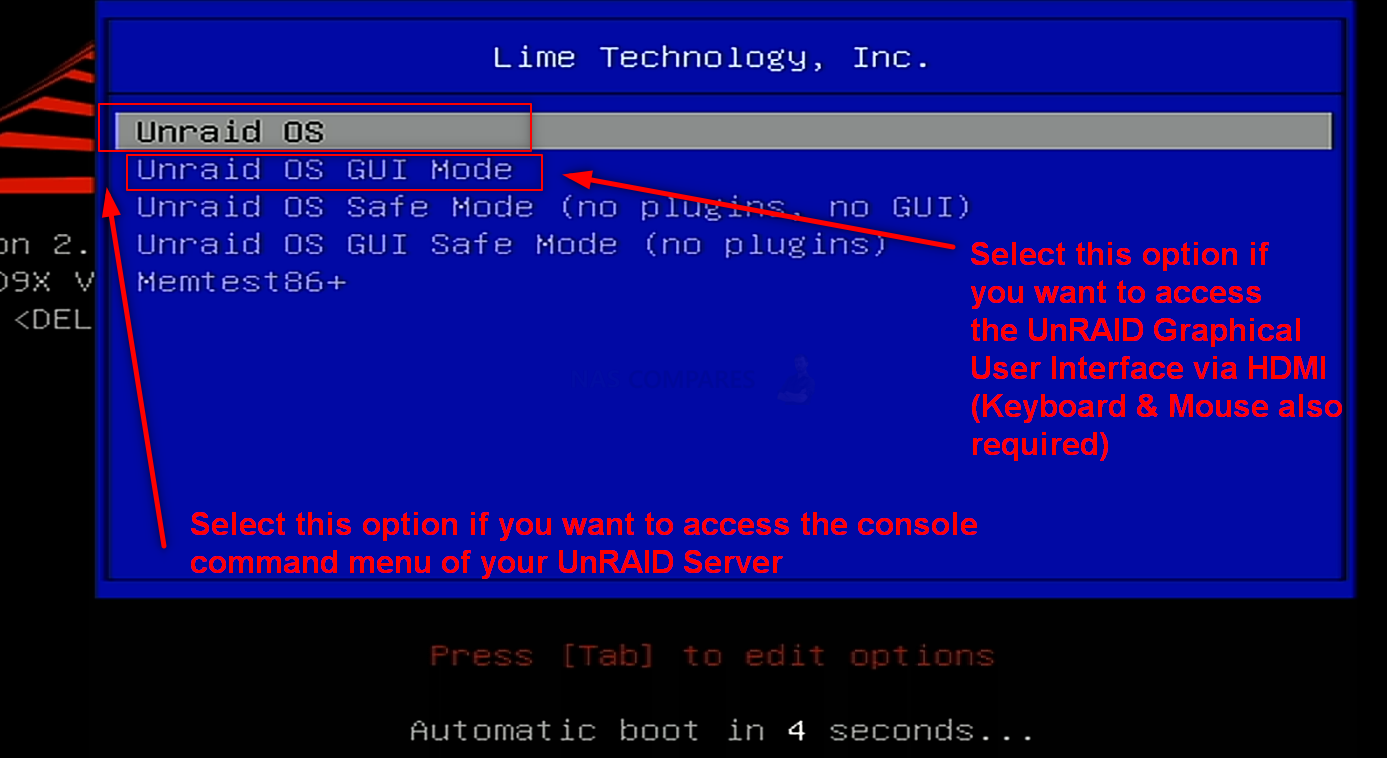
UnRAID on a Jonsbo N2 NAS – Step 9, Booting from the New UnRAID Installer USB
When you are in the bios menu, tap right until you reach the ‘Boot’ menu. From here, you need to change the boot priority order and ensure that the USB Drive is in Boot Priority #1. This is because UnRAID loads and runs from the USB drive. Normally, the Jonsbo N2 NAS will boot from the internal SSD that contains the Jonsbo N2 OS by default (differs, depending on the board you bought from Topton, whether it inc an SSD and a pre-installed OS like pfsense, etc). When you are done, head into the ‘Exit’ tab using right and select save and exit. This should result in the system rebooting and you will be greeted with the UnRAID initialization page.

UnRAID on a Jonsbo N2 NAS – Step 7, Accessing the HDMI Port and Keyboard Control
Next, you need to start getting the system ready for Initialization and Setup. I would strongly recommend running the first-time installation via a direct interface with the Jonsbo N2 NAS over KVM locally connected. You will need to connect an HDMI Monitor/TV/Capture Card to the HDMI port of the NAS, a Keyboard (and/or mouse) to an available USB port) and then connect the power/network connections to the NAS and boot the device up.
After this method of connection (as it allows you to check everything is working), you can switch back to accessing the system over the network in future.
You have two options with how to access the configuration and controls.
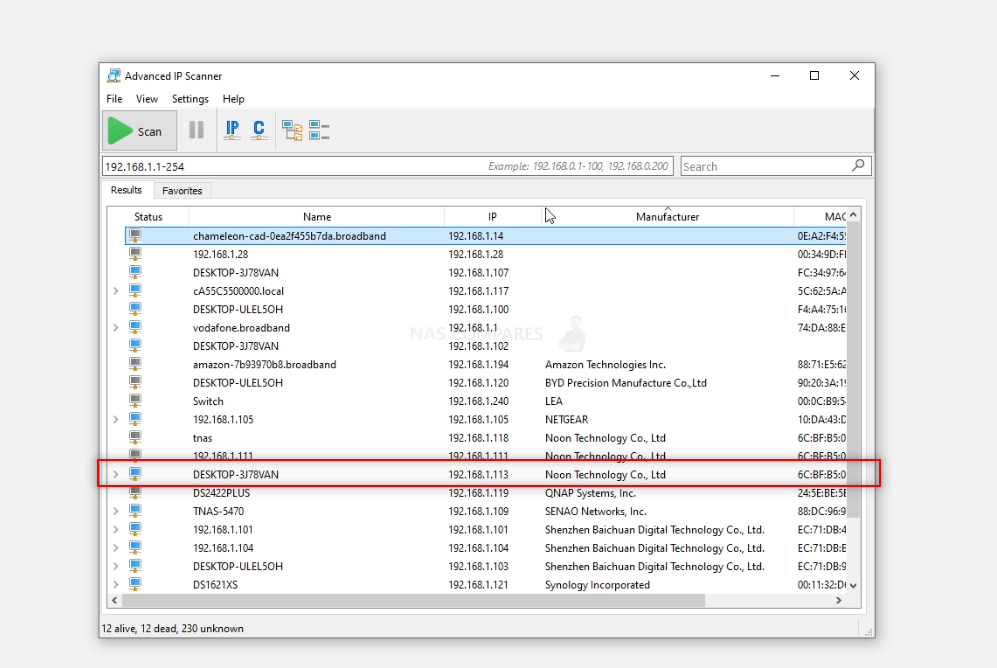
You can use the HDMI+Keyboard if you choose for console/command level access. Alternatively (much more recommended), use a program such as Advanced IP Scanner, which is free and VERY useful anyway, or even network command prompt) to scan your local area network and find where the Jonsbo N2 with UnRAID is located (i.e it’s IP).
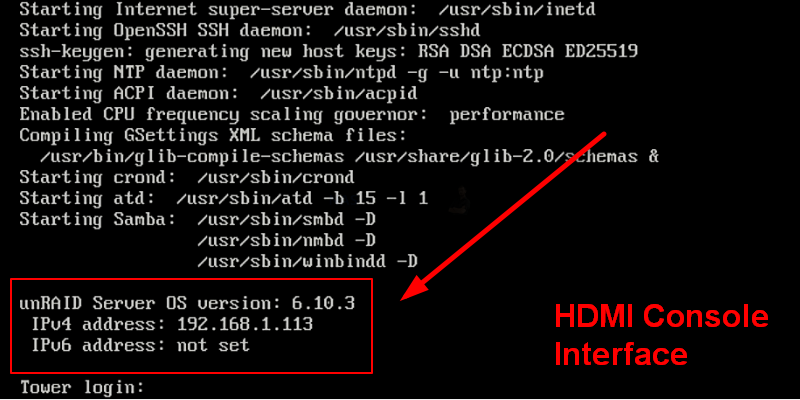
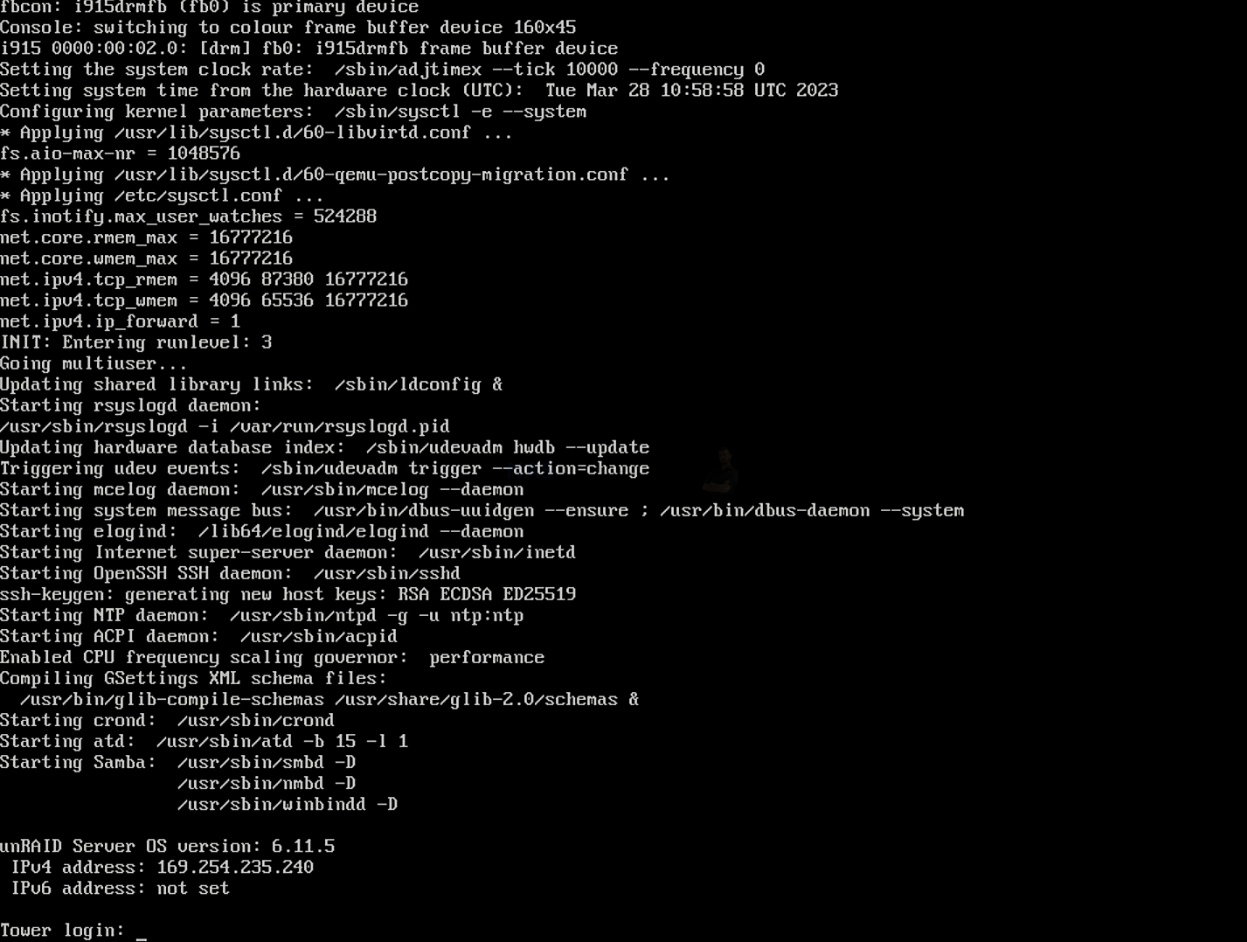
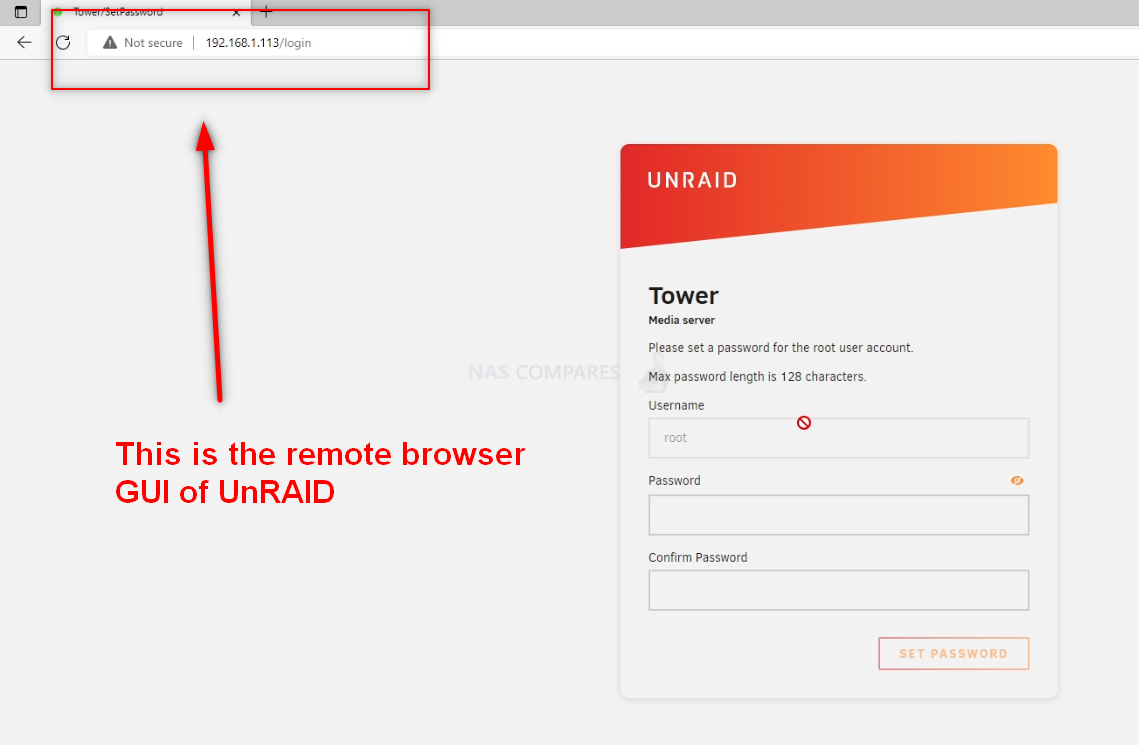
This IP (eg 192.168.1.113) is what you put into the URL bar of your web browser and it will load into the login GUI for UnRAID. From here you will need to use the username ‘root’ in combination with the password that you created during initialization.
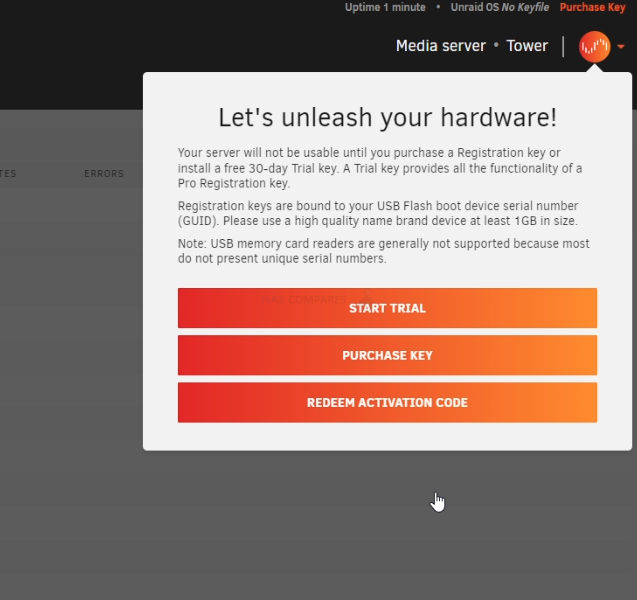
And that is about it. You now have UnRAID installed as the default OS of your Jonsbo N2 NAS. Now, it is worth remembering that UnRAID does require the use of a licence key in order to use all of the storage features. The type of licence you will need will be largely based on the scale of your storage (in terms of # of drives). However, you CAN go ahead and register for a free 30 day trial of UnRAID from within the GUI and get started.
From here you can do anything and everything that his highly regarded and exceptionally low resource-consuming server software offers. Head into the Storage area and start creating pools, as well as areas for caching and lots more features.
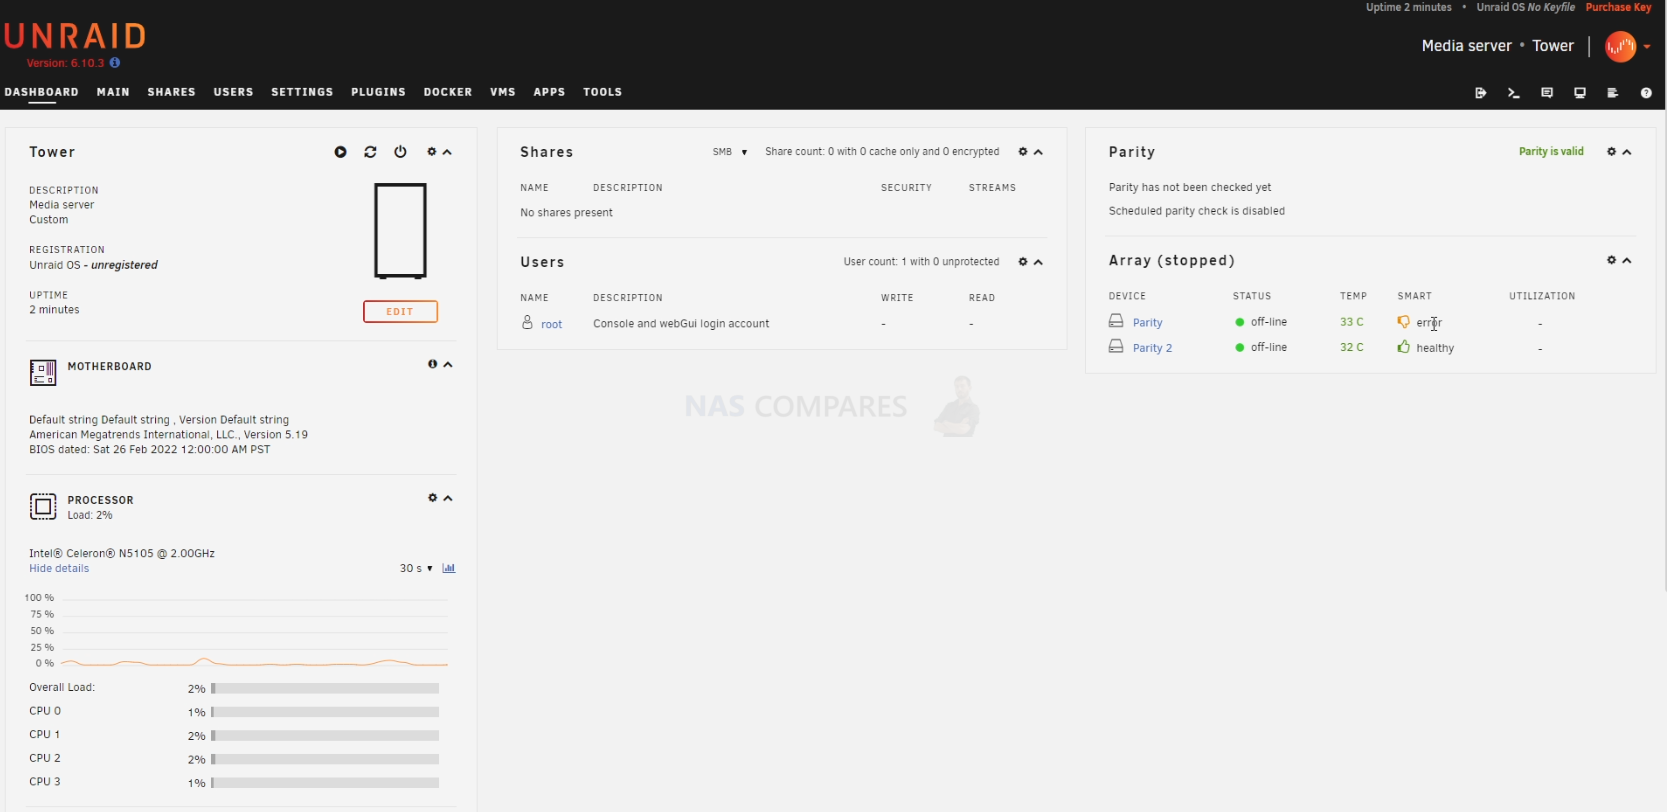
UnRAID was recently updated to ver.6.10.3 in a stable release of the massively portable format The first thing you are going to need to do when setting up your UnRAID > Jonsbo N2 NAS server is set up your storage. Do this by heading into the storage tab and following the handy steps on the screen. After that, you can pretty much do anything on your new lightweight NAS server!

TrueNAS Installation on the Jonsbo N2 NAS Build Setup Walkthrough (Optional)
For those leaning towards TrueNAS on the Jonsbo N2 NAS, keep in mind that TrueNAS requires more hardware resources. Thus, you might need to upgrade your CPU and memory. Follow these steps for the installation:
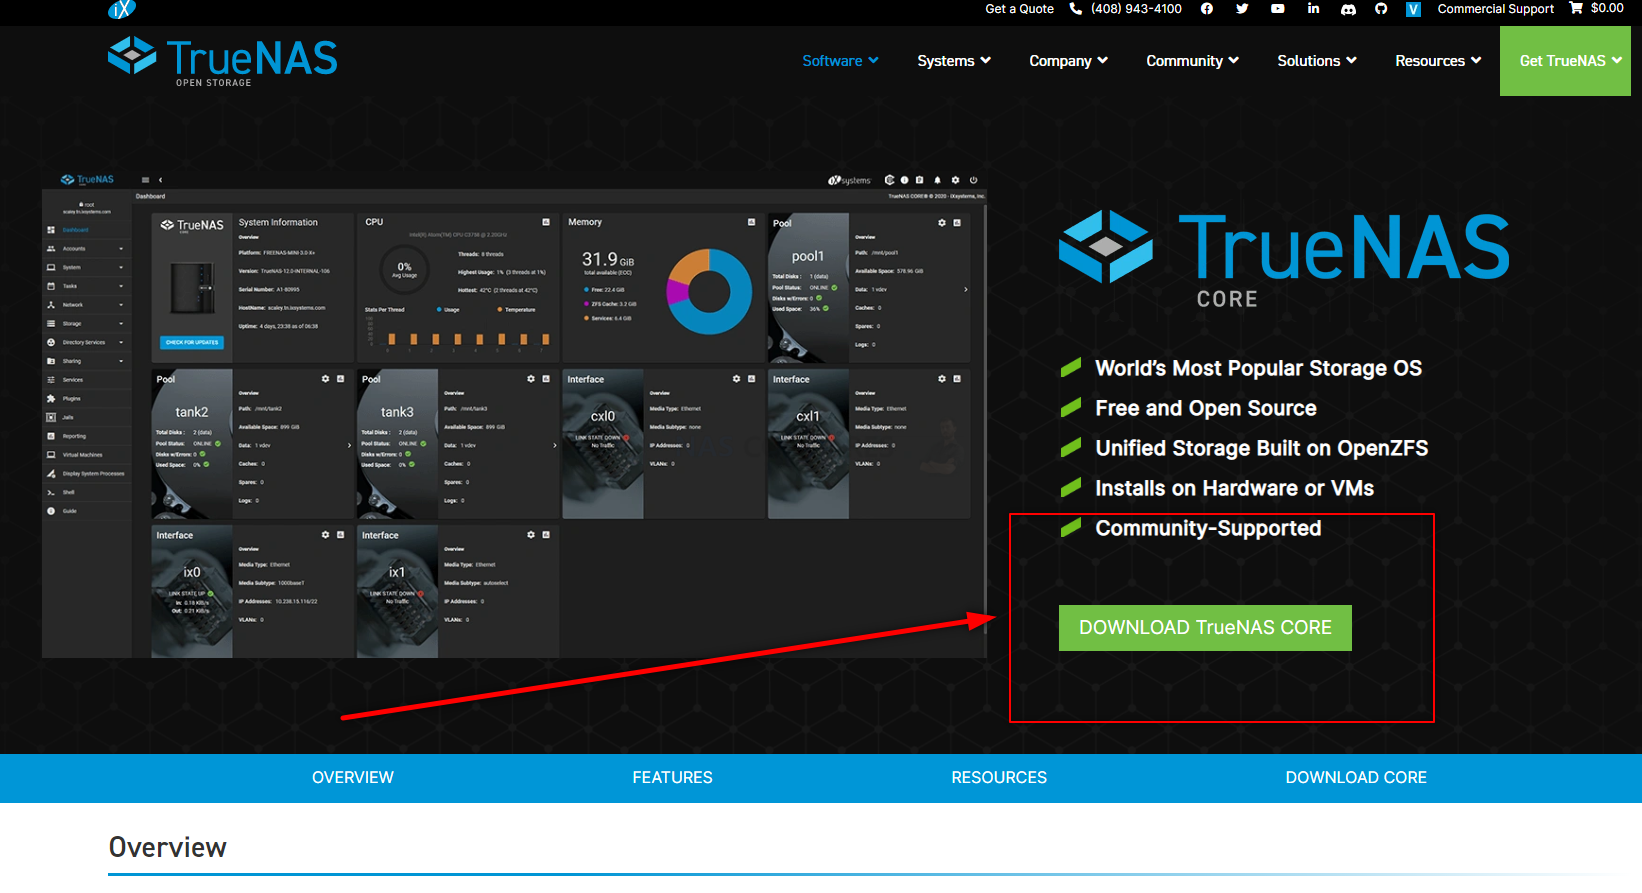
Head to the TrueNAS Core website HERE and download the latest stable release of the software to your local PC, Linux or Mac system. Make sure to remember where you downloaded it.
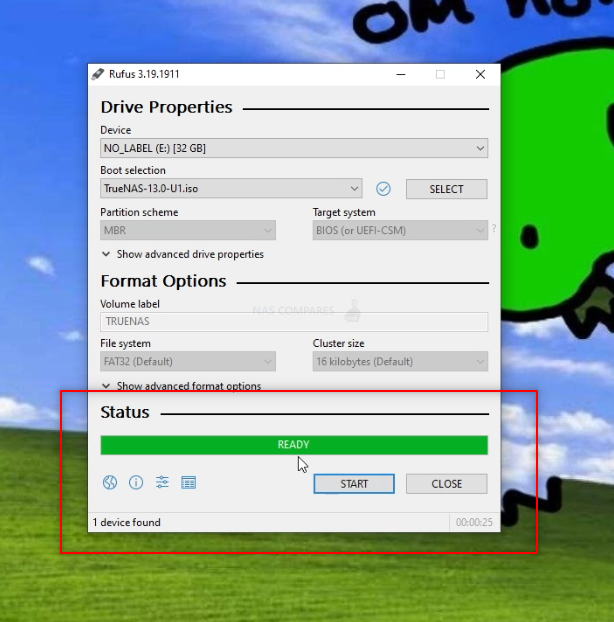
TrueNAS Core on a Jonsbo N2 NAS – Step 2, Download Rufus USB Image Tool
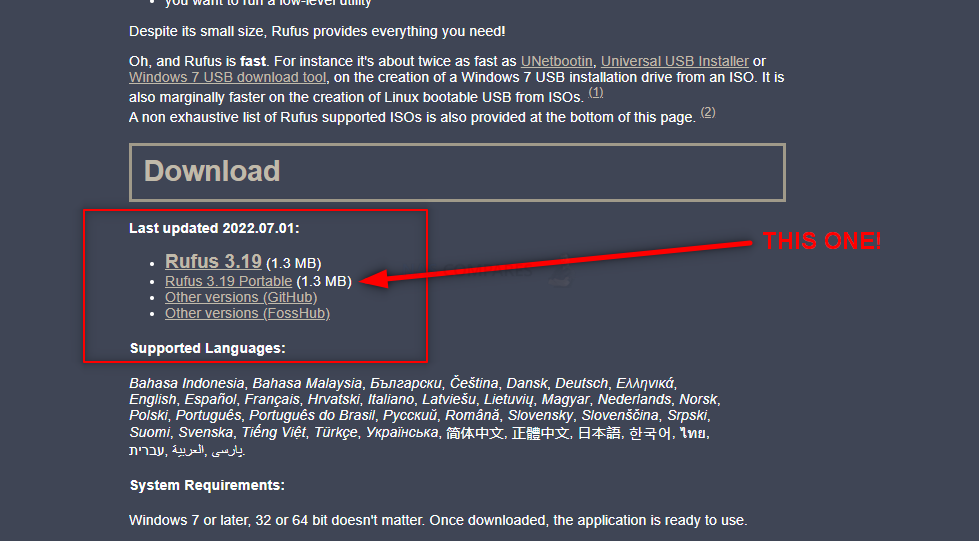
Head to the Rufus website and download the latest version of that tool – I recommend downloading the standalone executable file here, as then it will immediately run when you double-click the file, without installation etc. It may redirect you to Github, but it will be the same executable file. Once again, remember where you downloaded it.
TrueNAS Core on a Jonsbo N2 NAS – Step 3, Preparing the USB
Connect the small form factor USB Drive to your system (again, this is the one I used from Sandisk) and after a few seconds, it should appear as an available USB Drive. The drive MAY need formatting (you will be prompted to do so), if that is the case, then you can format it via the system prompts and by default, it will format it to FAT32 (as long as your USB is less than 32GB). If you are not presented with a system prompt to format your USB, then you can head into My PC, or My Computer via a windows computer and right-click the drive, select ‘format’ and format it that way.
If you have used the USB for other things previously, there is a chance that the drive has existing partitions in place. For that, the quickest way to completely remove any partitions is to open up the bottom-left windows system menu as normal, and then just type diskpart and open the command-line GUI tool. From there, use the command list disk to show the available drives that are connected, you will see your USB (normally disk 1 or 2, but can differ depending on your system layout and can be spotted by the storage amount). From there, type select disk # (where # is the drive number that your USB is shown as) and then type clean, which will then remove any index structure for the drive (i.e the partitions and existing format) and then you can go back to the My Computer/My PC page and format the drive to FAT 32 as normal.
TrueNAS Core on a Jonsbo N2 NAS – Step 4, Creating a USB Installer Image of TrueNAS Core
Open the Rufus application and from there you will see the USB Drive (listed as NO NAME, or ‘UNTITLED’, ETC) at the top. From there, look to the select image/find image option (depending on the ver. of Rufus or your USB Image Creator tool of choice) and find the TrueNAS Core disk image you downloaded earlier). If the drive is not listed, it may have downloaded as a compressed/archive file. If that is the case, head to the location of where you downloaded TrueNAS Core (in your file explorer, not in Rufus) and right-click the file you downloaded. If the option to ‘extract‘ is visible, then you can extract it (i.e unpack it to the original form) in that same download directory. From there, head back into RUFUS and then the TrueNAS Core system image should be visible. Select it, then run the Rufus System image creator tool and create your USB bootable TrueNAS Core disk image.
REMEMBER! This will completely format your USB drive and any files that are on that USB will be destroyed. The system image creator tool will turn the USB into a pure boot image tool – the USB will not be usable for traditional storage again unless you completely format it again.
TrueNAS Core on a Jonsbo N2 NAS – Step 5, REMOVE THE USB FROM YOUR PC!!!!!!!!!
Really, really important and sometimes overlooked. Once the USB creation is completed, you need to remove the USB (using the eject hardware safely option at the bottom right of your windows machine taskbar as normal). DO NOT accidentally leave the USB in your USB Ports for any longer than necessary. If you leave it in and your system reboots at any point (eg in a normal ‘end of day shut down, go home, reboot tomorrow’ scenario), then the system might boot directly into the TrueNAS Core installation and although it is easy to exit from, it can change your system default boot preferences, maybe even remove your primary boot drive as the OS drive – requiring a little messing with a windows installation disk to change it back. The odds of this are very small, but not zero, so make sure to safely remove your USB drive when the TrueNAS Core system image creator tool is completed.
TrueNAS Core on a Jonsbo N2 NAS – Step 6, (OPTIONAL) – Install an NVMe SSD
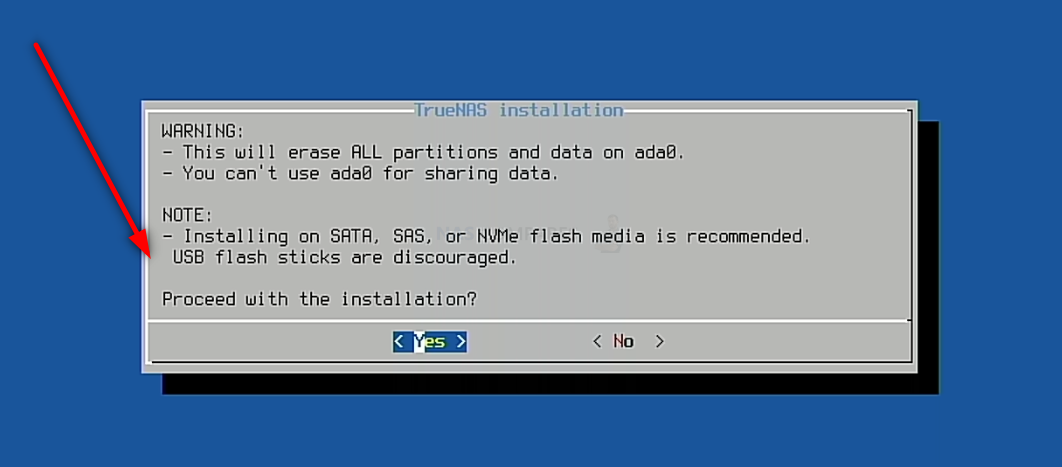
This is an optional step, but one I would certainly recommend for newer-generation Jonsbo N2 NAS devices. TrueNAS is a lot like a traditional computer operating system (eg Windows or macOS) in it’s architecture and will run at its best when the necessary boot files are located on a seperate, smaller and faster area of SSD/flash storage away from the general bulk storage. So, if possible/available in your Jonsbo N2 NAS, I would recommend installing a smaller m.2 NVMe SSD drive and then using that as the target/location for your TrueNAS Core installation. This is not compulsory and you can also use a single HDD or SSD in one of the main storage bays of your Jonsbo N2 , however, it means that this drive will unusable for general storage (i.e in any RAID configuration or storage pool). This CAN be negated with some creative portion creation, but I wouldn’t recommend it. Additionally, do NOT try to install TrueNAS Core on another USB drive that is connected to the system – this isn’t particularly stable and tends to result in a poorer TrueNAS Core experience. M.2 NVMe bays and their location in the Jonsbo N2 NAS changes depending on the system. Reminder – TrueNAS is NOT a big program and you can use an SSD as small as 32GB and still have a tonne of provision for future storage space. However, M.2 NVMe SSDs are not available in smaller sizes than 120GB. Lower size than this and you will generally only find 2240 SSDs and/or SATA M.2 SSDs. These are still perfectly fine to use, but the performance difference between SATA and NVMe (PCIe) is HUGE! You can find many SSD options here on amazon for as little as $30 – Find Low Capacitiy and Low Price M.2 NVMe SSDs HERE on Amazon (already filtered the results)
NOTE – If you plan on upgrading the memory of your NAS to 4GB-8GB-16GB or higher (in order to use ALL of the features of TrueNAS Core to their fullest extent), I would recommend doing so at this point before rebuilding the physical chassis again, as many Jonsbo N2 NAS have the 2nd SODIMM memory slot in really tight locations.
TrueNAS Core on a Jonsbo N2 NAS – Step 7, Connecting the USB, Keyboard and HDMI Monitor
Next, we need to connect the external means to install TrueNAS Core on the Jonsbo N2 NAS. Unlike when you set up your Jonsbo N2 NAS for the first time, TrueNAS cannot typically be installed via the network like QTS/DSM/etc. TrueNAS requires you to use a KVM (keyboard, Video Mouse – though you won’t need a mouse!) and go through the installation using a low-res graphical user interface. Now you will ONLY need this setup/items for the installation and initialization of your TrueNAS Core server and after that, you will be able to use the server over the network/internet as normal. You are going to need a basic USB Keyboard (not a Bluetooth or wireless one, as these may need drivers to run and you cannot install drivers at this point) and an HDMI Monitor/TV. You CAN use a mouse, but it is not hugely necessary and 99% of the choices in the setup of TrueNAS core can/will be via keyboard input. Also, I would also recommend connecting the NAS to the network during setup as this will allow the system to assume certain network values during setup that will save a tonne of time later. Once that is all connected, do NOT turn the NAS on yet – there is one small and slightly time-sensitive thing to do.
TrueNAS Core on a Jonsbo N2 NAS – Step 8, Accessing the BIOS Menu of your Jonsbo N2 NAS
Now that your Jonsbo N2 NAS is all connected and you are ready at your keyboard/Monitor, turn the NAS on and wait till you hear a beep (should take between 5-15secs depending on the Jonsbo N2 NAS). As soon as your hear that noise (and likely see a flashing character or underscore on the monitor screen), you need to continuously hit the F12 and/or DEL keys (not at the same time, just back and forth). One of these will result in the system displaying the blue BIOS menu (it changes between motherboards and Jonsbo N2 supports a mixture of mobos in their Intel and AMD-powered systems). You need to be quick, as you only have about 3 seconds to do this.
TrueNAS Core on a Jonsbo N2 NAS – Step 9, Booting from the New TrueNAS Installer USB
Next, you need to tap ‘RIGHT‘ on the keyboard and head to the ‘Save & Exit’ option. At the bottom, you should see, under the ‘boot override‘ option, your USB Drive. Tap ‘DOWN‘ until you are highlighting the USB and then tap ‘Enter‘ or ‘Return‘ on your keyboard, as this will push the Jonsbo N2 to boot from that USB and begin the TrueNAS Core installation. Later on I will show you how to force the system to ALWAYS boot into TrueNAS Core, but for now, we just need it to read from this USB this one time.
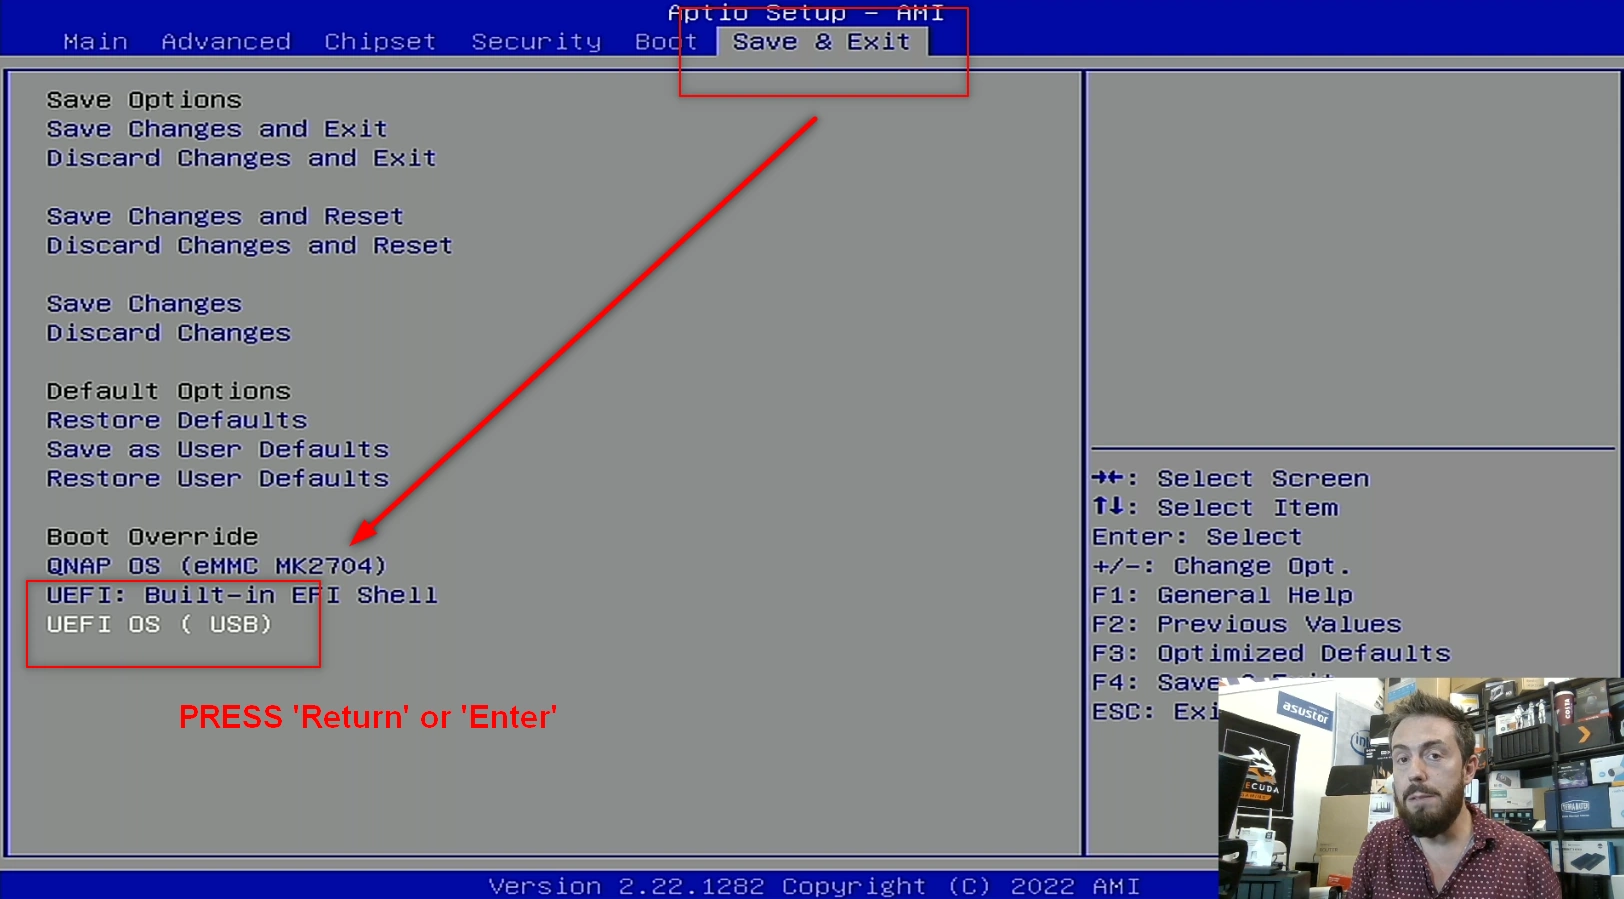
TrueNAS Core on a Jonsbo N2 NAS – Step 10, Rebooting and Starting the TrueNAS Installer
This next step is a bit of a quick one. Around 5-15 seconds after you selected the USB Drive in BIOS, the screen will display the TrueNAS Installer option page. Tap ‘Enter’ as soon as you see it, as the page is on a countdown and when it reaches zero it will (possibly, depending on the version) reboot and then you will have to repeat the last few steps again!), So, in order to avoid this, tap ‘ENTER‘ as soon as this page appears.
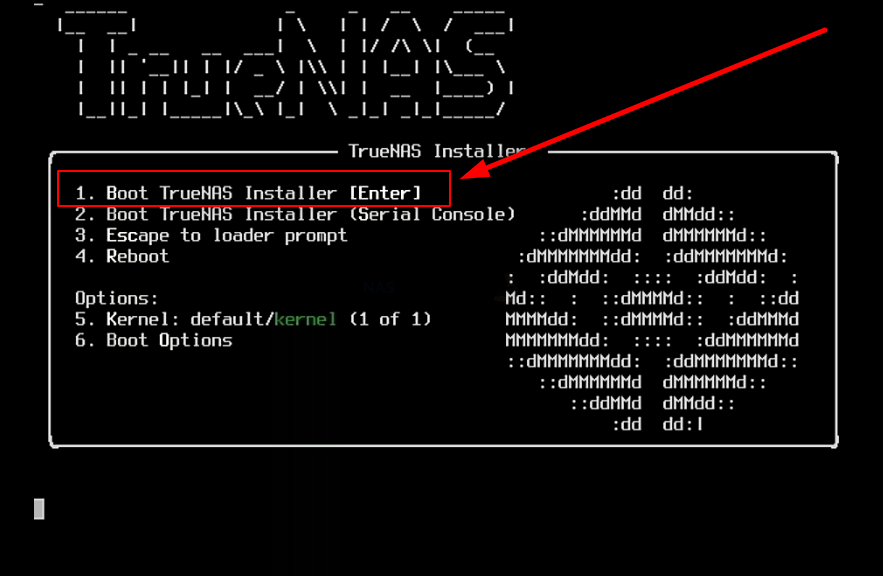
After a few minutes, the TrueNAS Core GUI/Command will appear on your monitor and all you need to do is navigate the config choices to set up your TrueNAS Core NAS the first time.
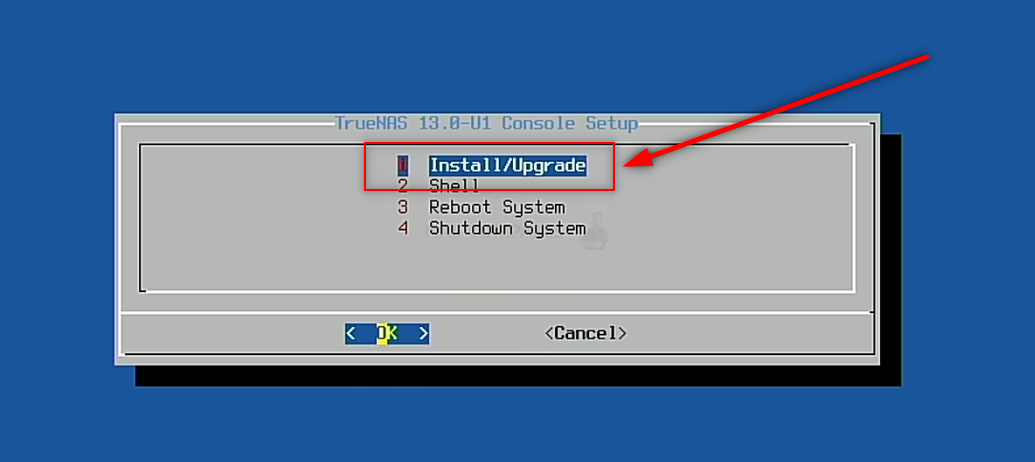
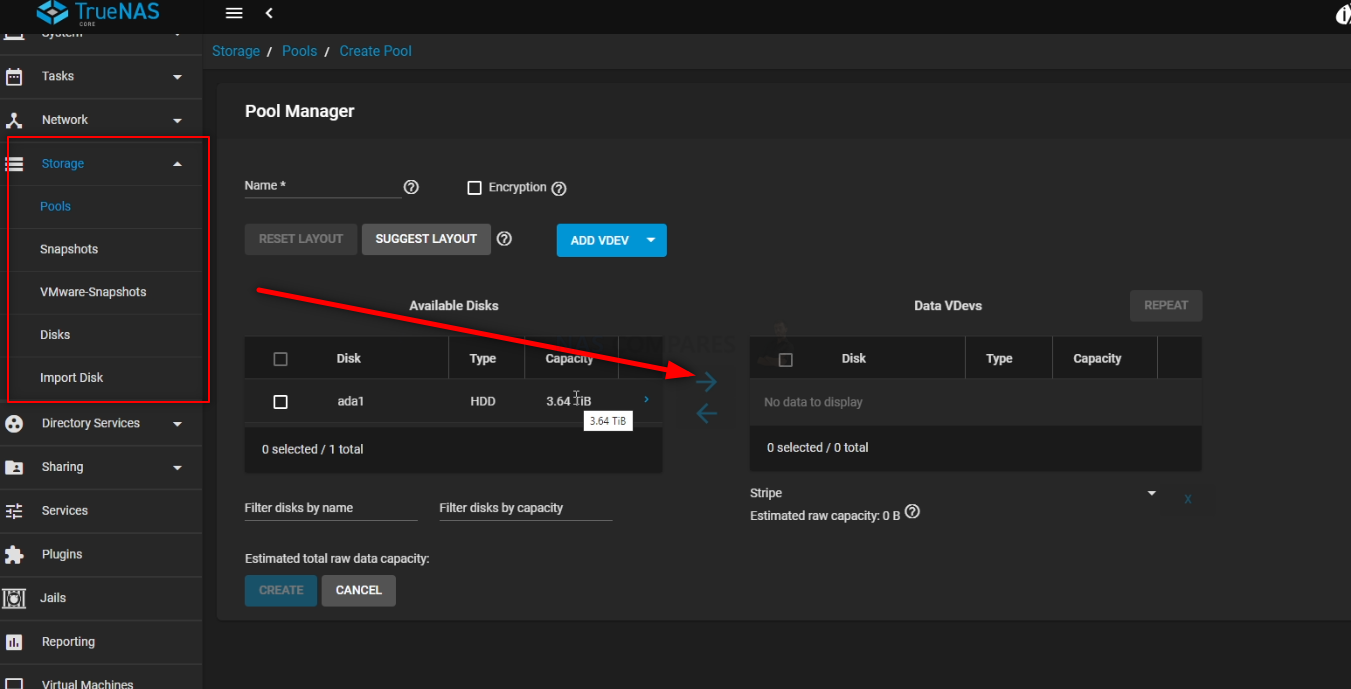
Important – TrueNAS Core runs at its best when it is run on a separate drive from your storage. Much like an Operating System, you can install TrueNAS Core on an available SSD in a SATA or NVMe SSD slot in the Jonsbo N2 NAS, then (after initialization) you can go into the TrueNAS Core > Storage area and create a pool of storage using the available storage media bays,

It is NOT recommended that you install it on a USB drive, for reasons of speed and power-connections.
After you have completed the setup and are back at the initial TrueNAS Core boot menu, select the ‘SHUTDOWN‘ option (not reboot/restart, for reasons I will explain in a moment).
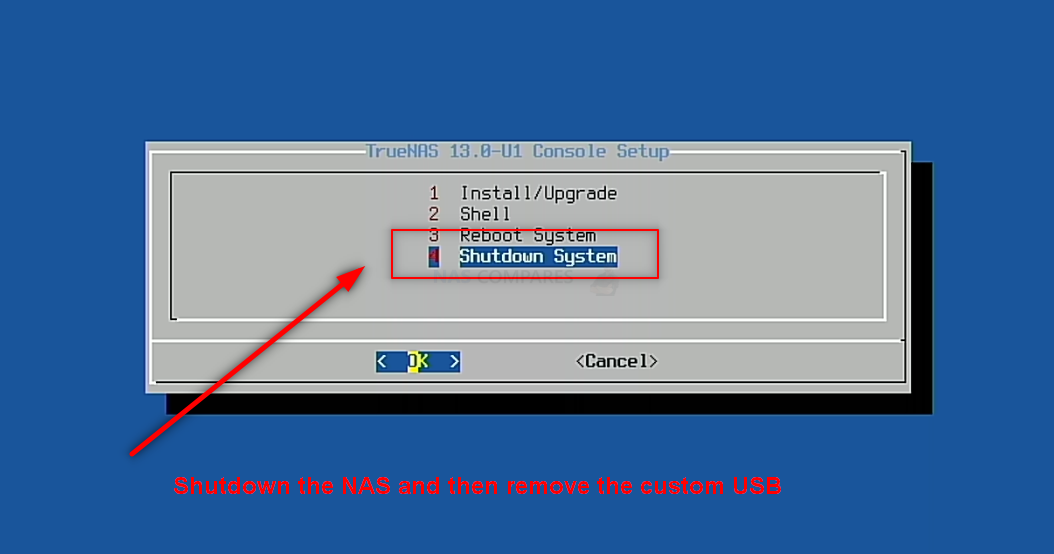
TrueNAS Core on a Jonsbo N2 NAS – Step 8, Remove the Boot USB Drive AND CHANGE BIOS!!!
Once your Jonsbo N2 NAS has fully powered down, you need to disconnect the USB drive you installed earlier with TrueNAS Core boot loader on it. You need to do this otherwise, when you reboot the Jonsbo N2 NAS, it can potentially reboot into the bootloader again. You can skip past this and/or it will not action a reinitialization without your input, but better to remove the USB and therefore allow the system to always immediately boot into the TrueNAS Core system you just created.
Next, you need to head back into the BIOS from earlier. Keep the Keyboard and HDMI Monitor connected and use the same method you used earlier during the initial boot of the Jonsbo N2 (pressing F12 and/or Delete repeatedly when you hear the first Jonsbo N2 beep after about 10-15 secs) and as soon as you are greeted with the familiar blue BIOS screen. From here, tap right a few times to highlight the ‘Boot’ option and change the option for Boot Priority #1. The default is Jonsbo N2 OS, you need to change it to the drive you installed TrueNAS on (whether that is a SATA/NVMe SSD or one of the main storage bays).
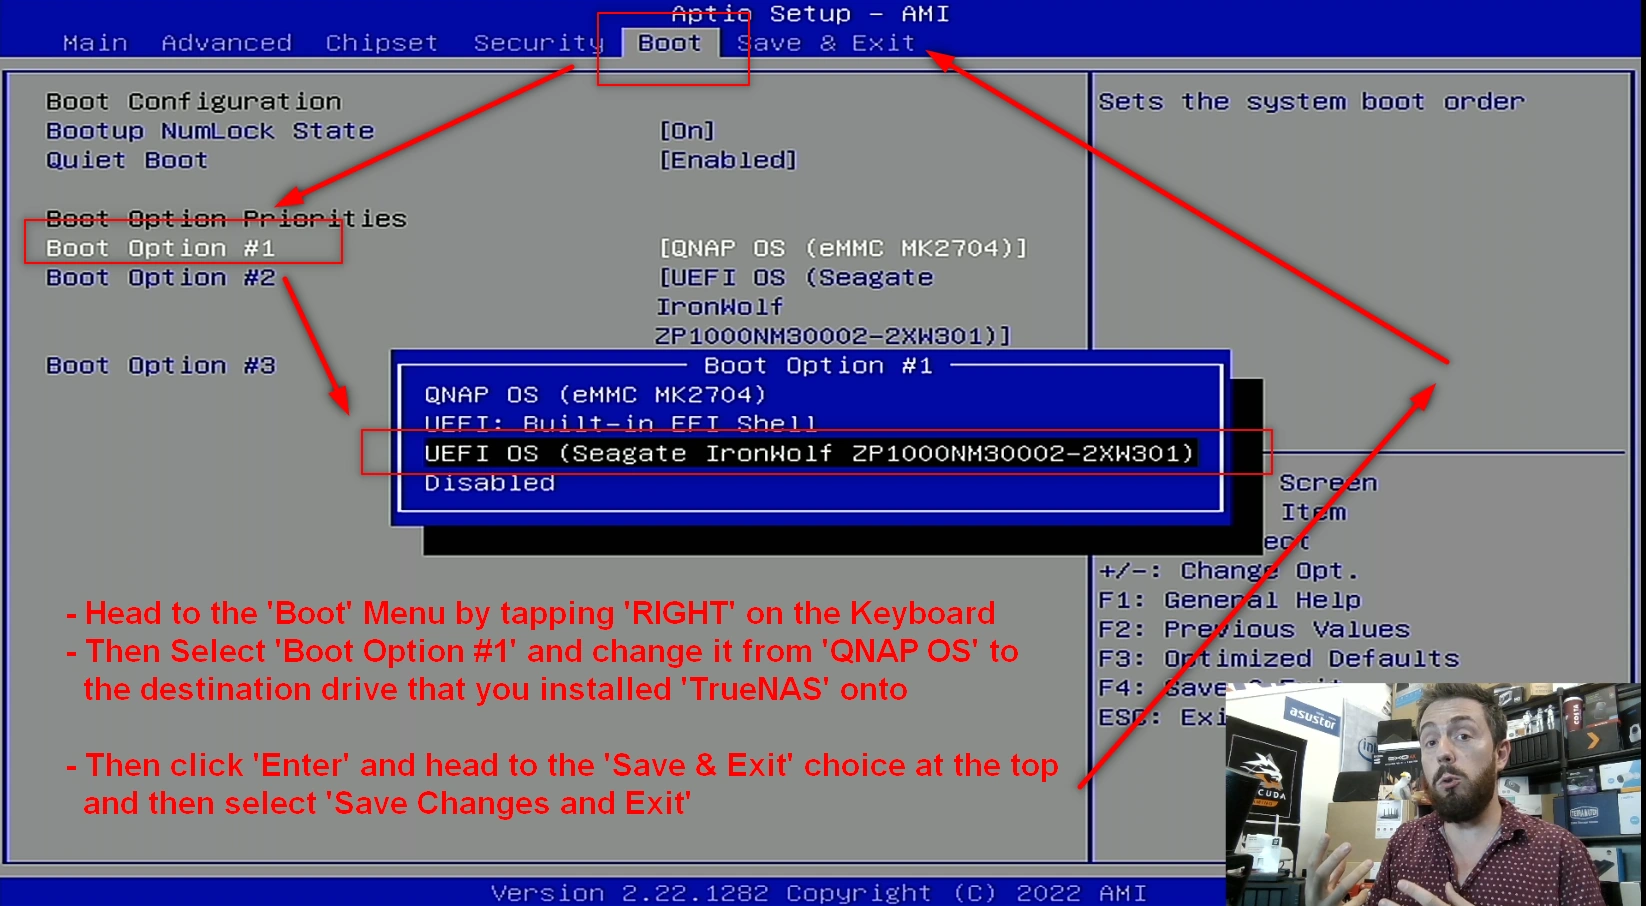
This will change the boot order to allow the system when it is first powered on to always boot into TrueNAS. After this, you can click right again in the BIOS menu to select the option to Save and restart. The system will then boot into the TrueNAS initialization (first time setup).
TrueNAS Core on a Jonsbo N2 NAS – Step 9, Reboot the NAS
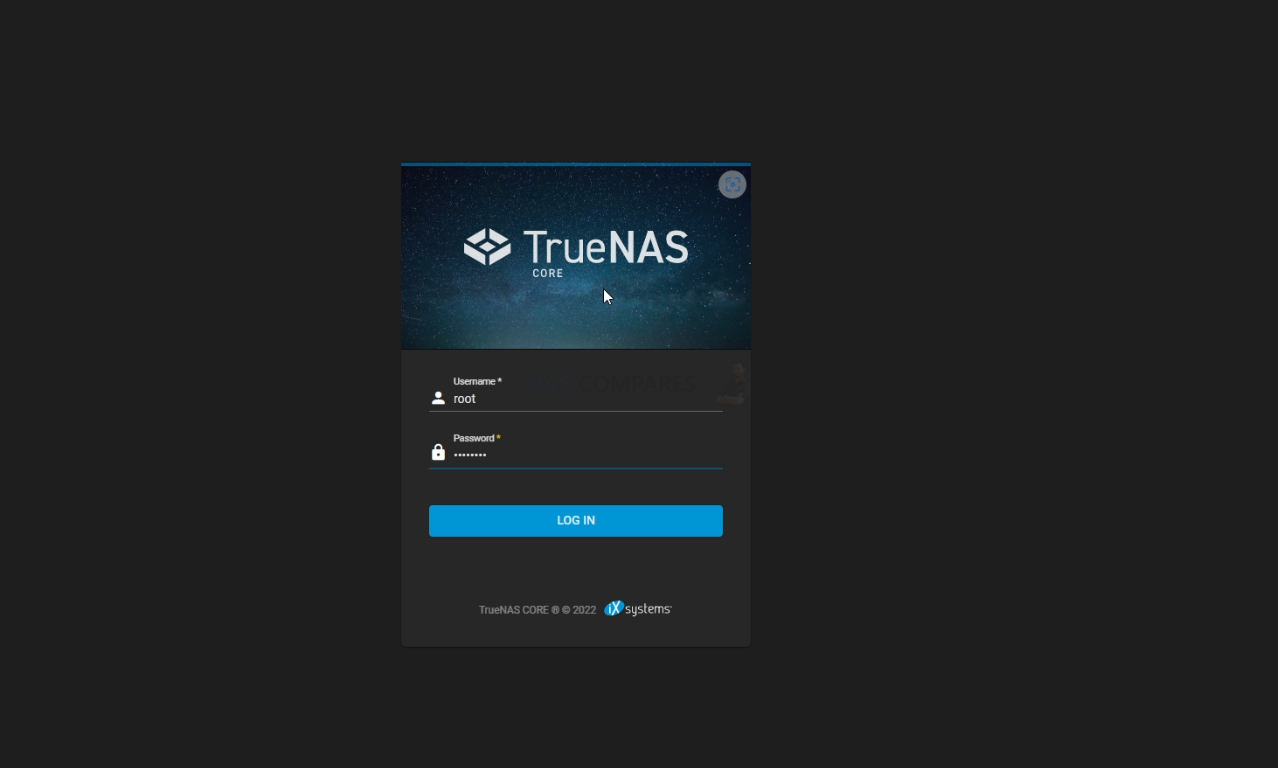
Upon rebooting the Jonsbo N2 into TrueNAS Core (can take up to 5 mins, but usually much quicker). You have two options with how to access the configuration and controls. You can use the HDMI+Keyboard if you choose for console/command level access. Alternatively (much more recommended), use a program such as Advanced IP Scanner, which is free and VERY useful anyway, or even network command prompt) to scan your local area network and find where the Jonsbo N2 with TrueNAS Core is located (i.e it’s IP). This IP (eg 192.168.1.111) is what you put into the URL bar ofay web browser and it will load into the login GUI for TrueNAS Core. From here you will need to use the username ‘root’ in combination with the password that you created during initialization.
And that is about it. You now have TrueNAS Core installed as the default OS of your Jonsbo N2 NAS. From here you can do anything and everything that his highly regarded ZFS powered server software offers. Head into the Storage area and start creating pools, as well as areas for caching and lots more features.
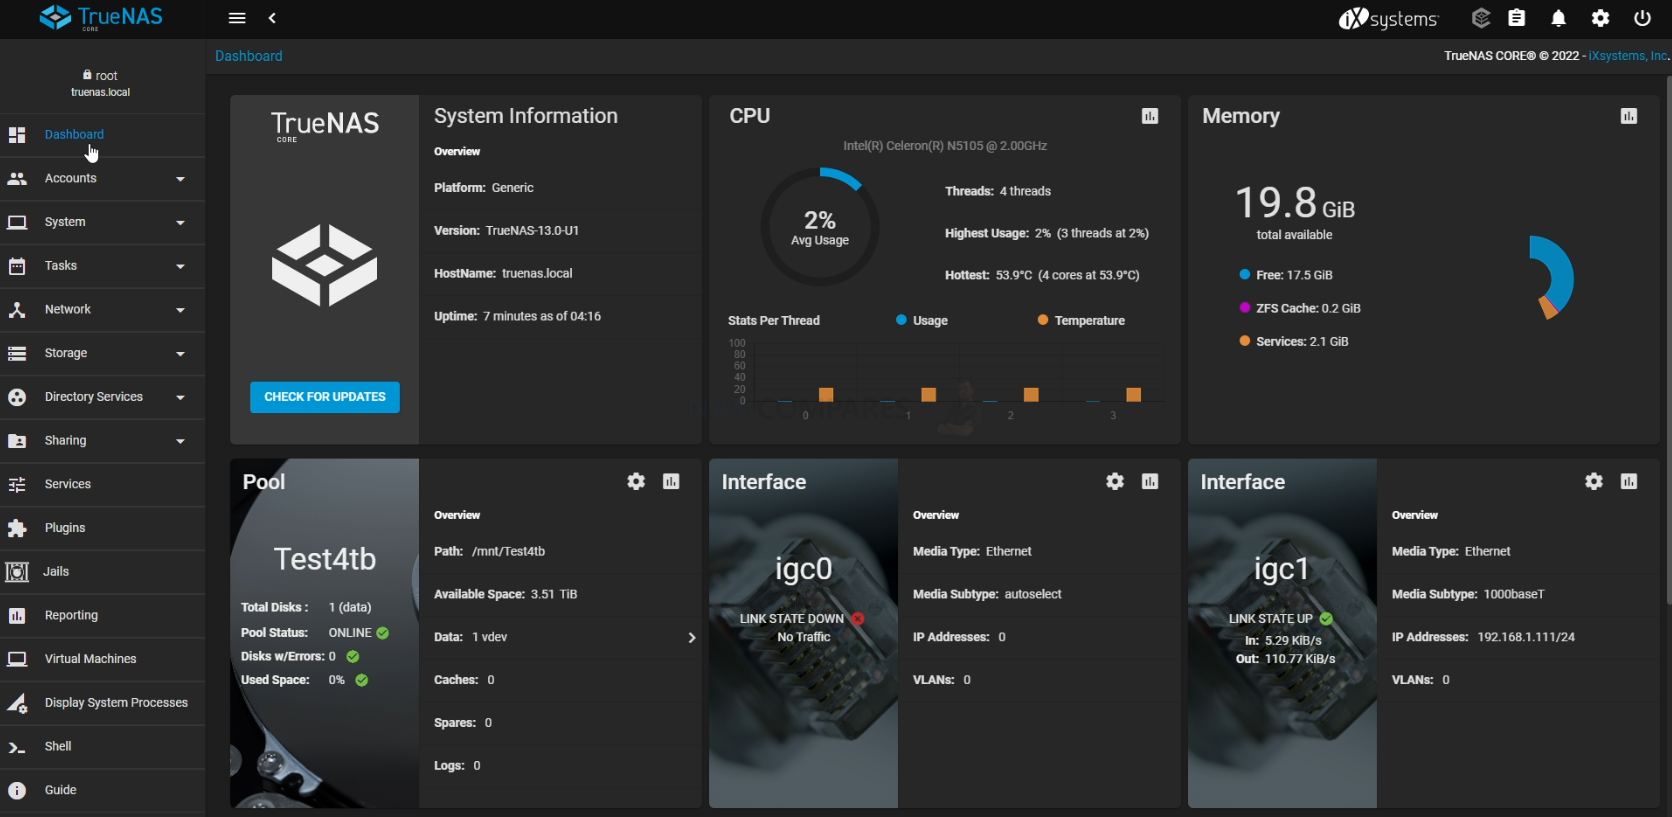
TrueNAS was recently updated to ver.13 in a stable release of the FreeBSD format, as well as new improvements in the Linux-based version ‘TrueNAS Scale’. The first thing you are going to need to do when setting up your TrueNAS Core > Jonsbo N2 NAS server is set up your storage. Do this by heading into the storage tab and following the handy steps on screen. After that, you can pretty much do anything on your new ZFS NAS!
You can find out more about TrueNAS in my full review below that covers everything I like and dislike about the platform:
Jonsbo NAS DIY Vs Synology and QNAP? Better or Worse?
The perennial question for many tech enthusiasts: how does a custom-built NAS stack up against pre-packaged solutions like Synology and QNAP? The decision largely boils down to convenience vs. cost. For individuals who prioritize convenience and have a bit more to spend, a pre-assembled NAS from brands like Synology and QNAP offers an attractive package. With everything set up out of the box, from hardware to software, and a unified warranty, it’s a hassle-free solution. On the other hand, for those with a tighter budget, technical knowledge, and time on their hands, a DIY NAS like the Jonsbo N2 offers an economical alternative. The detailed Jonsbo N2 build listed in the guide above provides a 5-6 bay NAS system with an Intel Celeron processor popular in the server market, 4GB of DDR4 memory, 4x 2.5 G LAN ports, M.2 NVME support, an unused PCIE slot for 10GbE additions, and KVM capabilities. Factoring in all components, delivery, and a lifetime UnRAID license, the entire build costs roughly £350. Here’s a price breakdown:
Hardware:
- Topton N5105 NAS Motherboard – £149.37 (with 4GB Memory + 120GB NVMe Included – £127.72 Bare)
- Jonsbo N2 5/6 Bay NAS Case – £74.60
- SATA 6 Cable Fan/Multi-Cable – £11.59
- SFX 250W PSU – £25
Total = £260.56 with 4GB Memory + 120GB SSD (£238.91 without SSD/Memory)
Additional (i.e. optional/flexible):
- + $59-89 for UnRAID Basic/Plus License HERE
- + $0 for TrueNAS Core/Scale
- + $7 for a 32GB USB
- +£29.40 Delivery to UK
For comparison, acquiring a similar level of hardware from brands like Synology, QNAP, Terramaster, and Asustor will set you back between £600 to £800:
Clearly, the Jonsbo N2 build offers a significant cost-saving, coming in at over half the price of its branded counterparts. But this economical choice does come with trade-offs. You might end up relying on community-supported software, which could be less intuitive than proprietary software bundled with turnkey NAS solutions. Moreover, the time and effort invested in building and maintaining the NAS need to be factored in. Even with a clear guide, the DIY route will never be as plug-and-play as a pre-built solution.
Additionally, a custom-built NAS like the Jonsbo N2 typically involves dealing with warranties from various vendors. This means your components like the CPU, motherboard, case, PSU, and cables may all come with different warranty terms and lengths. Compatibility checks, troubleshooting, and potentially more maintenance time are other considerations. In conclusion, while building your own NAS can be both financially and personally rewarding, it does lack the comprehensive support and seamless experience associated with turnkey solutions from brands like Synology and QNAP.
📧 SUBSCRIBE TO OUR NEWSLETTER 🔔
🔒 Join Inner Circle
Get an alert every time something gets added to this specific article!
This description contains links to Amazon. These links will take you to some of the products mentioned in today's content. As an Amazon Associate, I earn from qualifying purchases. Visit the NASCompares Deal Finder to find the best place to buy this device in your region, based on Service, Support and Reputation - Just Search for your NAS Drive in the Box Below
Need Advice on Data Storage from an Expert?
Finally, for free advice about your setup, just leave a message in the comments below here at NASCompares.com and we will get back to you. Need Help?
Where possible (and where appropriate) please provide as much information about your requirements, as then I can arrange the best answer and solution to your needs. Do not worry about your e-mail address being required, it will NOT be used in a mailing list and will NOT be used in any way other than to respond to your enquiry.
Need Help?
Where possible (and where appropriate) please provide as much information about your requirements, as then I can arrange the best answer and solution to your needs. Do not worry about your e-mail address being required, it will NOT be used in a mailing list and will NOT be used in any way other than to respond to your enquiry.


|
 |


Best NAS for under $499
Best NAS for Under $250 (2025)
Minisforum N5 Pro NAS - FIRST IMPRESSIONS
HexOS Q2 Update - What's Changed?
5 Exciting NAS Coming Later in 2025
Beelink ME Mini vs GMKtec G9 vs CWWK P6 NAS Comparison
Access content via Patreon or KO-FI
I’d love to see an updated version of this, I’m considering the 4800 plus or DIY… it’ll no doubt drop again to 479 on the green, it seems to every other month lol, so prime day ‘deal’ is budget at 479, can we do better DIY??
REPLY ON YOUTUBE
Great video, however the case does have standard usb 3.0 and usb c connectors, the issue is the motherboard
REPLY ON YOUTUBE
I’ve been looking for a ITX MB that supports 8 sata ports and has a pcie slot
REPLY ON YOUTUBE
Nas playing at the beginning is too good ????
REPLY ON YOUTUBE
I highly value the joy of learning how to do this and then doing the assembly of the NAS. For me. Invaluable.
REPLY ON YOUTUBE
i still dont know how is this a 6 bay casing?
where is the 2.5″ placed?
i watched like 10 of N2 build videos nobody 4kin ever put in a 2.5″
weird shit
REPLY ON YOUTUBE
always build the entire system on a table to make sure everything is working before placing them into such a tiny and troublesome casing
REPLY ON YOUTUBE
Excellent vid. Very detailed. I like the case.
REPLY ON YOUTUBE
Excellent vid. Very detailed. I like the case.
REPLY ON YOUTUBE
Excellent vid. Very detailed. I like the case.
REPLY ON YOUTUBE
Excellent vid. Very detailed. I like the case.
REPLY ON YOUTUBE
Excellent vid. Very detailed. I like the case.
REPLY ON YOUTUBE
Excellent vid. Very detailed. I like the case.
REPLY ON YOUTUBE
Excellent vid. Very detailed. I like the case.
REPLY ON YOUTUBE
Excellent vid. Very detailed. I like the case.
REPLY ON YOUTUBE
CWWK 12th Gen i3-N305 N355 N100 N150 2*Intel i226-V 2.5G NAS Motherboard 6*SATA3.0 6-Bay Soft Rout 1*DDR5 4800MHz Firewall ITX Mainboard…. where can i get the manual to view the front panel connections?
REPLY ON YOUTUBE
Topton has no quality whatsoever, I bought it from Aliexpress and threw my money away, they didn’t accept the return of the product or give me my money back and there’s no repair. Friendly advice, don’t buy this crap.
REPLY ON YOUTUBE
BE CAREFUL WITH TOPTON PRODUCTS, TOPTON COMPUTER, TOPTON LAPTOP, TOPTON MINI-PC, TOPTON NOTEBOOK, THEY ARE POOR QUALITY PRODUCTS AND THERE IS NO TECHNICAL ASSISTANCE OR TECHNICAL SUPPORT AND ALIEXPRESS IS NOT RESPONSIBLE FOR ANYTHING.
REPLY ON YOUTUBE
Looking at building this a year later and it’s more than twice expensive now. And the mobo isn’t available.
REPLY ON YOUTUBE
I love seagulls ????
REPLY ON YOUTUBE
I know I’m a year late, but fantastic walkthrough – inspired me to build one myself! Subbed and will dive deeper down this rabbit hole, thank you!
REPLY ON YOUTUBE
I bought a Topton computer on Aliexpress and I was so angry with myself, it was a poor quality product, without technical support, it was money thrown away. If you want some advice from a friend, look for another brand.
REPLY ON YOUTUBE
Loved your vid, TrueNAS is a bit sketchy to first setup but does it job after a while of tinkering. The 6 port sata controller based on the ASMedia 1166 chipset is the way to go? Works great with TN instead of the JMB585… Don’t cheap out on that one. I used a PCI x4 card, neater and cleaner with cables. And btw, for the money and quality of parts stop using the Ali bords and just buy an Asus N100 or something… Good bios, great hardware and you can support local or national companies
REPLY ON YOUTUBE
I bought a TOPTON computer on Aliexpress and I don’t recommend it, it’s a disposable and maintenance-free product. I don’t recommend it either.
REPLY ON YOUTUBE
I bought a Topton computer and threw my money away, it is a low quality product, without technical support. Friendly advice, look for another brand.
REPLY ON YOUTUBE
I am still thinking to made by your guide around 300-350£ or buy Synology 423+ different 100-150£ + good warranty , quality .
REPLY ON YOUTUBE
45:26 …what did you spill onto your fan cover filter? The world wonders.
REPLY ON YOUTUBE
I miss what is wattage usage of this setup .
REPLY ON YOUTUBE
You FAILED, I can buy used HP Z800 with 128RAM 2x XEON, for 300Eur. I is way better then any china crap you have here, the Synology or QNAP is even more overprices china crap.
REPLY ON YOUTUBE
6:20 You have seen nothing. I once received a server power cable packed in a box which was larger then the case box on your desk. Bit shorter but much wider. It was also packed in all kinds of bubble wrap. A fricking standard power cable! ????
REPLY ON YOUTUBE
Its xpenology compatible?
REPLY ON YOUTUBE
Cavity is not the same as a hole. Cavity is empty enclosed space, like a mini cave.
What you call cavities are simply holes or openings.
REPLY ON YOUTUBE
my Synology 215+ still going strong after almost 10 years lol. even gets updates.
REPLY ON YOUTUBE
Horrible overrated case (good video though). What if you want to put SSD drives in those drive bays without drive trays? Doh!!
REPLY ON YOUTUBE
I have an ex2 by WD. It’s time to increase my capabilities. I was going to build an old pc and fill it with hdd. This is a great option.
REPLY ON YOUTUBE
Great review, you will save alot of people countless hours money and effort to find this info out
REPLY ON YOUTUBE
So you get the unraid license for free? So your nas cost hundred bucks more. And it is an Motherboard and a io shield.
And proxmox is a hypervisor and has absolutely nothing to do with network attached storage.
REPLY ON YOUTUBE
thank you
REPLY ON YOUTUBE
Yo what’s that track at the beginning???
REPLY ON YOUTUBE
Thanks for making this video. I’ve ordered all the bits and pieces to put a Jonsbo N2 NAS together.
REPLY ON YOUTUBE
U leaving off cost of unraid? Not that good after adding or close to other with vendor’s support
REPLY ON YOUTUBE
make videos less than 1 hour …
REPLY ON YOUTUBE
Would you advise another psu which is at least gold rated or are you satisfied with yours for 24/7 usage?
REPLY ON YOUTUBE
HI! I am struggling to find the adapters for the N2 front panel USBs to Topton USB pins, could you link youir solution? thank you!
REPLY ON YOUTUBE
best video ever
REPLY ON YOUTUBE
Car sick Mate!
REPLY ON YOUTUBE
How are the hdd temps it that? They seems to be pretty crammed and that I/O boars seems to cover whole fan.
REPLY ON YOUTUBE
Thank you. I’d love to see the next steps: actually connecting the box to the internet and your in-house network and configuring the system to function as intended. Good job!
REPLY ON YOUTUBE
what an unfortunate intro…
REPLY ON YOUTUBE
Do I need a sata power splitter cable?
REPLY ON YOUTUBE
Helpful hints:
1) first boot the motherboard outside of the case. If it is dead you don’t want to be wasting time installing it and routing cables
2) never use a cheap USB drive. Use a Samsung Fit or Bar USB Drive. You can do a search for the guy who tested them out and they beat out the rest. I am not sure but I think you can clone the USB. If so get two so when the first one dies you are not scambling looking for configurations.
3) update the BIOS. If the board dies it can be RMA’ed.
4) Use the Preclear tool in Unraid on the hard drives before using them. Side note, if you want a really nice NAS case SuperMirco offers a 4 bay one. It is not cheap but it will last and also keep your drives cool. best of luck.
REPLY ON YOUTUBE
back when i build my nas , i buy a full atx lga 1150 with 2pcie 16x 2pci 6 drives 4dim , for 70eu , and got a celeron for 40 that i later upgrade with i5 , got a 10gb nic , and still got a free pcie for gpu or extra storage , and house everthing in old style case that had 8 drive slot , and 4dvd slots , yes is bit bigger and you may need more time to swap a drive , but is much more powerful and upgradable ,
REPLY ON YOUTUBE
Very helpful thanks for taking the time to put this together ????????
REPLY ON YOUTUBE
It’s really crazy how budget you can go! ATM I’m looking at a total budget of 200usd for a NAS with 16TBs of storage in a raid 6 config no idea how I did it but it’s an amazing thing crazy utility.
REPLY ON YOUTUBE
Are you pointing the power supply fan INTO the case? Is that correct?
REPLY ON YOUTUBE
Have no idea what is going on those permissions.
However.. on my xcp-ng server all i needed to do was to pass through an lsi controller and plug in a disk and by magic it picked it up immediately. Dropped in 5 more driver and a few seconds later i has a zfs pool.. v cool
REPLY ON YOUTUBE
you deserve a like and sub
give this man a like
????????????????????????????????????????????
it’s rare to find legend people nowadays
Thanks man that was super helpful
❤
REPLY ON YOUTUBE
Those connectors for front panel are standard front panel connectors. They’re not on your motherboard because you bought a cheap ITX one.
REPLY ON YOUTUBE
Wow. another great video. Thanks so much for all the excellent content. I’ve been gearing up to replace my old Dell PowerEdge r510 12-HDD server. It’s such a noise generator and power hog. I wonder if you could maybe do a video that focuses on daisy-chaining servers for more space. I don’t want to manage multiple Unraid instances. What I’d like to do is set up one server and then attach multiple SANs as my library grows.
REPLY ON YOUTUBE
Thaks a lot for this! It made building my N2 NAS a breeze. Different motherboard, different power supply, but this video is an excellent resource in any case.
REPLY ON YOUTUBE
Are you getting laid by the word? Lol
REPLY ON YOUTUBE
Be Real ,,, just Sellect qnap !
REPLY ON YOUTUBE
Great experiments! May I ask What’s the power consumption of this DIY NAS? Also if we don’t mind put the power block into the case, can I use my old pc regular power block to power up this DIY NAS? Many thanks!
REPLY ON YOUTUBE
Upvoted for the bird
REPLY ON YOUTUBE
In the days of lore, way back, when Drobo first appeared and later all the little NAS boxen were born; I decided that they were too expensive and way under-powered. Then I found a way to build my own home lab NAS, one where I could host containers as well as serve shares, etc. This predates Unraid and TrueNAS. Many pros were building rackmount 4U servers but then came along some very well suited m-ITX server boards. Supermicro, Asrock, Gigabyte, etc. The first build utilized Joyent’s fork of OpenSolaris and their base image called SmartOS, providing ZFS, Zones, networking, etc. in a private cloud. Then Linux became capable of the same (Joyent was bought by Samsung and development slowed). I switched to Ubuntu Server with LXD to manage native containers and VM’s and Microk8s for Kubernetes. I was even able to import my zpool. But now I am thinking I may switch to TrueNAS Scale and build a 3rd generation NAS with a Jonsbo NAS case. Newer m-ITX boards have come a long way. The advent of those M.2 PCIe SATA adapters, will free up the 16x PCIe slot allowing for dual 10GbE network card. Ultimately, home builds can be built for less but if you put a bit more power into the build, you get a lot more out of it. However, you will end up being more expensive but your NAS will be more of a home lab server.
REPLY ON YOUTUBE
Also resale value of turn key is something worth considering. DIY resale close to zero once components get old. Whereas synology keeps value well.
REPLY ON YOUTUBE
The hair is a nice touch, funny
REPLY ON YOUTUBE
How reliable is apevia?
REPLY ON YOUTUBE
I have the same NAS case, and I’m curious about your hard drives’ behavior. Mine are always active and noisy, even when not in use. Do you experience the same issue with your setup?
REPLY ON YOUTUBE
Perfect system! However, I’m VERY curious what the power consumption (in Watt) this system averages in with all HDD’s spun down?
REPLY ON YOUTUBE
Would you make an episode about what’s better? UnRAID or TrueNAS? What gives more possibilities? What is updated more often? And what, in general, will be a better solution?
REPLY ON YOUTUBE
very informative easy sub from me
REPLY ON YOUTUBE
I’d like to see a build done that doesn’t rely on chinese parts. I really don’t trust them in my network.
REPLY ON YOUTUBE
Thanks for the great info.
I have just built my home made NAS based on this tutorial with Unraid and it is spinning away happily on my table.
I deviated slightly by going with the Node 304 case which I purchased locally from eBuyer for £74 delivered and the same board with 4 GB memory and the 128 GB NVME from Amazon for £151. With the saving I also added a 10 Gbe PCI card from Ali Express for £71 and a Hisource 4 port 2.5 Gbe + 2 10 Gbe uplink ports for for £29 from Ali Express
I have to admit that getting the 10 Gbe link working with Unraid (!***!) was a bit stressful, but everything now works as it should.
Onwards and upwards and thanks again.
REPLY ON YOUTUBE
hi, what about the power consumption
REPLY ON YOUTUBE
loved the tutorial but that constant banging on your desk coming through your mic needs solved, very annoying
REPLY ON YOUTUBE
Your psu needs to be turned 180°, the mesh on the case is for the psu fan
REPLY ON YOUTUBE
Thank you so much for this detailed video. I used it for my own Jonsbo N2 build and it was so helpful with the step-by-step instructions and guidance on the gotchas. It saved me so much time to pre-plan. Excellent video!
REPLY ON YOUTUBE
how much power does it max out at?
REPLY ON YOUTUBE
Whats the best server grade psu for this diy NAS to run 24/7?
REPLY ON YOUTUBE
Better than qnap not difficult, better than Synology ? At this price point highly possible
REPLY ON YOUTUBE
Hey, as this vid is 4 months old, I just wanted to ask if the mobo is holding out good? I’ve been considering it myself, just wondering if theres anything you found out later that someone looking to buy one may want to know before making a decision. Cheers for the good vid ????
REPLY ON YOUTUBE
if you review NAS, would’nt average power draw, and especially “IDLE” power draw be a pretty important topic?
REPLY ON YOUTUBE
Do I trust my data to an AliExpress motherboard… But, is it better than a NAS in terms of build quality? Who knows?
REPLY ON YOUTUBE
Hey great video just wanted to check what mobo you used for this build as would be really handy as struggling for itx boards. Cheers Phil
REPLY ON YOUTUBE
HI, Great vid! I must have watched this a few times now, and am currently building my own. Currently unable to track down the pdf for the header pin layout. Did you ever add the link in for that?
REPLY ON YOUTUBE
QNAP and Synology better start being competitive, or they will disappear.
REPLY ON YOUTUBE
Would love to see more videos like that
REPLY ON YOUTUBE
Looks like you like Nas alot lol.
REPLY ON YOUTUBE
???? Listening to Nas while building a Nas
REPLY ON YOUTUBE
I think the biggest pro for Synology is the software package and ease of use and not only putting together a case, a board and a JOBD.
REPLY ON YOUTUBE
The Floppy Disc Sounds killed me really … ????
REPLY ON YOUTUBE
Thanks bro!
REPLY ON YOUTUBE
This video is really well done. I have been trying to give an answer to this question for four years now. The problem is summarized at the end of the video. My time costs much more than what I save by building it myself “from scratch”. But on the other hand I am too stingy , and I like to build things myself. Frustration.
REPLY ON YOUTUBE
Did anyone suggest Xpenology DSM (open source Synology OS)?
REPLY ON YOUTUBE
Would love you to take a look at the CWWK J6412 NAS/6 SATA/Dual M.2/ITX/i226-V enclosure/motherboard combo. Looks like a pretty interesting case.
REPLY ON YOUTUBE
Good job. I always advice to just use an old pc or used mini pc you have and it would do the mainly same job if DIY. Easy upgrade and maintenance.
REPLY ON YOUTUBE
The price of the shipping from Aliexpress not only varies, but can make or break your budget so it should definitely not be left out. For example here are the prices as of Nov 2023:
Jonsbo N2 (Aliexpress): $93 + $97 shipping to the US = $190
Jonsbo N2 (Amazon): $150
Jonsbo N2 (Newegg): $140
Jonsbo N3 (Aliexpress): $117 + $99 shipping = $216
Jonsbo N3 (Amazon): $170
Jonsbo N3 (Newegg): $162
As you can see, if you are in the US it’s a no-brainer to buy the case from Amazon/Newegg as Aliexpress offers an inferior shipping experience.
REPLY ON YOUTUBE
I built a NAS with a Raspberry Pi4B and a 18TB USB HDD. Beat that.
REPLY ON YOUTUBE
Watch this video in x2
REPLY ON YOUTUBE
I love the Jonsbo N2 and N3 builds but if you’re running RAID-6 you really want a minimum of 8 x 3.5″ drives not just 5. Are there any good NAS cases for this?
REPLY ON YOUTUBE
I am thinking about to follow this route but going with Truenas. Is that a bad idea? Bottleneck?????
REPLY ON YOUTUBE
fantastic video mate.
I do have some questions, if you aloud me to ask.
privately.
Thanks so much
REPLY ON YOUTUBE
The Amazon reviews of that TopTon board are awful! 🙁
REPLY ON YOUTUBE
haha quality intro – happy anniversary
REPLY ON YOUTUBE
Just a couple notes on this as I have the same case. First if you did NOT use the angled sata cables on the backplane they won’t warranty the case. Second I found a flat dual molex adapter that saved me even more room. Between the angled sata cables (same slim blue your using with 90 degree one end), and the molex adapter I was able to replace that loud inefficient 15mm fan with the standard 25mm one. Also replaced those grates on both side with basic wire grills. Both those things got me better air flow as well as less noise.
REPLY ON YOUTUBE
Hi there! Has anyone used one of those china boards a little longer? Can they be trusted the data to throw at them in the long run? What is your opinion?
REPLY ON YOUTUBE
Thanks for the video. I watched it until the end. Skipped some during the video but watched minimum 90%. I may try this at home. ????
REPLY ON YOUTUBE
i’m a bit disappointed, your title said you were gonna build a NAS, but you just assembled a NAS :/ (i was expecting electronic component tinkering, not computer parts tinkering…)
REPLY ON YOUTUBE
I have just built a TopTon board (Same version) with a Jonsbo case. One note is you can actually fit that board out with 64Gb Mem so Truenas has plenty of spare capacity. I also spec’d out a lot better power supply just for the peace of mind. Wish you had done this review earlier as I would have gone with the case you had.
REPLY ON YOUTUBE
hell yeah
imma build this
REPLY ON YOUTUBE
Thanks for sharing. You’ve had it for at least a month now. How have the drive temperatures been? Cooling on that case seems like it might be an issue.
REPLY ON YOUTUBE
We are definitely not all humans. Both trolls and robots in here…
REPLY ON YOUTUBE
Looking forward to your N3 build with the i9 mobo – I am planning a very similar build and would love your feedback on the setup (power draw, performance, etc).
REPLY ON YOUTUBE
It’s not an environmental disaster until you dispose for the packing in the wrong way. RECYCLE!
REPLY ON YOUTUBE
I’m a little confused… Did you show the correct extra parts (Re: video ~35:00)? Of the four parts shown, it seems that I would need (1) of the parts shown (top & bottom right side parts), but nothing from the left top/bottom parts. Additionally, if I select either top or bottom right side parts then I now have (2) 20-pin connectors (one from the front panel USB and one from the adapter (top/bottom right side parts)) which now need to go to a 20-pin + 20-pin splitter (not shown on your display of parts). Unfortunately, my Topton MoBo has not arrived yet so I can’t reference what is there in order to understand what’s what with all the parts you showed. Can you provide any more clarity to this? Thank you so much and thanks, again, for making this very informative video!!!!
REPLY ON YOUTUBE
Investing that much time and effort probably isn’t worth it unless you have time to waste or very specific possibly high-end applications.
Also, you may want to got get a more current ITX board + CPU for more performance and RAM in this case.
Honestly for a simple setup like that it probably is better connecting something like a TerraMaster D5-300C or ORICO-NS500RC3 to a Raspberry Pi.
REPLY ON YOUTUBE
I dont think you save so much time going turn key as you have to learn the software. Easiest is take an old machine, install Nas software learn how it fits in your life. Then upgrade hardware later. As a person whos built many computers, the hardware part wasnt the issue. Learning the Truenas/Proxmox/Unraid interface probably didnt take longer than the Synology interface. Now I have a machine which can grow cheaply if needed.
REPLY ON YOUTUBE
Those front USB connectors are standard, USB3 and USB3.1 for the Type A and Type C connector respectively, and are found on most modern motherboards. That Topton board is made as cheaply as possible, so it only has basic USB2 connectors, which is why they wouldn’t fit.
REPLY ON YOUTUBE
whats a nicker?..
REPLY ON YOUTUBE
Totally a great replacement for another orange channel. You explain everything that you had to go through and other options to tackle those issues. Great vid! It s subscribe for me bud!
REPLY ON YOUTUBE
stop banging the desk man… or move your mic.
REPLY ON YOUTUBE
2nd Hand HP Microserver G8 is better.
REPLY ON YOUTUBE
34:29 I see where the 3.1 connector is different, but what’s with the 2.x? Also the ali link for Topton doesn’t seem to come with ram or ssd anymore?
REPLY ON YOUTUBE
Very informative video. Could a person substitute a standard ITX board with a low end processor in your build?
REPLY ON YOUTUBE
according to Topton, the pin headers on their motherboards (N5xxx and N6xxx) is only USB 2.0, were you able to confirm/deny it? The blue ports on the mobo however are indeed 3.x
REPLY ON YOUTUBE
“Nas Is Like” at the beginning. Excellent touch ????????
REPLY ON YOUTUBE
So, do you have the full sata bandwidth available on this system ? If you’d put sata ssd for example, would you be limited by the pcie lanes of the celeron ?
REPLY ON YOUTUBE
This was oddly relaxing to watch, but maybe I have issues if watching a bloke build a NAS before bed is my idea of a good time ????
REPLY ON YOUTUBE
YANV. Yet Another NAS Video. ????
REPLY ON YOUTUBE
your antiquated selection is crap in 2023.
Fractal Design Node 804 – Black
MSI PRO B550M-VC WiFi ProSeries Motherboard
Ryzen 7 5700G 8-core, 16-Thread Processor
Thermalright AXP120-X67 WHITE ARGB Low Profile CPU Air Cooler
Corsair VENGEANCE LPX DDR4 RAM 32GB (2x16GB) 3200MHz
WD_BLUE SN570 1TB M.2 2280 PCIe Gen3
IBM M5015 Array Card, Megaraid 9260-8i SATA/SAS Controller RAID 6G PCI-E x8
INTEL Original X540-T2 Ethernet Converged Network Adaptor X540T2BLK
8×3.5 drives, + 8x 2.5 drives & small cage
REPLY ON YOUTUBE
Congratulations on the 100K it is quite an accomplishment. Brilliant video. Fantastic presentation. I have a big unraid system featuring a Xeon E3 with 16 bays. but I do EVERTHIING on this. I have never regretted building my own NAS.
REPLY ON YOUTUBE
@35:00 – I love the very cool special effects in your video.
REPLY ON YOUTUBE
Congratulations on your 100k+ subscribers! ????
Is Topton a trustworthy brand?
I’ve never heard of them?
REPLY ON YOUTUBE
Nice job, what about the power consumption?
REPLY ON YOUTUBE
Did you miss the license cost of the unsaid software? You come close to the cost of a synology 6 bay.
REPLY ON YOUTUBE
Would this case take a low profile GPU like the gigabyte rtx 4060 low profile?
REPLY ON YOUTUBE
Define “better”!
One of the slower builds I have seen but for next time:
Step number ONE:
Test 100% of the components BEFORE cramming them into the case!
REPLY ON YOUTUBE
Those USB cables are USB 3.x and it appears that the Mobo you picked has only USB 2 headers.
REPLY ON YOUTUBE
Very nice tutorial. So thorough and complete. My hats off to you.
REPLY ON YOUTUBE
Beautiful build, nicely done, and I love the “on the cheap” side of things (so much, must be the Scottish in me ????) Makes me want to do this rather than get another Synology. I have the skills, but Synology just made things so “easy” that I got lazy. Thanks for the video and congrats on 100K! Here’s to the next 900K ????
REPLY ON YOUTUBE
have you been able to do any performance testing on this build?
REPLY ON YOUTUBE
WTF the Jonsbo N2 price is double what you paid for, and I’m in continental Europe so if anything I should pay less than you! that’s insane, the price doubled in a month…
REPLY ON YOUTUBE
audio is scuff’d, buzzing
REPLY ON YOUTUBE
TopTon makes a mini router with 4×2.5G, 6 x sata plus optional 4×2.5G or 2x 10G. Has anyone tried to use this for a NAS solution by moving to NAS case?
REPLY ON YOUTUBE
<3
REPLY ON YOUTUBE
So the million dollar question. Should i buy this setup instead of a prebuilt?
REPLY ON YOUTUBE
Great video, and the case has standard USB 3 and Type C cables and plugs, the board is the problem, with only 1 USB 2 socket onboard.
REPLY ON YOUTUBE
Why should i go for a n5105 board instead of a equal priced n100 …. newer more performance less power draw …
REPLY ON YOUTUBE
Thank you so much for the videos, appreciate your thorough and critical takes!
REPLY ON YOUTUBE
???? “Nas is like”!!!! Respect ????
REPLY ON YOUTUBE
I built one from used parts on eBay, for the magic price of about £187, 10 SAS 2tb drives i picked up for 80 quid, Dell H200 perc 24 quid( needed firmware changing to LSI SAS 9210-8i ), the motherboard (FM2 with 8gb of DDR 3 and 500w PSU) came to together from what someone was tipping, 64gb SSD OS disk i picked up for around 7 quid, eBay again, the only build that was new was the Mini SAS 36Pin SFF-8088 to 4 x 29Pin SFF-8482 SATA Power Cable 0.5m 20 quid, 2 x Molex to 4 SATA power cable 10 quid and a new ATX case from Amazon for around 30 quid, i manage to pick up 6 BEQUIET 120mm fans for 16 quid, i used TrueNas 12 at the time, now been updated to version13, it runs as my SMB and plex server, its on a 1Gb Lan of which i can use nearly all of the bandwidth maintaining 110MB all the time download(single user at a time), at the end of the day, i really enjoyed building it, it was fun, Im planning on building more, good stuff
REPLY ON YOUTUBE
Every good #MOTHERboard should tell their sons living in the basement to purge unused files and make their bed!
REPLY ON YOUTUBE
the terminology you use is pretty non-standard. the controller board is a motherboard.
REPLY ON YOUTUBE
I can afford to buy a branded NAS, but I prefer to go through similar to what you see in this video, not because I want to appear tech savvy, but because of the drinking involved during and after the build. I especially relish the heavy drinking involved when it fails and I have no one to blame but myself. Cheers!
????????
REPLY ON YOUTUBE
am i missing something about how it performs and power consumption? Will that come in a later upload? Thinking of trying the motherboard/cpu combo
REPLY ON YOUTUBE
I got a white one before, really a nice NAS case!
REPLY ON YOUTUBE
Tht looks like a fake AMI bios, but I guess if it works it works 🙂
Interesting little board
REPLY ON YOUTUBE
EX fkn ACTLY
REPLY ON YOUTUBE
I got the same mobo (justo with the intel N6005)… there’s an internal USB port… just sayin its safer tu put the usb in ther so no one “accidentally ” pulls it out… huge mistake I made with going with a pico PSU… changed it to a 400w… no working fine… thank you for your videos! ther really helped deciding what to get!… went also with unraid
REPLY ON YOUTUBE
“Best Jonsbo N2 Build for Under/Around £250”
You need a maths lesson, parts included in this comes to around £300 not £250 (based on your pricing shown)
Also pricing is a lot higher than you stated form the sources you stated, and you use both £ and $ which is confusing /constructive criticism use one or the other
REPLY ON YOUTUBE
49:16 Well I personally usually chek that 127 other things in the BIOS to make sure I don’t have to reinstall the whole system just because I changed something like SecureBoot only after I installed the OS. 🙂
REPLY ON YOUTUBE
Thanks for the Video! Very nice and interesting! Mind doing some plex transcoding (4k hdr) tests with this system
REPLY ON YOUTUBE
Hey – nice job here. There is also the value of the learning that is in depth – you can also upgrade individual components to go with as you need. The cost of upgrading a turn key is quite a bit larger – you have about the same 2x factor I think. Interesting – worth the hour invested to watch here!
And congratulations!
REPLY ON YOUTUBE
It is a lot more work to set up your own but it is so much more powerful and cheaper. There is no comparison really. I used a retired PC and bought a multibay drive caddy.
REPLY ON YOUTUBE
I just built one for my friend, N6005 + 16 RAM + H6 case + 1 TB NVME SSD + 250W PSU + Unraid Plus, and spent nearly £330.
Of course, I was building this while in China, so the shipping cost is way lower, but spent another £25 mailing it to UK.
REPLY ON YOUTUBE
Hey, I’ve been looking for an alternative to my NAS as mine is currently my old gamingpc, which is complete overkill and higher than ideal power consumption.
Can I as, why this wouldn’t be good to use with TrueNAS at it seemingly fits their hardware requirements.
I’m a bit new to all this, so please excuse me if this is a dumb question.
REPLY ON YOUTUBE
I’ve been wanting to build a NAS for months. Why has it taken this long for the algorithm to recommend this channel? – Subbed
REPLY ON YOUTUBE
One of the best channels on youtube
REPLY ON YOUTUBE
I *loved* this build video. So much detail, great explanation, and it is clearly a done with love for this topic. I’d be interested in a similar build video if you can find a low-cost build with drive trays rather than those off rubber-pull attachments.
REPLY ON YOUTUBE
Kudos to everyone who made this video to happen
REPLY ON YOUTUBE
Awesome video.
Thanks for the good work!
REPLY ON YOUTUBE
It’s not just about the time spent. It’s about how much your data is worth. If you’re not thinking about things like patrol reads and notifications on disk failures. Rebuild processes for the array. Those types of things… you can end up with bit rot or data loss when not noticing hardware failures.
REPLY ON YOUTUBE
It’s so weird to me that JONSBO is a brand of NAS now, when fifteen years ago JONSBO was a line of table lamps at IKEA. (Rather nice ones, too!)
(Unlike a lot of other IKEA product names, JONSBO does not appear to be a Swedish placename, but there was a 20th Century Norwegian artist named Kåre Mikkelsen Jonsborg so maybe that’s the etymology idk)
REPLY ON YOUTUBE
Congrats for 100K! Is there any plan to do test on this system? since I think it is only lack of that right now
REPLY ON YOUTUBE
Does anyone know a small 2.5″ NAS Case ?
REPLY ON YOUTUBE
When i go shopping for the sheep build on Amazon i get the following prices:
case Jonsbo N2 = €225
N5105 Motherboard 8MB RAM/ 128GB NVMe=€221.93
SATA cable = €14
etc,
REPLY ON YOUTUBE
Pretty Nice Video of this build! But the most important question i have is how high is the power consumption ? Is it the same like the Qnap / Synology or is the power consumption much higher because Qnap / Synology did some optimization of their used components ?
REPLY ON YOUTUBE
Congrats on 100k! Another great video of course but one complaint…… holy ads!
REPLY ON YOUTUBE
“Sorry Captain Planet” you had a few clever comments. I have a Synology DS213 that I now realize is 10 years old but it’s all I need with 2 1TB WD Red drives in hybrid. If I had the need I’d be into building my own.
REPLY ON YOUTUBE
New to your channel. NASCompares and you’ve never built a NAS from scratch before?! You can build one better than any QNAP, Synology, etc. for less. As for the USB connectors from the case. They match EXACTLY what they are since one is USB 3.0 and the other is USB-C 3.2. There is nothing non-standard about them. The issue is your motherboard only has USB 2.0.
REPLY ON YOUTUBE
Good video but it’s missing something very important at the end.
And it’s speed test on sub file system for example.
Also with/without cache
REPLY ON YOUTUBE
Very educational. Thank you!
REPLY ON YOUTUBE
There was no throughput test results ???? Cited MB comprises 1 SATA shared by 5 interfaces. That’s the main drawback for this NAS. Or is it meant to be for the first DIY device?
REPLY ON YOUTUBE
Brilliant video! This is the best tutorial and guide I’ve seen for building a fully-functional, do-it-yourself NAS. I especially appreciated the step-by-step details, and your objective, brand and device-specific recommendations, evaluations, and critiques of each of the components. The Unraid solution allowing the use of such an enormous variety and size of SATA disk drives is likewise amazing. You have motivated me to take this on myself. Thank you! Now subscribed.
REPLY ON YOUTUBE
You’ll send it on skipe? What’s that
REPLY ON YOUTUBE
been a sub since 25k and your HDD info helped me on my zfs nas build years back haha, glad to see your channel grew and helping new viewers !
REPLY ON YOUTUBE
Did you get the PSU in the right way? Looks like the fan is blowing in to the case? Good job and congratz to 100 000.
REPLY ON YOUTUBE
UI’ve built Jonsbo N2 nas a couple of months ago. It is important to order the angular SATA cables. I also advise 65mm cpu fan.
REPLY ON YOUTUBE
699 squid is too high
REPLY ON YOUTUBE
Been down both paths for 20+ years. If I want to impress my peers I build my own servers. If I want to impress my family get a Synology. Played with Unraid to make hardware pass through setups with Windows XP/98 systems and 3DFX and Creative EAX cards and its an ongoing project, fraught with many many issues. They are fun projects, but you will get to the stage that other hobbies call you and a Synology is the way to go. After all, we don’t live forever and the kids will inherit them, so they need something less IT knowledge base intensive.
REPLY ON YOUTUBE
I’ve been looking to upgrade my Synology to a DS423+ or similar, that’s what brought me here.
But, from what I could see, this build is just not worth the cost or hassle when I can get a pre-built unit with Synology’s DSM that is basically plug and play. Great if you want to build your own system for the hell of it, but personally I just can’t justify the time.
REPLY ON YOUTUBE
One recomendation I would make is using a way better power supply like an FSP or Sparkle to enhance the reliability and stability of the build (start with a good foundation) and to turn the power supply around so the vents allow the power supply to suck in cool air and the rear to exit the heat. Most newer motherboard do use the USB3 connectors provided by Jonsbo. The rest of the video is great. Congratulations to your subscriptions! Dr. Dave
REPLY ON YOUTUBE
unraid is so expensive you can buy more powerfull hw and go with truenas and be better off
REPLY ON YOUTUBE
I’m just wondering.
Wouldn’t it be better if the vent grill of the PSU face the left side of the case?
REPLY ON YOUTUBE
Hmm way less money then i thought. Built my own stuff sense my early teens but never looked in to NAS. Now days whit all the data we have on our hands this might be a good time to start my first NAS project. Grats on 100k and thanks for the info.
REPLY ON YOUTUBE
What a fantastic guide! I THANK YOU!
I’ve assembled PC last time probably 35 years ago – not many things have changed since then I can see.
Btw why did you go with 5105 rather than 6005? No big price difference there…
You have kept the t-shirt but you have changed the watch between the recordings – even 2 times !!! 😉
REPLY ON YOUTUBE
you inserted the PSU wrong side in…. correct it pls.
REPLY ON YOUTUBE
Hate to be the one to say it: no ECC
REPLY ON YOUTUBE
I gave up halfway through, too many ads, it’s unbearable!
REPLY ON YOUTUBE
The good thing is that the fan is not at all cluttered by all those badly managed cables, and the air circulates perfectly well.
REPLY ON YOUTUBE
No, thank you for the fantastic video. Hope you hit 200k soon you guys deserve it. Really appreciate the thorough details My one tip would be to invest in a build mat for that poor old scratched table, helps dampen noise, stops things rolling, can be anti static or have a brand logo.
REPLY ON YOUTUBE
Could you provide a download link for N5105 motherboard technical layout pdf? I’m curious about the details of the various headers on the mobo you used in the build.
REPLY ON YOUTUBE
Congrats on 100k! This was an interesting video… I look forward to seeing you put it through it’s paces. It’s a shame that the Jonesbo case only holds five 3.5″ drives, though… if it at least held the full 6 that motherboard and cable supported, it might be more of a contender for my next upgrade dollars, once my 4-bay Synology is no longer adequate. (Doesn’t seem worth the money to upgrade and add only a single drive)
REPLY ON YOUTUBE
After seeing the GUI of Unraid and the price of the total project, I am very happy that I decided for a Synology solution ….
REPLY ON YOUTUBE
Why call a motherboard, a controller board? BTW get a magnetic dish, try are great keeping all the screws etc together.
REPLY ON YOUTUBE
Synology DSM beats any other NAS OS… for most people.
REPLY ON YOUTUBE
Congratulations on 100K I have been interested in building my own NAS and have been watching your channel for some time now. Tons of information you guys are doing a great job!
REPLY ON YOUTUBE
How about the new n3 case build?
REPLY ON YOUTUBE
I don’t understand why people put those awful N series Intel CPUs in these devices, a 5600u/5800u at 15-25w is so much better it isn’t funny.
REPLY ON YOUTUBE
I watched this vid and got the Tipton, I can’t work out how to turn down the fan header which seems to run at full whack all the time which is annoying, I don’t see it in the bios only the cpu. Is there another way to control the fan header?
REPLY ON YOUTUBE
For a future video, I would be interested to know how that Jonsbo N2 case handles the heat of a 13th gen i3 or i5 or i7. Does it throttle badly? Does it cook the drive underneath?
REPLY ON YOUTUBE
congrats on the 100k I can’t believe you don’t have more. You’ve been around for a long time and have helped tons of people me included. Thank you for all you do.
REPLY ON YOUTUBE
Would a modular PSU eleiminate some of the cables? More expensive I guess.
REPLY ON YOUTUBE
I am happy that you mentioned the TIME too, but how much do you think the time taken cost you?
REPLY ON YOUTUBE
_Off topic:_
I *love* your watches!
You switched them a couple of times. How many retro-watches do you have?
REPLY ON YOUTUBE
I’ve built many computers over the years. For me, assembling the hardware is fairly easy, configuring the software/OS is what will be a challenge for me. I have two old synology NASes and they’re ok. I’m looking to upgrade, so having the option to build a new NAS is a good thing to have. Knowing me, I probably won’t build because the software seems like something I would have to invest time into learning (and I don’t have the time unfortunately). The detailed guide on the website is really good and I will be bookmarking it in case I change my mind.
REPLY ON YOUTUBE
That’s the pink g-shock square i’ve never seen before.
REPLY ON YOUTUBE
Thanks guys. Congrats on 100k subs.
REPLY ON YOUTUBE
Congrats on 100k subs
REPLY ON YOUTUBE
Congrats on 100k subs! I also built a NAS/HTPC (with TrueNAS) in this case recently. For the most part, I love it and would absolutely recommend it for DIY NAS/HTPC builds.
Regarding the not-so-quiet case fan: if your motherboard has an extra fan header, connect the fan to that instead of the drive backplane. The backplane has no speed control and runs it at 100% speed 100% of the time. But hooked into the motherboard you can set the speed in the system’s BIOS. Mine now runs very quietly while still keeping the drives at 30-45°C (depending on load).
My only gripes with the case are:
1/ I wish the shank (the unthreaded part) of the bolts for the drive track grommets were longer so that they could be screwed in tightly.
2/ Why is the dust-catching mesh only on the side grills of the motherboard section but not on the top grill? It should be the opposite since the top is where most air intake will be happening and the sides would be exhaust (or they could have put mesh on all the grills). I removed the mesh from the sides of the motherboard area and hot-glued a mesh to the top.
3/ Too many different bolt types for the exterior. One part has Phillips thumbscrews, another has small hex flat head bolts, another has Phillips truss head bolts, and still another uses the standard Phillips hex head case bolts. If those hex flat head bolts were Phillips instead, the whole case could be managed with a single Phillips screwdriver. And the truss head bolts could have just been standard case bolts.
REPLY ON YOUTUBE
That front USB3 is standard, it’s just not included on the board you chose.
REPLY ON YOUTUBE
Recommended Jonsbo N2 NAS Builds for $250, $500, $750 and $1000 – https://nascompares.com/guide/recommended-jonsbo-n2-nas-builds-for-250-500-750-and-1000/
REPLY ON YOUTUBE
Just to point out the metal thing you call “backplane” is actually called “i/o shield”. There’s a backplane on this case though and that’s the green board on the drive bay where you connect your drivers.
TrueNAS would’ve worked, although it’d have complained about not enough memory. it would’ve probably been fine though.
And congrats on 100k subscribers mate.
REPLY ON YOUTUBE
What an epic intro!!! And congratulations ????
REPLY ON YOUTUBE
Actually great to see this option being shown, between an off the shelf ready to go NAS and a rack mounted NAS (but not everyone has the space for 1U, 2U or even 4U racks). I might go down this route next time.
If you can find one get the Intel N100 board instead, for a little more money (coz it’s newer) it’s way more powerful then the N5105, I’m running pfSense on the Intel N100 as my router, but I haven’t seen a board only version on Aliexpress yet although the search is terrible, it’s just what I’d do, especially if you wanna run lots of containers or CCTV recording, the N5105 can do that just fine, coz I’m doing it on my QNAP TS–464, just thinking more longer term.
Robbie, one thing that might be worth testing is PSU orientation and temperatures, I see you put the fan facing inwards, would be interesting to see if temps on the motherboard and in fact drives were higher or lower if the PSU was facing out through the case vents, and thinking about after seeing Gamers Nexus test a Fractal Design mini ITX case, if there’s any sound difference the orientation.
REPLY ON YOUTUBE
Robbie, how about a video where you give us a glimpse of your upcoming videos and open the comments to request videos. I watch a lot of your older videos as I tackle new projects and find that many are out of date due to software updates, many need clarification ( I need the Step By Step Guide For Complete Idiots type instruction), and asking questions generally gets no replies from anyone.
REPLY ON YOUTUBE
Nice project but some improvements are possible. For example some cable management should be in order in the space behind your fan. As it is now the cables are obstructing the airflow to the Sata backplate. And the airflow is already disputable as it is with such constructions. And by the way: that “backplate” is also known as an i/o shield.
REPLY ON YOUTUBE
Congratulations on 100K subscribers.
REPLY ON YOUTUBE
Great video, exactly what I was looking for.
I would like to point out a detail that was left out about the total cost, standard low budget PSUs normally have abysmal power efficiency under light load which means that the PSU could even pull double the required wattage from the wall (so, half goes to waste because of inefficiency), over a span of 5y this could add up to a substantial difference in the final price.
(this is based on the fact that normally a NAS comes with a 12V power supply which is designed for that type of load while a standard PSU for PCs has 3V, 5V and 12V rails and the unit normally has its peak efficiency around 50-65% load)
REPLY ON YOUTUBE
Hi, do you have a video tutorial complete for how to do install matiadb on nas qnap and setting all for Kodi in best way? Thanks.
REPLY ON YOUTUBE
I’ve been thinking about building a NAS myself but conflicted with platform. I want storage but also the ability to run a plex server and a small vm or two for system monitoring and other random things.
Would a topton N6005 board suffice for this or, do I need to go with a ryzen 5700G?
REPLY ON YOUTUBE
N3 is even cooler
REPLY ON YOUTUBE
100K congrats.
REPLY ON YOUTUBE
Danke!
REPLY ON YOUTUBE
Danke!
REPLY ON YOUTUBE
Great video, and congrats on the 100K although I’m only just finding the channel now. Currently running 3x Buffalo Linkstation units on RAID 1 each and looking for something to increase my capacity/drive use efficiency and this has been a huge help. Any recommended 6x 3.5″ bay cases out there?
REPLY ON YOUTUBE
“Nas is like” for the ringtone is just sublime! ???? Congratulations on 100K subs! This channel guided me on HDD choices for my Jonsbo N1 NAS. Keep up the great work!
REPLY ON YOUTUBE
Great Video. I got motivated to build my own NAS, but when I checked out current prices on the recommended parts, I ended up with a $500 shopping cart on Amazon. Bummer. I guess word got out. That’s generally what happens. Still looking to keep the cost to about $250 – $300 . . .
REPLY ON YOUTUBE
Does any air actually flow out between the drives? I mean, that’s the point of that case fan right?
Why would you run the OS from the USB stick? Wouldn’t it be considered better practice to use the nvme or the last sata for a small ssd?
REPLY ON YOUTUBE
This video is really heplful to beginner want to build nas, for my case i think i’ll replace mobi with b660m itx + i3 13100f.
REPLY ON YOUTUBE
Really helpful
REPLY ON YOUTUBE
Gotta love Amazon over package. I’m about to build similar, but using a Fractal Nice 304 for £70 from Amazon.
REPLY ON YOUTUBE
I was planning to build exactly the same thing with the same board. This will be useful once I got around to building mine. Thanks much!
REPLY ON YOUTUBE
I may have missed it, but was there a power consumption figure mentioned for this? PSU efficiency is quite important when you’re leaving something running 24/7! I was tempted to build one with a pico itx psu but daisy chaining power connectors is very frowned upon to get the necessary molex/sata connections!
REPLY ON YOUTUBE
Congrats on 100k – well deserved! Loved the video and it was very cool to see the whole process – especially for the price!
REPLY ON YOUTUBE
I purchased the QNAP tvs-h874 with the i9 processor. Now I need to build this DIY NAS:-(
REPLY ON YOUTUBE
UK retailers sell that case and btw the N3 case is coming very soon.
REPLY ON YOUTUBE
Nice video, thankyou congratulations to 100k subs. I am horrified by the psu. This thing looks like fire hazard, I would not connect anything to it. Was probably the cheapest shit money could buy.
REPLY ON YOUTUBE
Wouldn’t it be better to put the power supply the other way around, so the fan is drawing the air through it’s dedicated grill on the NAS side? Or there was a particular reason to not do that that I haven’t noticed?
REPLY ON YOUTUBE
What be a better board for this with a more powerful cpu?
REPLY ON YOUTUBE
congrats Robbie
REPLY ON YOUTUBE
Congrats on the 100k subscribers!
REPLY ON YOUTUBE
Congrats on 100K from Ukraine! What its power consumption on idle? I’m lookin for power efficient configuration.
REPLY ON YOUTUBE
Congrats and fun build
REPLY ON YOUTUBE
Fun! Wish I had build it like this myself last year, but that motherboard didn’t exist back then. Man, what a beautiful case. Mine is huge.
Just as you’ve described, both NAS solutions have their ups and downs. I like both. My Asustor has been nice to me. The ones I built are used to back it up.
REPLY ON YOUTUBE
Been waiting for this video… Same as intro, surprised you haven’t done one ????
Great vid, thanks very much Robbie
REPLY ON YOUTUBE
Where is a space for your YouTube badge? Congratulations… Well deserved.
REPLY ON YOUTUBE
And what is the average power consumption in 24 hours
REPLY ON YOUTUBE
It came in the anti-static bag, but how about the foam that was inside?
REPLY ON YOUTUBE
Congrats, for lightweight use should of gone Open MediaVault (OMV) nice easy JBOD system. Works really well for my home NAS, and of course it’s cheap and open source.
REPLY ON YOUTUBE
Still laughing at the floppy disk drive sound.
Congrats on the 100k!!!
REPLY ON YOUTUBE
We’re still not gotten rid of that molex connector, huh? 🙂
Rather have seen a sata power connector on the board.
REPLY ON YOUTUBE
Congrats on 100k!
REPLY ON YOUTUBE
Another great video, and congrats on the 100K subs.
You’re gonna have to do A LOT more content with this new bad boy. Detailed setup, apps, containers etc. Can’t wait for more!!!
REPLY ON YOUTUBE
Thanks!
REPLY ON YOUTUBE
Thank you! Great video.
REPLY ON YOUTUBE
Something tells me he’s not really talking to anyone at the beginning of the video……just a hunch.
REPLY ON YOUTUBE
Im curious about power supply install. Is the PSU fan supposed to be facing the interior of case rather than the “slotted/vents” in exterior wall of case?
REPLY ON YOUTUBE
Massive Congratulations to You! 100K and many more for you and your insanely interesting content. Thank you.
REPLY ON YOUTUBE
this is for direct play right? for 4k bluray transcode which cpu do i need min. ?
REPLY ON YOUTUBE
You should have gotten the jonsbo n3 instead.
REPLY ON YOUTUBE
not sure if the motherboard has a fan header but that would help with the fan noise, using the motherboard instead of the backplane
REPLY ON YOUTUBE
Congratulations on 100K Robbie! Well deserved!
REPLY ON YOUTUBE
It the max ethernet speed 2.5gb? What are the extra ports for?
REPLY ON YOUTUBE
Cool video idea. It would have nice to see some performance testing on the DIY vs professional NAS. Nice budget build for sure though!
REPLY ON YOUTUBE
Sweet! What’s the idle power consumption on this bad boy?!?
REPLY ON YOUTUBE
Thank you so mutch @Robbie and eddy for the great videos and geting to 100K you both deserve this and more @NASCompares ps how about a DIY nas with a APU 8 or more cores and 32 gig of ram or 16 gig 6 m.2 0r 6 sata ssd`s and a nic 2.5 or 5 or 10 gig so on you get what i mean then plex test it with a vm and prox mox thanks as ever Kenny
REPLY ON YOUTUBE
The sad thing is that buying a modular PSU and short cables, in order not to have to deal with cable management, would cost more than the entire build.
I really would ike to see a standard to make PC builds as cable-less as possible. Think about HP and lenovo workstations, or the old Mac pro.
Congrats on the 100K milestone.
REPLY ON YOUTUBE
Great video! I’d love you to do a higher spec version of this video and see what you can put together on a £1000 budget. Even if it’s just a demo of what components you’d put together on that budget without the actual build! Would be great!
REPLY ON YOUTUBE
It’s not the peace-of-mind that’s worth the difference in price between the home built unit and a, say, Synology unit. It’s the support you get on an off-the-shelf unit and, specifically with Synology, it’s the software suite; DSM and all the wonderful Synology packages.
REPLY ON YOUTUBE
U drivin me crazzee! Pounds, quids, knickers! Don’t make no $cents to me.????????????????????
REPLY ON YOUTUBE
I do not yet have my first NAS. Even so, to my mind, these videos are informative, helpful and entertaining . Well done and Much appreciated. 100K well deserved.
REPLY ON YOUTUBE
So the total cost in cash terms (but not time clearly) would be in the same order as say a TERRAMASTER F4-423 at around £450. So on that basis what does your DIY approach offer over the prebuilt solution? ????????♂
REPLY ON YOUTUBE
Great video, how long did it take for the Jonsbo case to arrive?
REPLY ON YOUTUBE
Congratulations on 100k keep up the good work I enjoy watching and maybe one day you’ll try xpenology on that build
REPLY ON YOUTUBE
Thanks for the video and congratulations on reaching 100k subs. Definitely a major landmark for any channel.
I’d be very interested in how this compares to the Storaxa if that ever arrives.
REPLY ON YOUTUBE
Congrats!
You’ve read my thoughts with this DIY NAS. But I had some doubts about noise level of each part (PSU fan, motherboard fan, etc.), then got tired of reading reviews for each potential part of this build… Finaly, I’ve bought terramaster and cleaned up my shopping cart at Ali. )))
REPLY ON YOUTUBE
I’ll skip my morning coffee at Starbucks / Costa / Pret until the end of the year and use the savings to buy a Synology.
REPLY ON YOUTUBE
Congrats on the 100k subscribers. BTW i’ve contacted the Build Police so expect a visit anytime soon lol.
REPLY ON YOUTUBE
Robbie, thanks a lot for doing this! I have a couple of questions: (#1) About 23:18 you stacked up all the PSU wires (of the DOA PSU) behind the fan intake guard. Are you concerned about the reduced airflow from the cabling obstruction, and if not, why not? (#2) The RMA PSU came without cables, how did you handle that? One last note, your closing comments on being time rich-money poor and the expertise needed to do all of this are GREAT! So many people just forget about all of that and it’s really important to remember. Thanks again for another very informative video.
REPLY ON YOUTUBE
I love to see real world (random) file transfer benchmarks over a 10 gigabit network as Unraid performs poorly in my experience.
REPLY ON YOUTUBE
Thanks! After being retired for 8 years from IT at a fortune 50 company, I have spent the last 6 weeks watching network and nas videos on YouTube because I got a knee replacement and have lots of time. @Nascompares is one of the better channels and to celebrate thier 100k here’s a tip. If you can afford it, you can too!
REPLY ON YOUTUBE
at 41:48 there is an error that simply states you need to run that BAT file with Administrator privelege level.
REPLY ON YOUTUBE
Yeah, Roll-your-own!… Here goes, DSM.7.2 with RedPill on Xeon E3-1226, 16GB Ram, 10 Sata ports (6 active now), two NVME drives) and a Four Port 2.5GB LAN. All for less than that NAS board plus its ram!. Oh, Container Manager in 7.2 is just brilliant!.
REPLY ON YOUTUBE
Greetings from Germany. I also discovered your channel a few months ago and subscribed. Congratulations on 100k subscribers. I like to watch your channel and it has also helped me in the decision which NAS I buy and then landed on the Synology DS 920+. Self-build is no longer an option for me. I used to assemble my PC myself, but that’s long gone. The professionals can still better assemble a system than me and it’s enough for me if I then only perform the one or other upgrade.
REPLY ON YOUTUBE
Congratulation for you 100k subscribers, well done.
Just a stupid question. Why did you install the PSU with the fan pointing into the housing instead towards the housing? At least I would have installed it the other way around so that it could freely suck or blow air directly outside…
REPLY ON YOUTUBE
If it didn’t have all the foam and well packaged from China, you’d be bitching and complaining if it arrive broken and didn’t have all the packaging
REPLY ON YOUTUBE
Fubar for me!!Dont know what happened video just quit on the video side and voice over. Doc BC
REPLY ON YOUTUBE
Robbie & Eddie congratulations and thank you for the always interesting videos!
REPLY ON YOUTUBE
Great content! Congratulations on a well-deserved 100K!
REPLY ON YOUTUBE
You guys over the pond kill me with the 800 names for money lol
REPLY ON YOUTUBE
I subscribed when there were only a couple thousand subs. I thought to myself that this channel would never break 10K because NAS is such a small market. But here you are, 100K. Congrats!
REPLY ON YOUTUBE
Thank you. Enjoy your shtick 🙂
REPLY ON YOUTUBE
Whe populated all drive and running ,will this case have those humming and noise amplification issue like some prebuild nas ?
Thank you for quality contact
REPLY ON YOUTUBE
Congratulations mate. I’m a recent subscriber, and I don’t watch every video (I mainly skip the ones on low-end NAS’s like the Synology 225X or whatever, as I know I’ll never get those), but you’ve provided great information and even when I feel I have a pretty different lean on a lot of things, I enjoy it nonetheless.
And here I was expecting the 100K special would be Robbie embarking on The Great Seagull Massacre of 2023. Maybe an idea for 200K!
REPLY ON YOUTUBE
Great video! Now…. Let’s do a 2 to 4u rack mount with an Intel I5 or better. Let’s give it some kick. ????
REPLY ON YOUTUBE
BIG Congratulations on 100K, well deserved! Keep it up with the very interesting content!
REPLY ON YOUTUBE
Ok this is going on my watch later playlist. How the hell did you do a complete build for 260 the case itself costs 110?
REPLY ON YOUTUBE
The seagull!!! ????
REPLY ON YOUTUBE
WOW! Best video yet. I will be interested to see if SSDs can be used in place of the HDDs.
REPLY ON YOUTUBE
Thanks for all the great content!
(Everyone else, throw them a tip for 100K Subscribers!)
REPLY ON YOUTUBE
Congrats! Pretty soon you can slap a shiny plaque behind you, or maybe make a NAS case out of it!. A channel I run needs just 8k to hit 100k. Man is it slow going once you start watching the subscriber count 😀
REPLY ON YOUTUBE
This was fun…nice to see you build that in an hour ????
Would have been nice to use a faster motherboard with more memory that can handle more complex VM duties… This seems like something you’d find in prebuilts
REPLY ON YOUTUBE
Congrats on 100K subscribers.
Yeah, I can easily see 10+ hours of build time which at any reasonable hourly rate would easily add $200 to $400 dollars unless one was doing it as a learning experience and was extremely cash poor and time abundant (a student or someone laid off in a severe recession). Reminds me of the old Heath Kits for radios and other electronic devices. Even if one would do it once, would one do it twice, let alone half a dozen times? I am still puzzled by the price disparity between a laptop and a NAS. If I go to my local Target department store I can see laptops from an i7 all the way down to a Celeron. A NAS doesn’t have a large screen or a keyboard why does it cost more to manufacture than a laptop? Or the disparity between a NAS and an Apple Mac Mini. A NAS is brain dead, but has lots of storage, while an Apple Mac Mini has lots of processing power, but little storage and needs a “Time Machine” (which Apple no longer manufactures) for backup. Perhaps there is a synergistic setup between an Apple Mac Mini and a NAS. But, unless there is a new Apple product announcement Docker X86 is crippled on Apple Mac Mini with Apple Silicon (M1, M2, etc) and one is dependent on a limited and aging supply of Apple Mac Minis (which are soon going to lack security upgrades).
REPLY ON YOUTUBE
100k ????
REPLY ON YOUTUBE
Storaxa people crying rivers now.
REPLY ON YOUTUBE
I get the budget objectives of this build but personally I’d want a more standardised components setup. Brand name PSU for sure (e.g. seasonic sgx-500 fully modular), a major brand ITX or matx mboard running a recent gen intel (for transcoding ability so no need for gpu) and a matching case to suit either a storage or performance server bias or both. Unraid has the flexibility for sure I have mine on a 12 year old system running backup for other devices as its main function. I was going to throw it out for ewaste otherwise but it got me thinking with the case it was in being about to hold 10 hdds. That’s often the first time you come across unraid when you wonder what do with old hardware after an upgrade.
REPLY ON YOUTUBE
Congratulations!
REPLY ON YOUTUBE
Those sata cables won’t work. You have to get 90* for the backplane.
REPLY ON YOUTUBE
Congrats
REPLY ON YOUTUBE
congrats on the subs! great video. How high are the heatsinks on the mobo? I have an ye olde HP microserver with nice pro-level drive caddies that I’ve been wondering about updgrading for a while. In the microserver the proprietary size HP Mobo has 30mm high heatsinks, and is squeezed in under the drive bays at the bottom. Do any of the BKHD mobo heatsinks/connectors stick up higher than that? Might work if I can urge the microserver case to develop a new hole for the backplane.
REPLY ON YOUTUBE
Interesting video. But please get your mic off your desk. I listen mostly on headphones and the constant low frequency banging makes the video almost unwatchable. ????
REPLY ON YOUTUBE
How have you never built a NAS on here?! ????
REPLY ON YOUTUBE
Didn’t hear you mention graphics card???? Will it run Plex?? Cheers
REPLY ON YOUTUBE
Well done & congratulations! Thanks for all the great vids ????
REPLY ON YOUTUBE
Congratulation on 100K subscribers. Keep it up and thank you for sharing quality contents and mainly your passion to share unbiased info with us! Fantastic job! ????????
REPLY ON YOUTUBE
Great video. Intrested to see if you can build an all-NVME model without the x1 bottle neck of the consumer models in the market ????
REPLY ON YOUTUBE
Well you got great musical taste… That NAS ringer is ????????
REPLY ON YOUTUBE
Robbie & Eddie – congratulations on 100K and thank you both for the incredible NAS content!
REPLY ON YOUTUBE
X 1.5 is the correct speed to watch this.
REPLY ON YOUTUBE
Well done to reach 100k subscribers!
REPLY ON YOUTUBE
Congrats on the 100k,. Keep going!
REPLY ON YOUTUBE
When a drive fails, how do I know which one needs to be pulled out?
REPLY ON YOUTUBE
I enjoyed this and I appreciate you.
REPLY ON YOUTUBE
Congrats on 100k! Could have done with this vido, when I built in my Jonsbo N2 a few days ago!
REPLY ON YOUTUBE
Congrats on the 100k subscribers. Nice setup. ????
REPLY ON YOUTUBE
Congrats on 100k sub!
REPLY ON YOUTUBE
congrats on 100k
Looks like a nice reference point for comparing the Storaxa review unit 🙂
REPLY ON YOUTUBE
Nice set up … both the intro and the target NAS Jonsbo N2 build idea 😉
REPLY ON YOUTUBE
I just want to say thank you! I have been watching your videos for a bit now and the passion, and need for the truth with no bull sh#t comes through along with the love of what you do. That’s why I can sit and listen to an hour about True Nas and it is compelling at 58 minutes just as it was at 2 minutes. So again thank you for the incredibly tedious and hard work that you do!
REPLY ON YOUTUBE
Thanks!
REPLY ON YOUTUBE
i would only use ZFS when they allow you to expand your errays like raid5 lets you…
REPLY ON YOUTUBE
At first a 1-hour video seemed long, but every point mentioned was pertinent. And it’s the weekend anyway, so. 😉
Only addition I would have liked is an overview of network shares management.
And you are spot-on my user usecase/profile: Home techie power user currently using a Synology that likes its simplicity but that still keeps an eye on other totally open source platforms for a bit more control/flexibility (and lot more verbose logs!!). And so I agree with every single of your comments.
Indeed, an “easy” mode in TrueNAS or more wizards across the system would be greatly helpful because I may be tech-savvy at some level, still maybe not quite the TrueNAS level.
So to have something to bridge the gap between current TrueNAS “complexity” and Synology DSM “simplicity” would be perfect.
The other thing that makes me hesitating from leaving Synology ecosystem is the turn-key/hand-holding/well-integrated (DSM/mobile) apps. But even there — and it’s one of the reasons I’m looking elsewhere — is that in the recent years Synology has seemed to neglect all their non-business apps.
REPLY ON YOUTUBE
Compare this to UnRAID also.
REPLY ON YOUTUBE
I would find it very interesting.
If u would test out TrueNAS scale ad the review u have made now about TrueNAS Core.
It’s out of beta and in the release channel.
And it opens up a tons of possibilities as a Linux user, because of docker and k8s.
I really trust and enjoy ur indept reviews.
It would be great to see that for TrueNAS SCALE.
Best regards from me.
REPLY ON YOUTUBE
Adding a comment here to your most recent upload, hoping to get a reply. Watched 100’s of your uploads now. I need a new nas (4-10 bays). My old one died. Won’t be editing on it or doing anything taxing (fancy) with it, so not bothered with nvme caching etc. Just storing/accessing files locally via LAN. Best option? (Ideally with faster than 1.0GBe)
REPLY ON YOUTUBE
I’d be all over TrueNAS (and/or Proxmox), but I have a QNAP TS-453D and for the life of me I cannot boot off the internal drives. No, I am not happy booting off an external USB drive. Do you, or anyone, have any tricks to be able to boot directly off the internal drives on a midrange QNAP device?
REPLY ON YOUTUBE
Please compare to Unraid too. Thanks. ????
REPLY ON YOUTUBE
There is a debian version of truenas called truenas scale
REPLY ON YOUTUBE
Sweet! Great deep dive as always without being intimidating for us newbies rob! – bit the bullet last year on a tvs-h1288x due to your coverage and don’t regret it as it’s been great overall but with all the gross stuff that’s been happening in the qnap camp, definitely considering potentially repurposing it for a truenas. Possible?
REPLY ON YOUTUBE
I’m looking into a NAS system. But I don’t know how much I want to do with it. Right now I only want storage. But I also bought a raspberry pi 4 just for experimenting, and now I have: an add sinkhole, VPN server, Home Assistent, link to smart meter, DDNS server, selfhosted Bitwarden, node red, ZigBee network, and on and on… In just three months. So yea.. it will probably not only be for storage and will take over all tasks from the pi, start media server, couch potato, radarr, lidarr, security cameras with AI face detection, etc. I think I just have to go with TrueNas because eventually I want it all….
REPLY ON YOUTUBE
I was using freenas/truenas before I got a qnap for ease of use. Truenas wipes the floor with qnap, you just need some patience to get your head around the user interface. Please also advise everyone that you can run truenas on an old pc or in a virtual environment to test.
REPLY ON YOUTUBE
Yayyyyy Robbie is back! I bought a qnap based on your review. Your info was great. Its a shame that qnap decided to, there is no delicate way of saying this, shaft thier user base. I really think this is a fantastic idea and would love to see more of your valuable input. Might be time to get the big hammer out and doctor my tvs-1282. Once more it’s good to see you with your enthusiasm for nas. You are back on the watch list. Thank you Robbie.
REPLY ON YOUTUBE
Thanks for this look at TrueNAS. I’m eagerly awaiting your review of that IXsystems box you’ve got there as well as a “Setting Up” video on it. If at all possible it would be nice if you showed a basic, recommended system setup from the point of view of Joe, Jane and Baby Bag-O’Donuts.
REPLY ON YOUTUBE
is there a light mode?
REPLY ON YOUTUBE
I like to see a video how well Plex would work, for transcoding and server multiple users…????
REPLY ON YOUTUBE
Wow, great timing on this review. Been thinking about setting up a freenas box myself.
REPLY ON YOUTUBE
IX-Systems in the UK????
REPLY ON YOUTUBE
Appreciate the DIY coverage!
REPLY ON YOUTUBE
Will you cover TrueNAS Scale??
REPLY ON YOUTUBE
Make a video on how to set up a personal web server, to host a website. If that is possible, using plugins and addons. On TrueNAS Scale.
REPLY ON YOUTUBE