How to Install TrueNAS Core on a Terramaster NAS Drive – Step By Step Guide
Most new or relatively inexperienced NAS users can be separated into two clear categories. There are those that want to get their hands dirty, spend sensibly on a DiY system in order to take advantage of community built platforms such as TrueNAS Core, and then there are those that are happy to pay extra for the system to arrive prebuilt, but also know that the software that it comes with can be a little more restrictive. However, it is NOT impossible to have the best of both! Today, I want to show you how to turn the remarkably affordable NAS solutions from Terramaster (easily the best Value NAS in the market right now, even when the 2022 range is pretty well hardware equipped with NVMe, 2.5G, Embedded Graphics CPUs and more) into a TrueNAS Core ZFS Powered NAS system. It is considerably easier than you might think, is very easy to reverse and allows you to have the full customization and freedom of TrueNAS Core, a prebuilt 24×7 designed server system and all whilst still getting exceptional value for money for the hardware. Cool right? Let’s begin the step-by-step guide.
Note – a FULL 30 Minute Installation Guide for TrueNAS Core on a Terramaster NAS is available HERE on the NASCompares YouTube Channel
TrueNAS Core Software on Terramaster NAS Hardware – What You Need?
It is worth highlighting that having just a Terramaster NAS is not quite enough and in order to get TrueNAS Core up and running on a Terramaster NAS requires a few extra checks and use of a few items you might have already in the home/office, or a quick $10 shop online at most. In order to upgrade your system to TrueNAS Core, you will need to consider/have the following:
- A Terramaster NAS Drive with (minimum) an Intel 64bit x86 CPU and a minimum 2GB of Memory (recommended 8GB+)
- Download the latest stable release of TrueNAS Core here as a system image (you will be converting this to USB later on) – DOWNLOAD
- Any Data that is currently on the Terramaster NAS RAID that is mission critical to be backed up or moved (as it will be completely formatted)
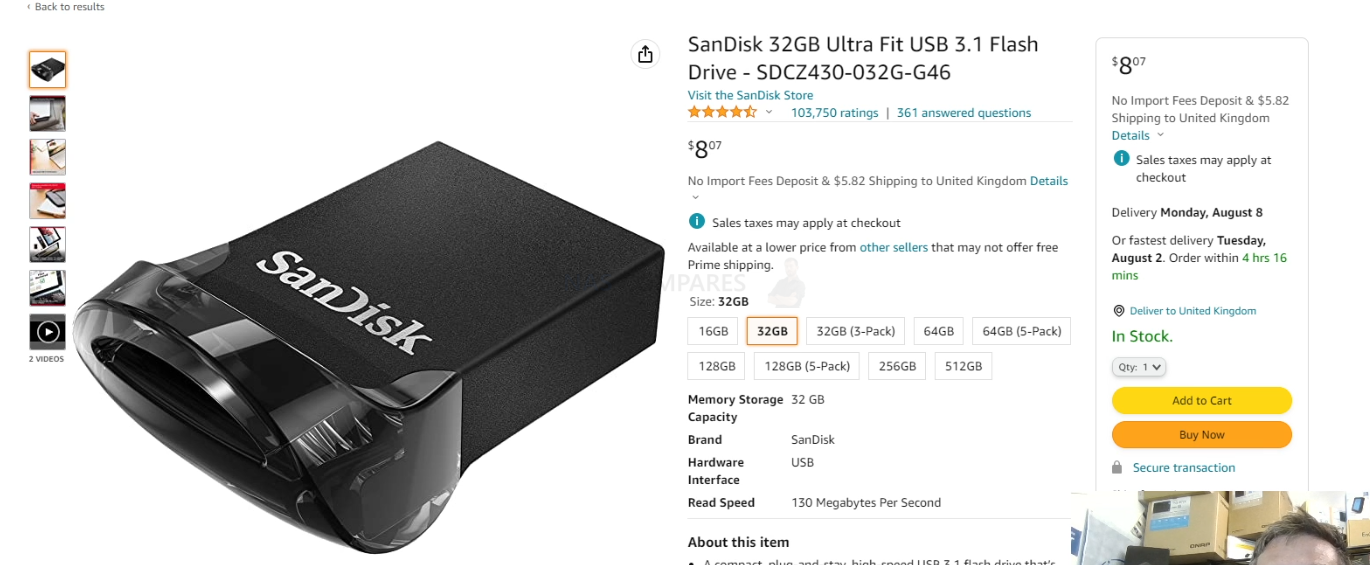
- A USB drive no bigger than 9mm x 17mm x 20mm ( I STRONGLY recommend THIS ONE here from Sandisk, as it is low price and incredibly small, even at 32GB)
- I recommend not using a USB larger than 32GB, due to the constraints of 1st party software to format larger than this in FAT32. Don’t be tempted to spend like $2 more for a 64GB, as the TrueNAS Core installation will occupy the full USB space (as you will create a system-image-USB) and space is utterly irrelevant when the TrueNAS Core installation is so small
- A Disk Image to USB conversion too. I recommend ‘Rufus’, currently in ver 3.19 and can be run in a portable .exe form that doesn’t require installation – DOWNLOAD
- A basic USB Keyboard (example HERE but really, any will do) and an HDMI Monitor (or simply any device that has an HDMI input – NOT output) such as a TV or Capture card
- Hard Drive and/or SSD media (you should already have these, but just in case) for your storage
- Optional – Download Advanced IP Scanner HERE, as it is a really useful tool for analyzing your network and finding your new TrueNAS Core NAS for remote access
That is about it. Most of these (maybe not the USB drive at that physical size) you will almost certainly already have to hand.
Can I Reverse the TrueNAS Core Installation and go back to Terramaster TOS?
Almost certainly YES! I say ‘almost certainly’, as there is one small caveat. When you make the change from Terramster TOS to TrueNAS Core on the NAS hardware, the drives (HDD and/or SSD) inside are formatted to ZFS and used in the new system software. This works both ways if you want to revert back to TOS on the NAS too. So, although the act of reinitializing the NAS to its original software is very easy (simply needing you to replace the internal USB and rebooting), it will mean that any data that resides on the disks inside will be formatted. So, if you are choosing to make a change from one NAS OS to another, make sure you have your data appropriately backed up elsewhere. So, let’s begin the installation of TrueNAS Core on the Terramaster NAS.
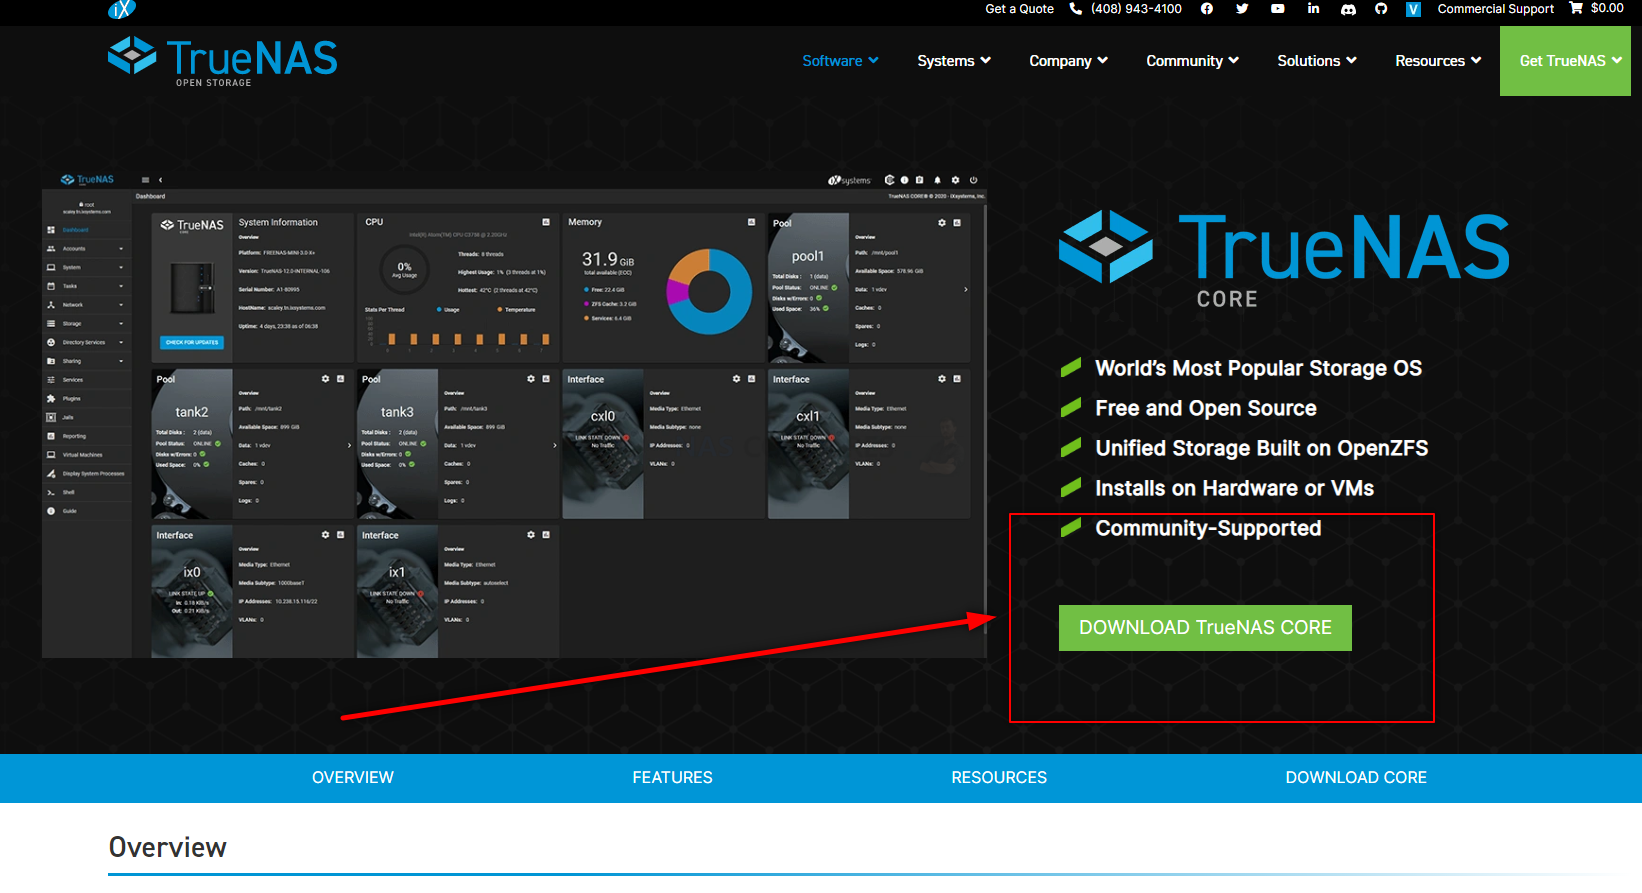
TrueNAS Core on a Terramaster NAS – Step 1, Download TrueNAS Core
Head to the TrueNAS Core website HERE and download the latest stable release of the software to your local PC, Linux or Mac system. Make sure to remember where you downloaded it.
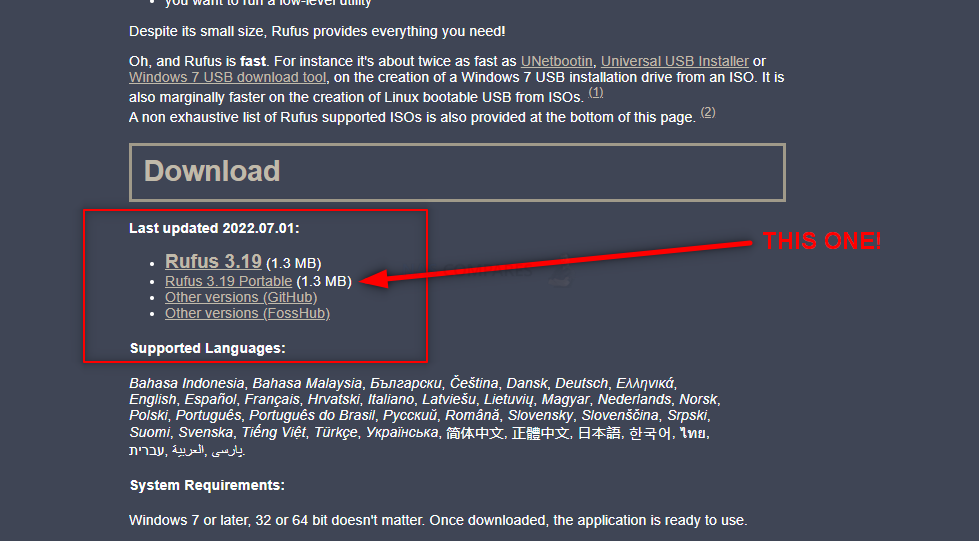
TrueNAS Core on a Terramaster NAS – Step 2, Download Rufus USB Image Tool
Head to the Rufus website and download the latest version of that tool – I recommend downloading the standalone executable file here, as then it will immediately run when you double click the file, without installation etc. It may redirect you to Github, but it will be the same executable file. Once again, remember where you downloaded it.
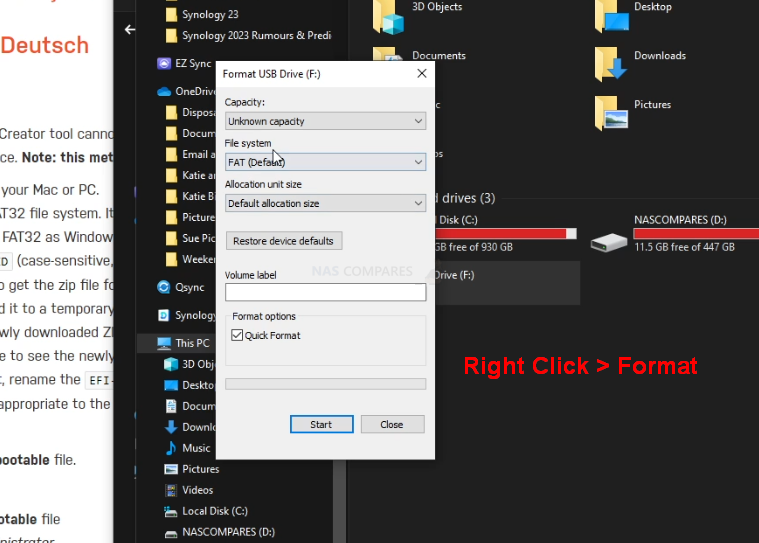
TrueNAS Core on a Terramaster NAS – Step 3, Preparing the USB
Connect the small form factor USB Drive to your system (again, this is the one I used from Sandisk) and after a few seconds, it should appear as an available USB Drive. The drive MAY need formatting (you will be prompted to do so), if that is the case, then you can format it via the system prompts and by default, it will format it to FAT32 (as long as your USB is less than 32GB). If you are not presented with a system prompt to format your USB, then you can head into My PC, or My Computer via a windows computer and right-click the drive, select ‘format’ and format it that way.
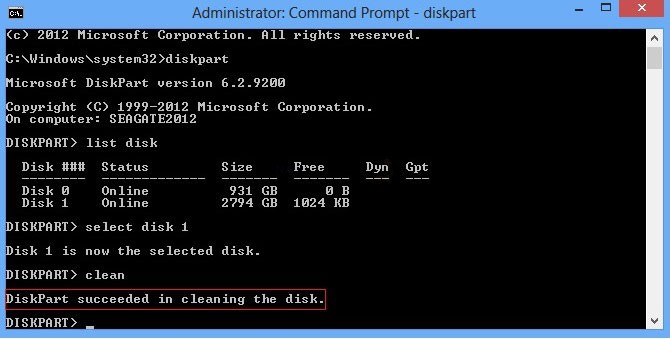
If you have used the USB for other things previously, there is a chance that the drive has existing partitions in place. For that, the quickest way to completely remove any partitions is to open up the bottom-left windows system menu as normal, and then just type diskpart and open the command-line GUI tool. From there, use the command list disk to show the available drives that are connected, you will see your USB (normally disk 1 or 2, but can differ depending on your system layout and can be spotted by the storage amount). From there, type select disk # (where # is the drive number that your USB is shown as) and then type clean, which which will then remove any index structure for the drive (i.e the partitions and existing format) and then you can go back to the My Computer/My PC page and format the drive to FAT 32 as normal.
TrueNAS Core on a Terramaster NAS – Step 4, Creating a USB Installer Image of TrueNAS Core
Open the Rufus application and from there you will see the USB Drive (listed as NO NAME, or ‘UNTITLED’, ETC) at the top. From there, look to the select image/find image option (depending on the ver. of Rufus or your USB Image Creator tool of choice) and find the TrueNAS Core disk image you downloaded earlier). If the drive is not listed, it may have downloaded as a compressed/archive file. If that is the case, head to the location of where you downloaded TrueNAS Core (in your file explorer, not in Rufus) and right-click the file you downloaded. If the option to ‘extract‘ is visible, then you can extract it (i.e unpack it to the original form) in that same download directory. From there, head back into RUFUS and then the TrueNAS Core system image should be visible. Select it, then run the Rufus System image creator tool and create your USB bootable TrueNAS Core disk image.
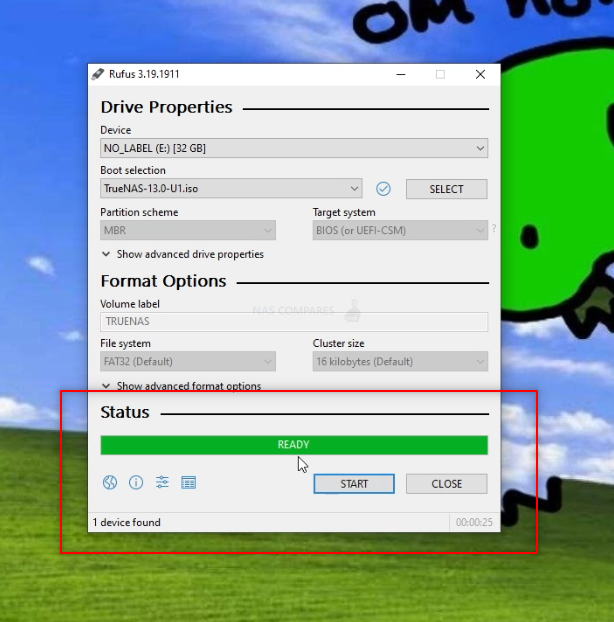
REMEMBER! This will completely format your USB drive and any files that are on that USB will be destroyed. The system image creator tool will turn the USB into a pure boot image tool – the USB will not be usable for traditional storage again unless you completely format it again.
TrueNAS Core on a Terramaster NAS – Step 5, REMOVE THE USB FROM YOUR PC!!!!!!!!!
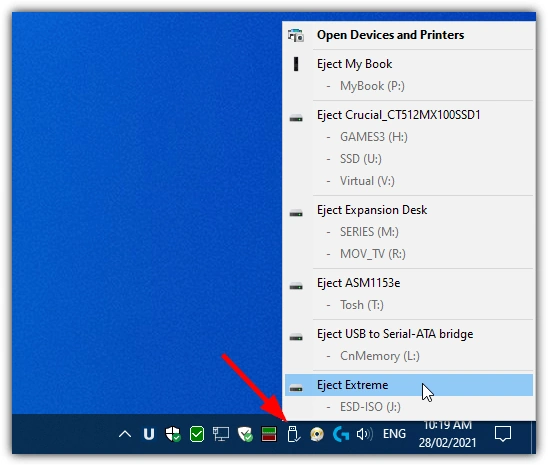
Really, really important and sometimes overlooked. Once the USB creation is completed, you need to remove the USB (using the eject hardware safely option at the bottom right of your windows machine taskbar as normal). DO NOT accidentally leave the USB in your USB Ports for any longer than necessary. If you leave it in and your system reboots at any point (eg in a normal ‘end of day shut down, go home, reboot tomorrow’ scenario), then the system might boot directly into the TrueNAS Core installation and although it is easy to exit from, it can change your system default boot preferences, maybe even remove your primary boot drive as the OS drive – requiring a little messing with a windows installation disk to change it back. The odds of this are very small, but not zero, so make sure to safely remove your USB drive when the TrueNAS Core system image creator tool is completed.
TrueNAS Core on a Terramaster NAS – Step 6, Opening up your Terramaster NAS
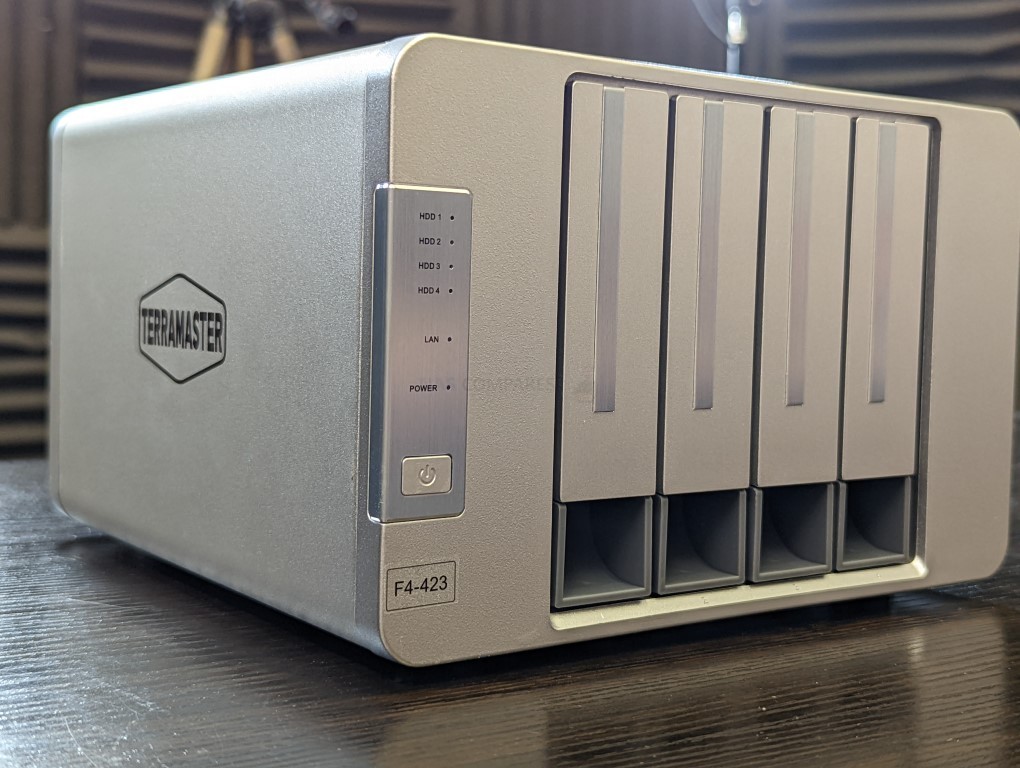
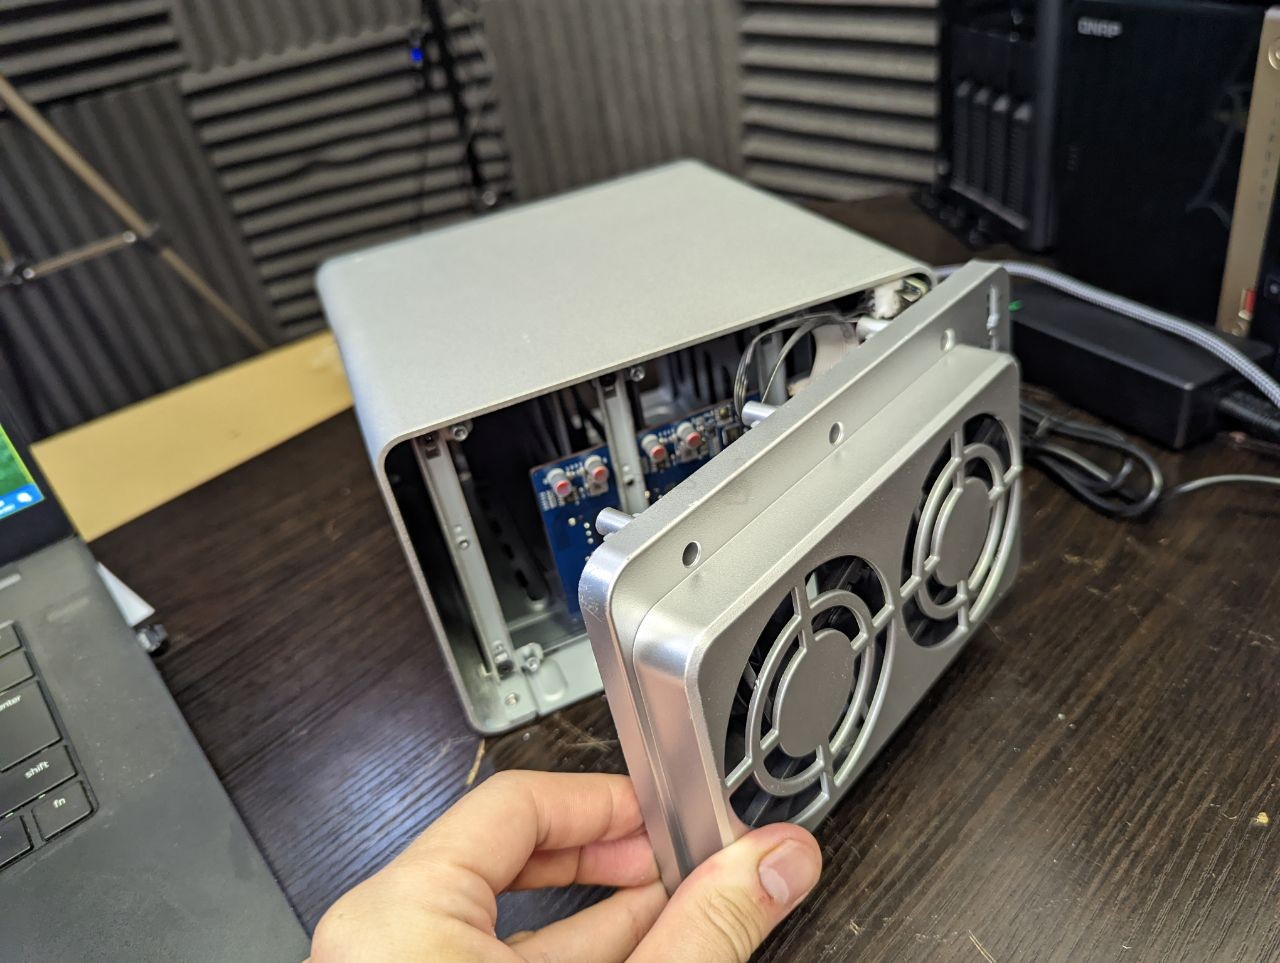
This next step is going to differ depending on the Terramaster NAS Drive you are choosing to use. For this guide, I am using a 2022 generation F4-423 4-Bay NAS, but the general steps are the same for any Terramaster NAS (though the location of the USB will differ). With the Terramaster NAS disconnected from the network and from any power source. From there you will need to remove the external casing. In the case of most Terramaster NAS, the chassis is held by 4-6 screws on the rear of the casing that, when removed, allow you to remove the rear pannel+fans and slide the internal framework out the front of the casing (be sure to check the fans are not disconnected accidentally in this process). IMPORTANT – Remove any HDD/SSD Media during the dismantling of the Terramaster NAS chassis, as it would be so, SO easy to harm these with accidentally dropping/motion damage. No need to remember the order of the drives when you re-install them, as they are going to be formatted during the TrueNAS Core installation.
Now, if you take a closer look at the main controller board of the Terramaster NAS (the one with network/USB ports attached, not the one that the HDD/SSD bays are on), you will spot a VERY small USB module in a tiny USB port. It should look something like this:
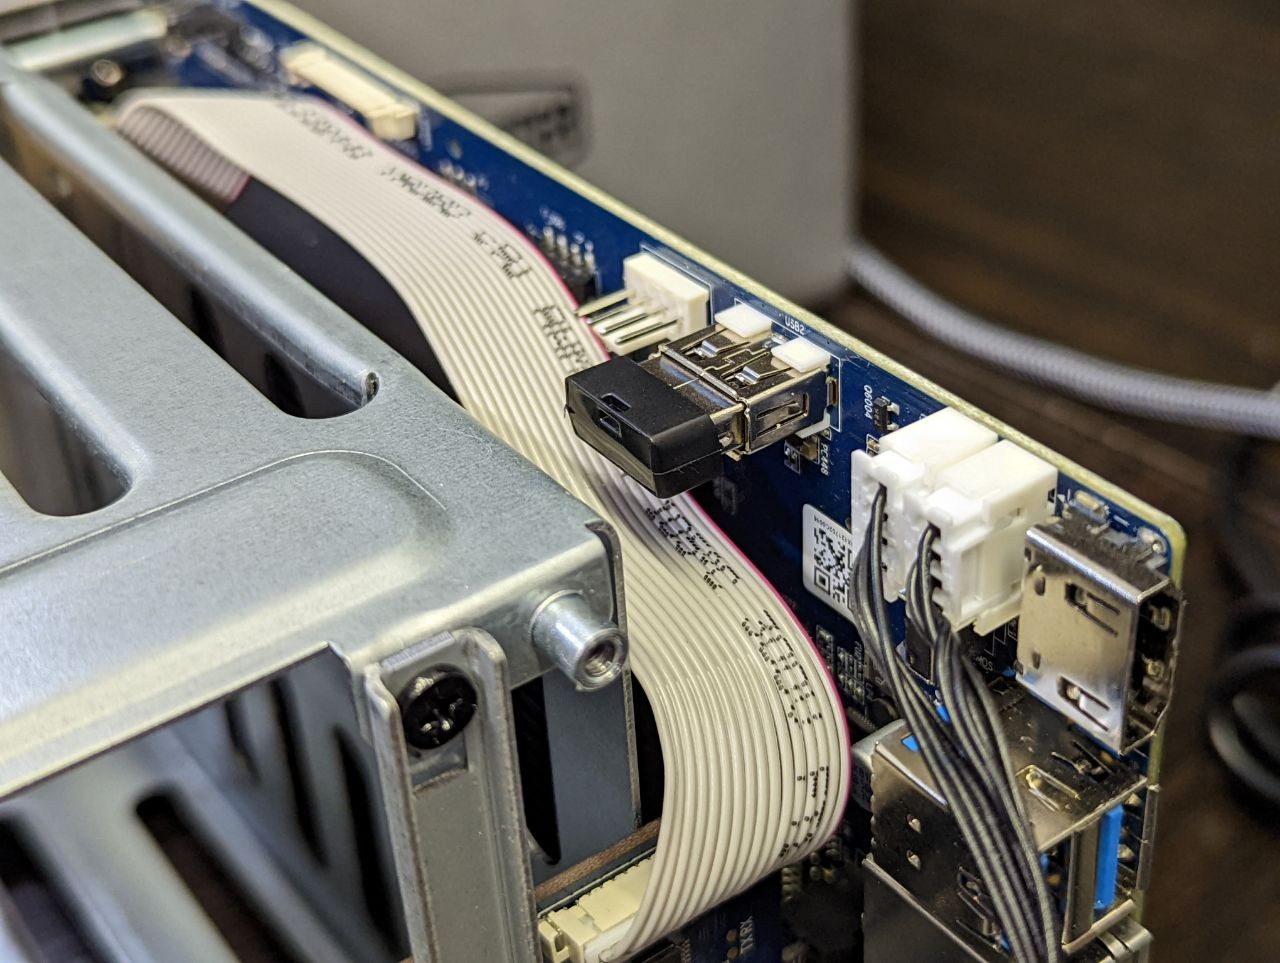
Now, THIS is where the default Terramaster TOS NAS software installation is kept. This is NOT where the OS actually runs from, but this is where the system checks in it’s BIOS when booting to find installation media (IF the system does not already have an active OS on the drives). Very delicately (as it IS a small USB and likely tucked in next to some other delicate components) remove the USB there is there, put it somewhere safe (as you will need this if you ever want to return the Terramster back to a TOS software system) and then replace it with the USB from earlier that has the TrueNAS Core system image you created in Rufus. THIS is why you needed a very small USB, as otherwise there is simply no way you would fit a traditional USB flash stick in the space provided.
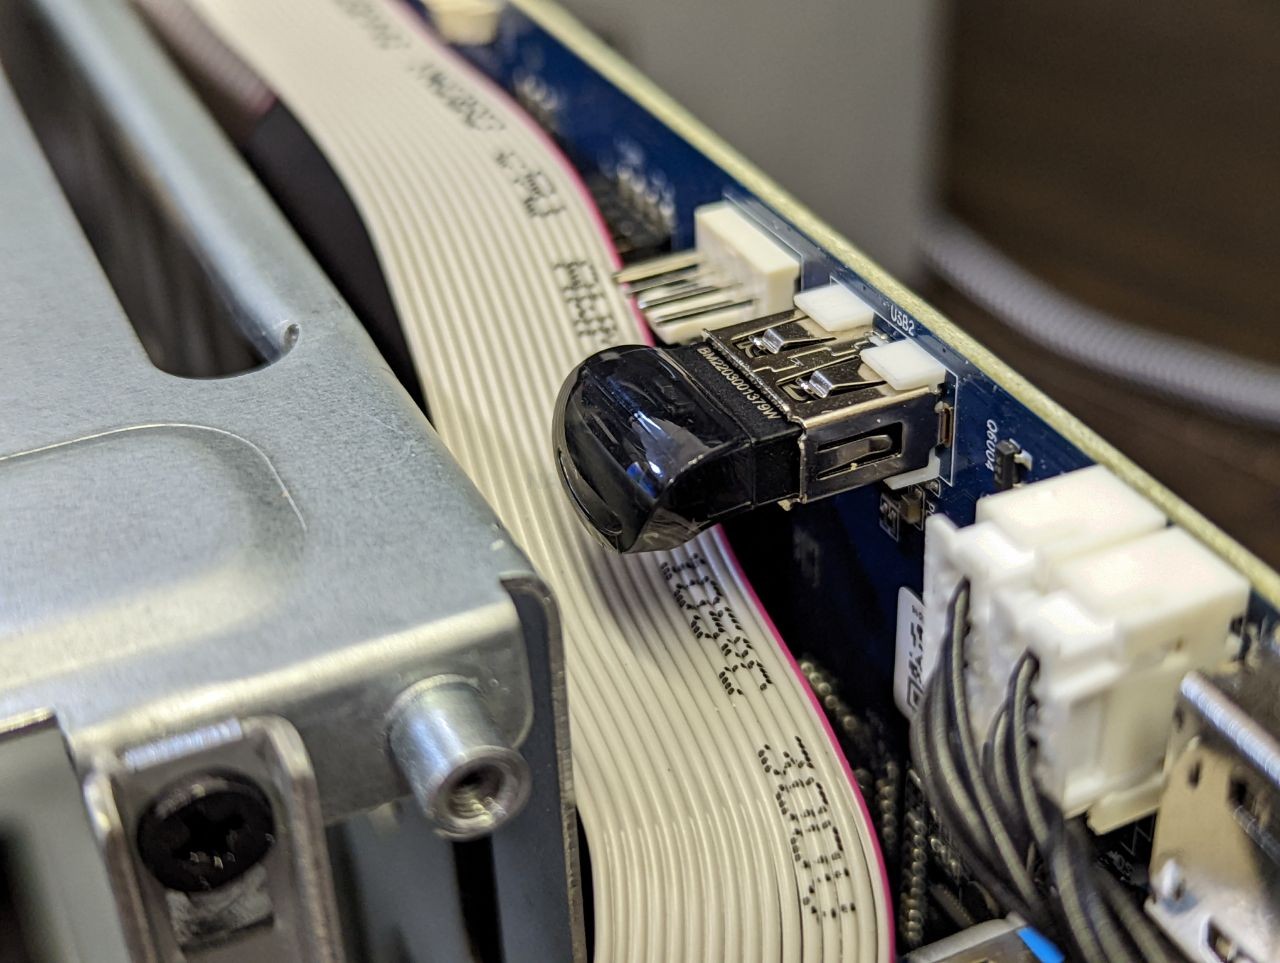
That is pretty much it. This only other thing to factor in here is IF your Terramaster NAS does NOT have an external HDMI port. Most Terramsater NAS released in 2020-2022 have an HDMI port on the rear that although largely useless in TOS, is still accessible (something you will need for TrueNAS Core initialization. However, some Terramaster NAS with Intel Processors have the HDMI Port located INSIDE the main chassis. So, IF your NAS has an inside HDMI port, you are going to need to connect an HDMI monitor to it and run the initial installation (covering in a bit) with the chassis in this open state. After installation is complete, you can close the Terramaster NAS chassis up. Otherwise, if your NAS already has an external HDMI port, you can go ahead and reconstruct the NAS chassis.
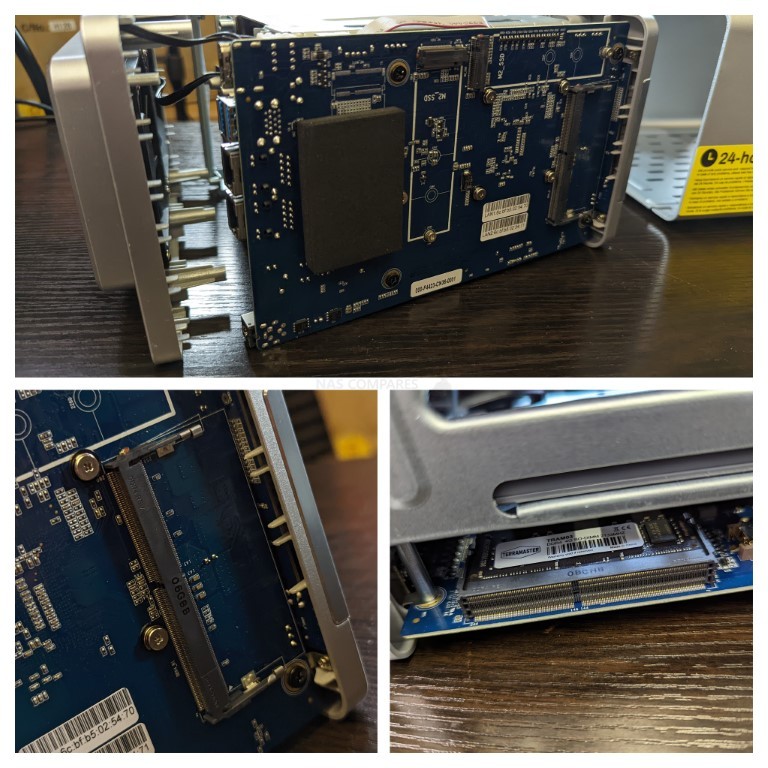
NOTE – If you plan on upgrading the memory of your NAS to 8GB-16GB (in order to use ALL of the features of TrueNAS Core to their fullest extent), I would recommend doing so at this point before rebuilding the physical chassis again, as many Terramaser NAS have the 2nd SODIMM memory slot in really tight locations.
TrueNAS Core on a Terramaster NAS – Step 7, Accessing the HDMI Port and Keyboard Control
Next, you need to start getting the system ready for Initialization and Setup. I would strongly recommend running the first-time installation via a direct interface with the Terramaster NAS. You will need to connect an HDMI Monitor/TV/Capture Card to the HDMI port of the NAS, a Keyboard (and/or mouse) to an available USB port) and then connect the power/network connections to the NAS and boot the device up.
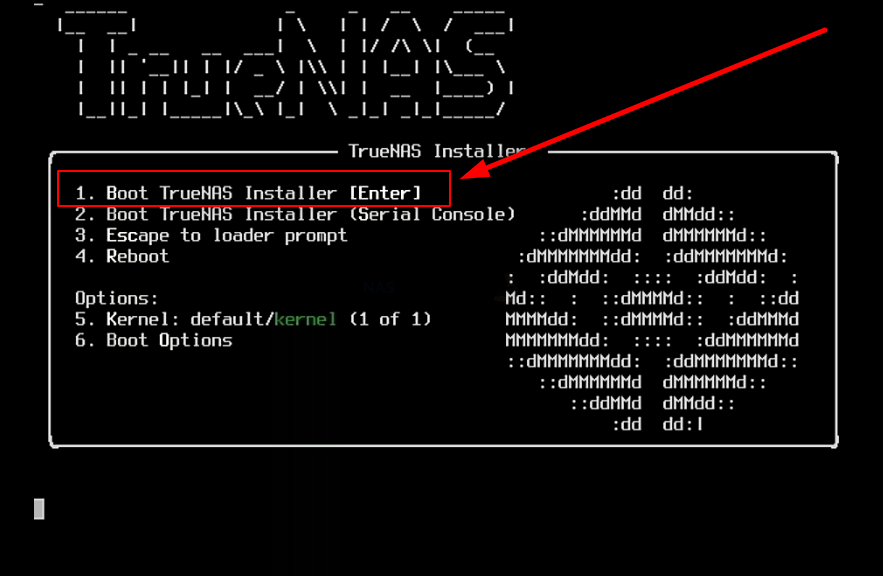
After a few minutes, the TrueNAS Core GUI/Command will appear on your monitor and all you need to do is navigate the config choices to set up your TrueNAS Core NAS the first time.
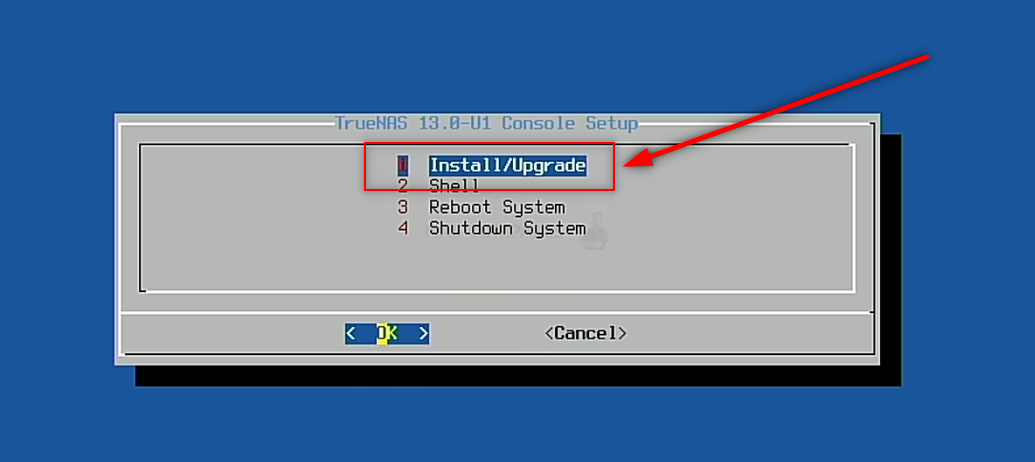
Important – TrueNAS Core runs at its best when it is run on a separate drive from your storage. Much like an Operating System, you can install TrueNAS Core on an available SSD in a SATA or NVMe SSD slot in the Terramaster NAS, then (after initialization) you can go into the TrueNAS Core > Storage area and create a pool of storage using the available storage media bays,
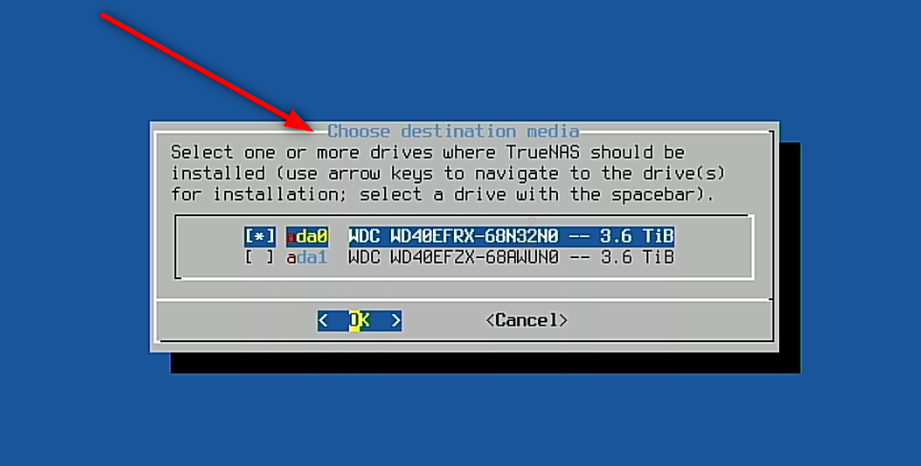
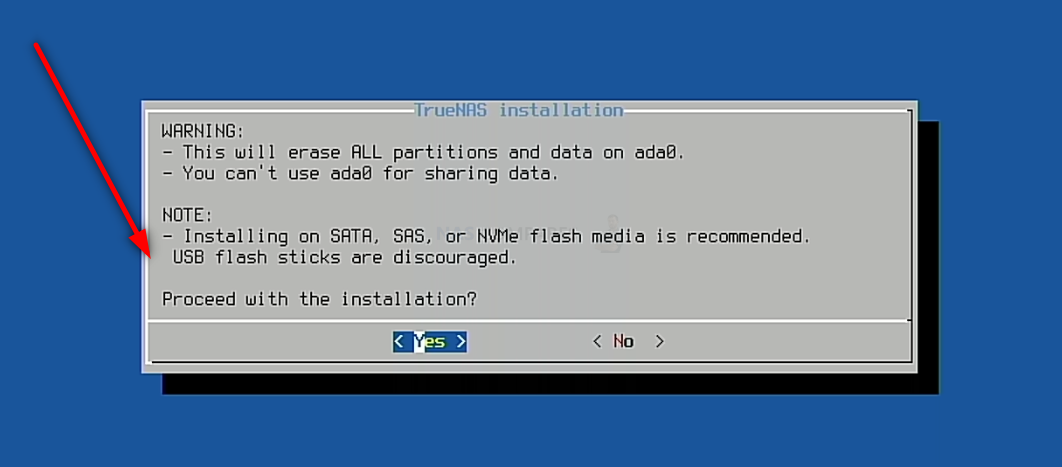
It is NOT recommended that you install it on a USB drive, for reasons of speed and power-connections.
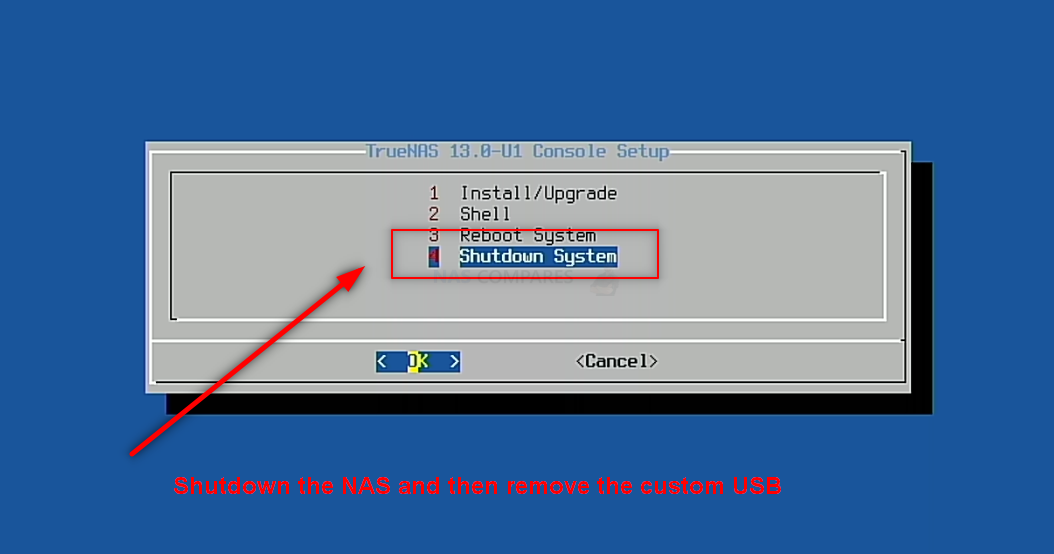
After you have completed the setup and are back at the initial TrueNAS Core boot menu, select the ‘SHUTDOWN‘ option (not reboot/restart, for reasons I will explain in a moment).
TrueNAS Core on a Terramaster NAS – Step 8, Remove the Boot USB Drive
Once your Terramaster NAS has fully powered down, you need to disconnect the storage, power and any other cables, then open up the Terramaster NAS again (if it was re-constructed from earlier) and then remove the USB drive you installed earlier with TrueNAS Core boot loader on it. You need to do this as otherwise, when you reboot the Terramaster NAS, it will reboot into the bootloader again. You can skip past this and/or it will not action a reinitialization without your input, but better to remove the USB and therefore allow the system to always immediately boot into the TrueNAS Core system. After you have reconstructed the terramaster NAS, you can go ahead and connect all the cables and power on the device.
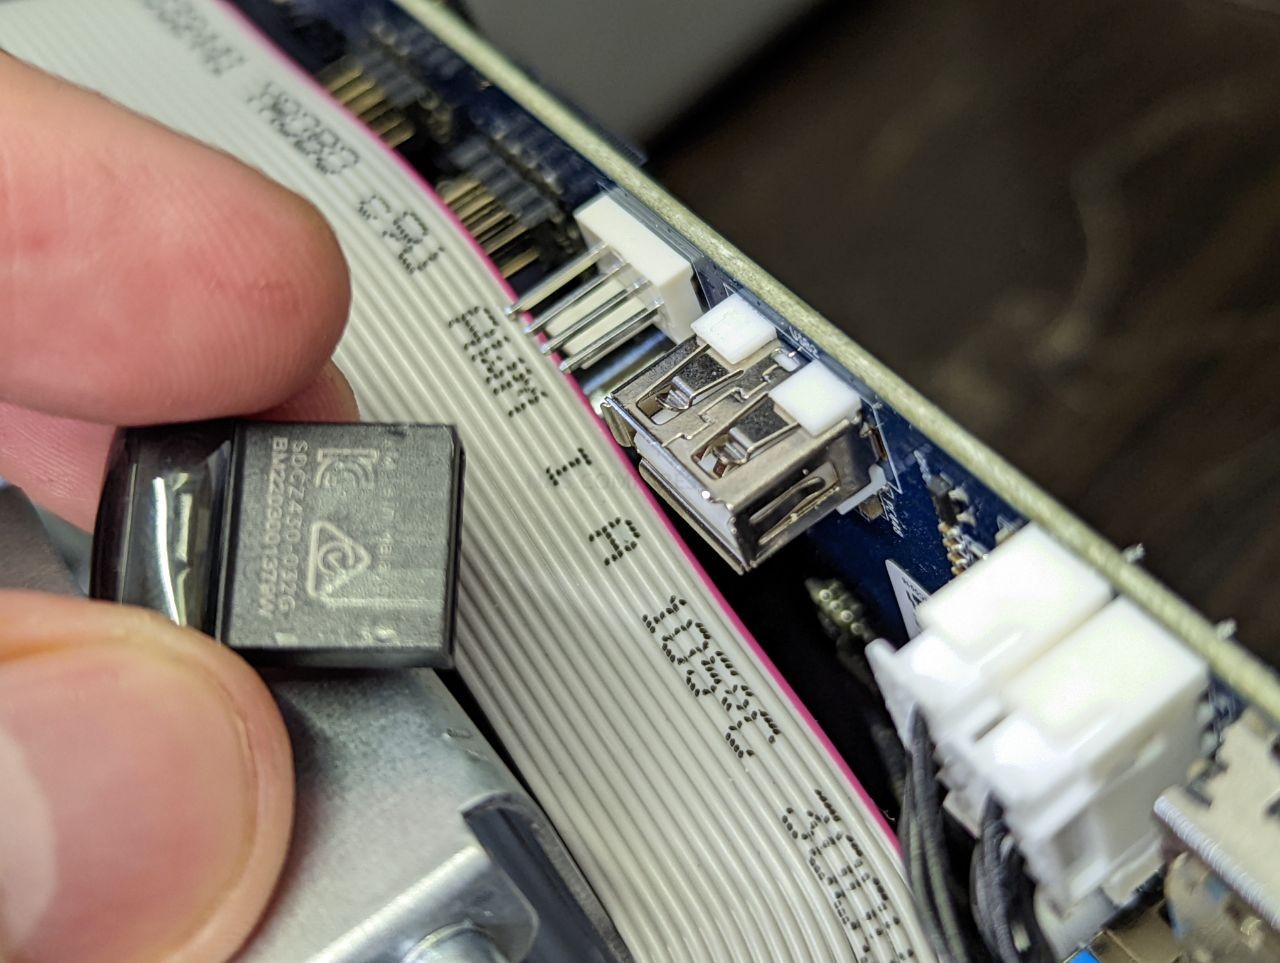
Note – Do NOT replace the USB with the original Terramaster USB Drive that it arrived with, or the system will auto boot into the Terramaster TOS Installation setup.
TrueNAS Core on a Terramaster NAS – Step 9, Reboot the NAS
Upon rebooting the Terramaster into TrueNAS Core (can take up to 5 mins, but usually much quicker). You have two options with how to access the configuration and controls. You can use the HDMI+Keyboard if you choose for console/command level access. Alternatively (much more recommended), use a program such as Advanced IP Scanner, which is free and VERY useful anyway, or even network command prompt) to scan your local area network and find where the Terramaster with TrueNAS Core is located (i.e it’s IP). This IP (eg 192.168.1.111) is what you put into the URL bar ofay web browser and it will load into the login GUI for TrueNAS Core. From here you will need to use the username ‘root’ in combination with the password that you created during initialization.
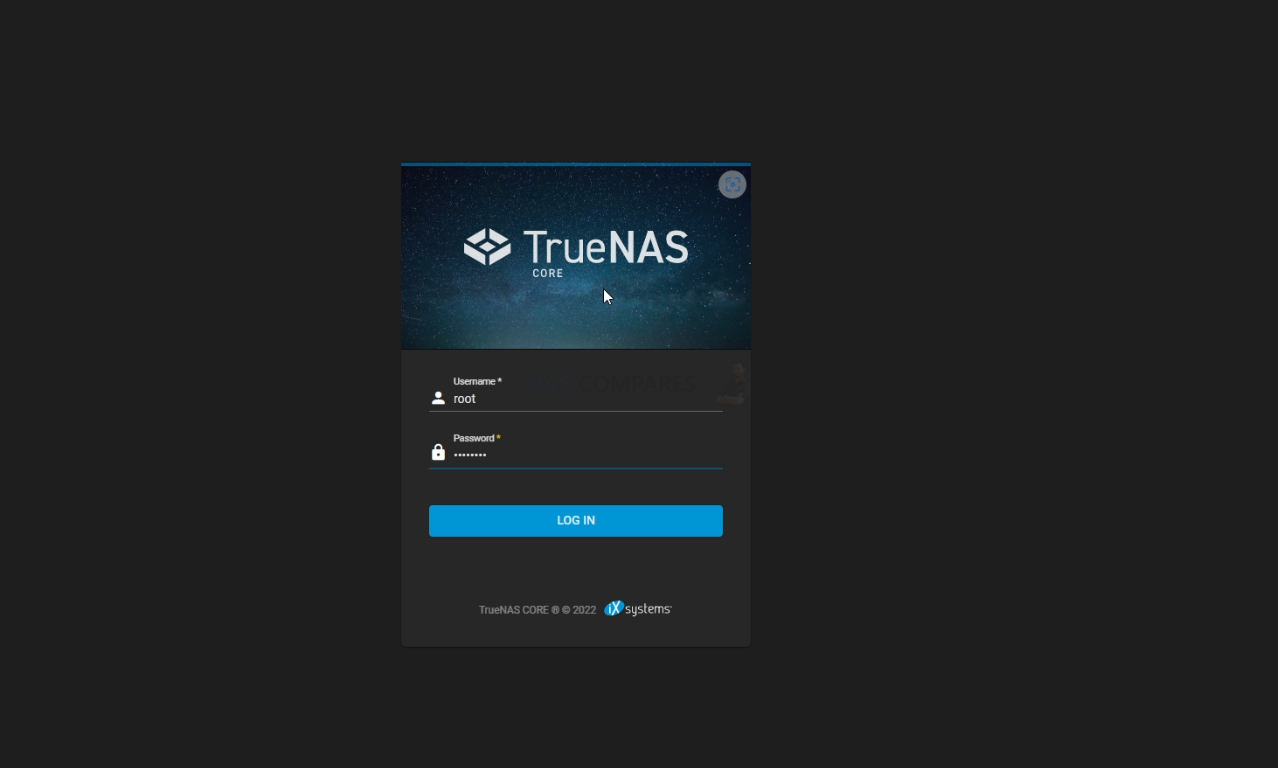
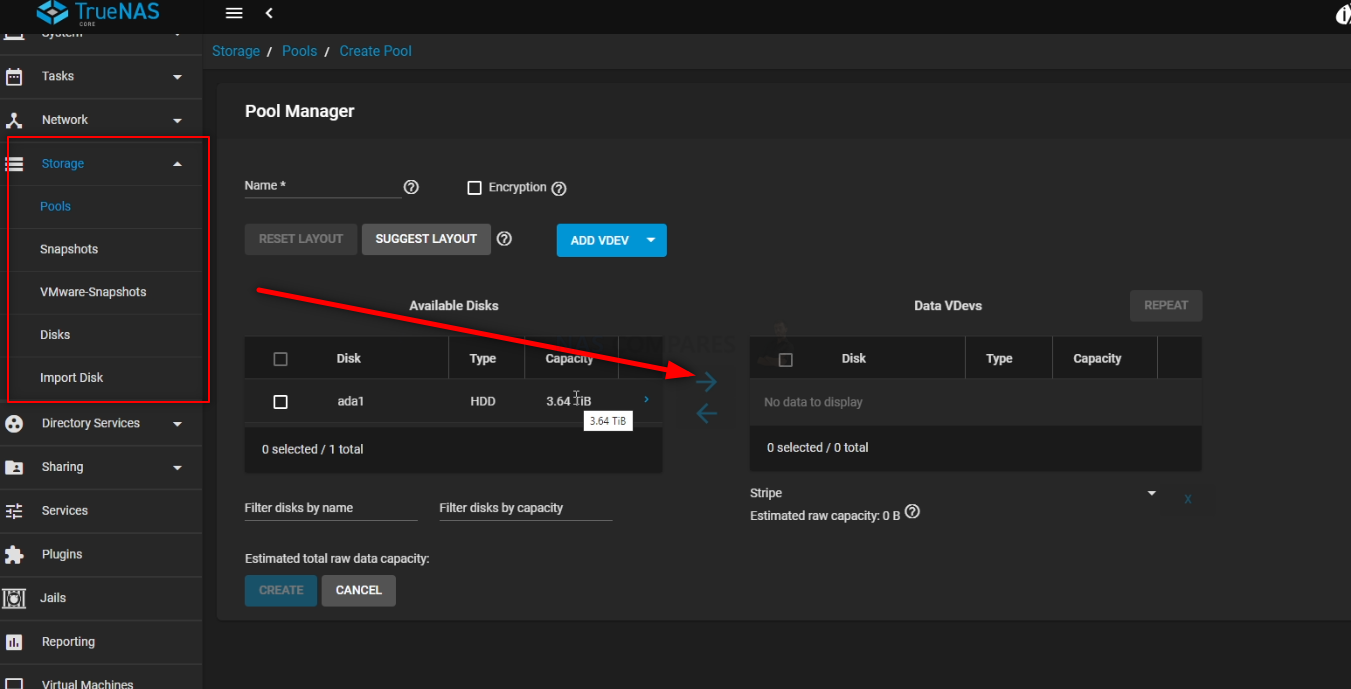
And that is about it. You now have TrueNAS Core installed as the default OS of your Terramaster NAS. From here you can do anything and everything that his highly regarded ZFS powered server software offers. Head into the Storage area and start creating pools, as well as areas for caching and lots more features.
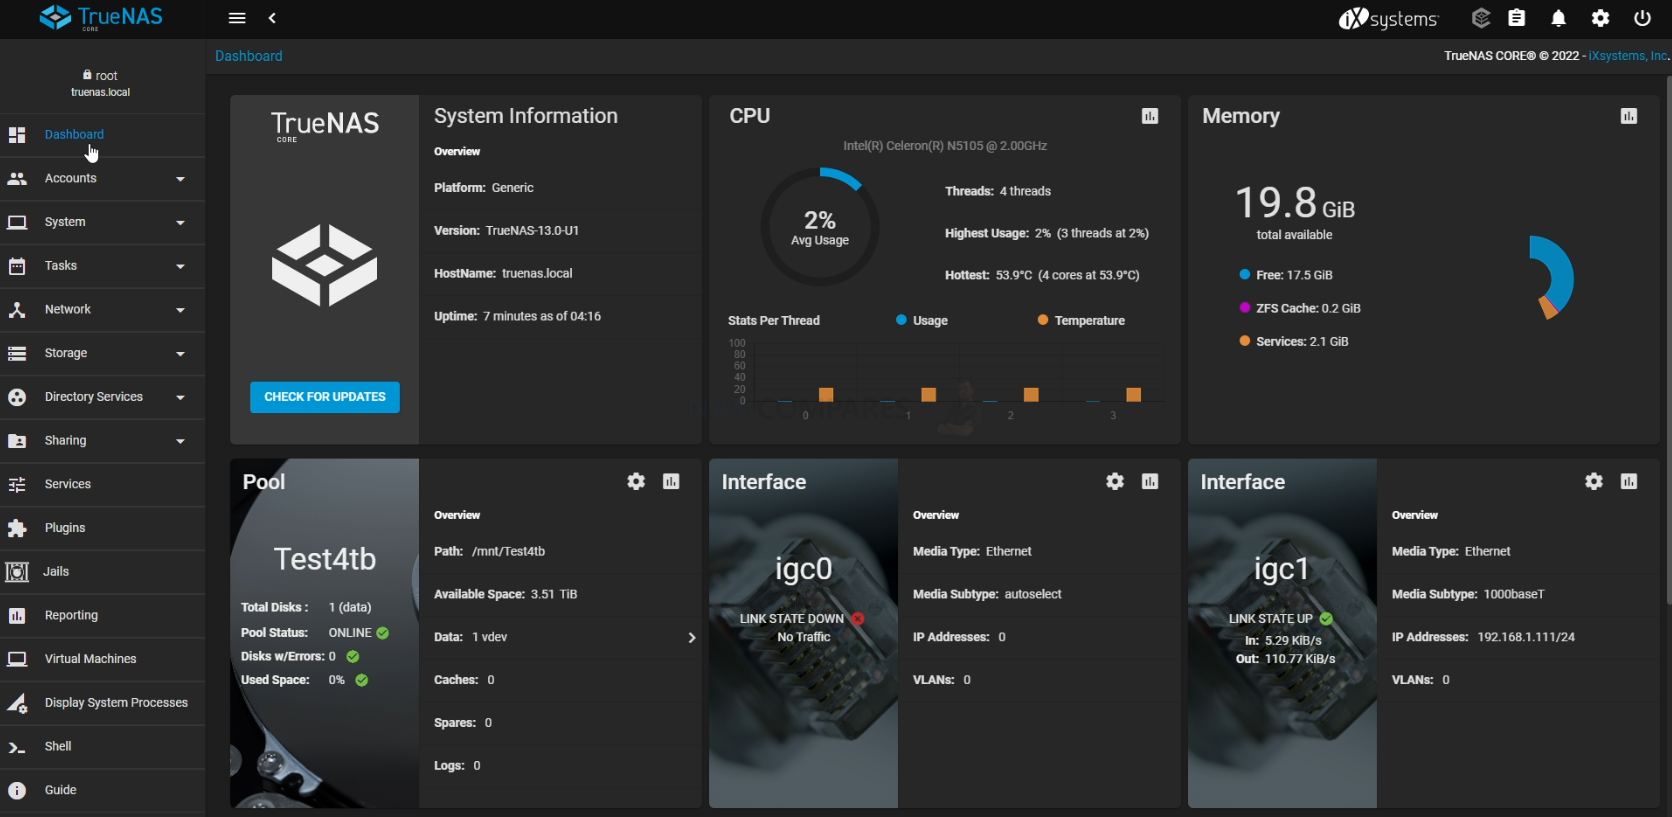
TrueNAS was recently updated to ver.13 in a stable release of the FreeBSD format, as well as new improvements in the Linux-based version ‘TrueNAS Scale’. The first thing you are going to need to do when setting up your TrueNAS Core > Terramaster NAS server is set up your storage. Do this by heading into the storage tab and following the handy steps on screen. After that, you can pretty much do anything on your new ZFS NAS!
You can find out more about TrueNAS in my full review below that covers everything I like and dislike about the platform:
Thanks for reading! I hope you found this helpful and that it really helped you to make the most of your storage. Want to help me continue to make more guides, reviews and tutorials on the subject of NAS? Then you can do so in a few different ways (any of which I will be eternally grateful for if you choose to!). You can visit the ‘Support NAS Passion’ page HERE and see a few different ways that you can help us keep the lights on. Alternatively, you can use one of the links below to shop for your hardware today or in future (visiting those sites via the link below ensures that we get a mall commission on absolutely anything you purchase – and doesn’t cost you anything extra). Finally, if you want to support us in spirit rather than financially, recommend our blog to a friend or professional colleague or share a link on your social media site of choice. Thank you for reading and have a fantastic week!
| Where to Buy a Product | |||
|
|
    
|

|
VISIT RETAILER ➤ |
 |
    
|

|
VISIT RETAILER ➤ |
 |
    
|

|
VISIT RETAILER ➤ |
 |
    
|

|
VISIT RETAILER ➤ |
📧 SUBSCRIBE TO OUR NEWSLETTER 🔔
🔒 Join Inner Circle
Get an alert every time something gets added to this specific article!
This description contains links to Amazon. These links will take you to some of the products mentioned in today's content. As an Amazon Associate, I earn from qualifying purchases. Visit the NASCompares Deal Finder to find the best place to buy this device in your region, based on Service, Support and Reputation - Just Search for your NAS Drive in the Box Below
Need Advice on Data Storage from an Expert?
Finally, for free advice about your setup, just leave a message in the comments below here at NASCompares.com and we will get back to you. Need Help?
Where possible (and where appropriate) please provide as much information about your requirements, as then I can arrange the best answer and solution to your needs. Do not worry about your e-mail address being required, it will NOT be used in a mailing list and will NOT be used in any way other than to respond to your enquiry.

|
 |
Best NAS for under $499
Best NAS for Under $250 (2025)
Minisforum N5 Pro NAS - FIRST IMPRESSIONS
HexOS Q2 Update - What's Changed?
5 Exciting NAS Coming Later in 2025
Beelink ME Mini vs GMKtec G9 vs CWWK P6 NAS Comparison
Access content via Patreon or KO-FI




This setup is rather nuts than useful!
First: Dont install the OS on freaking 4TB, those drives are for your Data. What a huge waste
second: You can use every port for booting, but its smart to keep the front USB free for Keyboard/Mouse or a USB-Backup drive etc.
third: Use the USB inside as OS. You have at least 5yrs before a pendrive USB wears off. You can also use a usb-to-sata and use a sata drive. (In the Terramaster-Case use a 99degree Angle USB-Cable as there is tiny space)
REPLY ON YOUTUBE
This is really a shitty video. Did exactly what described. Terramaster F2-423. Trunas installed on 32gb bootdisk with rufus. Tried diverse bootmethods.. Booting from nvme. Boot tos disabled in bios. But the system never booted in TNAS. It stucks in de TNAS menu. Reinstalled the original TOS usb disk. After changing de bootdisk to BIOS, the system boots into the shell.
REPLY ON YOUTUBE
Terranas boots up in GRUB and not TRUENAS. Removed de usb stick. Changed bootorder to NVMSE2. But keeps booting in Grub and keeps saying Tos boot USB storage not found. This is not as expected. Really disappointing.
REPLY ON YOUTUBE
Can I do the same for TrueNAS Scale? Do you have a video for it? Thanks
REPLY ON YOUTUBE
Have no idea what is going on those permissions.
However.. on my xcp-ng server all i needed to do was to pass through an lsi controller and plug in a disk and by magic it picked it up immediately. Dropped in 5 more driver and a few seconds later i has a zfs pool.. v cool
REPLY ON YOUTUBE
Hello !
Lately I’ve been carefully following your channel and blog about NAS systems.
At this time, the question arose of choosing between Synology DS423+ or Terramaster F4-423 NAS.
Before your reviews, I checked a lot of information about Terramaster and just like you, I came to the conclusion that Terramaster is much better in hardware than Synology.
Until the moment when the need arose to use something more compact and less energy-consuming than a PC with True Nas installed, I did not explore the market for compact NAS systems.
With Terramaster, new horizons and opportunities have opened up.
Great video review!
Still, I discovered one point in the video: it is not necessary to insert the installation/bootable USB flash drive from TrueNAS inside the Terramaster.
We only need it at the stage of system installation. Upon completion of the installation, it is advisable to remove the USB flash drive and put it aside so as not to occupy the USB ports and not create confusion in the boot devices.
TrueNAS can install the system on a separate disk or soft raid (if you select 2 identical disks during installation – for example, 2 SSDs)
Therefore, keeping the TrueNAS installation flash drive in the device simply does not make sense.
I will also say that if you install the system on a disk, it can no longer be used as part of a RAID array – RAID1 mirror, for example – this is at least what I know from personal experience.
To avoid such problems and inappropriate use of the disk (of course, you can separate the partition with the system and use the free space, but RAID will still not be available for creation), you need to install TrueNas on a separate physical disk – an SSD, for example, or better yet, 2 disks in software RAID mirror.
That way, if the system drive fails, our data in the storage pool will not be affected.
This still makes sense for replacing disks – the system remains the same as it was, but we only change the disks and create an array from them. All settings will be saved.
Perhaps I missed something or I don’t know from either side the whole TrueNas mechanism, but the general concept is this: the disk is separate for the system and the disks for the data pool are separate.
Thanks for the review! Good luck!
REPLY ON YOUTUBE
What is the reason to replace Terramaster’s OS with TrueNas? Does TrueNas provide better features? Is there any comparison?
REPLY ON YOUTUBE
hope you don’t want to encrypt your zfs volumes, performance is so bad on f4-423 🙁
REPLY ON YOUTUBE
I’m running this on a F2-423 and I completed the hardware process. When I did the bootup however, I got a message ‘grub_fshelp_find_file_lookup’ not found…any idea what I did wrong?
REPLY ON YOUTUBE
Would it not be advantageous to use the Internal USB socket to install TrueNAS on? Would be a sweet way to free up the NVMe slot for maybe a cache.
REPLY ON YOUTUBE
I just want to say thank you! I have been watching your videos for a bit now and the passion, and need for the truth with no bull sh#t comes through along with the love of what you do. That’s why I can sit and listen to an hour about True Nas and it is compelling at 58 minutes just as it was at 2 minutes. So again thank you for the incredibly tedious and hard work that you do!
REPLY ON YOUTUBE
If the USB was used for installation only, what’s the purpose of keeping that inside???
REPLY ON YOUTUBE
I am looking at getting the F4-423 and x4 16TB in one go and want to run TRUNAS rather than the original OS from the start. What size of nvme would you recommend for the terramaster running for TRUNAS? I am thinking of WD Red SN700 1TB drives or Intel Optane nvme H10 for durability, one for OS and one for cache or would you recommend a different NVME config or brands? Later i think i would like to setup a second identical system as a second tier of backup, but the debit card can only take so much wear at one time after all.
REPLY ON YOUTUBE
Is this a better idea than building a DIY server? What are the pros and cons. That would be a good video… but also a fantastic comment reply.
REPLY ON YOUTUBE
Hola, compre el NAD F2-210 de terramaster, es posible instalar este sistema en ese NAS o es muy limitado?
REPLY ON YOUTUBE
Can we get a wordpress video on how to put a website live with port forwarding??
REPLY ON YOUTUBE
Hi greats from Ecuador – South America. ¿Can I change the OS from F2-210?
REPLY ON YOUTUBE
Thank you for the vid. I bought a F4-423 the other day and did this. Works great and much better in every way than the old server i was running as a nas.
REPLY ON YOUTUBE
Is it possible to instal truenas from USB to other USB? so i dont have to use m.2 ?
Also, is it worth to get TrueNAS over the TOS 5?
REPLY ON YOUTUBE
CRITICAL NOTE: This isn’t really viable for all Terramaster units!!!! 2/3 into the video a critical point is made. This should only be done on models that allow for a NVMe drive or if you plan to give up a drive bay for a drive to host the TRUENAS OS.
I saw these walk-throughs and went out and bought a F5-422. The F5-422 does not have a NVMe slot. And giving up a drive slot means forgoing the NAS configuration I planned on.
I tried installing TRUENAS on a flash drive (even though it isn’t recommended). The install fails.
I tried installing TRUENAS on the internal flash drive port (I put the ISO file on a different flash drive plugged into an external USB port). Booting off a flash drive mounted externally worked. In fact the external USB ports are super fast (at least 400MB/s) compared to the internal one (40MB/s). So the installer and OS load goes really quickly (but actual OS launching would be slow if this worked since the internal port is slow). Again though, after the OS install happens it tries to read from the assigned OS drive and fails. The install self terminates when it sees this error.
REPLY ON YOUTUBE
I have a F5-422 and am getting the following when I try to install: “mounting from ufs:/dev/md0.uzip failed with error 2”. It loops like this for about 3 minutes and then dies. The only other oddity is that I have to spam Esc on boot-up and select the USB drive as it insists on going to TOS otherwise. Any suggestions?
REPLY ON YOUTUBE
Thanks!
REPLY ON YOUTUBE
Feel like the install process should have been to replace the internal USB key with a blank, boot TrueNAS a 2nd USB drive off one of the external USB ports and install it to the internal blank, was there a reason you didn’t do it the way you did? Are the external USB ports non-bootable or something? Like nvme/SSD would be quicker, but can’t imagine HDD would be a lot faster than USB.
REPLY ON YOUTUBE
Can anybody confirm the Ram capacity on the F4-423? Docs say 32GB, chip seems to handle 16GB? Anybody tested this? Would like to save a few pennies if 16gb is the limit.
REPLY ON YOUTUBE
Why are you using TrueNAS Core and not the scale version actually ?
REPLY ON YOUTUBE
If I don’t already have a TerraMaster NAS and the intent is to use TrueNAS would there be better alternatives retailing NAS chassis with integrated motherboard/cpu to buy or is it that buying a TerraMaster NAS just for its chassis/mb/cpu is a bargain?
REPLY ON YOUTUBE
I just ventoy now for multiple bootable isos on the same usb sticks instead of Rufus.
REPLY ON YOUTUBE
To your knowledge, does this work with the Terramaster new T series NAS as well or only the F series NAS? Or do you even suggest not using the T series? Thank you in advance!
REPLY ON YOUTUBE
Hello and welcome to my comment. And that is right. I have a quick question. 🙂
I was just wondering why you got a USB drive specifically to fit inside when it didn’t need to stay there. I assumed that the software would be installed on the internal stick and it would remain inside but clearly not.
To save pulling it apart twice (once to swap the drive, and again to remove it), wouldn’t it be easier to remove it the first time and then use an external USB port with any old stick we find kicking about the place? I assume there’s a specific reason why the internal USB port is the best (or only) choice here but I may have missed it. I was just thinking about missing a step and halving the potential for damage by only ripping the thing to bits one time.
Also, a second question if I may: I was under the impression that TrueNAS required (or advised) the use of ECC memory. I’m not sure that Terramaster supports it, and the memory you selected didn’t appear to be ECC. I haven’t looked into either yet, by the way. Any thoughts on that?
That’s all from me. I didn’t realise that was even possible, and I may consider getting a Terramaster NAS for use as a low-powered home Linux server on the back of your presentation. Thanks a lot for the video.
REPLY ON YOUTUBE
Like yousaid over and over again best commercial NAS is QNAP TS-h973AX-32G period.
REPLY ON YOUTUBE
TOS 5 was a major flop so I’ll be using true nas core
REPLY ON YOUTUBE
I’d Love to see this on some of their rack mount models like the U4-111 or U4-423
REPLY ON YOUTUBE
Are you going to do a tutorial for getting Unraid on the TM too? Really interested in a T9 or T12 and if it can use Unraid, it’s an absolute deal for me.
REPLY ON YOUTUBE
This does create the ultimate zfs NAS in my opinion. Really thinking to replace my very outdated Qnap (839-pro) with this setup.
REPLY ON YOUTUBE
Why not remove the fan connector from the mainboard before you install the USB stick? that could make things easier. I think.
REPLY ON YOUTUBE
Isn’t Terramaster one of the companies that has been hit with ransomware attacks relatively recently? Does installing TruNAS, instead of using the factory-installed OS, help to mitigate these attacks?
REPLY ON YOUTUBE
Quick question: it’s a bit off topic to the video but it’s regarding replacing a wifi card in a laptop (I was watching a video from 2 months ago on this topic):
Question: what would I do if the wifi card I’m replacing is the exact same model as the one I had? What would I do in terms of installing drivers?
I have an Acer Nitro 5 AN517-51 with an Intel Ax200 wifi 6 card in my system. Recently I was doing a fan replacement and repaste of the heat sink, and I accidentally pulled the aux cable and the aux connector attached to my wifi card came off while trying to reattach the wire.
I wasn’t sure if I should upgrade to AX210 (cause I’m scared of it not working, then I have no working laptop at all), so I was wondering whether I could just do a straight swap of AX200 for AX200 and would that require any driver installation beforehand, if the card is the same model as the old…?
Or would upgrading to AX210 be better all round as a solution. I just want the least painful and quickest experience, which is why I thought AX200 for AX200 may be as I may not need to fiddle with driver updates
REPLY ON YOUTUBE
Will something like this work on a asustor lockerstor? ADM is half baked.
BTW your channel is awesome and crazy helpful.
REPLY ON YOUTUBE
Alles sehr schön. Aber zuerst zusammen die Nummern 10 und 1. Eine verwohn.online Brünette und eine anderec Blondine. Es wäre unfair, wenn ich 4 wählen würde
REPLY ON YOUTUBE
Ahh of course, when you don’t really know:
You do not need a display output!
Simply install on a PC and then move to this device, boot and simply find the IP address.
Do not install on a regular USB drive as it will fail sooner or later. Spend a little more for an USB SSD, NVMe or a high endurance USB drive.
Just make sure your device has an Intel CPU and NOT an ARM CPU!
REPLY ON YOUTUBE
16:50 I don’t think we were meant to see that.
REPLY ON YOUTUBE
i would only use ZFS when they allow you to expand your errays like raid5 lets you…
REPLY ON YOUTUBE
At first a 1-hour video seemed long, but every point mentioned was pertinent. And it’s the weekend anyway, so. 😉
Only addition I would have liked is an overview of network shares management.
And you are spot-on my user usecase/profile: Home techie power user currently using a Synology that likes its simplicity but that still keeps an eye on other totally open source platforms for a bit more control/flexibility (and lot more verbose logs!!). And so I agree with every single of your comments.
Indeed, an “easy” mode in TrueNAS or more wizards across the system would be greatly helpful because I may be tech-savvy at some level, still maybe not quite the TrueNAS level.
So to have something to bridge the gap between current TrueNAS “complexity” and Synology DSM “simplicity” would be perfect.
The other thing that makes me hesitating from leaving Synology ecosystem is the turn-key/hand-holding/well-integrated (DSM/mobile) apps. But even there — and it’s one of the reasons I’m looking elsewhere — is that in the recent years Synology has seemed to neglect all their non-business apps.
REPLY ON YOUTUBE
Compare this to UnRAID also.
REPLY ON YOUTUBE
I would find it very interesting.
If u would test out TrueNAS scale ad the review u have made now about TrueNAS Core.
It’s out of beta and in the release channel.
And it opens up a tons of possibilities as a Linux user, because of docker and k8s.
I really trust and enjoy ur indept reviews.
It would be great to see that for TrueNAS SCALE.
Best regards from me.
REPLY ON YOUTUBE
Adding a comment here to your most recent upload, hoping to get a reply. Watched 100’s of your uploads now. I need a new nas (4-10 bays). My old one died. Won’t be editing on it or doing anything taxing (fancy) with it, so not bothered with nvme caching etc. Just storing/accessing files locally via LAN. Best option? (Ideally with faster than 1.0GBe)
REPLY ON YOUTUBE
I’d be all over TrueNAS (and/or Proxmox), but I have a QNAP TS-453D and for the life of me I cannot boot off the internal drives. No, I am not happy booting off an external USB drive. Do you, or anyone, have any tricks to be able to boot directly off the internal drives on a midrange QNAP device?
REPLY ON YOUTUBE
Please compare to Unraid too. Thanks. ????
REPLY ON YOUTUBE
There is a debian version of truenas called truenas scale
REPLY ON YOUTUBE
Sweet! Great deep dive as always without being intimidating for us newbies rob! – bit the bullet last year on a tvs-h1288x due to your coverage and don’t regret it as it’s been great overall but with all the gross stuff that’s been happening in the qnap camp, definitely considering potentially repurposing it for a truenas. Possible?
REPLY ON YOUTUBE
I’m looking into a NAS system. But I don’t know how much I want to do with it. Right now I only want storage. But I also bought a raspberry pi 4 just for experimenting, and now I have: an add sinkhole, VPN server, Home Assistent, link to smart meter, DDNS server, selfhosted Bitwarden, node red, ZigBee network, and on and on… In just three months. So yea.. it will probably not only be for storage and will take over all tasks from the pi, start media server, couch potato, radarr, lidarr, security cameras with AI face detection, etc. I think I just have to go with TrueNas because eventually I want it all….
REPLY ON YOUTUBE
I was using freenas/truenas before I got a qnap for ease of use. Truenas wipes the floor with qnap, you just need some patience to get your head around the user interface. Please also advise everyone that you can run truenas on an old pc or in a virtual environment to test.
REPLY ON YOUTUBE
Yayyyyy Robbie is back! I bought a qnap based on your review. Your info was great. Its a shame that qnap decided to, there is no delicate way of saying this, shaft thier user base. I really think this is a fantastic idea and would love to see more of your valuable input. Might be time to get the big hammer out and doctor my tvs-1282. Once more it’s good to see you with your enthusiasm for nas. You are back on the watch list. Thank you Robbie.
REPLY ON YOUTUBE
Thanks for this look at TrueNAS. I’m eagerly awaiting your review of that IXsystems box you’ve got there as well as a “Setting Up” video on it. If at all possible it would be nice if you showed a basic, recommended system setup from the point of view of Joe, Jane and Baby Bag-O’Donuts.
REPLY ON YOUTUBE
is there a light mode?
REPLY ON YOUTUBE
I like to see a video how well Plex would work, for transcoding and server multiple users…????
REPLY ON YOUTUBE
Wow, great timing on this review. Been thinking about setting up a freenas box myself.
REPLY ON YOUTUBE
IX-Systems in the UK????
REPLY ON YOUTUBE
Appreciate the DIY coverage!
REPLY ON YOUTUBE
Will you cover TrueNAS Scale??
REPLY ON YOUTUBE
Make a video on how to set up a personal web server, to host a website. If that is possible, using plugins and addons. On TrueNAS Scale.
REPLY ON YOUTUBE