

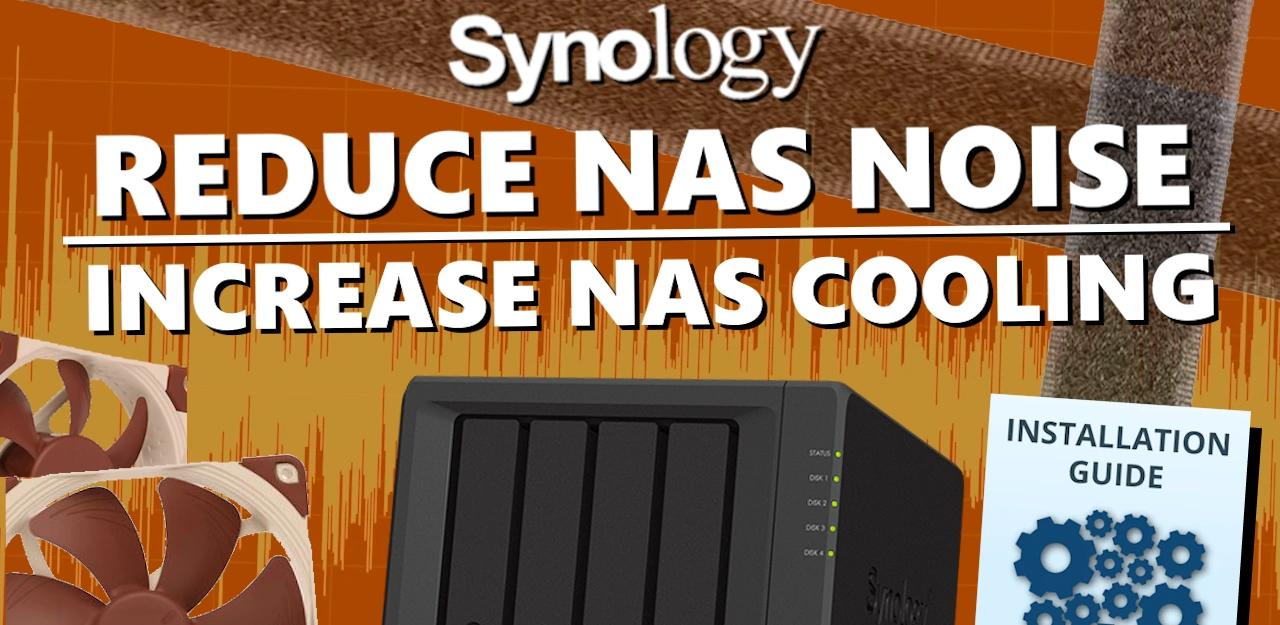
How to Make Your Synology DS920+ NAS Cooler and Quieter in Just 20 Minutes!
The appeal of having your very own private cloud space, accessible much more securely and faster than the average third-party cloud service, is undeniable. Purchasing a Synology DS920+ NAS to centralize all your data, granting true control over who accesses your data, as well as how, when, and where it’s distributed, has long been a desirable alternative to services like Google Drive and Dropbox. Whether you’re a home user or a business user, it’s clear that a NAS comes with its own unique downsides. Two of the most frequently mentioned issues are that the systems can be noisy when in operation, which can become annoying if you’re in close proximity. Additionally, keeping the system on 24/7 results in the generation of a significant amount of heat, necessitating increased active cooling through fans, which inevitably leads to even more noise. The level of noise generated by your NAS varies from user to user, affected by factors such as the scale of the system’s storage capacity, the specific drives used, and the extent of its utility. However, there are several clever hacks and modifications you can apply to a broad range of Synology 4-Bay NAS devices to reduce operational noise and improve system temperature, ensuring your device runs cooler and quieter in the future. In this guide, I will show you step-by-step how to apply these modifications in around 20 minutes.
Video Walkthrough of a Synology Fan Upgrade and Velcro Mod is HERE on YouTube
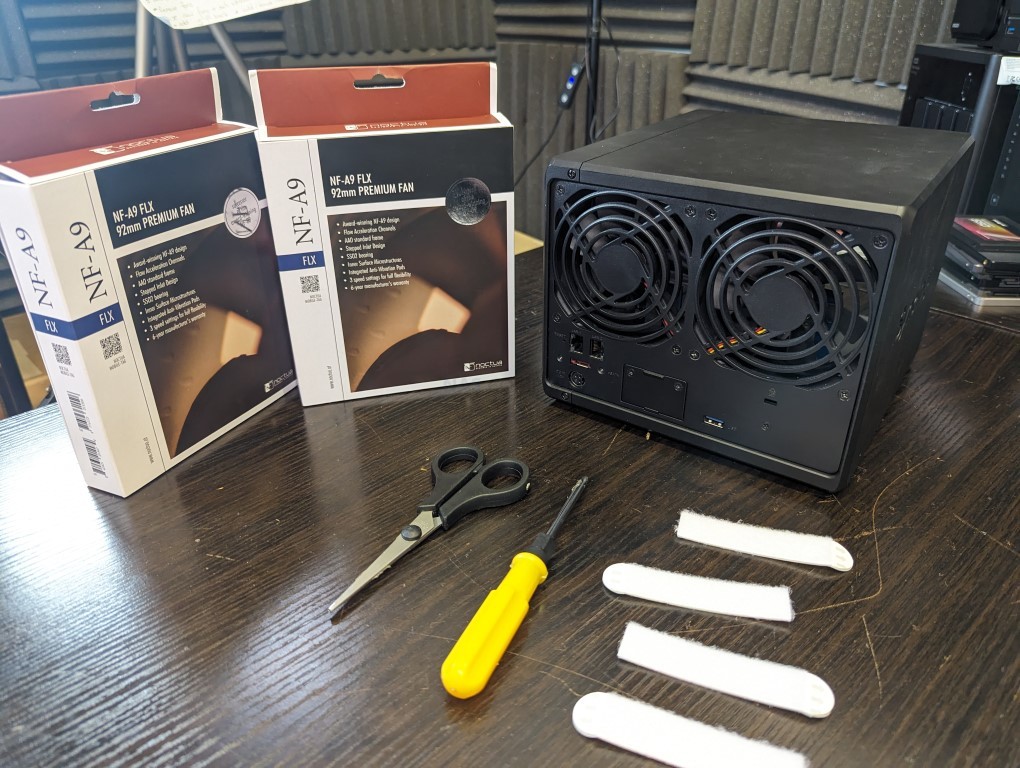
In a Hurry? Here are the parts for this guide:
|
Before You Start – Disclaimer and Important Considerations
Before following this step-by-step guide to improve the noise and cooling performance of your Synology NAS, it’s crucial to understand whether your system will benefit from these modifications, as well as the potential risks to your support and warranty from Synology. So, before we begin, please keep the following in mind:
- Synology does not endorse physical or software modifications to their systems using non-Synology components or methods not approved by Synology. The changes and suggestions detailed in this guide do not align with the recommended maintenance and use of your Synology NAS. By following these steps, you will almost certainly void your hardware warranty. Consider this carefully if you rely on Synology’s support, warranty, and guarantees.
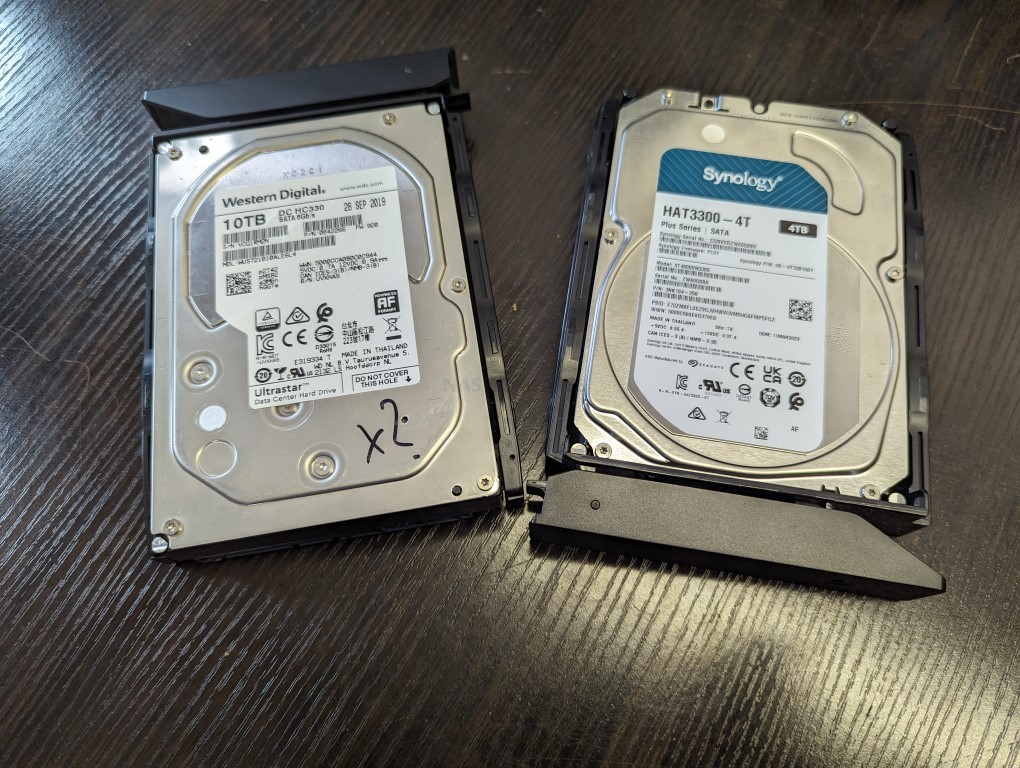
- Many users are mistaken about what components within their Synology NAS are generating the ambient noise during operation. It’s important to realize that in many high-use, high-capacity setups, the primary source of noise is not the Synology unit itself but the professional and enterprise-class hard drives. These drives, designed for larger capacity and business use, incorporate more platters and actuator movements and are inherently more enterprise-grade in their architecture. As a result, most of the noise comes from within the hard drives themselves, making it nearly impossible to eliminate this noise from any storage system. If your system uses hard drives larger than 10 to 12 terabytes, then the noise during heavy/active use is likely emanating from the drives. While the modifications in this guide can help mitigate some issues (e.g., the Velcro tray modification will reduce vibration), noisy hard drives will remain noisy, regardless of any changes made to the NAS enclosure. Keep this in mind before investing in accessories for the modifications suggested in this guide.
- Lastly, not all Synology units are built the same. The physical size of the DiskStation or RackStation, the number of fans, the size of individual fans, and the placement of storage drives can vary significantly. While you can compare systems with the same number of hard drive bays and enclosure size for modification purposes, you cannot apply the same modifications to larger or smaller models. For instance, the DS224 Plus features a single rear-mounted fan and twin hot-swappable ‘click and load’ bays within a largely plastic enclosure, whereas the DS420j is mostly metal, features internal-only, non-hot-swappable trays, and two rear fans smaller than those found in most other NAS systems. Ensure you are purchasing the correct size fans for your specific Synology NAS model.
That’s it! Let’s get started on upgrading the cooling and reducing the noise on your Synology NAS.
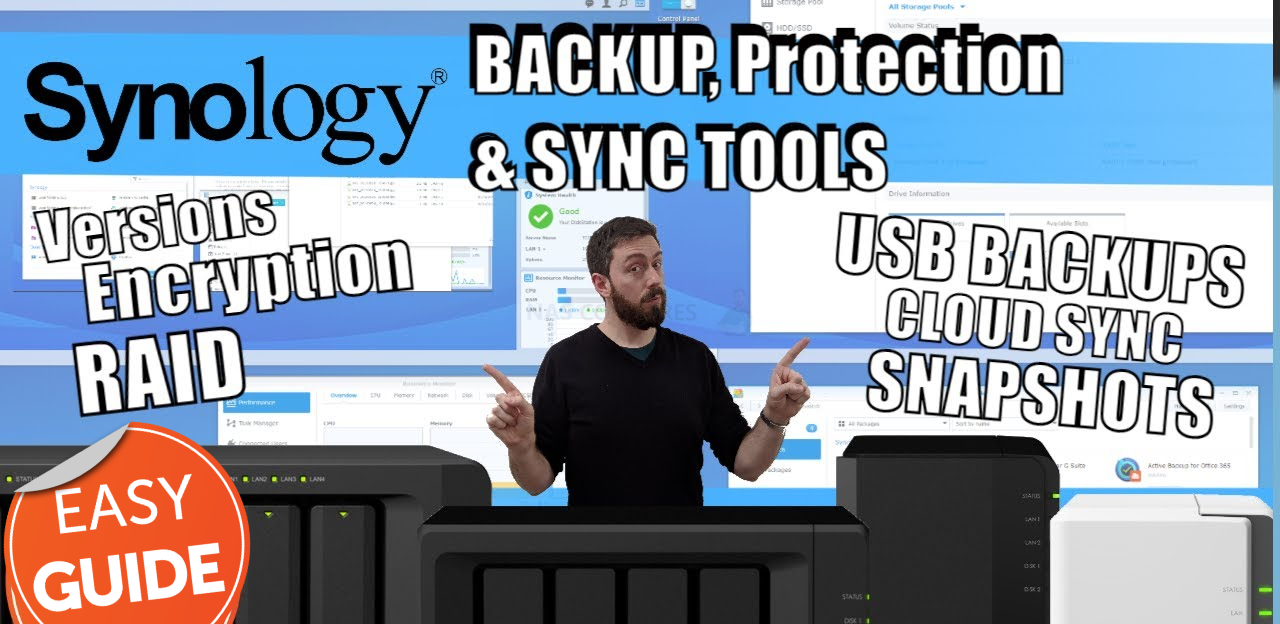
BACKUP, BACKUP, BACKUP!
Ensure you have a backup of all the data stored on your Synology NAS. This can be on another NAS device, a connected USB device, or a cloud service. Although the risk of data loss from the modifications you’re about to make is exceptionally low, you will be handling your storage media and ejecting and inserting drives, which could lead to accidental mishandling. Therefore, having a backup of your data before proceeding is crucial.
FULL GUIDE TO SYNOLOGY BACKUP OPTIONS IN THE LINK BELOW (opens in new tab):
Next, safely power down your Synology NAS system via the controls in DSM (DiskStation Manager). After the system has fully shut down, allow 3 to 4 minutes for the storage media to completely spin down.
Now, disconnect the power, network connectivity, and any other accessories or peripherals connected to the Synology system.
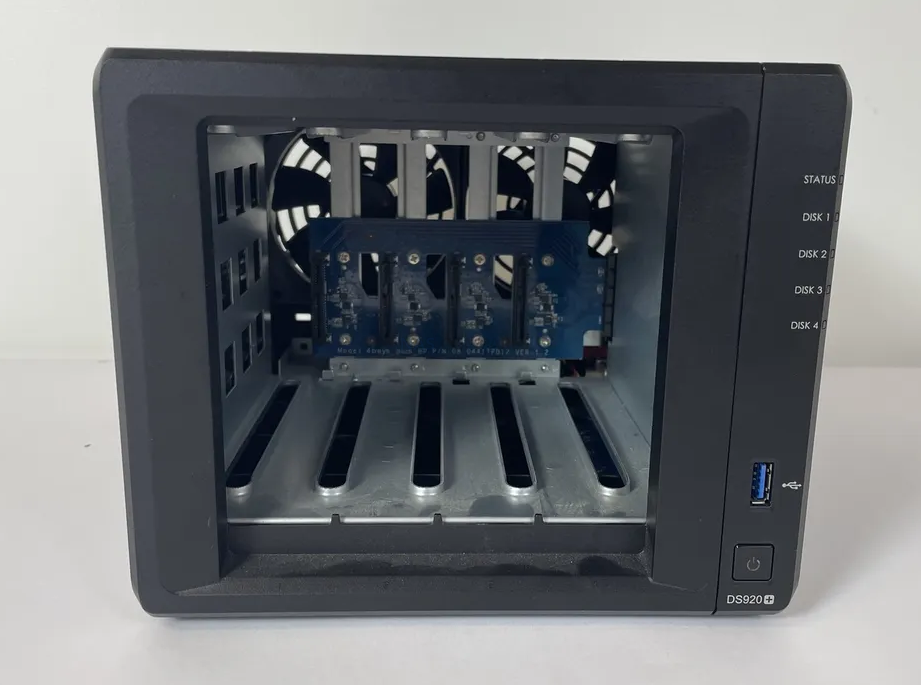
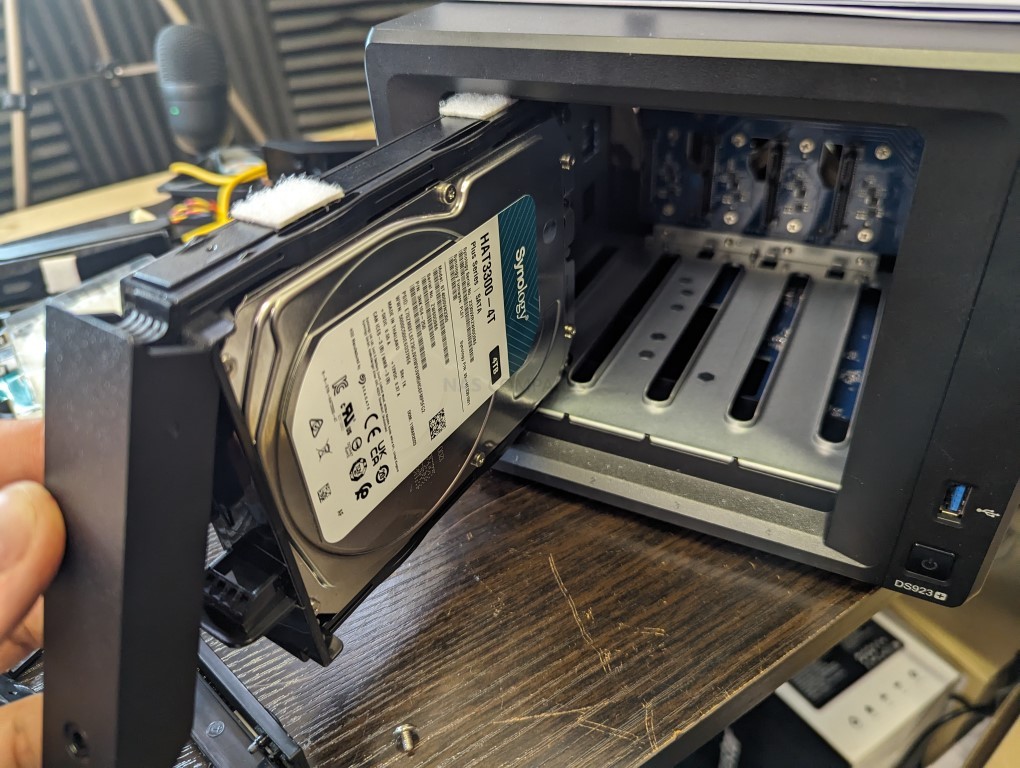
Carefully remove each hard drive from the Synology unit, placing them safely to one side. It’s important to avoid jostling these drives while you’re making modifications to your system. If you have internal M.2 NVMe SSDs inside the system, these can remain in place. Additionally, try to keep track of which bay each hard drive is removed from so you can ensure they are returned to their correct slots. Although modern versions of Synology DSM can still identify drives if they are placed in different slots, it’s best not to risk potential complications.
Synology NAS Velcro Hard Drive Mod Guide Start
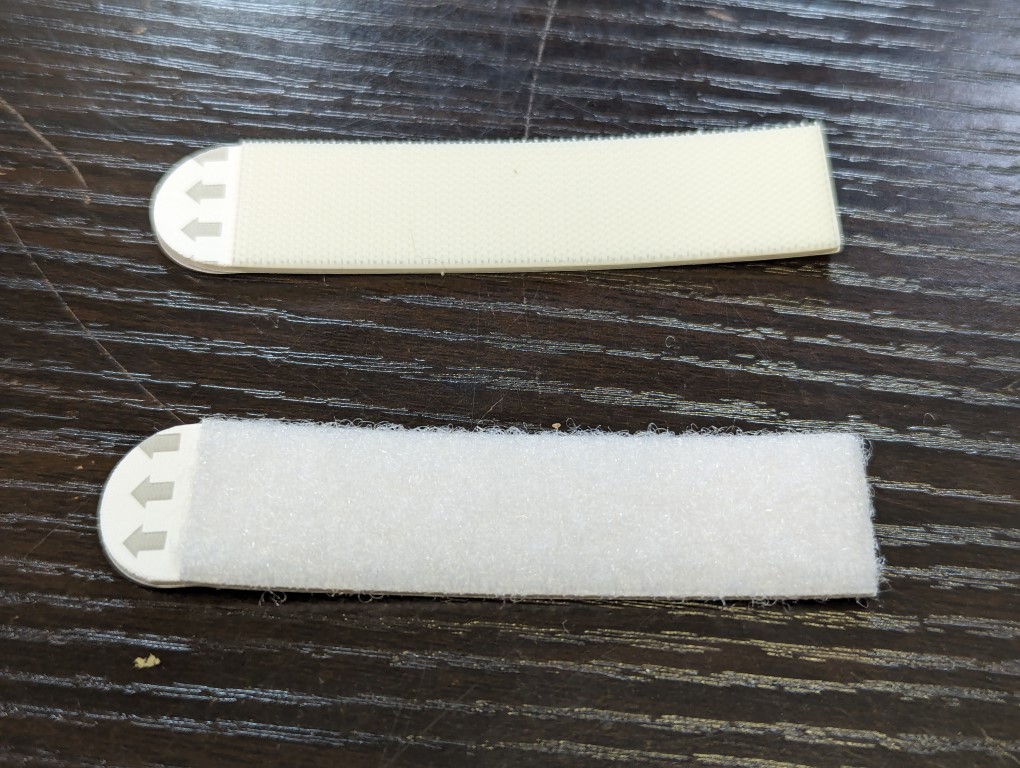
As mentioned earlier, a significant source of ambient noise from a Synology NAS during operation comes from the internal hard drives. As they spin, they cause vibrations throughout the NAS. The larger the drive’s capacity, the more ambient vibration and access noise it tends to produce. This is where the Velcro modification for the individual trays comes into play. The goal is to neutralize the vibration caused by these drives, preventing it from being transmitted through the chassis of the Synology NAS. There are two methods to use Velcro within the Synology NAS, each with its own advantages and disadvantages. It’s important to only use the soft, fuzzy side of the Velcro.
Velcro Method 1
One approach is to place strips of Velcro into the individual SATA storage slots of the Synology NAS.
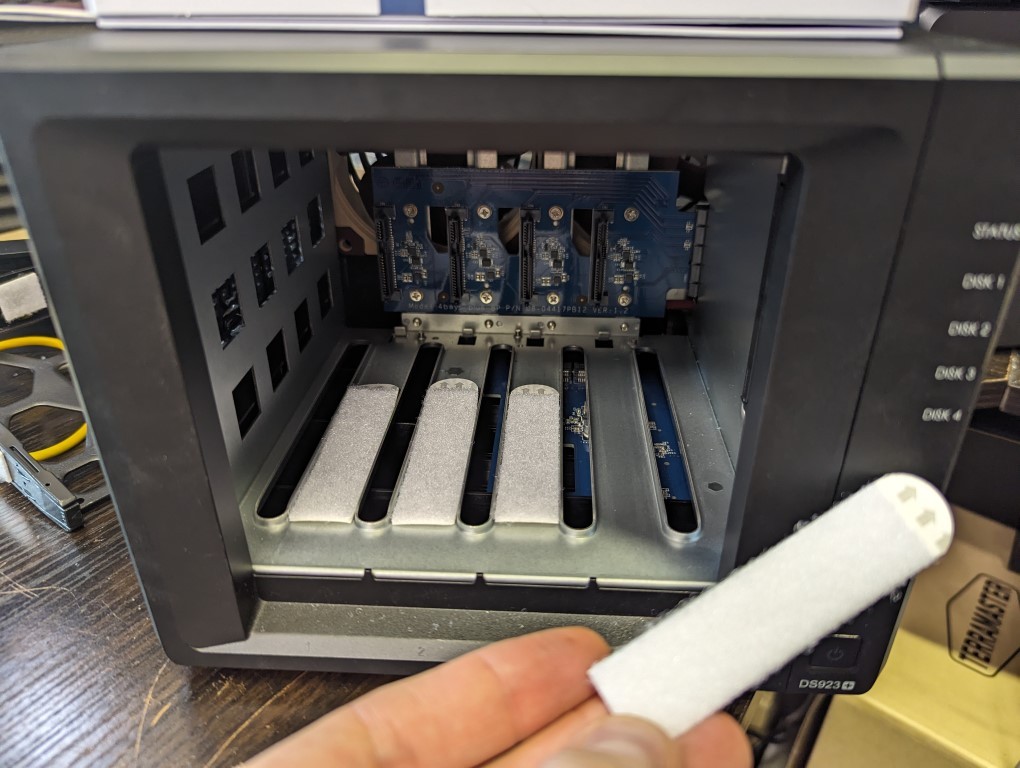
It’s optional to place a Velcro strip at both the top and bottom of each slot. A single piece of Velcro at the base of the drive bay should be sufficient to neutralize the vibration traveling through the system, though adding a second piece at the opposite end can enhance stability. These modifications will not increase the system’s operating temperature but may make reinserting the drives slightly more challenging. This is expected, as the Velcro strips are designed to secure the drive more firmly in place.
Velcro Method 2
Velcro method 2 is a little bit more surgical and requires a pair of scissors and the removal of the drives from each of the trays.
Once you have removed the drive from each tray, you need to place five individual squares of the soft side of the Velcro in each of the areas displayed in the images. Place four squares, two on each side, at the points where the Synology tray clips traditionally go into the holes of the drive as shown here.
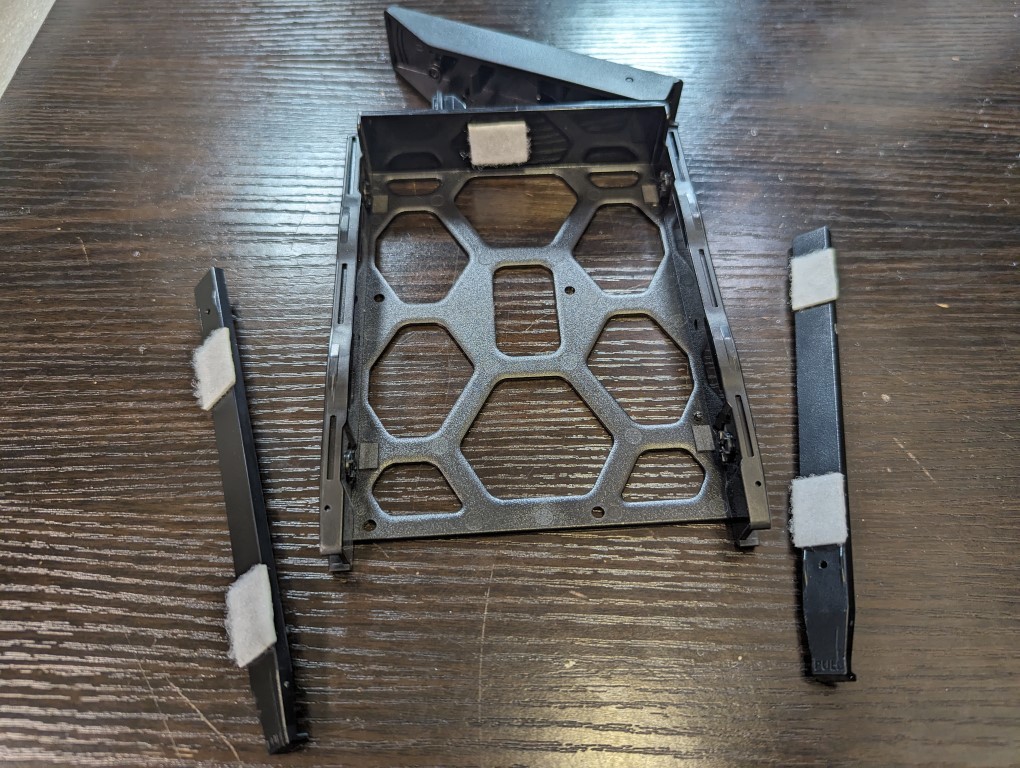
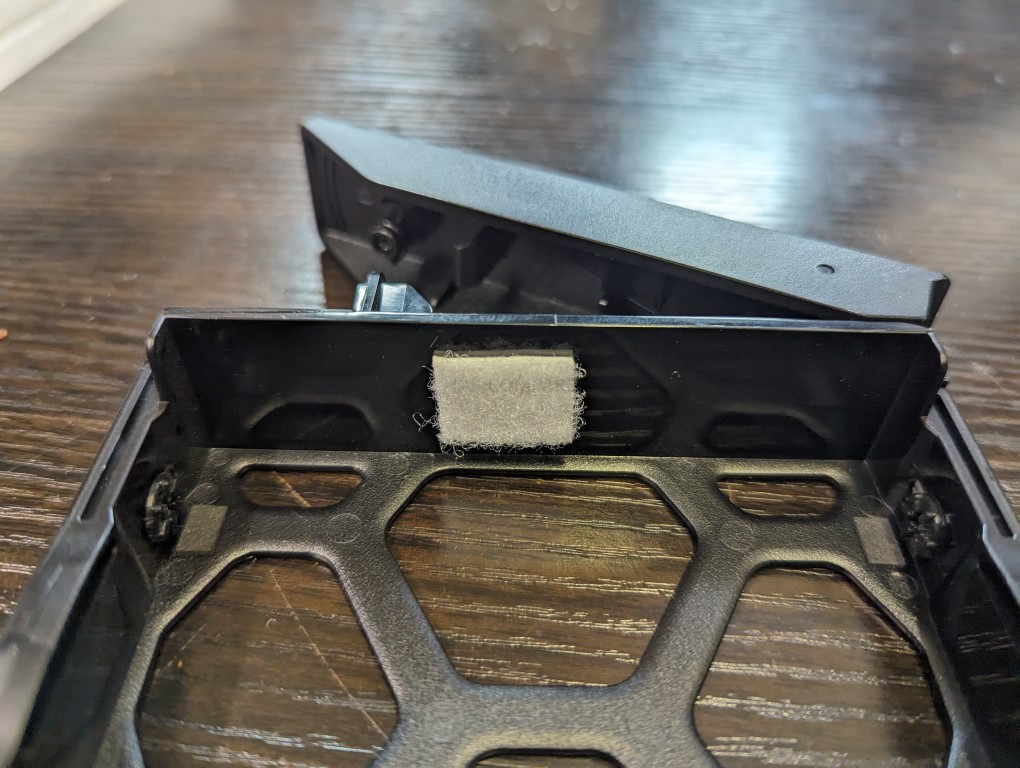
Then, also add an additional Velcro square on the inside of the tray where the back of the drive meets the handle of the tray, as shown in the image below.
Once you have done this, reintroduce the hard drive into the tray. You may notice that aligning the clips into the drive is a little harder this time around and this is because the additional fifth Velcro square is wedged between the drive and the tray. This is normal and just requires a little bit more pushing to apply the clips into the tray and secure the drive.
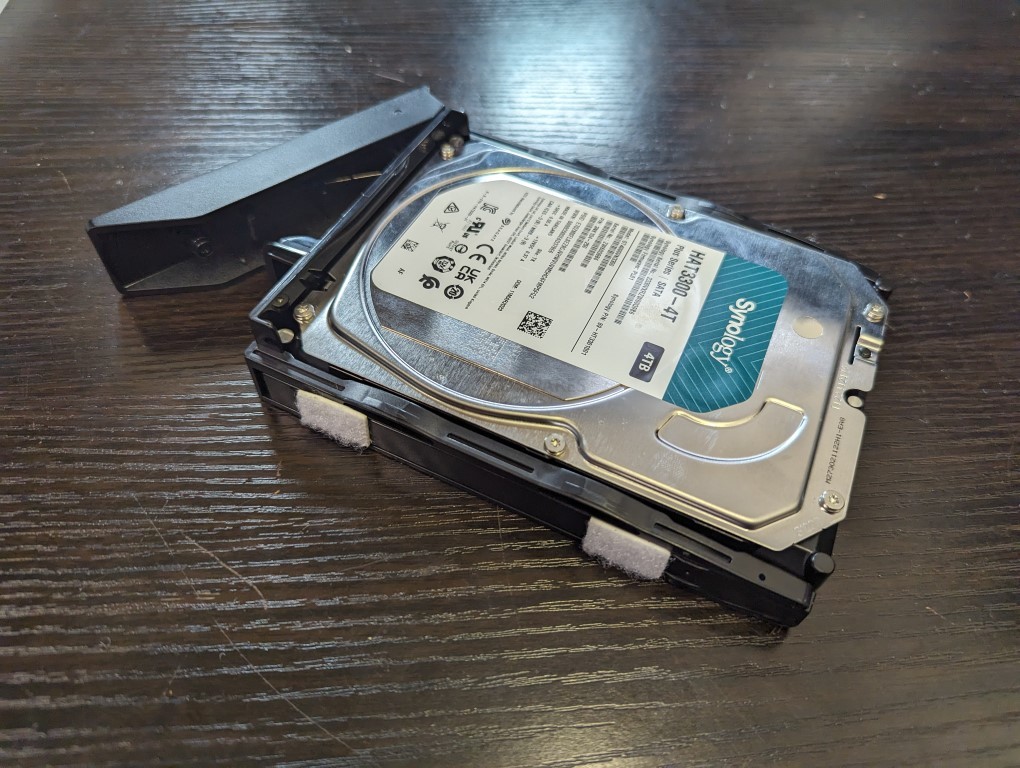
Now, regardless of which method you chose to apply the Velcro absorption panels into the Synology storage area, you may now reintroduce each of the drives into the Synology NAS. Once again, be aware that the drives will go in with a little more friction than previously, and this is part of the way in which the vibration of the drives will be decreased during operation. The tray should still neatly connect with the back SATA connection.

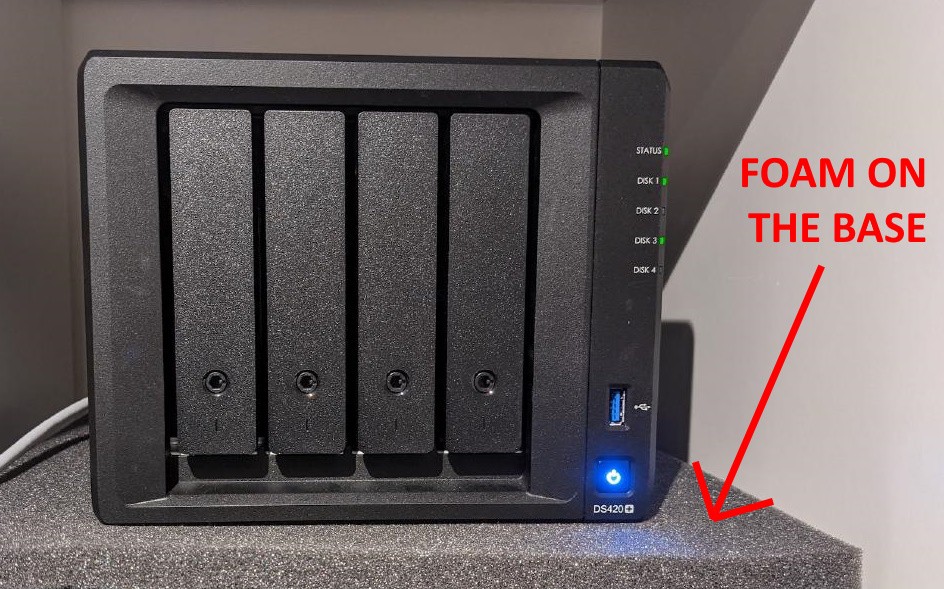
There you go, you now have the means to hugely reduce ambient vibration noise from the drives traveling through the Synology NAS system. If you are especially concerned about vibration and the Synology NAS creating increased ambient noise, you may also introduce a foam panel underneath the Synology unit, which will further decrease any vibration being caused between the network-attached storage device and the desktop that you deploy the system onto.
Next, let’s discuss how to swap out the default fans on the NAS for faster and lower noise alternatives.
Synology NAS Noctua Fan Modification Guide Start
The first thing you need to do is ensure that the hard drives are completely disconnected from your Synology NAS, as you will be disassembling the system and rotating it at certain points which can all add up to drives being jostled and potentially damaged. So make sure that all storage media has been removed from the Synology NAS before proceeding.
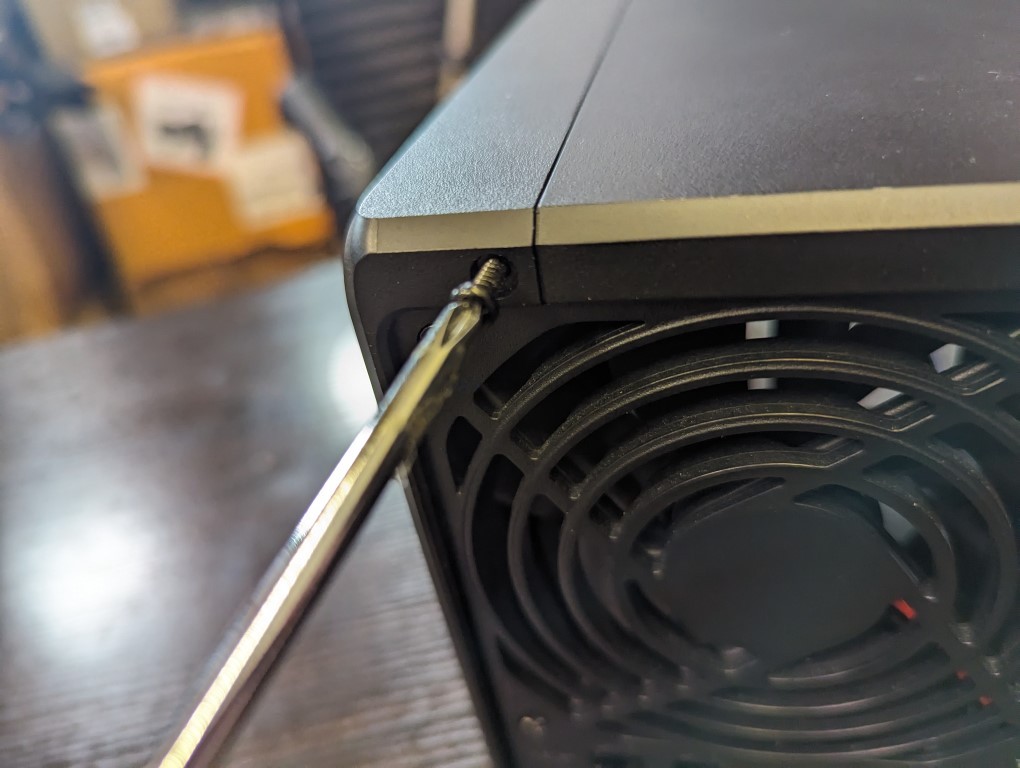
Next, rotate the Synology NAS and remove the two screws located on the left-hand side of the chassis as indicated in the image below:
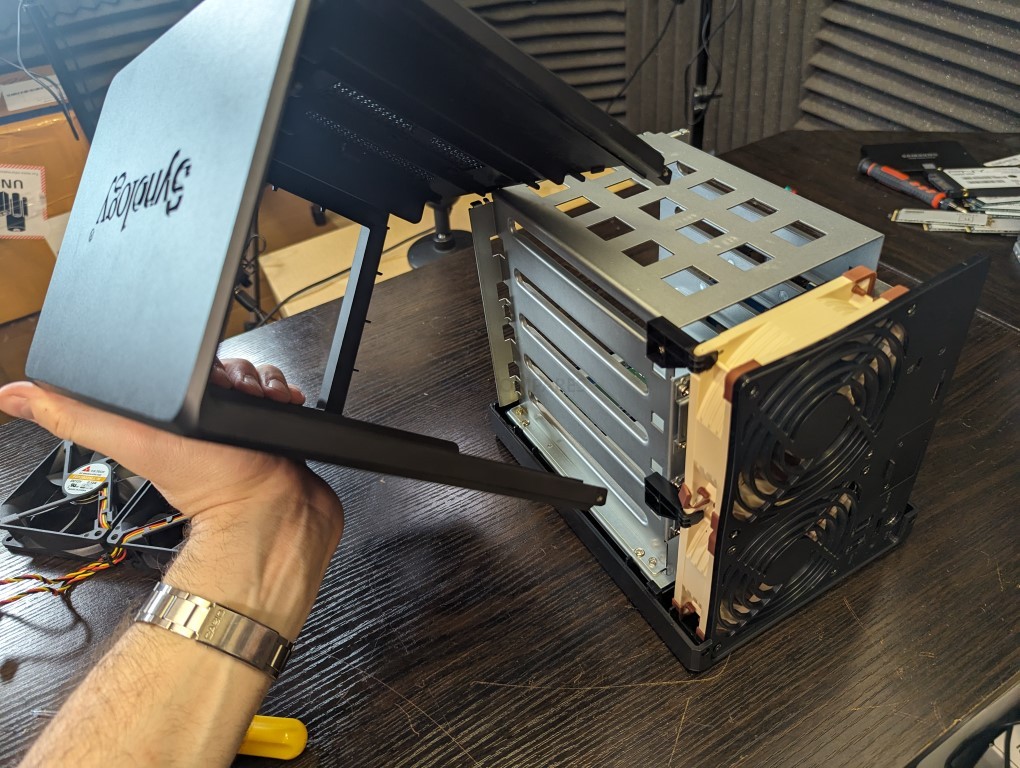
Once you have removed these two screws, the chassis should slide apart into two pieces. If the two pieces do not neatly slide apart, then gently place your hand on the inside of the storage area and apply a small amount of pressure in the area shown in the image below:
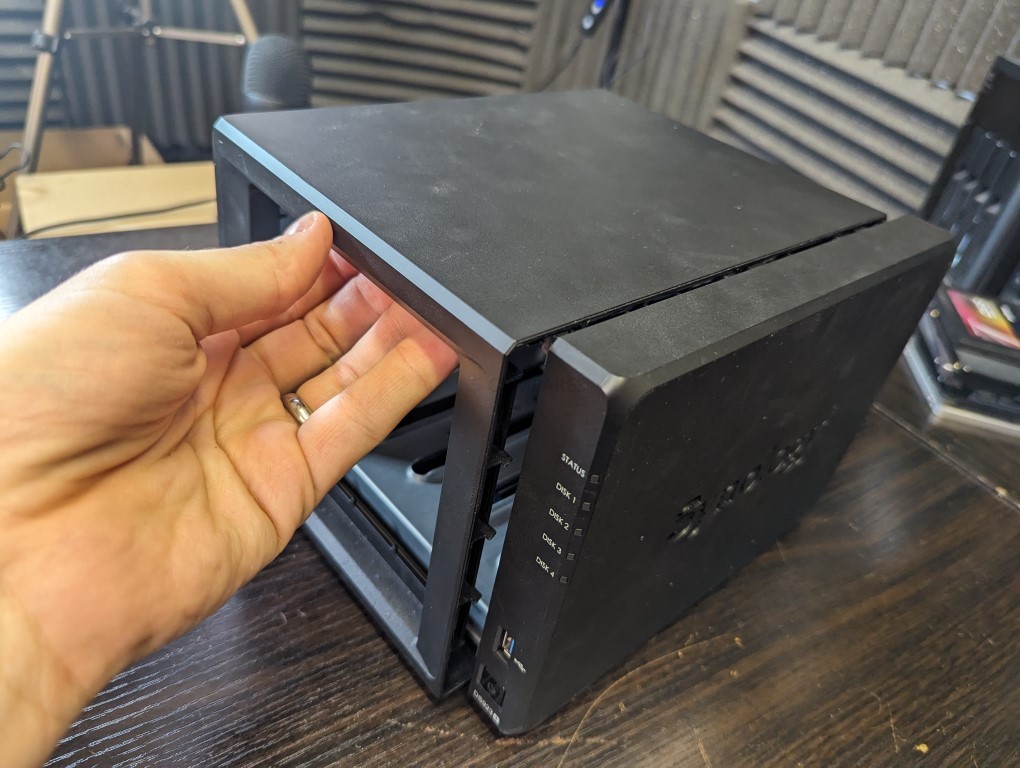
This should allow the larger area of the external casing to come off neatly, allowing you full access to the internal metal SATA cage and internal components.
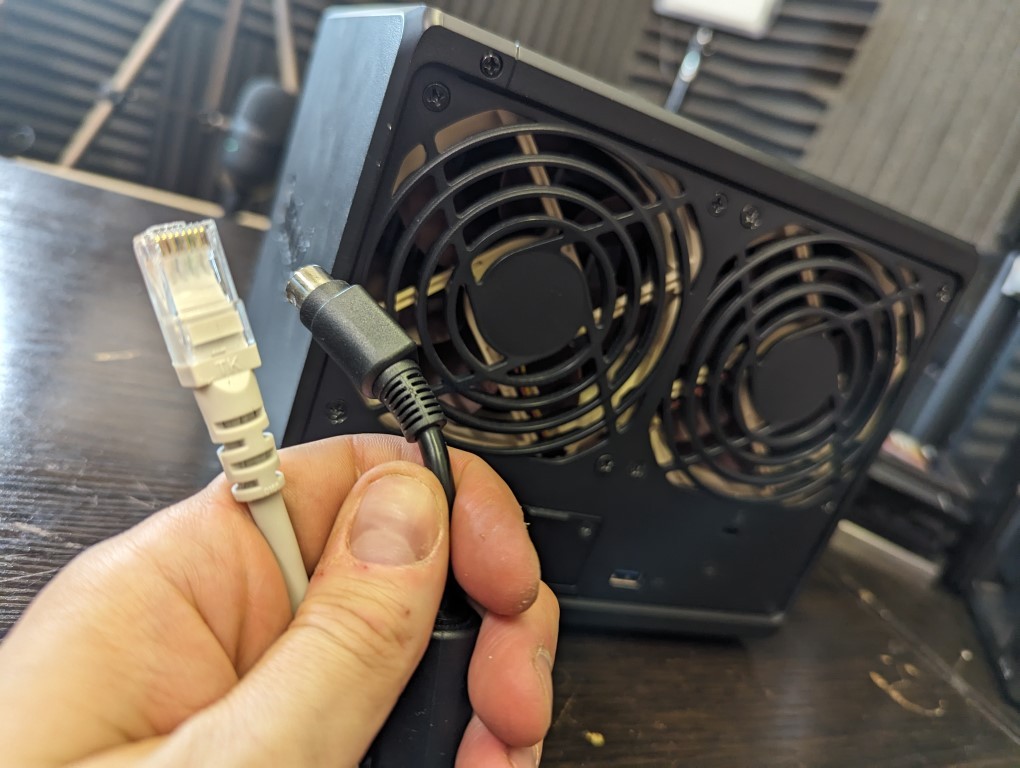
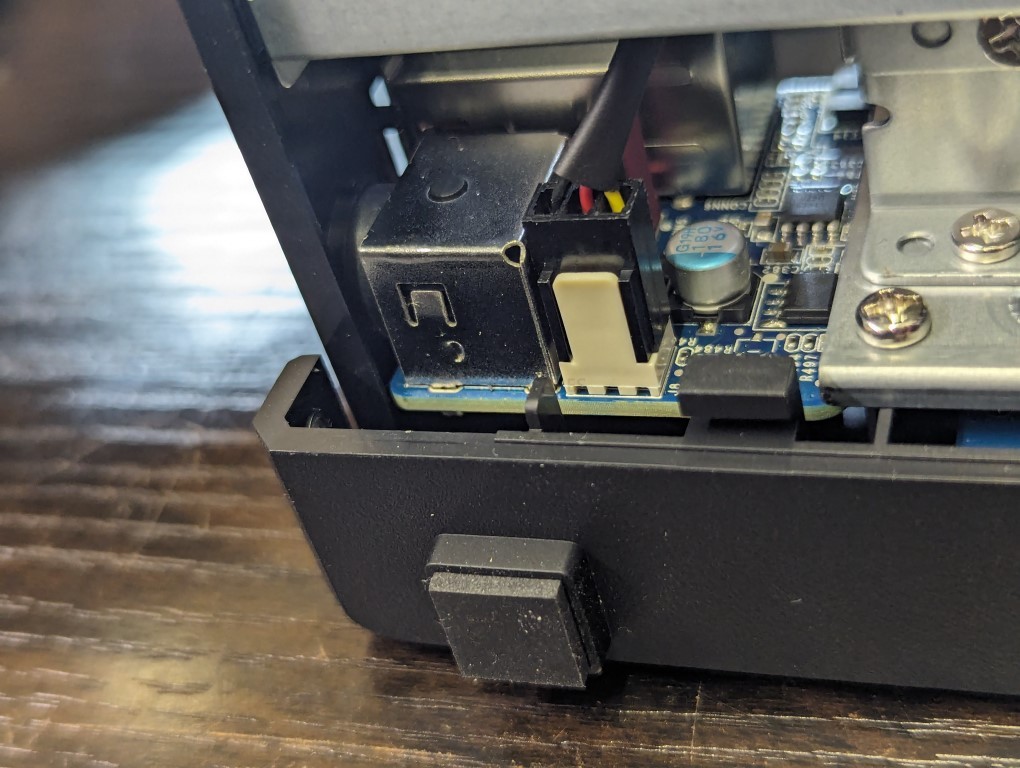
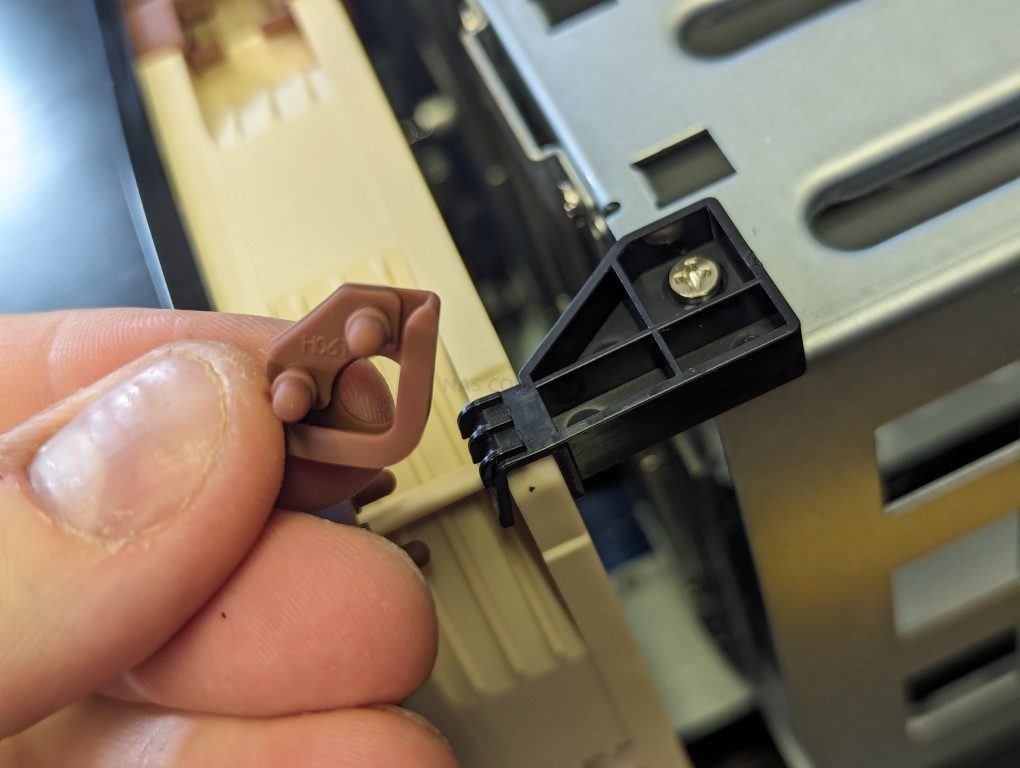
Next, you need to make your way to the rear of the NAS and remove the two black clips that hold the individual fans in place at the top of the SATA cage.
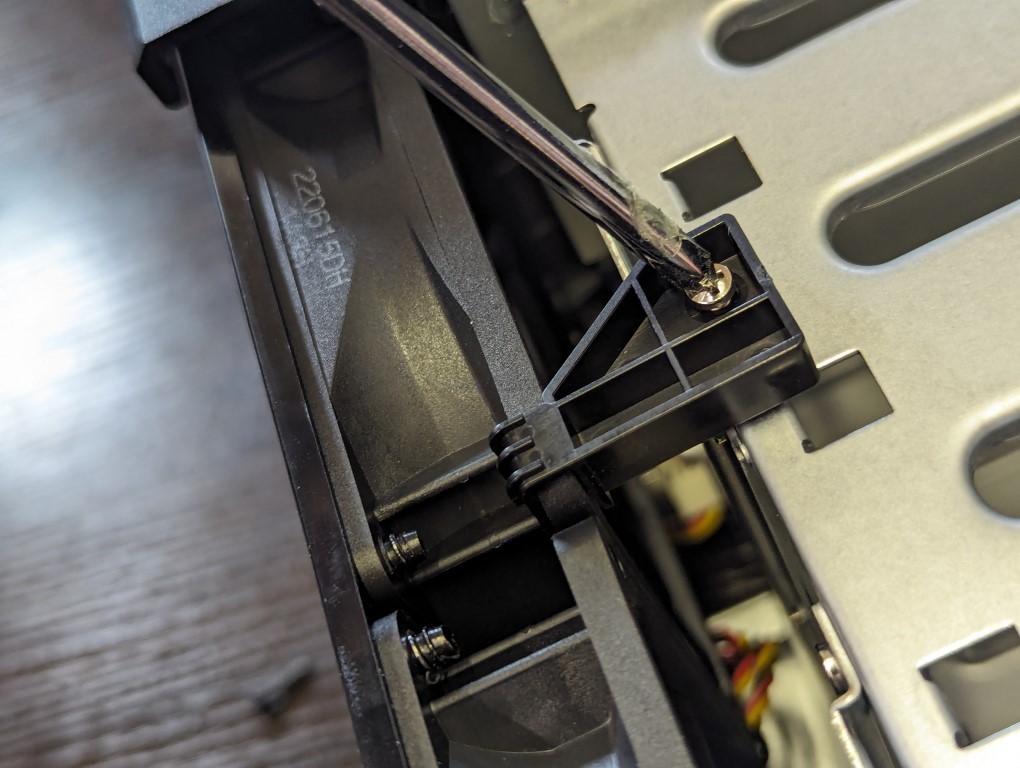
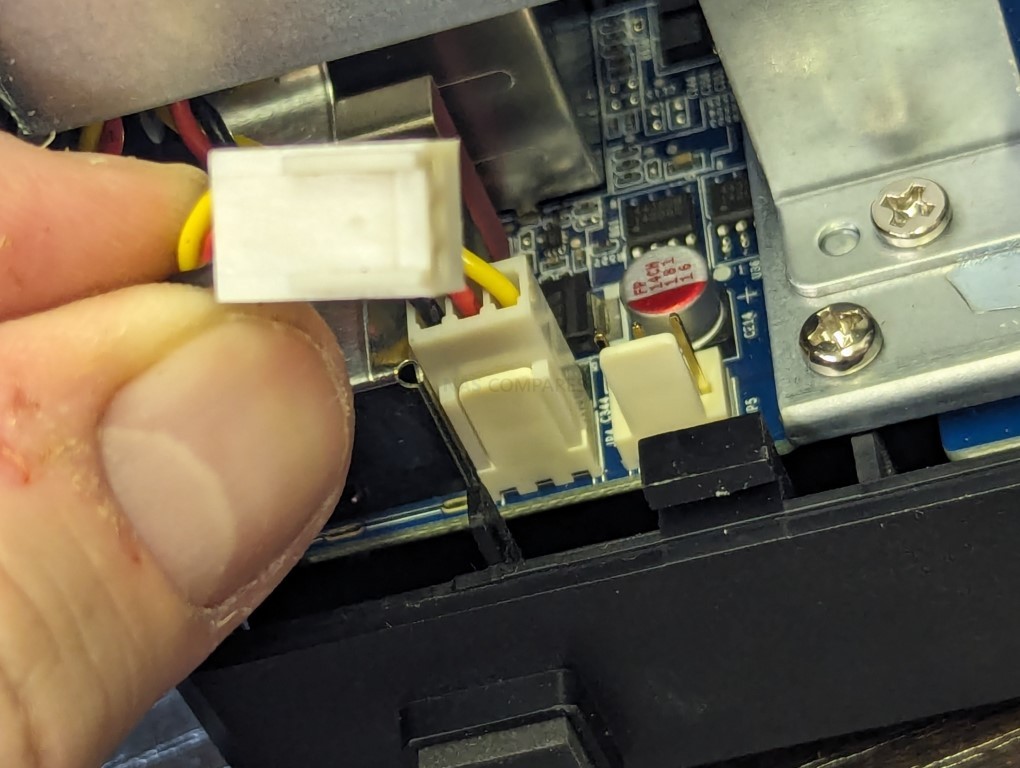
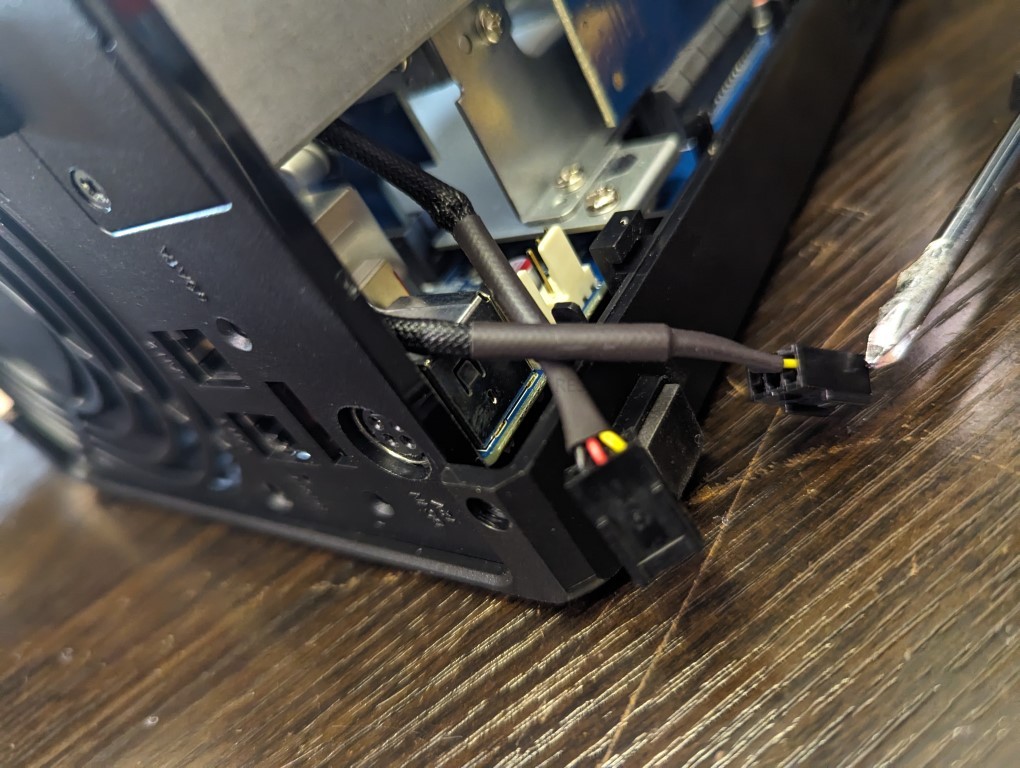
Next, head to the side of the Synology NAS frame and gently remove the fan power clips from the internal board. They are white clips that you can see in the image below:
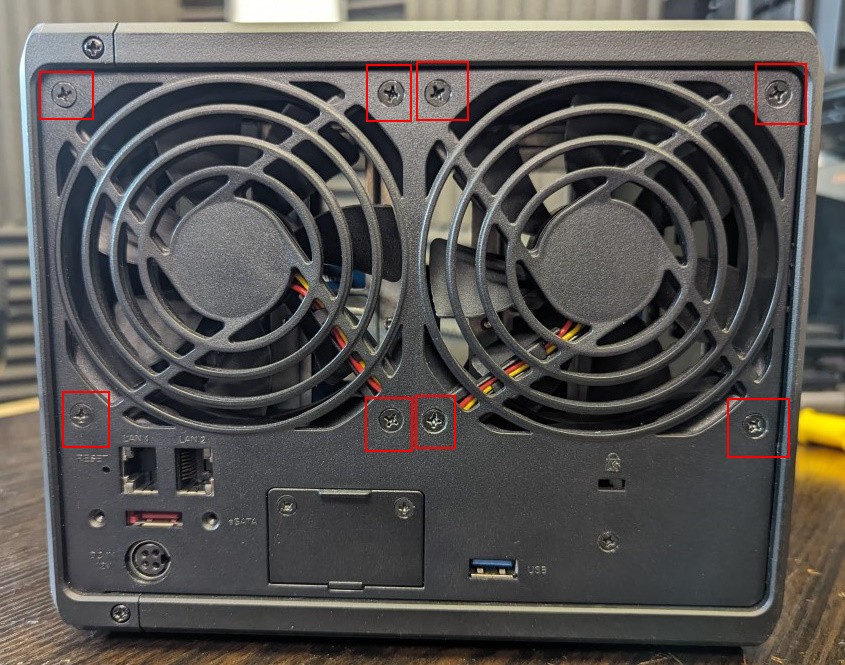
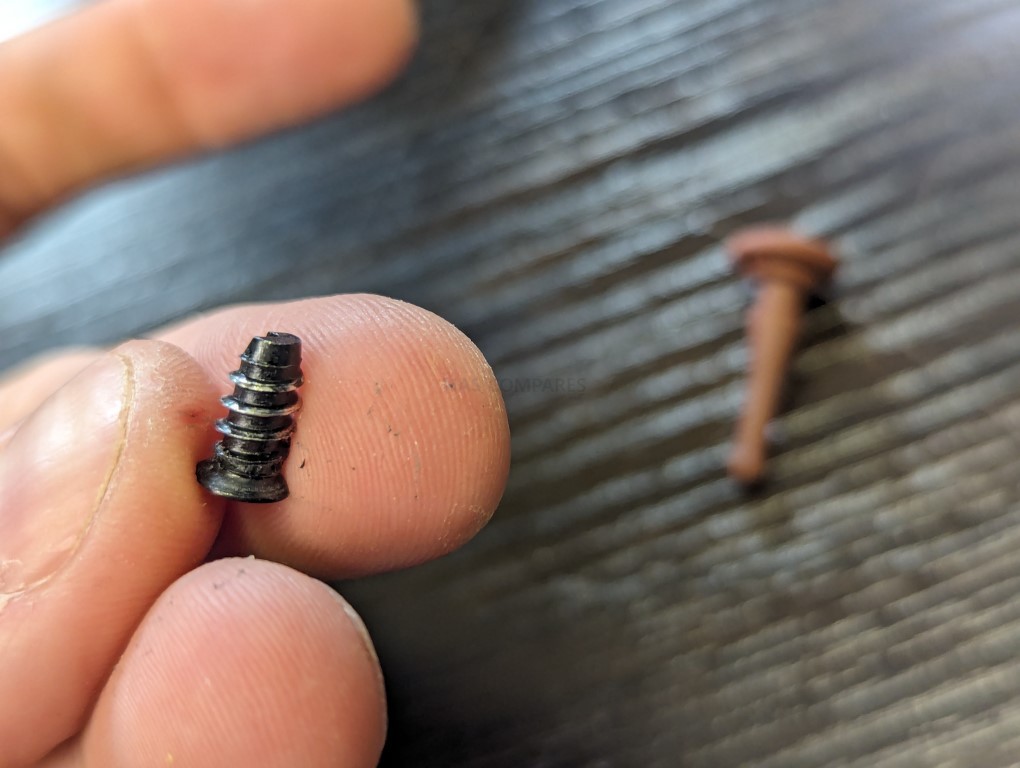
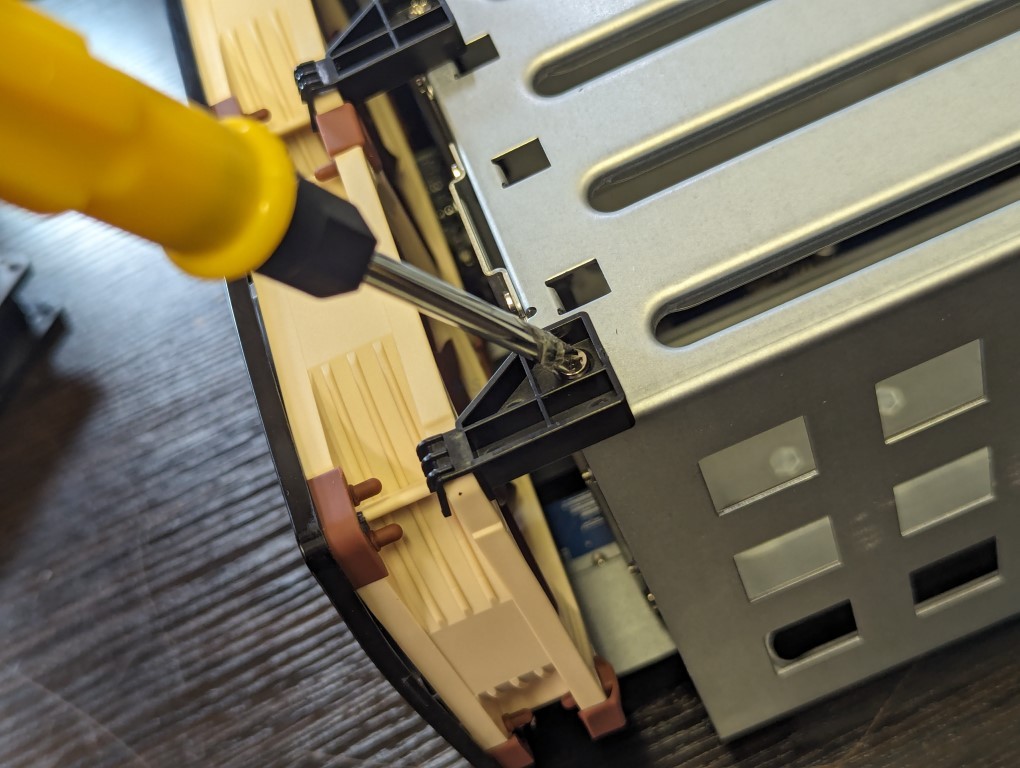
Next, return to the rear of the Synology NAS chassis and remove all eight of the screws indicated below, as these hold the default Synology fans in place.
The fans should neatly slide out from their cavity in the rear of the Synology NAS.
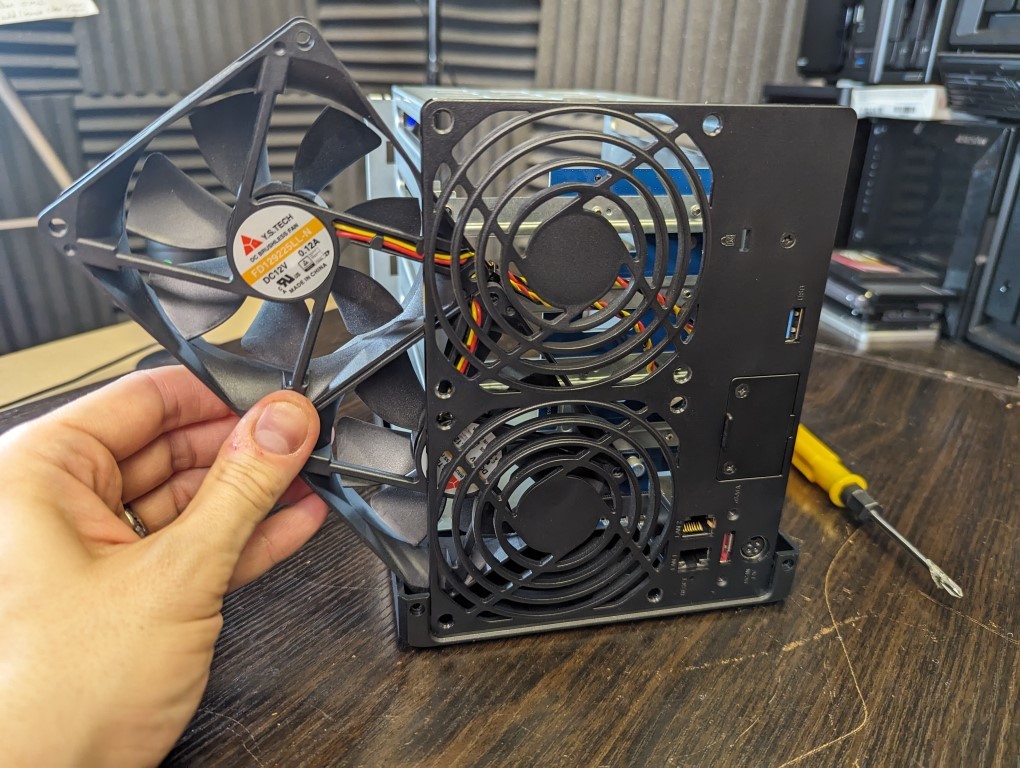
While doing this, do take note of the direction of the fans, as well as their alignment, which shows you exactly where the cables feed into the base of the Synology NAS cavity for the fans.
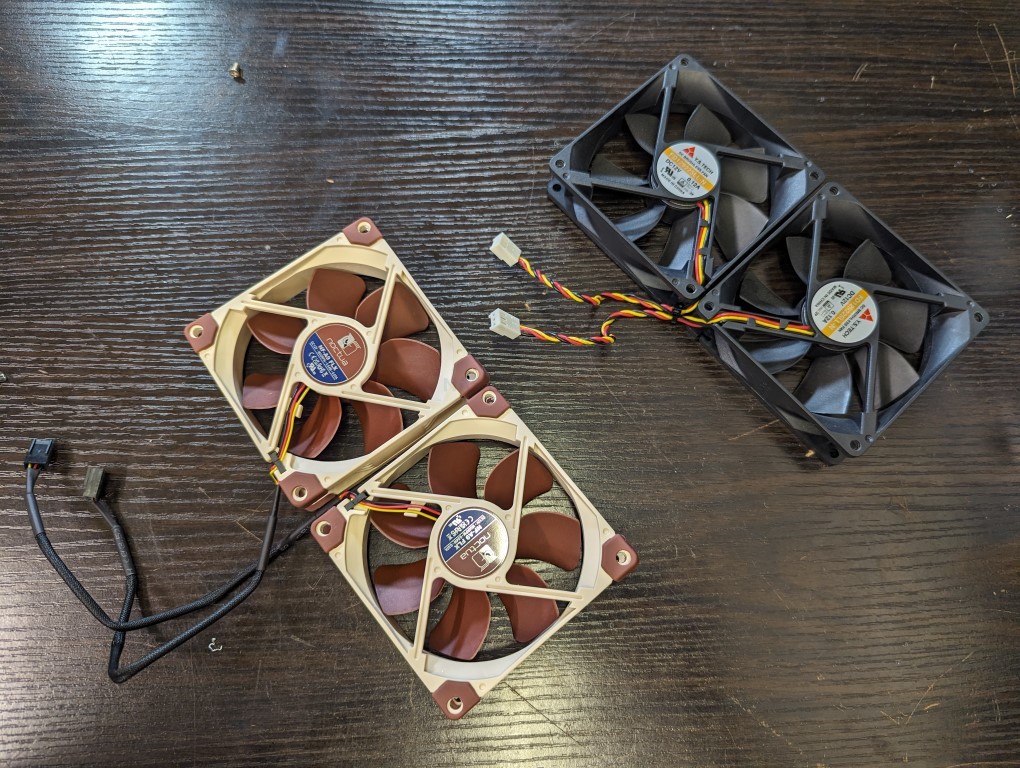
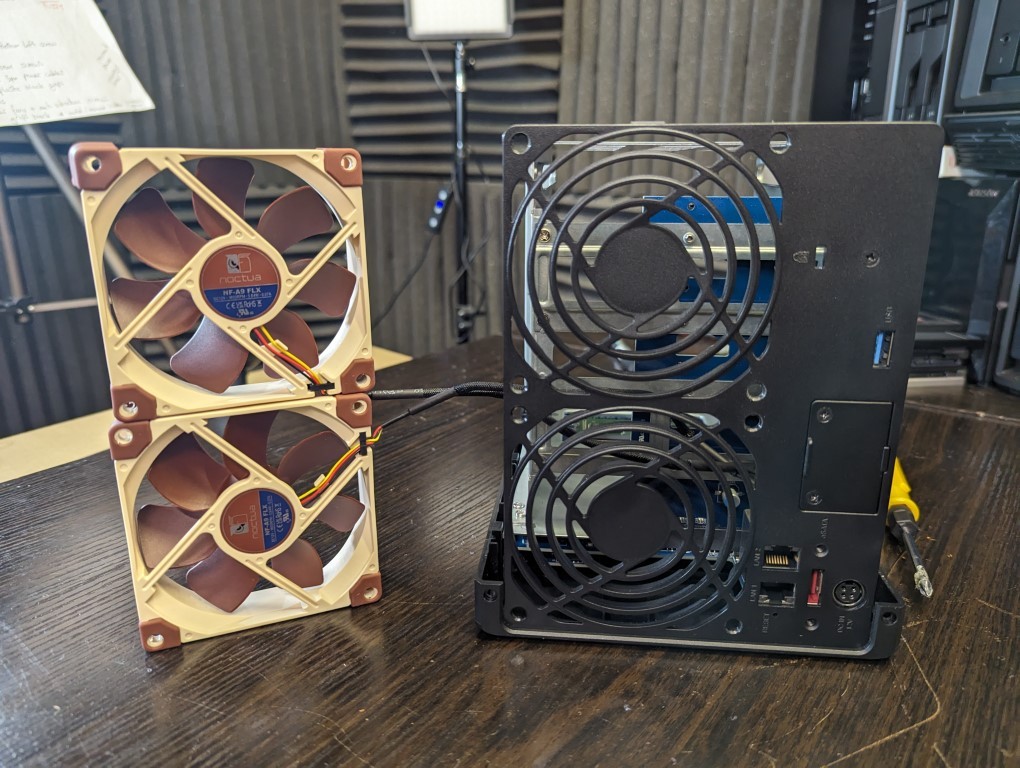
Now you need to get the two noctua replacement fans (or the third-party fans you have opted to buy) and hold them in the identical alignment and direction that you found the official fans when you removed them.
Gently insert the left fan first and guide it into the cavity that is now available.

When doing this, make sure that you guide the fan power cable through first to ensure that you are able to reconnect it later.
Some fans, like the Noctua fans, arrive with their own rubber screws or just general screws for reinstalling these fans
It is recommended that you use the original Synology screws when installing these new fans, as using other screws may lead to causing damage to the rear of your chassis. After you have screwed the new fans into the Synology NAS, connect the fan power cables appropriately back into the Synology motherboard as shown below:
Next, you need to reattach the clips that hold the fans in alignment and in place with the SATA cage at the top. It’s worth noting that premium fans often come with rubber covers at their corners.
These can interfere with the placement of the fan clips on the Synology NAS, so it is recommended that you remove these rubber covers to ensure that the fans fit neatly within the Synology fan cavity.
Ensure that the power cables are not trapped when reattaching the external enclosure, as this could damage the cables and prevent the fans from functioning properly! Once the external casing is back in place, reattach the two individual screws on the left-hand side of the rear of the case to secure the enclosure.
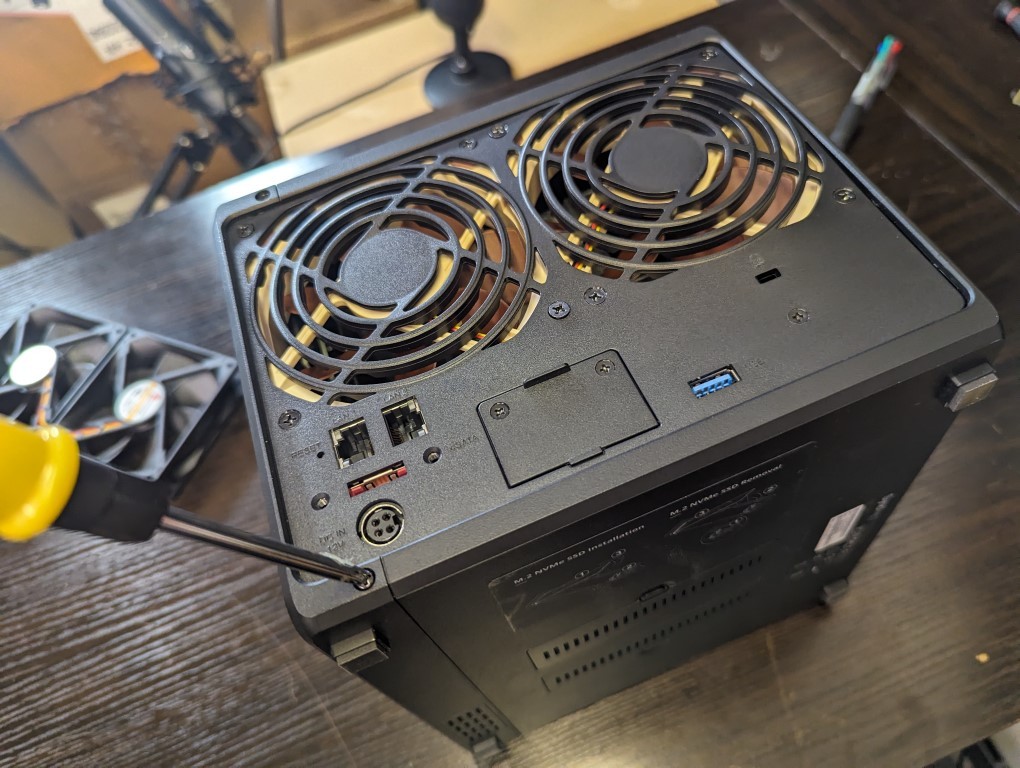
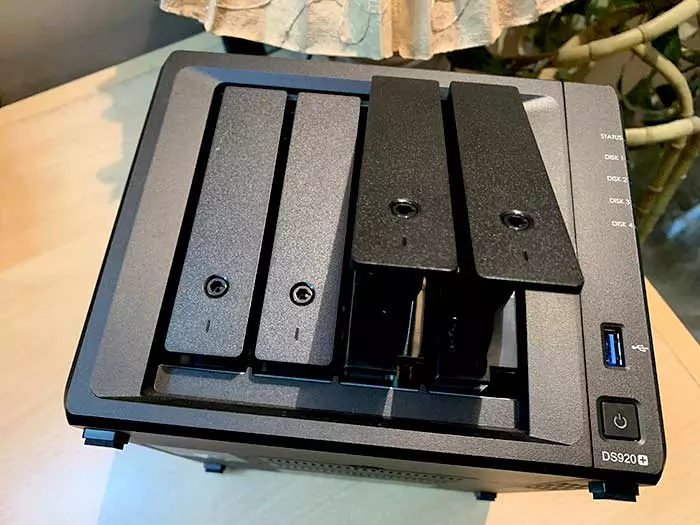
Now you can reintroduce the storage media that you removed earlier, ensuring to place them back in the same slot alignment as before. Finally, reattach power and network connectivity to your Synology NAS to reboot the system.
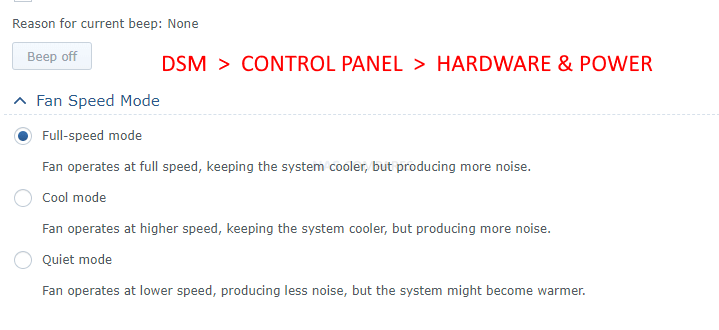
Now you will need to reboot the system. Depending on the quality of the fans you’ve purchased, the impact of replacing fans in a Synology NAS can range from minimal to massive! To ensure that the installation has been successful, once your Synology NAS has rebooted, navigate to the Control Panel > Power and Hardware. From there, you can check the system’s operational temperature as well as the RPM of the fans. If you’ve correctly connected the fan power cables, you should still be able to control the RPM of these fans if you choose.
And that’s it! Adding new, low-noise optimized fans to your Synology NAS will definitely have a significant impact on reducing the ambient sound of the NAS when it’s running. Likewise, applying the Velcro modification to each of the individual storage bays will mean that hard drive vibration that travels through the system during heavy write operations will be significantly reduced. However, keep in mind that if your system is housed in a larger metal enclosure, or you are using Pro/enterprise-grade hard drives, achieving noise reduction in the Synology NAS can be challenging. You are reducing the operational sounds of the NAS, but few modifications can prevent the inherent noise levels of more industrial-quality drives.
Would NOT Recommend This:
You might be tempted to place your Synology NAS in a contained foam noise-dampening cube, which is a solution some people mention online. While this can effectively reduce total ambient noise, it may also restrict active airflow to your system and potentially lead to recirculating warm or hot air inside the system. This can exacerbate poor operational temperatures, leading to increased fan usage and higher power consumption. So, just keep in mind that while these modifications can positively impact your Synology NAS, their effectiveness has limits, especially in more industrial or enterprise deployments.
| In a Hurry? Here are the parts for this guide:
Noctua NF-A9 Fans (x2 Needed) $16-20 – AMAZON – ALIEXPRESS Velcro Strips/Spots $4-6 – AMAZON – ALIEXPRESS Foam Panel $6-10 – AMAZON – ALIEXPRESS Synology 4-Bay NAS $499+ – AMAZON |
📧 SUBSCRIBE TO OUR NEWSLETTER 🔔 This description contains links to Amazon. These links will take you to some of the products mentioned in today's content. As an Amazon Associate, I earn from qualifying purchases. Visit the NASCompares Deal Finder to find the best place to buy this device in your region, based on Service, Support and Reputation - Just Search for your NAS Drive in the Box Below
🔒 Join Inner Circle
Get an alert every time something gets added to this specific article!
Need Advice on Data Storage from an Expert?
Finally, for free advice about your setup, just leave a message in the comments below here at NASCompares.com and we will get back to you.
 Need Help?
Where possible (and where appropriate) please provide as much information about your requirements, as then I can arrange the best answer and solution to your needs. Do not worry about your e-mail address being required, it will NOT be used in a mailing list and will NOT be used in any way other than to respond to your enquiry.
Need Help?
Where possible (and where appropriate) please provide as much information about your requirements, as then I can arrange the best answer and solution to your needs. Do not worry about your e-mail address being required, it will NOT be used in a mailing list and will NOT be used in any way other than to respond to your enquiry.
![]() TRY CHAT
Terms and Conditions
TRY CHAT
Terms and Conditions

![]()
![]()
![]()
![]()
![]()
![]()
![]()
![]()


UGREEN DH4300 & DH2300 NAS Revealed - Good Value?
Aoostar WTR Max NAS - Should You Buy?
Xyber Hydra N150 NAS Review - Is This COOL?
Minisforum N5 Pro vs Aoostar WTR Max - The BIG Showdown
Do MORE with Your M.2 Slots - GREAT M.2 Adapters!
5 Top Tips for Content Creators Buying a NAS
Access content via Patreon or KO-FI
Cool Clock on your Arm ???? I had soemthing similar 30 Years ago. ????
REPLY ON YOUTUBE
This is so freaky. Spend over 600 dollars on a NAS then put foam padding and fans to cool it !!! What’s going on !
REPLY ON YOUTUBE
CAN YOU DO THIS FAN UPGRADE TO DS923+? THANKS
REPLY ON YOUTUBE
Hello, what fans would you recommend for DS1511+?
REPLY ON YOUTUBE
Used the Tutorial for the DS923+. The links he provides are incorrect. The DS923+ is a 3 pin as many have reported. Found out the hard way and should have READ all of these messages first. Would have been nice if he read the comments and made a quick note in the Tutorial.
REPLY ON YOUTUBE
Dear all! I just tried to change the fan on a DS224+ and in the description stated ‘Noctua NF-A8 ULN Fans (DS224+/DS223/DS220+ NAS) is incorrect’ for it. NF-A8 ULN (actually all NF-A8 fans) fan is a 80mm fan, but in the 2 bay NAS devices Synology uses 92mm fans. Well, at least in the DS224+ definitely. So probably I will need the NF-A9 FLX for the DS224+, because that is the only 3-pin, 12V, 92mm fan in the Nocuta 92mm lineup. Dear @NAScompare, please check information and maybe correct the fan size regarding the DS224+. Thank you!
REPLY ON YOUTUBE
A company cannot simply void your entire warranty just because you made modifications to your product due to the Magnuson-Moss Warranty Act, a federal law that protects consumers; however, they can deny warranty claims if they can prove that the modification directly caused the product failure.
REPLY ON YOUTUBE
I have a DAS box that made such a noise with the stock fans on full RPM. So I replaced them with Noctura fans, attached the PWM wires to an ESP32 (sits outside the box so had to do some drilling) and I can control those fans according to Drive temps. It’s amazing how slow you can actually have the fans and still provide enough cooling. Pretty much silent now 🙂
REPLY ON YOUTUBE
Not sure which way round you put the fans in as the video cut away.
Is it the label on the fan facing the opening?
REPLY ON YOUTUBE
FYi, I got a 923+ for Christmas, my fans are y.s. Tech (fd129225ll-n) have 3 pin and not 4 pin as you link to
REPLY ON YOUTUBE
when i change fans in ds418 to noctua, one fan stops working after some time
REPLY ON YOUTUBE
The Noctua fans dont work good on a DS916+ and probably the other NAS the same age. The fans are just a bit above the minimum needed voltage to run so sometimes you get an error that the fans don´t work. I swapped the Noctua NF-A9 FLX for some be quiet! PURE WINGS 2 92mm an they can still work with the lower voltage provided by the NAS.
REPLY ON YOUTUBE
I made mine silent instantly(ds923+) I have a MacBook pro 16 m3 pro it did sound like coffee machine just one seagate IronWolf 6TB in it all this for £570 for the nas and another £70 for the HDD I boxed it up and sent it back external ssd and 5 years of iCloud yes it don’t do plex £600 for a plex box to watch 3 hours a week nah , photos app that’s garbage compared to in built apple photos snap and its everywhere nah , have a UDM pro so not even using the sub par NVR when I looked at it I was convinced by channels like this its their bread and butter and very well made but very niche I’m done still here for the seagulls
REPLY ON YOUTUBE
DS1621+ what fans for this NAS
REPLY ON YOUTUBE
It would have been nice to know that the Noctua fans has to be FLX model not the PWM one. PWM has 4 pin plug where the FLX model is the 3 pin variant. As you can guess I have now two of those 4 pin PWM Noctua’s on my table.
REPLY ON YOUTUBE
These boxes arent cheap the synology engineers should have sorted this rather than go for cheap to maximise profits – its a no buy from me
REPLY ON YOUTUBE
hi there. DS224+ actually uses 92mm fan (so model NF-A8 doesn’t work)
REPLY ON YOUTUBE
Noctua fans are slower than stock and push less CFMs, that is not recommended.
REPLY ON YOUTUBE
Noct Tua! Quiet that thang..
REPLY ON YOUTUBE
Saw your video when it came but haven’t tried the velcro until now but what a difference! Thanks!
REPLY ON YOUTUBE
I don’t usually comment, but I’ve been a big fan of your videos for a while, and earlier today i installed two Noctua fans into my DX517 due to the warmer weather round the corner, and my NAS and extension sat in a cupboard – instant improvement in drive temperatures. It wasn’t absolutely critical for me, but i still feel better knowing they’re staying cooler, more efficiently – will do the main unit next month. Thanks for the walk through! Will do the velcro mod when i can afford bigger drives!
REPLY ON YOUTUBE
Do the velco strips affect the hdd temp in any way?
REPLY ON YOUTUBE
What’s the noise comparison (db levels) of the NAS while the HDDs are at max read/write speeds?
REPLY ON YOUTUBE
I have a Synology DS918+ and I wanted to use the Noctua NF-A9 FLX fans, but Noctua was telling me that newer software updates can cause problems. E.g. a failure is reported and the NAS refuses to run with a “defective” fan.
REPLY ON YOUTUBE
Simple fix, no mods – buy one of those rectangular kneeling pads about an inch thick by 9 or 10 inches front to back.
Cut the kneeling pad so it is at least an inch wider than the NAS enclosure on each side, or use the full pad for two NASs
Put the NAS on the upside down kneeling pad, with the hard surface upwards, the NAS enclosure legs don’t sink into the rubber.
REPLY ON YOUTUBE
I’ve read that (some?) Noctua fan mods also require that you change some settings via SSH because they apparently run on lower RPM. Can someone confirm this?
REPLY ON YOUTUBE
I swapped the fans on my 1821+ with Noctuas, but now the PSU fan annoys me 😛
REPLY ON YOUTUBE
In case it has not been said: On most fans, especially Noctua’s, have on their plastic housing arrows that indicate the direction the fan spins as well as the airflow direction.
REPLY ON YOUTUBE
Would love to see a specific video for Asustor NAS like the 5402.
REPLY ON YOUTUBE
I literally did this the day before this video. Works a treat, wife approved! My nas has been off for a year because of the vibration hum!
REPLY ON YOUTUBE
Hi. I’m new to anything NAS and recently purchased a DS923+. The Noctua fans you suggested for this unit are 4 pin but the fans in the NAS are 3 pin. Does this matter?
REPLY ON YOUTUBE
Hey hey! finaly got my hands on one nas.. the ticking of HDD are making me insane. so going to do this mod.
REPLY ON YOUTUBE
So is it Noctua NF-A9 FLX Fans (6-Bay NAS) compatible with DS1621xs+ ?
REPLY ON YOUTUBE
Hi everyone,
I have a DS1515+ that has died, a new power supply didn’t fix the flashing blue light.
It has a mix of WD red and Seagate ironwolf drives, I would like to replace it with a Synology DiskStation DS1522+ but I am not sure if I can just swap my old drives into it, as their drive compatibility list does list WD reds as far,as I can see.
Thanks.
REPLY ON YOUTUBE
I can definitely agree adding the Velcro and getting a pad to set the NAS on really helps. I just cut 4 small squares of craft foam to make new feet for my 920+. It actually has more airflow than before as the new feet are a bit taller and just attached with some double-sided tape.
REPLY ON YOUTUBE
0:10: ⚙️ Tips for reducing noise and improving cooling in a Synology NAS system.
3:18: ???? Tips to reduce noise and improve cooling in Synology NAS systems without affecting performance.
6:40: ⚙️ Enhance Synology NAS cooling with compatible third-party fans and simple modifications.
9:54: ⏱️ Improving NAS cooling and noise reduction quickly and easily
13:21: ⚙️ Upgrade your NAS with fan adjustments and velcro mod for improved cooling and reduced noise.
Timestamps by Tammy AI
REPLY ON YOUTUBE
Hi, do you know what Noctua fans should I use, in order to replace the fans of Synology DX517 expansion unit?
REPLY ON YOUTUBE
Hi,
REPLY ON YOUTUBE
I’m putting a 180mm silverstone fan at the roof of my jonsbo n4, meaning I can run it near minimum.
REPLY ON YOUTUBE
Can i use NAS drive for pc? Or with other drives in hdd enclosure, where i turned it on and off regularly?
REPLY ON YOUTUBE
You can add Noctua NF-B9 Redux to the list that often work out excellent for the QNAP’s.
But before anyone endeavours on replacing fans, first look-up the specs of your existing fans. (where technical details such as PWM versus voltage-controlled, 3- or 4-pin connector, airflow such as CFM and noise-level in dB(A) are quite important).
Any replacement fan needs to match several of these parameters. (and can exceed the CFM value but definitely not a lower value).
An alternative solution to vibrations, is to place the NAS itself on a “foamy” underground. I have successfully used speaker padding for an installation at a family-member.
REPLY ON YOUTUBE
Can we get the same on a Qnap 🙂
REPLY ON YOUTUBE
Yeah, but how do I deal with the massively overvalued, underspecced hardware?
Absolute travesty that they chose not to embrace Alder Lake-N.
REPLY ON YOUTUBE
I really didn’t need to do any this, don’t care, still love these type of vids Robbie! And yes, I hate seagulls too, tips on making them buggers quieter next please! o7
REPLY ON YOUTUBE
Just put the Nas somewhere else.problem solved.thanks
REPLY ON YOUTUBE
I did this about five years ago to the DX517 5 bay expansion unit. The fan noise was noticeably louder than my DS518+ and ended up swapping the factory fans for Noctua NF-A8 ULN Fans. It’s been a silent runner since. Great content as always!
REPLY ON YOUTUBE
Thank you
REPLY ON YOUTUBE
this type of modification does not void your warranty in the US.
REPLY ON YOUTUBE
Do you know what Kind of Noctua fan I need to replace the one in my Qnap TS-264-8G?
REPLY ON YOUTUBE
Thanks! This is exactly what I’m looking at at the moment? Velcro seems to be everyone’s suggestion. How about other soft sticky things, like furniture feet?
The other noise source is the seek noises from the drives that others have mentioned already in the comments. Is there any way to reduce the performance of the seeks and lower that noise? In my case, I think that is the main source. I’d hate to buy new drives, as that is much more expensive than the NAS itself.
REPLY ON YOUTUBE
How much cooler does it run?
REPLY ON YOUTUBE
Great video and thoughtful, easy to adopt upgrades!
REPLY ON YOUTUBE
Ehm, I replaced the 2TB WD Greens in my DS218+, with 12TB Seagate Ironwolfs, which are helium filled, and they are quieter when idle. As per the spec as well (18dB). The only downside is that the noise they do make, contains something like a whistle tone. Which I read is common for helium filled drives. But it’s not horrible. I mean, with all the switch mode power supplies around, I got some similar noise from those too. Still, I let them switch to idle after 20 minutes of no activity.
Seeks are more noisy, but I’m not too bothered by that.
REPLY ON YOUTUBE
I have the 1522+ and a 220j side by side… I have them set to quiet mode. They are so quiet that my computer fans at idle are often louder.
I have ultrastore drives in my NAS and they are not appreciably loud….
I am an audio engineer and editor. So I notice noise more than most.
I think that placement is probably more effective than these mods. Place them on the bottom shelf of a entertainment center or similar space.
‘Felt’ furniture sliders on the feet of the NAS will help… also a foam piece about 6-12 inches behind the unit will help
REPLY ON YOUTUBE
I replaced the fans in my USG Pro, best move ever! Noisy to whisper quiet. Noctua all the way
REPLY ON YOUTUBE
8gb iron wolves has distinct noises in my synology. At first I thought about som silenced box for nas. But than I simply turn it off for the night
REPLY ON YOUTUBE
which fans for the DS923+?
REPLY ON YOUTUBE
Thanks for the info.
Mine’s in the garage in a portable rack with built in cooling – so there are the NAS fans and the NAS itself is inside a rack with fans too.
The joys of wiring the house with CAT-6E some years ago.
REPLY ON YOUTUBE
Did this with a DS416j – added Noctuas. They run and stop. DMS stating the the fan stopped working. Then it runs again, stops again. Very annoying.
REPLY ON YOUTUBE
My DS220 was crazy loud, started looking into mods like this and then my WD Red died. Replaced and its quiet enough now.
REPLY ON YOUTUBE
The chassis of my TS453D made an extremely annoying hum with 4 Seagate IronWolf 6TBs inside.
I had already tried foam underneath, but that didn’t help long. Once the foam sagged a bit the hum just started over.
Since about a year I have doublestacked cork coasters under each corner. Problem entirey fixed!
I then did the same for a DS418 with 4 WD Red Pro 4TBs to avoid the drive vibration transferred via the shelf into the brick wall. This NAS only runs for a few hours a week, just while backing up, but when it was on it was quiet audible even through a brick wall. With the ‘cork coaster hack’ it’s not 100% fixed, but it’s now very close to inaudible on the other side of the wall.
REPLY ON YOUTUBE
When I put enterprise drives in I was stunned by the raising of the noise level. My 8 bay started to sound like a kettle just off the boil. I tried everything. The solution was to turn the TV up louder.
REPLY ON YOUTUBE
Thanks for the video. However, dedicating a well ventilated cold room for NAS systems is less risky.
REPLY ON YOUTUBE
Good video. 3:18 When you place your synology on panels like this it will most certainly result in heat congestion around your nvme’s… I’ve tried lol… didn’t improve my noise since I had to increase the fans.
REPLY ON YOUTUBE
I wouldn’t recommend changing the fans, for the most part it won’t change much in regards to noise, and may end up making your NAS running hotter. The velcro mod however I feel is mandatory, it eliminates all hum from the NAS.
REPLY ON YOUTUBE
This is one of the best video I would say. I’m in Asian country with hot weather. A better fan is a must!
REPLY ON YOUTUBE
Robbie, I keep my TVS-h874 8-bay in my spare bedroom on an open shelf. I really only need 2 drives but it is fully populated with 8 large noisy drives. I forgot to mention that this is the spare bedroom that the in-laws occupy when they are visiting. Why on earth would I want to make this quiet when I spent good money on 6 drives that I have absolutely no use for to make this thing as noisy as possible. The in-laws now never stay longer than 2 nights which means not feeding them for 3 weeks the way I used to. That makes the cost of the extra drives a great investment. I broke even after just 2 visits.
REPLY ON YOUTUBE
When placing synology on foam, it’s best to make a sort of stand for it – a solid base say of plywood or carton, glue the strips of foam so that they don’t move around and you don’t risk the unit tipping. Maybe also glue s foam pad to the bottom of the plywoid/carton base as well.
This way the bottom intake vents won’t be covered. If you’re paranoid, you can affix the unit to the base with straps, so that it doesn’t fall off
REPLY ON YOUTUBE
I did the same mod on my DS920 but unfortunately one of the fan didn’t spin and create alarm. Swapping the fans didn’t help, anyhow one of the fan will stop spinning. It was not due to fan malfunction, for sure. Ultimately I have to swap back with the default fans and both fans spin.
REPLY ON YOUTUBE
Noctua fans, especially NF-A9, aren’t compatible with at least my DS923+.
REPLY ON YOUTUBE
On the noise front, the best thing I did for my NAS, I got these probably 3/4″ thick noise dampening foam pads, 4 of them, and sat my NAS on those. The pads dampen the vibrations and keep the NAS from rattling whatever it’s sitting on.
REPLY ON YOUTUBE
I had a problem with my QNAP TS-453D, after replacing stock fan to Noctua NF-S12A PWM. When fan RPM dropped below 500 (that is just after powering on device) system was thinking that fan is broken and RPM in device BIOS was 0.
With NF-A12x25 PWM I don’t have this problem even with Low-Noise Adaptor. in most cases temperatures are below 40 Celsius degrees and RPM below 700, with 3 WD Red 6TB in RAID5, extension QM2 card with 2x WD RED m.2 SATA 500GB drives.
REPLY ON YOUTUBE
Great video I use the Noctua fans myself in my DS920 however DSM randomly stops one of the fans bringing in a fan failure warning. I have to run them at full speed to avoid the issue. Even in full speed mode they are quiet and nearly not hearable. It still sometimes stops one of the fans despite running them at full speed. The only way to fix it is to restart the DS. Many have reported this issue after they upgraded to DSM 7.
REPLY ON YOUTUBE
You’ve go to wonder why PC case manufacturers, I’m sorry, NAS manufacturers, don’t just let you install perfectly normal fans. Its like they think you buy your NAS by physical size and having the space for proper ones would annoy you or something.
REPLY ON YOUTUBE
Noctua fans are obscenely overpriced, if you want to swap fans just get something from Arctic, 95% as good as Noctua for less than 50% of the price if not even lower than that.
REPLY ON YOUTUBE
I had a loud noise from my DS932+ when the NAS was standing in the middle of the shelf, very likely the shelf just resonated. When I shifted NAS close to the edge the noise went away. So it is worth checking if the NAS stands on a steady basement.
REPLY ON YOUTUBE
Interesting topic. I really wish fan manufacturers use a industry standard pin order for their power headers, because I tried switching out the fans for both my Asustor and Terramaster fans with Noctua fans. I looked up the pin order for the OEM fans and switched the pin order of the Noctua fans to match. The Terramaster didn’t recognize the fan at all (0 rpm), while the Asustor was operating at half speed. It’s quite frustrating that I can’t just switch out better fans without having to worry about pin order or voltage.
REPLY ON YOUTUBE
I inverted the noctua fans and added dust screens so that air gets pulled in from the rear and moves over the drives and exits the drive bays
REPLY ON YOUTUBE
Did the Velcro mod back in 2020 along with placing NAS on rubber mat, Makes a huge difference getting rid of vibration hum, Won’t stop the HDD clicks though if you have faster/higher capacity drives, I only use 5400rpm WD red plus, Only issue is 14TB is the highest capacity, Need to move to pro’s if you want more space.
REPLY ON YOUTUBE
Synology’s fans are that bad that they have to be swapped with a Noctua?
REPLY ON YOUTUBE